
DO430GO - Grill plate DOMO - Free user manual and instructions
Find the device manual for free DO430GO DOMO in PDF.

| Product type | Grill plate / table oven |
| Brand | Domo |
| Model | DO430GO |
| Power supply | 230 V ~ 50 Hz |
| Power | 1500 W (estimate) |
| Capacity | Approximately 12 L (estimate) |
| Dimensions (W x D x H) | Not specified |
| Weight | Not specified |
| Main material | Paint-coated steel, tempered glass |
| Main functions | Grilling, baking, keep warm |
| Temperature setting | 90°C - 230°C (thermostat) |
| Timer | 0 - 120 minutes with auto shut-off |
| Light indicator | Thermostat indicator (red) |
| Supplied parts | Grid, cooking plate, fat collection tray |
| Cleaning | Removable parts dishwasher safe; exterior with damp sponge |
| Safety | Tempered glass door, auto shht-off, overheat protection |
| Warranty | 2 years |
| Replacement bulb | 15W 300°C (standard base) |
| Usage | Domestic and similar (offices, farms, etc.) |
Frequently Asked Questions - DO430GO DOMO
User questions about DO430GO DOMO
0 question about this device. Answer the ones you know or ask your own.
Ask a new question about this device
Download the instructions for your Grill plate in PDF format for free! Find your manual DO430GO - DOMO and take your electronic device back in hand. On this page are published all the documents necessary for the use of your device. DO430GO by DOMO.
USER MANUAL DO430GO DOMO
natural_image
Modern kitchen toaster with open oven and control knobs (no visible text or symbols)GARANTIEVOORWAARDEN
CONDITIONS DE GARANTIE
This appliance has a two year warranty period. During this period the manufacturer is responsible for any failures which are the direct result of construction failure. When these failures occur the appliance will be repaired or replaced if necessary. The warranty will not be valid when the damage to the appliance is caused by wrong use, not following the instructions or repairs executed by a third party. The warranty will only be valid if the warranty application has been completed by the dealer at the time of purchase. All parts, which are subject to wear, are excluded from the warranty.
Type nr. Apparaat
natural_image
Symbol of a trash bin crossed with two crossed lines, no text or numbers presentRECYCLING INFORMATIONEN
natural_image
Recycling symbol composed of three chasing arrows forming a triangle (no text or labels)RECYCLING INFORMATION
This symbol on the product or on its packaging indicates that this product may not be treated as household waste. Instead it shall be brought to the applicable collection
point for recycling of electrical and electronic equipment. By ensuring this product is disposed of correctly, you will help prevent potential negative consequences for the environment and human health, which could otherwise be caused by inappropriate waste handling of this product. For more detailed information about recycling of this product, please contact your local city office, your household waste disposal service or the shop where you purchased the product.
The packaging is recyclable. Please treat package ecologically
INFORMACE O RECYKLACI ODPADU
If the supply cord is damaged, it must be replaced by manufacturer of its service agent or a similarly qualified person in order to avoid a hazard.
DE BAKPLAAT PLAATSEN
This appliance may be used by children from the age of 8 and up, and also by persons with a physical or sensory limitation, as well as mentally limited persons or persons with a lack of experience and knowledge. But only on the condition that these persons have received the necessary instructions on how to use this appliance in a safe way and know the dangers that can occur by using this appliance.
Children cannot be allowed to play with the appliance. Maintenance and cleaning of the appliance may not be done by children, unless they are older than 8 years old and are under supervision. Keep the appliance out of reach of children younger than 8 years old.
This appliance is suitable to be used in a household environment and in similar surroundings such as:
- Kitchen for personnel of shops, offices or other similar professional surroundings
- Farms
- Hotel or motel rooms and other surroundings with a residential character
- Guest rooms or similar
Attention: This appliance cannot be used with an external timer or a separate remote control.
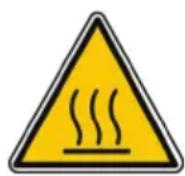
The appliance can become hot during use. Keep the power cord away from hot parts and don't cover the appliance.
The safety instructions below must always be followed when you using an electric appliance, read all instructions before use:
- Do not touch hot surfaces. Use the handles or the knobs.
- To prevent electric shocks keep the electric lead, the plug and the appliance away from water.
- Keep a close eye on children if using the appliance near them.
- Disconnect the plug from the socket if the appliance is not being used or you want to clean it. Allow the appliance to cool off before attaching or removing any parts or cleaning it.
- Do not use the appliance if the electric lead or plug is damaged, if it is not working correctly, or if it is damaged in any other way. Take the appliance to a customer services for repair. Always make sure that the appliance is repaired by a qualified electrician.
- Do not use the appliance outdoors.
- Do not allow the lead to hang over the edge of a table or worktop. Make sure that it does not come into contact with hot surfaces.
- Do not place the appliance near electrical burners, gas burners, hot ovens or microwave ovens.
- Do not use the appliance for any other purposes than those that it is designed for.
- Do not clean the appliance with a scourer pad. Loose pieces of the sponge may come into contact with the electrical parts and cause electric shocks.
-
In order to avoid the risk of accidents, do not use accessories that are not recommended by the manufacturer.
-
Allow approximately 10 cm of space around the appliance when it is in use so that there is sufficient air circulation.
- Turn the dials to ‘0’ before removing the plug from the socket. Always hold the plug and never pull on the lead.
- Always remove foodstuffs from the oven before moving it.
- Do not cover the crumb tray or any other part of the oven with aluminium foil it can cause overheating.
- In order to prevent fire or electrocution do not stick or push metal utensils or oversized foodstuffs into the oven.
- Fire can be caused by allowing the appliance to come into contact with inflammable materials(s) such as towels, dishcloths, curtains, walls, etc, or by placing items such as these on top of it.
- Do not put objects in the oven when it is switched on.
• Take extra care when placing dishes in the oven that are not made from metal or ovenproof glass. - Never put any of the following materials in the oven: cardboard, plastic, paper or similar inflammable items.
- Keep only items recommended by the manufacturer in the oven when it is not in use.
- This appliance has a reinforced door with safety glass. This glass is stronger and more resistant to breakage than ordinary glass. Hardened glass can break but the pieces have no sharp edges. Avoid making scratches on the door surface or its edges.
- Always use oven mitts if you touch the hot oven, hot dishes and hot food or if you place or remove the baking tray, excess fat tray or other dishes.
- The surfaces can become hot when the appliance is in use or remain hot after use.
- Save the above instructions for later reference.
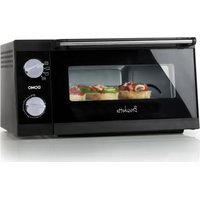
- Door handle
- Curved glass door
- Thermostat, with indicator light
- Control panel
- Fat collection tray
- Baking tray
- Grill grid
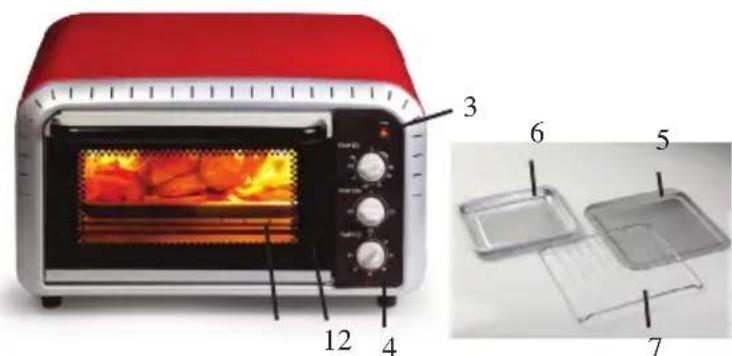
The grill grid can be slid into the top or bottom rail for the grilling and baking in trays and oven dishes.
The baking tray can be used for the grilling and baking/roasting of meat, fowl, fish and other foodstuffs.
The excess fat tray ensures that fat, oil or other roasting liquids are collected in the baking tray. This prevents the liquid splashing upwards and the creation of smoke.
Remarks: food with a basis of salt and sugar usually stick on all sides and surfaces making these difficult to clean. If you prepare such things, make sure you clean the baking tray and excess fat tray immediately after use.
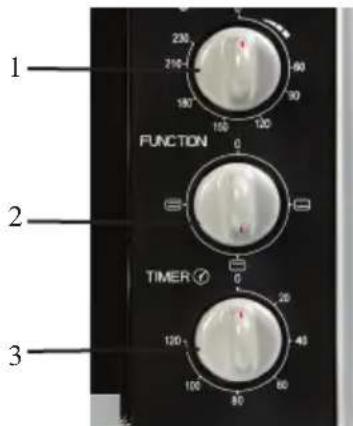
CONTROL PANEL
- Temperature regulator
- Switch functions
- Timer
INSTRUCTIONS FOR USE
Heat-retaining function
Baked/roasted food can be kept warm for 60 minutes. It is not advisable to keep food warm for any longer than this.
-
Turn the temperature regulator to 120^ .
Remark: if you are planning on keeping food warm for longer than 30 minutes or if the food contains little liquid, adjust the temperature regulator to 90°. -
Turn the switch setting to the ‘(1 ^st icon 📋).
-
Adjust the timer to '60 minutes' by turning the switch in an anti-clockwise direction.
-
If you want to use the heat retaining function for a shorter amount of time, you can adjust the timer to a shorter setting. Set the timer to '0', if you take the food out of the oven before the bell timer rings.
Grilling
In order to obtain an optimal result, preheat the grill-oven for 5 minutes. Remove excess fat from the meat and dab the meat to dry if it is too wet, before grilling it.
- Place the grill grid in the top rail.
- Turn the temperature regulator to the highest temperature ( 230^ ).
- Turn the function switch and set it at the ‘(2 ^nd icon ☐).
- Then turn the timer to the right in order to turn the appliance on. The red light will switch on. For all time settings lower than 20 minutes, first turn the timer to 20 before turning it back to the desired time setting.
- Place the excess fat tray upside down on the baking tray so that there is space between the excess fat tray and the baking tray.
- Place the food to be grilled on the excess fat tray. If desired, brush the food with sauces or oils.
- If the oven has reached the preheat temperature you will hear the bell timer ring and the oven will switch off. Slide the excess fat tray and baking tray onto the grill grid. Turn the timer to the desired grilling time (see your recipe's instructions). If a recipe shows various grilling times, choose the shortest one and then check to see whether the food is already cooked by this time.
- Turn the food over after reaching half of the grilling time or otherwise follow your recipe's instructions.
- If the grilling time is complete, the bell timer rings and the timer will now be back at '0'. The red light goes out and the appliance switches off. If it is necessary to grill for a little longer, adjust your timer again.
- If the food is ready before the bell timer rings, turn the timer to '0'.
Baking
If you wish to bake a single item only, slide the grill grid into the bottom rail of the oven. Make sure you use a suitably sized dish.
- Slide the grill grid into the bottom rail.
- Turn the switch to the ‘3 ^rd icon’ (E) and adjust the temperature regulator to the desired temperature (see your recipe’s instructions) in order to preheat the oven. For all time settings lower than 20 minutes, first turn the timer up to 20 before turning it back to the desired time setting.
- Then turn the timer to the right to switch the appliance on. The red light will switch on.
-
If the oven has reached the preheat temperature you will hear the bell timer ring and the oven will switch off. Place the food to be baked on the grill grid and turn the timer to the desired baking time (see your recipe's instructions). If a recipe shows various baking times, choose the shortest one and then check to see whether the food is already cooked by this time
-
If the baking time is complete, the bell timer rings and the timer will now be back at '0'. The red light goes out and the appliance switches off. If it is necessary to bake for a little longer, adjust your timer again.
-
If the food is ready before the bell timer rings, turn the dial to '0'.
PLACING THE BAKING TRAY
If you want to bake biscuits or tarts you can slide the grill grid into one of two rails or use two grids and both rails simultaneously (by buying and using an extra grid).
If you wish to bake layered cakes, slide the grill grid into the bottom rail.
If you bake tarts always use baking paper to catch any spillage.
MAINTENANCE AND CLEANING
Take care: never get the plug, lead or the appliance wet with water or any other liquid. Do not use metal scourers to clean the appliance. Pieces of the scourer can come loose, touch the electrical parts and cause a short circuit.
- Remove the plug from the power source and allow the appliance and all parts to cool off completely before cleaning.
- All parts should be cleaned with hot soapy water or be placed in the washing-up machine. Rinse and dry all parts thoroughly.
- Use neither cleaning products that contain scouring agents, nor metal scouring pads to clean the baking tray, because both can damage the porcelain enamelled finish.
- The glass door can be cleaned with a damp sponge and dried with paper or cloth towels.
- Clean the outside with a damp sponge. Do not use a cleaning product that contains a scouring agent because this can damage the outside finish. Clean the inside with a damp cloth. Make sure that no water drops make contact with the electric parts of the oven.
- Allow all parts and surfaces to dry thoroughly before putting the plug back into the socket and using the oven again.
REPLACING THE LIGHT BULB
Allow the oven to cool off completely.
Remove the protective glass cover by turning it in an anti-clockwise direction to unscrew it.
Remove the bulb from the oven by unscrewing the bulb in an anti-clockwise direction.
Replace the broken bulb with a new one (15W 300°).
Screw the new bulb into position, until it is firmly in place.
Return the protective glass cover over the bulb and screw it back into place.
DŮLEŽITÉ

Brand : DOMO
Model : DO430GO
Category : Grill plate