
ECP-64110 X - Basket EDESA - Free user manual and instructions
Find the device manual for free ECP-64110 X EDESA in PDF.

| Brand | Edesa |
| Model | ECP-64110 X |
| Product type | Extractor hood |
| Installation type | Wall-mounted |
| Evacuation type | External or recirculation with charcoal filter |
| Duct diameter | 120 mm minimum |
| Minimum distance from cooktop | 65 cm |
| Power supply | 230 V / 50 Hz |
| Lighting | LED |
| Speed levels | 3 to 5 speeds + Turbo depending on control panel |
| Grease filter | Washable metal |
| Charcoal filter | Replacement every 3 months |
| Material | Stainless steel |
| Controls | Button or touch control panel depending on version |
| Timer | Yes (5 min or 2 min depending on control panel) |
| Safety | Automatic shut-off, electrostatic protection |
| External cleaning | Non-corrosive liquid detergent |
| Repairability | Replaceable LED bulbs, accessible filters |
| Warranty | Not specified |
Frequently Asked Questions - ECP-64110 X EDESA
User questions about ECP-64110 X EDESA
0 question about this device. Answer the ones you know or ask your own.
Ask a new question about this device
Download the instructions for your Basket in PDF format for free! Find your manual ECP-64110 X - EDESA and take your electronic device back in hand. On this page are published all the documents necessary for the use of your device. ECP-64110 X by EDESA.
USER MANUAL ECP-64110 X EDESA
natural_image
Abstract wavy line pattern with gradient shading, no text or symbols present
natural_image
Simple line drawing of a kitchen range hood (no text or symbols)ES Manual de instrucciones
EN Instruction manual
PT Manual de instruções
FR Manuel d'instructions
DE Bedienungsanleitung

natural_image
Illustration of a handheld tool with screw and screwdriver components, including a plug and three screws (no text or symbols)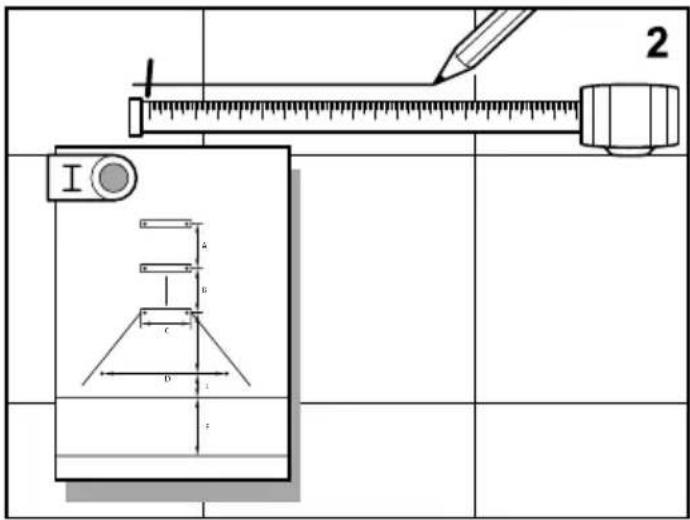

natural_image
Technical line drawing of a mechanical device with a fan and mesh panel, labeled 'A' (no text or symbols on the diagram itself)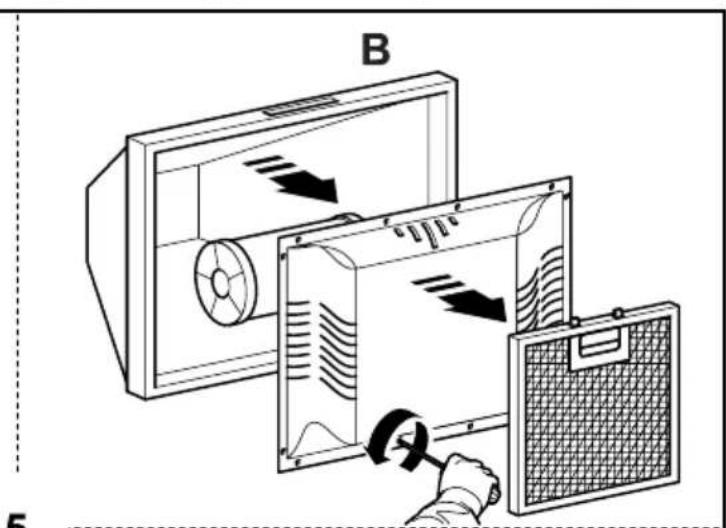

natural_image
Technical diagram of a ceiling-mounted electrical cabinet with an inset showing a wall-mounted switch and a circular component (no text or symbols)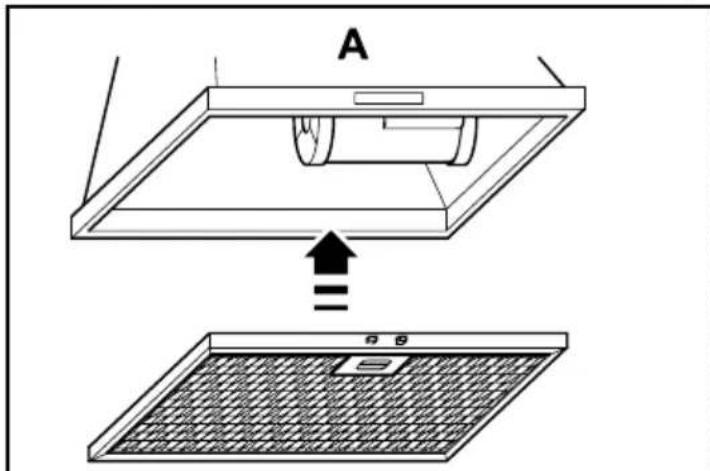
natural_image
Technical diagram of a mechanical assembly with a base, clamping device, and mounting bracket (no text or symbols)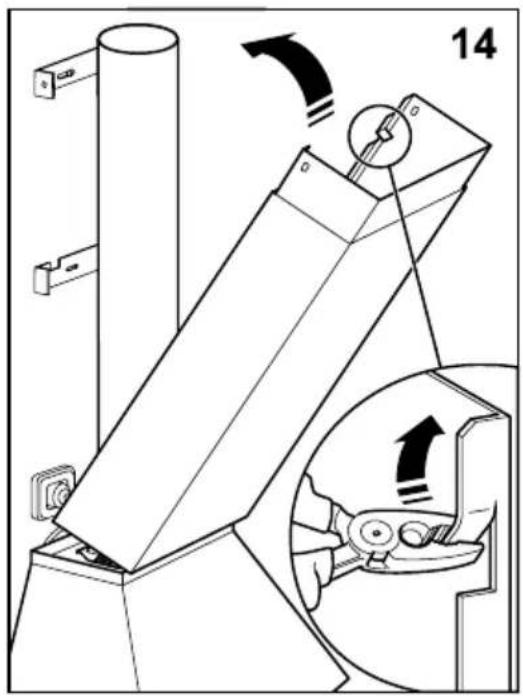
natural_image
Technical diagram of a mechanical device with an inset showing a rotating component (no text or symbols present)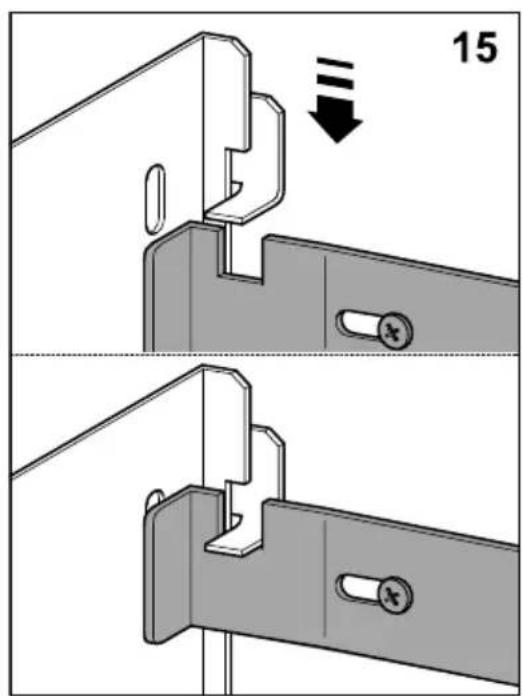
P1


natural_image
Diagram showing a showerhead emitting downward with a minus sign, next to a grid of rectangular objects labeled A-2 (no text or symbols on objects)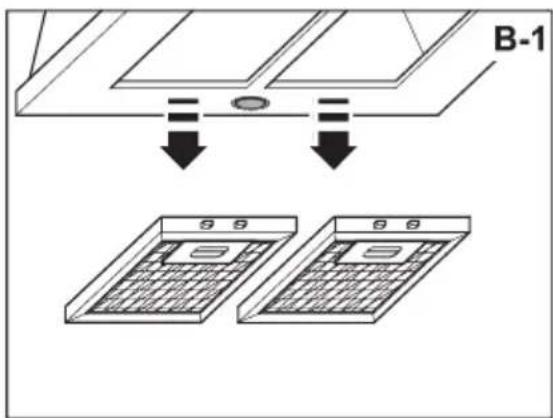
natural_image
Illustration of hands using a mechanical component to adjust a circular component, with no visible text or symbols.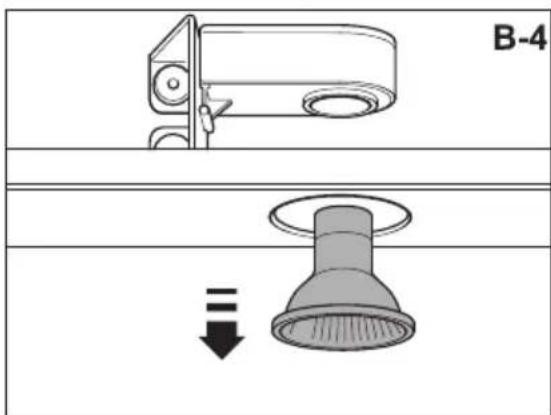
natural_image
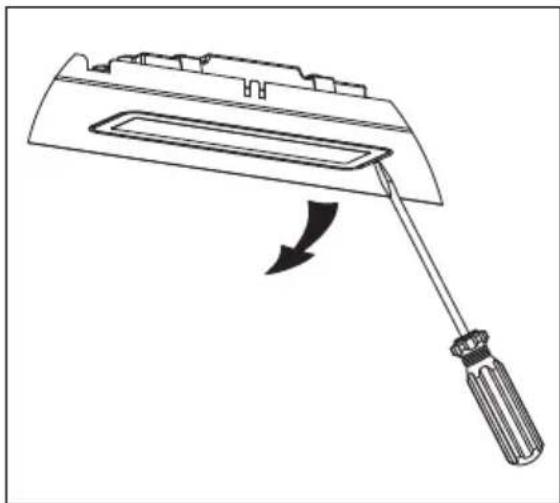
Diagram of a mechanical component with a screwdriver and arrow indicating rotation (no text or symbols)
natural_image
Diagram showing a device being lifted or lowered, with no visible text or symbolsES
Thank you for buying our hood. Please read these instructions carefully for its optimum installation, use and maintenance.
This appliance has been designed and manufactured exclusively for use at home.
In order to ensure optimal installation, use and maintenance of the appliance, we recommend that you read these instructions carefully.
Check the appliance before installing it. Do not use the hood if it is damaged or faulty. If this is the case, please contact your distributor or installer.
Warning: You must comply with existing legislation on emission of fumes and environmental ventilation. Do not connect the hood to another vent for smoke, ventilation or hot air which is already being used by other appliances that are fuelled by gas or another fuel.
For optimal and safe performance, the pressure in the room should not drop by more than 4 Pa (0.04 mbar). For this purpose, sufficient permanent air inlets should be provided to prevent the premises from being sealed.
If a kitchen extractor hood and appliances fuelled by gas or another fuel are used simultaneously, there must be an appropriate ventilation system in the room.
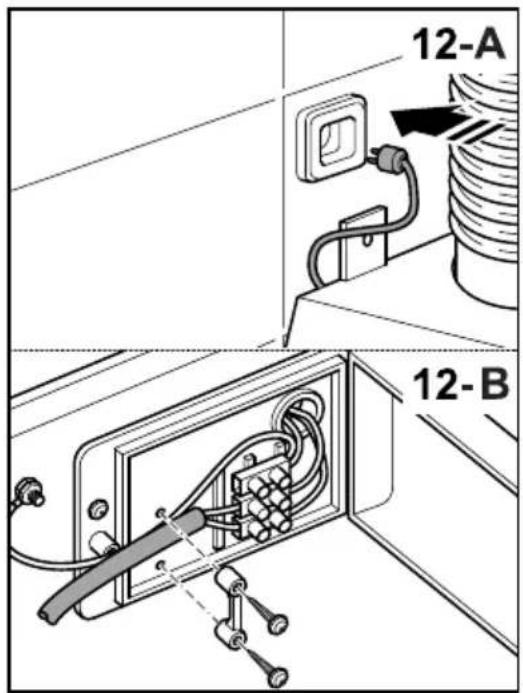
Connecting the hood to the grid
Warning: before connecting the hood: shut off the power supply and check that the voltage and frequency supply matches that indicated on the rating plate of the equipment.
If the appliance is equipped with a plug, connect the hood to a socket located in an accessible area which is compliant with existing standards.
If the appliance is not equipped with a plug, connect the appliance directly to the power grid, protected by an omnipolar separating device which can be accessed to disconnect it, in accordance with local regulations.
If the power cable is damaged, it must be replaced by the manufacturer through its post-sale service, or by similar, qualified personnel in order to prevent danger.
Using the hood - Safety
Warning: during electrostatic discharge (e.g. a flash of lightning) the hood may stop working. This does not involve risk of damage. Shut off the power supply to the hood and re-connect it after one minute.
Children under the age of 8 years should be kept away from the appliance unless under permanent supervision.
This appliance can be used by children of 8 years and over and people with reduced physical, sensory or mental capacities or a lack of experience or knowledge, if supervised by a person responsible for their safety or if they have been given suitable instructions regarding the safe use of the appliance and they understand the risks involved. Children should not play with the appliance. The cleaning and maintenance to be performed by the user should not be carried out by unsupervised children.
To avoid the risk of fire, the metal filter should be cleaned regularly.
Containers with hot oil should be monitored continuously.
Do not set food alight under the hood.
Accessible parts may become hot when used with cooking appliances.
Legal information
The manufacturer:
- Declares that this appliance complies
with the essential requirements for low-voltage electrical equipment, as set out in Directive 2014/35/EU, and electromagnetic compatibility, as set out in Directive 2014/30/EU.
- Shall not be held responsible for failure to follow the instructions given in this manual or non-compliance with safety standards relating to the correct use of the equipment.
- Shall not be held responsible for any damage caused by the incorrect installation, use or maintenance of the appliance.
- Reserves the right to make any changes to the equipment or this manual without giving prior notice.
Should you need technical assistance or additional information about our products, please contact your distributor or an official, authorised technical service.
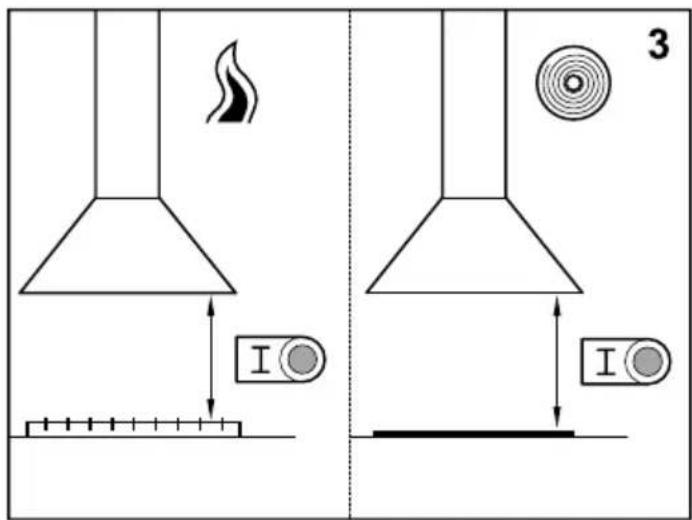
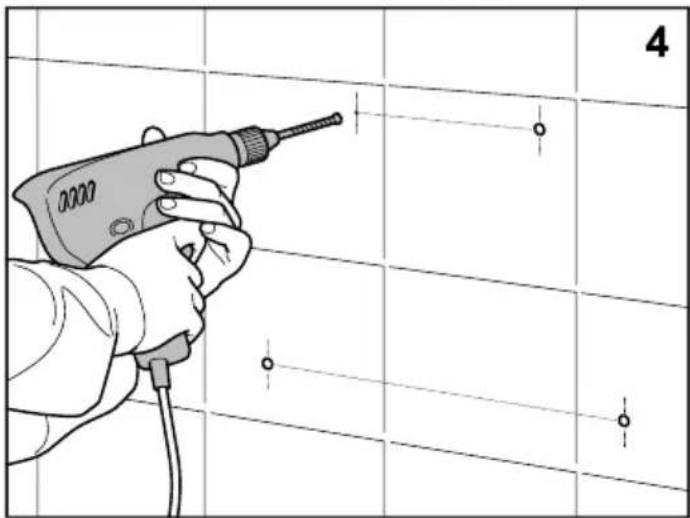
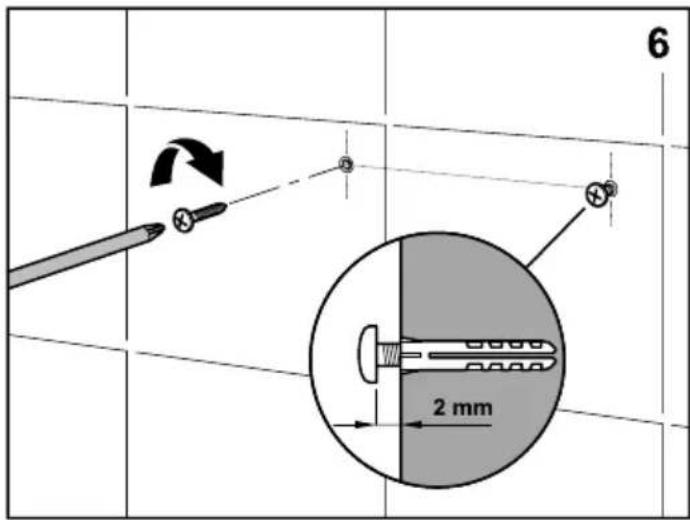
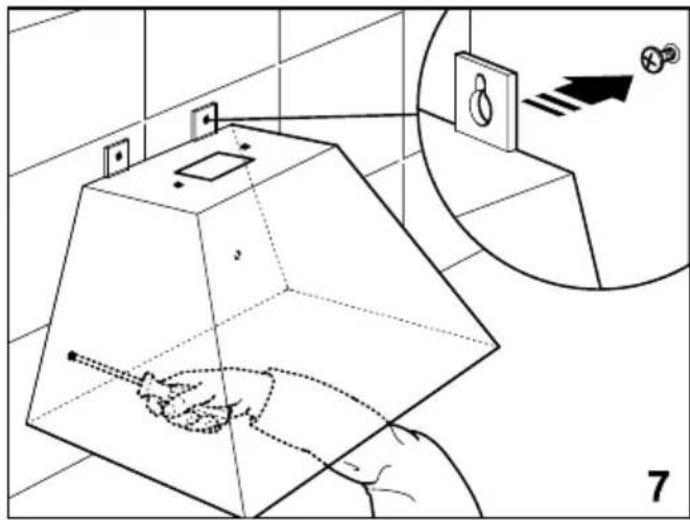
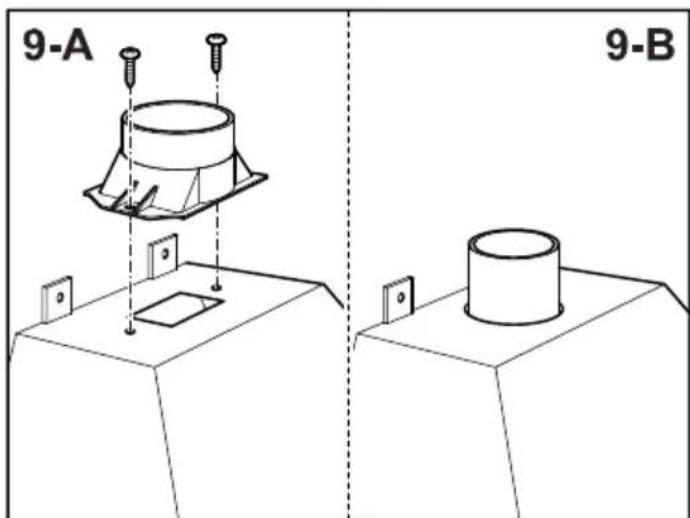
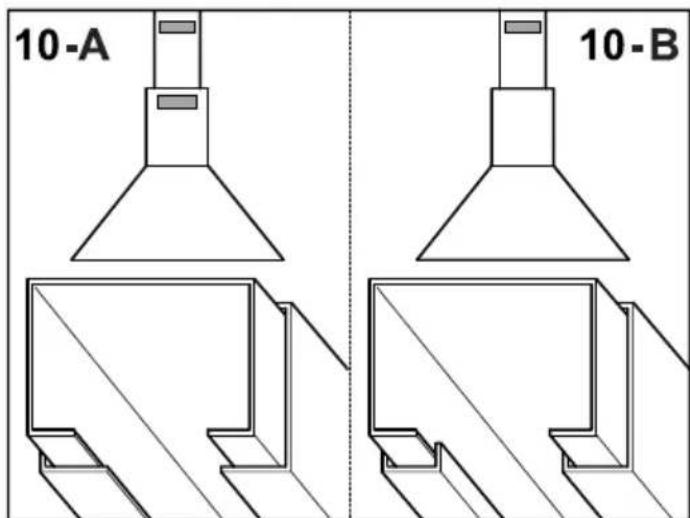
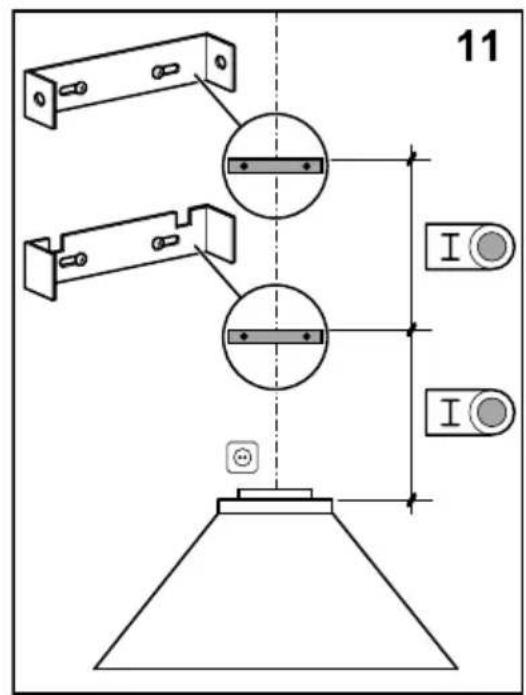
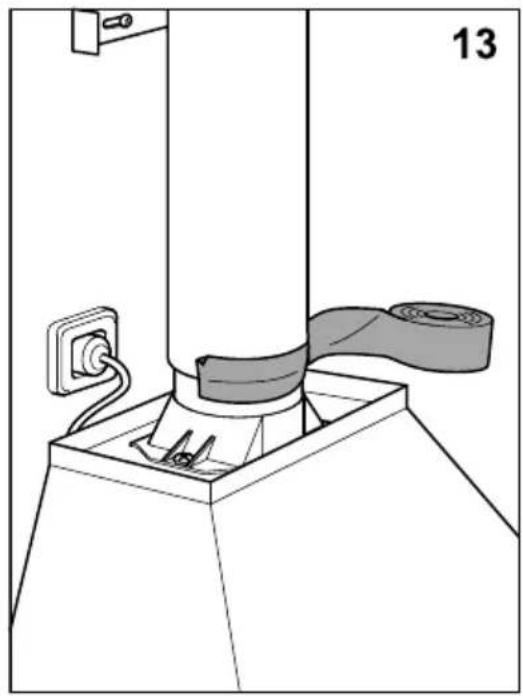
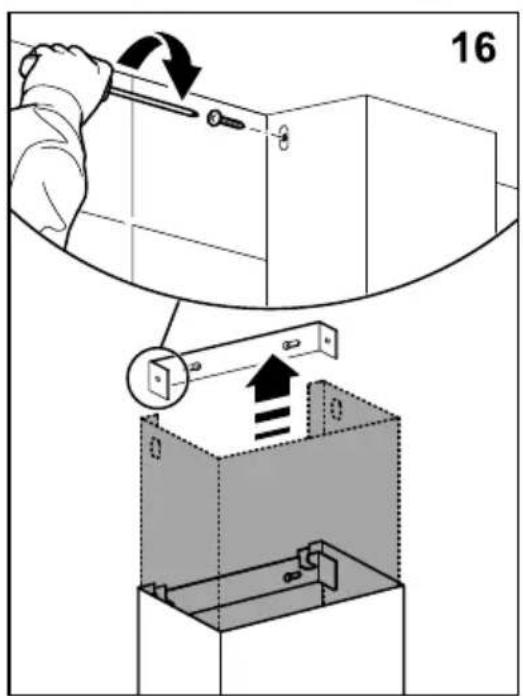
Hood installation on walls (Fig.1, Fig.2, Fig.3)
Notes: The figures mentioned in this manual are in the first pages.
If the height from the Hob to the hood in the instruction user manual of the hob supplier is higher than the hood template, follow adhere to the hob supplier info.
For gas cooking appliances only: the minimum distance to the hood must be at least 65 cm.
The screws and bolts supplied for attaching the hood to the wall are for solid masonry walls. For other types of wall, the suitable means should be used.
Use a rigid PVC pipe with a min. ∅ l20 mm to evacuate fumes outside.
It is recommended that there are no bends in the outlet tube, and that there is a distance of less than 1 metre between the hood outlet and the bend.
The above restrictions do not apply to hoods with no fumes outlet to outside (recirculation system with activated charcoal filter). (fig. 7)
Use of the hood - Control panel (Fig.4)
The different control panels are described below. Check the panel model installed on your hood and see the figure indicated in each case.
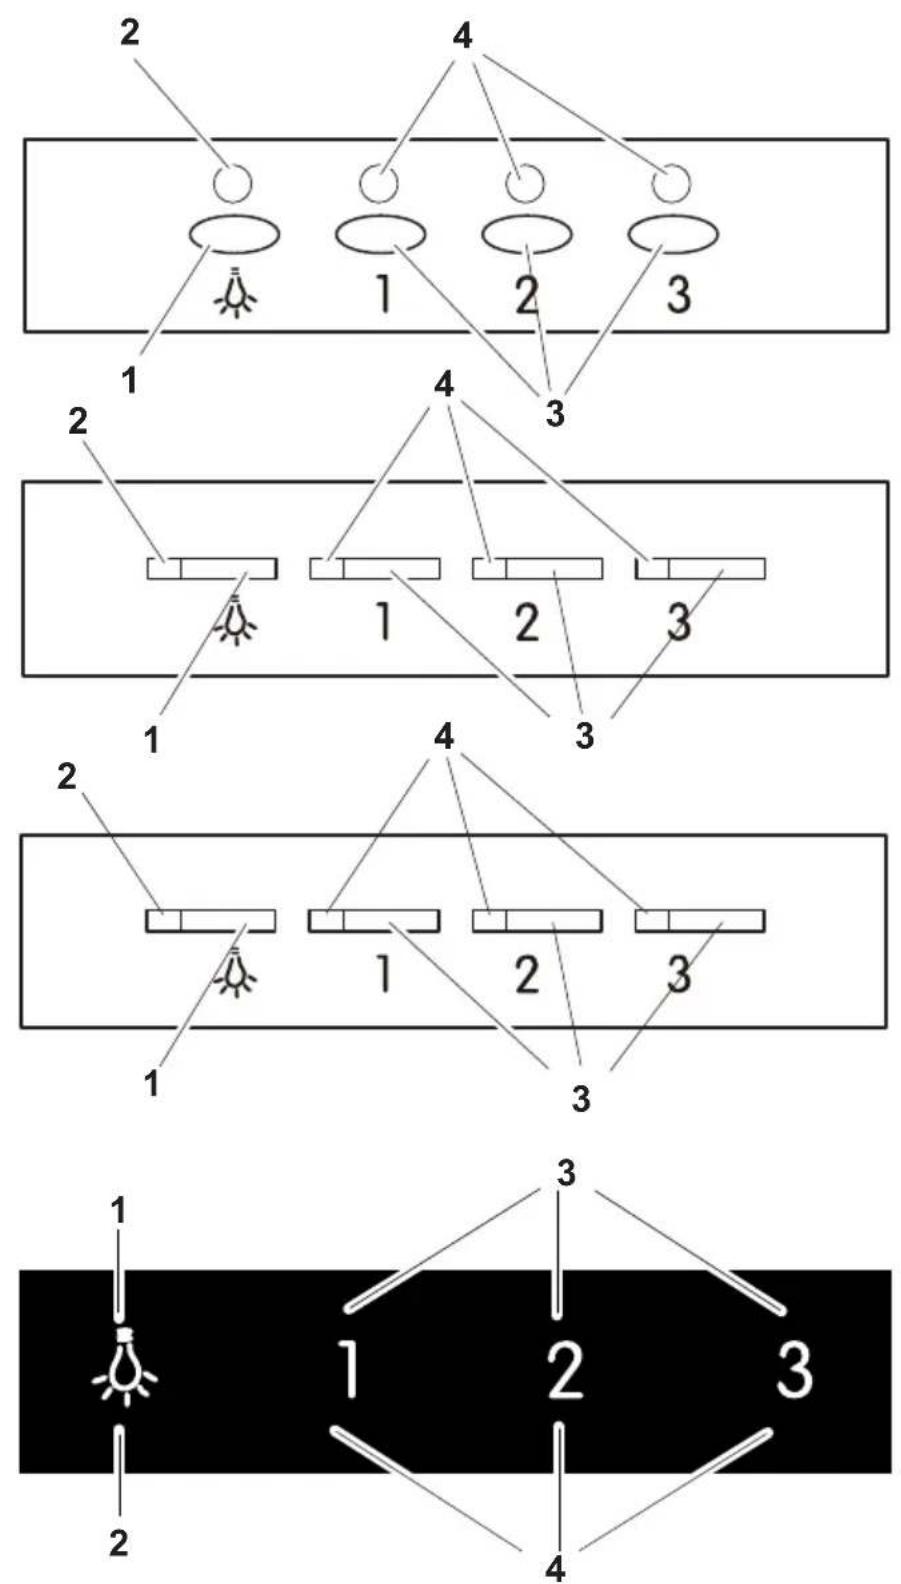
Panel with electronic button (Fig. P1)
1- Lighting on and off.
2- Lighting operating control pilot light.
3- Extractor fan speed - button: speed 1, 2 and 3 Press the current speed
again to switch off the extractor fan. In panels with TURBO (I I
I i) button,
Turbo speed only will work during 5 minutes, once it runs out, the speed will
decrease to 2nd speed.
4- Extractor fan operating speed control pilot light.
Timer: keep the chosen speed button pressed down for two seconds until the
display fashes. The extractor fan works for 5 min. at the current speed and
another 5 min. at each of the lower speeds until it stops and the lighting
switches off.
To cancel the timer: press the chosen speed button once.
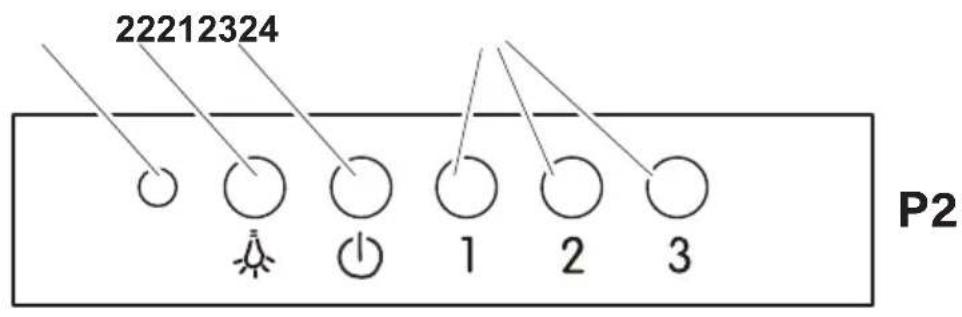
Five-button panel (Fig. P2)
1- Extractor fan operating control pilot light.
2- Lighting on and off.
3- Extractor fan off.
4- Extractor fan speed - button: speed 1, 2 and 3,
Touch panel (Fig. P3)
1- Filter clean warning display/button. Warning of the need to replace the
filter – press to deactivate once the filter has been cleaned or replaced.
2- Enable and disable extractor fan timer.
3- Lighting on and off. Keep pressed down to adjust the lighting intensity.
4- Extractor fan on and off.
5- Extractor fan speed - button: speed 1, 2 and 3/4. In panels with TURBO (T)
button, Turbo speed only will work during 5 minutes, once it runs out, the
speed will decrease to 3rd speed.
Timer: the extractor fan works for 5 min. at the current speed and another 5
min. at each of the lower speeds until it stops.
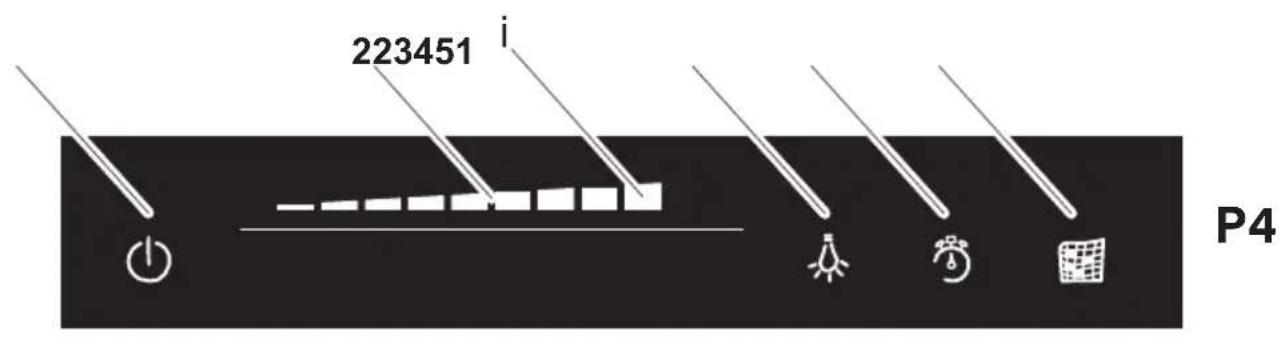
Sliding touch panel (Fig. P4)
1- Extractor fan on and off.
2- Sliding touch panel for extractor fan speed control. Also used in combination
with button -3-. In panels with TURBO (i) button, Turbo speed only will work
during 5 minutes, once it runs out, the speed will decrease to 9th speed.
3- Lighting on and off. Press the button and, while it is flashing, adjust the
lighting intensity using the sliding touch panel -2-.
4- Enable and disable extractor fan timer.
5- Filter clean warning display/button. Warning of the need to replace the
filter – press to deactivate once the filter has been cleaned or replaced.
Timer: the extractor fan works for 2 min. at the current speed and another 2 min.
at each of the lower speeds until it stops and the lighting switches off.
Touch panel TC5V (Fig. P5)
1- Extractor fan on and off.
2- Extractor fan speed - button: speed SILENT, 1, 2, 3 and TURBO. In panels with
TURBO (T) button, Turbo speed only will work during 5 minutes, once it runs out,
the speed will decrease to 3rd speed.
Turbo speed only will work during 5 minutes, once it runs out, the speed will
decrease to 3th speed.
3- Enable and disable extractor fan timer. Filter clean warning.
4- Lighting on and off.
5- Button to decrease the light intensity
6- Button to increase the light intensity
Timer: the extractor fan works for 2 min. at the current speed and another 2 min. at each of the lower speeds until it stops and the lighting switches off.
Filter cleaning warning: when the hood is OFF and the Timer indicator is blinking, grease filters must be cleaned. To stop the blinking signal, timer indicator must be pressed and afterwards the working hours counter will be reset to 0.
Hood maintenance
Warning: always switch off the electricity supply before carrying out maintenance work on the hood. In the event of a fault, contact an official distributor or authorised dealer.
Cleaning the outside: use liquid, non-corrosive detergent and avoid using abrasive cleaning products and solvents.
Do not use high-pressure or steam cleaning devices.
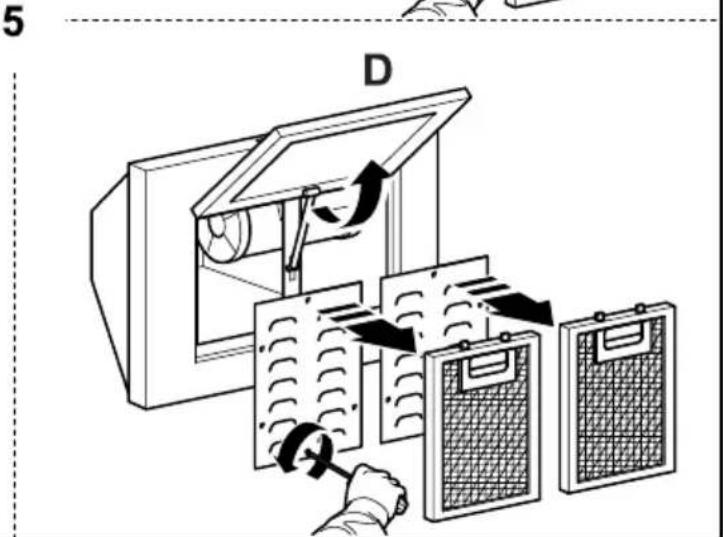
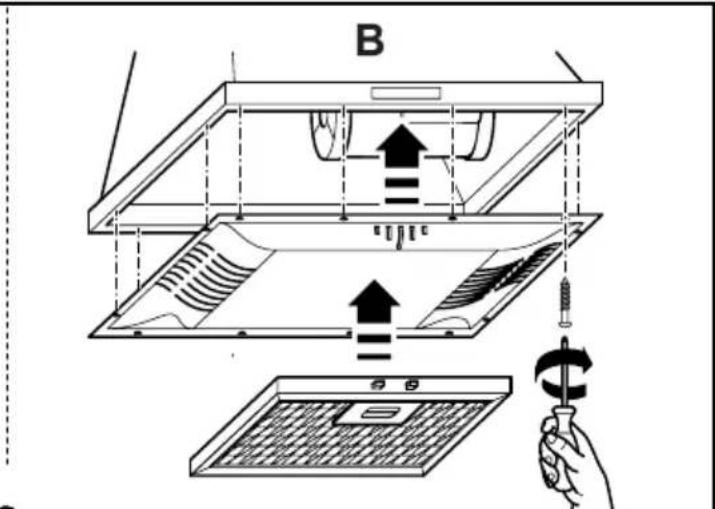
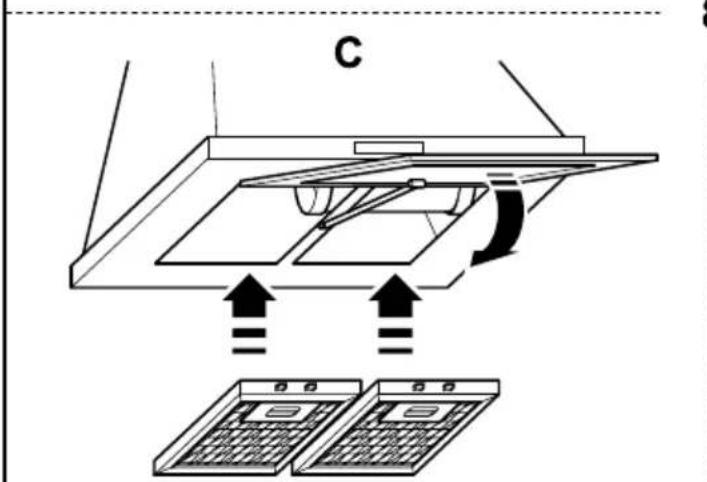
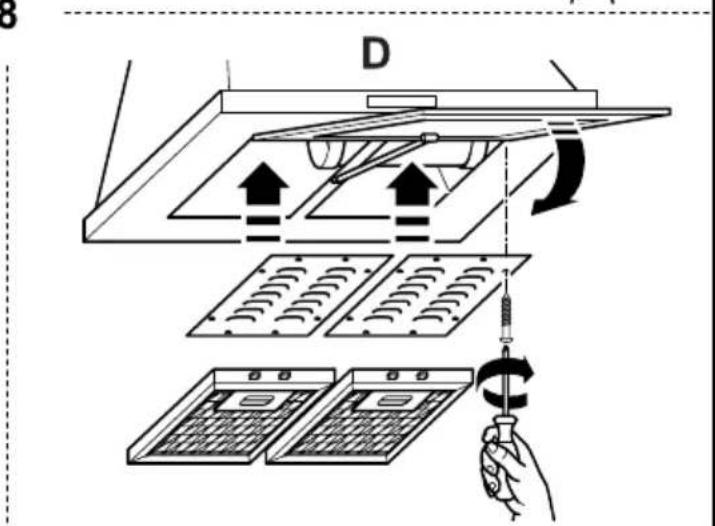
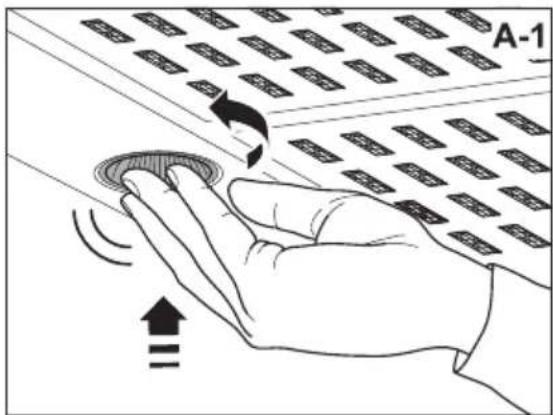
Grease filters (Fig. 5): to avoid fires, clean thoroughly once a month or whenever the display pilot light indicates as such. To do so, remove the filters and wash with hot water and detergent. If using a dishwasher (metal parts may turn black without this affecting their functional capacity), load the filters vertically to avoid solid residue from being deposited.
Activated charcoal filters: replace the every 3 months.
Important: increase the filter cleaning/replacement frequency if the hood is used for more than 2 hours a day. Always use genuine filters from the manufacturer.
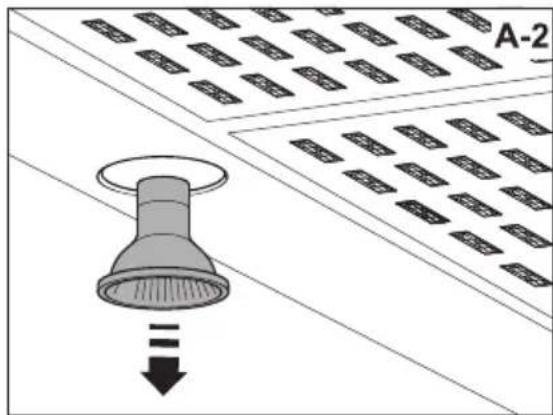
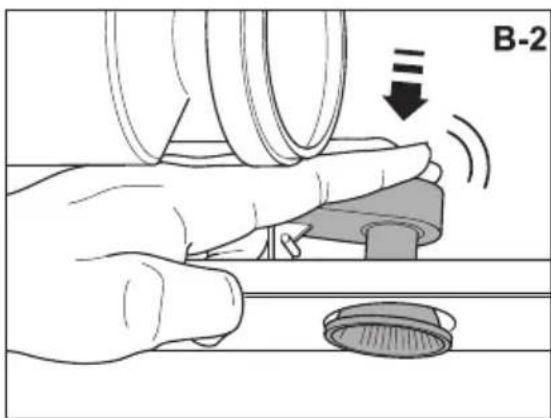
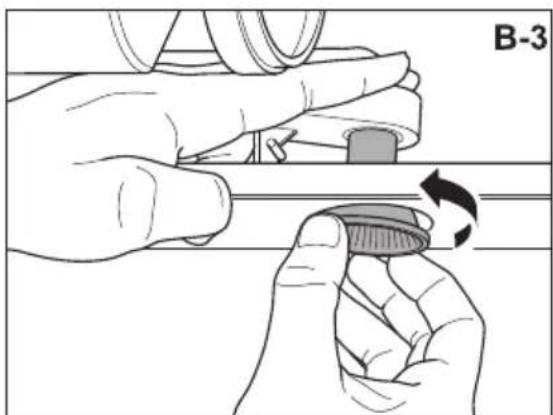
Bulb replacement (Fig.6)
Warning: do not handle the bulbs until the electricity supply has been switched off and they have cooled.
Important: use new bulbs according to that indicated on the hood nameplate.
If using LED lighting, do not look directly at the light.
Do not use dichroic bulbs - risk of overheating.
For LED lamp replacements, please contact Technical Support or the distributor of the brand.
In case of possible failure, before calling the technical service, check the following table:
| Problem Cause / Solution | |
| The lamps do not work A | change may be necessary, but first check that the lamp is correctly positioned and that the contact is correct. Remember that lamps are not covered by the warranty.Disconnect the current hood before handling the lamps. Use lamps with the same properties described on the nameplate. It is advisable to use lamps supplied by the manufacturer of the hood. |
| The motor works, but it seems to have requested performance or extraction capacity | The selected speed is too low / Select a higher speedCheck the Metallic Filter (grease filter). If it has not been washed recently, it may be clogged with grease or dirt. Disassemble and wash it in hot water and detergent, and let it dry before reassembling again.Ensure that the air outlet tube has not been obstructed. |
| The hood works, but the smell of the food persists. | If you are using the hood in recirculation mode, the Active Carbon Filter must be replaced. |
| The hood does not work | Check that the hood is connected to power.Check that the fuses or automatic have not jumped. |
| The hood still does not work | If, after having checked the points mentioned above, your problem has not yet been solved, contact the technical service or your distributor. |
EXAUSTOR
Estimado cliente:
natural_image
Abstract wavy line pattern with gradient shading, no text or symbols present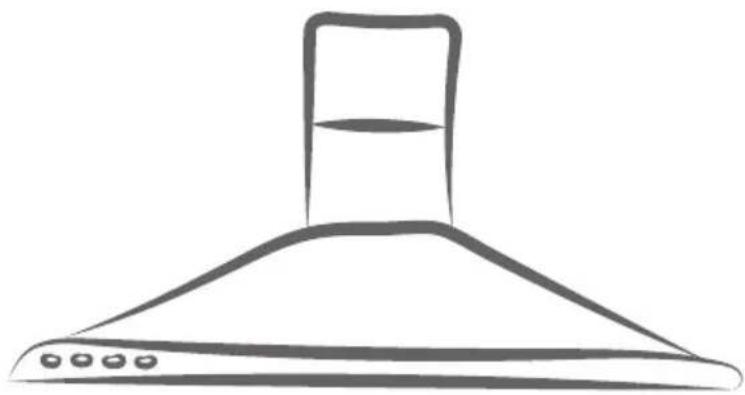
natural_image
Line drawing of a kitchen range hood with ventilation slots (no text or symbols)Sticker
RATING PLATE


- ES
- Using the hood - Safety
- Legal information
- The manufacturer:
- Hood installation on walls (Fig.1, Fig.2, Fig.3)
- Use of the hood - Control panel (Fig.4)
- Panel with electronic button (Fig. P1)
- Five-button panel (Fig. P2)
- Touch panel (Fig. P3)
- Sliding touch panel (Fig. P4)
- Touch panel TC5V (Fig. P5)
- Hood maintenance
- Bulb replacement (Fig.6)
- EXAUSTOR
Brand : EDESA
Model : ECP-64110 X
Category : Basket