VA6311RF - Dishwasher Atag - Free user manual and instructions
Find the device manual for free VA6311RF Atag in PDF.

| Brand | Atag |
| Model | VA6311RF |
| Product type | Dishwasher |
| Capacity | 12 place settings |
| Dimensions (W x H x D) | 596 x 818-898 x 575 mm |
| Water pressure | 0.5 - 8 bar (0.05 - 0.8 MPa) |
| Water supply | Cold water or hot water max. 60 °C, 3/4 inch threaded connection |
| Wash programs | 45°-70° AUTO, 70°, 60°, 50°, EXTRA SILENT |
| Special functions | All in 1, Delayed start (1-24h) |
| Water softener setting | Levels 1 to 10 (manual and electronic) |
| Salt reservoir capacity | 1 liter initial water then salt |
| Rinse aid dispenser | Adjustable from 1 to 4 |
| Maintenance | Regular cleaning of filters and spray arms |
| Safety | Automatic shut-off, child safety, overflow protection |
| Installation | Built-in, height adjustable (feet) |
| Adjustable upper basket dimensions | High/low position |
| Noise level | EXTRA SILENT program (quiet) |
| Energy consumption | Varies by program (0.9-1.7 kWh) |
| Water consumption | 8-15 liters depending on program |
Frequently Asked Questions - VA6311RF Atag
User questions about VA6311RF Atag
0 question about this device. Answer the ones you know or ask your own.
Ask a new question about this device
Download the instructions for your Dishwasher in PDF format for free! Find your manual VA6311RF - Atag and take your electronic device back in hand. On this page are published all the documents necessary for the use of your device. VA6311RF by Atag.
USER MANUAL VA6311RF Atag
natural_image
Diagram of two mechanical components with directional arrows indicating motion or flow (no text or symbols)natural_image
Illustration of a multi-tiered storage tray with circular components and a spoon (no text or symbols)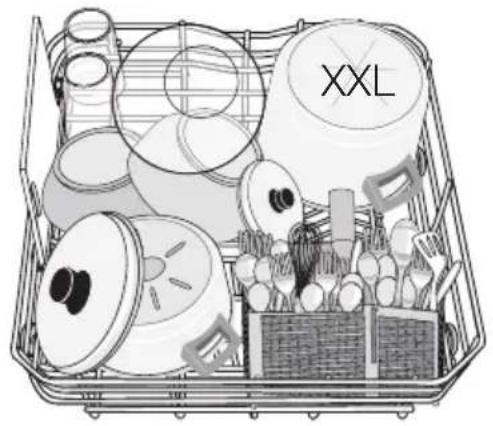
natural_image
Illustration of a shopping basket filled with various items including a box labeled 'XXL' and circular cutouts (no text or symbols on the items themselves)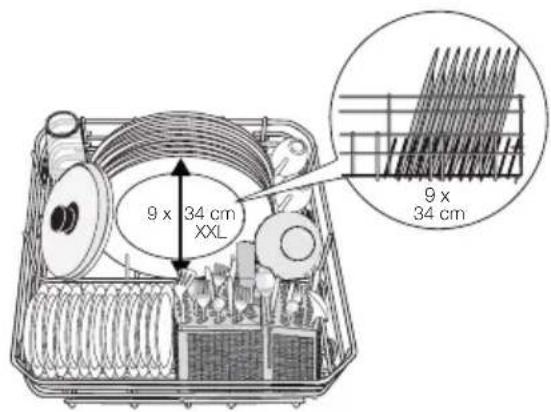
natural_image
Technical line drawing of a wire cage with structural supports and a brick wall (no text or symbols)De bestekmand
natural_image
Illustration of a hand using a portable device to press down a grid-patterned container, with arrows indicating rotation (no text or symbols)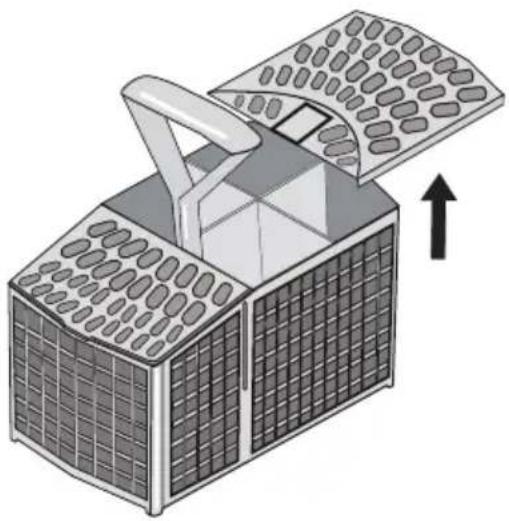
natural_image
Isometric illustration of a mechanical device with a curved top and grid-patterned base, showing an upward arrow (no text or symbols)Bovenkorf
natural_image
Technical diagram of a mechanical component with internal channels and directional arrows indicating flow or movement (no text or symbols)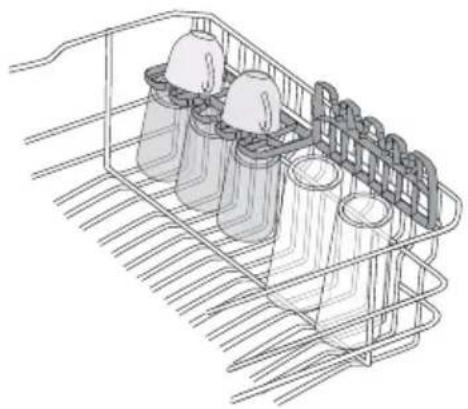
natural_image
Line drawing of a shopping cart filled with plastic bags (no text or symbols)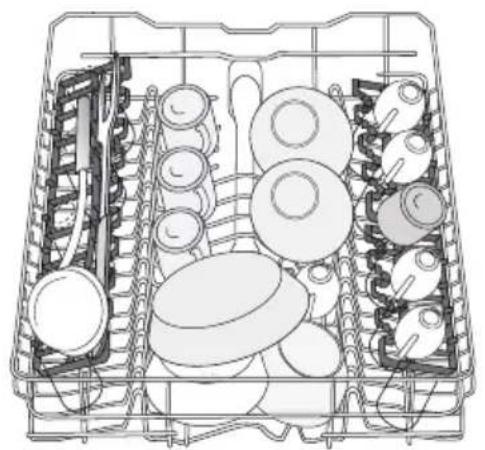
natural_image
Technical line drawing of a mechanical assembly with multiple circular components and internal channels (no text or symbols)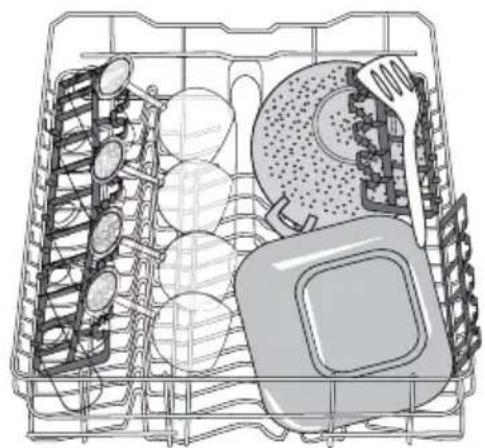
natural_image
Illustration of a multi-wheeled kitchen appliance with plates, sink, and drawer (no text or symbols)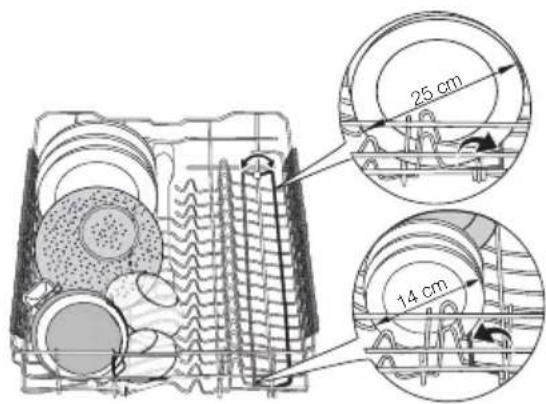
Zachte punten
natural_image
Technical line drawing of a mechanical device with multiple cylindrical components and a grid-patterned base (no text or symbols)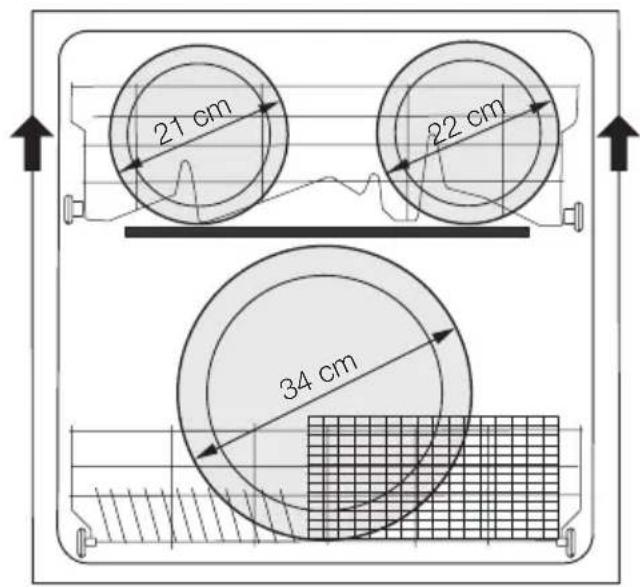
natural_image
Diagram showing a hand using a tool to connect grid-like structures, with an inset magnified view of a grid pattern marked by a diagonal line (no text or symbols present)natural_image
Diagram of a mechanical assembly with hands installing components into a grid-like structure (no text or symbols visible)natural_image
Technical illustration of a mechanical device with a meshed top and internal structure, showing internal components and a directional arrow (no text or symbols)natural_image
Diagram showing a hand pressing down on a mechanical component with an inset close-up of the component (no text or symbols)Use of the appliance 25
Setting the water softener 25
Use of dishwasher salt 26
Use of detergent and rinse aid 27
Multitab function 28
Loading cutlery and dishes 28
Setting and starting a washing programme
31
Washing programmes 32
Care and cleaning 33
What to do if... 34
Technical data 36
Environment concerns 37
Subject to change without notice

Safety information
Before the installation and use, read this manual carefully:
- For your safety and the safety of your property.
- To help the environment.
- For the correct operation of the appliance.
Always keep these instructions with the appliance also if you move or give it to a different person.
The manufacturer is not responsible if an incorrect installation and use causes damage.
Children and vulnerable persons safety
- Do not let persons, children included, with reduced physical sensory, reduced mental functions or lack of experience and knowledge to use the appliance.
They must have supervision or instruction for the operation of the appliance by a person who is responsible for their safety. - Children must get supervision to make sure that they do not play with the appliance.
- Keep all packaging away from children. There is the risk of suffocation or injury.
- Keep all detergents in a safe area. Do not let the children touch the detergents.
- Keep children and pets away from the appliance when the door is open.
General safety
- Do not change the specifications of this appliance. There is the risk of injury and damage to the appliance.
-
Obey the safety instructions from the detergent manufacturer to prevent burns to eyes, mouth and throat.
-
Do not drink the water from the appliance. Particles of detergent can stay in your appliance.
- Do not keep the appliance door open without supervision. This to prevent injury and to fall on an open door.
- Do not sit or stand on the open door.
Use
- The appliance is only for domestic use. Do not use the appliance for other uses to prevent injury to persons and damage to property.
- Only use the appliance to clean accessories that are applicable for dishwashers.
- Do not put flammable products or items that are wet with flammable products in, near or on the appliance. Risk of explosion or fire.
- Put the knives and all items with sharp points in the cutlery basket with their points down. If not, put in a horizontal position in the upper basket or in the knife basket. (Not all models have the knife basket).
- Use only specified products for dishwashers (detergent, salt, rinse aid).
- Types of salt that are not specified for dishwashers can cause damage to the water softener.
- Fill the appliance with salt before you start a washing programme. Remaining salt in the appliance can cause corrosion or make a hole in the bottom of the appliance.
-
Do not fill the rinse aid dispenser with other products than the rinse aid, (dish-washer cleaning agent, liquid detergent). This can cause damage to the appliance.
-
Make sure that the spray arms can move freely before you start a washing programme.
- The appliance can release hot steam if you open the door while a washing programme operates. There is a risk of skin burns.
- Do not remove the dishes once until the washing programme is completed.
Care and cleaning
- Before you clean the appliance, deactivate it and disconnect the mains plug from the mains socket.
- Do not use flammable products or products that can cause corrosion.
- Do not use the appliance without the filters. Make sure that the installation of the filters is correct. An incorrect installation causes unsatisfactory washing results and damage to the appliance.
- Do not use spray water or steam to clean the appliance. Risk of electrical shock and damage to the appliance.
Installation
- Make sure that the appliance is not damaged. Do not install or connect a damaged appliance, contact the supplier.
- Remove all packaging before you install and use the appliance.
- Only a qualified person must do the electrical connection, the plumbing and the installation of the appliance. This to prevent the risks of structural damage or injury.
- Make sure that the mains plug is disconnected from the mains socket during installation.
- Do not drill into the sides of the appliance to prevent damage to hydraulic components and electrical components.
- Important! Obey the instructions in the template supplied with the appliance:
- To install the appliance.
- To assemble the door panel.
- To connect to the water supply and drain.
- Make sure that the appliance is installed below and adjacent to safe structures.
Frost precautions
- Do not install the appliance where the temperature is less than 0 °C.
- The manufacturer is not responsible for frost damage.
Water connection
- Use new hoses to connect the appliance to the water supply. Do not use used hoses.
- Do not connect the appliance to new pipes or pipes not used for a long time. Let the water flow for some minutes, then connect the inlet hose.
- Make sure not to squash or cause damage to the water hoses when you install the appliance.
- Make sure that the water couplings are tight to prevent a water leakage.
- The first time you use the appliance, make sure that the hoses do not have water leaks.
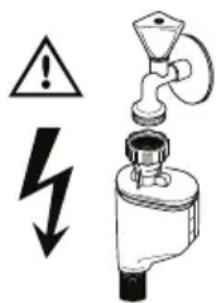
- The water inlet hose has a safety valve and a double sheath with an inner mains cable. There is pressure in the water inlet hose only when the water flows. If there is a leak in the water inlet hose, the safety valve interrupts the flow of water.
- Be careful when you connect the water inlet hose:
- Do not put the water inlet hose or the safety valve in water.
- If the water inlet hose or the safety valve are damaged, immediately disconnect the mains plug from the mains socket.
- Contact the service centre to replace the water inlet hose with safety valve.

Warning! Dangerous voltage.
Electrical connection
- The appliance must be earthed.
- Make sure that the electrical information on the rating plate agrees with the power supply.
-
Always use a correctly installed shock-proof socket.
-
Do not use multiple plugs and extension cables. There is a risk of fire.
- Do not replace or change the mains cable. Contact the service centre.
- Make sure not to squash or cause damage to the mains plug and cable behind the appliance.
- Make sure that there is access to the mains plug after the installation.
- Do not pull the mains cable to disconnect the appliance. Always pull the mains plug.
Service centre
- Only a qualified person can repair or work on the appliance. Contact the service centre.
- Use only original spare parts.
To discard the appliance
• To prevent the risk of injury or damage:
- Disconnect the mains plug from the mains socket.
-
Cut off the mains cable and discard it.
-
Remove the door catch. This prevents children or pets to be closed in the appliance. There is a risk of suffocation.
- Discard the appliance at the local waste disposal centre.
Warning! The dishwasher detergents are dangerous and can cause corrosion!
- If an accident occurs with these detergents, contact immediately a physician.
- If the detergent gets into the mouth, contact immediately a physician.
- If the detergent gets into the eyes, contact immediately a physician and clean the eyes with water.
- Keep dishwasher detergents in a safe area and out of children touch.
- Do not keep the appliance door open when there is detergent in the detergent dispenser.
- Fill the detergent dispenser only before you start a washing programme.
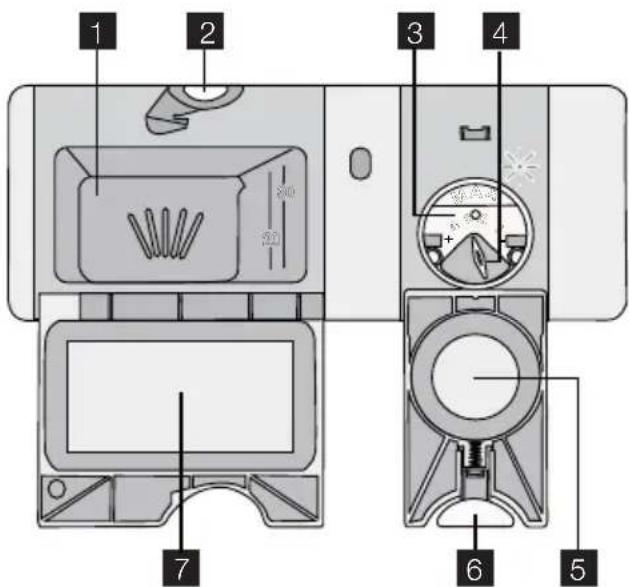
Product description
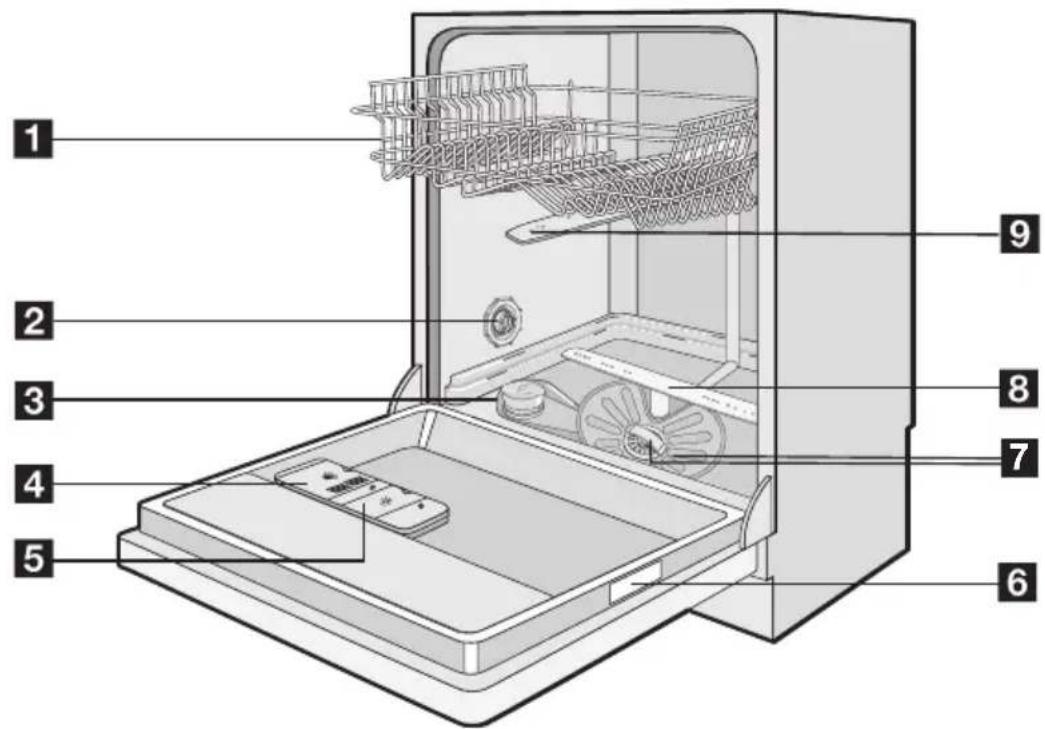
1 Upper basket
2 Water hardness dial
3 Salt container
4 Detergent dispenser
5 Rinse aid dispenser
6 Rating plate
7 Filters
8 lower spray arm
9 Upper spray arm
Control panel

1 Display
2 On/off button
3 indicators
4 Delay start button
5 Programme buttons
6 Function buttons
| Indicators | |
| Washing phase indicator. It comes on when the washing and rinsing phases operate. | |
| Drying phase indicator. It comes on when the drying phase operates. | |
| End indicator. It comes on when the washing programme is completed. | |
| Multitab indicator. It comes on when you activate the function. | |
| Salt indicator. It comes on when it is necessary to fill the salt container. 1) After you fill the container, the salt indicator can stay on for some hours. This does not have an unwanted effect on the operation of the appliance. | |
| Rinse aid indicator. It comes on when it is necessary to fill the rinse aid dispenser. 1) | |
1) When the salt container and/or the rinse aid dispenser are empty, the related indicators do not come on while a washing programme operates.
Display
The display shows:
- The electronic adjustment of the level of the water softener
- The activation and deactivation of the rinse aid dispenser (only with the multitab function on)
• The washing programme time
• The remaining time to the end of the washing programme
- The end of a washing programme (the display shows a zero)
• The delay start time
- The alarm codes.
On/off button
Press this button to activate or deactivate the appliance.
After ten minutes from the end of the washing programme, the AUTO OFF function automatically deactivates the appliance. This helps to decrease energy consumption.
Delay start button
Press this button again and again to delay the start of the washing programme from 1 to 24 hours.
Programme buttons
Press one of these buttons to set a washing programme. The related indicator comes on. Refer to 'Washing programmes'.
Function buttons
With these buttons you can:
- Adjust electronically the level of the water softener. Refer to 'Setting the water softener'.
- Activate and deactivate the multitab function. Refer to 'Multitab function'.
- Activate and deactivate the rinse aid dispenser (only with the multitab function on). Refer to 'What to do if...'.
- Cancel a washing programme in operation. Refer to 'Select and start a washing programme'.
Use of the appliance
- Be sure that the set level of the water softener agrees with the water hardness in your area. If not, adjust the water softener.
- Fill the salt container with dishwasher salt.
- Fill the rinse aid dispenser with rinse aid.
- Load cutlery and dishes into the appliance.
- Set the correct washing programme for the type of load and soil.
Setting the water softener
The water softener removes minerals and salts from the water supply. These minerals and salts can cause damage to the appliance.
Setting mode
The appliance must be in setting mode for these operations:
- To set and start a washing programme.
- To set and start a delay start.
- To adjust electronically the level of the water softener.
- To activate or deactivate the multitab function.
- To deactivate or activate the rinse aid dispenser (only with the multitab function on).
Activate the appliance. The appliance is in setting mode when:
- All the programme indicators come on.
Activate the appliance. The appliance is not in setting mode when:
- Only one programme indicator comes on.
- The display shows the time of the washing programme or the time of the delay start.
-
It is necessary to cancel the programme or the delay start to go back to the setting mode. Refer to 'Setting and starting a washing programme'.
-
Fill the detergent dispenser with the correct quantity of detergent.
-
Start the washing programme.
If you use the combi detergent tablets ('3 in 1', '4 in 1', '5 in 1'), use the multitab function (refer to 'Multitab function').
Adjust the level of the water softener if this does not agree with the water hardness in your area.
Contact your local water authority to know the water hardness in your area.
| German degrees (°dH) | Water hardness | Water hardness adjustment | |||
| French degrees (TH°) | mmol/l Clarke de-grees | manually elec-troni-cally | |||
| 51 - 70 | 91 - 125 | 9,1 - 12,5 | 64 - 88 | 21) | 10 |
| 43 - 50 76 - 90 | 7,6 - 9,0 53 - 63 | 21) | 9 | ||
| 37 - 42 65 - 75 | 6,5 - 7,5 46 - 52 | 21) | 8 | ||
| 29 - 36 51 - 64 | 5,1 - 6,4 36 - 45 | 21) | 7 | ||
| 23 - 28 40 - 50 | 4,0 - 5,0 28 - 35 | 21) | 6 | ||
| 19 - 22 33 - 39 | 3,3 - 3,9 23 - 27 | 21) | 51) | ||
| 15 - 18 | 26 - 32 | 2,6 - 3,2 | 18 - 22 | 1 | 4 |
| 11 - 14 | 19 - 25 | 1,9 - 2,5 | 13 - 17 | 1 | 3 |
| 4 - 10 7 - 18 | 0,7 - 1,8 5 - 12 1 2 | ||||
| < 4 < 7 < 0,7 | < 5 | 12) | 12) | ||
1) Factory position.
2) Do not use salt at this level.
You must adjust the water softener manually and electronically.
Manual adjustment
Turn the water hardness dial to the position 1 or 2 (refer to the table).
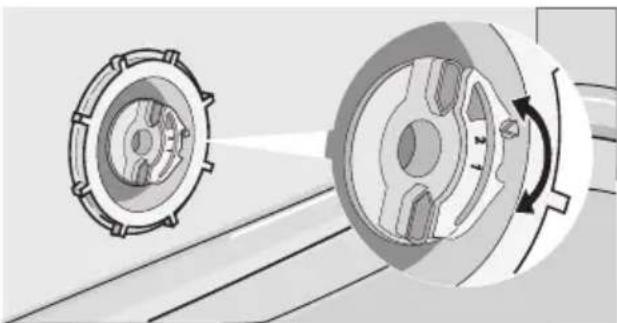
natural_image
Mechanical component diagram showing two circular parts with internal gear-like structures, one emitting light from a beam (no text or symbols)Electronic adjustment
-
Activate the appliance. Make sure that the appliance is in setting mode.
-
Press and hold function button (B) and function button (C) at the same time un-
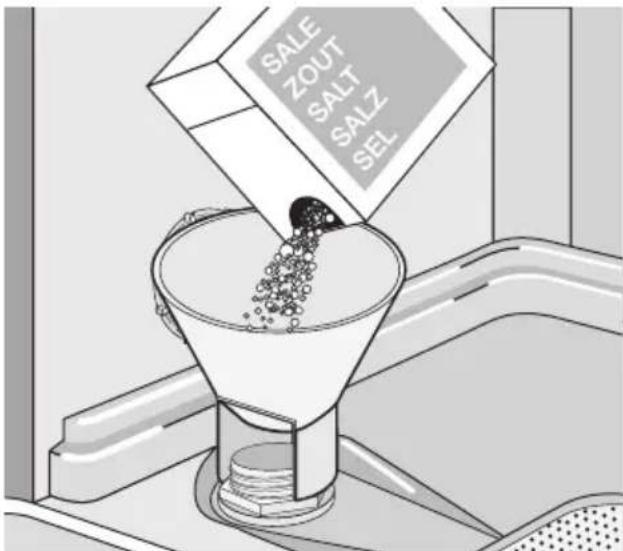
Use of dishwasher salt
How to fill the salt container:
-
Turn the cap counterclockwise and open the salt container.
-
Fill the salt container with 1 litre of water (only for the first time you fill with salt).
-
Use the funnel to fill the salt container with salt.
til the programme indicators above function buttons (A), (B) and (C) flash.
-
Release function button (B) and function button (C).
-
Press function button (A).
-
The programme indicators above function button (B) and function button (C) go off.
- The programme indicator above function button (A) continues to flash.
-
The display shows the setting of the water softener (example: 5L = level 5 ).
-
Press function button (A) again and again to change the setting.
- Deactivate the appliance to confirm.
If the water softener is set electronically to the level 1, the salt indicator stays off.
- Remove the salt around the opening of the salt container.
- Turn the cap clockwise to close the salt container.
i It is correct that water comes out from the salt container when you fill it with salt.
Use of detergent and rinse aid
Use of detergent

To help the environment, do not use more than the correct quantity of detergent.
Obey the instructions on the detergent packaging.
How to fill the detergent dispenser:
-
Press the release button 2 to open the lid 7 of the detergent dispenser.
-
Put the detergent in the dispenser 1.
-
If the washing programme has a pre-wash phase, put a small quantity of detergent on the inner part of the appliance door.
-
If you use the detergent tablets, put the tablet in the detergent dispenser 1.
-
Close the detergent dispenser. Press the lid until it locks into position.
Use long washing programmes when you use the detergent tablets. These cannot fully dissolve with short washing programmes and can decrease the washing results.
Use of rinse aid
i Rinse aid makes it possible to dry the dishes without streaks and stains. The rinse aid dispenser automatically adds rinse aid during the last rinsing phase.
Do these steps to fill the rinse aid dispenser:
- Press the release button 6 to open the lid 5 of the rinse aid dispenser.
- Fill the rinse aid dispenser 3 with rinse aid. The mark 'max' shows the maximum level.
- Remove the spilled rinse aid with an absorbent cloth to prevent too much foam during the washing programme.
- Close the rinse aid dispenser. Press the lid until it locks into position.
Adjust the rinse aid dosage
Factory set: position 3.
You can set the rinse aid dosage between position 1 (lowest dosage) and position 4 (highest dosage).
Multitab function
The multitab function is for combi detergent tablets.
These tablets contain agents as detergent, rinse aid and dishwasher salt. Some types of tablets can contain other agents.
Be sure that these tablets are applicable for the water hardness in your area (refer to the instructions on the packaging of the products).
The multitab function deactivates the flow of rinse aid and salt.
The multitab function deactivates the indicators of salt and rinse aid.
The programme duration can increase if you use the multitab function.
i Activate or deactivate the multitab function before the start of a washing programme. You cannot activate or deactivate the function when a washing programme operates.
To activate the multitab function
- Activate the appliance.
- Make sure that the appliance is in setting mode.
- Press and hold function buttons (D) and (E) at the same time until the multitab indicator comes on.
Loading cutlery and dishes
Hints and tips
- Do not put in the appliance items that can absorb water (sponges, household cloths).
- Remove the remaining food from the items.
- Make soft the remaining burned food on the items.
- Put hollow items (cups, glasses and pans) with the opening down.
- Make sure that water does not collect in containers or in bowls.
- Make sure that cutlery and dishes do not bond together.
- Make sure that the glasses do not touch other glasses.
- Put small items in the cutlery basket.
Turn the rinse aid selector 4 to increase or decrease the dosage.
- Release function buttons (D) and (E). The function is activated.
- When you activate the multitab function, it stays on until you deactivate it.
To deactivate the multitab function and use separately detergent, salt and rinse aid
- Activate the appliance.
- Make sure that the appliance is in setting mode.
- Press and hold at the same time, function buttons (D) and (E) until the multitab indicator goes on.
- Release function buttons (D) and (E). The function is deactivated.
- Fill the salt container and the rinse aid dispenser.
- Adjust the water hardness to the highest level.
- Start a washing programme without dishes.
- When the washing programme is completed, adjust the water softener to the water hardness in your area.
-
Adjust the quantity of rinse aid.
-
Mix the spoons with other cutlery to prevent them to bond together.
- When you put the items in the baskets, make sure that the water can touch all surfaces.
- Put light items in the upper basket. Make sure that the items do not move.
- Water droplets can collect on plastic items and non-stick pans.
Lower basket
Put the saucepans, lids, plates, salad bowls and cutlery in the lower basket. Arrange the service dishes and large lids around the edge of the basket.
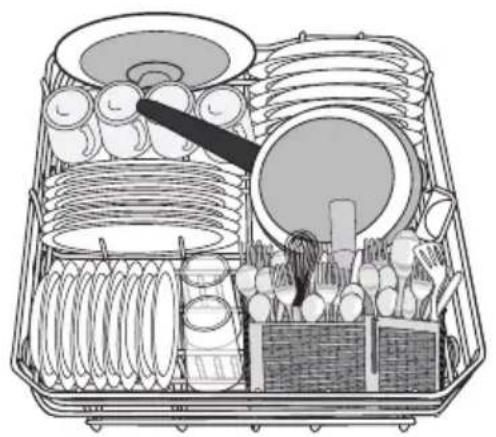
natural_image
Interior view of a woven basket with various items including plates, rings, and a cloth (no text or symbols visible)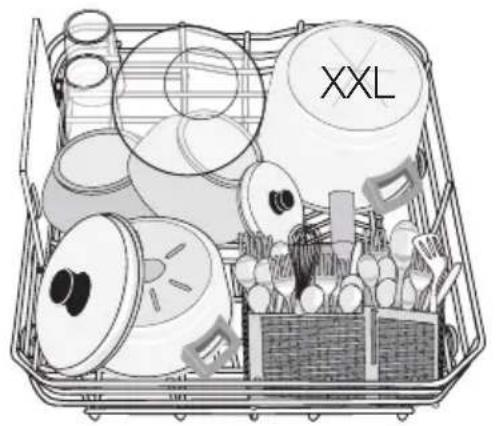
natural_image
Line drawing of a basket filled with various items including spools, cutlery, and accessories (no text or symbols)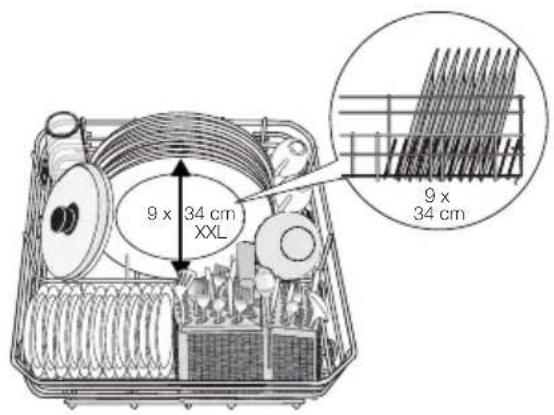
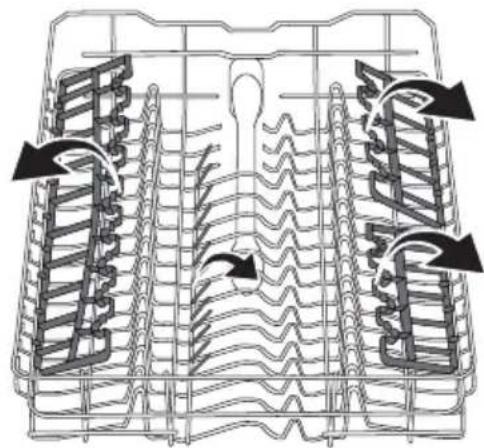
The two rows of prongs in the lower basket can be flat to load pots, pans and bowls.
natural_image
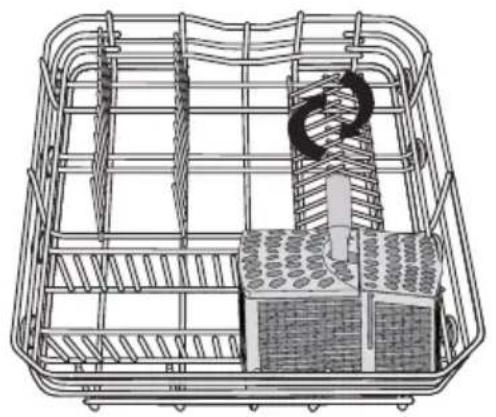
Technical line drawing of a steel rebar cage with internal structural components (no text or symbols)The cutlery basket
Put the forks and spoons with the handles down.
Put the knives with the handles up.
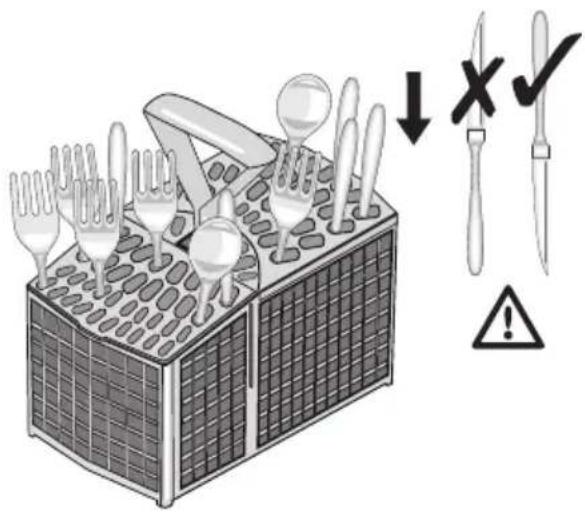
Mix the spoons with other cutlery to prevent them to bond together.
Use the cutlery grids. If the dimensions of the cutlery prevent to use the cutlery grids, you can easily hide or remove them.
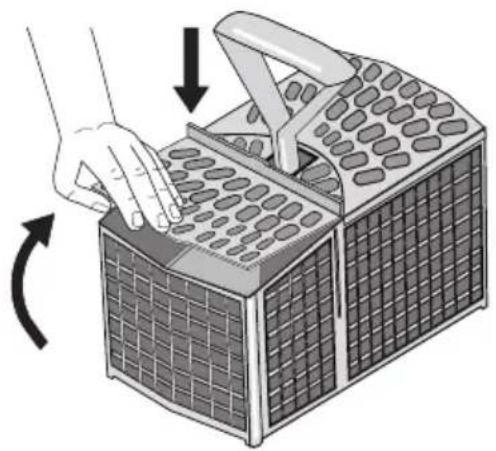
natural_image
Illustration of a hand pressing down on a grid-patterned device with an arrow indicating rotation (no text or symbols)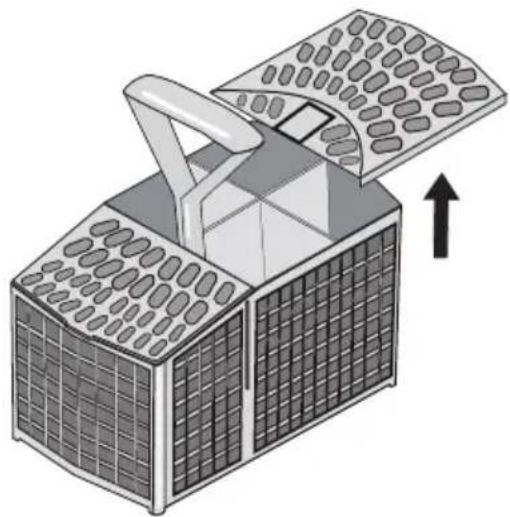
natural_image
Isometric illustration of a solar panel array with a handle and upward arrow (no text or symbols)Upper basket
Arrange the items to let water touch all surfaces.
natural_image
Diagram of a car backrest structure with ribbeds and mesh framework (no text or labels)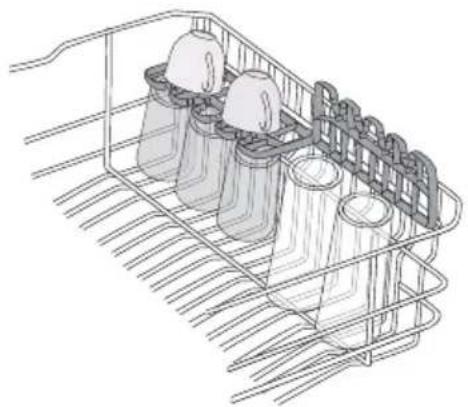
natural_image
Line drawing of a shopping cart filled with plastic bags, no text or symbols present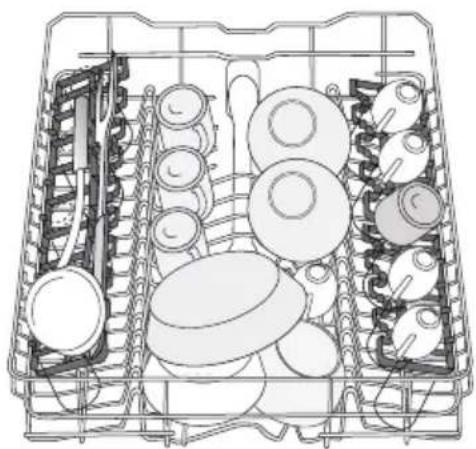
natural_image
Technical line drawing of a multi-compartment kitchen appliance with multiple circular components and a central rack (no text or symbols)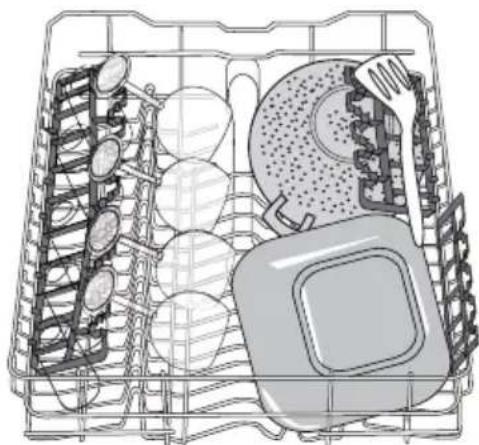
natural_image
Illustration of a multi-tiered kitchen drawer with cutlery and a plate (no text or symbols)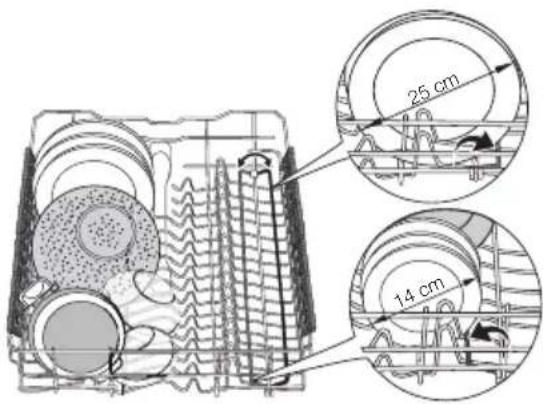
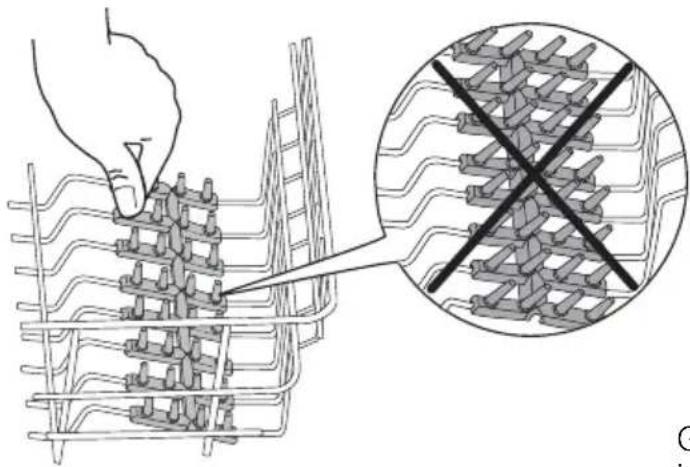
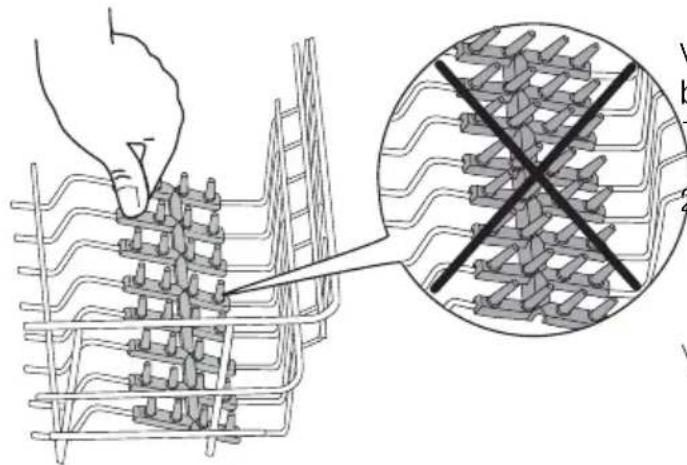
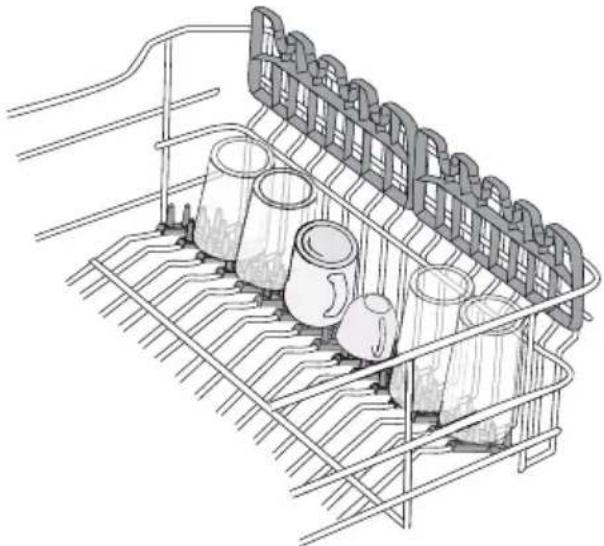
Soft spikes
The soft spikes prevent glassware to move during the washing programme or when you move the upper basket.
Put the soft spikes in the correct position. Press them down and make sure that they do not move, refer to the illustrations.
natural_image
Technical line drawing of a metal rack with multiple cups and a mesh fence (no text or symbols)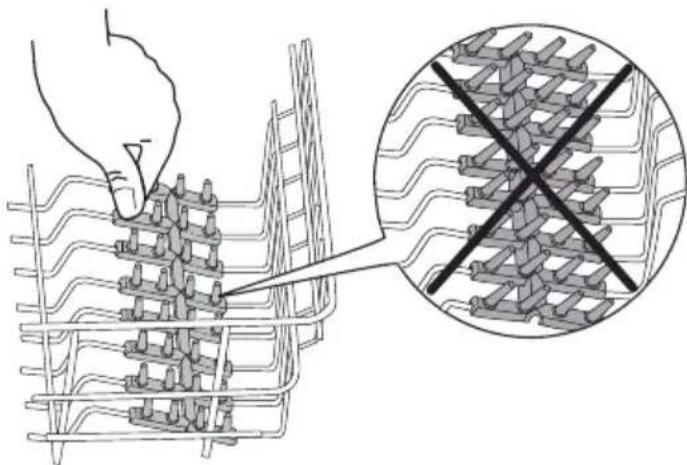
natural_image
Diagram showing a hand using a tool to connect grid-like structures, with an inset magnified view of a grid pattern marked by a black X (no text or symbols present)Adjustment of the height of the upper basket
To load large plates move the upper basket to the higher position.
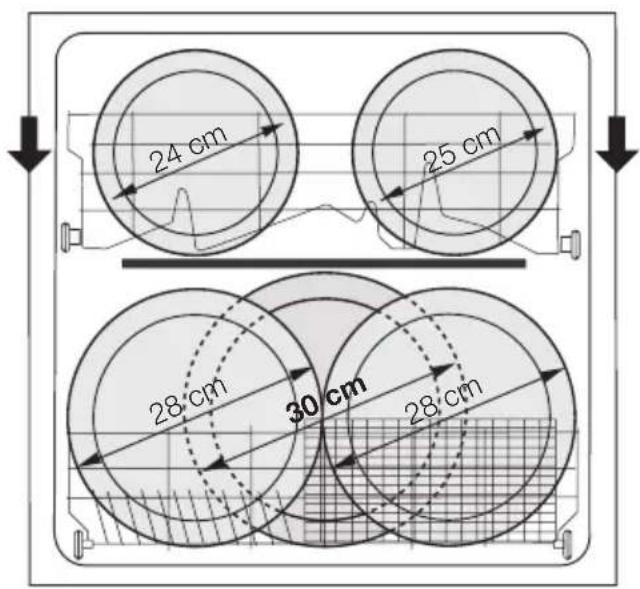
Do these steps to move the upper basket to the higher position:
- Pull the basket out until it stops.
- Carefully lift the two sides until the mechanism is engaged and the basket is stable.
natural_image
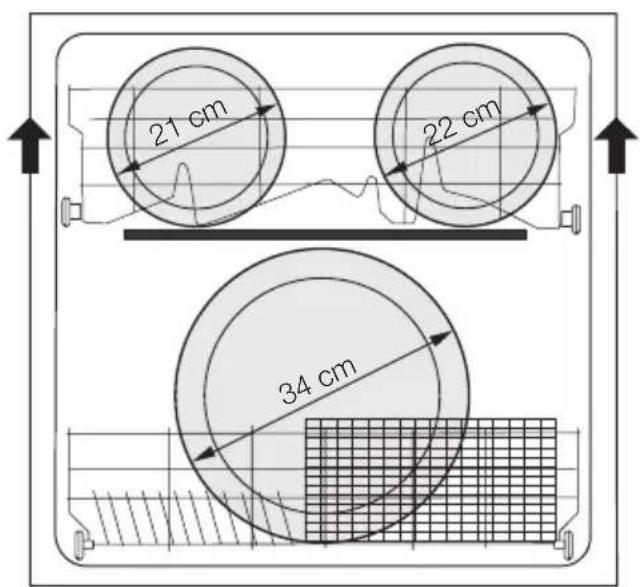
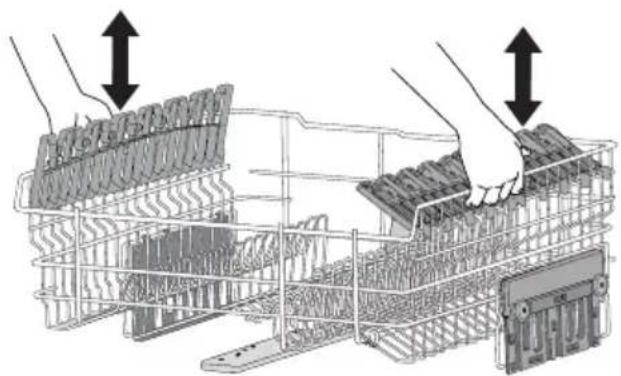
Diagram of hands installing or adjusting a grid-like structure inside a container (no text or symbols visible)Do these steps to move the upper basket to the lower position:
- Pull the basket out until it stops.
- Carefully lift up the two sides.
- Hold the mechanism and let it fall back down slowly.
Caution!
- Do not lift or lower the basket on one side only.
Setting and starting a washing programme
Starting the washing programme without delay start
You can set the washing programme with the appliance door open or closed.
If the door is open, you can change the setting, the appliance starts to operate only after you close the door.
If the door is closed, the appliance starts to operate after 3 seconds from the setting of the washing programme.
- Activate the appliance. Make sure that the appliance is in setting mode.
-
Set the washing programme.
-
The related programme indicator comes on. All the other programme indicators go off.
- The programme time flashes in the display.
-
The phase indicators of the set washing programme come on.
-
Close the appliance door, the washing programme starts automatically.
-
The programme time flashes no more in the display.
- Only the phase indicator of the phase in operation stays on.
Starting the washing programme with delay start
You can set the delay start with the appliance door open or closed. If the door is open, you can change the setting because the appliance starts to operate only after you close the door. If the door is closed, the appliance starts to operate after 3 seconds from the setting of the delay start.
- Activate the appliance. Make sure that the appliance is in setting mode.
- Set the washing programme.
- Press the delay start button again and again until the display shows the time of the delay start.
- The delay time flashes in the display.
- Close the appliance door, the count-down starts automatically.
- The delay time flashes no more in the display.
- The phase indicators of the set washing programme go off.
When the countdown is completed, the washing programme starts automatically. The indicator of the phase in operation comes on.
The opening of the appliance door stops the countdown. When you close the door, the countdown continues from the point of interruption.
Cancelling the delay start
The countdown is not operating
- Press the delay start button again and again until the display shows the time of the washing programme.
- Close the appliance door, the washing programme starts automatically.
The countdown is operating
- Press the delay start button again and again until the display shows the time of the washing programme.
- The programme time flashes in the display. After some seconds, the time stops to flash and the washing programme starts automatically.
Interruption of a washing programme
- Open the appliance door.
- The washing programme stops.
- Close the appliance door.
- The washing programme continues from the point of interruption.
Cancelling the washing programme
If the washing programme has not started, you can change the selection.
To change the selection while the washing programme operates, it is necessary to cancel the programme.
- Press and hold function button (B) and function button (C) at the same time until all the programme indicators come on.
i Make sure that there is detergent in the detergent dispenser before you start a new washing programme.
End of the washing programme
When the washing programme is completed, the display shows a zero and the end indicator is on.
-
Deactivate the appliance.
-
Open the appliance door.
For better drying results, keep the appliance door ajar for some minutes.
Remove the items from the baskets
- Let the dishes become cold before you remove them from the appliance. Hot dishes can be easily damaged.
- First remove the items from the lower basket, then from the upper basket.
- There can be water on the sides and on the door of the appliance. Stainless steel becomes cool more quickly than the dishes.
Washing programmes
| Programme | Type of soil | Type of load | Programme description |
| 45^ - 70^ AUTO1) | All Crockery, cutlery,pots and pans | PrewashWash 45^ or 70^ RinsesDry | |
| 70° | Heavy soil Crockery, cutlery,pots and pans | PrewashWash 70 °CRinsesDry | |
| 60°2) | Fresh soil Crockery and cutlery Wash 60 °C | Rinse | |
| 50°3) | Normal soil Crockery and cutlery Prewash | Wash 50 °CRinsesDry | |
| EXTRASILENT4) | Normal soil Crockery and cutlery Prewash | Wash 50 °CRinsesDry | |
1) The appliance senses the type of soil and the quantity of items in the baskets. It automatically adjusts the temperature and quantity of the water, the energy consumption and the programme time.
2) With this programme you can wash a load with fresh soil. It gives good washing results in a short time.
3) This is the standard programme for test institutes. With this programme you have the most efficient use of water and energy consumption for crockery and cutlery with normal soil. Refer to the supplied leaflet for test information.
4) This is the most silent washing programme. The pump works at a very low speed to decrease the level of noise. Because of the low speed, the programme time is long.
Consumption values
| Programme1) | Energy (kWh) Water (litre) |
| 45°-70° | 0.9 - 1.7 8 - 15 |
| AUTO | |
| 70° | 1.4 - 1.5 13 - 14 |
| 60° | 0.9 9 |
| 50° | 0.9 - 1.0 9 - 11 |
| EXTRA SILENT | 1.1 - 1.2 9 - 11 |
1) The display shows the programme time.
The water pressure and temperature, the variations of the mains supply and
the quantity of dishes can change the consumption values.
Care and cleaning
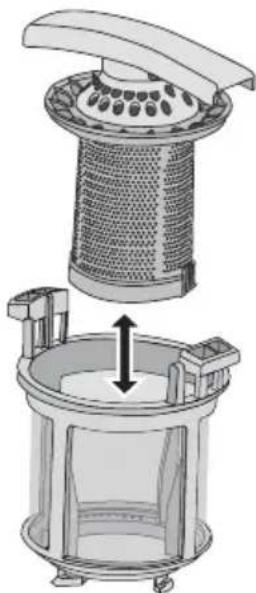
To remove and clean the filters
Dirty filters decrease the washing results. Although the maintenance is very low with these filters, make a check at intervals and if necessary, clean them.
- Turn the filter (A) counterclockwise and remove it out from filter (B).

- Filter (A) has two parts. To disassemble the filter, pull them apart.
natural_image
Technical illustration of a mechanical device with a lid and internal structure, showing no text or symbols.- Fully clean the parts with water.
- Put the two parts of the filter (A) together and push. Make sure that they assemble correctly in each other.
What to do if...
The start of the appliance does not occur or it stops during operation.
First try to find a solution to the problem (refer to the table). If not, contact the service centre.
With some malfunctions, the display shows an alarm code:
• ,10 - The appliance does not fill with water
- Remove the filter (B).
- Fully clean the filter (B) with water.
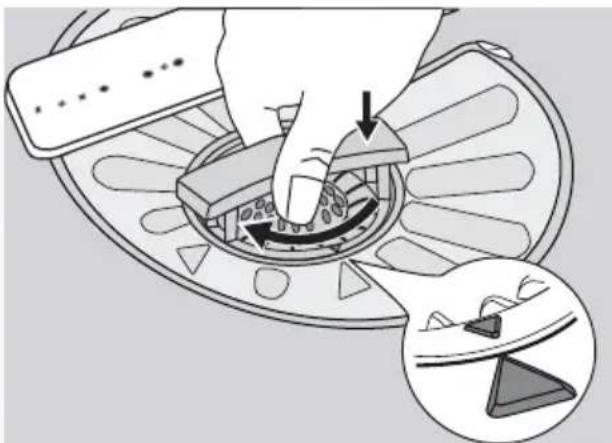
- Put the filter (B) to its initial position. Make sure that it assembles correctly in the two guides (C).
natural_image
Diagram showing a hand pressing down on a mechanical component with an inset close-up of a component detail (no text or symbols)- Put the filter (A) into position in filter (B). Turn the filter (A) clockwise until it locks.
To clean the spray arms
Do not remove the spray arms. If the holes in the spray arms become clogged, remove remaining parts of soil with a thin pointed object.
To clean the external surfaces
Clean the external surfaces of the appliance and control panel with a moist soft cloth.
Only use neutral detergents.
Do not use abrasive products, abrasive cleaning pads or solvents (acetone).
• ,20 - The appliance does not drain the water
• ,30 - The anti-flood device is on.
Warning! Deactivate the appliance before you do the checks.
| Malfunction Possible cause Possible solution | ||
| The appliance does not fill with water. | The water tap is blocked or there is limescale on it. | Clean the water tap. |
| The water pressure is too low. | Contact your local water authority. | |
| The water tap is closed. Open the water tap. | ||
| The filter in the water inlet hose | is blocked. | Clean the filter. |
| The connection of the water inlet hose is damaged. | let hose is not correct. | Make sure that the connection is correct. |
| The water inlet hose is damaged. | There is a blockage in the sink spigot. | Make sure that the water inlet hose has no damages. |
| The appliance does not drain the water. | drain hose is not correct. | Clean the sink spigot. |
| The connection of the water | drain hose is not correct. | Make sure that the connection is correct. |
| The water drain hose is damaged. | drain hose is not correct. | Make sure that the water drain hose has no damages. |
| The anti-flood device is on. Close the water tap and contact the service centre. | ||
| The start of the washing programme does not occur. | The appliance door is open. Close the appliance door. | |
| The mains plug is not connected in the mains socket. | Connect the mains plug. | |
| The fuse in the fuse box is damaged. | Damage. | Replace the fuse. |
| The delay start is set. • Cancel the delay start. | • When the countdown is completed, the washing programme starts automatically. | |
After the check, activate the appliance. The programme continues from the point of interruption.
If the malfunction occurs again, contact the service centre.
If the display shows other alarm codes, contact the service centre.
The necessary information for the service centre is on the rating plate.
Record this information:
- Model (MOD.)
...
- Product number
(PNC)
- Serial number
(S.N.)
The washing results and drying results are not satisfactory
| Problem Possible cause Possible solution | ||
| The dishes are not clean. The washing programme was not applicable for the type of load and soil. | Make sure that the washing programme is applicable for the type of load and soil. | |
| You did not put the items correctly in the baskets, water did not touch all surfaces. | Put the items correctly in the baskets. | |
| The spray arms could not turn freely. Incorrect position of the items in the baskets. | Make sure that an incorrect position of the items do not cause the blockage of the spray arms. | |
| The filters are dirty or not assembled and installed correctly. | Make sure that the filters are clean and correctly assembled and installed. | |
| The quantity of detergent was | not sufficient or missing. | Make sure that the quantity of detergent is sufficient. |
| Limescale particles on the dishes. | The salt container is empty. Fill the salt container with dish-washer salt. | |
| Incorrect level of the water soft-ener adjustment. | Adjust the water softener with the correct level. | |
| The salt container cap is not closed correctly. | Make sure that the salt container cap is closed correctly. | |
| There are streaks, whitish stains, or a bluish layer on glasses and dishes. | The rinse aid quantity is too high. | Decrease the rinse aid quantity. |
| Dry water drop stains on glasses and dishes. | The rinse aid quantity is too low. | Increase the rinse aid quantity. |
| The detergent can be the cause. | Use a different brand of deter-gent. | |
| The dishes are wet. The washing programme was without a drying phase or with a decreased drying phase. | For better drying results, keep the door ajar for some minutes. | |
| The dishes are wet and matt. The rinse aid dispenser is em-pty. | Fill the rinse aid dispenser with rinse aid. | |
| The multitab function is on (this function automatically deactivates the rinse aid dispenser). | Activate the rinse aid dispenser. | |
Activating the rinse aid dispenser
-
Activate the appliance. Make sure that the appliance is in setting mode.
-
Press and hold function button (B) and function button (C) at the same time until the programme indicators above function buttons (A), (B), and (C) start to flash.
-
Release function button (B) and function button (C).
-
Press function button (B).
- The programme indicators above function button (A) and function button (C) go off.
- The programme indicator above function button (B) continues to flash.
- The display shows the setting of the rinse aid dispenser.
| 0d | The rinse aid dispenser is deactivated. |
| 1d | The rinse aid dispenser is activated. |
- Press function button (B) to change the setting.
- Deactivate the appliance to confirm.
Technical data
| Dimensions Width 596 mm | ||
| Height 818 - 898 mm | ||
| Depth 575 mm | ||
| Water supply pressure | Minimum | 0.5 bar (0.05 MPa) |
| Maximum | 8 bar (0.8 MPa) | |
| Water supply 1) | Cold water or hot water | maximum 60 °C |
| Capacity | Place settings | 12 |
1) Connect the water inlet hose to a water tap with a 3/4" thread.
The rating plate on the inner edge of the appliance door shows the electrical connection data.
i If the hot water comes from alternative sources of energy, (e.g. solar panels,
Environment concerns
The symbol ☑ on the product or on its packaging indicates that this product may not be treated as household waste. Instead it should be taken to the appropriate collection point for the recycling of electrical and electronic equipment. By ensuring this product is disposed of correctly, you will help prevent potential negative consequences for the environment and human health, which could otherwise be
photovoltaic panels and aeolian), use a hot water supply to decrease energy consumption.
caused by inappropriate waste handling of this product. For more detailed information about recycling of this product, please contact your local council, your household waste disposal service or the shop where you purchased the product.
Recycle the materials with the symbol 📋. Put the packaging in applicable containers to recycle it.
Sommaire
natural_image
Mechanical component diagram showing two circular parts with internal gear-like structures, one emitting motion arrows (no text or symbols)natural_image
Line drawing of a basket containing various household items including plates, spoons, and woven baskets (no text or symbols)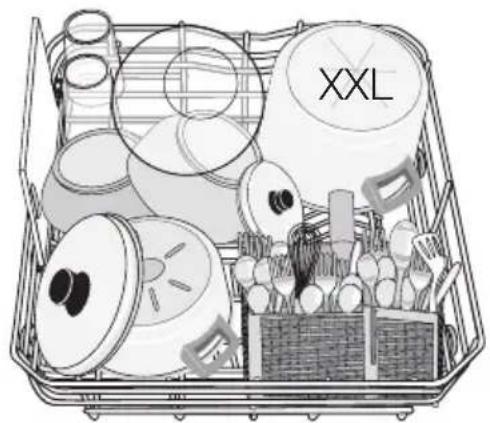
natural_image
Line drawing of a shopping basket filled with various items including a box labeled 'XXL' and circular cutouts (no text or symbols on the items themselves)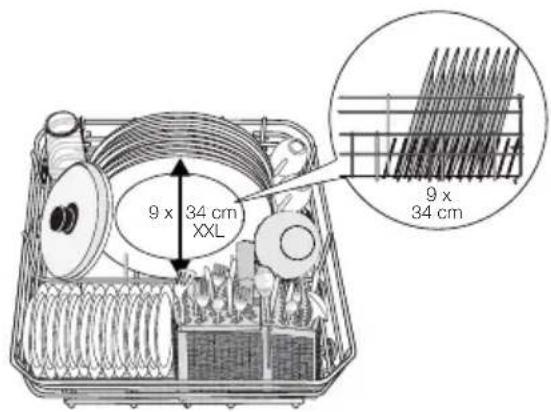
natural_image
Line drawing of a wire cage with construction materials and a hanging object (no text or symbols)Panier à couverts
natural_image
Illustration of a hand using a tool to press down a grid-patterned device, with arrows indicating rotation (no text or symbols)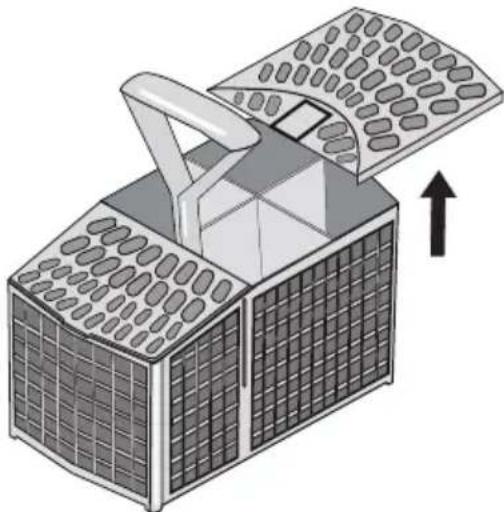
natural_image
Illustration of a solar panel array with a handle and grid pattern, showing an upward arrow (no text or symbols)Panier du haut
natural_image
Technical diagram of a mechanical component with internal channels and directional arrows indicating flow or movement (no text or symbols)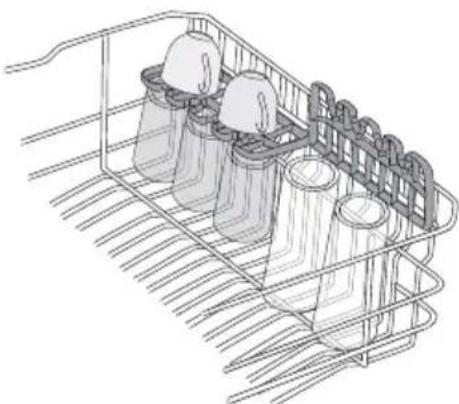
natural_image
Line drawing of a shopping basket with plastic cups and a mesh rack (no text or symbols)
Ergots souples
natural_image
Technical illustration of a container with multiple cups and a grid structure, plus a magnified view showing a hand holding a grid with no text or symbols.natural_image
Diagram of a mechanical assembly with two hands holding stacked components, no visible text or symbolsnatural_image
Technical illustration of a mechanical device with a meshed top component and a side view showing internal structure (no text or symbols)natural_image
Diagram showing a hand pressing down on a mechanical component with an inset close-up of the component (no text or symbols)natural_image
Diagram of a mechanical component with two views: one showing a circular gear-like structure and the other showing a rotating wheel (no text or symbols)natural_image
Cross-sectional diagram of a traditional kitchen appliance with spools, rings, and a basket (no text or labels)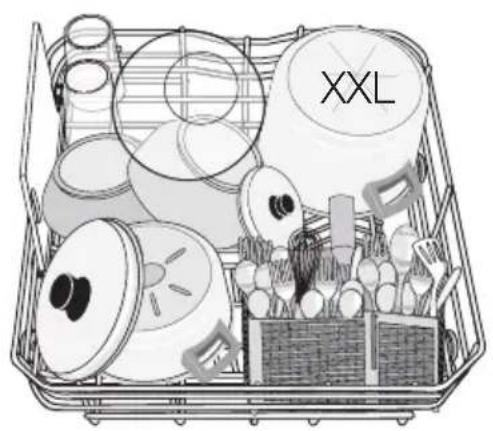
natural_image
Illustration of a basket filled with various items including cutlamps, drums, and accessories (no text or symbols)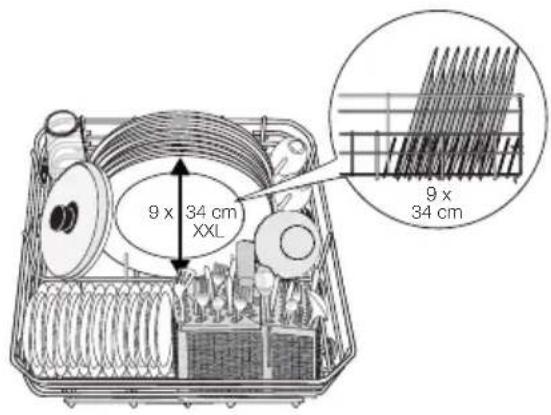
natural_image
Line drawing of a wire cage with structural supports and a partially assembled component (no text or symbols)Besteckkorb
natural_image
Illustration of two steps of a food vendor's open box, showing hand positioning and lifting mechanism (no text or symbols)Oberkorb
natural_image
Technical line drawing of a mechanical component with internal channels and directional arrows (no text or symbols)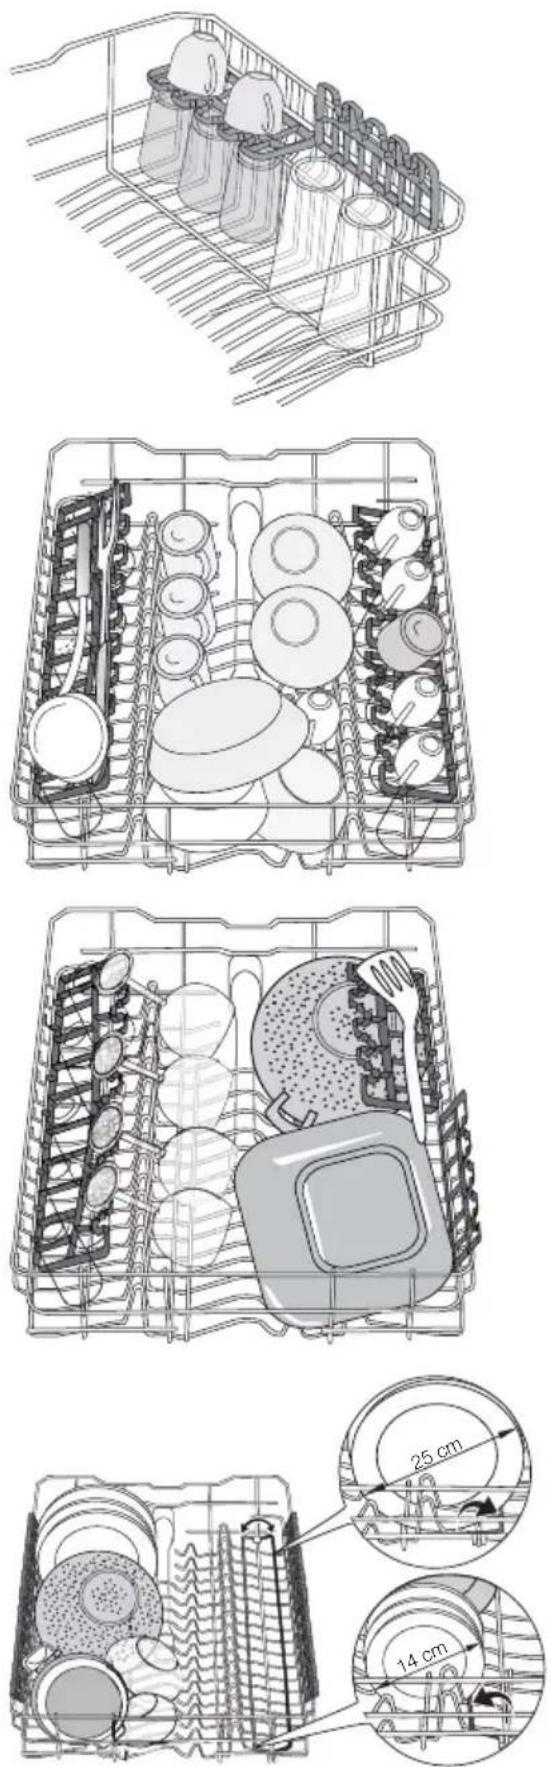
natural_image
Technical line drawings of a multi-space kitchen appliance with internal compartments and labeled dimensions (25 cm and 14 cm), no readable text or symbols beyond measurement annotations.natural_image
Line drawing of a metal tray with multiple cups and a rack, no text or symbols present