USER MANUAL DD 160-22 HILTI
DD-ST 22 110/150/160 SFL & SFM
DD-ST 150-U CTL
3
8
9
natural_image
Two 3D mechanical assembly diagrams showing a robotic arm interacting with a small component, no text or symbols present.
10
natural_image
Two 3D mechanical assembly diagrams showing a tool pressing a cylindrical component, with arrows indicating motion or movement (no text or symbols present)
11
natural_image
Three-step diagram showing a mechanical assembly with labeled parts, no text or symbols present.
DD 160-22
en Original operating instructions 1
fr Notice d'utilisation originale 32
es Manual de instrucciones original 65
pt Manual de instruções original 99
Original operating instructions
Contents
1.1 About these operating instructions ..... 2
1.2 Explanation of symbols 2
1.3 Product-dependent symbols 3
2 Safety 4
2.1 General power tool safety warnings 4
2.2 Diamond drill safety warnings 6
2.3 Safety instructions for power drills 6
2.4 Additional safety instructions 6
2.5 Careful handling and use of batteries 8
2.6 Working in the rain 8
3 Description 9
3.1 Product overview 1 9
3.2 Overview, DD-ST 150-U CTL & DD-ST 22 110/150/160 (SFL & SFM) drill stands 2 . . . . . . . . . 9
3.3 Accessories (optional) 3 9
3.4 Information notices on drill stand, base plate or diamond core drilling machine 10
3.5 Items supplied 10
3.6 Intended use 10
3.7 Data transfer 11
3.8 Status indicators of the Li-ion battery 11
3.9 Performance ratings on the type identification plate 12
3.10 Active Torque Control (ATC) 12
4 Preparations at the workplace 12
4.1 Charging the battery 12
4.2 Inserting the battery 12
4.3 Removing the battery 13
4.4 Securing drill stand 13
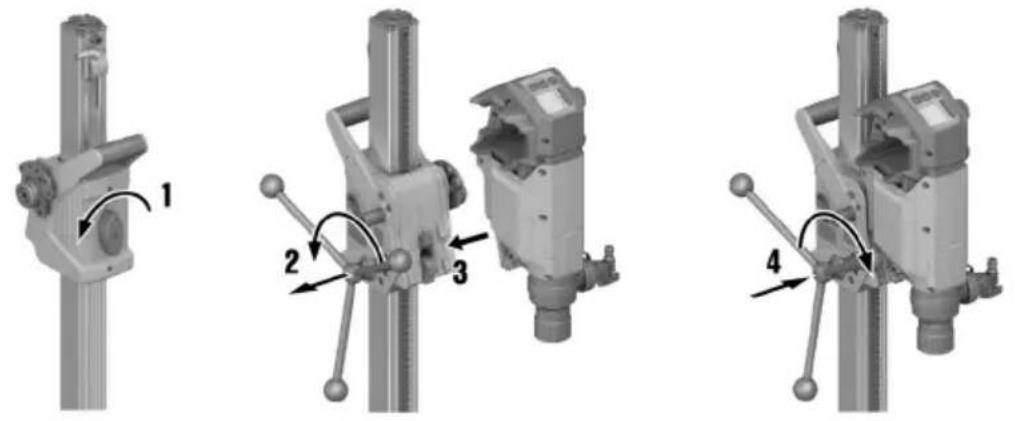
4.5 Fitting the hand wheel on the drill stand 7 14
4.6 Assembling diamond core drilling machine 14
4.7 Fitting the core bit 9 15
4.8 Removing core bit 10 15
4.9 Connecting the vacuum removal system 11 16
4.10 Preparations for wet drilling 16
4.11 Setting the depth gage (accessory) 16
4.12 Adjusting the drilling angle when using the drill stand with combination base plate 14 . . . . . . 16
4.13 Adjusting the play between the rail and carriage 17
4.14 Using the Rota-Rail (column swivel) 17
5 Operation 17
5.1 Switching diamond core drilling machine on or off 17
5.2 Multifunction display 17
5.3 Display after powering up 18
5.4 Logbook & settings 18
5.5 Adapting speed to core bit diameter 19
5.6 Hole-starting mode 20
5.7 Drilling performance indicator 20
5.8 Function Iron Boost 21
HILTI
5.9 Performing wet drilling 21
5.10 Performing dry drilling 21
5.11 Core removal 22
5.12 Bluetooth® (optional) 22
6 Care and maintenance 24
6.1 Instructions for care of diamond core drilling machines 24
6.2 Care of the Li-ion batteries 24
6.3 Maintenance 24
7 Transport and storage 24
7.1 Instructions on transport and storage of diamond core drilling machines 25
8 Troubleshooting 25
8.1 Troubleshooting the diamond core drilling machine 25
8.2 Troubleshooting the drilling system 27
9 Disposal instructions 29
9.1 Disposal 29
9.2 Recommended pretreatment for disposal of drilling slurry 29
10 Manufacturer's warranty 29
11 FCC statement (applicable in US) / IC statement (applicable in Canada) 30
12 Further information 30
13 Technical data 30
13.1 Diamond core drilling machine 30
13.2 Core bit diameter 30
13.3 Ideal distances from hole center 31
13.4 Weights, drill stand 31
13.5 Lengths, drill stand 31
13.6 Fastening with vacuum base plate 31
13.7 Bluetooth 31
13.8 Battery 31
1.1 About these operating instructions
- Warning! Read and understand all accompanying documentation, including but not limited to instructions, safety warnings, illustrations, and specifications provided with this product. Familiarize yourself with all the instructions, safety warnings, illustrations, specifications, components, and functions of the product before use. Failure to do so may result in electric shock, fire, and/or serious injury. Save all warnings and instructions for future reference.
- MILTI products are designed for professional users and only trained, authorized personnel are permitted to operate, service and maintain the products. This personnel must be specifically informed about the possible hazards. The product and its ancillary equipment can present hazards if used incorrectly by untrained personnel or if used not in accordance with the intended use.
- The accompanying documentation corresponds to the current state of the art at the time of printing. Please always check for the latest version on the product's page on Hilti's website. To do this, follow the link or scan the QR code in this documentation, marked with the symbol .
- Ensure that these operating instructions are with the product when it is given to other persons.
1.2 Explanation of symbols
1.2.1 Warnings
Warnings alert persons to hazards that occur when handling or using the product. The following signal words are used:

DANGER
DANGER!
- Draws attention to imminent danger that will lead to serious personal injury or fatality.

WARNING
WARNING!
- Draws attention to a potential threat of danger that can lead to serious injury or fatality.

CAUTION
CAUTION!
- Draws attention to a potentially dangerous situation that could lead to personal injury or damage to the equipment or other property.
1.2.2 Symbols in the operating instructions
The following symbols are used in these operating instructions:
 | Comply with the operating instructions |
 | Instructions for use and other useful information |
 | Dealing with recyclable materials |
 | Do not dispose of electric equipment and batteries as household waste |
| [BYWC] | Hilti Li-ion battery |
 | Hilti charger |
1.2.3 Symbols in illustrations
The following symbols are used in illustrations:
| 2 | These numbers refer to the illustrations at the beginning of these operating instructions. |
| 3 | The numbers in illustrations refer to important work steps or to components important for the work steps. In the text, the corresponding numbers draw attention to these work steps or components, e.g. (3). |
| 11 | Item reference numbers are used in theoverview illustrationand refer to the numbers used in the key in theproduct overviewsection. |
| ! | This symbol is intended to draw your special attention to certain points for handling the product. |
1.3 Product-dependent symbols
1.3.1 General symbols
Symbols used in relation to the product.
 | Product is IPX4M-classified and therefore approved for use in the rain. |
 | Rated speed under no load |
 | Direct current (DC) |
 | Diameter |
 | Locking mechanism opened |
 | Locking mechanism closed |
 | The product supports near-field communication (NFC) technology compatible with iOS and Android platforms. |
| Li-Ion | Li-ion battery |
 | Never use the battery as a striking tool. |
 | Do not drop the battery. Never use a battery that has suffered an impact or is damaged in any other way. |
 | Use in dry conditions with batteries fromHilti B 22series. Observe the information given in the section headedIntended use. |
 | OK to use in rain & dry conditions with batteries fromHilti B 22series marked with "IPX4". Observe the information given in the section headedIntended use. |
 | If applied on the product, the product has been certified by this certification body for the US and Canadian markets according to the applicable standards. |
1.3.2 "Must do" symbols
Obligation symbols indicate "must do" actions.
 | Wear eye protection |
 | Wear a hard hat |
 | Wear ear protection |
 | Wear protective gloves |
 | Wear protective footwear |
 | Wear light respiratory protection |
2 Safety
WARNING Read all safety warnings, instructions, illustrations and specifications provided with this power tool. Failure to follow all instructions listed below may result in electric shock, fire and/or serious injury.
Save all warnings and instructions for future reference.
The term "power tool" in the warnings refers to your mains-operated (corded) power tool or battery-operated (cordless) power tool.
Work area safety
- Keep work area clean and well lit. Cluttered or dark areas invite accidents.
- Do not operate power tools in explosive atmospheres, such as in the presence of flammable liquids, gases or dust. Power tools create sparks which may ignite the dust or fumes.
- Keep children and bystanders away while operating a power tool. Distractions can cause you to lose control.
Electrical safety
Power tool plugs must match the outlet. Never modify the plug in any way. Do not use any adapter plugs with earthed (grounded) power tools. Unmodified plugs and matching outlets will reduce risk of electric shock.
- Avoid body contact with earthed or grounded surfaces, such as pipes, radiators, ranges and refrigerators. There is an increased risk of electric shock if your body is earthed or grounded.
Do not abuse the cord. Never use the cord for carrying, pulling or unplugging the power tool. Keep cord away from heat, oil, sharp edges or moving parts. Damaged or entangled cords increase the risk of electric shock.
When operating a power tool outdoors, use an extension cord suitable for outdoor use. Use of a cord suitable for outdoor use reduces the risk of electric shock.
If operating a power tool in a damp location is unavoidable, use a residual current device (RCD) protected supply. Use of an RCD reduces the risk of electric shock.
Personal safety
- Stay alert, watch what you are doing and use common sense when operating a power tool. Do not use a power tool while you are tired or under the influence of drugs, alcohol or medication. A moment of inattention while operating power tools may result in serious personal injury.
▶ Use personal protective equipment. Always wear eye protection. Protective equipment such as a dust mask, non-skid safety shoes, hard hat or hearing protection used for appropriate conditions will reduce personal injuries.
▶ Prevent unintentional starting. Ensure the switch is in the off-position before connecting to power source and/or battery pack, picking up or carrying the tool. Carrying power tools with your finger on the switch or energising power tools that have the switch on invites accidents.
Remove any adjusting key or wrench before turning the power tool on. A wrench or a key left attached to a rotating part of the power tool may result in personal injury.
Do not overreach. Keep proper footing and balance at all times. This enables better control of the power tool in unexpected situations.
- Dress properly. Do not wear loose clothing or jewellery. Keep your hair and clothing away from moving parts. Loose clothes, jewellery or long hair can be caught in moving parts.
If devices are provided for the connection of dust extraction and collection facilities, ensure these are connected and properly used. Use of dust collection can reduce dust-related hazards.
Do not let familiarity gained from frequent use of tools allow you to become complacent and ignore tool safety principles. A careless action can cause severe injury within a fraction of a second.
Do not force the power tool. Use the correct power tool for your application. The correct power tool will do the job better and safer at the rate for which it was designed.
- Do not use the power tool if the switch does not turn it on and off. Any power tool that cannot be controlled with the switch is dangerous and must be repaired.
- Disconnect the plug from the power source and/or remove the battery pack, if detachable, from the power tool before making any adjustments, changing accessories, or storing power tools. Such preventive safety measures reduce the risk of starting the power tool accidentally.
- Store idle power tools out of the reach of children and do not allow persons unfamiliar with the power tool or these instructions to operate the power tool. Power tools are dangerous in the hands of untrained users.
- Maintain power tools and accessories. Check for misalignment or binding of moving parts, breakage of parts and any other condition that may affect the power tool's operation. If damaged, have the power tool repaired before use. Many accidents are caused by poorly maintained power tools.
- Keep cutting tools sharp and clean. Properly maintained cutting tools with sharp cutting edges are less likely to bind and are easier to control.
▶ Use the power tool, accessories and tool bits etc. in accordance with these instructions, taking into account the working conditions and the work to be performed. Use of the power tool for operations different from those intended could result in a hazardous situation.
- Keep handles and grasping surfaces dry, clean and free from oil and grease. Slippery handles and grasping surfaces do not allow for safe handling and control of the tool in unexpected situations.
▶ Recharge only with the charger specified by the manufacturer. A charger that is suitable for one type of battery pack may create a risk of fire when used with another battery pack.
▶ Use power tools only with specifically designated battery packs. Use of any other battery packs may create a risk of injury and fire.
When battery pack is not in use, keep it away from other metal objects, like paper clips, coins, keys, nails, screws or other small metal objects, that can make a connection from one terminal to another. Shorting the battery terminals together may cause burns or a fire.
▶ Under abusive conditions, liquid may be ejected from the battery; avoid contact. If contact accidentally occurs, flush with water. If liquid contacts eyes, additionally seek medical help. Liquid ejected from the battery may cause irritation or burns.
Do not use a battery pack or tool that is damaged or modified. Damaged or modified batteries may exhibit unpredictable behaviour resulting in fire, explosion or risk of injury.
Do not expose a battery pack or tool to fire or excessive temperature. Exposure to fire or temperature above 130°C (265°F) may cause explosion.
HILTI
▶ Follow all charging instructions and do not charge the battery pack or tool outside the temperature range specified in the instructions. Charging improperly or at temperatures outside the specified range may damage the battery and increase the risk of fire.
Service
▶ Have your power tool serviced by a qualified repair person using only identical replacement parts. This will ensure that the safety of the power tool is maintained.
▶ Never service damaged battery packs. Service of battery packs should only be performed by the manufacturer or authorized service providers.
2.2 Diamond drill safety warnings
- When performing drilling that requires the use of water, route the water away from the operator's work area or use a liquid collection device. Such precautionary measures keep the operator's work area dry and reduce the risk of electrical shock.
- Operate power tool by insulated grasping surfaces, when performing an operation where the cutting accessory may contact hidden wiring or its own cord. Cutting accessory contacting a “live” wire may make exposed metal parts of the power tool “live” and could give the operator an electric shock.
▶ Wear hearing protection when diamond drilling. Exposure to noise can cause hearing loss.
- When the bit is jammed, stop applying downward pressure and turn off the tool. Investigate and take corrective actions to eliminate the cause of the bit jamming.
- When restarting a diamond drill in the workpiece check that the bit rotates freely before starting. If the bit is jammed, it may not start, may overload the tool, or may cause the diamond drill to release from the workpiece.
- When securing the drill stand with anchors and fasteners to the workpiece, ensure that the anchoring used is capable of holding and restraining the machine during use. If the workpiece is weak or porous, the anchor may pull out causing the drill stand to release from the workpiece.
- When securing the drill stand with a vacuum pad to the workpiece, install the pad on a smooth, clean, non-porous surface. Do not secure to laminated surfaces such as tiles and composite coating. If the workpiece is not smooth, flat or well affixed, the pad may pull away from the workpiece.
▶ Ensure there is sufficient vacuum before and during drilling. If the vacuum is insufficient, the pad may release from the workpiece.
▶ Never perform drilling with the machine secured by the vacuum pad only, except when drilling downwards. If the vacuum is lost, the pad will release from the workpiece.
When drilling through walls or ceilings, ensure to protect persons and the work area on the other side. The bit may extend through the hole or the core may fall out on the other side.
- When drilling overhead, always use the liquid collection device specified in the instructions. Do not allow water to flow into the tool. Water entering the power tool will increase the risk of electric shock.
2.3 Safety instructions for power drills
Safety instructions when using long drill bits
▶ Never operate at higher speed than the maximum speed rating of the drill bit. At higher speeds, the bit is likely to bend if allowed to rotate freely without contacting the workpiece, resulting in personal injury.
▶ Always start drilling at low speed and with the bit tip in contact with the workpiece. At higher speeds, the bit is likely to bend if allowed to rotate freely without contacting the workpiece, resulting in personal injury.
▶ Apply pressure only in direct line with the bit and do not apply excessive pressure. Bits can bend causing breakage or loss of control, resulting in personal injury.
2.4 Additional safety instructions
Personal safety
- Do not tamper with or attempt to make alterations to the product.
The product is not intended for use by debilitated persons who have received no special training.
▶ Keep clear of rotating parts. Switch the product on only after it is in position at the workpiece. Touching rotating parts, especially rotating accessory tools, can result in injury.
▶ Do not allow drilling slurry to come into contact with the skin or eyes.
- Dust produced by grinding, sanding, cutting and drilling can contain dangerous chemicals. Some examples are: lead or lead-based paints; brick, concrete and other masonry products, natural stone and other products containing silicates; certain types of wood, such as oak, beech and chemically treated wood; asbestos or materials that contain asbestos. Determine the exposure of the operator and bystanders by means of the hazard classification of the materials to be worked. Implement the necessary measures to restrict exposure to a safe level, for example by the use of a dust collection system or by the wearing of suitable respiratory protection. The general measures for reducing exposure include:
▶ working in an area that is well ventilated,
- avoidance of prolonged contact with dust,
- directing dust away from the face and body,
- wearing protective clothing and washing exposed areas of the skin with water and soap.
The diamond core drilling machine and the core bit are heavy. There is a risk of crushing parts of the body. The user and persons in the vicinity must wear suitable protective goggles, a hard hat, hearing protection, protective gloves and safety footwear while the product is in use.
Core bits and hole-starting aids can become hot in operation due to friction heat, particularly during dry drilling. Wear protective gloves when removing core bits or hole-starting aids.
▶ Improve the blood circulation in your fingers by relaxing your hands and exercising your fingers during breaks between working.
▶ If work involves break-through, always secure the area on the side opposite where the work is carried out. Pieces of debris could drop out and/or fall down and injure other persons.
- When securing the drill stand to the workpiece, make sure that the drill stand is soundly and securely connected to the workpiece. If the drill stand is not adequately connected to the workpiece, binding of an accessory tool can result in uncontrolled spinning of the drill stand.
- Ensure that the accessory tools used are compatible with the tool-holder system and that they are correctly secured in the tool holder.
When working with vacuum extraction, always guide the extraction hose to the rear and away from the product. This helps to avoid tripping over the extraction hose while working.
- When taking a break, lay the diamond core drilling machine down on a suitable surface where it will be safe. Wait until the diamond core drilling machine has come to a complete stop before you lay it down.
- Remove the batteries before removing the core or changing tools.
▶ Do not use damaged hoses.
▶ Make sure that the product is correctly and securely mounted on the drill stand.
▶ Always make sure that an end stop is installed on the drill stand as otherwise the safety-relevant end-stop function is not implemented.
- Set the drill stand on a firm, flat and horizontal surface. It will not be possible to guide the power tool smoothly and safely if the drill stand can slip or wobble.
▶ Check the nature of the surface. Rough surfaces may reduce holding power. Coatings or composite materials may pull away from the surface while you are working.
- Do not overload the drill stand and do not use the drill stand as a substitute for a ladder or platform. Overloading or standing on the drill stand can shift the drill stand's center of gravity to a higher position, causing it to tip over.
Electrical safety
Before beginning work, check the working area (e.g. using a metal detector) to ensure that no concealed electric cables or gas and water pipes are present. External metal parts of the product can become live, for example, when an electric cable is damaged accidentally. This constitutes a serious risk of electric shock.
▶ Never operate the product when it is dirty or wet. Dust (especially dust from conductive materials) or dampness adhering to the surface of the machine may, under unfavorable conditions, lead to electric shock. Dirty or dusty machines should thus be checked by Hilti Service at regular intervals, especially if used frequently for working on conductive materials.
Tip the diamond core drilling machine in order to empty a filled core bit. Make sure that the water does not get onto the diamond core drilling machine.
Workplace
- Approval must be obtained from the site engineer or architect prior to beginning drilling work. Drilling work on buildings and other structures may influence the static equilibrium of the structure, especially when steel reinforcing bars or load-bearing components are cut through.
- Do not switch on the diamond core drilling machine until it is in the desired position.
HILTI
If the drill stand is not properly fastened, always move the diamond core drilling machine mounted on the drill stand all the way down in order to prevent the stand from falling over.
- Keep the suction and vacuum hose away from rotating parts.
▶ Use of the vacuum securing method without an additional means of fastening is prohibited for drilling in an upward direction.
An additional means of securing the drill stand must be employed when the machine is used for horizontal drilling with the vacuum securing method.
▶ Check that the wooden subbase material is suitable for attachment by vacuum. If in doubt, always use the woodscrew or threaded spindle method of securing.
- When wet-drilling upward (drilling into overhead slabs), always use a water collection system whenever possible. In this way you prevent uncontrolled discharge of drilling slurry on to the diamond core drilling machine, your clothing or your skin.
2.5 Careful handling and use of batteries
- Comply with the following safety instructions for the safe handling and use of Li-ion batteries.
Failure to comply can lead to skin irritation, severe corrosive injury, chemical burns, fire and/or explosion.
▶ Use only batteries that are in perfect working order.
▶ Treat batteries with care in order to avoid damage and prevent leakage of fluids that are extremely harmful to health!
- Do not under any circumstances modify or tamper with batteries!
- Do not disassemble, crush or incinerate batteries and do not subject them to temperatures over 80 °C (176 °F).
▶ Never use or charge a battery that has suffered an impact or been damaged in any other way. Check your batteries regularly for signs of damage.
▶ Never use recycled or repaired batteries.
▶ Never use the battery or a battery-operated power tool as a striking tool.
▶ Never expose batteries to the direct rays of the sun, elevated temperature, sparking, or open flame. This can lead to explosions.
- Do not touch the battery poles with your fingers, tools, jewelry, or other electrically conductive objects. This can damage the battery and also cause material damage and personal injury.
- Keep batteries away from rain, moisture and liquids. Penetrating moisture can cause short circuits, electric shock, burns, fire and explosions.
▶ Use only chargers and power tools approved for the specific battery type. Read and follow the relevant operating instructions.
- Do not use or store the battery in explosive environments.
If the battery is too hot to touch, it may be defective. Put the battery in a place where it is clearly visible and where there is no risk of fire, at an adequate distance from flammable materials. Allow the battery to cool down. If it is still too hot to touch after an hour, the battery is faulty. Consult Hilti Service or read the document entitled "Instructions on safety and use for Hilti Li-ion batteries".

Observe the special guidelines applicable to the transport, storage and use of lithium-ion batteries.
Read the instructions on safety and use of Hilti Li-ion batteries that you can access by scanning the QR code at the end of these operating instructions.
2.6 Working in the rain
Products with the symbol on the type identification plate are classified and approved for working in the rain. The classification applies only to the product in ready-for-use condition (i.e. battery inserted) and cannot be considered as applicable to any given battery, even if it fits into the product.
These products may be used for working in the rain only if the battery is also classified for working in the rain. You can recognize classified and approved batteries by the IPX4 lettering on the type identification plate of the battery. Before starting work in the rain, check the type identification plate of the battery and the operating instructions of the battery to ascertain whether the battery has the corresponding classification and approval.
Important instructions for working in the rain
- For transporting and using the product in the rain, make sure that the batteries are always fully inserted and remain inserted for the entire duration of exposure to the rain.
-
When inserting and changing batteries, make sure that the product and the product's battery (particularly the contacts) remain dry. Move to a dry area when you have to change batteries and always keep the batteries where they remain dry.
-
Wear suitable clothing, make sure you have good visibility and take particular care to maintain firm footing when working in the rain. Wet surfaces can be extra-slippery or become unexpectedly slippery.
- Make sure that even when gripping surfaces are wet, you can always keep the product under control and operate it safely.
3 Description
3.1 Product overview
① Tool holder BI+
② Water swivel / suction head
③ Suction hose connector
④ Motor
⑤ Screw cap, flushing/suction head
⑥ Water flow regulator
⑦ Water supply
⑧ Multifunction display
⑨ Operating button
(Logbook & settings)
⑩ Operating button
(Hole-starting mode)
⑪ Switch on/switch off operating button
⑫ Operating button
(select a smaller core bit diameter)
⑬ Operating button+
(select a larger core bit diameter)
⑭ Rating plate
⑮ Interface plate (machine to drill stand)
⑯ Bay for battery
⑰ Release button, battery
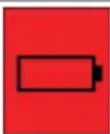
⑱ Battery status indicator
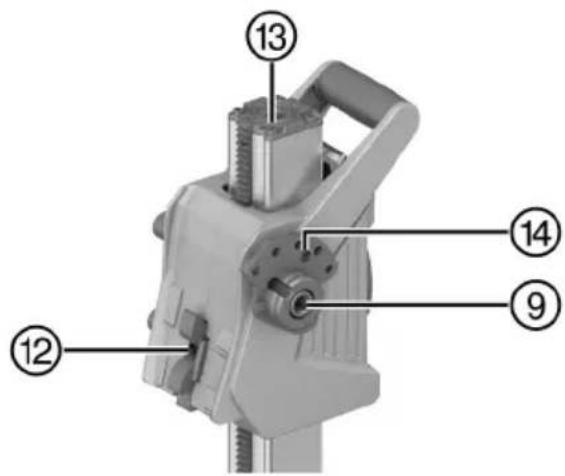
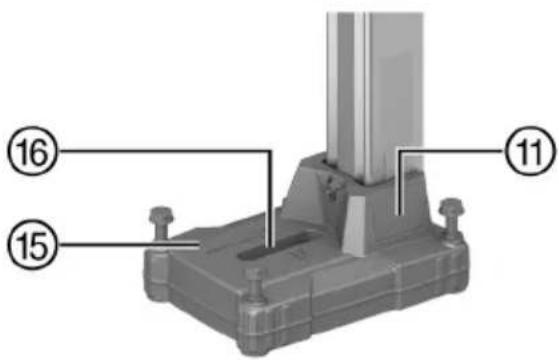
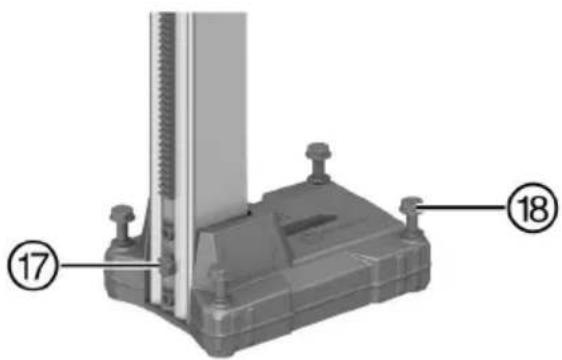
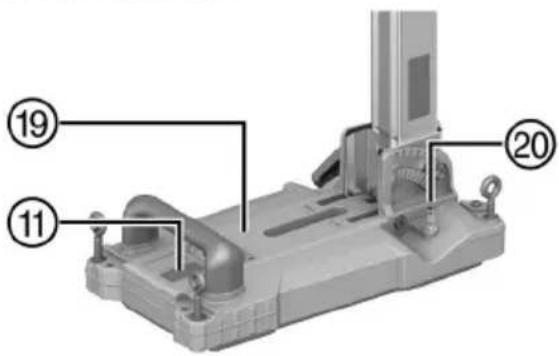
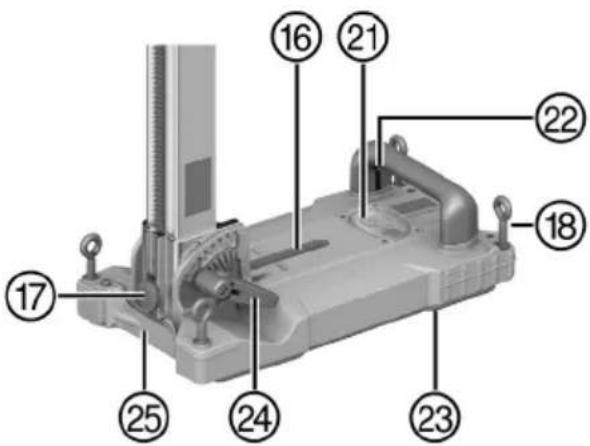
3.2 Overview, DD-ST 150-U CTL & DD-ST 22 110/150/160 (SFL & SFM) drill stands 2
① Column
② End stop screw
③ Grip
④ Carriage play adjusting screw
⑤ Leveling indicator
⑥ Carriage lock
⑦ Carriage
⑧ Supply cord holder
⑨ Hand wheel shaft
⑩ Locking pin (machine attachment)
⑪ Rating plate
⑫ Mount, interface plate
⑬ Rota-Rail adapter interface
⑭ Adapter interface for auto-feed unit
⑮ Anchor base plate
⑯ Mount, anchor
⑰ Water collector holder screw
⑱ Leveling screw (4×)
⑲ Combination base plate
⑳ Vacuum hose connector
②1 Leveling indicator and pressure gauge
②2 Vacuum release valve
②3 Vacuum seal
⑳ Adjusting lever, drilling angle setting
②5 Hole center indicator
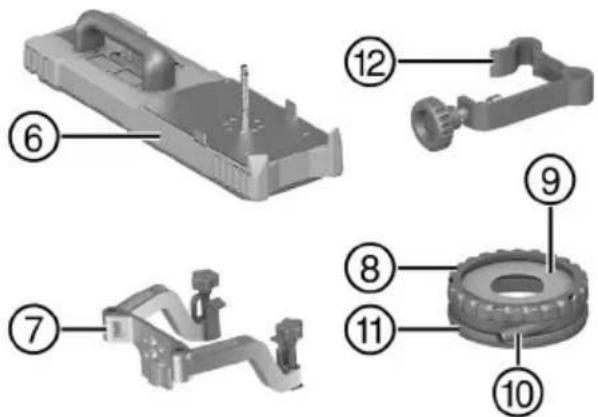
3.3 Accessories (optional) 3
① Hand wheel
② Lever
③ Wheel assembly
④ Threaded spindle
⑤ Rota-Rail (column swivel)
⑥ Vacuum base plate
⑦ Water collector holder
⑧ Water collector
⑨ Water collector sealing disk
⑩ Suction hose connector
⑪ Seal
⑫ Depth gauge
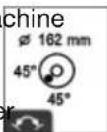
On the drill stand and on the vacuum base plate
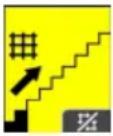
Upper half of the image: An additional means of securing the drill stand must be employed when the machine is used for horizontal drilling with the vacuum securing method.
Lower half of the image: Use of the vacuum securing method without an additional means of securing is prohibited for drilling in an upward direction.

On the diamond core drilling machine
This product is equipped with Bluetooth (optional).
3.5 Items supplied
Diamond core drilling machine, operating instructions, case

Other system products approved for use with this product can be found at your local Hilti Store or at: www.hilti.group
3.6 Intended use
The product described is an electrically powered diamond core drilling machine. It is designed for the stand-guided drilling of through-holes and blind holes in (reinforced) mineral materials and materials made of wood. Hand-held use of the diamond core drilling machine is not permitted.
This product is designed for stand-guided operation.
This product is designed for dry drilling.
This product is designed for wet drilling.
▶ Always use a drill stand when using the diamond core drilling machine.
The drill stand must be sufficiently anchored in the base material by an anchor base plate or vacuum base plate.
- Do not use a hammer or other heavy object to adjustment the base plate.
- For this product, use only Hilti Nuron lithium-ion batteries of the B 22 series. For optimum performance, Hilti recommends the batteries stated in the table at the end of these operating instructions for this product.

Further development of the Hilti battery portfolio is ongoing, so more powerful batteries might be available.
For products of this performance class use the Hilti battery type with the highest range and power, in order to make full use of the product's performance capabilities. Suitable batteries from the current portfolio can be found on the product page at www.hilti.group.
- For these batteries, use only Hilti chargers of the type series stated in the table at the end of these operating instructions.
This product is designed for dry drilling in wood, in combination with special core bits.
3.7 Data transfer
This product is designed to enable communication and data transfer with mobile devices and gateways and transmit product-related data attributes via this connection. To do this you need an active Bluetooth connection and the Hilti 'ON!Track' app installed on your mobile device or an active gateway, such as the Charger Data Module adapter in combination with a Hilti charger.
The data that can be transmitted include the following:
- Location of the receiving device
- Fault messages
- Running time
- Total number and total duration of the applications
• Number and duration over the course of an interval
- Timestamp of the data transmission
Also see the section headed "Logbook & settings" 18

More information about the connectivity functions offered can be found in the respective Hilti app or in the operating instructions of the product used.
3.8 Status indicators of the Li-ion battery
Hilti Nuron Li-ion batteries can indicate state of charge, fault messages and the battery's state of health.
3.8.1 Indicators for state of charge and fault messages

WARNING
Risk of injury by a falling battery!
If the release button is pressed with a battery inserted in the product, subsequently check that the battery is correctly re-engaged and secure.
Short-press the release button of the battery to get whichever of the following status indications is applicable at the time.
State of charge and, if applicable, faults are indicated constantly as long as the connected product is switched on.
| Status Meaning | |
| Four (4) LEDs show constantly green State of charge: 100 % to 71 % |
| Three (3) LEDs show constantly green | State of charge: 70 % to 51 % |
| Two (2) LEDs show constantly green | State of charge: 50 % to 26 % |
| One (1) LED shows constantly green | State of charge: 25 % to 10 % |
| One (1) LED slow-flashes green | State of charge: < 10 % |
| One (1) LED quick-flashes green | The Li-ion battery is completely discharged. Recharge the battery.If the LED again starts quick-flashing after the battery has been charged, consultHilti Service. |
| One (1) LED quick-flashes yellow | The Li-ion battery or the product in which it is inserted is overloaded, too hot or too cold, or experiencing some other fault.Bring the product and the battery to the recommended working temperature and do not overload the product when it is in use.If the message persists, consultHilti Service. |
| One (1) LED shows yellow | The Li-ion battery and the product in which it is inserted are not compatible. ConsultHilti Service. |
| One (1) LED quick-flashes red | The Li-ion battery is locked and cannot be used. ConsultHilti Service. |
3.8.2 Indicators showing the battery's state of health
To check the battery's state of health, press the release button and hold it down for longer than three seconds. The system does not detect a potential malfunction of the battery due to misuse, for example battery dropped or pierced, external heat damage, etc.
| Status Meaning | |
| All LEDs show in sequence, followed by one (1) LED showing constantly green. | The battery can remain in use. |
| All LEDs show in sequence, followed by one (1) LED quick-flashing yellow. | The check to ascertain the battery's state of health did not complete. Repeat the procedure, or consult Hilti Service. |
| All LEDs show in sequence, followed by one (1) LED showing constantly red. | If a connected product can still be used, the remaining battery capacity is below 50%. If a connected product can no longer be used, the battery has reached the end of its useful life and has to be replaced. Consult Hilti Service. |
On the type identification plate you can find various performance data ratings, for example 1400 W and 1650 W S6 40%. This information is to be interpreted as follows:
1400 W
- This performance rating states the product's continuous power rating. You can operate the diamond core drilling machine without time limit at this power.
1650 W S6 40%
- This performance rating states a load cycle at a power of 1650 watts. You can operate the diamond core drilling machine for 4 minutes without interruption at this power. Alternating with low load, also without time limit.
3.10 Active Torque Control (ATC)
The product is equipped with the ATC (Active Torque Control) quick-acting electronic cut-out.
If the core bit sticks or stalls, the product will suddenly pivot about its own axis in the opposite direction. ATC detects this sudden pivoting movement of the product and switches the product off immediately.

After an ATC cut-out, switch the product off and then on again.

If binding or jamming of the core bit does not cause deflection of the diamond core drilling machine, the motor switches to a pulsation function. This prevents the core bit from seizing completely in the base material. Reduce contact pressure until the core bit can move freely again. The diamond core drilling machine automatically ramps back up to the preset speed.
4 Preparations at the workplace
Observe the safety instructions and warnings in these operating instructions and on the product.
4.1 Charging the battery
- Before charging the battery, read the operating instructions for the charger.
- Make sure that the contacts on the battery and the contacts on the charger are clean and dry.
- Use an approved charger to charge the battery.
4.2 Inserting the battery
WARNING
Risk of injury by short circuit or falling battery!
Before inserting the battery, make sure that the contacts on the battery and the contacts on the product are free of foreign matter.
▶ Make sure that the battery always engages correctly.
- Charge the battery fully before using it for the first time.
- Push the battery into the product until it engages with an audible click.
- Check that the battery is seated securely.
4.3 Removing the battery
- Press the battery release button.
- Remove the battery from the product.
4.4 Securing drill stand

WARNING
Risk of injury! When a drill stand is used, it can spin or topple if it is not adequately secured.
Before using the diamond core drilling machine, secure the drill stand to the work surface with anchors or with a vacuum base plate.
- Use only anchors suitable for the base material and comply with the anchor manufacturer's instructions.
▶ Use a vacuum base plate only when the work surface is suitable for securing the drill stand by the vacuum method.
When securing the drill stand to the workpiece, make sure that the drill stand is soundly and securely connected to the workpiece.
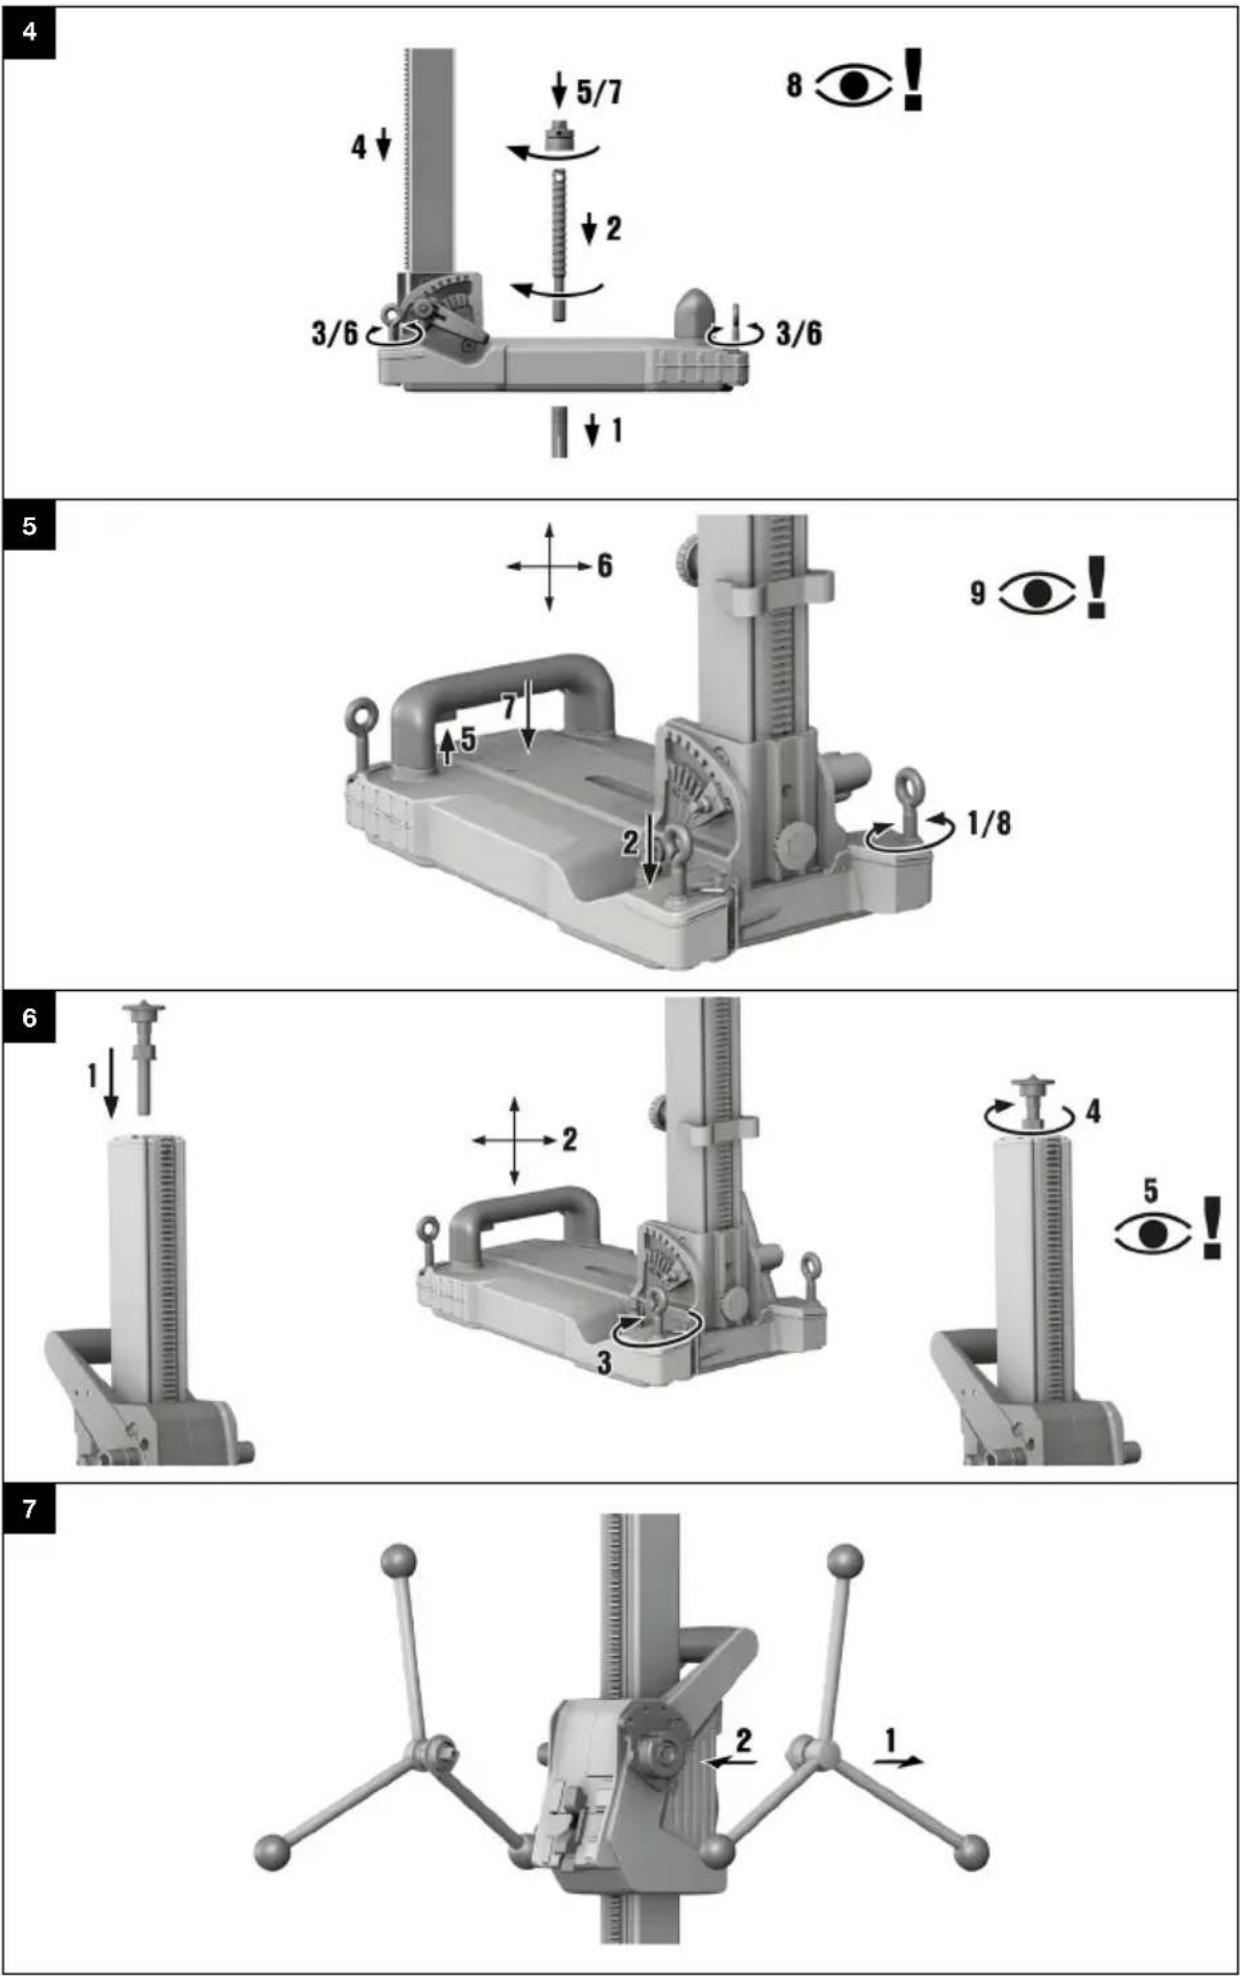
4.4.1 Securing the drill stand with an anchor 4
- Use the anchor that is suitable for the corresponding base material (Hilti metal expansion anchor M16).
- Screw the anchor spindle into the anchor.
- Back off all leveling screws until the base plate is flush with the surface.
- Slip the drill stand over the clamping spindle and align the drill stand.
- Screw the clamping spindle nut on to the clamping spindle but do not tighten it.
-
Level the base plate by turning the 4 leveling screws.
▶ All leveling screws make be seated firmly on the surface.
-
Tighten the clamping spindle nut with a suitable open-end wrench.
-
Check that the drill stand is secure.
4.4.2 Securing the drill stand by vacuum 5

DANGER
Risk of injury if the diamond core drilling machine falls!
- Fastening the drill stand to the ceiling only by means of the vacuum securing method is not permissible. A heavy structural support or a threaded spindle, for example, can serve as an additional means of fastening.

WARNING
Risk of injury if pressure is not checked!
Before and during drilling, check that the pressure gage pointer remains in the green zone.

In order to use the drill stand with anchor base plate, establish a secure, flat-on-flat connection between vacuum base plate and anchor base plate. Screw the anchor base plate securely to the vacuum base plate. Make sure that the core bit selected for use will not damage the vacuum base plate.
If you are going to drill horizontally, use additional means of securing the diamond core drilling machine (e.g. chain secured to anchor).
Before positioning the drill stand, check that you have sufficient space for assembly and operation.
- Turn all the leveling screws until they project approx. 5 mm underneath the base plate.
- Connect the vacuum connector of the base plate to the vacuum pump.
- Locate the center point of the hole to be drilled. Draw a line from the center of the hole to be drilled in the direction in which the machine is to be positioned.
- Make a mark on the line at the specified distance from the center of the hole to be drilled.
- Switch on the vacuum pump and press and hold the vacuum release valve.
HILTI
- Line up the mark on the base plate with the line.
- When the drill stand has been positioned correctly, release the vacuum release valve and press the base plate against the base material.
- Use the leveling screws to level the base plate.
- Check that the drill stand is secure.
4.4.3 Securing drill stand with woodscrew
Use this method of attachment only for drilling in wood. For drilling in other subbase materials, always use the method of attachment by anchoring 13 or (if the subbase material is suitable) by vacuum 13.
For secure attachment you must use woodscrews with a minimum tensile strength rating of 11 kN.
- Screw a suitable woodscrew with matching washer through the slot into the subbase material.

Tighten the screw only to the point at which you can still level the drill stand.
- Level the base plate by turning the 4 leveling screws.
▶ All leveling screws make be seated firmly on the surface.
-
Fully tighten the woodscrew in the subbase material.
-
Check that the drill stand is secure.
4.4.4 Fastening the drill stand with the threaded spindle 6
- Secure the threaded spindle at the top end of the column.
- Position the drill stand on the work surface.
- Use the leveling screws to level the base plate.
- Secure the drill stand with the threaded spindle and tighten the threaded spindle.
- Check that the drill stand is secure.
4.5 Fitting the hand wheel on the drill stand 7

The hand wheel may be fitted on the left-hand or on the right-hand side of the carriage.
- Pull the black ring back to fit the hand wheel.
- Fit the hand wheel onto the axle.
4.6 Assembling diamond core drilling machine
4.6.1 Installing diamond core drilling machine on drill stand 8

Check the play between rail and carriage before starting operation.
- Lock the carriage of the drill stand on the rail with the carriage lock.
- Mount the hand wheel on the locking pin and pull the locking pin out.
- Engage the interface plate on to the hook on the drill stand.
- Push the locking pin in and use the hand wheel to tighten it securely (turn clockwise).
4.6.2 Detaching the diamond core drilling machine from the drill stand
- Lock the carriage of the drill stand on the rail with the carriage lock.
- Connect the water flow regulator to the diamond core drilling machine.
- Disconnect the water supply.
- Use the hand wheel to release the locking pin (turn counterclockwise).
- Pull out the locking pins.
- Pivot the machine away from the drill stand.
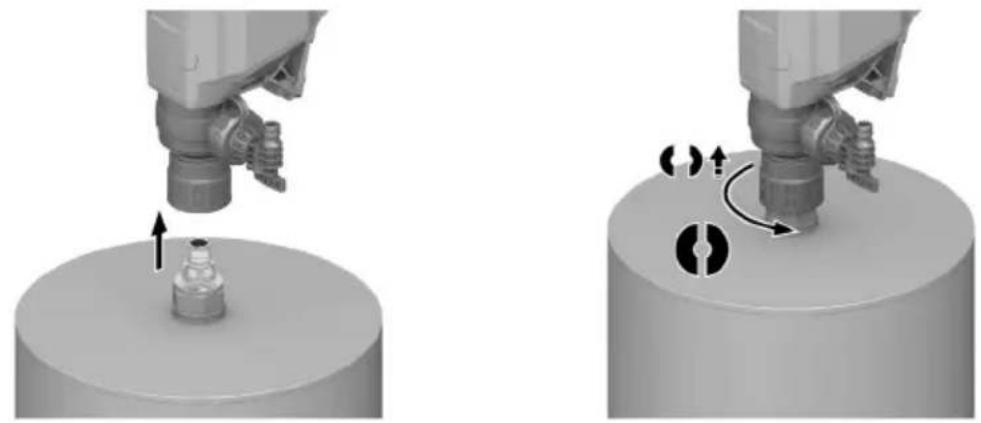
4.7 Fitting the core bit 9

DANGER
Risk of injury Fragments of the workpiece or of broken insert tools may be ejected and cause injury beyond the immediate area of operation.
- Do not use damaged insert tools. Check the insert tools for chipping, cracks, or heavy wear each time before use.

CAUTION
Risk of injury when changing the tool! The tool becomes hot as a result of use. It may have sharp edges.
▶ Always wear protective gloves when changing the tool.

Diamond core bits must be replaced when the cutting performance and/or rate of drilling progress drops significantly. This generally is the case when the diamond segments reach a height of less than 2 mm (1/16 in).
- Lock the carriage of the drill stand on the rail with the carriage lock.
- Select one of the following alternatives.
Alternative 1/2
- From below, push the core bit on to the splines of the tool holder on the diamond core drilling machine and turn it until it engages.
- Close the tool holder by turning it in the direction of the symbol.
▶ Check that the core bit is secure in the tool holder.
Alternative 2/2

WARNING
Risk of injury by falling parts! Core bits that become detached can fall down and lead to injuries.
- Make sure that all threaded connections between core bit and diamond core drilling machine are securely connected to each other. Avoid the use of products such as copper rings that facilitate loosening of the threads.
- Lock the drive spindle with a suitable open-end wrench.
▶ Tighten the core bit with a suitable open-end wrench.
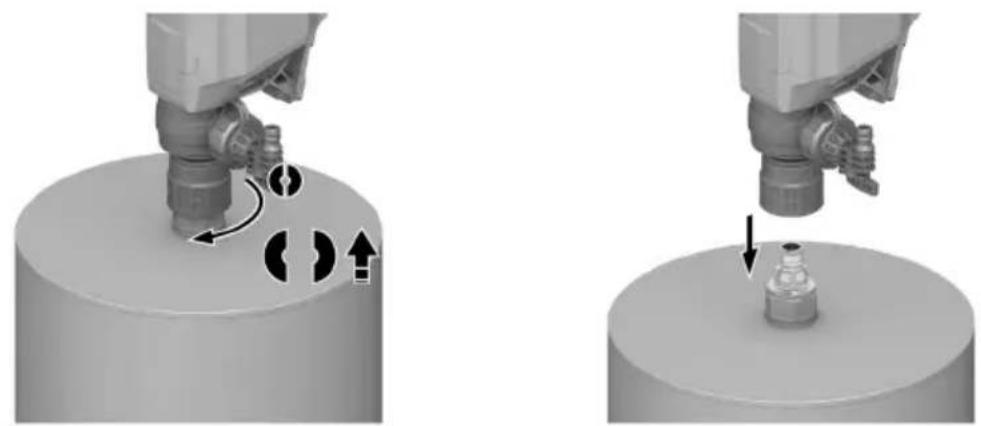
4.8 Removing core bit


CAUTION
Risk of injury when changing the tool! The tool becomes hot as a result of use. It may have sharp edges.
▶ Always wear protective gloves when changing the tool.
- Lock the carriage of the drill stand on the rail with the carriage lock.
- Select one of the following alternatives.
Alternative 1/2
▶ Open the tool holder by turning it in the direction of the symbol.
▶ Pull the sleeve on the tool holder in the direction of the arrow towards the diamond core drilling machine.
▶ The core bit is unlocked.
▶ Remove the core bit.
Alternative 2/2
- Lock the drive spindle with a suitable open-end wrench.
▶ Release the core bit with a suitable open-ended wrench.
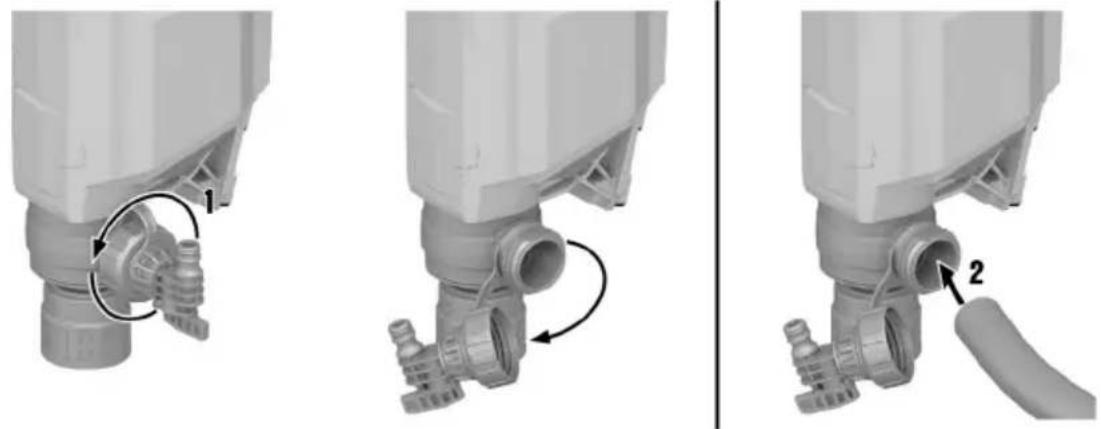
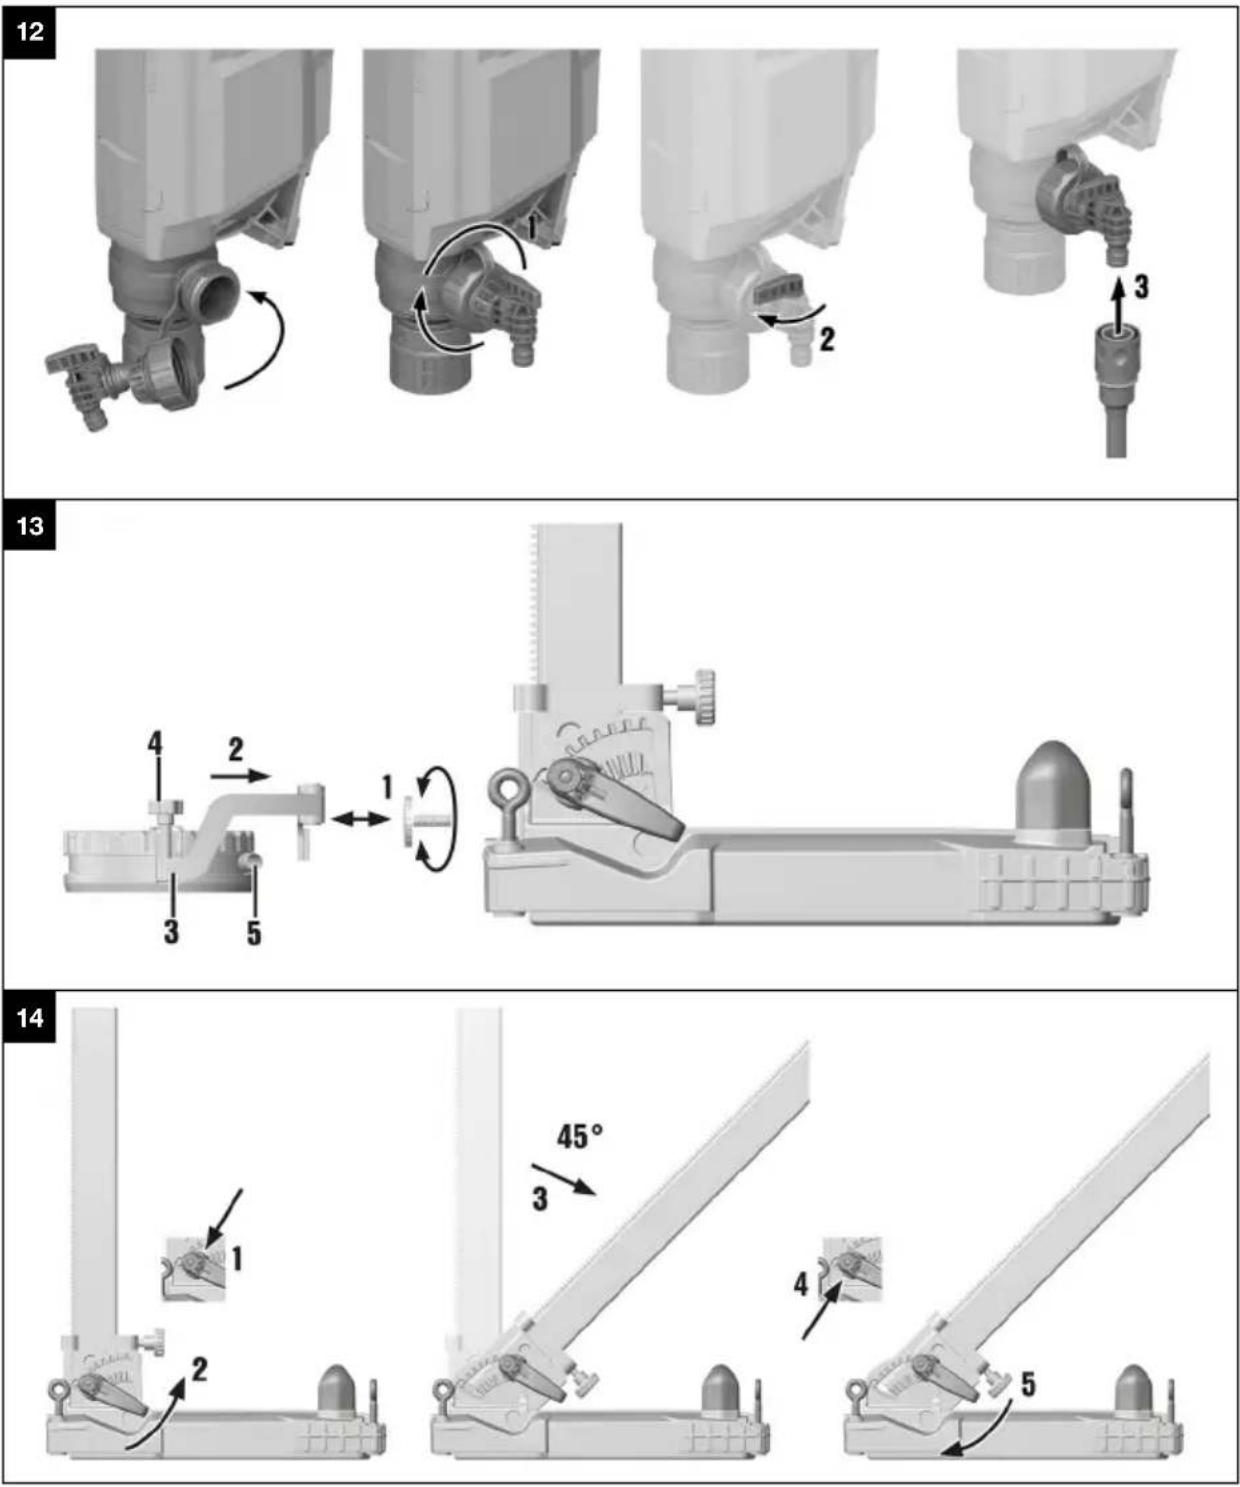
4.9 Connecting the vacuum removal system 11
- Open the screw cap of the dust removal connector on the suction head.
- Push the suction hose into the suction hose connector.
4.10 Preparations for wet drilling
4.10.1 Fitting the water supply connection 12

ATTENTION
Hazard due to incorrect use! Incorrect use can result in irreparable damage to the hose.
▶ Regularly check the hose for damage and make sure that the maximum permissible water supply pressure is not exceeded (see "Technical data 30").
▶ Make sure that the hose does not come into contact with rotating parts.
▶ Make sure that the hose is not damaged as the carriage advances.
- Comply with the maximum water temperature as stated in the section headed Technical data 30.
▶ Check the water supply system to ensure there are no leaks.

To avoid damage to the components, use only fresh water containing no dirt particles.
- Close the screw cap of the flushing/suction head.
- Connect the water flow regulator to the diamond core drilling machine.
- Connect the water supply (hose coupling).
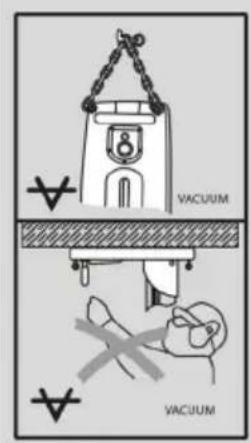
4.10.2 Install water collection system for drill stand (accessory) 13

The diamond core drilling machine must be at a 90^ angle to the slab. The water collector sealing disk must match the diamond core bit diameter.
Use of the water collection system allows water to be led away under control, thus preventing the surrounding area from being heavily soiled.
- Remove the water collector holder screw from the drill stand.
- Install the water collector holder on the drill stand with the water collector holder screw.
- Position the water collector, with the water collector sealing disk installed, between the two movable arms of the holder.
- Press the water collector against the work surface by turning the two screws on the water collector holder.
- Connect a wet-type industrial vacuum cleaner to the water collector or establish a hose connection through which the water can drain away.
4.11 Setting the depth gage (accessory)
- Turn the hand wheel until the core bit is in contact with the base material.
- Set the desired drilling depth by adjusting the distance between the depth gage and the carriage.
- Lock the depth gage in position.
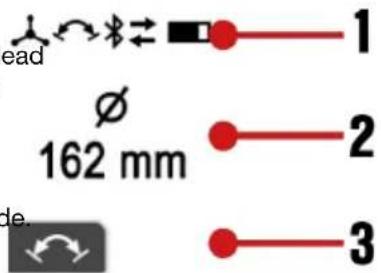
4.12 Adjusting the drilling angle when using the drill stand with combination base plate 14

CAUTION
Risk of crushing the fingers in the articulation! Release of the clamping mechanism can result in sudden tip-over of the drill stand.
▶ Wear protective gloves.
- Secure the drill stand against tip-over before releasing the clamping mechanism.
- Set the knob to the "Reverse" position.
- At the foot of the drill stand, release the adjusting lever until the sliding nuts are disengaged.
- Adjust the column to the desired detent position.
-
Set the knob to the "Forward" position.
-
Tighten the adjusting lever until the sliding nuts are fully engaged and the column is again secured in position.
4.13 Adjusting the play between the rail and carriage
- Use a hex key to tighten the adjusting screws hand-tight (5 Nm).
-
Slacken the adjusting screws slightly by turning back a 1/4 turn.
-
The carriage is correctly adjusted when it remains in position without a core bit but moves down when a core bit is fitted.
4.14 Using the Rota-Rail (column swivel)

The Rota-Rail allows quick and easy access to the hole or core being drilled, with no need to partly or fully dismantle the system.

WARNING
Risk of injury caused by incorrect use! The drill stand can be damaged or it can break.
▶ Never use the Rota-Rail as a column extension.
- Lock the carriage with the carriage lock. Check to ensure that it is securely fastened.
- Remove the end stop screw from the rear section of the column and install the end stop screw on the rear section of the Rota-Rail.
- Attach the Rota-Rail so that the toothed racks are facing the same direction.
- Tighten the screw on the Rota-Rail securely.
- Release the carriage lock and run the carriage along the rail on to the Rota-Rail.
- Slacken the securing screws of the Rota-Rail and turn the device to the left or right with the Rota-Rail. This will give you access to the drill hole.
- Remove the core or change the core bit.
- Turn the tool with the Rota-Rail back to its original position and tighten the securing screws of the Rota-Rail. Move the tool back to the column of the stand to resume work.
- After removing the Rota-Rail, refit the end stop screw on the rear section of the column.
5 Operation
5.1 Switching diamond core drilling machine on or off
Waking up/switching on product
- Press the operating button.
The multifunction display lights up and shows the start screen with bar indicator for state of charge.
▶ The product is ready for use.
Switching motor on
- Press the operating button.
Switching motor off
- Press the operating button.
Switching product off
- Press the operating button and hold it down for several seconds.
The multifunction display goes out and the product is switched off.

In cordless operation, the diamond core drilling machine switches off automatically after approx. 30 minutes.
5.2 Multifunction display
Basics and layout
The diamond core drilling machine has a multifunction display. The multifunction display enables real-time data to be read, for example, and parameters to be set on the diamond core drilling machine. The multifunction display is active as soon as a battery is inserted into the diamond core drilling machine and the diamond core drilling machine is switched on 17.
HILTI
The multifunction display is divided into 3 main areas:
- Status area
Shows current settings and warnings that do not lead to an immediate stop of the diamond core drilling machine (the background of the status area turns black).
- Information area
Shows information about the current operating mode.
- Context-function area
Shows additional functions depending on operating mode. The functions are activated or deactivated by means of the operating button directly below the context function.
Acute warnings and faults
Warnings and fault messages during drilling operations appear in the multifunction display.
Warnings about system status show with a black back ground in the multifunction display.

Under certain circumstances the product remains ready for use, subject to restrictions. With a slight effort you can return the product to fully ready for use condition.
Faults in the system show with a red background in the multifunction display. The fault must be actively rectified in order to return the product to ready for use condition. Details on information and faults are to be found in the Troubleshooting section.

5.3 Display after powering up
Immediately after the diamond core drilling machine is switched on/woken up, the multifunction display shows the start screen for a few seconds. Current Bluetooth status, the user-defined name and the serial number of the diamond core drilling machine are shown in the st screen.


You can change the user-defined name of the diamond core drilling machine in the 'ON!Track' app. The default is 'Your name here'.
As long as the motor of the diamond core drilling ma is not switched on, the start screen is followed by information on the current orientation of the drilling system and the currently set core bit diameter/diameter range or the selected speed (in rpm).
The display helps with setting up the system, e.g. selecting the correct speed for the core bit used, leveling the drilling system and orienting the drill stand (stand-guided models) for drilling at an angle. The display shows the orientation of the diamond core drilling machine in graphic form as a circular bubble level and as a readout in degrees.

Angular accuracy at room temperature is ±2^ .
5.4 Logbook & settings
To access the logbook and settings, press the operating button. Step through the menu items by repeatedly pressing the operating button.
You can make an optional setting when the context function appears in the menu item. You make the setting by pressing the operating button below the symbol.
The setting is saved when:
- The menu item is exited after a few seconds without any input by you.
• You press the operating button again.

The following displays may differ, depending on the product version and on the application.
| Display icons | Description |
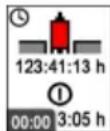 | The display shows drilling time (diamond core drilling machine time actually drilling since the last reset) at the top and operating hours (diamond core drilling machine switched on) at the bottom. Both figures are shown in hours, minutes and seconds.Context function: Reset drilling time and all other logbook data. |
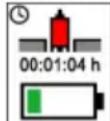 | The display shows remaining drilling time, in hours minutes and seconds, until battery discharge to empty.This forecast is based on energy demand over the last 3 minutes and can differ from reality if operating conditions change. |
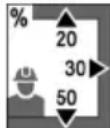
 | The display shows contact pressure during drilling time in %. Applying an optimum contact pressure can optimize performance and service life of the core bit.An up arrow indicates that contact force can be increased to some extent. A down arrow indicates that contact force should be reduced in general. |
 | The display shows a distribution of drilling time in % for each drilling direction. |
 | The display shows the duration of use of the respective diameter range setting in %. |
 | The display provides an overview of all system products and accessories connected to the diamond core drilling machine. |
 | This setting enables the unit of measure displayed for diameter to be toggled between millimeter [mm] and inch [in]. |
 | This setting enables the display for speed to be toggled between 'exact diameter' (default), 'diameter range' and 'revolutions per minute' ([rpm]). |
5.5 Adapting speed to core bit diameter

Notes on speed:
- Whenever necessary, the unit for diameter can be toggled between millimeter [mm] and inch [in] in the settings. Also see the section headed "Logbook & settings" 18.
- You can adapt the display for the speed setting and toggle between 'exact diameter' (default), 'diameter range' and 'revolutions per minute' ([rpm]. → Also see the section headed "Logbook & settings" 18.
- Depending on core-bit specification, material being drilled, water flow rate, contact pressure and other parameters, increasing or decreasing the speed setting can have a performance-optimizing effect. If the rate of drilling progress diminishes, increasing the diameter setting (speed decreases and torque increases) can have a sharpening effect on the core bit and generally may also be the better choice when the proportion of rebar in the material is high. Conversely, if the material is easily drilled and/or its proportion of rebar is low, a smaller diameter setting can increase the rate of drilling progress.
- If the motor of the diamond core drilling machine is switched on and is idling at no load, the current setting is displayed. The display helps ensure that the parameter settings are suitable for the core bit used.
HILTI
- Press the button or the button to view the current setting.
- Select one of the following alternatives.
Alternative 1/2
- Press the button again to adapt the setting to larger-diameter core bits.
In 'Diameter' mode you increase the diameter → speed decreases.
In 'Speed' mode you increase speed directly.

You can keep the operating button pressed down. Long-pressing increases the rate at which the setting changes.
Alternative 2/2
- Press the button again to adapt the setting to smaller-diameter core bits.
In 'Diameter' mode you reduce the diameter → speed increases.
▶ In 'Speed' mode you decrease speed directly.

You can keep the operating button pressed down. Long-pressing increases the rate at which the setting changes.
5.6 Hole-starting mode
The hole-starting mode makes it easier to start holes with low vibration when using large-diameter core bits. Activate the hole-starting mode with the motor running without load (idling at no load), by pressing the operating button.
The diamond core drilling machine is drilling and the hole-starting mode is active. The display shows the time remaining until the diamond core drilling machine automatically switches off.


To protect the diamond core drilling machine, the hole-starting mode switches off automatically after a maximum of 2 minutes.
You can switch the hole-starting mode off manually by pressing the operating button again while hole-starting mode is active.
The diamond core drilling machine automatically ramps speed up to the preset value.

You can also deactivate the function by changing the preset core bit diameter or the speed, or by switching off the motor of the diamond core drilling machine.
The drilling performance indicator helps you find the optimum contact pressure for drilling.

The drilling performance indicator of the diamond core drilling machine adapts automatically to the battery type used. Consequently, you always have the maximum achievable battery range with whichever battery type you use.
| Drilling | Drilling with Iron Boost | Description |
 | |  | | Contact pressure is too low. Increase the contact pressure.Background color: Yellow. |
 | |  | | Contact pressure is at the optimum level.Background color: Green. |
| Drilling Drilling with Iron Boost | Description |
 | |  | Contact pressure is too high. Reduce the contact pressure. Background color: Red. |
5.8 Function Iron Boost
A significant reduction in the rate of drilling progress can be indicative of a rebar hit. The Iron Boost function increases torque so that rebars can be cut through as efficiently as possible.
Use the Iron Boost function only for drilling in reinforced concrete. Switch the function off again when the rebar has been drilled through. This will help extend the life of the core bit.
Activating or deactivating Iron Boost function
▶ Activate the function by pressing the context-function button while drilling is in progress.
▶ Deactivate the function by pressing the context-function button while drilling is in progress.

You can also deactivate the function by changing the preset core bit diameter or the speed, or by switching off the motor of the diamond core drilling machine.

Important instructions for working upward:
- Use of the water collection system in combination with a wet vacuum cleaner is recommended for wet drilling.
- Before opening the water supply, make sure that the wet vacuum cleaner is switched on. Close the water supply before the wet vacuum cleaner is switched off.
- Do not use the power socket on the wet vacuum extractor.
5.9.1 Wet-drilling with the drill stand
- Optional: Install a water collection system approved by Hilti for the diamond core drilling machine.
- Release the carriage locking mechanism.
- Turn the hand wheel until the core bit is in contact with the work surface.
- Configure the system application and select a connection method for the connection between diamond core drilling machine and wet vacuum cleaner or water management system (e.g. Bluetooth).

Follow the instructions for establishing and using a Bluetooth connection in the operating instructions of the wet vacuum cleaner or water management system used.
- Slowly open the water flow regulator until the water flows at the desired rate.
- Start the motor of the diamond core drilling machine. 17
- When you start drilling apply only light pressure until the core bit has centered itself. Then apply more pressure.
- Regulate the contact pressure while observing the drilling performance indicator.

When you switch off the diamond core drilling machine after the drilling operation, allow the wet vacuum cleaner or the water management system to keep running for a few seconds. This will allow residual material to be removed from the extraction system.
5.10.1 Instructions for drilling in wood

Always comply with the instructions for use in the operating instructions of the core bit specified for wood drilling operations.
For drilling in wooden subbase materials, always use the dry-drilling method and a core bit specified for wood drilling operations. This will avoid excessive damage to the subbase material, and dry drilling chips are easier to collect.
HILTI
- Wet or damp drilling chips can clog the suction channel. Before wet drilling, check that the water swivel/suction head is as clear of drilling chips as possible. After wet drilling, allow the water swivel/suction head to dry.
▶ Follow the instructions for dry drilling with dust extraction 22.
- Connect the vacuum-cleaner hose to the dust removal adapter of the suction head.
- Establish the power supply to the vacuum cleaner.
- Configure the system application and select a connection method for the connection between diamond core drilling machine and vacuum cleaner (e.g. Bluetooth).

Follow the instructions for establishing and using a Bluetooth connection in the operating instructions of the vacuum cleaner used.
- Center the diamond core drilling machine where the hole is to be drilled.
- Start the motor of the diamond core drilling machine. 17
- Regulate the contact pressure while observing the drilling performance indicator.

When you switch off the diamond core drilling machine after the drilling operation, allow the vacuum cleaner to keep running for a few seconds. This will allow residual material to be removed from the extraction system.
When you perform dry drilling without dust extraction, use slotted core bits. Drilling upward (e.g. drilling into overhead slabs) is permissible only with dust extraction.
Always wear suitable respiratory protection when dry drilling.
- Center the diamond core drilling machine where the hole is to be drilled.
- Start the motor of the diamond core drilling machine. 17
- Regulate the contact pressure while observing the drilling performance indicator.
5.11 Core removal
The product has a core removal function. This function enables you to free a core stuck in the core bit.
- With the diamond core drilling machine ready for use and the core bit stationary, you can activate the function by pressing the operating button below the context function.
- When the function is activated, a message appears in the multifunction display.
- Hold the diamond core drilling machine with the core bit down and vacuum extraction switched off.
- Start the motor of the diamond core drilling machine. 17
The diamond core drilling machine starts a back-and-forth action to shake the core out of the core bit.
- You can deactivate the function by pressing the operating button below the context function.

To protect the product, the function is switched off automatically after 30 seconds.
You can also deactivate the function by changing the preset core bit diameter or the speed, or by switching off the motor of the diamond core drilling machine.
The core removal function works best with the Hilti BI+ tool-holder system. Other tool-holder systems or adapters can lead to function restrictions.
5.12 Bluetooth ^® (optional)
Depending on the product variant, this product has Bluetooth.
Bluetooth is a wireless data transfer system by which the two Bluetooth-enabled products can communicate with each other over a short distance.
To ensure a stable Bluetooth connection there must be a clear line of sight between the connected devices.
Bluetooth functions of this product
• Control and function optimization of the paired Hilti products.
• Service and status messages of the paired Hilti products are shown on the display of the diamond core drilling machine.
Consult the operating instructions of the paired products for detailed descriptions of the Bluetooth functions.
- Connection with a mobile terminal device via app for service functions and for transmission of product-related logbook data.
Installing and configuring 'ON!Track' app
You need the 'ON!Track' app in order to use all the connectivity functions.
Download the 'ON!Track' app from your operating system provider's app store, or scan this QR code:

When you start the 'ON!Track' app for the first time, either log in with your user account or register. After logging in successfully, follow the instructions issued by the 'ON!Track' app to pair your products with the mobile device.

We recommend you begin by working your way through the tutorial from start to finish. This will give you an overview of how the connection is established and of the other connectivity functions in the 'ON!Track' app.
Switching Bluetooth on or off

Hilti products ship ex-works with Bluetooth deactivated. Bluetooth switches itself on automatically during initial operation.
Switch off:
- To switch off, simultaneously press and hold down the and buttons for at least 10 seconds.


The diamond core drilling machine can no longer be connected to other products.
Switch on:
- To switch on, simultaneously press the and buttons.

Connecting products
The pairing with a Bluetooth-compatible Hilti device is sustained until the diamond core drilling machine is connected to another Hilti device of the same type or Bluetooth is switched off. Pairing is also sustained even when the products are switched off and then on again; paired products always automatically re-establish their paired connection.
To pair with a Bluetooth-compatible Hilti device or mobile device, with Bluetooth switched on simultaneously press the and buttons.

The time window for pairing with a Bluetooth-compatible Hilti device is 2 minutes. When the 2 minutes have expired, the connection process will be canceled.

The time is shown on the multifunction display as an expiring time bar.
6.1 Instructions for care of diamond core drilling machines
WARNING
Risk of injury! Care and maintenance with batteries inserted!
Remove the battery from the diamond core drilling machine before undertaking care and maintenance work.
- Do not use high-pressure cleaners, steam pressure cleaning equipment or running water for cleaning.
- Clean the chuck and the clamping segments with a cloth at regular intervals and lubricate the parts with Hilti lubricant spray.
- Remove all particles of foreign matter from the chuck.
▶ Carefully remove stubborn dirt.
▶ Use only a slightly damp cloth to clean the housing. Do not use cleaning agents containing silicone as these can attack the plastic parts.
- Do not permit foreign matter to enter the interior of the tool.
- Carefully clean the air vents, if present, with a dry, soft brush.
▶ Clean the contacts with a dry, clean cloth.
6.2 Care of the Li-ion batteries
- Never use a battery with clogged air vents. Clean the air vents carefully using a dry, soft brush.
- Avoid unnecessary exposure of the battery to dust and dirt. Never expose the battery to high levels of moisture (e.g. by being dipped in water or left in the rain).
If a battery has been soaked by moisture, treat it as a damaged battery. Isolate it in a non-flammable container and consult Hilti Service.
- Keep the battery free of extraneous oil and grease. Do not permit dust or dirt to accumulate unnecessarily on the battery. Clean the battery with a dry, soft brush or a clean, dry cloth.
Do not touch the contacts of the battery and do not remove the factory-applied grease from the contacts.
- Use only a slightly damp cloth to clean the housing.
- Do not use cleaning agents containing silicone as these can attack the plastic parts.
6.3 Maintenance
WARNING
Danger of electric shock! Improper repairs to electrical components may lead to serious injuries including burns.
- Repairs to the electrical section of the tool or appliance may be carried out only by trained electrical specialists.
- Check all visible parts and controls for signs of damage at regular intervals and make sure that they all function correctly.
- Do not use the product if signs of damage are found or if parts malfunction. Immediately have the product repaired by Hilti Service.
- After cleaning and maintenance, install all guards and protective devices and check that they are in full working order.

To help ensure safe and reliable operation, use only genuine Hilti spare parts, consumables and accessories. Spare parts, consumables and accessories approved by Hilti for use with your product can be found at your Hilti Store or online at: www.hilti.group
7 Transport and storage
CAUTION
Accidental starting during transport!
▶ Always transport your products with the batteries removed!
▶ Remove the battery/batteries.
▶ Never transport batteries loose and unprotected. During transport, batteries should be protected from excessive shock and vibration and isolated from any conductive materials or other batteries that may come in contact with the terminals and cause a short circuit. Comply with the locally applicable regulations for transporting batteries.
- Do not send batteries through the mail. Consult your shipper for instructions on how to ship undamaged batteries.
Prior to each use and before and after prolonged transport, check the product and the batteries for damage.

WARNING
Accidental damage caused by defective or leaking batteries!
▶ Always store your products with the batteries removed!
- Store the product and the batteries in a cool and dry place. Comply with the temperature limits stated in the technical data 30.
- Do not store batteries on the charger. Always remove the battery from the charger when the charging operation has completed.
▶ Never leave batteries in direct sunlight, on sources of heat, or behind glass.
- Store the product and batteries where they cannot be accessed by children or unauthorized persons.
- Prior to each use and before and after prolonged storage, check the product and the batteries for damage.
7.1 Instructions on transport and storage of diamond core drilling machines

WARNING
Risk of injury! Parts can work loose and drop off.
- Do not transport diamond core drilling machine, drill stand or the complete system by crane.
▶ Transport the diamond core drilling machine, drill stand and core bit as separate units. Use the wheel assembly (accessory) as an aid when transporting the equipment.
Transport
- Do not transport the diamond core drilling machine with an accessory tool inserted.
▶ Make sure that the equipment is held securely throughout all transport operations.
▶ After transporting, always check all visible parts for signs of damage and make sure that all controls function correctly.
Storage
Open the water flow regulator on the diamond core drilling machine when you are readying it for storage.
8 Troubleshooting
8.1 Troubleshooting the diamond core drilling machine
If the trouble you are experiencing is not listed in this table or you are unable to remedy the problem by yourself, please contact our Hilti Service.
| Malfunction | Possible cause | Action to be taken |
 The multifunction display is not showing anything. The multifunction display is not showing anything. | Battery fully discharged. ▶ Check | the battery's state of charge and if necessary, replace it with a charged battery. |
| The battery is not fully inserted. | ▸ Push the battery in until it engages with an audible click. |
 Service required. Service required. | Internal error. | ▸ Consult Hilti Service. |
| The battery is not fully inserted. | ▸ Push the battery in until it engages with an audible click. |
| Malfunction | Possible cause | Action to be taken |
 | The diamond core drilling machine has been overloaded | Switch the diamond core drilling machine off and then on again.Do not overload the diamond core drilling machine. |
| Restart interlock | Maximum running time with hole-starting mode activated exceeded. | Switch the diamond core drilling machine off and then on again. |
| Motor or battery overheated, or cooling down process has completed. | Switch the diamond core drilling machine off and then on again. |
| Maximum running time with core removal function activated exceeded. | Switch the diamond core drilling machine off and then on again. |
| ATC has been triggered | Switch the diamond core drilling machine off and then on again. |
 Overheating Overheating | The motor has overheated. The diamond core drilling machine is running in cooling mode. | Wait a few minutes until the motor has cooled down or allow the diamond core drilling machine to idle at no load in order to speed up the cooling process. When normal temperature is reached, the indicator goes out and the diamond core drilling machine switches to restart interlock.Switch the diamond core drilling machine off and then on again. |
 Unable to activate hole-starting mode Unable to activate hole-starting mode | Diamond core drilling machine is drilling. | Make sure that the core bit is no longer in contact with the base material. |
| The motor has overheated. The diamond core drilling machine is running in cooling mode. | Complete the cooling process. |
 Connection has been interrupted Connection has been interrupted | Existing Bluetooth connection has been separated. | Make sure there is a clear line of sight between the product and the accessory. Local conditions such as reinforced concrete walls, for example, can affect the quality of the connection.Connect the accessories to the diamond core drilling machine again. |
 Battery is dischargedLED on the battery quick-flashes green. Battery is dischargedLED on the battery quick-flashes green. | The battery is completely discharged. The diamond core drilling machine cannot be operated. | Charge the battery or use a fully charged battery. |
 Battery temperature too high Battery temperature too high | The battery is warm and will shut down soon. | Reduce the load on the diamond core drilling machine. |
| Malfunction | Possible cause | Action to be taken |
 Battery cooling in progressLED on the battery quick-flashes yellow. Battery cooling in progressLED on the battery quick-flashes yellow. | The battery is too warm and must be allowed to cool down. The system cannot be operated with a battery that is too warm. | Wait a few minutes until the battery has cooled down. When normal temperature is reached, the indicator goes out and the system is again ready for use. |
 Battery temperature too lowLED on the battery quick-flashes yellow. Battery temperature too lowLED on the battery quick-flashes yellow. | The battery is too cold and cannot be operated under full load. | Switch the motor of the diamond core drilling machine on and allow it to idle at no load.When minimum temperature is reached, the indicator goes out and the system can be operated at full power. |
 Sub-optimal battery type in use Sub-optimal battery type in use | The Li-ion battery is not of the optimum type for the connected product. Function restrictions of the system might occur. | Use a battery recommended byHilti. An overview of the recommended batteries can be found at the end of these operating instructions. |
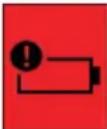 Wrong battery typeOne LED on the battery shows steady yellow. Wrong battery typeOne LED on the battery shows steady yellow. | The Li-ion battery and the connected product are not compatible and cannot be used together. | Use a battery recommended byHilti. An overview of the recommended batteries can be found at the end of these operating instructions. |
8.2 Troubleshooting the drilling system
| Trouble or fault | Possible cause | Action to be taken |
| Another diamond core drilling machine has automatically connected to the accessory used (e.g. water treatment system) via Bluetooth. | Several diamond core drilling machines are connected to the same accessory. The accessory always connects automatically to the diamond core drilling machine that enables the connection to be established fastest. | Switch Bluetooth on the accessory off and then on again and connect the diamond core drilling machine to the accessory again. |
| Core removal function not working. | Vacuum cleaner holds back the core. | Switch the vacuum cleaner off. |
| At least one threaded connection between core bit and diamond core drilling machine is loose. | Securely tighten all threaded connections between core bit and diamond core drilling machine. |
| The core bit does not rotate. | The core bit has become jammed in the base material. | Use an open-ended wrench to release the core bit: Grip the core bit with a suitable open-ended wrench close to the connection end and release the core bit by rotating it.Turn the hand wheel and try to release the core bit by moving the carriage up and down. |
| The drilling speed is decreasing. | Maximum drilling depth has been reached. | Remove the core and use a core bit extension. |
| The core is stuck in the core bit. | Remove the core. |
| Wrong core bit specification for the base material. | Select a more suitable core bit specification. |
| High steel content (indicated by clear water containing metal cuttings). | Select a more suitable core bit specification. |
| For stand-guided drilling in iron, use the IronBoost21 function. |
| The core bit is faulty. ▶ Check the core bit for damage and replace it if necessary. |
| Contact pressure is too low. ▶ Increase the contact pressure. |
| The machine has too little power. | Select a lower rpm speed of the core bit. |
| The core bit is polished. ▶ Sharpen the core bit on the sharpening plate. |
| Select a lower rpm speed of the core bit. |
| The water flow rate is too high. | Reduce the water flow rate by adjusting the water flow regulator. |
| Water flow rate too low. | Check the water supply and, if necessary, increase the flow rate by adjusting the water flow regulator on the diamond core drilling machine. |
| The carriage lock is engaged. | Release the carriage locking mechanism. |
| Dust is hindering drilling progress. | Use a suitable dust removal system. |
| The hand wheel can be turned without resistance. | The shear pin is broken. | Replace the shear pin. |
| The core bit cannot be inserted into the tool holder. | The core bit connection end or tool holder is dirty or damaged. | Clean and grease the connection end and/or the tool holder or replace these parts. |
| Water escapes at the water swivel or gear housing. | The water pressure is too high. | Reduce the water pressure. |
| The rotary shaft seal is worn out. | Replace the rotary shaft seal. |
| Water escapes from the tool holder during operation. | The core bit is not securely tightened in the tool holder. | Tighten the core bit securely.Remove the core bit approx. 90° about its own axis. Re-install the core bit. |
| The core bit connection end / tool holder is dirty. | Clean and grease the connection end and/or the tool holder. |
| The seal at the tool holder or at connection end is defective. | the Check the seal and replace it if necessary. |
| No water is flowing. | The filter or water flow indicator blocked. | Remove the filter or water flow indicator and flush it through. |
| The drilling system has too much play. | The core bit is not securely tightened in the tool holder. | Tighten the core bit securely.Remove the core bit approx. 90° about its own axis. Re-install the core bit. |
| The drilling system has too much play. | The core bit connection end / tool holder is defective. | ▶ Check the connection end and tool holder and replace them if necessary. |
| The carriage has too much play. | ▶ Adjust the play between the rail and carriage.17 |
| Screws / bolts on the drill stand loose. | are Check the security of screws / bolts on the drill stand and tighten them if necessary. |
| The drill stand is inadequately fastened. | ▶ Fasten the drill stand more securely. |
| The connection between the diamond core drilling machine and the carriage or spacers is loose. | ▶ Check the connection and, if necessary, refasten the diamond core drilling machine. |
| Imbalance in the system (e.g. heavy rattling) | Dust has collected in the core bit. | ▶ Remove the dust from the core bit.▶ To prevent electrostatic effects, use an anti-static vacuum extractor.▶ Remove the core bit. Rotate the core bit approx. 90° about its own axis. Re-install the core bit. |
9 Disposal instructions
9.1 Disposal

WARNING
Risk of injury due to incorrect disposal! Health hazards due to escaping gases or liquids.
▶ DO NOT send batteries through the mail!
▶ Cover the terminals with a non-conductive material (such as electrical tape) to prevent short circuiting.
- Dispose of your battery out of the reach of children.
- Dispose of the battery at your Hilti Store, or consult your local governmental garbage disposal or public health and safety resources for disposal instructions.

Most of the materials from which Hilti products are manufactured can be recycled. The materials must be directly separated before they can be recycled. In many countries, your old tools, machines or appliances can be returned to Hilti for recycling. Ask Hilti Service or your Hilti sales representative for further information.

- Do not dispose of power tools, electronic equipment or batteries as household waste!
9.2 Recommended pretreatment for disposal of drilling slurry

The disposal of drilling slurry directly into rivers, lakes or the sewerage system without suitable pretreatment presents problems of an environmental nature. Ask the local public authorities for information about current regulations.
- Collect the drilling slurry (e.g. using a wet-type industrial vacuum extractor).
- Allow the drilling slurry to settle and dispose of the solid material at a construction waste disposal site (adding a flocculant can accelerate the settling process).
- Neutralize the left-over water (alkaline, pH > 7) by adding acidic neutralizing agent or diluting it with a large quantity of water before it is allowed to flow into the sewerage system.
10 Manufacturer's warranty
- Please contact your local Hilti representative if you have questions about the warranty conditions.

This device has been tested and found to comply with the limits for a class A digital device, pursuant to part 15 of the FCC rules. These limits are intended to ensure adequate protection against electromagnetic interference when the device is operated in areas used for commercial purposes. This equipment generates, uses, and can radiate radio frequency energy and, if not installed and used in accordance with the instructions, may cause interference to radio communications. The user must bear costs incurred due to interference that operation of this device in residential areas can cause.
This device is in compliance with paragraph 15 of the FCC rules and the RSS-210 specifications of ISED. Operation is subject to the following two conditions:
- This device shall cause no harmful interference.
- This device must accept any interference received, including interference that may cause undesired operation.

Changes or modifications not expressly approved by Hilti may restrict the user's authorization to operate the equipment.
For more information on operation, technology, environment, RoHS declaration (markets in China and Taiwan only) and recycling, follow this link: qr.hilti.com/manual/?id=2407674
This link is also to be found at the end of the operating instructions, in the form of a QR code.
13 Technical data
13.1 Diamond core drilling machine
| DD 160-22 |
| Product generation | 01 |
| Weight | 6.8 kg(15.0 lb)(without battery) |
| Max. permissible water supply pressure | 6 bar(87 psi) |
| Max. cooling-water temperature | 40 °C(104 °F) |
| Maximum drilling depth | 450 mm(17.7 in) |
| Ambient temperature for operation | -15 °C ... 55 °C(5 °F ... 131 °F) |
| Storage temperature | -40 °C ... 85 °C(-40 °F ... 185 °F) |
13.2 Core bit diameter
| DD 160-22 |
| Permissible core bit diameter | 50 mm ... 162 mm(2.0 in ... 6.4 in) |
13.3 Ideal distances from hole center
| DD 160-22 |
| Anchor base plate: Mark ↔ hole center | 302 mm(11.9 in) |
| Vacuum & combination base plate: Mark ↔ hole center | 327 mm(12.9 in) |
13.4 Weights, drill stand
Weights determined with base plate and carriage.
| DD-ST 22 110/150/160 SFL | 11.8 kg(26.0 lb) |
| DD-ST 22 110/150/160 SFM | 11.0 kg(24.3 lb) |
| DD-ST 150-U CTL | 13.3 kg(29.3 lb) |
13.5 Lengths, drill stand
| DD-ST 22 110/150/160 SFL | 945 mm(37.2 in) |
| DD-ST 22 110/150/160 SFM | 725 mm(28.5 in) |
| DD-ST 150-U CTL | 945 mm(37.2 in) |
13.6 Fastening with vacuum base plate
| Minimum vacuum | 0.65 bar(9.43 psi) |
| Max. core bit diameter (for vacuum fastening) | 162 mm(6.4 in) |
13.7 Bluetooth
| Frequency band | 2,400 MHz ... 2,483 MHz |
| Maximum emitted transmission power | 10 dBm |
13.8 Battery
| Battery operating voltage | 21.6 V |
| Weight, battery | See the end of these operating instructions |
| Ambient temperature for operation | -17 °C ... 60 °C(1 °F ... 140 °F) |
| Storage temperature | -20 °C ... 40 °C(-4 °F ... 104 °F) |
| Battery charging starting temperature | -10 °C ... 45 °C(14 °F ... 113 °F) |
3.10 Active Torque Control (ATC) 44
4 Préparatifs 44
3.10 Active Torque Control (ATC)
3.10 Active Torque Control (ATC) 78
3.10 Active Torque Control (ATC)
3.10 Active Torque Control (ATC) 111
3.10 Active Torque Control (ATC)

natural_image
Icon showing a person reading a document above a battery with a triangular play button (no text or symbols)

NURON
| B 22-170 (01) | 1,34 kg | 2.95 lb |
| B 22-255 (01) | 1,87 kg | 4.12 lb |


Hilti Corporation
LI-9494 Schaan
Tel.:+423 234 21 11
Fax:+423 234 29 65
www.hilti.group