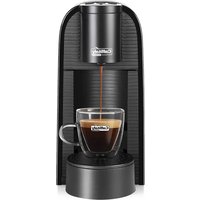
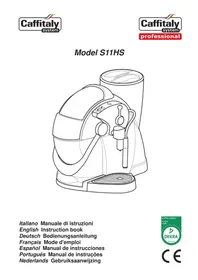
Quadra S22 - Coffee machine Caffitaly - Free user manual and instructions
Find the device manual for free Quadra S22 Caffitaly in PDF.

User questions about Quadra S22 Caffitaly
0 question about this device. Answer the ones you know or ask your own.
Ask a new question about this device
Download the instructions for your Coffee machine in PDF format for free! Find your manual Quadra S22 - Caffitaly and take your electronic device back in hand. On this page are published all the documents necessary for the use of your device. Quadra S22 by Caffitaly.
USER MANUAL Quadra S22 Caffitaly
Model S22 & S22R EVO
natural_image
Line drawing of a laboratory instrument with internal components and base stations (no text or symbols)Italiano Manuale di istruzioni English Instruction manual Deutsch Bedienungsanleitung Français Mode d'emploi Español Manual de instrucciones Português Manual de instruções Nederlands Gebruikshandleiding
- Italiano....8
- English....18
• Deutsch....28 - Français 38
- Español....48
- Português ....58
• Nederlands......68
text_image
1 COSO RIO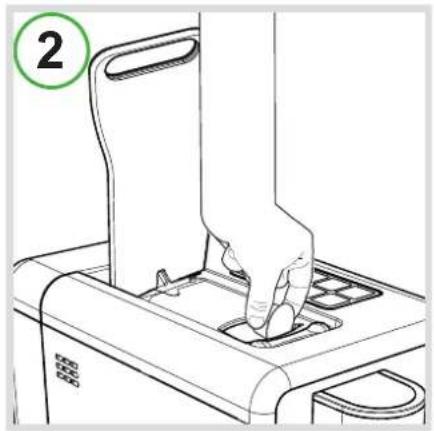
natural_image
Line drawing of a hand pressing down on a device's tray (no text or symbols)
text_image
3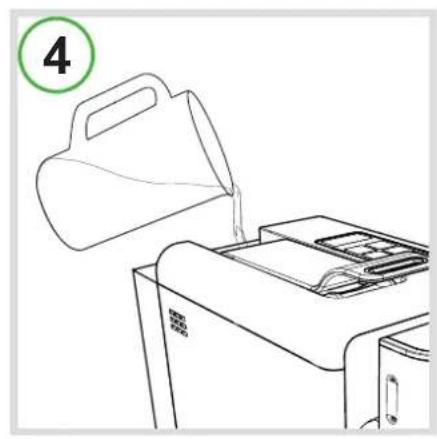
natural_image
Line drawing of a printer being poured into a stack of paper (no text or symbols)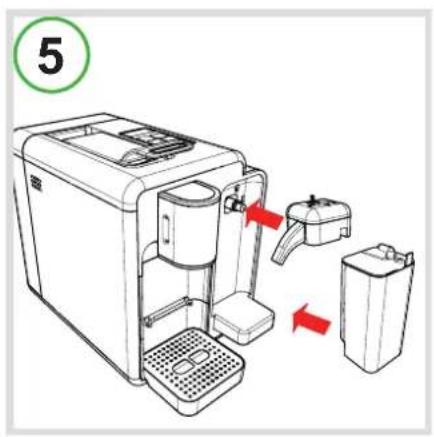
text_image
5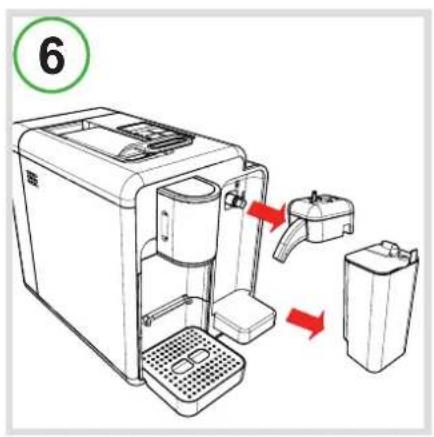
text_image
6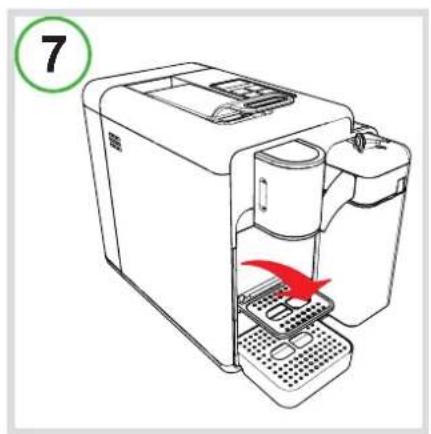
text_image
7
natural_image
Line drawing of a coffee maker with a cup and side panel, labeled with number 8 (no text or symbols on the device itself)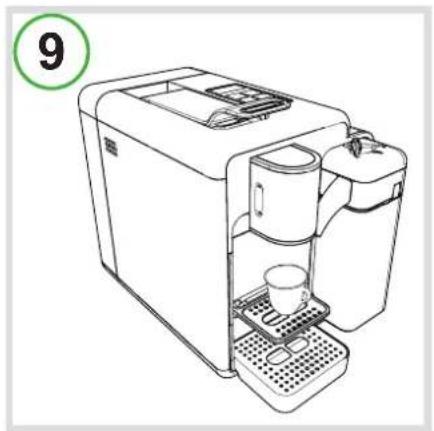
natural_image
Line drawing of a coffee machine with a cup and side table, labeled with number 9 (no text or symbols on the device itself)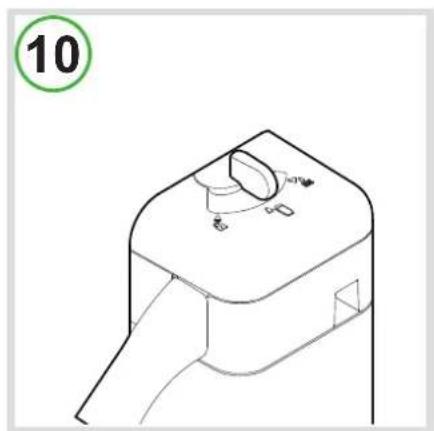
natural_image
Technical line drawing of a mechanical component with no visible text or symbols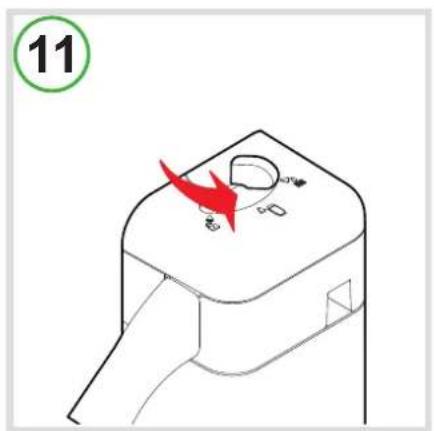
text_image
11
text_image
12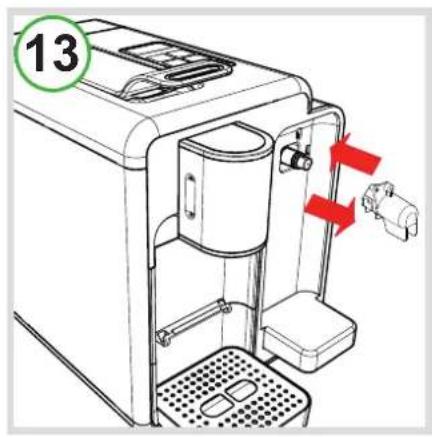
text_image
13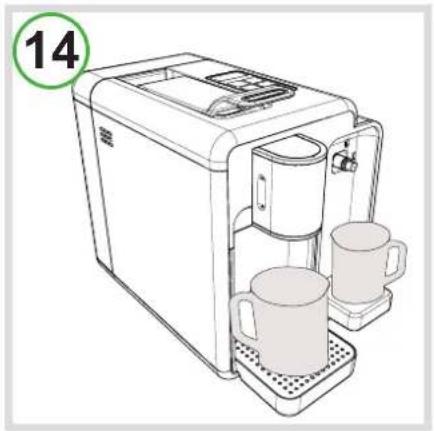
natural_image
Line drawing of a modern kitchen appliance with two mugs and a digital counter, labeled with number 14 (no text or symbols on the device itself)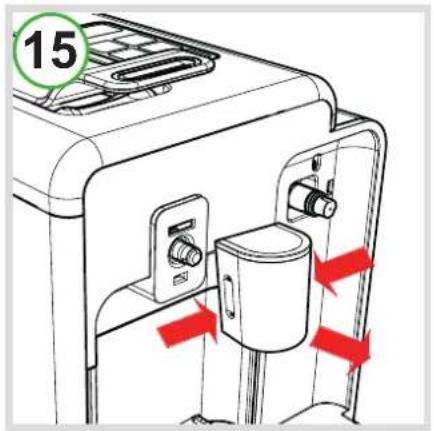
text_image
15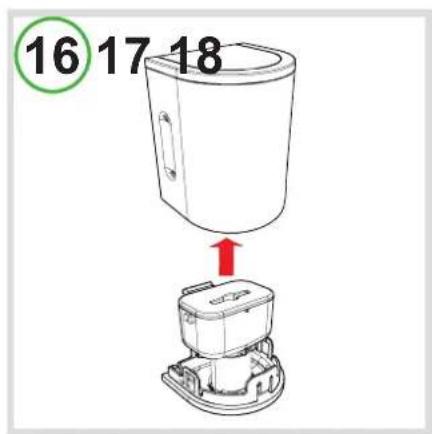
text_image
16 17 18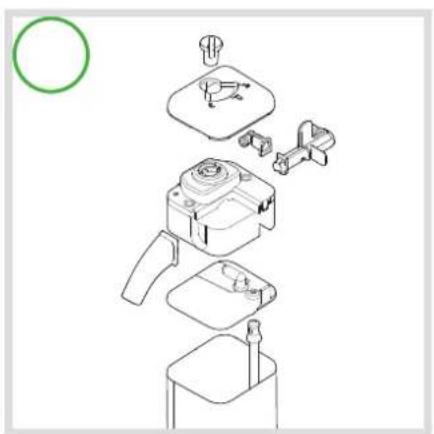
natural_image
Exploded view diagram of a mechanical device with exploded view (no text or labels)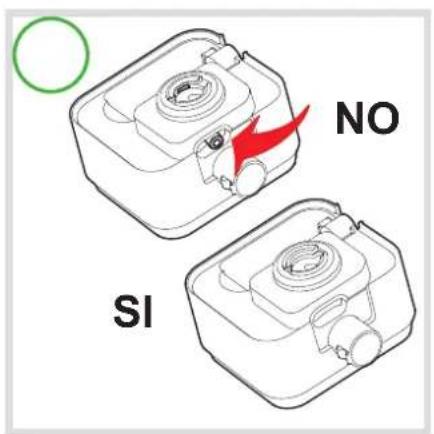
text_image
NO SI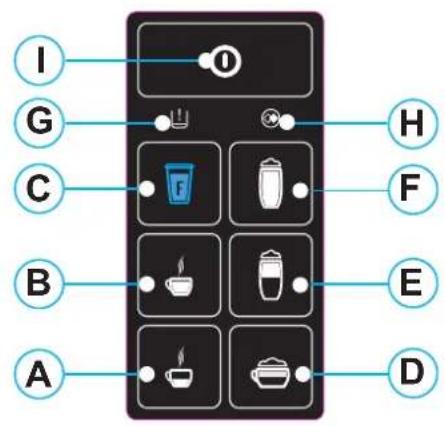
text_image
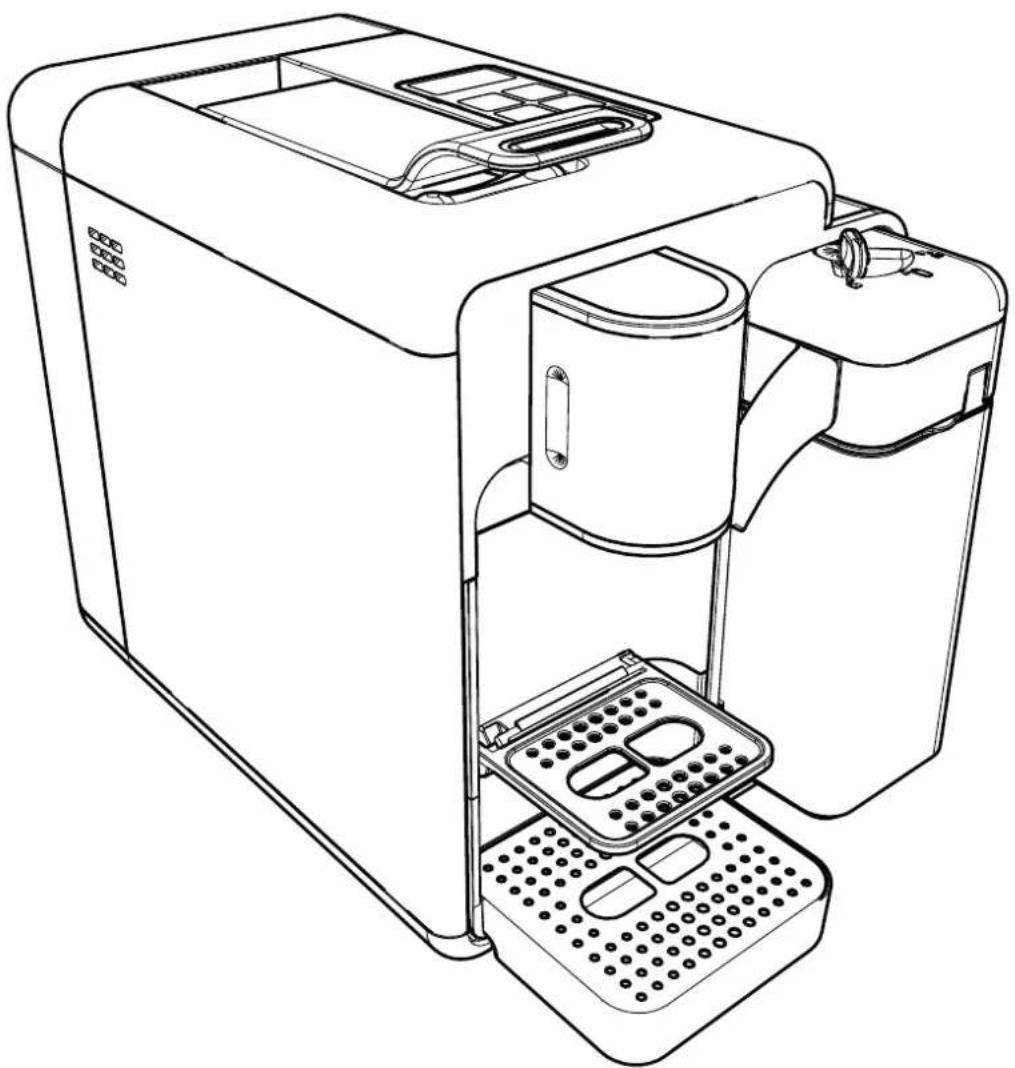
I G C B A H F E D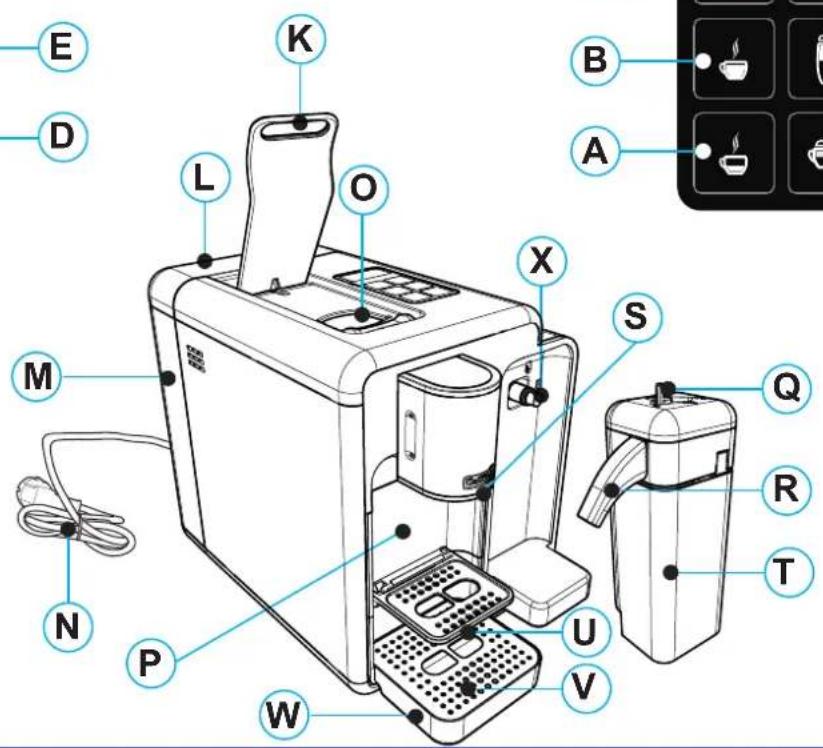
text_image
E D K L O X B A M S Q R T N P U V W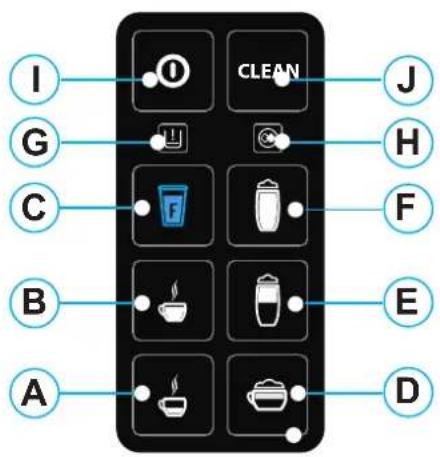
text_image
I G C B A J H F E D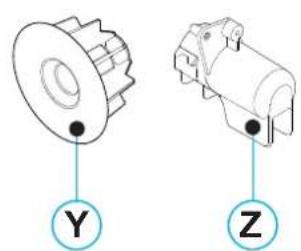
text_image
Y ZItaliano
A: "Espresso" button
B: "Long coffee" button
C: "Filter coffee" button
D: "Cappuccino" button
E: "Latte macchiato"
(milk with a dash of coffee) button
F: "Milk" button
G: "Multifunction" indicator light
H: "Descaling" indicator light
I: main switch
J: "Rinse cycle" button
(Only 8 buttons)
K: capsule compartment open / close lever;
L: water tank lid
M: water tank
N: power cord
O: capsule compartment
P: used capsule drawer
Q: milk jug knob
R: milk dispenser
S: coffee dispenser
T: milk container
U: upper grille for cups
V: drip-tray grille
W: drip-tray
X: steam outlet connection
Y: cleaning capsule
Z: connection for descaling
Deutsch
- Follow the instructions (Symbols)......18
- Your Caffitaly System contact ....18
• Safety warnings....29
• Instructions for use and disposal......20
Installation:
- At first use or after a long period of non-use ....20
• Turn the appliance on....21 - General operating indications....21
- Cup / espresso cup height adjustment ....21
Dispensing a product:
- Correct use of the buttons ....22
• Coffee dispensing....22 - Programming the amount of coffee in a cup (button A,B,C) 22
- Dispensing cappuccino / latte macchiato (milk with a dash of coffee) ....23
• Dispensing milk 23 - Programming the amount of milk / coffee in a cup (button D,E,F) ......23
Cleaning and Maintenance:
• Energy saving....24
- Rinse cycle....24
- Milk jug cleaning cycle....24
• Daily cleaning....24
• Descaling....25
Miscellaneous:
- Troubleshooting....26
• Technical data 27
Dear Customer, thank you for choosing our product and for the trust placed in us.
With our machine you can savour your favourite hot drinks any time of the day thanks to the various capsules Caffitaly System offers. For example: an espresso, a cocoa-flavoured drink or a tea will be ready in just a few seconds.
Follow the instructions (Symbols)
Warning.

This is the safety warning symbol.
It is used to bring attention to possible risks of personal injury.
Comply with the safety messages provided in order to avoid possible injury or death.

NB.
This is the symbol used to highlight some actions that improve machine use.
Not dishwasher safe

Cleaning advice
Your Caffitaly System contact
info@caffi taly.com
Safety instructions
Read the following instructions CAREFULLY!
In this way you will prevent the risk of accidents and damage to the appliance.
- This appliance is intended for use in domestic and similar applications. Its use in the following areas is not permitted: kitchen areas for shop staff, offices and other work environments, in hotels, holiday farms, motels, B&Bs and other residential-type places.
- Any other use not covered by these instructions may cause injury and voids the warranty. The manufacturer declines any liability for damage resulting from improper use of the appliance.
• After removing the packaging, make sure the appliance is intact. In case of damage, or at the first sign of faultiness (unusual noise or odours), or if any problem occurs inside the appliance, do not use it. Contact an Authorised Service Centre.
- The packaging elements (plastic bags, etc.) are potential hazards and must not be left within the reach of children.
- Only use the appliance if the power cord is intact. To replace a damaged cord, contact an Authorised Service Centre. Danger of electrocution.
- Store and use the appliance only indoors. Make sure the electrical elements, plugs and cords are dry. Never immerse the appliance. Protect the appliance from sprays and drips. Water and electricity together create a risk of electrocution.
- Only connect the appliance to approved power sockets. Make sure the mains voltage matches that shown on the data plate located on the bottom of the appliance.
- The surface on which the machine is installed must be level, solid, stable and heat resistant; the support surface must not slope more than 2^ .
- The appliance must not be used by children (even older than 8 years), or by persons with reduced physical, mental or sensory capabilities or with insufficient experience and expertise, unless they are carefully supervised and instructed by a person responsible for their safety. Children must be kept under supervision to prevent them from playing with the appliance!
- Do not leave the power cord near hot surfaces and sharp edges or objects.
- Never place hands inside the capsule compartment. Danger of injury.
• Always close the lever. Never open the lever while a product is being dispensed.
- Never remove parts of the machine, except those indicated for daily cleaning.
- Do not insert anything in the openings. This could cause electric shocks! Any operation not described in this instruction manual must only be carried out by an Authorised Service Centre!
- Grip the plug without pulling on the power cord to disconnect it.
- Descale the appliance regularly, according to the instructions. Otherwise it may become damaged.
- Clean the appliance carefully and regularly. If it is not cleaned, the build-up that forms could be hazardous to health. Unplug the appliance and allow it to cool before cleaning.
- If the appliance is not going to be used for long periods (holidays, etc.), unplug it.

Instructions for use and disposal
The appliance is made with high quality materials which can be reused or recycle. Dispose of the appliance at a suitable waste collection centre.
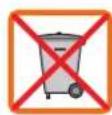
Warnings for the correct disposal of the product in accordance with the directive 2012/19/EU of the European Parliament and of the council of 4 July 2012 on waste electrical and electronic equipment (WEEE). At the end of its service life, the product must not be disposed of together with household waste. It can be taken to a suitable recycling centre set up by the local authorities or returned to a dealer who provides this service.
Disposing of an electrical appliance separately prevents possible negative consequences for the environment and health due to inadequate disposal, and allows the materials it is made from to be recovered in order to obtain significant savings in terms of energy and resources. The crossed-out bin symbol on the product highlights the obligation to dispose of electrical appliances separately. Improper disposal of the product by the user will involve the application of administrative penalties as provided for under current regulations.
The packaging is made from recyclable material. Contact the competent authoriti for information regarding local regulations.
First use or after a long period of non-use
Only use "original Caffi taly System capsules"
• Fill the tank with fresh, non-carbonated water (Fig.4).
• Make sure the lever is closed (Fig.3).
• Fit the milk dispenser first and then the jug in its special place (Fig.5).
- Plug the appliance in and turn it on by pressing the button I.
• Together with buttons A-B-C, indicator light G also blinks alternately RED.
- Place a large container (at least 250 ml) under the coffee and milk dispensers.
- Press one of the buttons A-B-C. Wait for the machine to complete the water circuit filling cycle. Indicator light G goes off.
NB: If indicator light G continues to blink RED after filling, repeat the steps of the previous point.
- Buttons A-B-C-D-E-F blink simultaneously; the machine is heating up.
- When buttons A-B-C light up steady, do a rinse by pressing button C. Press the button again to do a second rinse.
- Only remove the milk jug (Fig.6).
- Fill the milk container with water.
• Fit the milk jug in its special place (Fig.5).
• Make sure the milk jug knob is in the dispensing position (Fig.10).
- Place a large container (at least 250 ml) under the milk dispenser.
- When buttons D-E-F light up steady, do a rinse by pressing button F. Press the button again to do a second rinse.
• After this operation remove and rinse the used capsule drawer and milk jug (Fig.6).
Turn the appliance on
- Fill the tank with fresh, non-carbonated water (Fig.4).
- Turn the appliance on by pressing the main switch I.
- Buttons A-B-C blink simultaneously; the machine is heating up. When the buttons light up steady, the appliance is ready to dispense coffee.
• Fill the jug with the desired amount of milk. - Position the milk jug lid.
• Make sure the milk jug knob is in the dispensing position (Fig.10).
• Fit the milk dispenser first and then the jug in its special place (Fig.5). Buttons D-E-F blink. - When buttons D-E-F light up steady, the machine is ready to dispense milk.
General operating indications
DESCALING SIGNAL:
- When indicator light H is on steady YELLOW, it is advisable to do the descaling cycle (See the section Descaling).
COFFEE CIRCUIT HEATING:
- Buttons A-B-C blink simultaneously.
MILK CIRCUIT HEATING:
- Buttons D-E-F blink simultaneously.
WHEN THE WATER FINISHES DURING OPERATION:
- When indicator light G blinks RED and the machine beeps intermittently, the water tank is empty.
- Fill the water tank with fresh non-carbonated water (Fig.4).
- Press one of the buttons A-B-C. Wait for the machine to complete the water circuit filling cycle.
- When buttons A-B-C light up steady, the machine is ready to use.
IF THE LEVER IS RAISED DURING DISPENSING:
- Raising the lever when dispensing a product (Fig.1) can cause sprays of hot water. Danger of scalding!
- Indicator light G blinks RED and the machine beeps intermittently. Dispensing is immediately stopped.
- Close the lever (Fig.3).
- Press one of the buttons A-B-C to reset the alarm.
• The machine is ready to use again.
Cup / espresso cup height adjustment
• The machine can be adjusted for using large cups or espresso cups.
- Initially, the machine is arranged for large cups, to be placed on the drip-tray grille (Fig.8).
- For better results when using espresso cups, lower the upper grille for cups (Fig.7).
- An espresso cup can now be placed under the coffee dispenser (Fig.9).
Correct use of the buttons
To dispense "Espresso" or "Caffè crema" (cream coffee), only use buttons A or B, lit up WHITE. Depending on the amount, the same buttons are to be used for barley, ginseng or cocoa capsule dispensing.
Button C, lit up BLUE, must only be used for "Filter coffee" or "Americano". The same button can be used for tea, chamomile or herbal tea capsules.
Do not use button C for espresso or in any case for coffee with an intense flavour. In this function the machine is adjusted to low pressure and this reduces the "cream", diminishes the flavour of the coffee, and could cause an interruption of dispensing.
Buttons D-E-F are to be used only for dispensing drinks with milk,
always making sure the jug is correctly positioned in its special place (Fig.5), and that the knob is in the dispensing position (Fig.10).
NB: Traces of the product just dispensed may remain in the machine circuit. To ensure the full taste of the drink, it is advisable to do a rinse cycle when dispensing a product other than coffee.
To do the rinse cycle, see the section "Rinse cycle".
After each dispensing of drinks with milk, it is advisable to do a cleaning cycl placing a container (at least 250ml) under the milk dispenser and turning the knob of the milk jug to the right, anticlockwise (Fig.11).
Do not interrupt the cleaning cycle. At the end a beep sounds. Only then, turn the milk jug knob to the dispensing position (Fig.10). It is advisable to carry out this operation at least once a day if dispensing a beverage with milk.
Dispensing coffee
Only use "original Caffi taly System capsules"
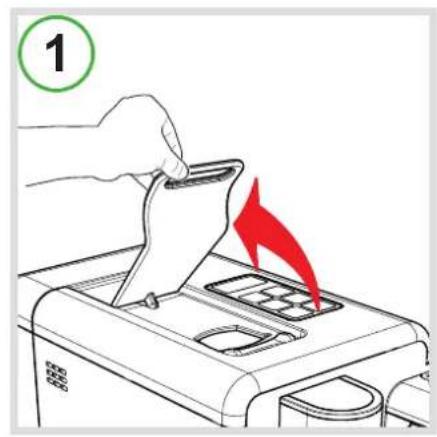
- Raise the lever to open the capsule compartment (Fig.1).
- Insert the capsule, pressing it gently inside (Fig.2).
- Close the lever fully (Fig.3).
- Place a cup or espresso cup under the coffee dispenser (Fig.8 or 9).
- Briefly press button A or B, depending on the desired coffee.
- The pressed button blinks. The machine stops dispensing when the programmed amount is reached and a beep sounds.
- Raise the lever to eject the used capsule into the special drawer (Fig.1).
- Close the lever (Fig.3).
NB: The amounts of coffee dispensed can be programmed according to personal taste and the size of the cups or espresso cups used. To program the amounts, see the section "Programming the amount of coffee in a cup".
Programming the amount of coffee in a cup (button A,B,C)
- Raise the lever to open the capsule compartment (Fig.1).
- Insert the capsule, pressing it gently inside (Fig.2).
- Close the lever fully (Fig.3).
- Place a cup or espresso cup under the coffee dispenser (Fig.8 or 9).
- Press and hold the desired coffee button.
- On reaching the desired amount of coffee, release the button. The button is now programmed. The amount of coffee dispensed can be programmed from a minimum of 20 to a maximum of 250 ml.
- Raise the lever to eject the used capsule into the special drawer (Fig.1).
- Close the lever (Fig.3).
Dispensing cappuccino / latte macchiato (milk with a dash of coffee)
- Fill the container with the desired amount of milk.
• Make sure the milk jug knob is in the dispensing position (Fig.10).
• Fit the milk dispenser first and then the jug in its special place (Fig.5). Buttons D-E-F blink. Wait until they light up steady.
- Raise the lever to open the capsule compartment (Fig.1).
- Insert the capsule, pressing it gently inside (Fig.2).
- Close the lever fully (Fig.3).
- Place a cup under the coffee and milk dispenser (Fig.8).
- Briefly press button D or E, depending on the desired beverage with milk.
- The pressed button blinks. The machine dispenses the programmed amount of milk. The coffee is then automatically dispensed.
- Dispensing stops if the selected button is pressed during the cycle.
- Raise the lever to eject the used capsule into the special drawer (Fig.1).
- Close the lever (Fig.3).
NB: For better results, use milk at refrigerator temperature (approx. 4^-8^ ). If the milk container is removed and put in the fridge, it is advisable not to keep the milk for more than 2 days. Do the "Milk jug cleaning cycle" (see the relevant section) after every dispensing of a beverage with milk.
Dispensing milk
- Fill the container with the desired amount of milk.
• Make sure the milk jug knob is in the dispensing position (Fig.10).
• Fit the milk dispenser first and then the jug in its special place (Fig.5). Buttons D-E-F blink. Wait until they light up steady.
- Place a cup under the milk dispenser (Fig.8).
- Press button F.
- The pressed button blinks. Dispensing stops when the programmed amount is reached.

NB: For better results, use milk at refrigerator temperature (approx. 4^-8^ ). If the jug is removed and put in the fridge, it is advisable not to keep the milk for more than 2 days. Do the "Milk jug cleaning cycle" (see the relevant section) after every dispensing of a beverage with milk.
Programming the amount of milk / coffee in a cup (button D,E,F)
- Fill the container with the desired amount of milk.
• Make sure the milk jug knob is in the dispensing position (Fig.10).
- Fit the milk dispenser first and then the jug in its special place (Fig.5). Buttons D-E-F blink. Wait until they light up steady.
- Raise the lever to open the capsule compartment (Fig.1).
- Insert the capsule, pressing it gently inside (Fig.2).
- Close the lever fully (Fig.3).
- Place a cup under the milk dispenser (Fig.8).
• To program the button there are two ways:
A) Press and hold the button D, E or F for a few seconds, depending on the desired beverage with milk. On reaching the desired amount of milk, press the same button again. Dispensing of coffee starts. Press and hold the button for a few seconds. On reaching the desired amount of coffee, press the same button again. The button is now programmed.
B) Press and hold the button D, E or F, depending on the desired beverage with milk. On reaching the desired amount of milk, release the button. Dispensing of coffee starts. Press and hold the button. On reaching the desired amount of coffee, release the button. The button is now programmed.
- Raise the lever to eject the used capsule into the special drawer (Fig.1).
- Close the lever (Fig.3).
Energy saving

After
10 minutes of non-use the machine turns off automatically.
To return to normal operating conditions, turn the machine on by pressing the ma switch I. When buttons A-B-C light up steady, the machine is ready to use. As well as the jug, it is advisable to always remove the milk dispenser if not dispensing beverages with milk; this is because the machine consumes more power when it detects the presence of the milk dispenser.
Rinse cycle

NB: Traces of the product just dispensed may remain in the machine circuit. To ensure the full taste of the drink, it is advisable to do a rinse cycle, as described below, when dispensing a product other than coffee.
ONLY S22R 8 buttons
• After dispensing a product other than coffee, button J blink.
- Raise the lever to eject the capsule (Fig.2). Close the lever (Fig.3).
- Press button J. The machine does the rinse cycle. Wait for the machine to finish dispensing.
S22 & S22R 7 & 8 buttons
If only coffee products are dispensed, it is advisable to do a rinse cycle at least 3 or 4 times a week, as described below.
- Raise the lever to open the capsule compartment (Fig.1).
- Insert the cleaning capsule (Fig.2).
- Close the lever fully (Fig.3).
- Press button B. The machine does the rinse cycle. Wait for the machine to finish dispensing.
- Raise the lever to eject the capsule (Fig.2). Close the lever (Fig.3).
- Remove the capsule drawer and retrieve the cleaning capsule. Reinsert the drawer.
Milk jug cleaning cycle
After each dispensing of drinks with milk, or in any case before removing the jug and placing it in the fridge, it is advisable to do a cleaning cycle.
- Place a container under the milk dispenser.
• To do the cleaning cycle, turn the milk jug knob anticlockwise to the right (Fig.11). - Do not interrupt the cleaning cycle! At the end a beep sounds.
- Turn the milk jug knob to the dispensing position (Fig.10) and remove the jug (Fig.6).

NB: If removing the milk container and putting it in the fridge, it is advisable not to keep the milk for more than 2 days.
the steam outlet connection with a damp cloth (Z).
Daily cleaning
- Pull out the drip-tray and used capsule drawer.
- Lift the used capsule drawer; empty and rinse it out.
- Remove the water tank; empty and rinse it out.
- Remove the front cover and the coffee dispenser (Fig.15). Remove the front cover and clean the coffee dispenser with running water (Fig.16).
- Fill the milk container with water and dispense milk by pressing button F.
- Turn the milk jug knob clockwise to the left (Fig.12) and remove the milk jug lid by pulling upward.
-
Clean the steam outlet connection with a damp cloth (Z).
-
Disassemble the milk dispenser (Fig.17), wash the parts with a detergent product, paying particular attention to the milk jug knob, dry and reassemble.
- Make sure the jug cover pin is in the correct position, otherwise turn it clockwise (Fig.18).
- Make sure the milk dispensing knob is in the dispensing position (Fig.10).
NB: Traces of the product just dispensed may remain in the machine circuit. To ensure the full taste of the drink, it is advisable to do a rinse cycle when dispensing a product other than coffee.
To do the rinse cycle, see the section "Rinse cycle".

Use a soft cloth and mild detergent to clean the surface of the appliance. Do not use jets of water to clean the appliance.
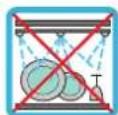
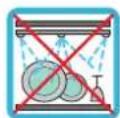
The machine's plastic parts, including the water tank, are NOT dishwasher safe.
Descaling
Descaling signal: when indicator light H is on steady YELLOW, it is advisable to do the descaling cycle, as illustrated below.
The machine has an advanced program that checks how much water is used to dispense products. This measurement allows the user to know when the machine needs a descaling cycle.
Make sure to use Caffitaly System descaler, which is designed to respect the technical characteristics of the machine, in full compliance with consumer safety. The descaler must be disposed of according to the manufacturer's instructions and/or the regulations in force in the country of use.

CAREFULLY read the directions for use provided on the descaler package. Avoid contact with eyes, skin and machine surfaces.
Do not turn the machine off and do not raise the lever during descaling. A per must be present during the operation.
Do not use vinegar: it could damage your machine!
- Turn the machine off by pressing the main switch I.
• Empty and rinse out the used capsule drawer and drip-tray.
- Remove and empty the water tank.
- Mix the contents of a Caffitaly System descaler bottle with about 750 cc. of water (total 1 litre) and pour into the tank.
- First remove the container and then the milk dispenser (Fig.6), and insert the descaling connector into its seat (Fig.13).

NB: If the descaling connection is not positioned correctly in the special milk jug seat, the descaling cycle cannot be done.
- Place a container (at least 500 ml) under the coffee dispenser and the milk container under the descaling connection (Fig.14).
• Make sure the lever is lowered and that there are no capsules in the capsule compartment.
- Keep buttons A and B pressed and at the same time turn the machine on by pressing the main switch I.
- Button B is lit up, whereas indicator lights G and H blink alternately YELLOW and RED.
- Press button B to start the descaling cycle.
- The machine dispenses the descaling solution at intervals (5 dispensings with a 4-minute pause between each, for a duration of about 25 minutes). During this phase, when the buttons must not be pressed, indicator lights G and H blink alternately YELLOW and RED. Empty the container, if necessary.
- When the first phase has been completed, button B is lit up and the water tank is empty.
• Carefully rinse out the water tank and refill it with fresh water (approx. 500ml).
- Press button B to start the rinse cycle.
- The machine delivers the rinsing water until the water tank is empty. During this phase, indicator lights G and H blink alternately YELLOW and RED.
- When the rinse cycle is completed, the machine returns to the "first use" state.
- Remove the descaling connector (Fig.13).
• Fit the milk dispenser first and then the jug in its special place (Fig.5).
• Carefully empty and rinse out the water tank and refill it with fresh water. - Press one of the buttons A-B-C. Wait for the machine to complete the water circuit filling cycle. Indicator light G goes off.
Troubleshooting
| PROBLEM | POSSIBLE | CAUSE | CURE |
| No coffee comes out. Indicator light G blinks RED. | - The water tank is empty.- The water tank is full:a) tank not inserted correctly.b) Grime.c) Limescale blockage.d) Capsule problem. | - Fill the tank with fresh water. Press a button to refill the circuit. When the buttons are lit up steady, the appliance is ready to use.a) Insert the tank correctly and fi ll the circuit.b) See the section “Rinse cycle” and “Daily cleaning”.c) Do a rinse cycle. If the problem persists, see the section “Descaling”.d) Notify the sales point of the blend(s)/batch(es). Replace capsules. | |
| The coffee is not hot enough. | - Cold cups / espresso cups.- Scale build-up in machine. | - Prewarm the cup.- Descale. | |
| The lever cannot be lowered. | - The used capsule drawer is full.- Capsule stuck inside the machine. | - Empty the used capsule drawer.- Remove the stuck capsule. | |
| Indicator light G is lit up steady RED. | Heating up problems. Turn the machine off, then on again. | ||
| When a button is pressed to dispense coffee, the machine seems to start but then stops without dispensing coffee, or only dispenses a small amount. | Incorrect programming of amounts. | Reprogram the amount for the button.See the section "Programming the amount of coffee in a cup". | |
| Coffee is dispensed very slowly, and is of poor quality. | Button C was used with an espresso capsule. | Use buttons A or B. | |
| The milk jug will not fi t. Wrong position of pin in jug lid. | See Fig.18 and the section "Daily Cleaning". | ||
Technical data
 | Approx. 6 kg |  | See the data plate on the bottom of the machine. |
 | 1.3 litres |  | Max. 15 bar |
 | room temperature: 10°C ÷ 40°C |  | < 70dB A |
 | 375 mm 18 capsul |  | |
 | 220 mm | 28 | [2COV] |
The materials and objects in contact with food products comply with the requirements of European Regulation 1935/2004.
INHALT
Einleitung:
PROBLÈME CAUSE POSSIBLE SOLUTION
Web: www.caffi taly.com
Caffitaly
system