
AP491RVS - Basket ETNA - Free user manual and instructions
Find the device manual for free AP491RVS ETNA in PDF.

| Product type | Chimney extractor hood |
| Brand | ETNA |
| Model | AP491RVS |
| Usage | External evacuation or recirculation with charcoal filter |
| Number of speeds | 3 |
| Control | Electronic buttons (stop, speed 1/2/3, lighting) |
| Lighting | Integrated lighting system (replacement by authorized technician) |
| Grease filters | Metallic, dishwasher-safe or hand-washable |
| Grease filter cleaning frequency | At least once a month |
| Charcoal filter | Optional, to be replaced every 3 months (ref. HF2028) |
| Hood material | Stainless steel |
| Power supply | 220-240 V, 50 Hz |
| Noise level | Varies depending on configuration (louder with charcoal filter) |
| Installation mode | Wall chimney, installation with exhaust duct or recirculation |
| Maintenance tips | Clean with soapy water and a soft cloth, avoid abrasive products |
| Stainless steel maintenance | Use a non-abrasive cleaner, rub in the direction of the grain |
| Safety | Disconnect power before any maintenance |
| Included accessories | Metallic grease filters |
| Optional accessories | Set of charcoal filters HF2028 |
| Compliance | Compliant with current European directives |
Frequently Asked Questions - AP491RVS ETNA
User questions about AP491RVS ETNA
0 question about this device. Answer the ones you know or ask your own.
Ask a new question about this device
Download the instructions for your Basket in PDF format for free! Find your manual AP491RVS - ETNA and take your electronic device back in hand. On this page are published all the documents necessary for the use of your device. AP491RVS by ETNA.
USER MANUAL AP491RVS ETNA
Instructions for use

Afzuigkap
Hotte cheminée
Dunstabzugshaube
Cooker hood
AP461____
AP491____
natural_image
Diagram of a building interior with brick walls, a chimney, and a cabinet (no text or symbols)natural_image
Diagram of a vertical structure with brick wall and adjacent panel, showing directional arrows indicating motion (no text or symbols)natural_image
Three abstract geometric shapes: a flat panel, a divided rectangle with scissors, and a diagonal stripe (no text or symbols)natural_image
Diagram of a building interior with brick walls, a chimney, and a cabinet (no text or symbols)natural_image
Diagram of a vertical structure with brick wall and adjacent panel, showing directional arrows indicating movement or force (no text or symbols)flowchart
graph TD
    A["0"] --> B["Circle"]
    C["1"] --> D["Circle"]
    E["2"] --> F["Circle"]
    G["3"] --> H["Circle"]
    I["Sun Icon"] --> J["Circle"]
natural_image
Blank white rectangular frame with gray border and two small feet at bottom (no text or symbols)
natural_image
Simple illustration of scissors cutting a gray rectangular block with two horizontal lines on the left (no text or symbols)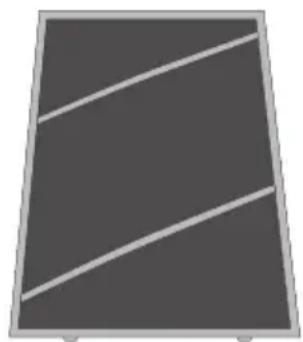
natural_image
Simple geometric diagram with two diagonal lines inside a trapezoidal frame (no text or symbols)natural_image
Diagram of a building interior with brick walls, a chimney, and a cabinet (no text or symbols)natural_image
Diagram of a vertical structure with brick wall and adjacent panel, showing directional arrows indicating movement or force (no text or symbols)natural_image
Blank white rectangular frame with gray border (no text or symbols)natural_image
Simple illustration of scissors cutting a gray rectangular block, no text or symbols present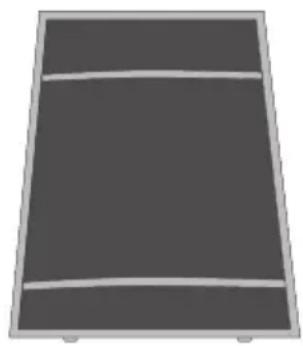
natural_image
Simple gray rectangular object with horizontal white stripes, no text or symbols visible| Introduction | 4 |
| Description | 4 |
| Extraction systems 5 |
Use
Controls 6
Maintenance
| Cleaning | 7 |
| Grease filters 8 | |
| Carbon filters 9 | |
| Lighting | 9 |
Faults
What should I do if... 10
Faults table 10
Matching accessories
Matching accessories 11
Appendice
Disposal of appliance and packaging 12
Introduction
Congratulations on your choice of this appliance. This product was designed with simple operation and optimum comfort in mind.
This manual describes the best way to use this appliance. In addition to information on operation, you will also find background information that may come in handy when using the appliance.

Please read the separate safety instructions carefully before using the appliance.
Read this manual before using the appliance and keep it in a safe place for future use.
Description
flowchart
graph TD
    A["0"] --> B["Circle"]
    BCDE["1"] --> D["Circle"]
    B --> E["Circle"]
    D --> F["Circle"]
    E --> G["Circle"]
    F --> H["Circle"]
    G --> I["Sun"]
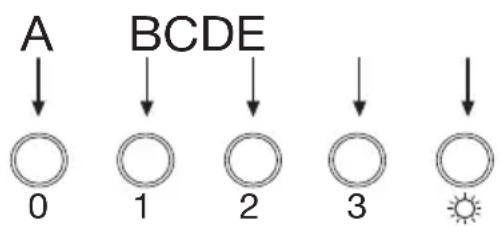
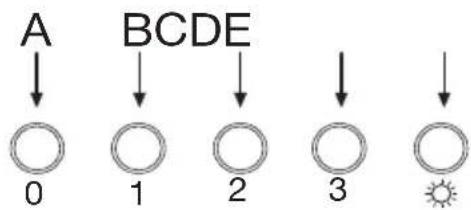
A Switch off
B Fan position 1
C Fan position 2
D Fan position 3
E Lighting
Exhaust systems

natural_image
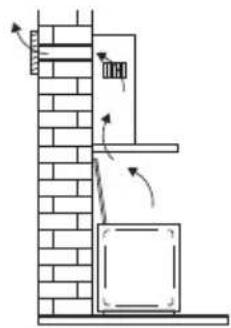
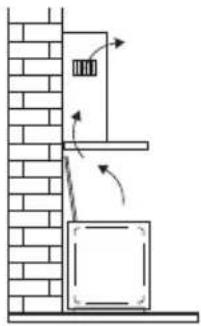
Diagram of a building interior with brick walls, a chimney, and a cabinet (no text or symbols)The cooker hood can, depending on the model, be connected in one of two ways:
- As a cooker hood connected to an exhaust duct.
The cooking fumes are drawn into the cooking hood, filtered, and exhausted outdoors. This is the best way!

natural_image
Diagram of a vertical structure with brick wall and adjacent panel, showing directional arrows indicating motion (no text or symbols)- As a recirculation cooker hood.
The cooking fumes are drawn into the cooking hood and the grease droplets and odours are filtered out.
The filtered air is not exhausted outdoors, but is returned to the kitchen. You then need to fit a carbon filter.
Note! The carbon filter for recirculation must be ordered separately and replaced regularly.
Operation
flowchart
graph TD
    A["A"] --> B["0"]
    BCDE["BCDE"] --> D["1"]
    BCDE --> E["2"]
    BCDE --> F["3"]
    BCDE --> G["Sun"]
Switching fan on and off
-
Press the speed button B, C or D The extractor hood switches on in the corresponding position.
-
Press the off button A. ▶The fan will switch off.
Switching lighting on and off
- Press the lighting button E. ▶The lighting switches on.
- Press the lighting button E again. ▶The lighting switches off.
Cleaning

Attention! Before carrying out maintenance work, always disconnect the cooker hood from the power supply by pulling out the plug or switching off the power at the fuse box.

The hood must be cleaned regularly, both inside as well as outside (with at least the same regularity as used for cleaning the grease filters). Do not use any products that contain abrasive materials. Do not clean with alcohol!

Attention! If you do not follow these instructions with regards to the cleaning of the appliance and the cleaning or replacement of the filters, this can lead to fire. It is essential to follow these instructions!
The manufacturer is not liable for damage to the motor or damage as a result of fire that is due to improper servicing or not following the above safety requirements.

Cooker hood
Clean the cooker hood with soapy water and a soft cloth. Then treat with clean water. Do not use any aggressive cleaning agents such as soda. The lacquer of the cooker hood will remain in good condition if you rub the lacquer with wax once in a while.

Stainless steel hoods
Do not use scouring sponges or other abrasives on stainless steel hoods. Finish with a non-abrasive, non-polishing agent and scrub in the direction of the brushing of the stainless steel.

Metal grease filters
Metal grease filters should be cleaned once a month (or when indicated by the filter saturation indication system, if present on your model), using a neutral cleaning agent, preferably by hand or in the dishwasher on a short, low-temperature program. Place the grease filters with the openings facing downwards in the dishwasher so the water can drain out of the filter. Aluminum-colored and black grease filters become dull as a result of dishwasher cleaning agents. This is normal and does not effect the working.
Grease filters

Regular filter cleaning ensures optimal performance and prevents release of cooking odours when the appliance is not in use.
Clean the grease filters at least once a month. During cleaning, the aluminium parts of the filters may become dull as a result of the cleaning agents used, particularly when placed in the dishwasher. This is normal.
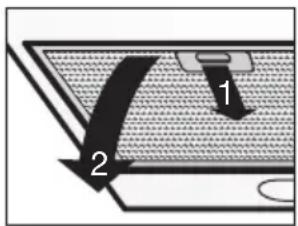
Removing the filter cassette
- Switch off the appliance and the lighting.
- Using the recess, press the filter backwards and tip it downwards at the front.
- Remove the filter from the hood.
Cleaning
- The filters can be easily cleaned by hand. Clean the filters in water and washing-up liquid and rinse them. Afterwards, let the filters drain and dry thoroughly before replacing them.
- You can also clean the filters in the dishwasher if necessary. Afterwards, let the filters drain and dry thoroughly before replacing them.
- The underside of the extractor hood can be cleaned with a mild cleaning agent and a moist cloth.
Reinstalling filter cassette
Make sure the filters are thoroughly dry before replacing them. The filter has to be installed with the locking mechanism at the front.
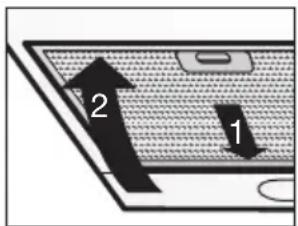
- Open the locking mechanism. This pulls the projections at the front of the filter inwards. When installing the filters hold the locking mechanism in this position.
- Push the projections at the back of the filter into the openings provided for this purpose at the rear of the extractor hood.
- Hinge the filter upwards.
- Release the locking mechanism. The projections at the front of the filter move outwards into the openings provided for this purpose at the front of the extractor hood.
Carbon filters
natural_image
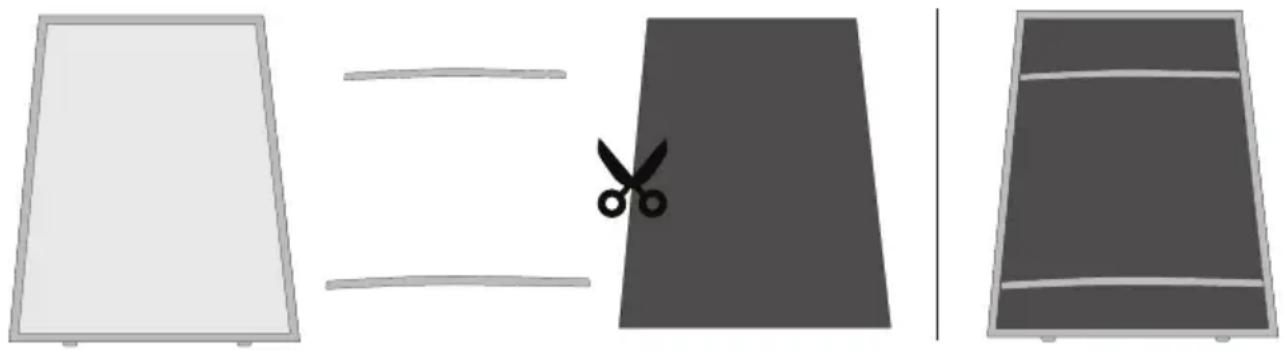
Three-panel image showing a white rectangular panel, a dark gray rectangular panel with a cutout of scissors, and a separate dark gray rectangular panel with horizontal stripes (no text or symbols)- If the appliance cannot drain to the outside, you will need to install an carbon filter to neutralise cooking odours.
- Cut the filter material to fit the filter and attach it to the grease filter frame using the two brackets provided as shown in the drawing.
- If the appliance cannot drain to the outside, you will need to install an carbon filter to neutralise cooking odours.
-
Cut the filter material to fit the filter and attach it to the grease filter frame using the two brackets provided as shown in the drawing.
-
Note that this application causes a sharp increase in noise and significantly reduces the performance of the appliance.
- The internal filter should be replaced every 3 months as it becomes saturated sooner.
Important:
- Filter saturation depends on the intensity of use, cooking methods and the regularity with which the grease filters are cleaned.
- The applied carbon filters are for single use and should be disposed of via the residual waste.
Lighting

This hood is fitted with a light system. This light system has to be replaced by an authorized technician. Do not attempt to replace it by yourself.

The lamp in this household appliance is only suitable for illumination of this appliance. The lamp is not suitable for household room illumination.

What should I do if...
If the appliance does not work properly, this does not always mean that it is defective. Try to deal with the problem yourself first. Phone the service department if the advice given below does not work.
Attention!
Disconnect the appliance from the mains before starting the repair, preferably by removing the plug from the socket or setting the main switch to zero.
Faults table
| Symptom Possible cause Solution | ||
| Lighting is not functioning. Light system defective. The light system has to be replaced by an authorized technician. Do not attempt to replace it by yourself. | ||
| Extractor hood makes a noise. | Discharge too long or too many bends in the duct. | Change the discharge ducting (see installation guide). |
| Flap defective. Phone the service department. | ||
| Carbon filters inserted. More noise is produced when carbon filters are used than when the cooker hood is used with an exhaust vent. | ||
| No extraction. Flap or controle defective. Phone the service department. | ||
Matching accessories
• HF2028 carbon filter set (replace every 4 months).

Scan the QR code to order the above accessories for your appliance.
Disposal of packaging and appliance
Sustainable materials were used in the manufacture of this appliance. At the end of its life cycle, this appliance must be disposed of in a responsible manner. You can obtain more information from the authorities.
The packaging of the appliance is recyclable. The following materials may have been used:
- cardboard;
• polyethylene foil (PE);
• CFC-free polystyrene (PS hard foam).
Dispose of these materials in a responsible manner and in accordance with governmental provisions.
natural_image
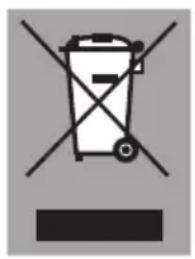
Symbol of a trash bin crossed with no text or numbers, representing waste sorting or disposal (no text present)To designate the requirement of sorted processing of electrical household equipment, the symbol of a crossed-out waste container is displayed on the product. This means that at the end of its life span, the appliance may not be added to the regular household waste. The appliance must be brought to a special municipal centre for sorted waste collection or to a dealer that provides this service.
The separate processing of a household appliance prevents possible negative consequences for the environment and health which exist due to inappropriate processing. Separate processing ensures that the materials of which the appliance is made can be recovered to obtain a considerable savings of energy and raw materials.

Conformity declaration
We declare that our products comply with the applicable European Directives, Resolutions and Regulations, as well as all requirements specified in the standards to which reference is made.
Op onze website kunt u de meest recente versie van de gebruiksaanwijzing vinden. Vous pouvez trouver la version la plus récente de le mode d'emploi sur notre site Web. You can find the most recent version of the instructions for use on our website. Die neueste Version der Bedienungsanleitung finden Sie auf unserer Website.
www.etna.nl
www.etna.be
960390

- Use
- Maintenance
- Faults
- Matching accessories
- Appendice
- Introduction
- Please read the separate safety instructions carefully before using the appliance.
- Description
- Exhaust systems
- The cooker hood can, depending on the model, be connected in one of two ways:
- Operation
- Switching fan on and off
- Switching lighting on and off
- Cleaning
- Cooker hood
- Stainless steel hoods
- Metal grease filters
- Grease filters
- Removing the filter cassette
- Reinstalling filter cassette
- Carbon filters
- Important:
- Lighting
- What should I do if...
- Attention!
- Disposal of packaging and appliance
- Conformity declaration
Brand : ETNA
Model : AP491RVS
Category : Basket