
TAW12CRNWOW - Air Conditioning TCL - Free user manual and instructions
Find the device manual for free TAW12CRNWOW TCL in PDF.

| Product Type | Window Air Conditioner |
| Brand | TCL |
| Model | TAW12CRNWOW |
| Cooling Capacity | 12,000 BTU/h |
| Power Supply | 115 V ~ 60 Hz, 12 A |
| Plug Type | Polarized 3-prong plug with grounding |
| Recommended Electrical Protection | 15 A time-delay fuse or circuit breaker |
| Operating Modes | Auto, Cool, Dry, Fan, Eco, Sleep |
| Fan Speed | High, Medium, Low, Auto |
| Temperature Range | 16 °C to 31 °C (61 °F to 88 °F) |
| Timer | Programmable on/off from 0.5 to 24 hours |
| Remote Control | Yes, with AAA batteries included |
| Wi-Fi Connectivity | Yes, via TCL Home Comfort app (2.4 GHz only) |
| Filter Indicator | Light after 500 hours of operation |
| Filter Cleaning | Clean regularly with a vacuum or warm water |
| Installation | Double-hung window, required tilt to the outside |
| Safety | Grounding required, do not use extension cord, RESET button on the cord |
| Approximate dimensions (W x H x D) | 50 x 35 x 60 cm |
| Approximate Weight | 30 kg |
| Repairability | Spare parts available through TCL customer service |
| Package Contents | Air conditioner, mounting rail, filler panels, remote control, batteries, screws, sealing gaskets |
Frequently Asked Questions - TAW12CRNWOW TCL
User questions about TAW12CRNWOW TCL
0 question about this device. Answer the ones you know or ask your own.
Ask a new question about this device
Download the instructions for your Air Conditioning in PDF format for free! Find your manual TAW12CRNWOW - TCL and take your electronic device back in hand. On this page are published all the documents necessary for the use of your device. TAW12CRNWOW by TCL.
USER MANUAL TAW12CRNWOW TCL
Hi! Let's Get Started.

natural_image
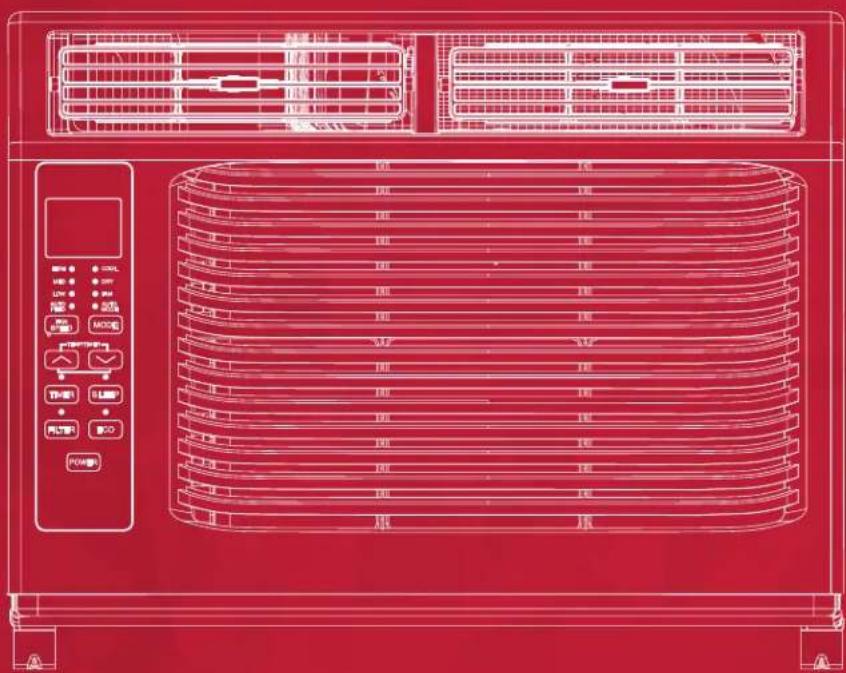
Red technical line drawing of a front air conditioner unit with control panel and fan (no text or symbols)IMPORTANT SAFETY INSTRUCTIONS
Before installing and using your air conditioner, please read this owner's manual carefully. Store this manual in a safe place for future reference. Your safety and the safety of others is very important to us. Please pay attention to all safety messages outlined in this owner's manual.
WARNING: To reduce the risk of fire, electrical shock or injury when using your air conditioner, follow the following basic precautions:
ELECTRICAL REQUIREMENTS
The electrical ratings for your air conditioner are listed on the model and serial number label located on the front right hand side of the
unit (when facing the front).
REGISTER YOUR APPLIANCE
You can register your appliance online by going to tclusa.com/registration
Be sure to retain your original sales receipt. A valid proof of purchase is required for all warranty claims.
BATTERY WARNING STATEMENT
Do not mix old and new batteries and do not mix alkaline, standard (carbon-zinc) or rechargeable (ni-cad, ni-mh, etc.) batteries
Document your model and serial numbers here:
Model #
Serial #
You can locate your 20 digit serial number underneath the bar code (On the right hand side of the AC).
WARNING
Electrical Shock Hazard
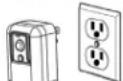
Plug into a grounded 3 prong outlet.
Do not remove the ground prong.
Do not use an adapter
Do not use an extension cord.
Failure to follow these instructions can result in
death, fire, or electrical shock
Specific electrical requirements are shown in the diagram below. Follow the requirements below for the type of plug on the power supply cord.
Wiring Requirements Power Supply Cord
• 115 Volt (103 min - 127 max)
• (5K-8K) (0-8 amps)
• (10K-12K) (0-12 amps)
• (5-8K) (10 amp time-delay fuse or circuit breaker)
• (10K-12K) (15 amp time-delay fuse or circuit breaker)
- Use on single outlet circuit only
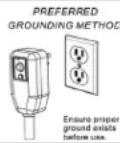
RECOMMENDED GROUND METHOD
For your personal safety, this air conditioner must be grounded. This air conditioner is equipped with a 3 prong power supply cord with a grounded plug. To minimize the possibility of electrical shock, the cord must be plugged into a 3 prong outlet and grounded in accordance with all local codes and ordinances. If a 3 prong outlet is not available, it is the customer's responsibility to have a properly grounded 3 prong outlet installed by a qualified electrician.
FCC CAUTION
This device complies with part 15 of the FCC Rules. Operation is subject to the following two conditions: (1) This device may not cause harmful interference, and (2) this device must accept any interference received, including interference that may cause undesired operation. Any Changes or modifications not expressly approved by the party responsible for compliance could void the user's authority to operate the equipment.
Note: This equipment has been tested and found to comply with the limits for a Class B digital device, pursuant to part 15 of the FCC Rules. These limits are designed to provide reasonable protection against harmful interference in a residential installation. This equipment generates uses and can radiate radio frequency energy and, if not installed and used in accordance with the instructions, may cause harmful interference to radio communications. However, there is no guarantee that interference will not occur in a particular installation. If this equipment does cause harmful interference to radio or television reception, which can be determined by turning the equipment off and on, the user is encouraged to try to correct the interference by one or more of the following measures:
-Reorient or relocate the receiving antenna.
-Increase the separation between the equipment and receiver.
-Connect the equipment into an outlet on a circuit different from that to which the receiver is connected.
-Consult the dealer or an experienced radio/TV technician for help.
The distance between user and device should be no less than 20cm.
DO NOT RETURN TO STORE
WE ARE
READY TO
HELP
contact us first
with any questions

TCL SUPPORT:
www.tclusa.com/support
1-800-825-6747

BE CAREFUL WHEN REMOVING
THE AIR CONDITIONING UNIT
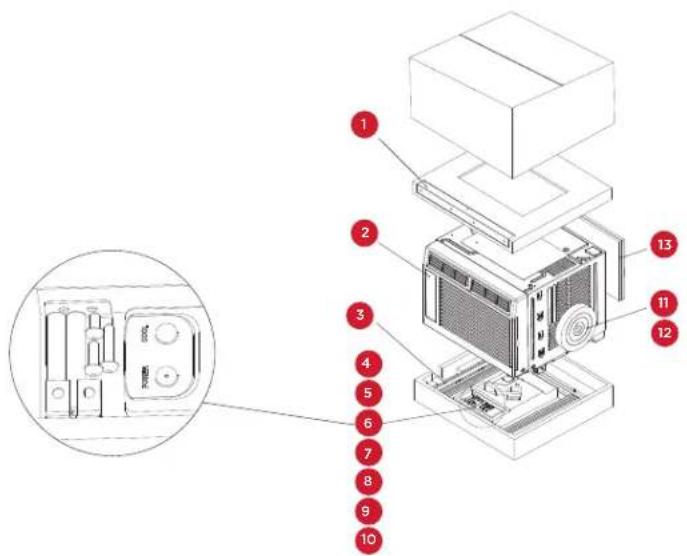
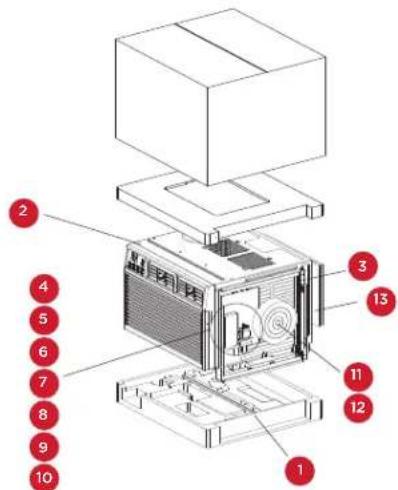
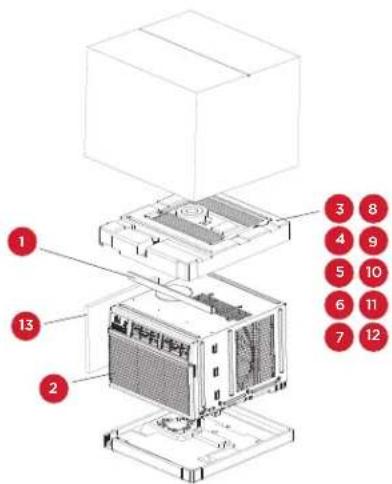
What's in the box
5K - 6K Units
Open the carton and remove the below parts.
| NO. APPEARANCE PART NAME QUANTITY | |||
| 1 |  | Top Rail 1 | |
| 2 |  | AC Unit 1 | |
| 3 |  | Filler Panels(labeled “Left” & “Right”) | 2 |
| 4 |  | Remote Control 1 | |
| 5 |  | Sash Lock 1 | |
| 6 |  | Battery (AAA) 2 | |
| 7 |  | Lock Frame 2 | |
| 8 |  | 3/8” Screws 4 | |
| 9 | 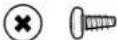 | 1/2” Screws | 3 |
| 10 | 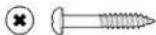 | 3/4” Screws | 4 |
| 11 |  | Window Sash Seal | 1 |
| 12 | 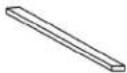 | Foam Top Window Gasket | 1 |
| 13 |  | Foam Insulation(only for E-star models) | 2 |
Tip! Before unboxing, cut the tape along the top of the box to loosen contents inside. Once you lift and remove the box, check the inside of the box as some parts may be stuck at the top. You can find the screws and other parts located in the tray beneath the AC unit.
What's in the box
8K Units
Open the carton and remove the below parts.
| NO. APPEARANCE PART NAME QUANTITY | |||
| 1 |  | Top Rail 1 | |
| 2 | 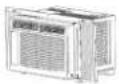 | AC Unit 1 | |
| 3 | 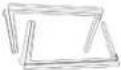 | Filler Panels (labeled “Left” & “Right”) | 2 |
| 4 | [GT58] | Remote Control 1 | |
| 5 |  | Sash Lock 1 | |
| 6 |  | Battery (AAA) 2 | |
| 7 |  | Lock Frame 2 | |
| 8 |  | 3/8" Screws 4 | |
| 9 | 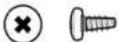 | 1/2" Screws 3 | |
| 10 | 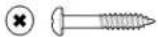 | 3/4" Screws | 4 |
| 11 |  | Window Sash Seal | 1 |
| 12 | 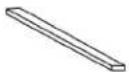 | Foam Top Window Gasket | 1 |
| 13 |  | Foam Insulation (only for E-star models) | 2 |
Tip! Before unboxing, cut the tape along the top of the box to loosen contents inside. Once you lift and remove the box, check the inside of the box as some parts may be stuck at the top. You can find the screws and other parts located in the tray beneath the AC unit.
What's in the box
10K-12K Units
Open the carton and remove the below parts.
| NO. APPEARANCE PART NAME QUANTITY | |||
| 1 | | Top Rail 1 | |
| 2 | 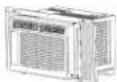 | AC Unit 1 | |
| 3 | | Filler Panels (labeled “Left” & “Right”) | 2 |
| 4 |  | Remote Control 1 | |
| 5 |  | Sash Lock 1 | |
| 6 | | Battery (AAA) 2 | |
| 7 | [0WTH] | Lock Frame 2 | |
| 8 |  | 3/8" Screws 4 | |
| 9 |  | 1/2" Screws 3 | |
| 10 |  | 3/4" Screws | 4 |
| 11 |  | Window Sash Seal | 1 |
| 12 | [008H] | Foam Top Window Gasket | 1 |
| 13 |  | Foam Insulation (only for E-star models) | 2 |
Tip! Before unboxing, cut the tape along the top of the box to loosen contents inside. Once you lift and remove the box, check the inside of the box as some parts may be stuck at the top. You can find the screws and other parts located in the tray beneath the AC unit.
Let's get started!
Step 1: Testing
Before you install the AC, let's test it to make sure it made it safely to your home and your outlet is proving proper power. Place it on a flat surface, plug it directly into a wall outlet, and turn it on. Next use the Mode button on your control panel and put the AC into Cool Mode and press the down arrow to set the temperature to the lowest setting. After 3 minutes, the AC should be blowing cool air. If so, please continue on to the next step. If not, see detailed troubleshooting tips at tclusa.com/support.
Step 2: Installation
A few quick notes before installing:
- This unit is made to fit inside a standard double-hung window.
-
Check the size of your window before installing.
-
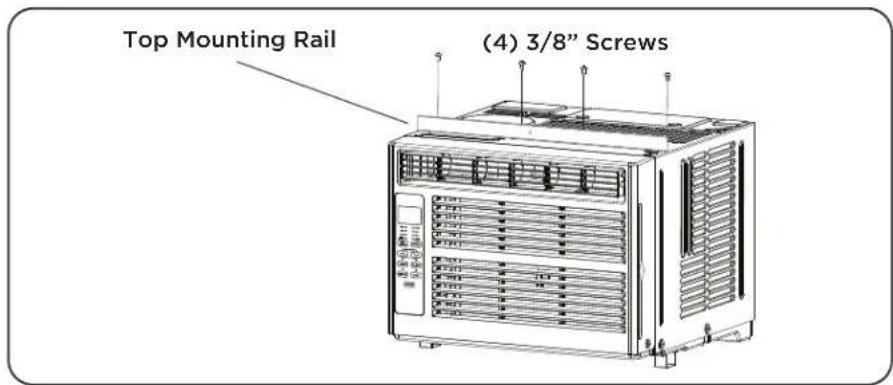
Use the (4) included 3/8" screws to fasten the top mounting rail to the unit.
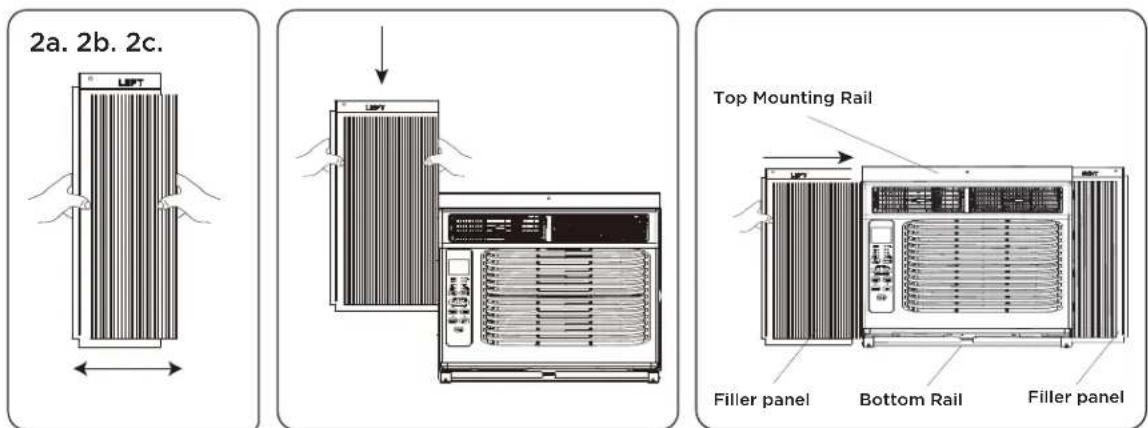
- Fasten the accordion styled window panel expander pieces to the unit. They are marked "Right" and "Left". Pull the leading edge of them to its maximum width. Then slide the panel expanders into the grooved notches (slide downward) on the sides of the unit, and make sure they are inserted into the metal rails tightly.
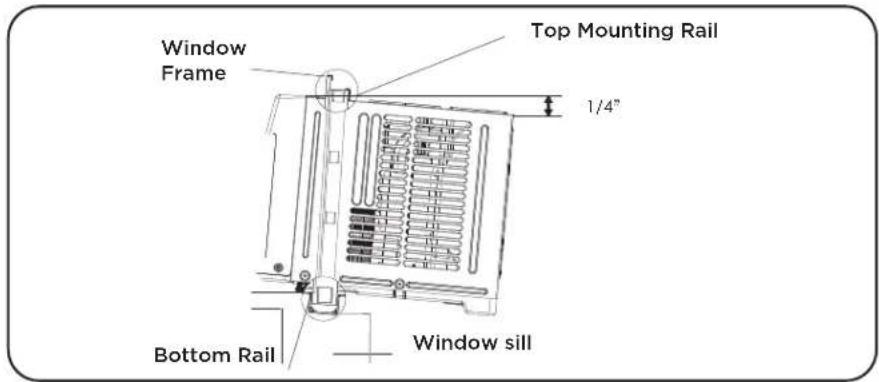
- Carefully place the window air conditioner into the window where it is to be installed (2 people are recommended for this step). Close the window securely. The AC unit should be slightly tilted to the outside area to allow water to drain out from the unit.
4a. Fasten the air conditioner to the window frame, using the included 12 " screws. Fasten each of the panel extenders (Left and Right). You may have to drill a pilot hole in the window frame to fasten these screws to the window sash.
4b. Attach the lock frame between the panel extender and the window sill and fasten them together with the included 34 " locking screw. Repeat for each side.

4c. Attach the sash lock between the top of the sliding window and window frame, using 1 of the included 34 screws to secure the window closed.
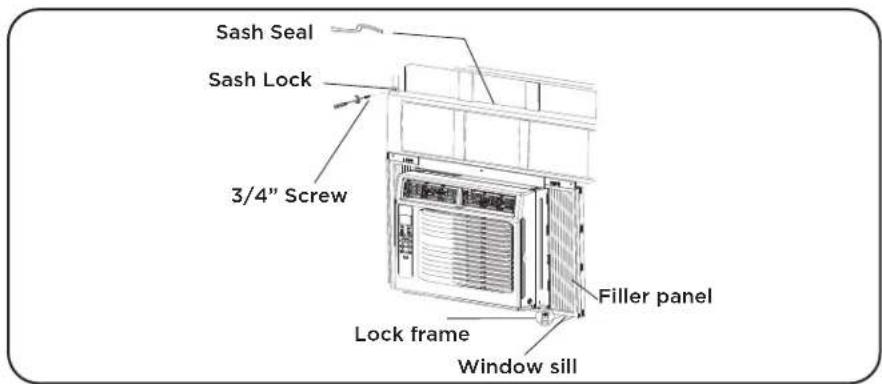
4d. To prevent outside air from entering the room, insert the foam top window gasket, cut to the width of the window.
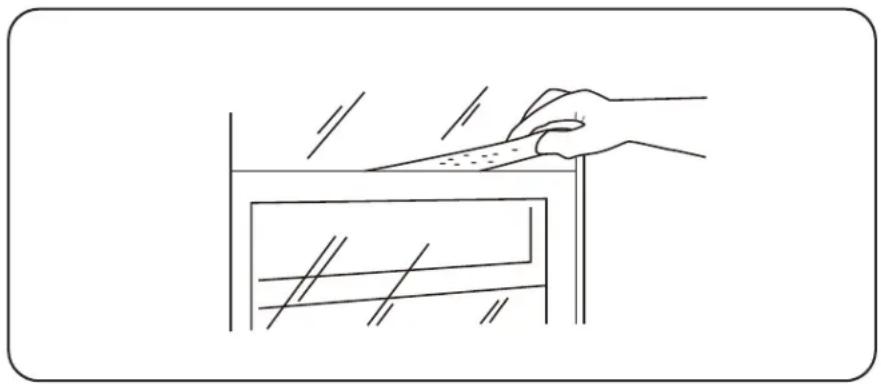
natural_image
Line drawing of a hand using a tool to cut or mark a rectangular object, no text or symbols present- Plug the unit into the electrical outlet as specified above in the electrical requirements. Move the control to the COOL mode.
How to Control Your AC
All the basics you need to know to stay cool!
- Power - turn the air conditioner on and off.
- ∧ and ∨ Buttons - use these buttons on the control panel or remote control to increase or decrease the desired temperature, or time using the Timer. The temperature range is: 61 -88 degrees Fahrenheit or 16 - 31 degrees Celsius.
- Display - By pressing the Display button on the remote, it can switch off/on all lights and LED Display. When the timer is not in use, the operation mode and the set temperature will be displayed. Time will be displayed under the timer setting.
- Modes - Press the mode button on the control panel to cycle and select a MODE, OR select a MODE by pressing the desired button on the remote.
- Auto Mode – press the MODE button on the panel or the Auto Mode button on the remote - In AUTO mode the unit automatically chooses the mode of operation (COOL, DRY or FAN). In this mode the temperature will be set according to the room temperature (tested by the temperature sensor which is incorporated in the indoor unit.).
- Cool Mode - press the MODE button on the panel or the Cool button on the remote - The cooling function allows the air conditioner to cool the room and at the same time reduces air humidity. Adjust the fan speed and air temperate to your desired comfort level. In this mode, if Eco is not enabled, the fan may continue to run after reaching the desired temperature.
- Eco Mode – press the ECO MODE button on the panel or the ECO button on the remote - When the unit is in ECO mode, the light will turn on. In ECO mode, the unit will turn off once the room is cooled to the user-set temperature. The unit will turn back on when the
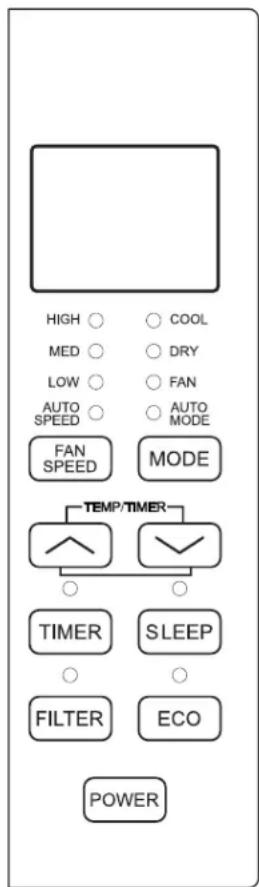
room temperature rises above the user-set temperature. While in ECO mode the fan will occasionally turn on for a few seconds in order to take a accurate temperature reading.
- Fan Mode - press the MODE button on the panel or the Fan Only button on the remote. This Fan Only mode only works when the air conditioner is vented.
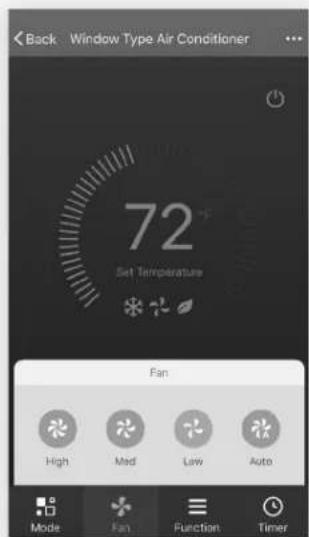
- Fan Speed - press the FAN SPEED button on the panel or the Fan Speed button on the remote - Press the FAN SPEED button to choose the fan speed options. You can choose Hi, Med, Lo or auto speed in COOL mode and choose Hi, Med, Lo in FAN mode.
-
Dry Mode - available only by pressing MODE button on the panel - This function reduces the humidity of the air to make the room more comfortable. Press the MODE button to set the DRY mode. An automatic function of alternating cooling cycles and air fan is activated.
-
Timer Button - press the TIMER button on the panel or the Timer button on the remote to set the timer.
-
Set Timer On: With the AC off, press the Timer button and then use the and buttons to set the desired temperature. Press the Timer button again and use the and buttons to set the desired amount of time before the AC turns on. Press the timer button again to start the countdown.
- Set Timer Off: With the AC on, press the Timer button and then use the ∧ and ∨ buttons to set the length of time before the AC will turn off. Press the timer button again to start the countdown.
Note: It can be set to automatically turn off or on in 0.5-24 hours. Each press of the buttons will increase or decrease the timer. The Timer can be set in 0.5 hours increment below 10 hours and 1 hour increments for 10 hours or above.
The SET light will turn on while setting. To cancel the set function, press the TIMER button again.
- Sleep Button - press the SLEEP button on the panel or the Sleep on the remote - by doing so, all of the display lights will turn off after a while, but the Sleep light is always on. In SLEEP mode, the air conditioner will automatically adjust the temperature and fan speed to make the room more comfortable during the night. The set temperature will automatically raise every 30-60 minutes, and at most change six times until the set temperature is 81 or 82 degrees.
- Filter Button - After the fan motor runs for 500 total hours, the Filter Check light will turn on to remind the user to clean the filter. After you clean the filter, you can turn off the light by pressing the Filter button.
Normal Operating Sounds
You may hear a pinging noise, caused by the water hitting the condenser on rainy days, or when the humidity is high. This design feature helps remove moisture and increase efficiency. You may hear the thermostat click when the compressor cycles on and off. Water will collect in the base pan on rainy days, or high humidity days. The water may overflow and drip from the unit on the outside. The fan may run, even when the compressor is not on.
Troubleshooting
Having trouble completing installation? Don't worry, it's usually an easy fix.
| PROBLEM POSSIBLE CAUSES SOLUTIONS | ||
| Air Conditioner will not start | The air conditioner is unplugged | Make sure the air conditioner is plug is pushed completely into the outlet |
| The fuse is blown/circuit breaker is tripped | Check the house fuse/circuit breaker box and replace the fuse or reset the breaker | |
| Power Failure | The unit will automatically re-start when power is restoredThere is a protective time delay (approx. 3 minutes) to prevent damage to the compressor. For this reason, the unit may not start normal cooling for 3 minutes after it is turned back on. | |
| The current interrupter device is tripped | Press the RESET button located on the power cord plugIf the RESET button will not stay engaged, discontinue use of the air conditioner and contact a qualified service technician. | |
| Air Conditioner does not cool as it should | Airflow is restricted | Make sure there are no curtains, blinds, or furniture blocking the front of the air conditioner |
| The temperature control may not be set correctly | Lower the set thermostat temperature | |
| The air filter is dirty | Clean the filter. See the Cleaning and Care Section of the manual | |
| The room may be too warm | Please allow time for the room to cool down after turning on the air conditioner | |
| Cold air is escaping | Check for open furnace registers and cold air returns | |
| The Cooling Coils are frozen • See “Air Conditioner Freezing Up” below | ||
| Air Conditioner is freezing up | Ice blocks the air flow and stops the air conditioner from cooling the room | Set the MODE to HIGH FAN or HIGH COOL and set the thermostat to a higher temperature |
| Remote Control is not working | The batteries are inserted incorrectly • Check the position of the batteries | |
| The batteries may be dead • Replace the batteries | ||
| Water is dripping outside Hot and humid weather • This is normal | ||
| Water is dripping inside the room | The air conditioner is not correctly tilted outside | For proper water drainage, make sure the air conditioner is slightly tilted downward from the front of the unit to the rear |
| Water collects in the base pan | Moisture removed from the air is draining into the base pan | This is normal for a short period in areas with low humidity and nor mal for a longer period in areas with high humidity |
| Digital Display reads “E1”, “E2” | A sensor has failed • Contact customer service | |
Wi-Fi App Installation and Instruction Manual
(for wifi models only)
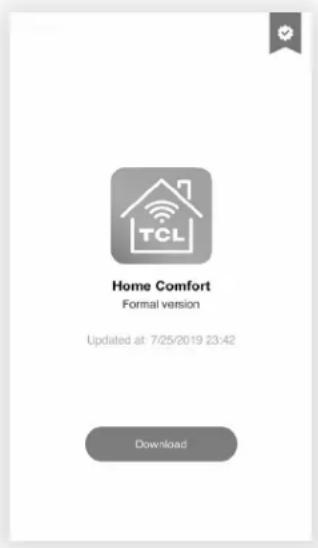
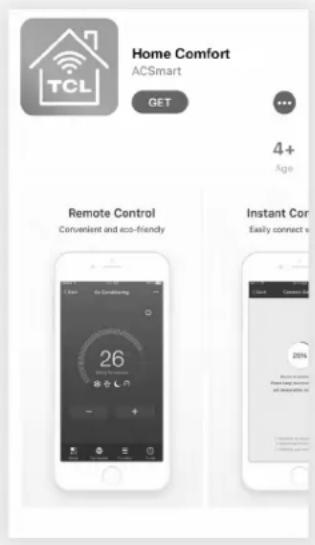
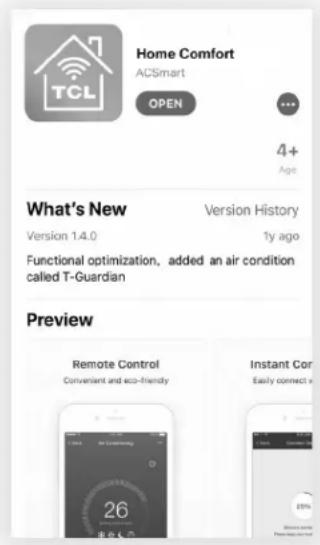
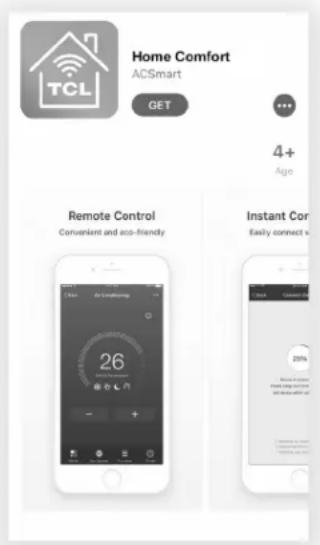
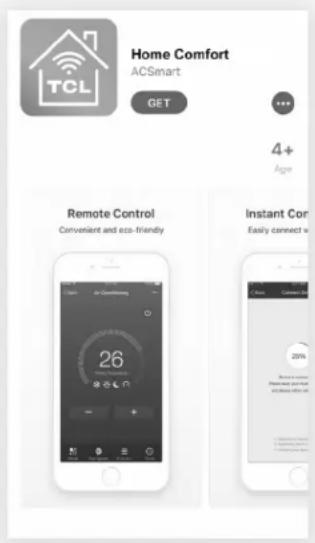
Step 1: Download and Install the TCL Home Comfort App
- Using your camera function on your smartphone, please scan the QR code below to be directed to download the latest App for your TCL branded air conditioner. If your phone does not currently have a QR scanner installed you can download and install one from your App store.


https://smartapp.tuya.com/tcl
Note: The TCL Home Comfort App is supported on 2.4 GHZ Wi-Fi Channels only. Please be sure your connection is using a Wireless channel broadcasting in 2.4GHZ
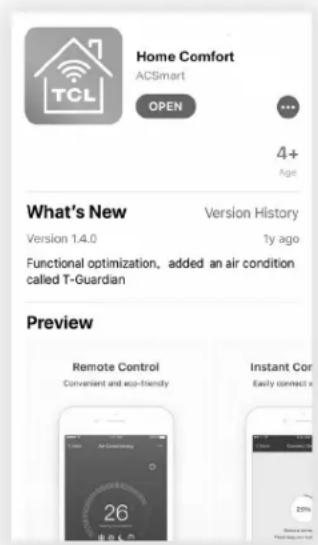
- After navigating to the TCL Home Comfort App select DOWNLOAD, INSTALL, and then OPEN.
Step 2: Activate the TCL Home Comfort App
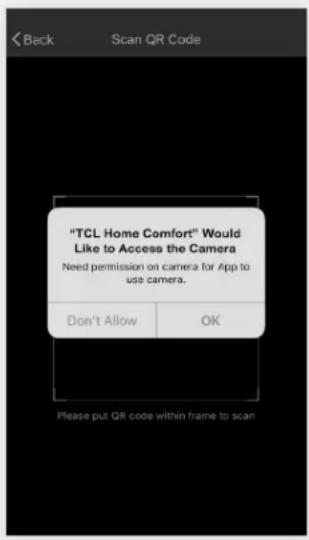
- The first time you access the App after downloading, an activation screen will appear. Scan the activation QR code using your phones camera (click the "Scan" button and scan the QR code below).
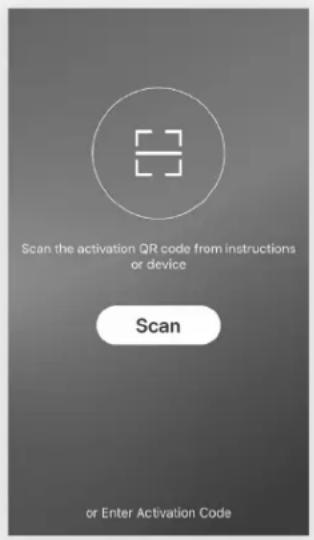


Note: If scanning the QR code, TCL Home Comfort must be provided permission to access the camera.
If permission is not granted, the alternative method of entering the TCL activation code is still available.
- You can also type in the activation code TCL after clicking on the Enter Activation Code prompt at the bottom of the screen.
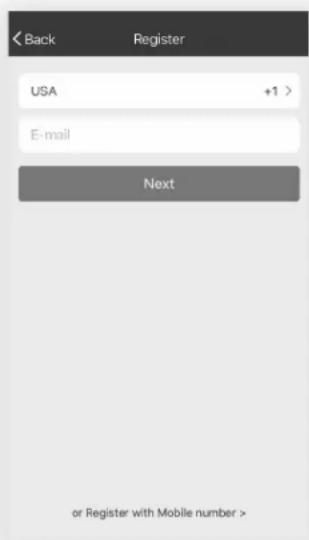
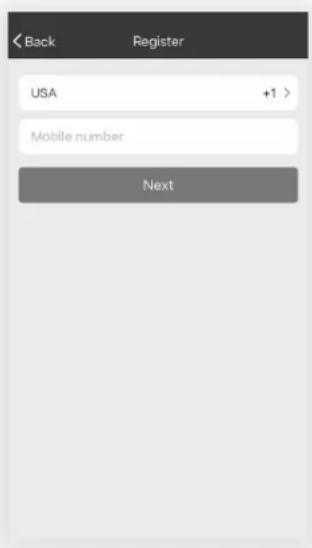
Step 3: Register Your Account
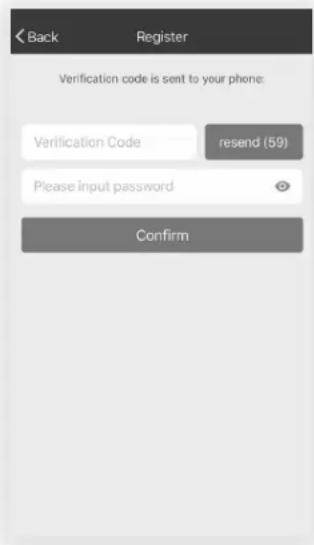
- Once you download the App, you will need to create an account. Click the "Register" button to begin the registration process. You can register with your email address OR with a mobile phone number.
Register with an email address:


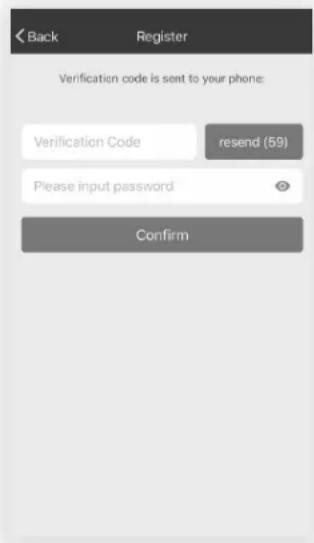
Register with a mobile phone number: Select "or Register with Mobile number" on the bottom of the screen. You will be sent a verification code via text to complete the registration process.
Step 4: Login to Your User Account
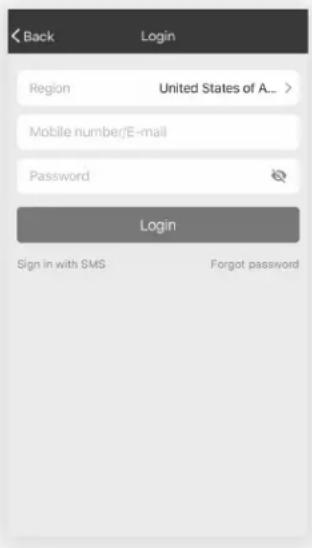
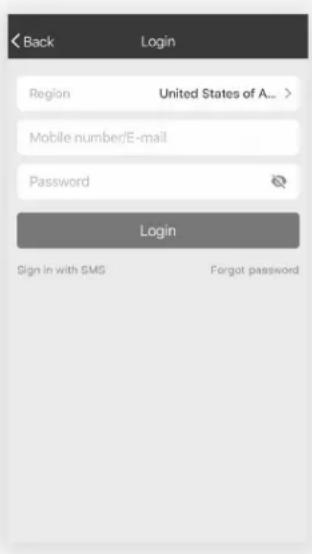
- Once you have registered and created an account, click the "Login" button. You will be able to login with either the email account or mobile phone number you registered with.
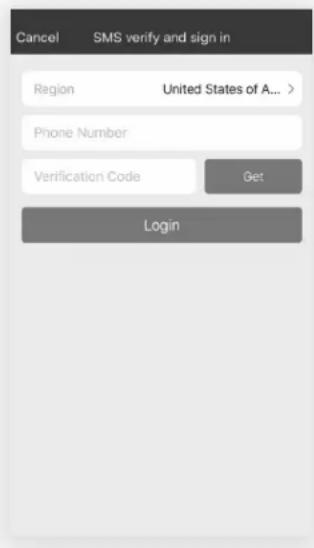
- For phone number login: You will be requested each time to validate login with a login code sent via text. Press the "Sign In with SMS" button to enter the login screen. Type in your phone number and press "Get" to receive a verification code. Once the verification code is received, type it into the login screen and press "Login".
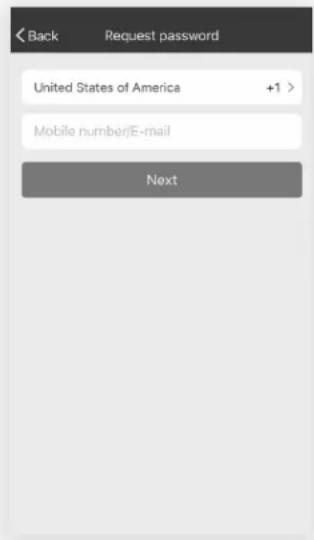
Forgot Password?
If you forget your password, you can retrieve it by following these instructions:
- Press the "Forgot password" button to enter the next page.
-
Type in the registered phone number or email address and press the "Next" button to continue.
-
You will receive a verification code to continue. Type in the code received and set a new password. Press the "Confirm" button to finish.

Step 5: Add Your AC Unit
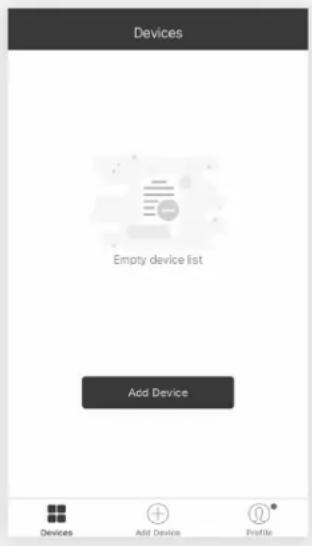
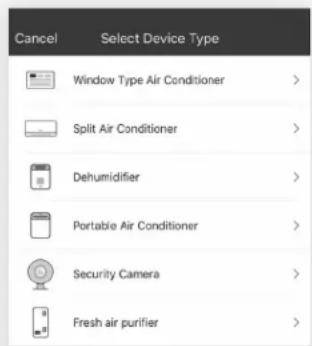
After installing the TCL Home Comfort App on your mobile device, you must then add your AC unit to be controlled by your installed app. Follow the directions below:
- Press the "Add Device" and click the type of product you are connecting to.

Step 6: Connect Your AC Unit to the Wireless Network
There are two setup Modes/Methods to connect the AC unit to the wireless network.
Reminder: The TCL Home Comfort App only works on 2.4 GHZ networks.
Note: The default set-up mode will be CF mode when first starting the AC unit.
CF Mode - When setting up your AC unit using a Wi-Fi connection using the CF mode, the AC unit being connected for Wi-Fi operation will automatically search for an available wireless network and connects automatically when the setup directions are followed. The unit and device will be synced together afterwards.
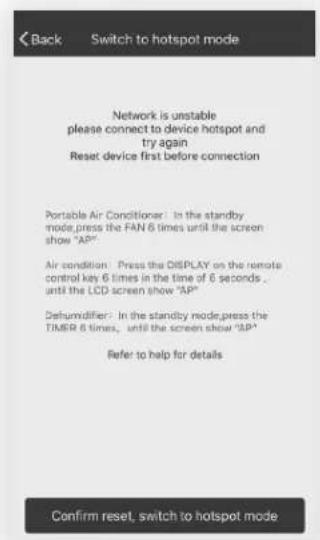
AP Mode - If your AC unit does not connect to the mobile device through the wireless network using the setup instruction in CF mode, you can connect the mobile device to the AC unit using the air conditioner's Wi-Fi adapter or "Device hotspot". The AC unit will show as a wireless network under the mobile devices Wi-Fi connections as "TCLHomeComfort -xxxx". You can then connect the mobile device from the AC unit's hotspot. After the AC unit is turned off/on the next time you use it, the AC unit will connect to the wireless network the phone is connected to.
Add the AC Unit to the Wireless Network using "CF Mode"
- The App and AC unit automatically defaults to CF mode upon start up. Follow the prompts on the screen and then press "Next Step" to continue.
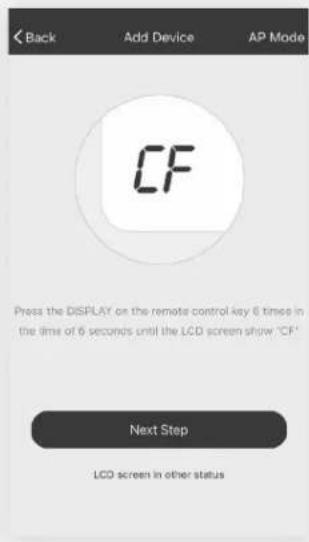
Note: If the AC unit is not in CF mode, press Display on the remote 6 times. After 8 to 10 seconds your will hear two beeps and the AC will display CF.
- Select the network you wish to connect to, enter the router password and press "Next" to continue.

Note: If having difficulties finding or joining your wireless network you may need to give the TCL Home Comfort App permission to enable Location. This setting can typically be found by going to Settings > Apps > TCL Home Comfort and then select to enable Location. The exact location and method to enable this setting varies by phone OS and version.
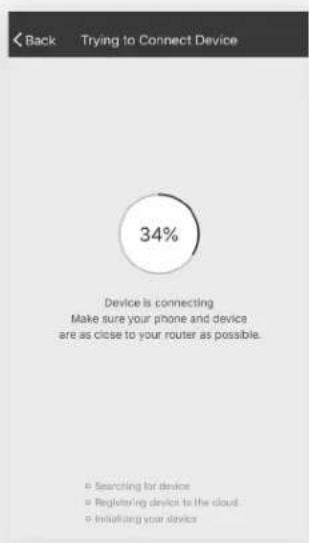
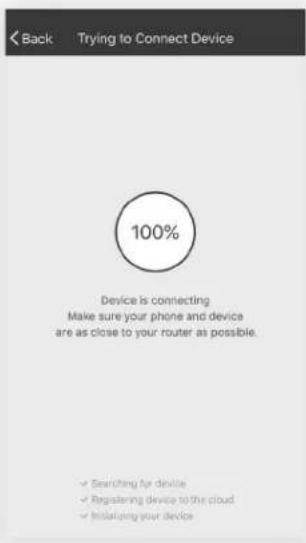
- After connecting to the wireless network, The TCL Home Comfort App software will automatically try to pair with the AC unit. The AC unit's LED screen may display "PP" or "SA", indicating it is searching for the network signal. This may take 10-15 seconds to connect the AC to the network.
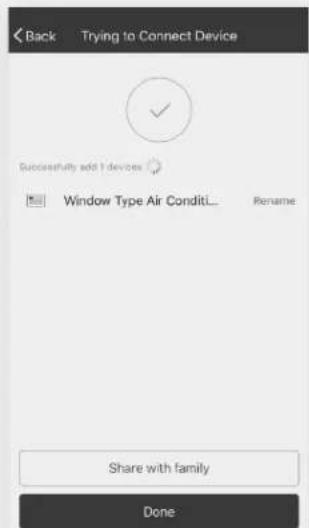
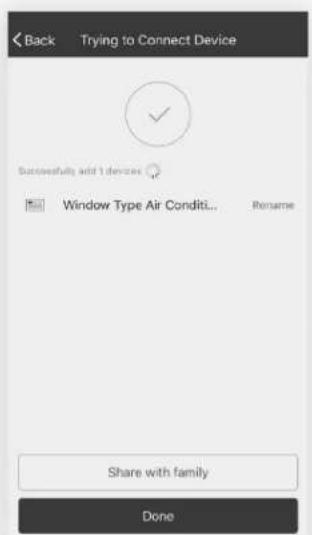
- After successfully pairing the AC unit to the network, the page will display as below. You can "Rename" the AC unit as you like, share with family, or press "Done" to start to controlling the device.
Note: If at any time you need to start over, pressing "Display" on the remote control 6 times will reset the wireless setup configuration on the AC unit back to CF mode. Pressing the "Display" button an additional 6 times after CF mode appears will switch the unit to AP mode. Please allow the unit 10-15 seconds to switch modes if toggling from CF to AP modes.
Add the AC Unit to the Wireless Network using "AP Mode"
If connections to the wireless network fail using the “CF mode”, you can connect using the “AP mode” (using the AC unit as a mobile hotspot).
- On the App page indicating CF mode, click "AP mode" in the top, right-hand corner as illustrated.
- AP should show on the page as illustrated below. Press "Next Step" to continue.
-
To the switch the AC unit over to AP mode - Press "Display" on the remote control 6 times within 6 seconds so the AC unit switches from "CF mode" to "AP mode". Allow the unit 10-15 seconds to switch modes and AP will flash on the AC unit display screen when complete.
-
Select the Wi-Fi network you are trying to connect to, type in the password, and press "Next" to continue.
- Open your mobile device settings to get to Wi-Fi connections.
- "TCLHomeComfort-xxxx" should show as an available network connection option. Connect to the TCLHomeComfort-xxxx network.
- After connecting to "TCLHomeComfort -xxxx" network using the AC unit's Wi-Fi adapter, return to the TCL Home Comfort App to resume setup.
Note: You may need to manually navigate back to the TCL Home Comfort App.
- The AC unit will automatically begin installing/syncing on the mobile device.
-
The AC unit's LED screen may display "PP" or "SA", indicating it is searching for the network signal. This may take 10-15 seconds to connect the AC to the network.
-
When the connection is complete, the TCL Home Comfort App on your mobile device will show the unit as connected with a check mark as illustrated. If the setup connection fails, the App will display a warning. Press "Retry" to try the connection again or "View help".

Connection FailedConnection Successful
- Once connected, you are ready to begin controlling your AC unit from your mobile device. Once your unit cycles on and off after using the AC unit's Wi-Fi adapter to connect, the AC unit will automatically pair with the network your phone is connected to.
Note: If at any time you need to start over, pressing "Display" on the remote control 6 times will reset the wireless setup configuration on the AC unit back to CF mode. Pressing the "Display" button an additional 6 times after CF mode appears will switch the unit to AP mode. Please allow the unit 10-15 seconds to switch modes if toggling from CF to AP modes.
Step 7: Controlling Your AC Unit
- Click the air conditioner name to enter the App control panel. Click the ON/OFF button to adjust the settings.
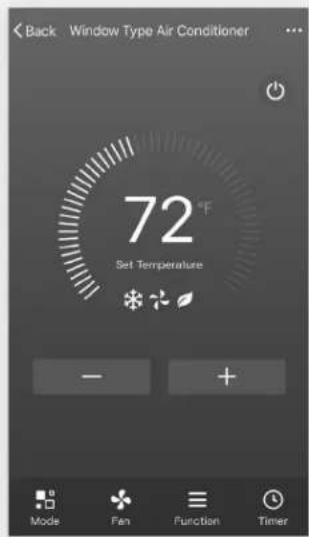
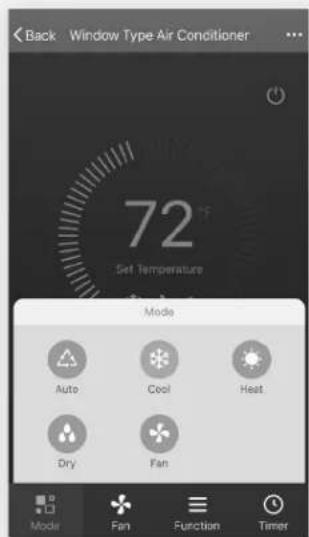
- You can adjust the settings for the operating mode you want to use: Cool, Heat, Dry, Fan, Auto. Click the "Mode" button and choose the mode you would like to change.
Note: Some units also have a heat function. The Heat mode on the App will not be functional or change any settings on AC units that are cool only.
- For Fan mode, click the "Fan" button and choose the speed you want: Low, Med, High, Auto.
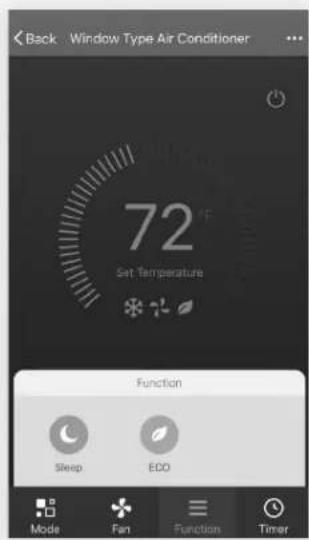
- Other unit controls can be changed by selecting the "Function" button. By selecting the Function control, you can select the Sleep or Eco modes. In Sleep mode, the fan speed will be set to low only.
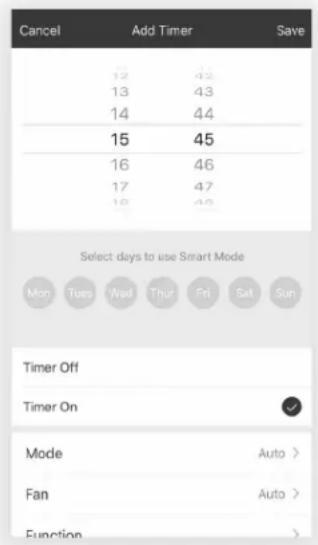
- To set the Timer function: Click the "Timer" button. The App will enter the timer setting screen. It will display times that were previously scheduled. You can press to edit the timer or create a new timer by clicking the "Add Timer" button.

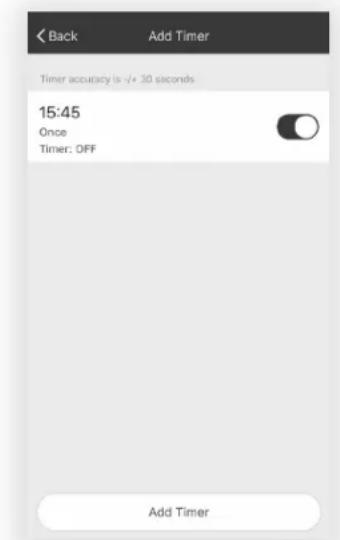
- Click "ON" or "OFF" button to set Timer ON or Timer OFF. You can set the: Hour, Minute, Operate Mode, Operate Fan Speed, Operate Temperature. You can also set a weekly timer. After you're finished setting the timer, click the button to Cancel or Confirm.
Notes:
Dry Mode - temperature is preset at and cannot be changed up or down.
Heat Mode - does not apply to all units. If your AC unit does not have a heat function, the heat mode on the App will not change anything on the AC unit for cooling only models. If your unit has a heater function, you will be able to adjust the temperature up or down.
Fan Mode - temperature is preset and cannot be adjusted up or down.
Auto Mode - temperature is preset and cannot be adjusted up or down.
Cool mode - temperature settings can be adjusted to the desired temperature.
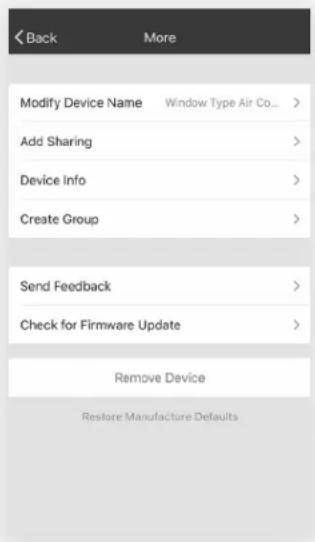
- More Options- From the upper, right-hand corner, you can view or change the following options: Modify Device Name, Device Sharing, Device Info, Feedback, Check for Updates, Remove the Device or Restore Defaults.

- Manage the information in your profile. It includes:
a. Account information.
b. Scan QR code: Opens a QR code reader within the App
c. Share Device: Display user's device sharing information
d. Message Center: Displays all messages that the system sent to the user
e. Feedback: Where users could submit feedback online
f. About: Displays the current App version information
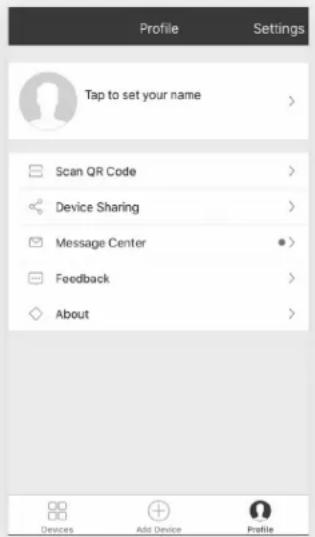
Note: The first registered mobile device is the main control and other devices can only be shared through the primary device. Shared accounts need to be setup for the same country.
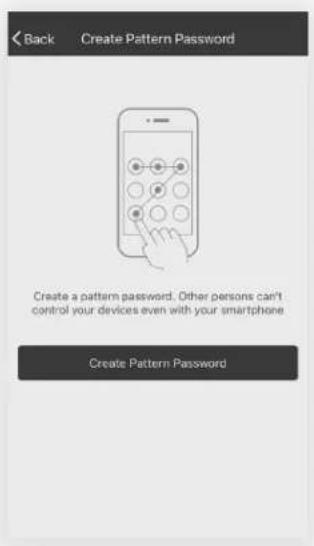
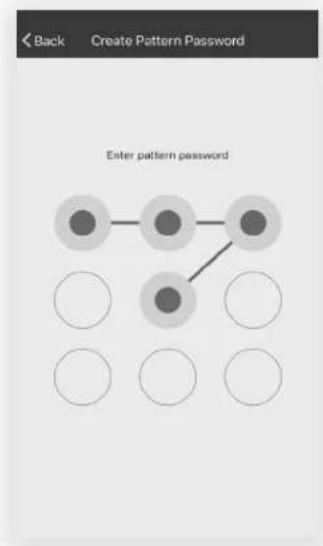
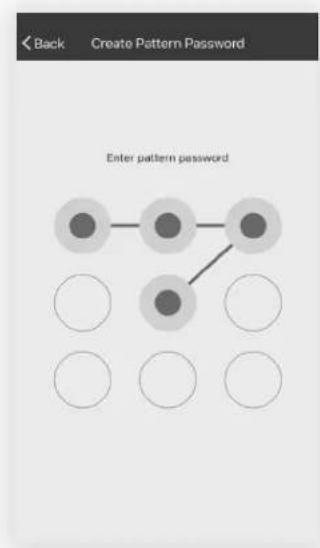
- Tap "Pattern unlock" under the Profile section where you set your name. You can then set up your App unlock pattern. After it is enabled, you need to draw the pattern to unlock the App.
flowchart
graph TD
    A["●"] --> B["●"]
    B --> C["●"]
    C --> D["●"]
    D --> E["●"]
    E --> F["●"]
    style A fill:#ccc,stroke:#333
    style B fill:#ccc,stroke:#333
    style C fill:#ccc,stroke:#333
    style D fill:#ccc,stroke:#333
    style E fill:#ccc,stroke:#333
    style F fill:#ccc,stroke:#333
Troubleshooting
Having trouble completing installation? Don't worry, it's usually an easy fix.
| PROBLEM POSSIBLE CAUSES SOLUTIONS | ||
| TCL Home Comfort App loses connectivity to AC during setup | Wireless router may be too far from AC | • Relocate wireless router closer to AC. |
| Network error | • Restart wireless router, AC, and restart mobile device with TCL Home Comfort App installed. | |
| TCL Home Comfort App cannot find AC | Network error | • Restart wireless router, AC, and restart mobile device with TCL Home Comfort App installed. |
| App & AC are not on the same 2.4GHz channel | • Confirm your device is connected to the 2.4GHz channel. | |
| Router blocking TCL Home Comfort App | • Verify App is not being blocked by router firewall. | |
| Failed to connect using CF mode | Unknown connectivity or network error | • Follow the instructions to Add the AC unit to the wireless network using "AP MODE". |
| Unable to find or connect to Wireless Network | App may need permission to location | • Give TCL Home Comfort App permission to Location in phone settings. |
¡Hola! Comencemos.
PREFERRED
GROUNDING METHOD
Ensure proper ground exists before use.
www.tclusa.com/support
1-800-825-6747

iComencemos!
Paso 1: Prueba
natural_image
Line drawing of a hand using a tool to cut or mark a rectangular object, no text or symbols presenthttps://smartapp.tuya.com/tcl


Connection FailedConnection Successful
CONSIGNES DE SÉCURITÉ IMPORTANTES
www.tclusa.com/support
1-800-825-6747

Contenu de la boîte
Appareils 8K
Contenu de la boîte
Appareils 10K-12K
C'est parti!
natural_image
Line drawing of a hand using a tool to cut or mark a rectangular object, no text or symbols present

https://smartapp.tuya.com/tcl
Étape 2:
Activation de l'application TCL Home Comfort


Étape 5:

Étape 6:
Connection FailedConnection Successful

www.TCLUSA.com/support
1-800-825-6747
TCL
Copyright © 2019 by TCL. All rights reserved.
TCL and the TCL Logo are owned by
Corporation and under License to TTE Technology, Inc.
Part No.:XXXXX