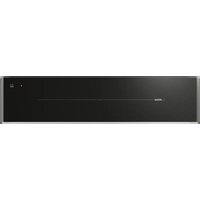
WD1774M - Oven Atag - Free user manual and instructions
Find the device manual for free WD1774M Atag in PDF.


User questions about WD1774M Atag
0 question about this device. Answer the ones you know or ask your own.
Ask a new question about this device
Download the instructions for your Oven in PDF format for free! Find your manual WD1774M - Atag and take your electronic device back in hand. On this page are published all the documents necessary for the use of your device. WD1774M by Atag.
USER MANUAL WD1774M Atag
natural_image
Prohibition sign showing a hand holding a horizontal bar with a downward arrow, enclosed in a circle (no text or symbols)Laadcapaciteit
text_image
Hand gesture pointing at a black interface with icons for time, duration, and formatting optionstext_image
Hand-drawn diagram showing finger positioning with icons for timer, zoom, and balance controls- Sluit de lade.
text_image
Hand gesture with icons and a finger pointing at a timer, showing time controls from 0 to 6h.text_image
Hand gesture with icons and a finger pointing at a button, likely from a digital interface or apptext_image
Hand-drawn interface toolbar with clock, plus/minus buttons, and finger pointing at button 10'text_image
Hand gesture bar with icons and time display, showing navigation controls and a finger pointing to the second hand icon.text_image
Hand-drawn interface toolbar with icons and time display, showing navigation controls and a finger pointing at the end.text_image
Warning symbol for a trash bin with crossed lines indicating no waste or discharge, and a black rectangle below.natural_image
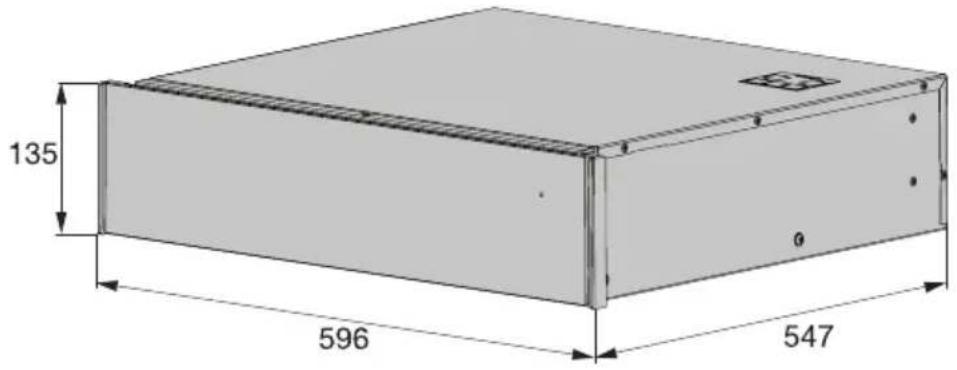
Technical line drawing of a computer rack unit with a cable and plug, showing internal components and mounting bracket (no text or symbols)Toestel afmetingen
text_image
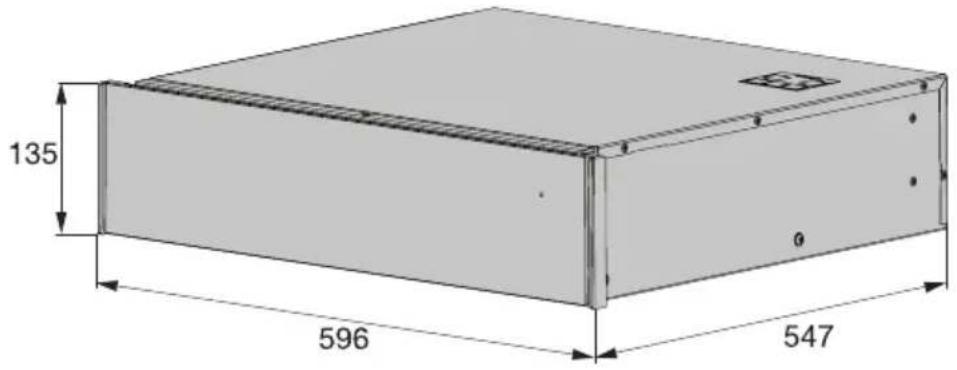
135 596 547Inbouwmaten
text_image
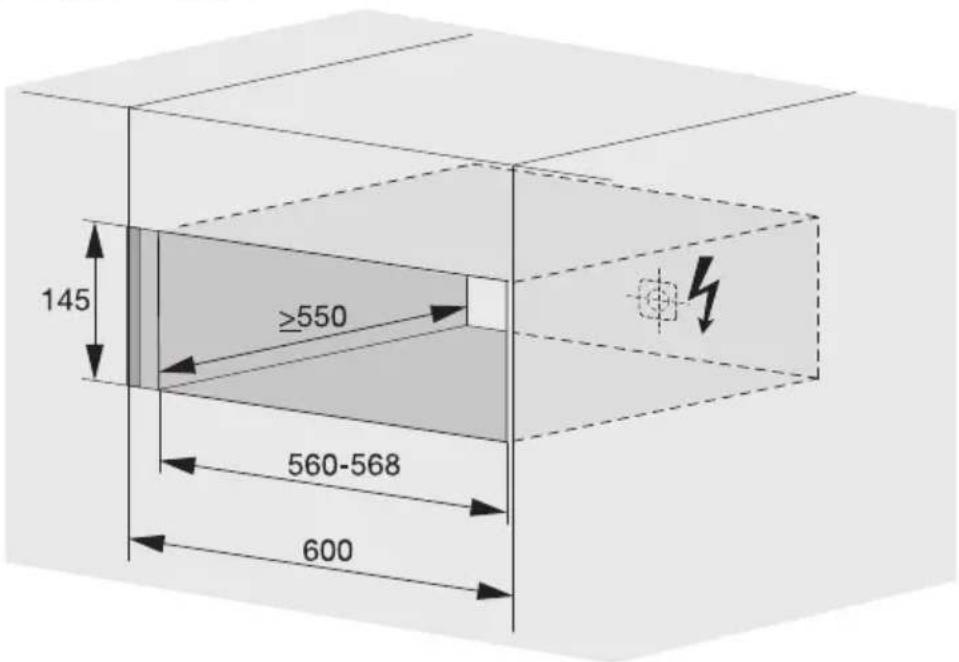
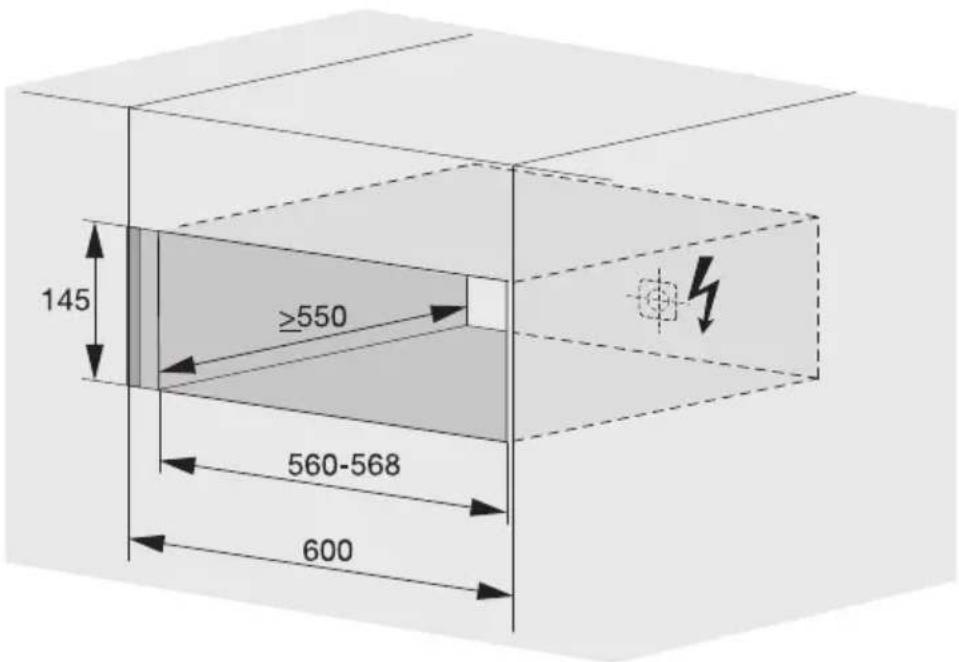
145 ≥550 560-568 600Installatie
Inbouwen
text_image
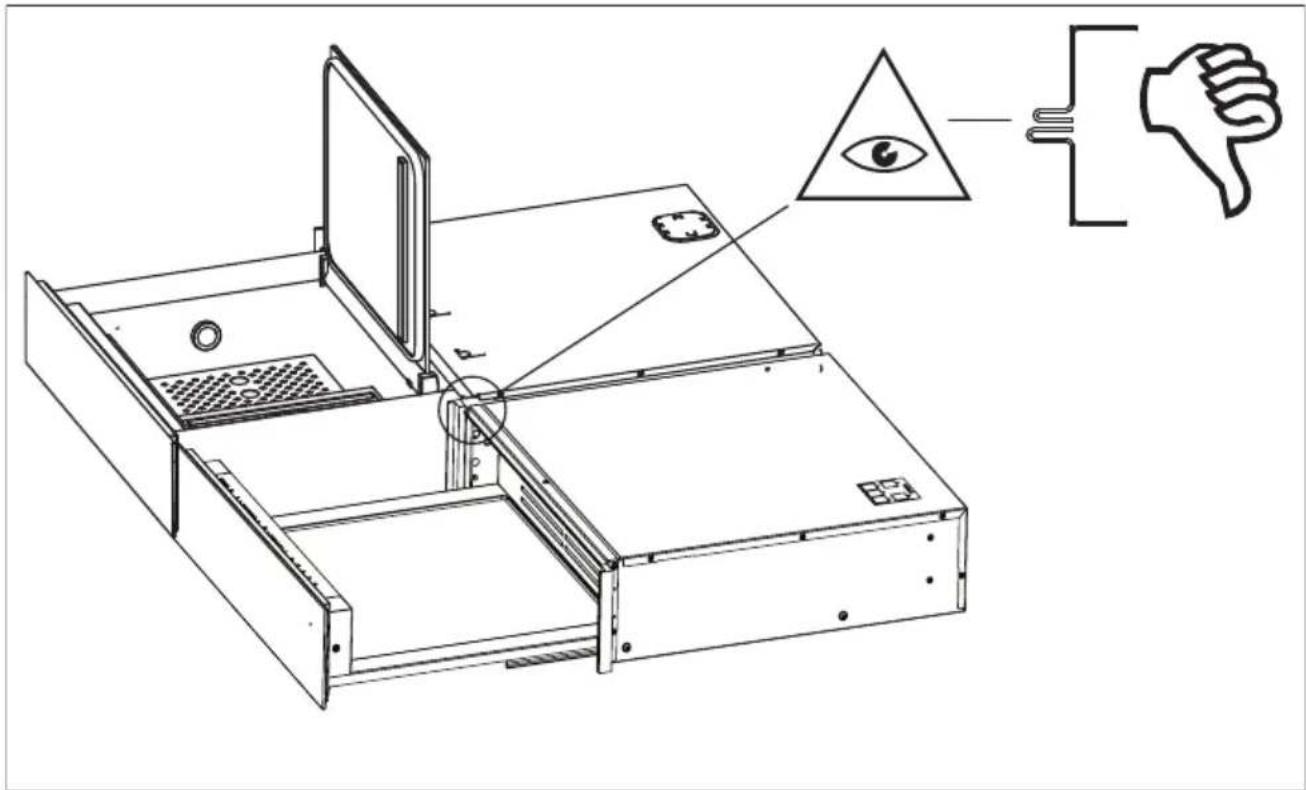
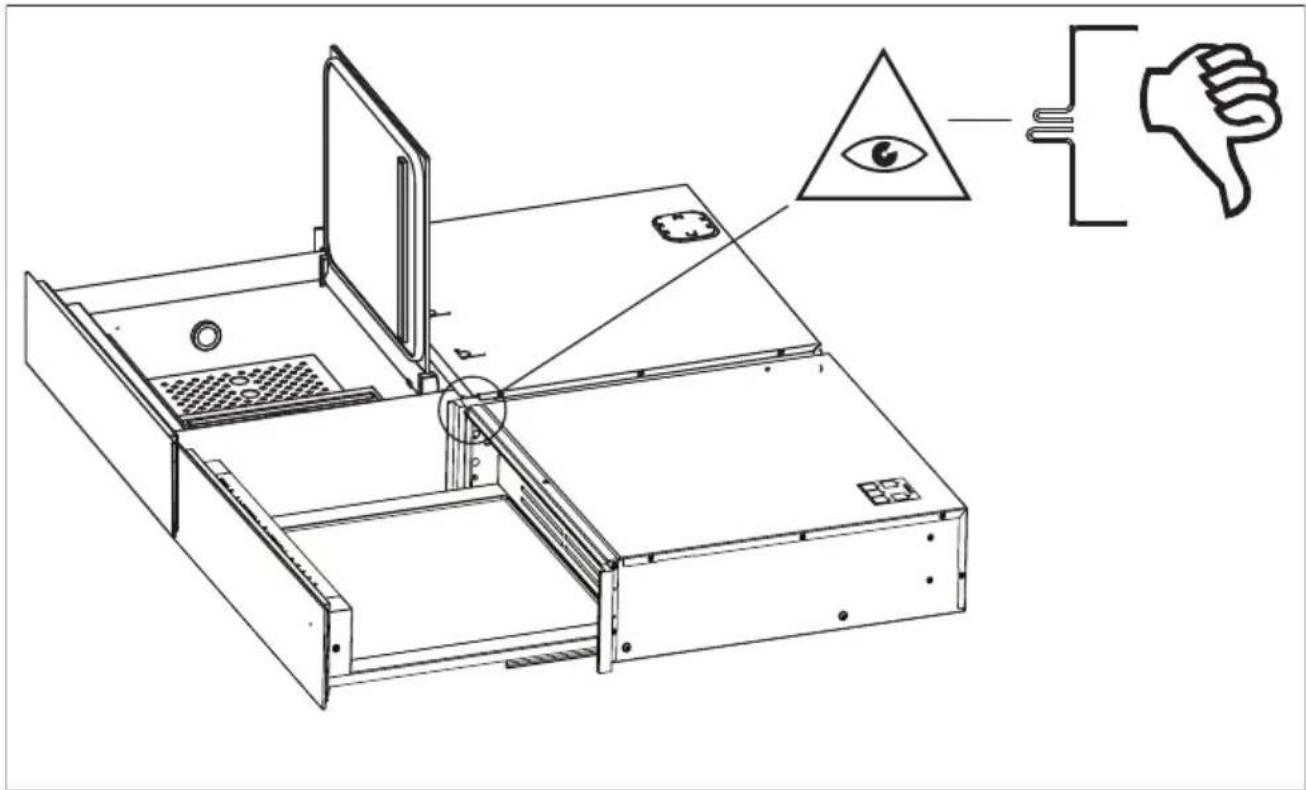
Technical diagram of a device with an eye symbol and a thumbs-down icon, illustrating mechanical or electrical assembly.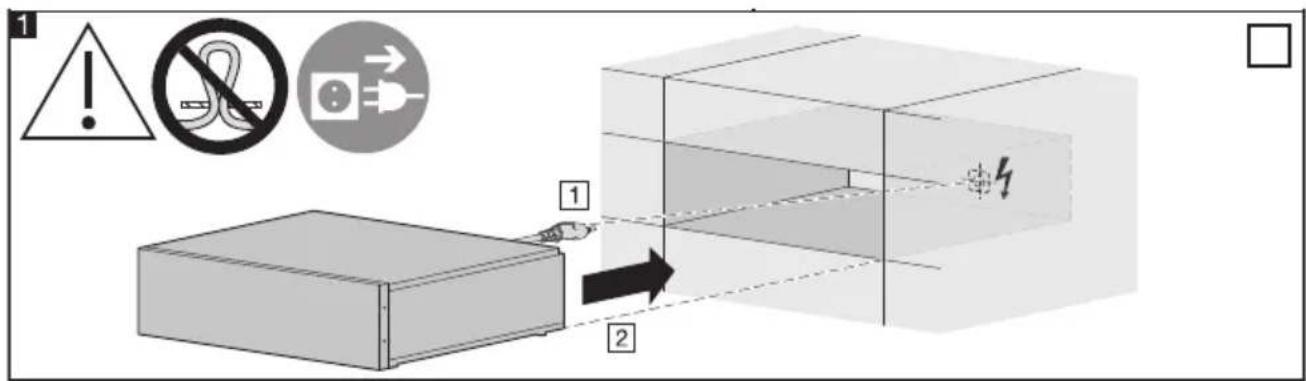
text_image
1 ! No → → 1 2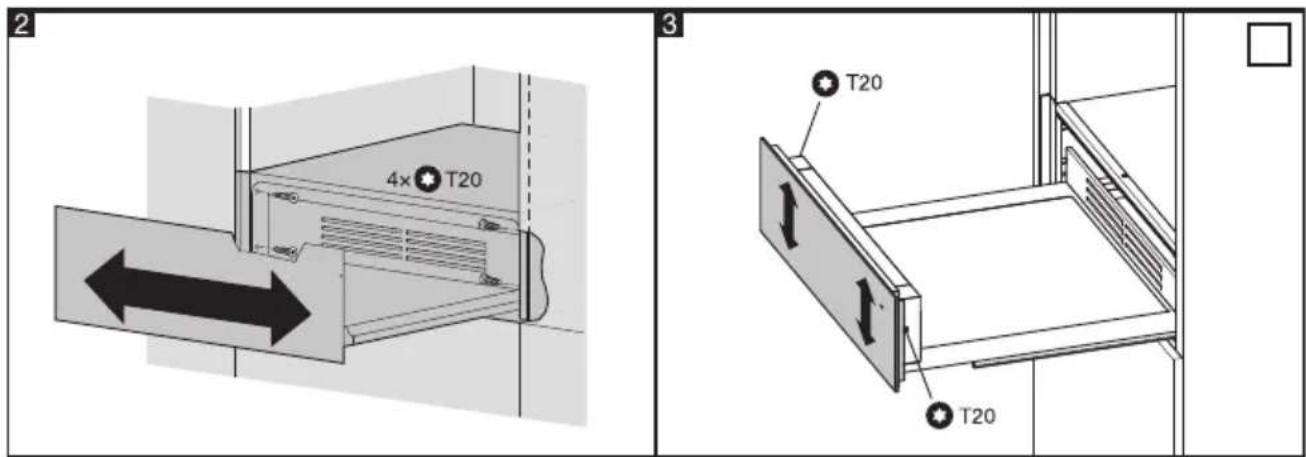
text_image
2 4× T20 3 T20 T20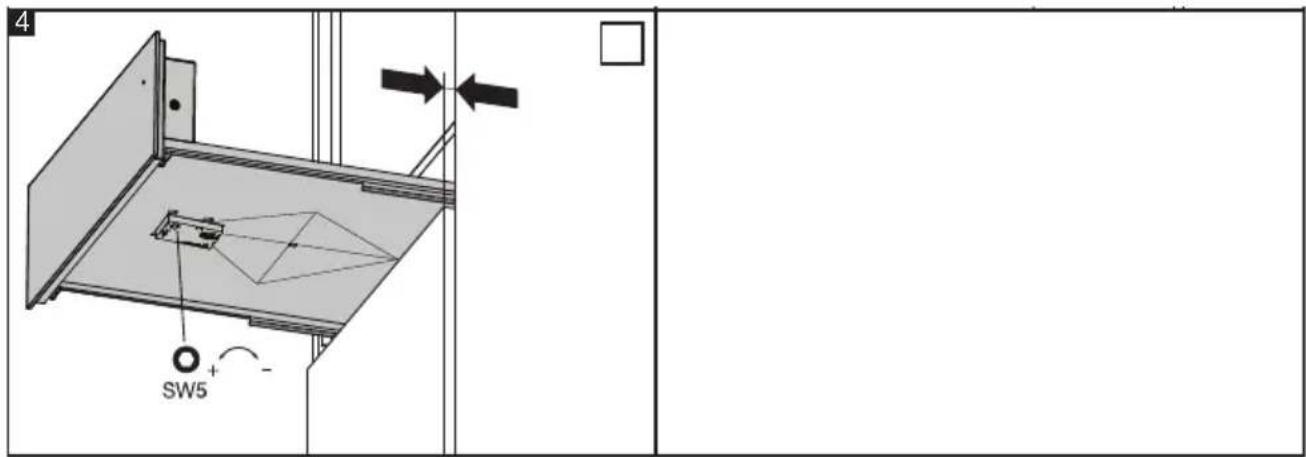
text_image
4 SW5 + -Notities
Notities
ATAG
www.atag.nl
www.atag.be
ATAG
NOTICED'UTILISATION
Tiroir chauffant
FR
WD17xxM
Tables des matières
natural_image
Prohibition sign showing a hand holding a horizontal bar with a downward arrow, enclosed in a circle (no text or symbols)text_image
Hand gesture with finger pointing at a black background displaying icons for time, duration, and formatting optionstext_image
Hand-drawn interface with finger icons and a numeric input field showing time intervals from 30' to 6h- Fermez le tiroir.
text_image
Hand gesture with icons and a finger pointing at a button, showing time controls from 0 to 6h.text_image
Hand gesture with icons and a finger pointing at a button, likely from a digital interface or apptext_image
Hand-drawn interface toolbar with clock, plus, and time controls labeled in Englishtext_image
Warning symbol for a trash bin with crossed lines indicating no waste or discharge, and a black rectangle below.natural_image
Technical line drawing of a computer rack unit with cable and connector, no text or symbols presentInstallation
text_image
Technical diagram of a device with an eye symbol and a thumbs-down icon, illustrating mechanical or electrical assembly.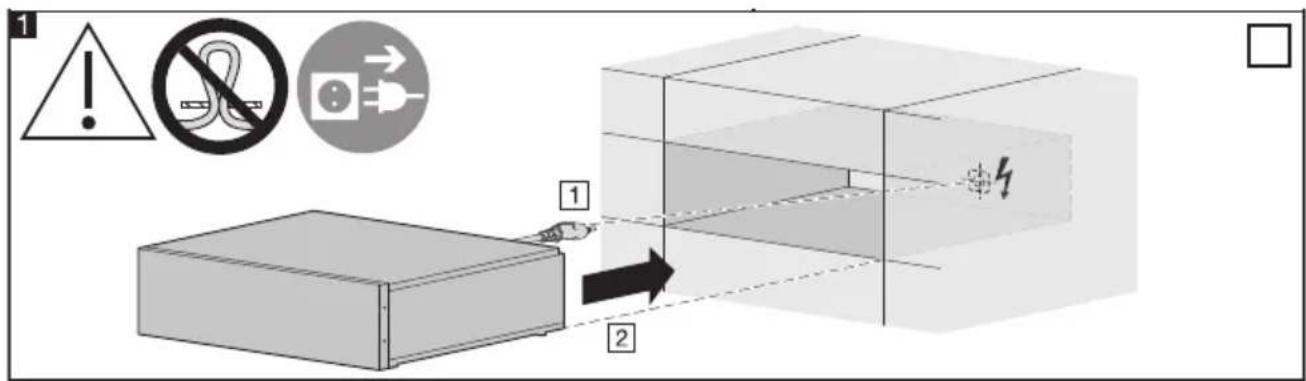
text_image
1 1 2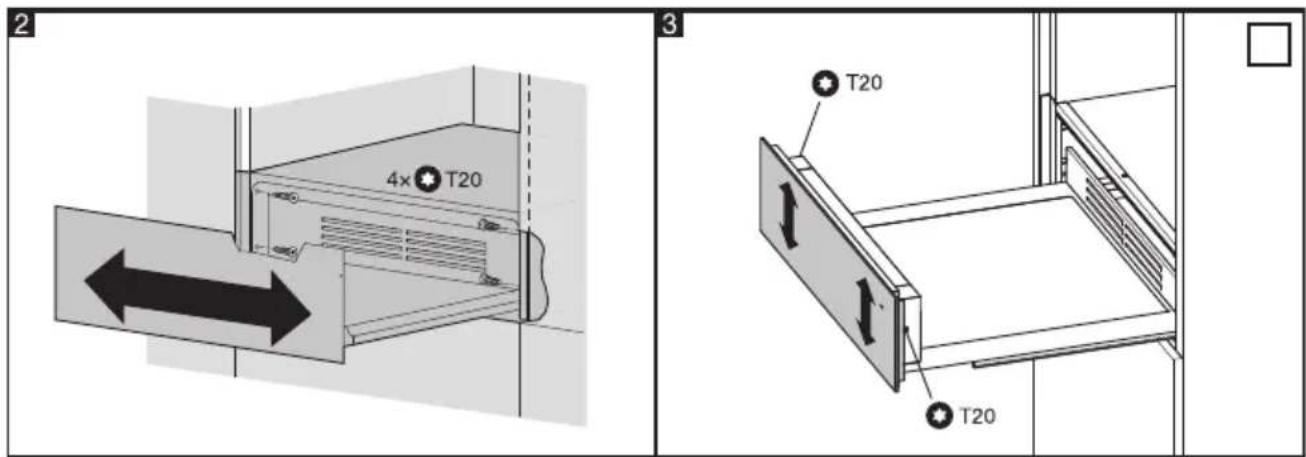
text_image
2 4× T20 3 T20 T20Installation

text_image
4 SW5 + -ATAG
www.atag.nl
www.atag.be
ATAG
GEBRAUCHSANWEISUNG
Wärmeschublade
DE
WD17xxM
natural_image
Prohibition sign showing a hand holding a horizontal bar with a downward arrow, enclosed in a circle (no text or symbols)Ladekapazität
text_image
Hand pointing at a black interface with icons for zoom, speed, and time controlstext_image
Hand-drawn illustration showing finger typing on a black background with icons for timer, hour, minute, and heart symbols.text_image
Hand gesture with icons and a finger pointing at a numeric display, likely from a digital interface or app.text_image
Hand gesture with icons and a finger pointing at a button, likely from a digital interface or apptext_image
Hand-drawn interface toolbar with clock, plus, and time controls on a black backgroundtext_image
Hand gesture with icons and a finger pointing at it, showing navigation controls for time and duration.text_image
Warning symbol for a trash bin with crossed lines indicating no waste or discharge, and a black rectangle below.natural_image
Simple line drawing of a trash bin with crossed lines indicating no waste or discharge (no text or symbols)natural_image
Technical line drawing of a computer rack unit with cable and connector, no text or symbols presentGeräteabmessungen
text_image
135 596 547Einbaumaße
text_image
145 ≥550 560-568 600Einbau
text_image
Technical diagram of a device with an eye symbol and a thumbs-down icon, illustrating mechanical or electrical assembly.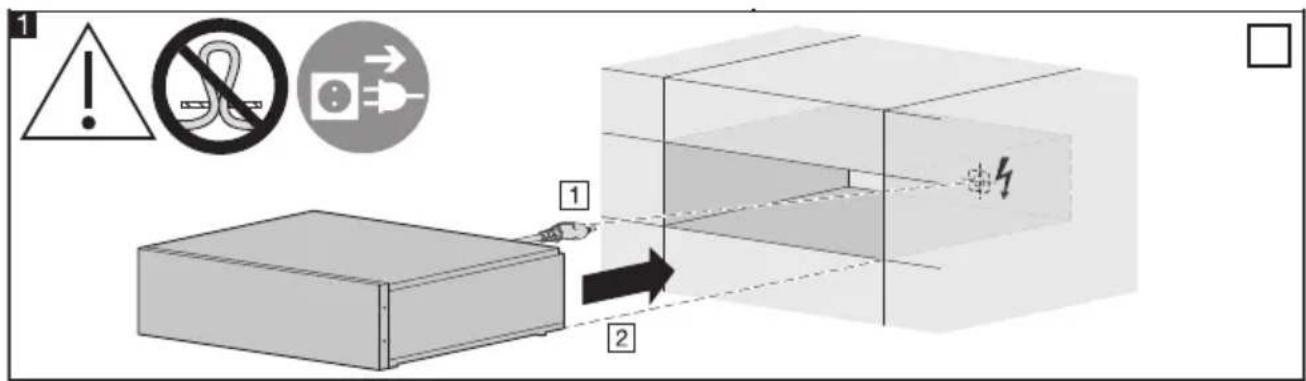
text_image
1 ! No → 1 2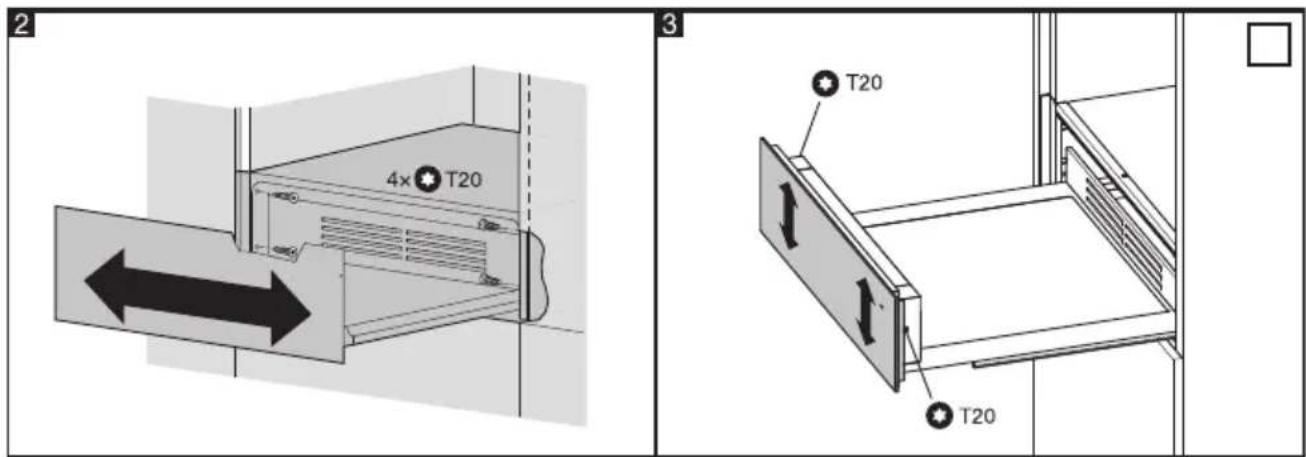
text_image
2 4× T20 3 T20 T20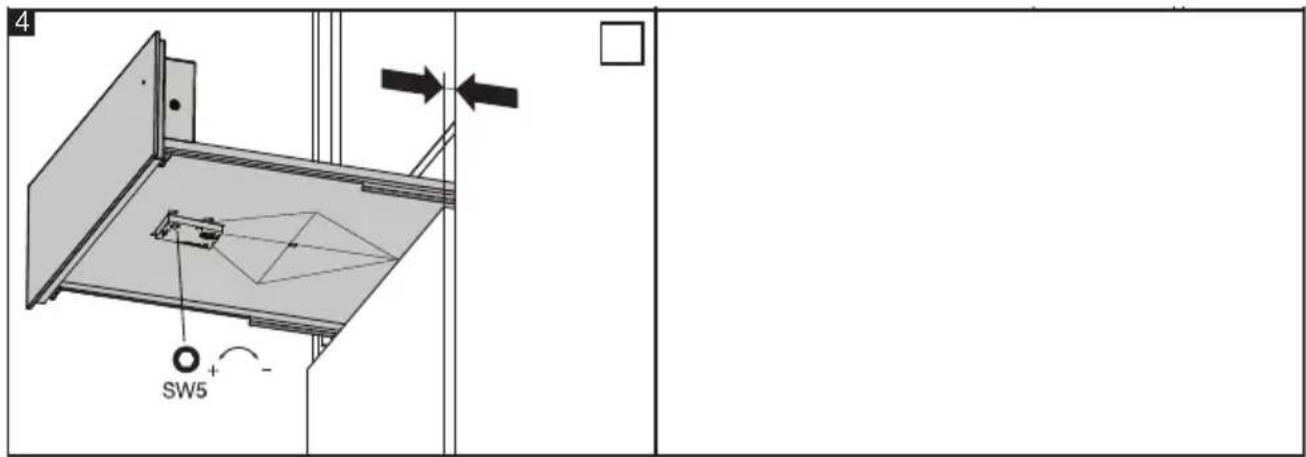
text_image
4 SW5 + -ATAG
www.atag.nl
www.atag.be
ATAG
INSTRUCTIONSFORUSE
Warming drawer
EN
WD17xxM
Contents
Description of the appliance ....
Operation of the touch-sensitive buttons .....
Opening and closing the drawer ....
3Pictogramsused......
4Safetyregulations......
6Use....
6
7Control panel ....
7
8 Disposal of the appliance and packaging
8Loading capacity ....
9Applications
11Slow cooking ....
13Operation....
13Operating the warming drawer ......
14Delayed start mode ....
14Sabbath mode ....
15Operating modes ....
20Maintena
20Cleaning
20Cleaning
21Troublesl
21Troublesh
22Environn
22
23Installatic
23Safety .....
26Preparatic
27Appliance
27Built-in dir
28Built-in ....
30Yournote
The following symbols are used throughout the manual, and they have the following meanings:

INFORMATION!
Information, advice, tip, or recommendation

WARNING!
Warning—general danger

ELECTRIC SHOCK!
Warning—dangerofelectricshock

HOT SURFACE!
Warning—dangerofhotsurface

DANGER OF FIRE!
Warning—dangeroffire
It is important that you carefully read the instructions.
WARNING!
READ CAREFULLY AND KEEP IT FOR FUTURE REFERENCE!
Whatyoushouldpayattentionto
WARNING!
This appliance and the accessible parts will become hot during use. Do not touch hot parts. Keep children younger than 8 away from the appliance unless they are under continuous supervision.
- This appliance can be used by children aged from 8 years and above and persons with reduced physical, sensory or mental capabilities or lack of experience and knowledge if they have been given supervision or instruction concerning use of the appliance in a safe way and understand the hazards involved.
- Appliances can be used by persons with reduced physical, sensory or mental capabilities or lack of experience and knowledge if they have been given supervision or instruction concerning the use of the appliance in a safe way and understand the hazards involved.
- Children should be supervised to ensure that they do not play with the appliance.
- Do not allow children to clean or maintain the appliance unless supervised.
- Always disconnect the appliance from the supply if it is left unattended and before assembling, disassembling or cleaning.
ELECTRIC SHOCK!
WARNING: If the surface is cracked, switch off the appliance to avoid the possibility of electric shock.
- Never use a steam cleaner for cleaning the appliance. Only clean the appliance when switched off. The steam of a steam cleaner could reach the conducting parts and cause an electrical short.
- A defective appliance may cause electric shock. Never switch on a defective appliance. Disconnect it and contact customer service.
- Improper installation and maintenance work or repairs are dangerous. Do not touch any conducting connections and do not change the electrical and mechanical design of the appliance. These may only be performed by authorized and trained technicians. If the appliance has a defect, please disconnect it and contact customer service.
- Do not operate the appliance with wet hands or in contact with water.
- This appliance is intended to be used in household only.
NOTE!
If you decide to discontinue using the appliance because of a fault, we recommend you cut off the cable after removing the plug from the plug socket. Take the appliance to your municipality's waste disposal site.
Use
Description of the appliance
The warming drawer can be used to warm dishes and keep food warm.
- Operating panel ▶ Touch the on/off-key to switch on the warming drawer.
- Drawer front ▶ Gently push the drawer front to open and close the drawer (push/pull system).
- Control lamp ▶ Illuminates when in operation, and the drawer is closed.
- Warming plate ▶ Gets hot when the drawer is in operation.
- Fan plate ▶ Outlet openings for heated air.
- Interior illumination ▶ Illuminates when the drawer is open.
- Identification plate ▶ Technical data.
Control panel
- On/off-touch key with indication ▶ Touch to switch on the warming drawer. The on/off indicator light illuminates.
- Standby mode
▶ on/off light illuminates dimmed.
- Active mode
▶ on/off light illuminates.
-
- (minus) temperature key ▶ Touch to decrease the temperature setting.
-
Temperature indicator ▶ The current temperature setting is displayed.
-
- (plus) temperature key ▶ Touch to increase the temperature setting.
-
- (minus) time key ▶ Touch to decrease the time duration setting.
-
Time duration indicator ▶ The current time duration is displayed.
-
- (plus) time key ▶ Touch to increase the time duration setting.
-
Operating modes
-
Heating serving and tableware ▶ Touch the key to start. The indicator lights up.
-
Heating cups ▶ Touch the key to start. The indicator lights up.
-
Keeping food warm ▶ Touch the key to start. The indicator lights up.
-
Making yoghurt ▶ Touch the key to start. The indicator lights up.
-
Favourite ▶ Touch the key to start. The indicator lights up.
NOTE!
- The temperature setting refers to the warming plate's surface when the appliance is empty. Own measurements can be imprecise and are not suitable for checking the accuracy of the temperature
- The warming drawer only starts to heat when it is properly closed.
- The warming drawer is equipped with a safety shut-off that switches the drawer to standby mode after a max. of 12 hours of continuous operation.
Operation of the touch-sensitive buttons
Place the tip of your finger flat on the control to achieve the best results. You do not have to apply any pressure.
The touch sensors have been set in such a way that they only react to the pressure and size of fingertips. The appliance can't be operated with other objects and won't, for instance, be switched on if your pet walks over the hob.
Opening and closing the drawer
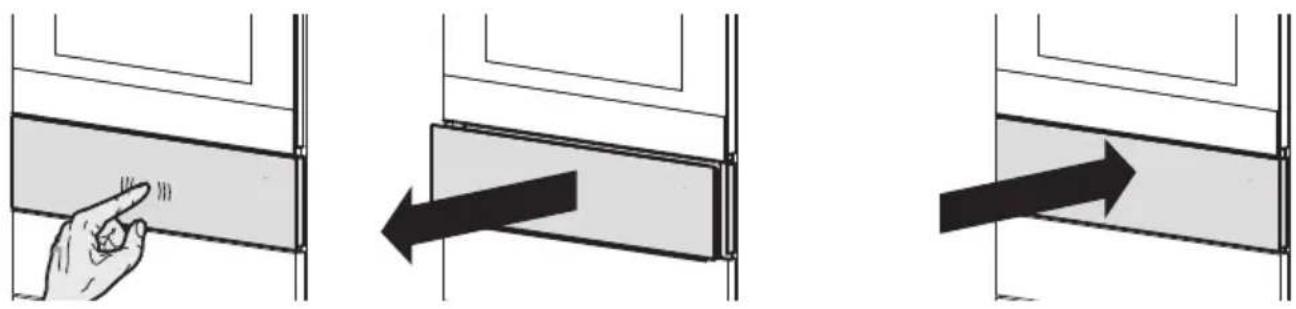
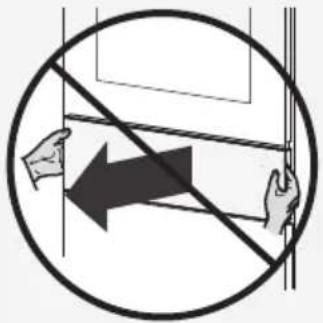
- Push in the middle of the drawer front to open or close the drawer.
! WARNING!
Never force the drawer to open. It could damage the closing mechanism (push/pull system).
text_image
Diagram showing a hand holding a device with a diagonal line crossing through it, indicating no change or prohibition.Loading capacity
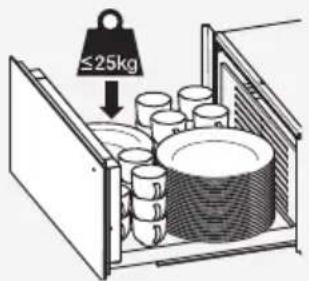
The maximum load depends on the dimensions and weight of your dishes.
| TablewareDishes | Fullplacesettingsandserving dishes | |
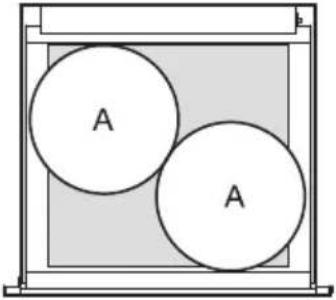 | 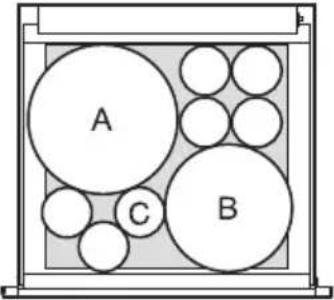 | 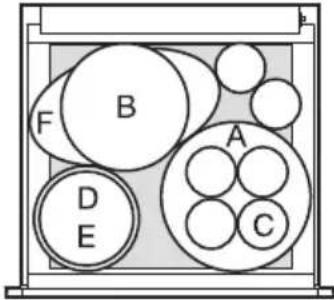 |
| 20 plates ∅ 27 cm (A) | 10 plates ∅ 27 cm (A)10 soup plates ∅ 23 cm (B)10 cups ∅ 9 cm (C) | 8 plates ∅ 27 cm (A)8 soup plates ∅ 23 cm (B)8 cups ∅ 9 cm (C)1 serving dish 17 cm (D)1 serving dish 19 cm (E)1 platter (F) |
WARNING!
The maximum load of the warming drawer is 25 kg. Damage to the appliance can occur if this load weight is exceeded.
text_image
≤25kgApplications
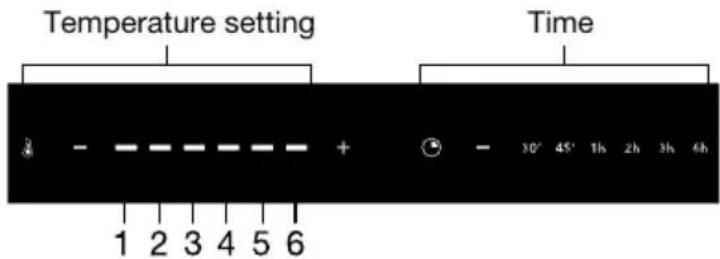
The table lists various uses for the warming drawer.
- Select the to be heated food/crockery from the table.
- Set the temperature setting and duration for the food/crockery to be heated.
text_image
Temperature setting Time 1 2 3 4 5 6 - - - - - - + - 30' 45' 1h 2h 3h 4h| Food/crockery | temperature | NotesEstimateddurationSetting | |
| 1Proofingyeast | doughutes to a max. of 45 minutes | •Use suitable cookware.•Cover with damp cloth. | |
| deep-frozenfood,e.g.cream cakes,butter,sausages,or cheese. | 1Defrostingdelic | 60 minutes to a max. of 1 hour | •Leave in the packaging. |
| 2Makingyoghurt | 6 hours and extend as required with max. 3 hours | •Possible to place in several small or one large receptacle.•Do not cover the yoghurt. |
Table continued from last page
| Food/crockery | temperature | NotesEstimateddurationSetting | |
| Keeping eggs warm, e.g. hard-boiledeggsorscrambled eggs. | 2 | 30 minutes till 1 hour | •Preheat tableware.•Cover up the eggs. |
| deep-frozenfood. | 30 minutes2Defrostingdelicate | Leave in the packaging. | |
| e.g.espressocups. | 30 minutes3Preheatingdrinkingvessels, tableware. | Drinking vessels, tableware. | |
| 30 minutes3Meltingchocolates | Late suitable cookware.•Leave chocolate uncovered. | ||
| 30 minutes3Dissolvinggelatine | Late suitable cookware.•Leave gelatine uncovered. | ||
| e.g.meatcookedatalow temperature. | 3Keepingdelicate foodswarm, a max. of 1 hour | 4Heatingupfood to keepings to a max. of 1 hour | •Preheat tableware.•Cover food. |
| warm,e.g.omelettes,crepes, pancakes,tacos,tortil-lasor fajitas. | 4Keepingfoodwalm, e.g. to a max. of 1 hour | 5Keepingfoodwalm to a max. of 1 hour | •Preheat tableware.•Cover food. |
| roastsorsauces. | 4Keepingbeverageswalm, to a max. of 1 hour | 6Keepingbreadswalm to a max. of 1 hour | •Preheat tableware as required. |
| toastorbreadrolls. | 30 minutes4Keepingbreadwalm, e.g. to a max. of 1 hour | •Leave the bread uncovered. | |
| crumblecakeormuffins. | 30 minutes4Warmingsporeake, e.g. to a max. of 1 hour | •Spread tableware as required. | |
| e.g.soupplates,plates,bowls, plattersorsauceboats. | 5Preheatings serving dishes, till max. 1 hour | 6Preheatings serving dishes, till max. 1 hour | •Spread tableware out flat for shorter heating times. |
Table continued from last page
| Food/crockery | temperature | NotesEstimateddurationSetting | |
| 5Keepingbeverageshot. | 30 minutes to a max. of 1 hour | •Preheat tableware.•Cover up the beverages. | |
| 5Dryingfruit. | 6 hours and extend as required, with max. 6 hours | •Prepare and chop up the fruit.•Turn the fruit as needed. | |
| 6Slowcooking. | 30 minutes to a max. of 1 hour | •Preheat tableware. | |
| wellnessapplications. | 4 till 6Warm,moistclothsfortill max. 1 hour | •Moisten cloths/towels, fold or roll and then place directly on the warming plate. Only use cloths/towels made from natural fibres -nosynthetic fibres! | |
Slow cooking
Temperature setting 6 is suitable for slow cooking to complete seared, minor to medium-sized, high-quality cuts of meat (beef, lamb, pork, veal) no thicker than 6 cm. We recommend cooking more significant pieces of meat in an oven or combi-steam oven. Cooking meat at a low temperature for longer makes it tender and succulent.
Preparations
First, sear the meat and then let it cook in the warming drawer at low temperature.
• Use suitable glass, porcelain or ceramic cookware.
• Preheat the drawer containing the cookware at setting level 6.
- Heat a little fat in a pan and sear the meat.
- Place the meat in the preheated cookware in the drawer to cook to completion.
The searing times below refer to the sealing of meat in hot fat.
| SearingonthehobType | Yaninthewarming drawer | |
| Smallpiecesofmeat. | ||
| 2–3 minutes on all sides | Stemperature setting 6 | |
Table continued from last page
| SearingonthehobType | Yawainthewarming drawer | |
| •Time duration:30 minutes till1 hour | ||
| Steak medallions. | 1–2 minutes per side | •Temperature setting 6•Time duration:30 minutes till1 hour |
| Medium-sizedpiecesofmeat. | ||
| Loin of lamb (about 150-300g). | 2–3 minutes per side | •Temperature setting 6•Time duration:1 hour |
| 4–6 minutes on all sides | Pilletofpork(400-600g). | |
| setting 6•Time duration: 2 till3 hours | ||
| Filletofbeef/veal,loinofpork,(upto900g). | 12–15 minutes on all sides | •Temperature setting 6•Time duration: 3 till6 hours |
NOTE!
Meat that has been low temperature cooked is not as hot as conventionally cooked meat. Sauces should be served very hot. Put the plates in the warming drawer during the last 45–60 minutes of cooking.
To keep meat prepared at a low temperature warm, turn the temperature down to position 4. Small pieces of meat can be kept warm for up to 45 minutes and large pieces for up to 2 hours.
Operating the warming drawer
WARNING!
The operating panel must be kept clean and dry. Wash and dry your hands before use. The keys will otherwise not react or can come on accidentally.
- Touch the on/off-key to switch on the drawer.

text_image
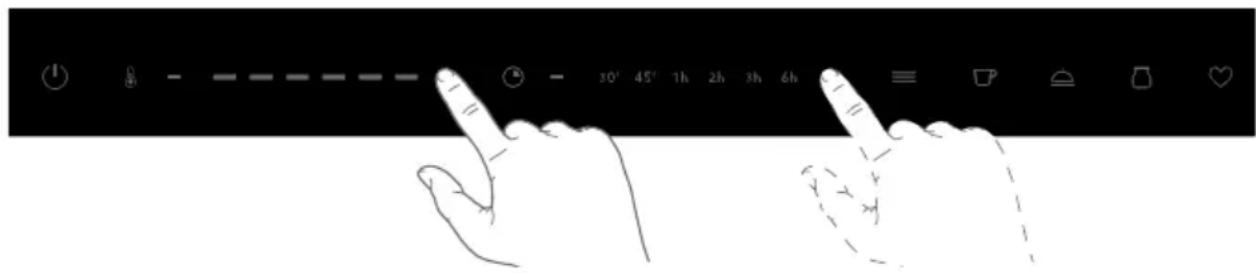
Hand gesture with finger pointing at a black background displaying icons for time, duration, and formatting options- Touch the + (plus) or - (minus) key to set the desired temperature and time duration or select one of the preset operating modes.
text_image
Hand-drawn diagram showing finger positioning and navigation controls with icons for camera, timer, and balance.- Close the drawer.
• The control lamp will light up.
• The warming drawer starts heating.
- Opening the drawer interrupts operation.
• The control lamp flashes if the drawer is open.
- Close the drawer to continue the programme.
- When the set time duration is up, an acoustic signal is emitted. The drawer stops heating.
NOTE!
After operation ends or the on/off-key is touched, the interior illumination of the opened warming drawer goes out automatically after 5 minutes. The interior illumination is activated again by touching the on/off-key or by closing and again opening the warming drawer.
- Switch off the appliance before time if necessary by touch and hold the on/off-key for 1 second.
• The appliance switches off when the key is released.
• The on/off-key is dimmed in the standby mode.
• The display for temperature, time duration and/or operating mode go out.
WARNING!
Do not leave the warming drawer unattended for more extended periods when using continuous operation. Keeping food warm overly long can dry it out and even cause it to catch fire.
This warming drawer is provided with a safety device that switches the drawer to standby mode after 12 hours of continuous operation.
Delayed start mode
The delayed start is activated if both an operating time and a delayed start duration are set for the operating mode selected. The appliance switches on when the delayed start is up and switches off again when the operating time finishes.
- Place the tableware in the warming drawer.
- Touch the key for the desired operating mode.
- If necessary, set a temperature setting and a period of time.
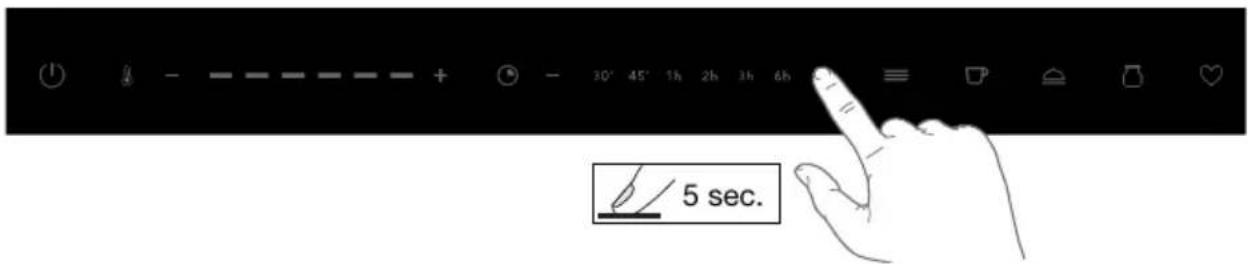
- Touch the + (plus) time key for 5 seconds.
text_image
5 sec.• The 30-minute indicator flashes.
- Touch the + (plus) or - (minus) key to set the desired delayed start.
• The delayed start selected flashes.
- Close the drawer.
- If a delayed start has been set, the control lamp flashes until the operation starts. The control lamp illuminates after an automatic start.
Sabbath mode
The Sabbath mode enables an operating duration of up to 72 hours. After the Sabbath mode is activated, the safety shut-off and illumination are deactivated except in the case of a malfunction. The food is heated up and kept warm in the warming drawer without operating the appliance.
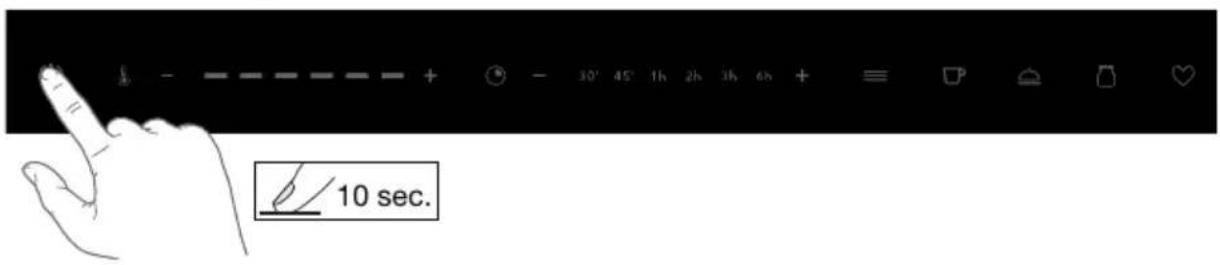
- Touch the on/off-key for 10 seconds.
text_image
10 sec.• The function is activated when the key is released.
• The duration and temperature displays illuminate briefly 3x.
• The Sabbath mode is activated.
- Touch the on/off-key for 10 seconds to switch off the sabbath mode.
• The function is activated when the key is released.
• The duration and temperature displays illuminate briefly 3x.
• The Sabbath mode is deactivated.
Operating modes
Heatingtableware
Spread tableware across the entire warming plate. The heating duration depends on the material and thickness of the dishes and their quantity, height and arrangement. Stacked plates take longer to heat up than individual items. Do not place any large platters on their end in front of the ventilation slits. They block the outlet openings for the heated air, and as a result, the dishes are not heated evenly.
- Place the tableware in the warming drawer.
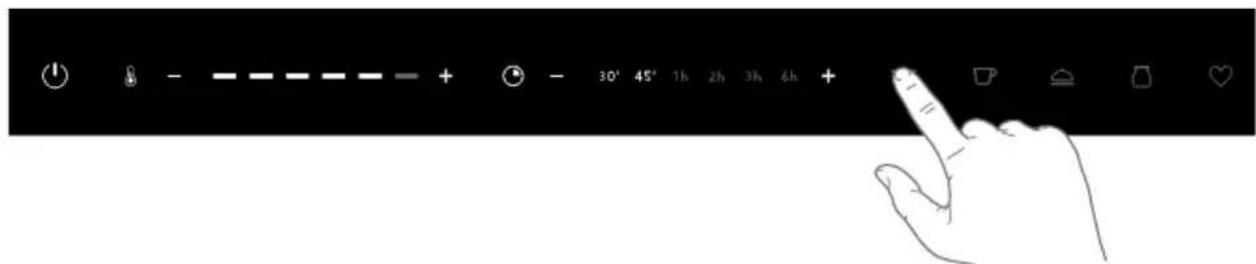
- Touch the 'Tableware' operating mode key.
text_image
Hand gesture with icons and a finger pointing at a button, showing navigation controls for time or position.• The recommended temperature setting and time duration illuminate.
- Close the drawer.
• The control lamp will light up.
• The warming drawer starts heating.
NOTE!
- It takes approximately 45 minutes to heat place settings for 6 persons.
-
As heated dishes cool down quickly, take them out of the warming drawer just before you need them.
-
Open the drawer when the operating mode finishes.
- Touch the on/off-key to switch off the appliance.
- Take the dish out of the drawer.

HOT SURFACE!
Riskofburns! The surface of the warming plate is hot. Items around the outside of the drawer get hotter than those in the middle. Always use protective gloves or oven cloths to remove the dishes.
Heatingcupsandglasses
The heating duration depends on the material and thickness of the dishes and their quantity, height and arrangement. Tall stacks of cups and glasses take longer to heat up than individual cups and glasses. Do not place any dishes in front of the ventilation slits. They block the outlet openings for the heated air, and as a result, the dishes are not heated evenly.

HOT SURFACE!
Risk of burns! Only use this operating mode for heating cups and glasses to prevent burns.
- Place the cups and/or glasses in the warming drawer.
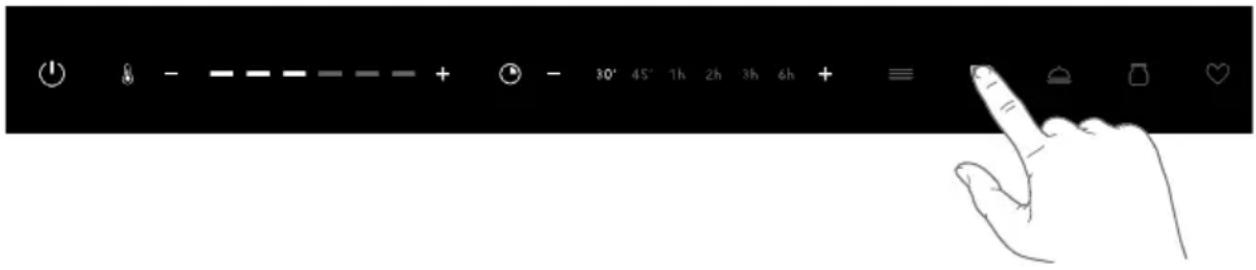
- Touch the 'Cups' operating mode key.
text_image
Hand gesture with icons and a finger pointing at a button, likely from a digital interface or app• The recommended temperature setting and time duration illuminate.
- Close the drawer.
• The control lamp will light up.
• The warming drawer starts heating.
NOTE!
It takes approximately 30 minutes to heat cups for 6 persons.
- Open the drawer when the operating mode finishes.
- Touch the on/off-key to switch off the appliance.
- Take the cups or glasses out of the drawer.

HOT SURFACE!
Riskofburns! The surface of the warming plate is hot. Items around the outside of the drawer get hotter than those in the middle. Always use protective gloves or oven cloths to remove the dishes.
Keepingfoodwarm
WARNING!
Use this operating mode to keep food warm straight after being cooked. Do not use it for reheating refrigerated food. Never place hot saucepans or frying pans straight to the warming plate from the hob. This can damage the warming plate.
- Put the dishes in the drawer.
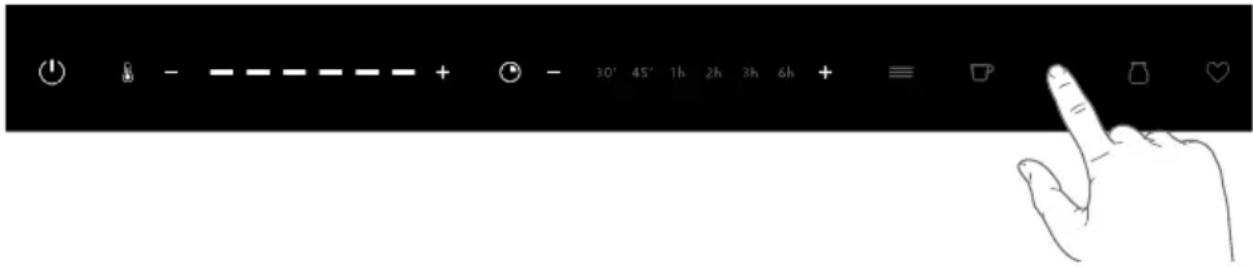
- Touch the 'keeping food warm' operating mode key and preheat for 15 minutes.
text_image
Hand gesture with navigation controls and icons, including play buttons, timer, and finger pointing at a button- Place the food in the drawer in the preheated dishes.
NOTE!
- Do not overfill plates, dishes, cups, etc., to avoid spilling.
-
Cover food with a heat-resistant lid or aluminium foil. The surface of the food that is not covered will dry out. Do not keep food warm for longer than one hour.
-
Close the drawer.
• The control lamp will light up.
• The warming drawer starts heating.
- Open the drawer when the operating mode finishes.
- Touch the on/off-key to switch off the appliance.
- Take the dish out of the drawer.
HOT SURFACE!
Riskofburns! The surface of the warming plate is hot. Items around the outside of the drawer get hotter than those in the middle. Always use protective gloves or oven cloths to remove the dishes.
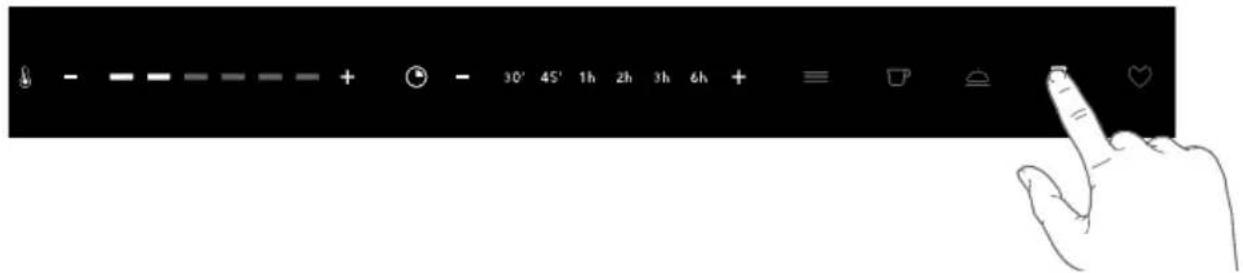
Makingyoghurt
- Put the prepared milk with the yoghurt in jars or dishes in the warming drawer.
- Touch the 'Making youghurt' operating mode key.
Operation
text_image
Hand gesture bar with icons and time display, showing navigation controls and a finger pointing to the second hand icon• The recommended temperature setting and time duration illuminate.
- Close the drawer.
• The control lamp will light up.
• The warming drawer heats up.
- Open the drawer when the operating mode finishes.
- Touch the on/off-key to switch off the appliance.
- Leave the yoghurt to cool down in the drawer for several hours, then store in a refrigerator.
Favourite
If a particular temperature and time duration setting is frequently used, these settings can be saved as a favourite.
Creatingfavourites
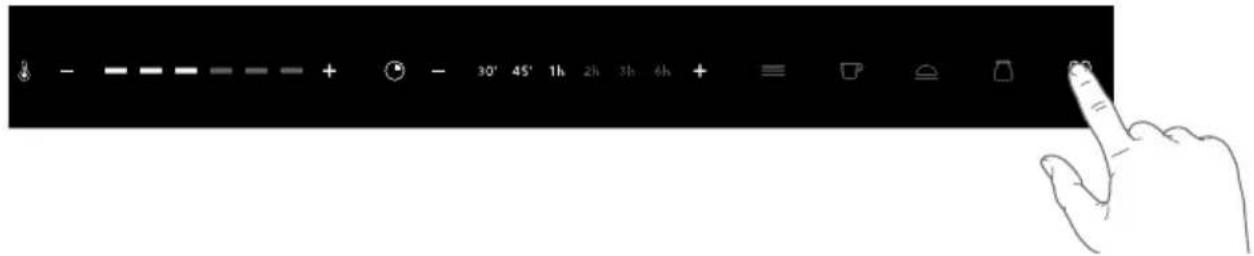
- Touch the 'Favourite' operating mode key.
text_image
- - - - - + - 30' 45' 1h 2h 3h 4h + ≡ □ ≅ □• The recommended temperature setting and time duration illuminate.
-
Touch the + (plus) or - (minus) key to set the desired temperature and time duration.
-
Touch the 'Favourite' operating mode key for 5 seconds.
• The settings are saved.
Startingfavourites
- Touch the "Favourite" key.
• The set temperature and time duration values illuminate.
- Close the drawer.
• The control lamp will light up.
• The warming drawer heats up.
-
Open the drawer when the operating mode finishes.
-
Touch the on/off-key to switch off the appliance.

HOT SURFACE!
Riskofburns! The surface of the warming plate is hot. Items around the outside of the drawer get hotter than those in the middle. Always use protective gloves or oven cloths to remove the dishes.
WARNING!
Put the drawer in standby mode before starting cleaning.
- Do not clean the appliance with a steam cleaner.
- Do not use abrasive products, alcohol or solvents as they may damage the device.
- The front is made of stainless steel or glass and is prone to scratches. Use a special non-abrasive cleaning agent for stainless steel.
Cleaning the exterior
- Remove dirt or cleaning agent residues immediately.
- Clean all surfaces only with a damp cloth and soapy water. Then dry with a soft cloth.
Cleaning the interior
- Remove any soiling from the warming drawer while still hand warm.
- Clean the warming plate, ventilation grille and operating panel with a soft cloth dampened with water and a little washing-up liquid and dry with a soft cloth.
The following is a list of faults that the user can quickly remedy after following the described solution. Call the service division if another fault is displayed, or the defect cannot be fixed.
Troubleshooting table
| SolutionPossiblecauseProblem | ||
| The dish remains cold. | The appliance is not switched on. | Switch the appliance on. |
| An interruption in the power supply. | Replace the fuse or switch on the fuse again in the fuse box. | |
| The drawer is not closed properly. | Close the drawer. | |
| The dish isn't warm enough. | Warming duration too short. | Lengthen the warming duration. |
| Temperature is not set high enough. | Select a higher temperature setting. | |
| The control lamp flashes regularly (with the drawer closed). | The delayed start is activated. | Deactivate delayed start mode. |
| The control lamp flashes rapidly (with the drawer opened). | The delayed start is activated. | Close the drawer and then select operation with a delayed start. Touch the on/off-key to end the delayed start. |
| Control lamp is defective. | Contact the service department. | |
| The control lamp does not illuminate when the drawer is in operation. | The Sabbath mode is activated. | Deactivate Sabbath mode. |
| The control lamp flashes rapidly (with the drawer openend or closed). | Drawer is still in operation. | Touch the on/off-key. |
| The operating panel shows no reaction when touched. | The Sabbath mode is activated. | Deactivate Sabbath mode. |
| The control panel is defective. | Contact the service department. | |
| The drawer cannot be opened/closed. | Push-pull mechanism is defective. | Contact the service department. |
WARNING!
Render the appliance unusable to prevent accidents caused by improper use (e.g. through children playing):
- Disconnect the appliance from the mains. With a fixed appliance, this is to be carried out by a qualified electrician.
- Then remove the power cord from the appliance by cutting it off at the device.
Disposal of the appliance and packaging
Sustainable materials have been used during the manufacture of this appliance. This appliance must be disposed of responsibly at the end of its service life. Ask your local authorities for more information about how to do this.
The appliance packaging is recyclable. The following may have been used:
- cardboard;
•polyethylene film (PE);
• CFC-free polystyrene (PS rigid foam).
Dispose of these materials in a responsible manner and in accordance with government regulations.
WARNING!
Never allow children to play with packaging material due to the danger of injury or suffocation. Store the packaging material safely or dispose of it in an environmentally-friendly way.
text_image
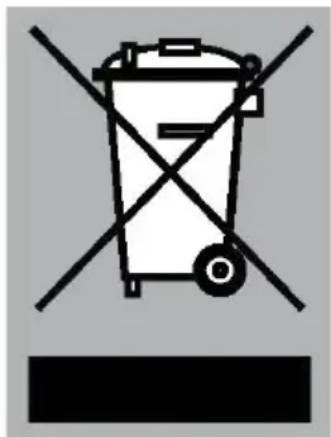
Warning symbol for a trash bin with crossed lines indicating no waste or discharge, and a black rectangle below.The product has been marked with a crossed-out dustbin symbol to remind you of the obligation to dispose of electrical household appliances separately. This means that the appliance may not be included with normal domestic refuse at the end of its service life. The appliance must be taken to a special municipal centre for separated waste collection or to a dealer providing this service.
A separate collection of household appliances helps to prevent any potential negative impact on the environment and on human health caused by improper disposal. It ensures that the materials of which the appliance is composed can be recovered to obtain significant savings in energy and raw materials.
Declarationofconformity
We hereby declare that our products satisfy the applicable European directives, orders and regulations, as well as the requirements stated in the referenced standards.
Safety
- This appliance should only be connected by a registered installer!
- The electrical connection must comply with national and local regulations.
- The wall plug socket and plug should always be accessible.
- If the power cord is damaged, it should be replaced by the manufacturer or an authorised service technician, in order to avoid hazard.
- If you want to make a fixed connection, make sure that a omnipolar switch with a contact separation of at least 3 mm is fitted in the supply cable.
- If a stationary appliance is not fitted with a supply cord and a plug, or with other means for disconnection from the supply mains having a contact separation in all poles that provide full disconnection under overvoltage category III conditions, the instructions shall state that means for disconnection must be incorporated in the fixed wiring in accordance with the wiring rules.
- WARNING: Never open the appliance casing. The casing may only be opened by a service technician.
- Prior to connecting the drawer, ensure that all cables in your home's electrical system are of sufficient diameter to supply the appliance properly.
- Complete all electrical connections before building in the appliance.
- Improper installation and maintenance work or repairs are dangerous. These may only be performed by authorized and trained technicians. If the appliance has a defect, please disconnect it and contact customer service.
- If the appliance is mounted behind a furniture front (e.g. a door), never close it while the appliance is in use. Heat and humidity accumulate behind a closed furniture front. This may damage drawer, cupboard and floor.
Installation
- Only use original replacement parts. These meet the required safety specifications.
- Please note that the appliance must not be mounted tilted or upended. The design of the appliance includes an oil-containing pump. Please refer to the installation instructions.
- The manufacturer cannot be held liable for any damage resulting from failure to follow the safety instructions and warnings.
Electricalconnection
- This appliance is manufactured in Class I; this means the device must be grounded.
- Check whether the power of the electrical mains corresponds to the power on the identification plate on the appliance.
- Before connecting to the electrical mains, check whether the power socket is grounded.
- The device is equipped with a plug. When installing the appliance, remember that this plug must remain accessible.
WARNING!
If a stationary appliance is not fitted with a supply cord and a plug, or with other means for disconnection from the supply mains having a contact separation in all poles that provide full disconnection under overvoltage category III conditions, the means for disconnection must be incorporated in the fixed wiring in accordance with the wiring rules. This is also applicable for appliances with a supply cord and plug when the plug is not accessible after installing the appliance. Using an omnipolar switch with a contact separation of at least 3 mm fitted in the fixed wiring will fulfil this requirement.
This warming drawer is designed for use by individuals in their home. It is only intended for pre-warming tableware, keeping food warm and slow cooking. Any other use is prohibited and may be dangerous. The manufacturer disclaims liability in the event of improper use.
Under certain conditions, the outside of the warming drawer may reach 70 °C (depending on the selected temperature and length of use). Always use oven mitts or gloves to remove the warmed tableware from the drawer.

WARNING!
Priortoconnectingthedrawer,ensurethatallcablesinyour home'selectricalsystemareofsufficientdiameter.Your systemshouldbeprotectedbya10-ampfuse.
Preparation
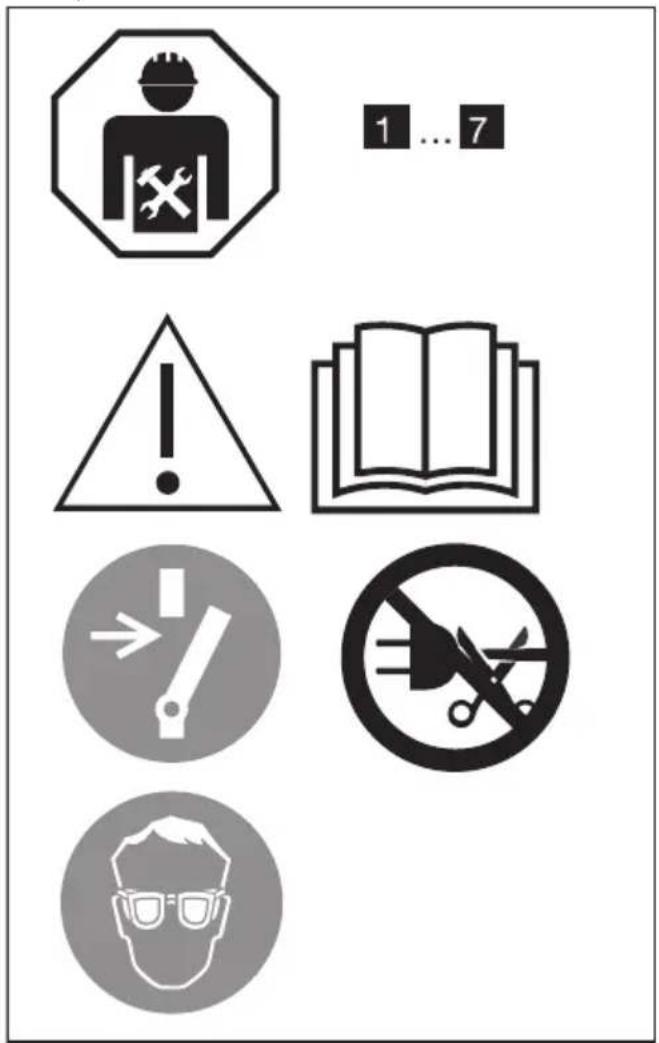
text_image
1 ... 7 !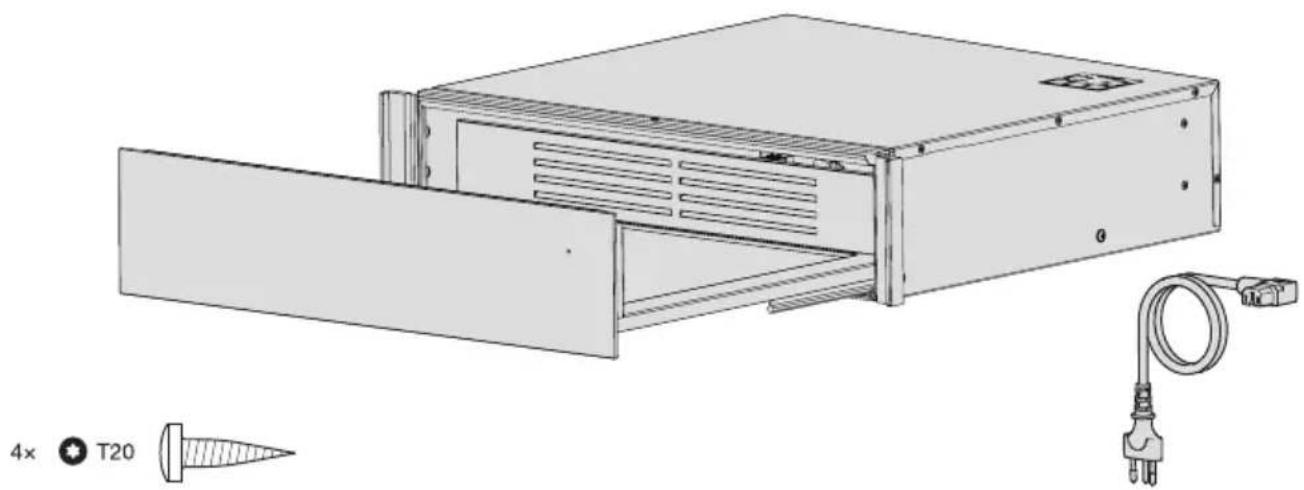
natural_image
Technical line drawing of a computer rack unit with cable and connector, no text or symbols presentAppliance dimensions
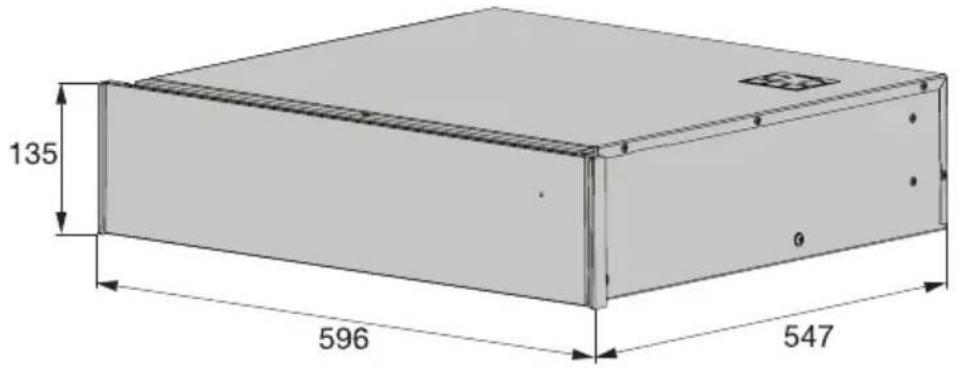
text_image
135 596 547Built-in dimensions
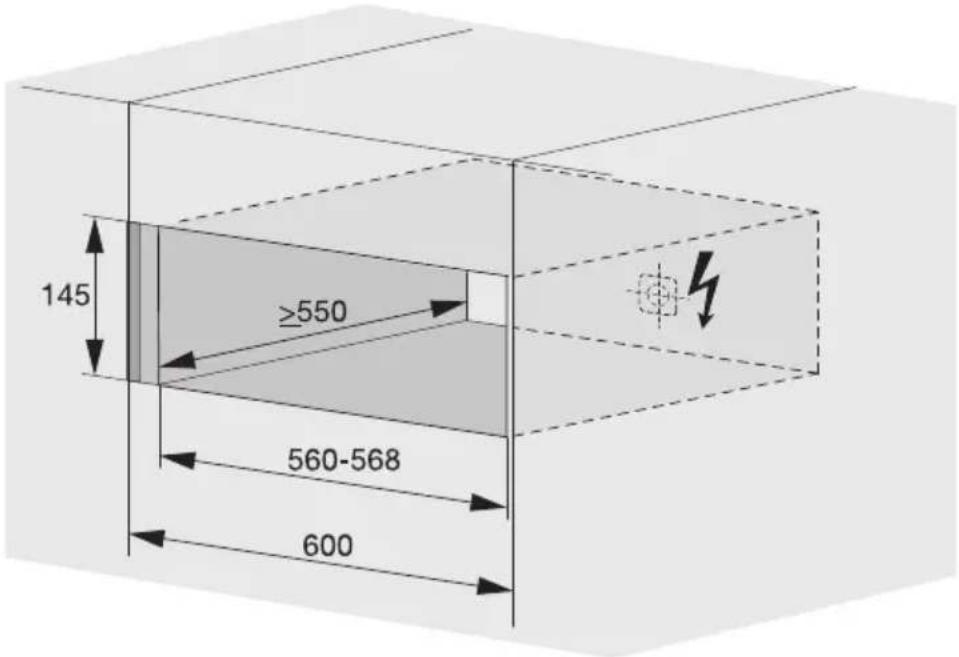
text_image
145 ≥550 560-568 600Built-in
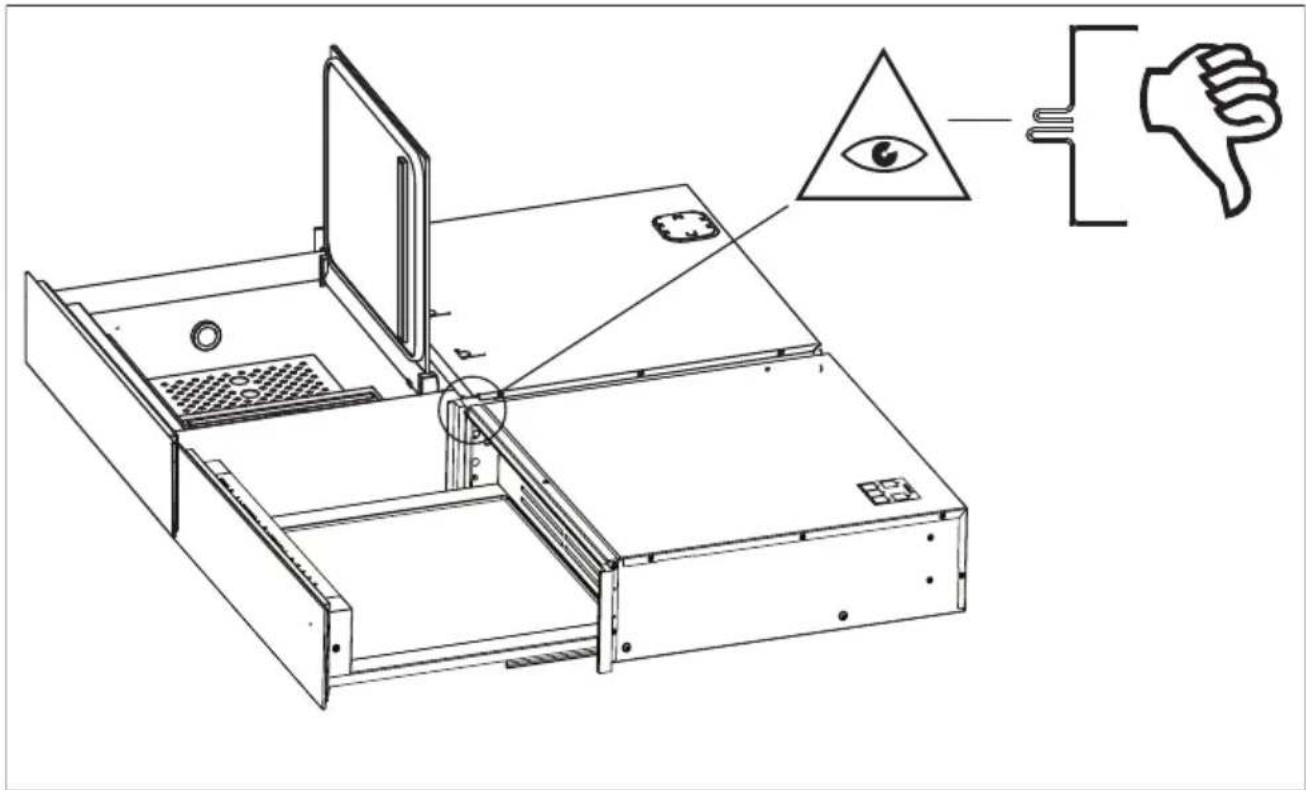
text_image
Technical diagram of a device with an eye symbol and a thumbs-down icon, illustrating mechanical or electrical assembly.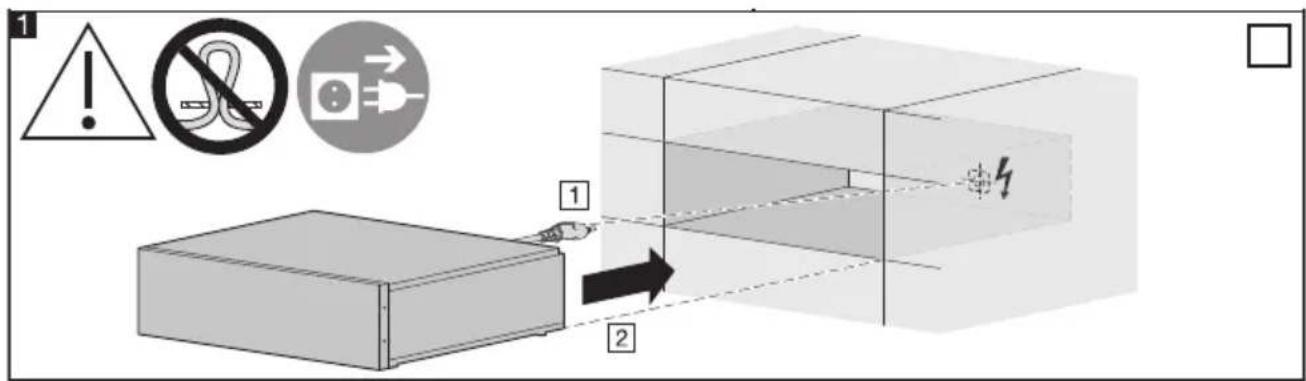
text_image
1 ! No → 1 2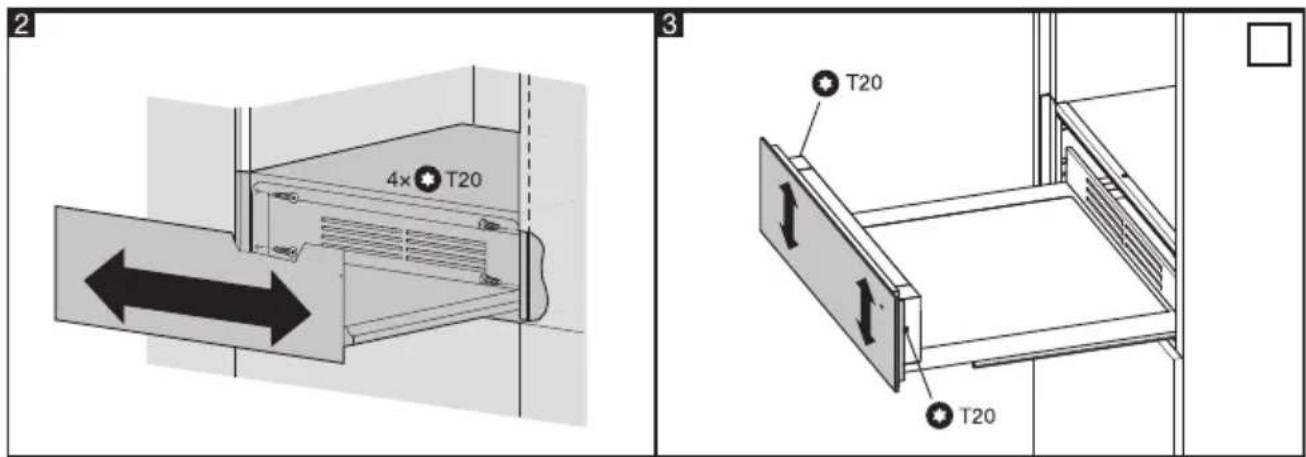
text_image
2 4× T20 3 T20 T20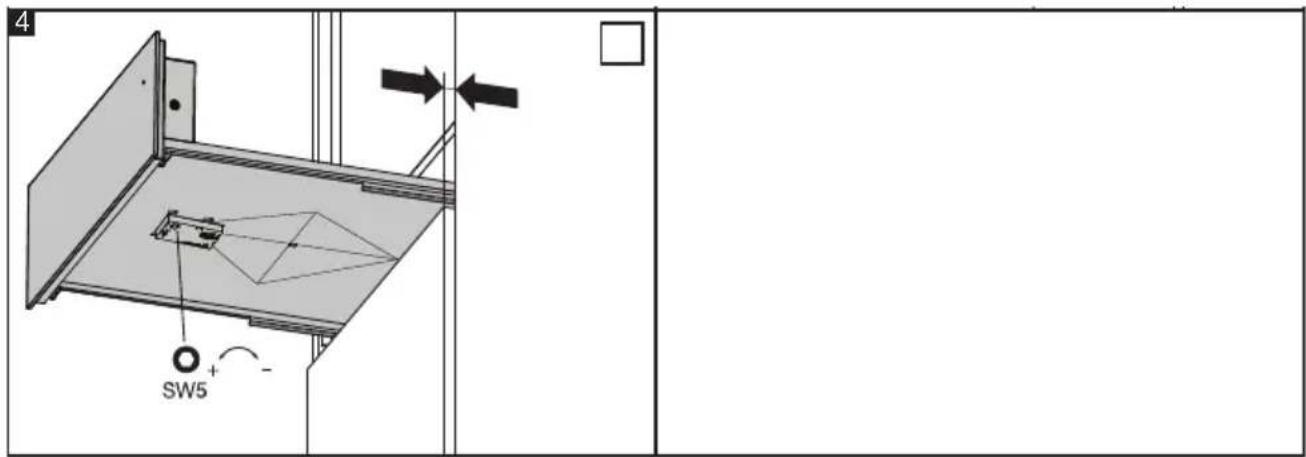
text_image
4 SW5 + -Your notes
Your notes
ATAG
www.atag.nl
www.atag.be
