
MB450 - Exercise bike VirtuFit - Free user manual and instructions
Find the device manual for free MB450 VirtuFit in PDF.

| Brand | VirtuFit |
| Model | MB450 |
| Product Type | Exercise Bike |
| Intended Use | Home |
| Maximum User Weight | 100 kg |
| Resistance | 12 magnetic levels |
| Training Programs | 5 preset programs (P1-P5) + manual mode |
| Display | LCD screen: speed, time, mode, rev counter, SCAN |
| Pedaling Direction | Reversible (forward/backward) |
| Power Supply | Mains (power cable included) |
| Safety Instructions | Consult a doctor before use, max weight 100 kg, flat surface, appropriate clothing |
| Daily Maintenance | Clean after each use, remove sweat and moisture |
| Semi-annual Maintenance | Check and tighten bolts and nuts |
| Storage | Dry place, temperature 5°C to 45°C |
| Operating Environment | Ambient temperature 10°C to 35°C |
| Warranty | According to conditions described in the manual |
| Spare Parts | Available on request from customer service |
| Repairs | By a professional technician only |
| Included Accessories | Hex key, screws and bolts |
| Number of pages in the manual | 21 pages |
| Available Languages | FR, DE, EN, NL |
Frequently Asked Questions - MB450 VirtuFit
User questions about MB450 VirtuFit
0 question about this device. Answer the ones you know or ask your own.
Ask a new question about this device
Download the instructions for your Exercise bike in PDF format for free! Find your manual MB450 - VirtuFit and take your electronic device back in hand. On this page are published all the documents necessary for the use of your device. MB450 by VirtuFit.
USER MANUAL MB450 VirtuFit
@virtufit_fitness
VirtuFit
www.virtufit.com
TOOLKIT
natural_image
Technical line drawing of a mechanical device with labeled component A (no text or symbols on the diagram itself)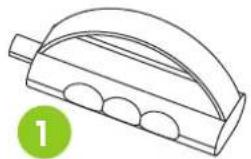
natural_image
Simple line drawing of a curved mechanical component with three circular holes, labeled with number 1 (no text or symbols on the object itself)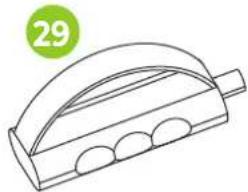
natural_image
Line drawing of a curved architectural structure with circular cutouts, no text or symbols present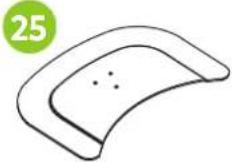


natural_image
Two types of threaded fasteners shown in 3D rendering, one with a green circle highlighting the number 26 (no text or symbols on the shafts)
natural_image
Two simple diagrams showing a washer and a nut, each with a green circular dot above (no text or symbols)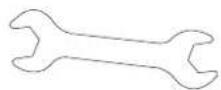
DESCRIPTION QTY
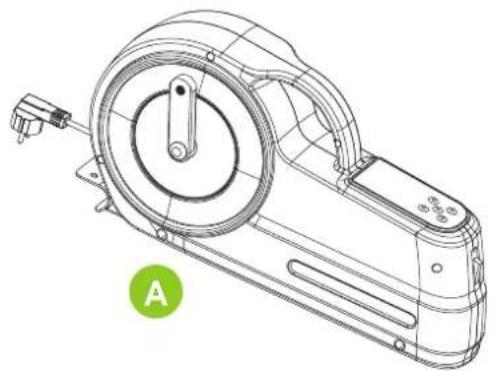
| A Main frame | 1 | |
| 1 | Right pedal | 1 |
| 29 | Left pedal | 1 |
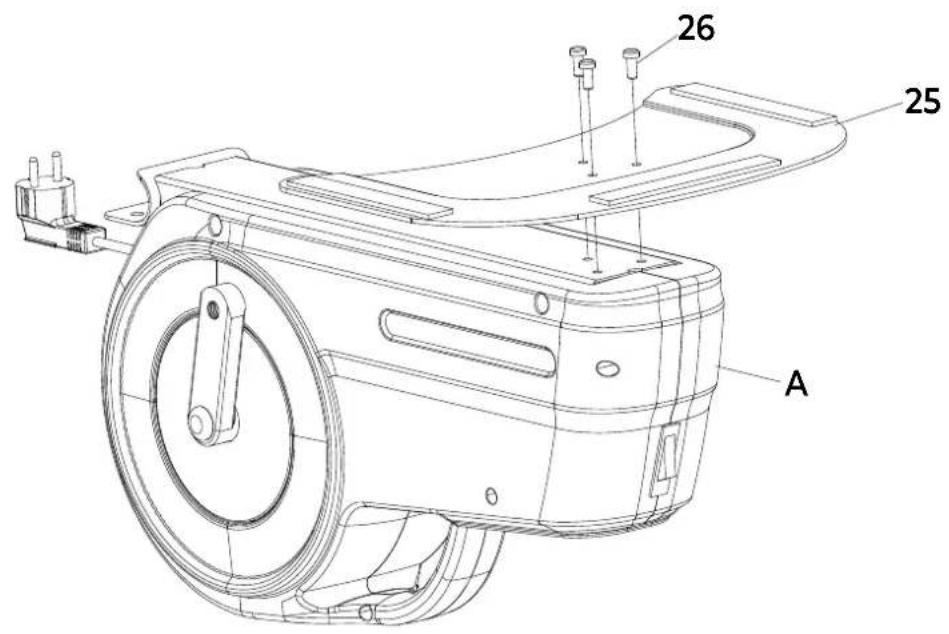
| 25 | Iron plate | 1 |
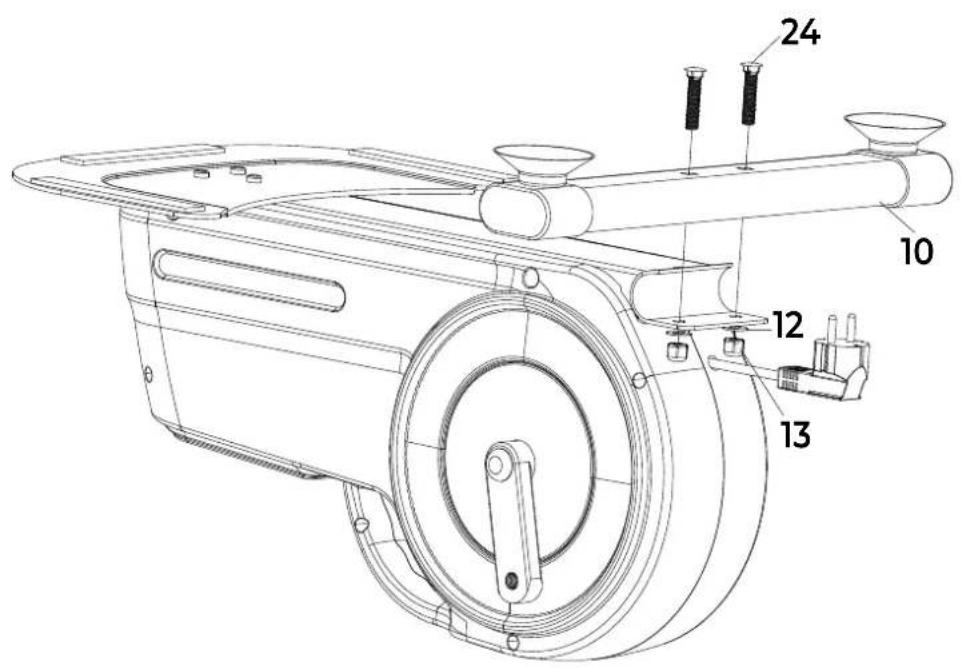
| 10 | Bottom tube | 1 |
DESCRIPTION QTY
| 26 M6*16 3 | |
| 24 M8*40 2 | |
| 12 M8 Flat pad 2 | |
| 13 Cap nut 2 | |
| Open wrench end 13-15 1 | |
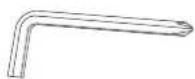
| Hex #5 1 |
STEP 01
STEP 02
STEP 03
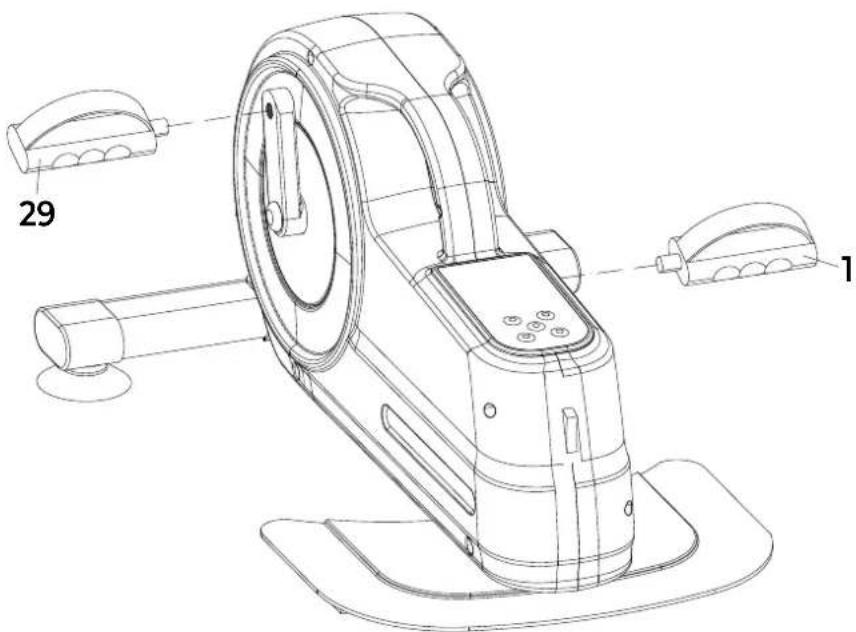
FIG. A

FIG. B
natural_image
Line drawing of a person bending forward with hands raised (no text or symbols)1

natural_image
Line drawing of a person sitting cross-legged, holding their feet (no text or symbols)2
natural_image
Line drawing of a person performing a seated stretch or exercise (no text or symbols)3
natural_image
Line drawing of a person in motion, viewed from the side (no text or symbols)4

natural_image
Line drawing of a person performing a stretching exercise with arms raised (no text or symbols)5
INDEX
| Safety | instructions | 07 | |
| Guarantee | 07 | ||
| Assembly instructions | 07 | ||
| Maintenance | 07 | ||
| Console | 08 | ||
| Training | guidelines | 08 |
SAFETY INSTRUCTIONS

WARNING!
Consult your doctor before you start exercising. This is particularly important for people with health problems. Please read all instructions before using the machine. VirtuFit assumes no responsibility for injury or property damage resulting from the use of this equipment. Please read this manual carefully before assembling and/or using the machine.
- Do not wear loose clothing to avoid getting caught in moving parts.
- Install and use the unit on a solid, level surface.
• Always wear clean sports shoes when using the appliance.
- Keep children and pets away from the appliance when in use.
- Maintain your balance when using the device.
- Do not place your fingers or other objects in the moving parts.
- Before exercising, consult your physician to determine the appropriate frequency, duration and intensity of exercise for your age and physical condition. Stop exercising immediately if you experience nausea, shortness of breath, fainting, headache, chest pain, tightness or any other discomfort.
- This machine should only be used by one person at a time.
- This machine is designed for domestic use and the maximum user weight is 100 kg.
- Leave 1-2 metres of space behind the machine to avoid accidents.
- Place the machine on a clean, flat surface. Do not place it on a thick carpet, as this may hinder the ventilation of the machine. Do not place the machine outdoors or near water.
- Keep the storage area dry, clean and level to prevent damage. Do not use the device for any purpose other than training.
- Use the device only in an environment where the ambient temperature is between 10^ and 35^ . Store the device only in an environment where the temperature is between 5^ and 45^ .
GUARANTEE
Warranty claims are excluded if the cause of the defect is the result of:
- Maintenance and repair work not carried out by an official dealer, unless otherwise by the supplier specified.
- Improper use, negligence and/or poor maintenance.
- Failure to maintain the appliance in accordance with the manufacturer's instructions.
ASSEMBLY INSTRUCTIONS (STEP 01-03)
Missing parts: If any parts are missing from the packaging, carefully check the polystyrene foam and the appliance itself. Some parts (bolts, screws, etc.) are already attached to the unit.
Hex head bolts: Make sure that the hex head spanner is pushed into the bolt before applying force. This will prevent the head of the socket bolt from turning.
NOTE! Check that all bolts and screws are properly tightened before use.
MAINTENANCE
Safe and efficient use can only be achieved if the appliance is properly installed and maintained. It is your responsibility to ensure that the appliance is maintained regularly. Parts that have been used and/or damaged must be replaced before the appliance is used again. The appliance should only be used and stored indoors. Long-term exposure to weather and temperature/humidity changes can have a serious impact on the electrical components and moving parts of the unit. Always unplug the power cord from the unit before cleaning or servicing it.
Daily maintenance
- Clean and remove sweat and moisture after each use.
- Check that the unit is free of dust and dirt.
- Do not use aggressive cleaning agents and keep the device away from moisture.
Semi-annual maintenance
- Inspect all bolts and nuts connected to the moving parts of the unit. Tighten bolts and nuts as necessary and appropriate.
- Check the mobility of moving parts and components of the unit.
We recommend the following:
- Clean the unit after use.
- Use a dry cloth to clean the control panel and the areas around the on/off switch.
- Use a soft, clean cloth and detergent to remove stubborn marks and dirt from the unit.
- Store the unit in a safe, dry place away from heat and water.
CAUTION! Repairs must be carried out by a professional technician, unless otherwise specified by the supplier or manufacturer.
Cleaning
General cleaning of the unit will extend its life. Keep the appliance clean by dusting it regularly. Regular maintenance will prolong the life of your appliance and prevent injuries! For more information, please visit https://www.virtufit.nl/service/faq/
CAUTION! Wear clean shoes to reduce the risk of soiling the machine. At least once a year, remove the cover to remove dust.
CONSOLE (FIG. A)

- Select key for decreasing speed (12 speed levels).
- Select key for increasing speed (12 speed levels).
- Switch on the mini bike.
- In standby, press this button to switch between manual mode and programme mode (P1-P5). During training, press this button to switch the display between different values.
- Change the pedal direction.
- SCAN The screen automatically switches between speed, mode, time and count.
- SPEED The screen displays the current speed.
- MODE The screen displays the current mode (P1, P2, P3, P4 or P5).
- TIME The screen displays the elapsed time of the workout.
- COUNT The screen displays the number of pedal revolutions of the current workout.
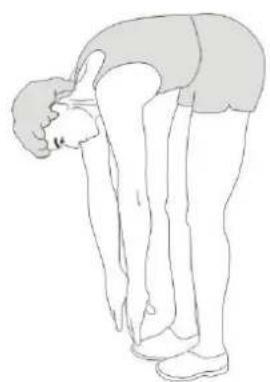
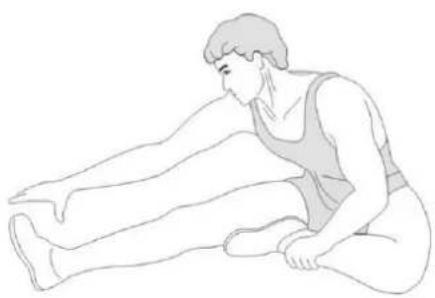
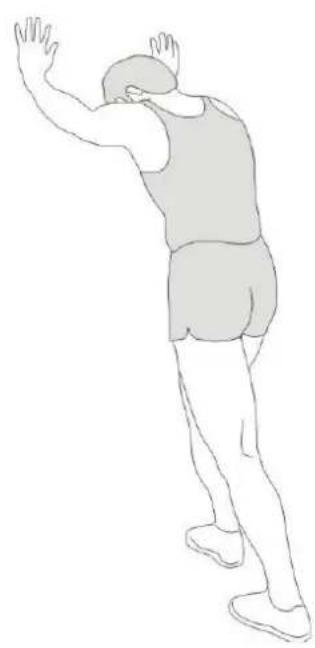
TRAINING GUIDELINES (FIG. B, 1-5)
A successful training program includes a warm-up, the actual training and a cool-down. Perform the complete training program at least twice, but preferably three times a week and keep a rest day between training sessions. After a few months, the intensity of the training can be increased, for example to four or five times a week.
The warm-up
The purpose of a warm-up is to prepare the body for training and to reduce the risk of injury. Warm up your body for two to five minutes before starting a cardio or strength training session. Do exercises that increase the heart rate and warm up the working muscles. Examples of this type of activity are running, jogging, jumping jacks, skipping and running in place.
Stretching
Stretching while the muscles are warm is very important after a good warm-up and cool-down. It reduces the risk of injury. Stretching exercises should be held for 15-30 seconds. Here are some examples of stretching exercises:
- Toe touch (Fig. B-1)
• Inner thight stretch (Fig. B-2)
• Hamstring stretch (Fig. B-3)
• Achilles stretch (Fig. B-4) - Side stretch (Fig. B-5)
ENGLISH
virtufit
Cooling down
The purpose of the cool-down is to return the body to its (near) normal resting position at the end of the workout. A good cool-down slowly reduces your heart rate and promotes recovery.
INHOUD
DESCRIPTION QTY.
| 1 Right pedal 1 | ||
| 2 Plastic cover 2 | ||
| 3 Flange screw R 1 | ||
| 4 Crank 2 | ||
| 5 Decoration cover 2 | ||
| 6 ST4.2*16 8 | ||
| 7 Right cover 1 | ||
| 8 ST4.2*16 drill screws 4 | ||
| 9 Suction end cap | 2 | |
| 10 | Bottom tube | 1 |
| 11 | Main frame 1 | |
| 12 | M8 flat pad 2 | |
| 13 | M8 Cap nut | 2 |
| 14 | Power cord 1 | |
| 15 | Motor | 1 |
| 16 | Core shaft | 1 |
| 17 | Console layout | 1 |
| 18 | Display stand | 1 |
| 19 | Key board | 1 |
| 20 | Display circuit board | 1 |
| 21 | Control circuit board | 1 |
| 22 | ST4.2*12 | 2 |
| 23 | Plastic column | 2 |
| 24 | Carriage screw M8*40 | 2 |
| 25 | Iron plate | 1 |
| 26 | Hexagon bolt with half round head M6*16 | 3 |
| 27 | Switch | 1 |
| 28 | Left cover | 1 |
| 29 | Left pedal | 1 |
| 30 | Flange screws L | 1 |
virtufit


- TOOLKIT
- DESCRIPTION QTY
- SAFETY INSTRUCTIONS
- WARNING!
- GUARANTEE
- ASSEMBLY INSTRUCTIONS (STEP 01-03)
- MAINTENANCE
- Daily maintenance
- Semi-annual maintenance
- We recommend the following:
- Cleaning
- CONSOLE (FIG. A)
- TRAINING GUIDELINES (FIG. B, 1-5)
- The warm-up
- Stretching
- ENGLISH
- virtufit
- Cooling down
- INHOUD
- DESCRIPTION QTY.
Brand : VirtuFit
Model : MB450
Category : Exercise bike