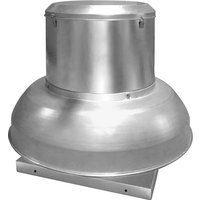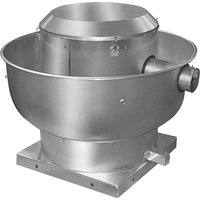
HVR36 - Fan Canarm - Free user manual and instructions
Find the device manual for free HVR36 Canarm in PDF.


User questions about HVR36 Canarm
0 question about this device. Answer the ones you know or ask your own.
Ask a new question about this device
Download the instructions for your Fan in PDF format for free! Find your manual HVR36 - Canarm and take your electronic device back in hand. On this page are published all the documents necessary for the use of your device. HVR36 by Canarm.
USER MANUAL HVR36 Canarm
natural_image
Line drawing of a large industrial fan with radial blades and wheels (no text or symbols)WARRANTY
CANARM Ltd. warrants every new fan to be free of defects in material and workmanship, to the extent that, within a period of one year from the date of purchase CANARMLtd.shalle either repair or replace at CANARM's option, any unit or part thereof, returned freight prepaid, and found to be defective.
This warranty does not include any labor or transportation costs incidental to the removal and reinstallation of the unit at theuser'spremises.
Componentsrepairedorreplacedarewarrantedthroughtheremainderoftheoriginalwarrantyperiodonly.
This warranty applies to the original purchaser-user only; it is null and void in case of alteration, accident, abuse, neglect, and operation not in accordance with instructions.
NOTICE: No warranty claims will be honored by CANARM Ltd. unless prior authorization is obtained.
InstallationorProductproblems?Donotreturntostoreofpurchase. ContactCanarmServiceat1-800-265-1833(CANADA)1-800-267-4427(U.S.A.) 1-800-567-2513(ENFRANCAIS)MondaytoFriday8:00-5:00pme.s.t.
User'sGuideForHVRFans
READINSTRUCTIONSCOMPLETELYBEFOREOPERATINGFAN.DONOTUSEIFANYPARTISDAMAGEDORMISSING
WARNING: Fan is provided with a grounded 120V plug. Use only in grounded outlets.
RULESFORSAFEOPERATION
-Alwaysunplugunitforcleaning.
-Alwaysunplugunitwhennotinuse.
-Alwaysunplugwhenmovingunitfromonelocationtoanother.
- D o notplaceforeignobjectsthroughguardintotheblade.
- D o notoperationwithoutfanguardproperlylocked.
- D o notusewithextensioncord.
- D o notusefaninwindows.Rainandmoisturemaycreateanelectricalhazard.
- D o notplacefanoranypartsnearanopenflame,cookingorotherheatingappliance.
- D o notoperateunitwithadamagedcordorplug.
-Forindooruseonly.
ASSEMBLYINSTRUCTIONS
This fan comes with wheelkit and ceiling mount kit. Choose preferred style and assemble as per instructions below:
(NOTE:24"fancomesalreadyassembled)
WHEELKITASSEMBLY:
FootAssembly:(SeeFigure1)
- Takeoutthebagofhardwareattachedtothecarton.
- Align the hole on the bushing (1) with the hole on the square tube. Insert bolt (2) with flat washer (3), and lock washer (4) asshownindiagramandtightentosecure.
- Removetheboltsandwashersfromthefoot.Insertcolumnoffootintobushingandalignbothholesonfootwithholesonbushing.(SeeFigure2)
- Insertbolt(2) with flatwasher(3) and lockwasher(4) and tightentosecure.
5.Repeatsteps2through4forotherconnectioncoverandfoot.
WheelAssembly:(SeeFigure3)
- Removethetwobolts(1), flatwashers(2) and lockwashers(3) from axle(4).
2.Inserttheaxle(4)intothesteeltubeandalignholesontubewithholesonaxle.
3.Insertthebolt(1),flatwashers(2)andlockwashers(3)removedinstep1,andtightentosecurethem.
4.Repeatsteps1through3fortheotheraxleassembly.
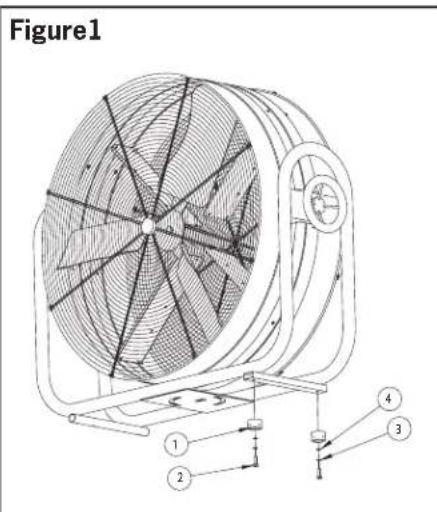
text_image
Figure1 ① ② ③ ④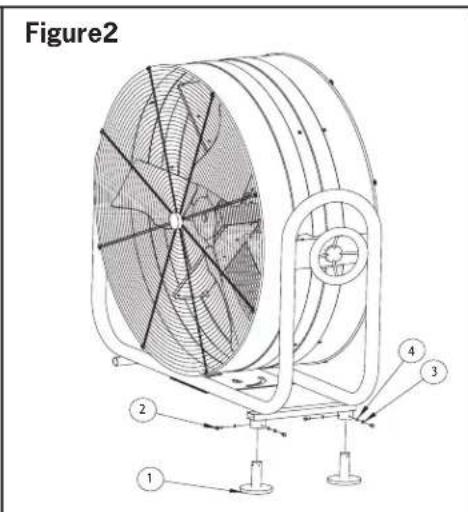
text_image
Figure2 1 2 3 4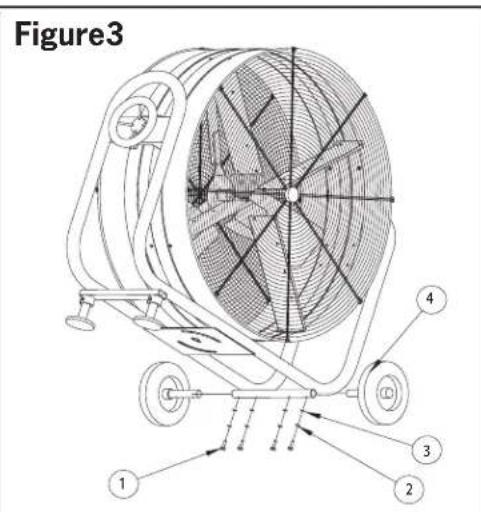
text_image
Figure3 1 2 3 4CEILINGMOUNTKIT:
WARNING: Ensure that fan is mounted on joistor beam capable of supporting the fan, and that suitable hardware is used.
MountingBracketInstallation:(SeeFigure4)
- Takeoutmountingbracket(2)andremovethethreescrewsandwashers.
- Mountmountingbracket(2)toceilingwithappropriatehardware.(Hardware not provided)Choose hardwares suitable for ceiling/beamstyle.
- Thread middle bolt (1) to mounting plate, use this bolt to locate fan. WARNING: Do not rely on this bolt alone to hold the fan.
- Align middle hole on mounting bracket with mounting plate on fan base and insert bolt with flat washer (3) through mounting plateintomountingbracket.Threadbolthalfway, donotfullytighten.
- Rotate fan to desired position and install two bolts (1) and washers (3) removed in step 1. Tighten all bolts to secure fan.
SafetyCableInstallation:(SeeFigure5)
- Removethetwosafetycablesfrompackaging.
- Attach safety cable to fan by looping cable (1) through bracket on side of fan housing and then through loop at other end of cableasshownindiagram.
3.Repeatstep2fortoinstallthesecondssafetycableonoppositesideoffanhousing.
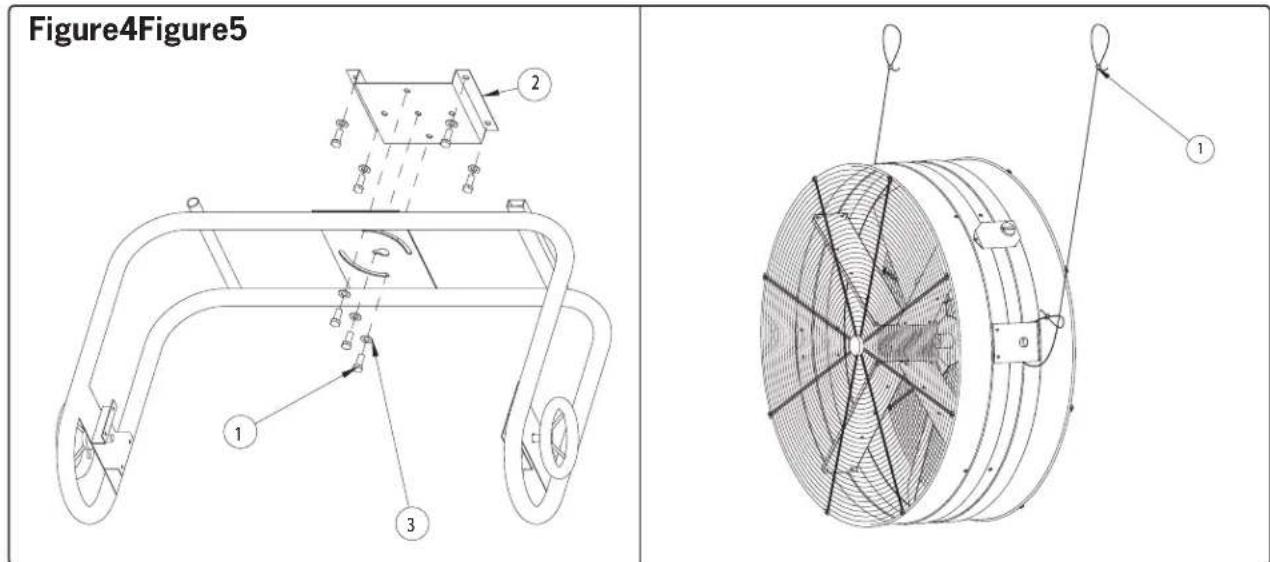
text_image
Figure4Figure5 1 2 3 1TO ADJUST TILT: Loosen handles ONE (1) turn only. Adjust to desired tilt and tighten by turning handles back 1 turn.
CLEANING:
WARNING: Unplug from electrical supply source before cleaning. After servicing, any safety device (including guard and blades) must be installed or remounted properly. To clean blades use a soft damp cloth then wipe with dry cloth. Do not use harmful cleaners.Donotbendtheblades.

text_image
CANARM®CANARMLTD.CANARMLTEE.
2157PARKEDALEAVENUE8500RUEGRENACHE
BROCKVILLE, ONTARIOK6V5V6ANJOU, QUEBECH1J2B1
TELEPHONE:(613)342-5424TELEPHONE:(514)353-2255
FAX:1-800-263-4598
E-MAIL:agsales@canarm.ca
FAX:(514)353-2522
E-MAIL:agsales@canarm.ca
Ventilateur HVR
Mode d'Emploi
VEUILLEZ LIRE ET GARDER CES INSTRUCTIONS
natural_image
Line drawing of a large industrial fan with radial blades and wheels (no text or symbols)GARANTIE
text_image
Technical diagram of a mechanical assembly with labeled components and motion indicators