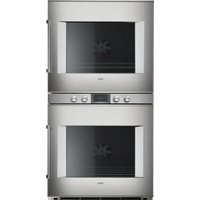
BX481611 - Oven GAGGENAU - Free user manual and instructions
Find the device manual for free BX481611 GAGGENAU in PDF.


| Brand | Gaggenau |
| Model | BX481611 |
| Product type | Built-in oven |
| Safety standards | Complies with UL 858, CAN/CSA C22.2 No. 61, UL 923, CSA C22.2 No. 64, UL 1026 standards |
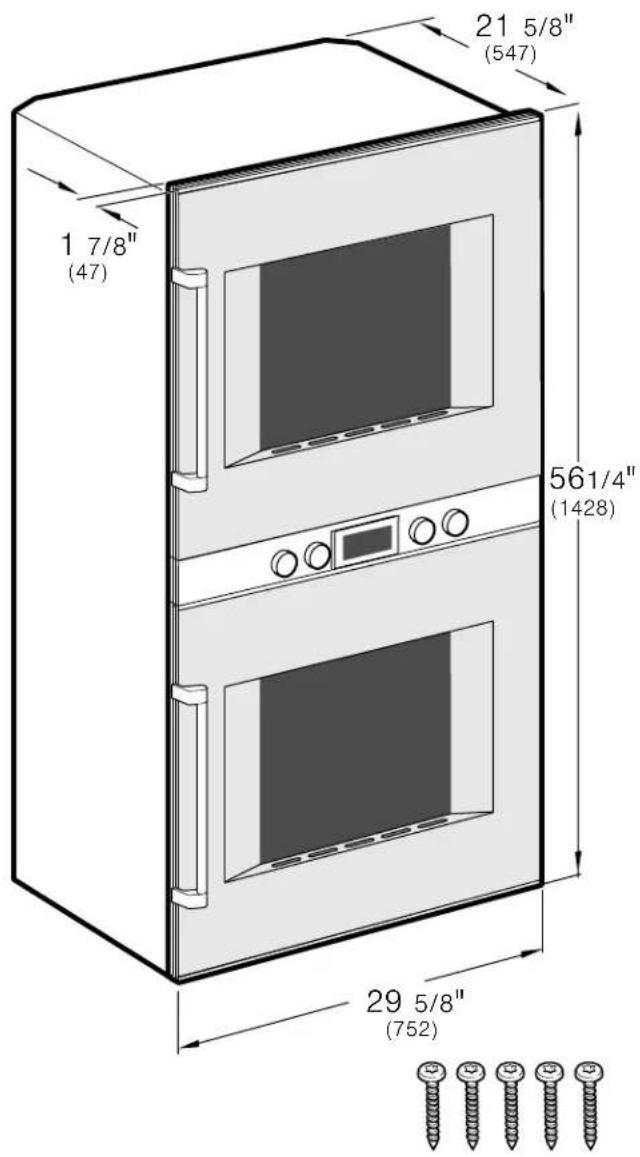
| Front of door to cabinet body distance | 47 mm |
| Outer edge of handle to cabinet body distance | 94 mm (with handle added) |
| Minimum door opening angle | 90° |
| Weight (double oven with accessories) | Approx. 150 kg (330 lb) |
| Required ventilation cutout | Min 20 x 500 mm |
| Cabinet thermal resistance | Up to 195°F (90°C) for the appliance, 160°F (70°C) for adjacent fronts |
| Electrical supply | 4-wire connection (red, black, white, yellow/green) for 240 V / 120 V |
| Cabinet mounting | 5 Torx screws supplied |
| Tools required for installation | Torx T20 screwdriver, 1/8 in drill bit, tape measure |
| Recommended number of people for installation | At least 2 |
| Proposition 65 Warning | This product contains chemicals known to cause cancer or birth defects |
| Rating plate | Located on the underside of the appliance |
| Customer service | Available at CA 800 828 9165 |
Frequently Asked Questions - BX481611 GAGGENAU
User questions about BX481611 GAGGENAU
0 question about this device. Answer the ones you know or ask your own.
Ask a new question about this device
Download the instructions for your Oven in PDF format for free! Find your manual BX481611 - GAGGENAU and take your electronic device back in hand. On this page are published all the documents necessary for the use of your device. BX481611 by GAGGENAU.
USER MANUAL BX481611 GAGGENAU
Installation instructions....2
Instructions d'installation....10
Signal Words for Safety and Best Use

WARNING
This indicates that death or serious injuries may occur as a result of non-observance of this warning.

CAUTION
This indicates that minor or moderate injuries may occur as a result of non-observance of this warning.
NOTICE: This indicates that damage to the appliance or property may occur as a result of non-compliance with this advisory.
Note: This alerts you to important information and/or tips.

IMPORTANT SAFETY INSTRUCTIONS
READ AND SAVE THESE INSTRUCTIONS
WARNING
If the information in this manual is not followed exactly, fire or shock may result causing property damage or personal injury.
WARNING
Do not repair, replace or remove any part of the appliance unless specifically recommended in the manuals. Improper installation, service or maintenance can cause injury or property damage. Refer to this manual for guidance. All other servicing should be done by a qualified technician.
State of California Proposition 65 Warnings
WARNING
This product contains chemicals known to the State of California to cause cancer, birth defects or other reproductive harm.
Appliance Handling Safety
Unit is heavy and requires at least two people or proper equipment to move.
Do not lift appliance by door handle.
Hidden surfaces may have sharp edges. Use caution when reaching behind or under appliance.
Safety Codes and Standards
This appliance complies with the latest version of one or more of the following standards:
CAN/CSA C22.2 No. 61 - Household Cooking Ranges
UL 858 - Household Electric Ranges
CAN/CSA C22.2 No. 150 - Microwave Ovens
UL 923 - Microwave Cooking Appliances
CSA C22.2 No. 64 - Household Cooking and Liquid-Heating Appliances
- UL 1026 - Electric Household Cooking and Food Serving Appliances
It is the responsibility of the owner and the installer to determine if additional requirements and/or standards apply to specific installations.
Electric Safety
Before you plug in an electrical cord, be sure all controls are in the OFF position.
If required by the National Electrical Code (or Canadian Electrical Code), this appliance must be installed on a separate branch circuit.
Installer - show the owner the location of the circuit breaker or fuse. Mark it for easy reference.
Important - save these instructions for the local electrical inspector's use..
Before installing, turn power OFF at the service panel. Lock service panel to prevent power from being turned ON accidentally.
Refer to data plate for more information. See "Data Plate" under "Service" for data plate location.
Be sure your appliance is properly installed and grounded by a qualified technician. Installation, electrical connections and grounding must comply with all applicable codes.
Related Equipment Safety
Remove all tape and packaging before using the appliance. Destroy the packaging after unpacking the appliance. Never allow children to play with packaging material
Never modify or alter the construction of the appliance. For example, do not remove leveling legs, panels, wire covers or anti-tip brackets/screws.

IMPORTANT SAFETY INSTRUCTIONS
READ AND SAVE THESE INSTRUCTIONS
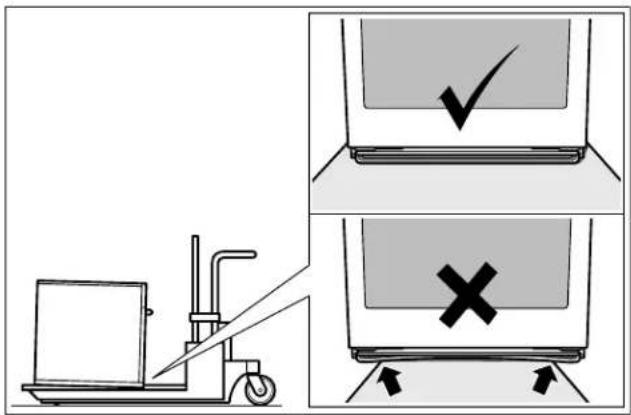
Transport
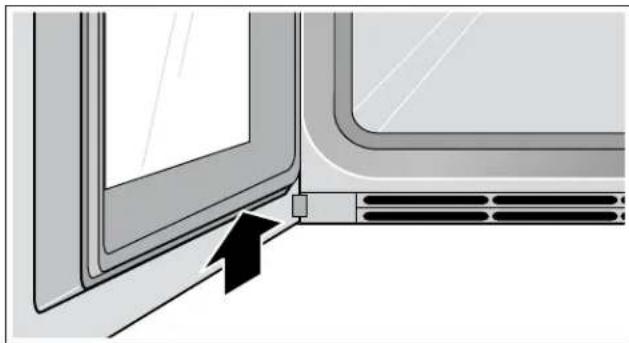
To avoid damage to the oven vent, use the transport method shown in the picture below.
Before You Begin
Tools and Parts Needed
- Torx T20 screwdriver
1/8" drill bit and drill - Measuring tape
Parts Included
Built-in oven
5 Torx screws
Power Requirements
The outlet must be properly grounded in accordance with all applicable codes.
Planning notes
Door hinge not interchangeable.
Distance from furniture body to door front 1.85" (47 mm).
Distance from furniture body to outer edge of door handle 3.7" (94 mm) after retrofitting the handle (special accessory).
Pay attention to the front protrusion, possibly including the door handle, for opening drawers at the sides.
When planning a corner solution, pay attention to the door opening angle of at least 90^ .
Preparing kitchen units
Kitchen units must be temperature-resistant up to 195^ F ( 90^ C) and adjoining furniture frontages up to 160^ F ( 70^ C).
Ventilation cut-out in the built-in cupboard's intermediate shelf: at least 0.8 in to 1.65 ft (20 x 500 mm).
The wall socket must be outside the built-in niche.
Cut recesses on the furniture before inserting the appliance. Remove any shavings, as these can affect the operation of electrical components.
Secure unsecured furniture items to the wall using a commercially available bracket.
Only install the appliance so high that accessories can be removed with ease.
Dimensions and Cabinet Requirements
General Cabinet Requirements
Cabinet requirements vary depending on the model to be installed. Please consult the section Dimensions for the details pertaining to your particular model.
All models require:
- 1/4" (6.4 mm) space between the side of the appliance and an adjacent wall or cabinet door when intalled at the end of a cabinet run.
- The cabinet base must be flat and capable of supporting the weight of your appliance when in use. See the appropriate weight for your model in the Dimensions section pertaining to your particular model.
Appliance Dimensions
Cabinet Dimensions
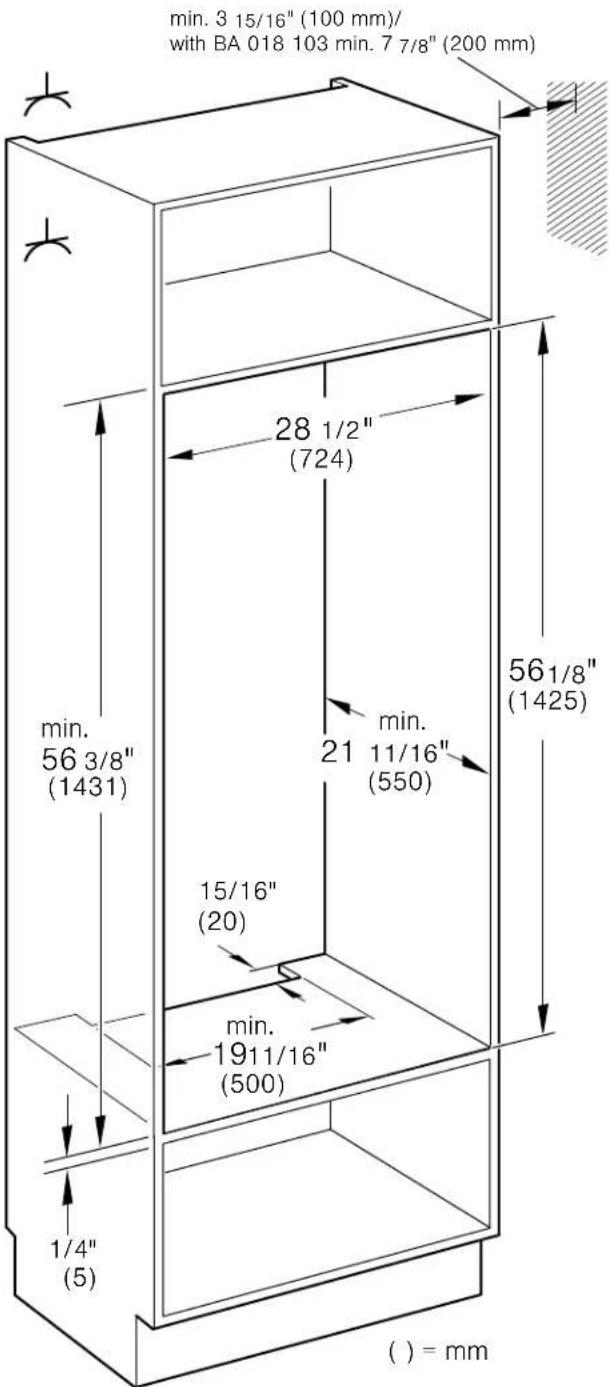
NOTICE: The cabinet base must be flat and capable of supporting a weight of at least 334 lbs (152 kg).
Removing Packaging
NOTICE: To prevent damage to your floor keep the unit in its packaging base until ready to be placed in the cabinet opening. Do not slide the unit across the flooring.
Different models use different packaging materials. Actual brackets may look differently. Bracket remains in packaging base.
1 Cut straps on outside of box.
2 Remove cardboard box.
3 Remove all top and side cardboard and Styrofoam braces.
4 Place oven in front of cabinets where it is to be installed.
Install Appliance
Note: The appliance is heavy. It is advisable to insert it together with a second person.
NOTICE: Before installing the oven, be sure to verify the cabinet dimensions and electrical connections.
Mount to Cabinet
- Important: Take into account the weight of the double oven (approx. 330 lbs/150 kg with accessories). Transport the appliance in an upright position.
- If there is no fitted shelf above the appliance, secure the appliance against tipping over when the door is opened. Fit two standard angles 3/16'' (5 mm) above the appliance at 17^3/4'' (450 mm) depth inside the cabinet.
1 Do not kink or trap the connecting cable, or route it over sharp edges.
2 Centre the appliance. There must be an air gap of 316 " (5 mm) between the appliance and adjacent cabinets.
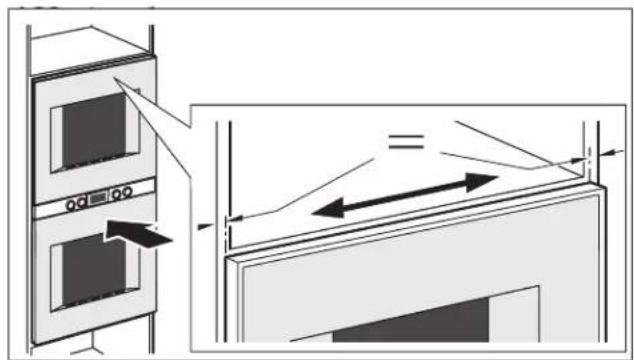
3 Using a spirit level, adjust the appliance so that it is perfectly level.
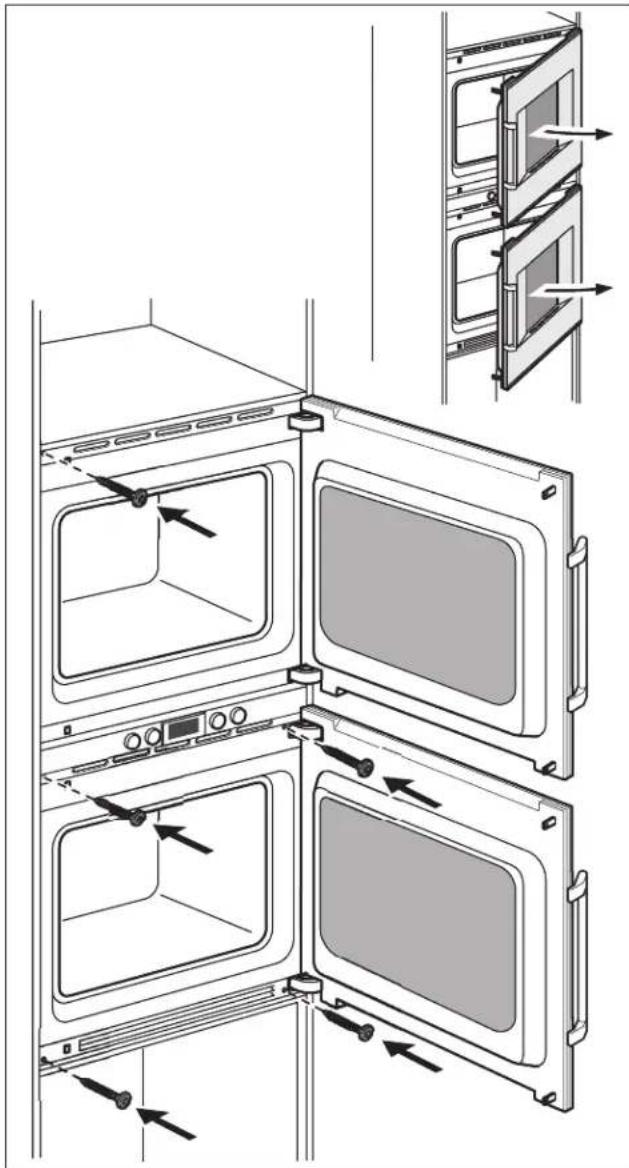
4 Screw the appliance into place. Remove the transport lock from the door.
Connect Electrical Supply

CAUTION
Local Codes may vary; installation, electrical connections and grounding must comply with all applicable local codes.
1 Connect red wire from oven to red electrical supply wire (hot wire).
2 Connect black wire from oven to black electrical supply wire (hot wire).
3 Connect white wire from oven to white electrical supply wire (neutral).
4 Connect yellow/green ground oven wire to electrical supply ground wire.
Attach flexible conduit to the junction box.
To facilitate serviceability, the flex conduit must not be shortened and should be routed to allow for temporary removal of the oven.
Combination with warming drawer
Important: Take into account the weight of the double oven (approx. 330 lbs/150 kg including accessories). A stable intermediate shelf must be installed above the warming drawer.
Check the Installation

WARNING
Before you plug in an electrical cord or turn on power supply, make sure all controls are in the OFF position.
Switch on the circuit breaker.
Verify that elements function properly.
Removal
1 Disconnect the appliance from the power supply.
2 Undo the fastening screws.
3 Raise the appliance slightly and pull it out completely.
Customer service
If your appliance needs repairs, our customer service is there for you. We work hard to help solve problems quickly and without unnecessary service calls, getting your appliance back up and running correctly in the least amount of time possible.
When you call, please indicate the product number (E-Nr.) and serial number (FD-Nr.) so that we can support you in a qualified manner. You will find the type plate with these numbers on the bottom of the appliance. To avoid having to search for a long time when you need it, you can enter your appliance data and the customer support telephone number here.
E-Nr. FD-Nr.
Customer Service
Please read the use and care instructions provided with your appliance. Failure to do so may result in an error in using the appliance. This could result in a service call that instead of fixing a mechanical issue is only needed for customer education. Such calls are not covered by the appliance warranty.
natural_image
Exterior view of a window with a black arrow pointing to the side panel (no text or symbols)Please find the contact data of all countries in the enclosed customer service list.
To book an engineer visit and product advice
USA 877 442 4436
toll-free
CANADA 800 828 9165
You can rely on the manufacturer's expertise. Rest assured that the repair will be handled by trained service technicians who have the original replacement parts for your appliance.
Avant de commencer
natural_image
Diagram of a window with an arrow pointing to the left side of the window (no text or symbols present)Antes de empezar
natural_image
Diagram of a window corner with an arrow pointing to the left side (no text or symbols present)1901 Main Street, Suite 600
Irvine, CA 92614
+1.877.442.4436
USA
www.gaggenau-usa.com
- Signal Words for Safety and Best Use
- WARNING
- CAUTION
- IMPORTANT SAFETY INSTRUCTIONS
- READ AND SAVE THESE INSTRUCTIONS
- State of California Proposition 65 Warnings
- Appliance Handling Safety
- Safety Codes and Standards
- Electric Safety
- Related Equipment Safety
- Transport
- Before You Begin
- Tools and Parts Needed
- Parts Included
- Power Requirements
- Planning notes
- Preparing kitchen units
- Dimensions and Cabinet Requirements
- General Cabinet Requirements
- Cabinet Dimensions
- Removing Packaging
- Install Appliance
- Mount to Cabinet
- Connect Electrical Supply
- Combination with warming drawer
- Check the Installation
- Removal
- Customer service
- Avant de commencer
- Antes de empezar
Brand : GAGGENAU
Model : BX481611
Category : Oven