X Core - Scooter EGRET - Free user manual and instructions
Find the device manual for free X Core EGRET in PDF.


User questions about X Core EGRET
0 question about this device. Answer the ones you know or ask your own.
Ask a new question about this device
Download the instructions for your Scooter in PDF format for free! Find your manual X Core - EGRET and take your electronic device back in hand. On this page are published all the documents necessary for the use of your device. X Core by EGRET.
USER MANUAL X Core EGRET
Operating instructions
natural_image
Exterior view of a modern electric scooter (no signage)text_image
Labeled diagram of an electric scooter with numbered components for identificationtext_image
Diagram of a modern electric scooter with labeled components A, B, and C for assembly or maintenance.text_image
Labeled diagram of a mechanical device with parts marked E and D, showing components like a clip, lens, and hook.natural_image
Mechanical bicycle lever assembly with labeled components (no text or symbols beyond label)text_image
Technical diagram of a vehicle tire assembly with labeled parts including gasket, hull, and wrench
natural_image
Side view of a gray electric scooter with visible battery pack and steering wheel (no text or symbols)Faltmechanismus
Auseinanderfalten
text_image
Technical diagram of an electric scooter with labeled components including battery, suspension, and wheelbase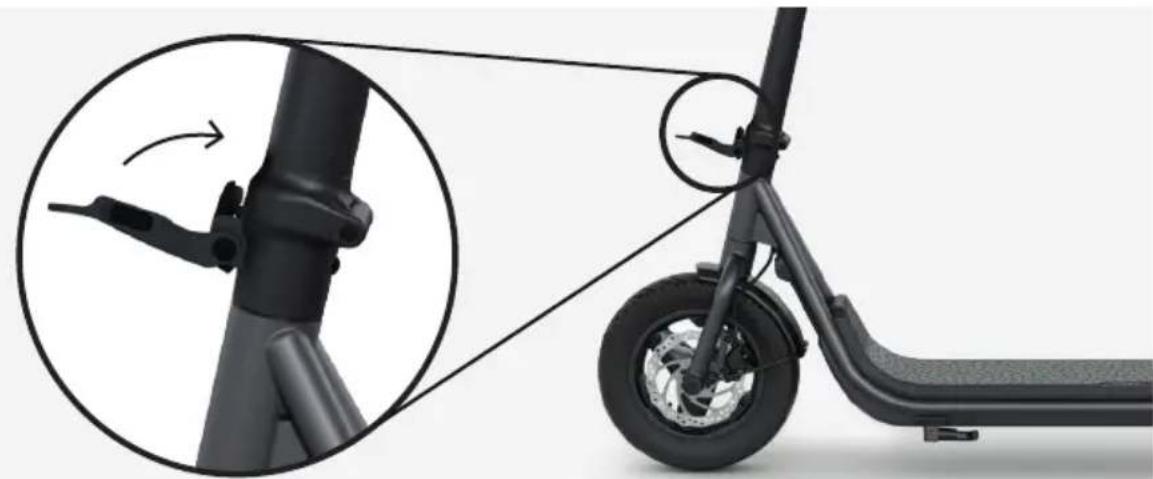
natural_image
Side view of a black electric scooter with a close-up inset showing the wheel and handle mechanism (no text or symbols)text_image
"click" K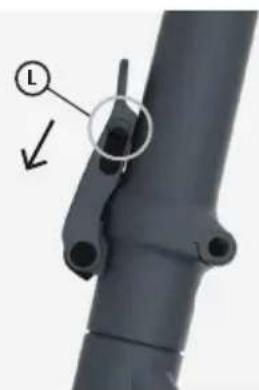
natural_image
Close-up of a mechanical pipe fitting with a labeled component (no text or symbols visible)natural_image
Close-up of a mechanical component with a circular inset highlighting a specific part (no text or symbols visible)Sturzgefahr!
natural_image
Mechanical assembly diagram showing a lever mechanism with a curved arrow indicating motion (no text or symbols present)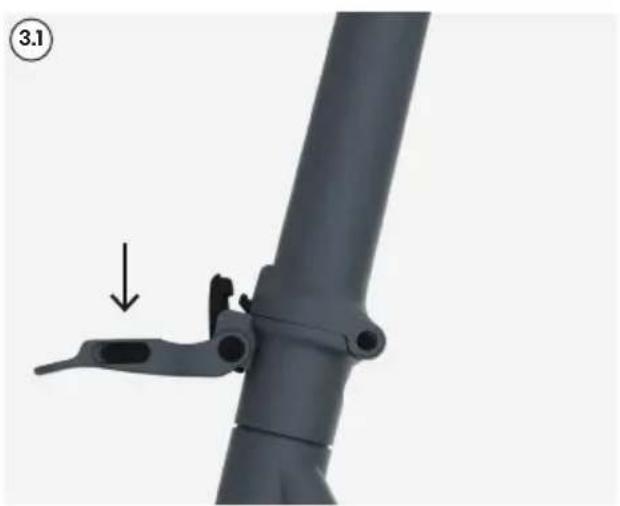
natural_image
Close-up of a gray mechanical lever assembly with a downward arrow indicating motion (no text or symbols)text_image
Technical diagram of a scooter with labeled components and motion arrows, showing structural components and component B.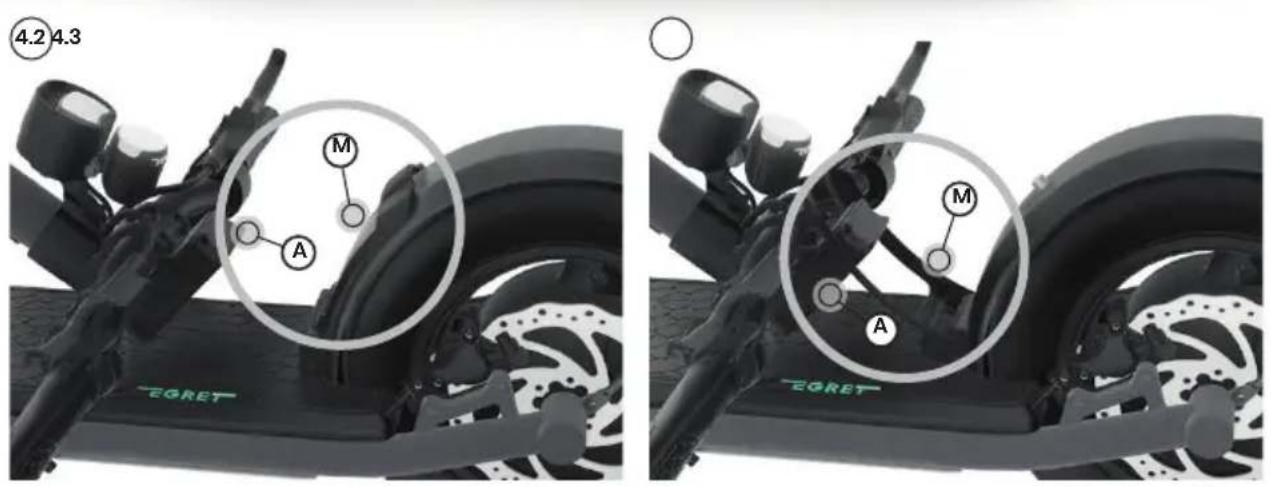
text_image
4.2 4.3 M A EORET EORETnatural_image
Close-up of a black Egret bicycle wheel assembly with hexagonal base and circular head (no text or symbols visible)natural_image
Close-up of a black mechanical component with a cracked surface and a circular mark, no visible text or symbols.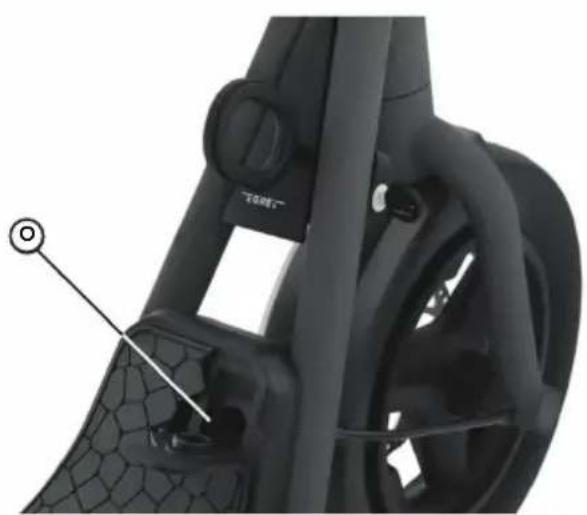
natural_image
Close-up of a black mechanical component with textured surface and mounting holes (no visible text or symbols)text_image
QR code image containing encoded data, no visible human-readable text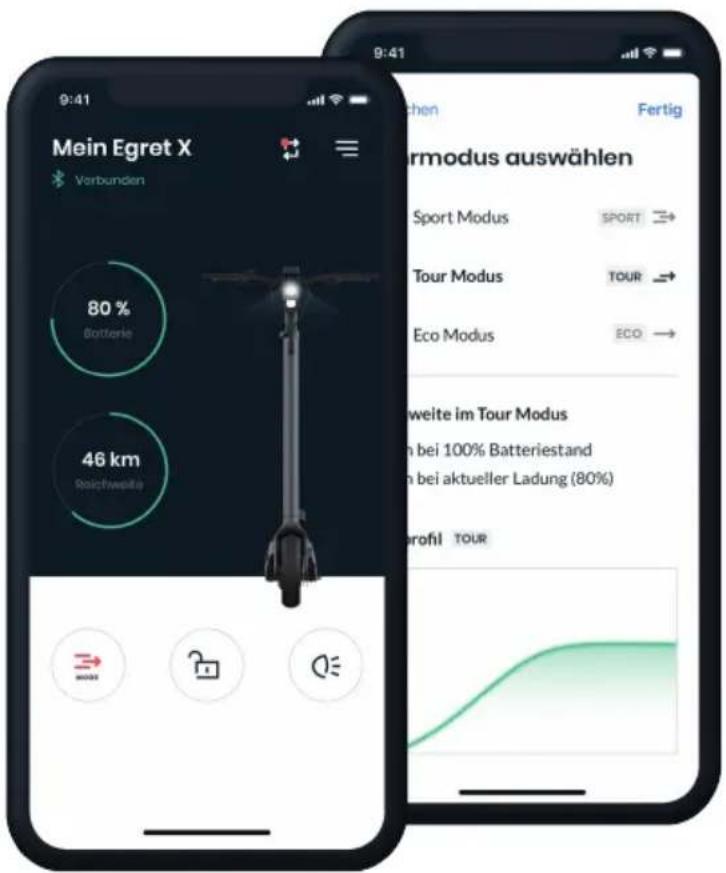
natural_image
Close-up of a black electronic device with three blue indicator lights on the side (no text or symbols visible)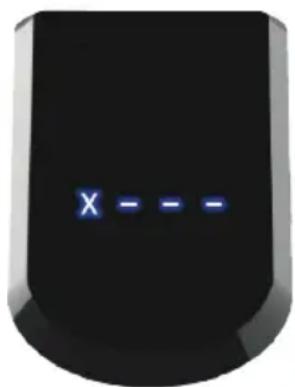
text_image
X - - -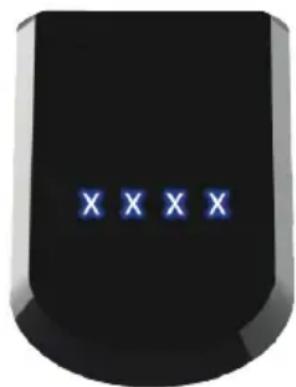
natural_image
Close-up of a black electronic component with three blue 'X' marks on its surface (no text or symbols)natural_image
Technical illustration of a mechanical device with labeled parts (no text or symbols present)text_image
R 00.0 17 Stext_image
Close-up of a camera control interface with labeled buttons and buttons, showing symbols for positive and negative inputs.Hupe
text_image
Close-up of a black handheld device with labeled buttons and a circular indicator symbol pointing to the button.Menü
text_image
Close-up of a black handheld device's grip and control buttons with labeled indicators (T, U) pointing to key functions.Menünavigation
Welcome to the club of Egret riders!
The first thing to do is get to know your scooter. Read these operating instructions and pay particular attention to the warning and safety information before you start riding. Keep these instructions somewhere safe for future reference.
You should also keep your original product packaging.
The features of the models shown may vary for different versions and countries. Egret also reserves the right to make changes to the appearance, features and technology.
You can find further information and FAQs at:
www.my-egret.com
Egret is a brand of
Walberg Urban Electrics GmbH
info@my-egret.com
+49 40 320 270 80 (mo-fr, 8am - 6pm)
Alter Wandrahm 6
20457 Hamburg
Germany
ENGLISH (Translation) 29-58
FRANCAIS (Traduction) 59-87
Contents
Scope of delivery and components 33
Information before getting started 34
Before riding for the first time 35
Warning and safety information 36-37
General information / environmental information 37-38
Assembly instructions 39-40
Operation 41-54
- Mounting the number plate holder with reflector 41
• Folding mechanism 42-45 - Lock 46
- Charging 47
- Switching on 48
- Lights 49
- First start of your Egret 50
- Accelerating 51
- Braking 52
- Riding modes 53
- Horn 54
- Menu 54
- Display / Other symbols 55
- Menu items 56
Data sheet 57
Service documentation 58
Declaration of conformity 88-90
Scope of delivery Egret X

text_image
SCOOTER DOCUMENTS (ONLY FORGERMANY)
text_image
OPERATING INSTRUCTIONS EGRET EGRET X Original-Sommetechnikung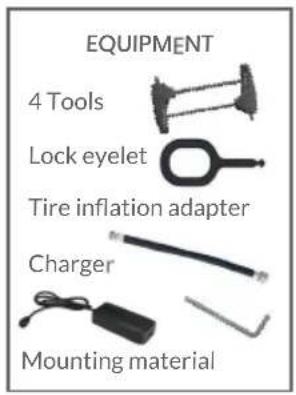
text_image
EQUIPMENT 4 Tools Lock eyelet Tire inflation adapter Charger Mounting material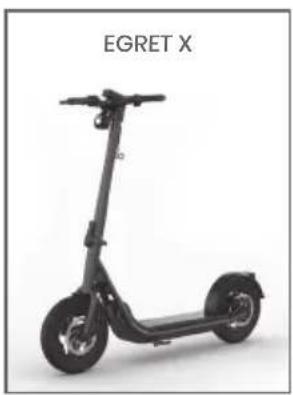
natural_image
Exterior view of a black electric scooter labeled 'EGRET X' (no other text or symbols visible)Egret X components
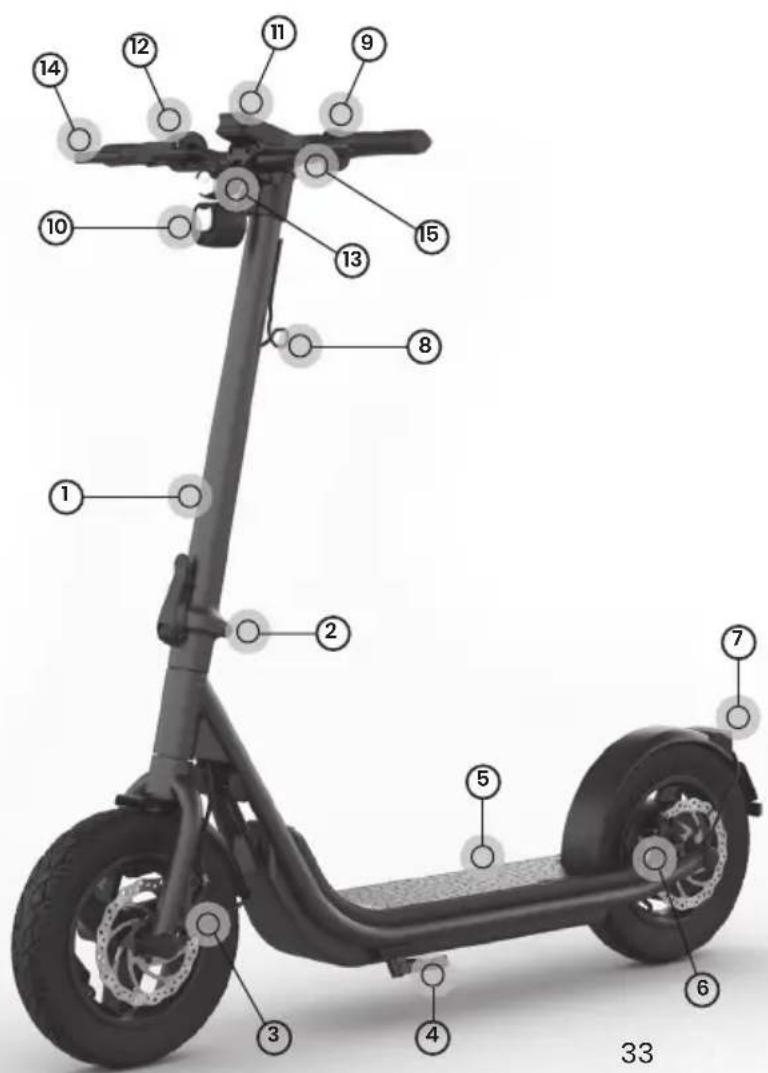
text_image
Labeled diagram of an electric scooter with numbered components for identification1 Steering tube
2 Folding mechanism
3 Front wheel brake
4 Side stand
5 Footboard
6 Rear wheel brake
7 Rear light
8 Accessories hook
9 Buttons
10 Horn and reflector
11 Display
12 Throttle
13 Front light
14 Brake lever for rear brake
15 Brake lever for front brake
Do not start riding until you have read this information.
Before using your Egret scooter, take note of the local rules and any applicable country-specific guidelines and laws regarding the use of vehicles on the road. The manufacturer assumes no liability or warranty if the Egret is used beyond the intended use and if warning or safety information is not followed correctly or is ignored. This also applies to assembly errors.
Service intervals
Contact our service team at the following service intervals: after the first 100 km and 500 km, and then annually thereafter. The manufacturer assumes no liability for technical problems resulting from non-compliance with the service intervals. Enter the serial number on the service documentation page in this manual so that you can find it quickly for potential service cases. The serial number can be found at the front on the right next to the footboard.
Intended use
The scooter is intended for use by one person (aged 14 and over, with a total load of 120 kg) for travel on dry and even surfaces.
Before riding for the first time
We recommend that you always wear a helmet, sturdy footwear and suitable protective equipment. Always ride carefully and responsibly and pay attention to other people around you.
For your first ride, we recommend that you find a clear, even surface where there is no or very little traffic. Test all the functions, particularly the brakes, to make sure that you can bring the scooter to a halt safely and can also operate the brakes safely in an emergency. Start with the lowest riding mode and increase it when you feel safe and confident. Take your time to get use to the scooter.
The throttle can be very sensitive in the highest riding mode. Be aware that rapid or abrupt operation may unbalance you. Take things slowly and familiarise yourself with all of the scooter's functions and riding modes.
Check the air pressure of the front and rear tyres before each ride, but in particular before your first ride. The pressure should be between 2.2 and 3.0 bar. If the air pressure is too low, the tyres have greater friction, which leads to a shorter range.
Shift your weight forwards slightly when accelerating and shift it backwards slightly when braking. This is key to confident riding.
Before starting your ride, check that all screws and the folding mechanism are secure.
The folding mechanism must be fully locked and must not have any play. Loose screws and/or a folding mechanism that is not locked in place can cause serious accidents and/or injury.
Before each ride, make sure that the side stand is fully folded in, the tyres and brakes are in a good condition and the tyres are pumped up with the correct air pressure.
To ensure good grip and safe riding, avoid the following surfaces:
- Sand and gravel
- Slippery surfaces
- Curbs and potholes
- Wet surfaces
- Ice and snow
- Loose surfaces
- Mud and rain
- Slopes and steep roads
Warning and safety information
Any alterations, technical or visual modifications or changes to the electronics or software may instantly invalidate the operating approval, the warranty and other claims against the manufacturer, and may pose a significant risk to life and health. Changes to the vehicle may lead to injuries, electric shock or accidents.
The Egret electric scooter is approved exclusively to carry one person and a maximum load of 120 kg in total. Overloading the scooter will impair the driving performance and may cause serious falls and accidents. The increased stresses on the material may also cause greater wear and may lead to premature material fatigue.
After the first 50 km, check again that all screw connections are secure, particularly on the folding mechanism and wheel axles, and tighten them if necessary. Loose screw connections may lead to functional failure and serious accidents.
Do not ride the scooter in rain or snow or on wet or slippery surfaces. The Egret electric scooter is protected against splashes but these surfaces require longer braking distances. This may lead to falls, accidents and injuries. If you cannot avoid a ride in bad weather, adapt your riding behaviour to the conditions and allow for longer braking distances, for example.
Only use the supplied accessories, genuine spare parts and the original power supply unit, and only use these if they are in the correct technical condition. Damaged cables or other components must be replaced immediately. Faulty or non-genuine components may lead to electric shocks, fire, component failure and accidents.
Never ride the scooter with an open safety lever or open safety lock on the folding mechanism. If the folding mechanism if not locked correctly, the Egret electric scooter may fold up during travel and there is a risk of falls.
Never ride without holding the handlebars. This causes unstable riding and may lead to accidents and injuries.
Before performing any maintenance or cleaning work on the Egret electric scooter, the scooter must be switched off and disconnected from the power supply unit. If it is not switched off and disconnected, there is a risk of electric shock.
Never direct a strong jet of water (e.g. pressure washer) at the Egret electric scooter. This may cause water to enter the components and damage the electronics. Water in the battery compartment may lead to electric shock.
Any load attached to the handlebars may change the riding behaviour and lead to accidents. The scooter's maximum load must also be taken into account here.
Do not touch the motor or the brake discs after riding. These parts may be very hot and cause burns.
Do not jump over obstacles or down curbs or steps with the Egret electric scooter. This causes extreme loads on the scooter and may cause component failures, falls and injuries.
Carry your Egret electric scooter over these and other obstacles.
Never misuse the Egret electric scooter (e.g. for jumps, stunts or tricks). This may lead to serious falls and injuries.
Keep the packaging (plastic and box) away from children. Children may swallow and choke on these items or parts of them.
Before and after every ride, check that there is no play in the locked folding mechanism.
General information
Do not use the Egret electric scooter in temperatures below 0^ C or above 40^ C. Excessively low or high temperatures may damage the electronics and mechanics.
Temperatures below 10^ C, hills and heavy loads lead to a reduction in range, lower top speeds and increased loading on the motor and electronics.
If the Egret electric scooter's battery is flat, it must be charged immediately after the ride. If not done, this can cause an irreparable fault (deep discharging) or a greatly reduced operational life span. This is not covered by the warranty or guarantee.
Ideally, you should charge your scooter in a dry indoor area with a moderate ambient temperature, on a fire-resistant, electrically non-conductive surface. Connect the charger to the socket first and then to the Egret electric scooter. Do not leave the power supply unit connected to the scooter for more than 24 hours. This can damage the electronics or the power supply unit.
Before each ride, check that your lights are working properly and switch them on promptly in the dark. This ensures that you can be seen.
Store your Egret electric scooter at room temperature (22°C) with the battery at least half full in a dry place that is protected against direct sun. Charge it to 50 – 75% at least every 60 days to avoid deep discharge. If this is not done, this may impair the life span of electrical
and mechanical components and even result in a fault.
Check and clean your Egret electric scooter after each ride. This is essential for identifying problems such as loose screws or worn brake pads or tyres. Clean the scooter with a soft brush, a slightly damp soft sponge and a dry cloth.
In the case of heavy use, the scooter needs to be checked for wear after each ride. This includes the frame, fork, folding mechanism, attached parts and all moving parts such as brakes or wheels. Sharp edges may be caused by use (e.g. by contact with the curb). Remove these as soon as you notice them.
Environmental information

By riding an Egret electric scooter, you are already playing your part in low-emission travel. When you have finished using your electric scooter, make sure that you dispose of all parts, the packaging and individual elements of these correctly and recycle them in the appropriate systems where possible.
Do not dispose of the batteries and electronics in household waste; these require specialist disposal via an authorised waste management company or a municipal waste disposal facility.
Assembly instructions
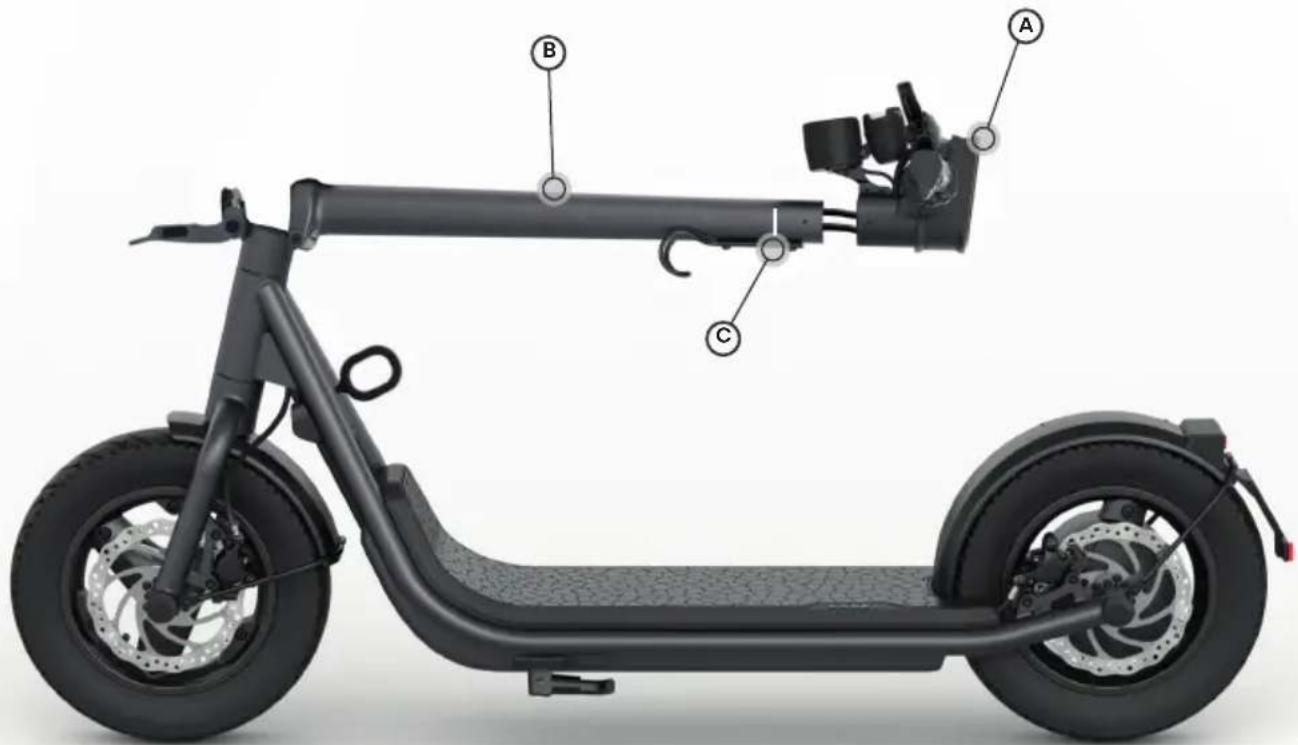
- Push the handlebar (A) onto the steering tube (B), making sure that the cables are not crushed. Push the handlebar in until the mark (C) on the steering tube (B) is no longer visible.
text_image
Diagram of a modern electric scooter with labeled components A, B, and C for assembly or maintenance.-
Unfold the scooter (see instructions "Folding mechanism", page 42).
-
The grub screw (D) on the handlebar must be positioned exactly above the hole (E) in the steering tube. Screw in the grub screw so that it is flush with the handlebar. This ensures that the handlebar is mounted at the correct angle.
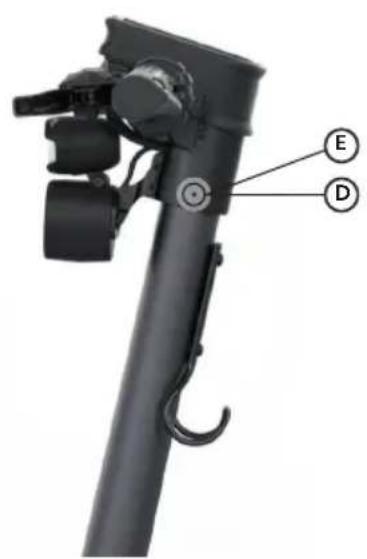
text_image
E D- Hand-thighten (6Nm) the two screws (F) on the handlebars.
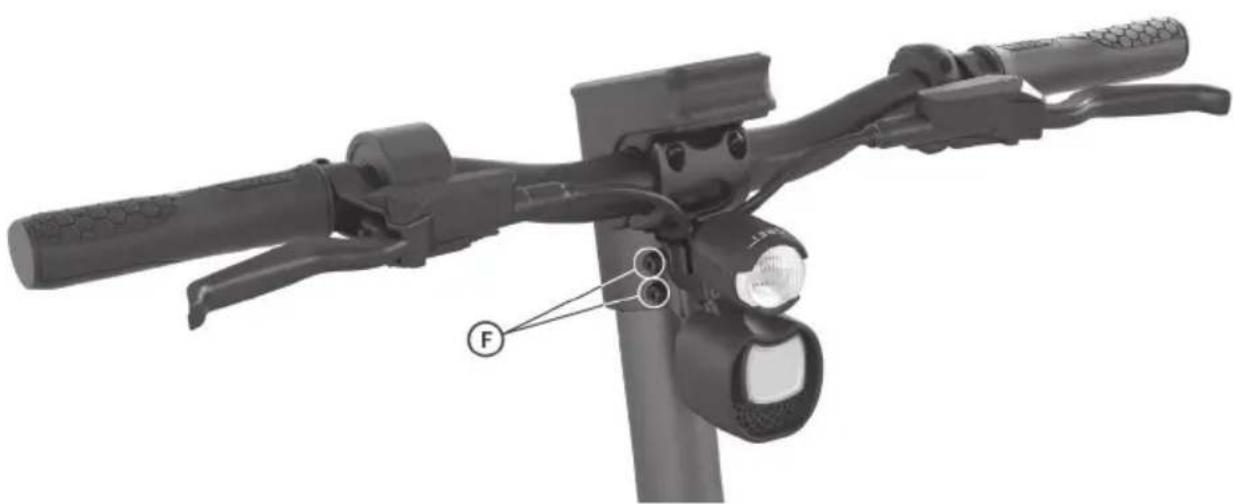
natural_image
Mechanical bicycle lever assembly with labeled component 'F' (no text or symbols beyond label)Loose screw connections are dangerous!
Connections may come loose if not assembled correctly or if screws are not tightened. This may lead to falls and accidents.
Mounting the number plate holder with reflector
Tighten the licence plate holder with the screws (G), the nuts (H) and the 2.5mm Allen key (I).
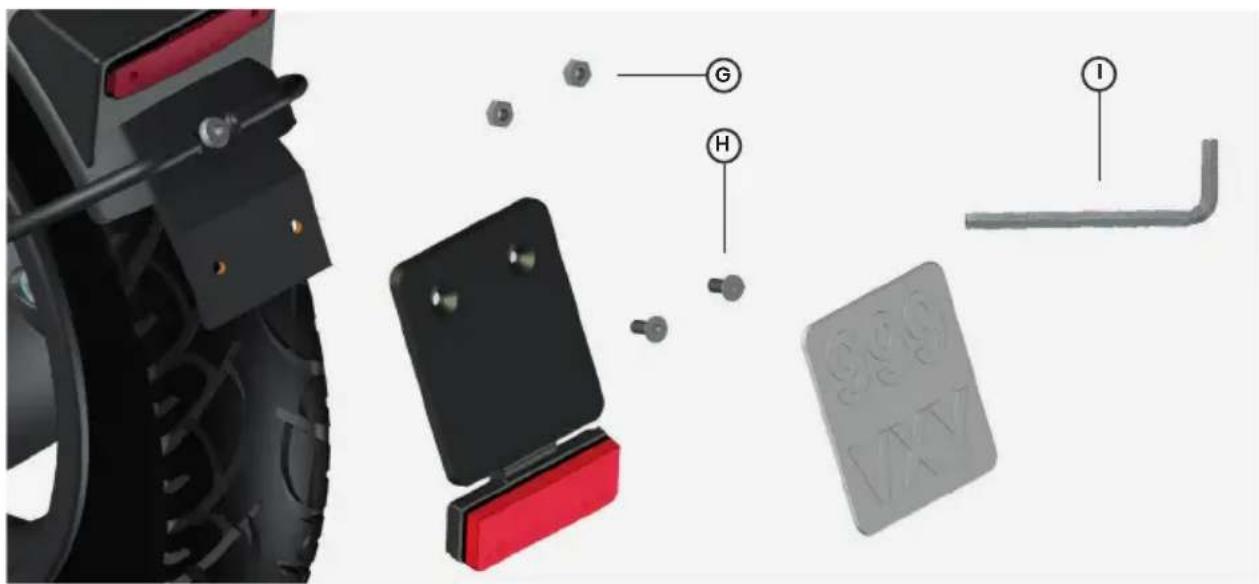
text_image
Technical diagram of a vehicle tire assembly with labeled parts including tire, bracket, and wrench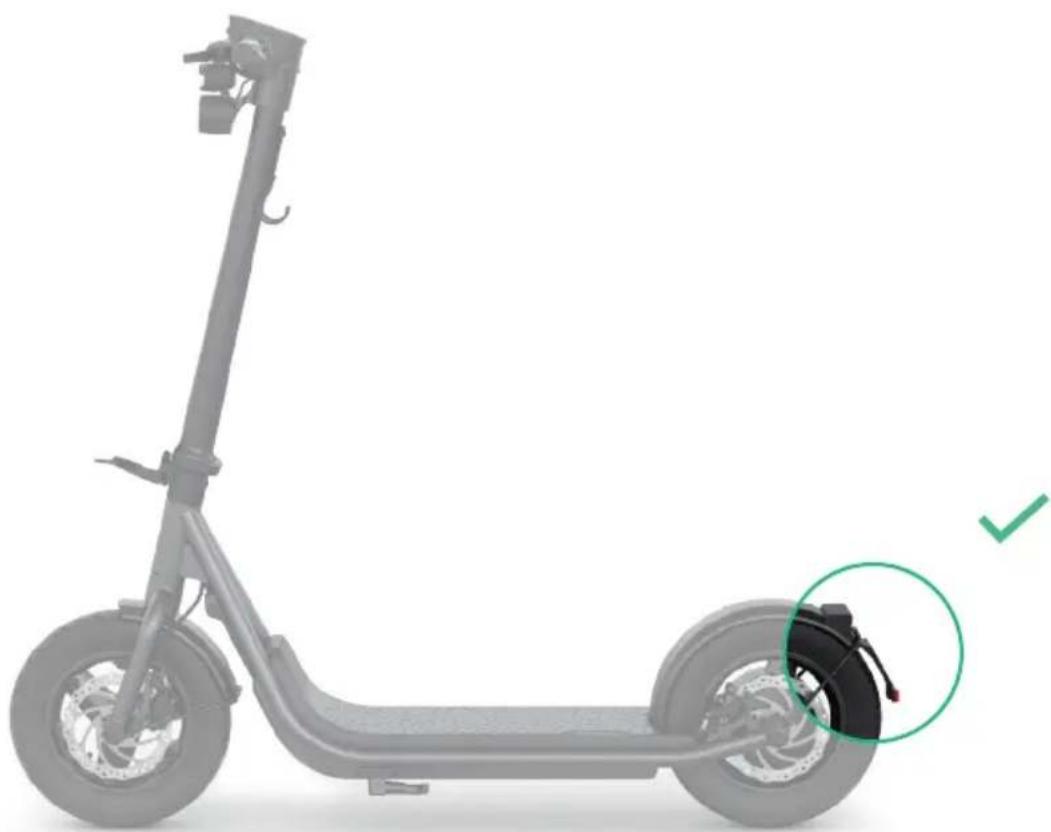
natural_image
Side view of a gray electric scooter with visible battery pack and steering wheel (no text or symbols)Folding mechanism
Unfolding
- Unfold the steering tube (B) until the hook (J) audibly engages. The scooter is now in locking step 1.
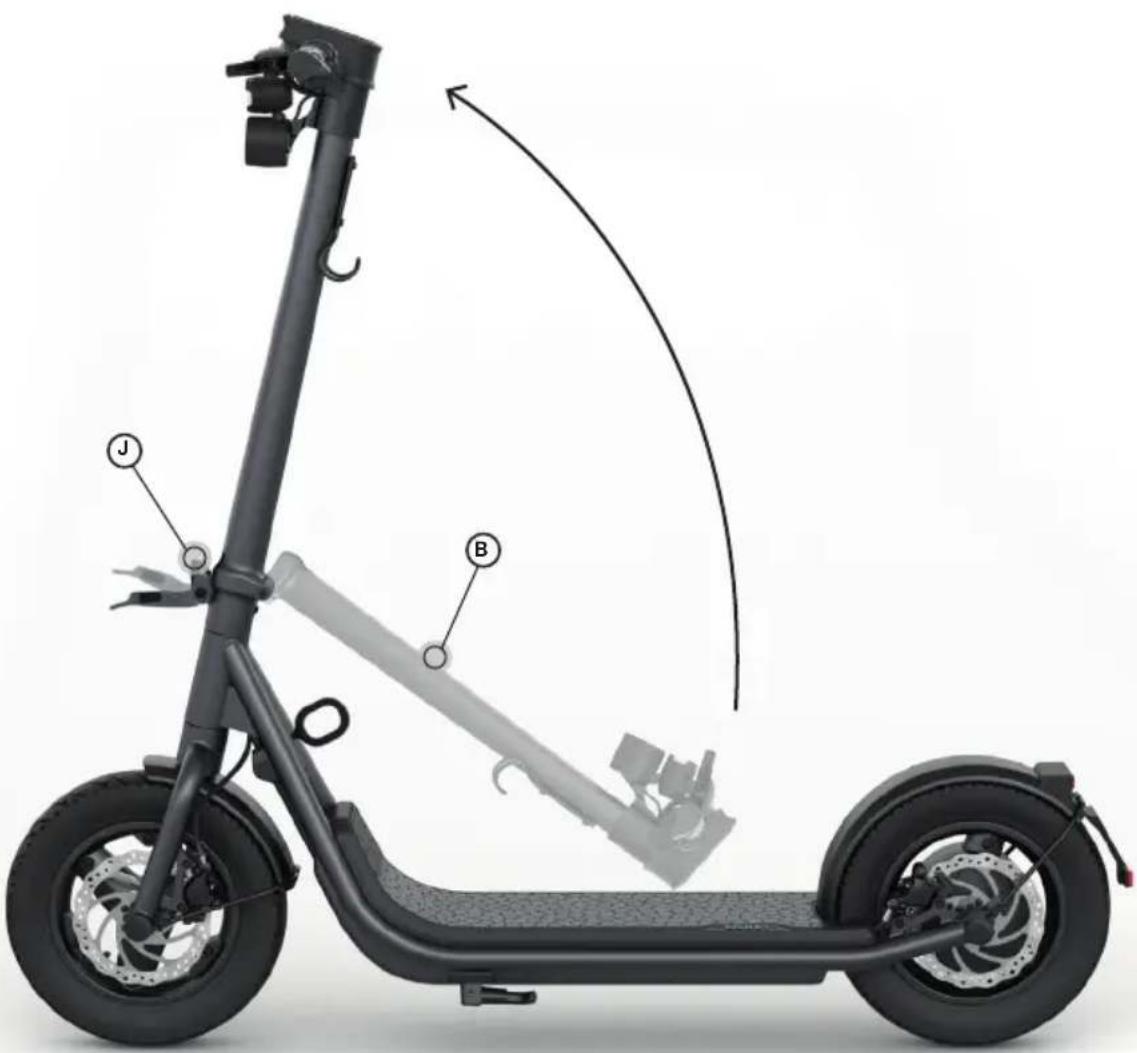
text_image
Technical diagram of an electric scooter with labeled components including battery, suspension, and wheelbase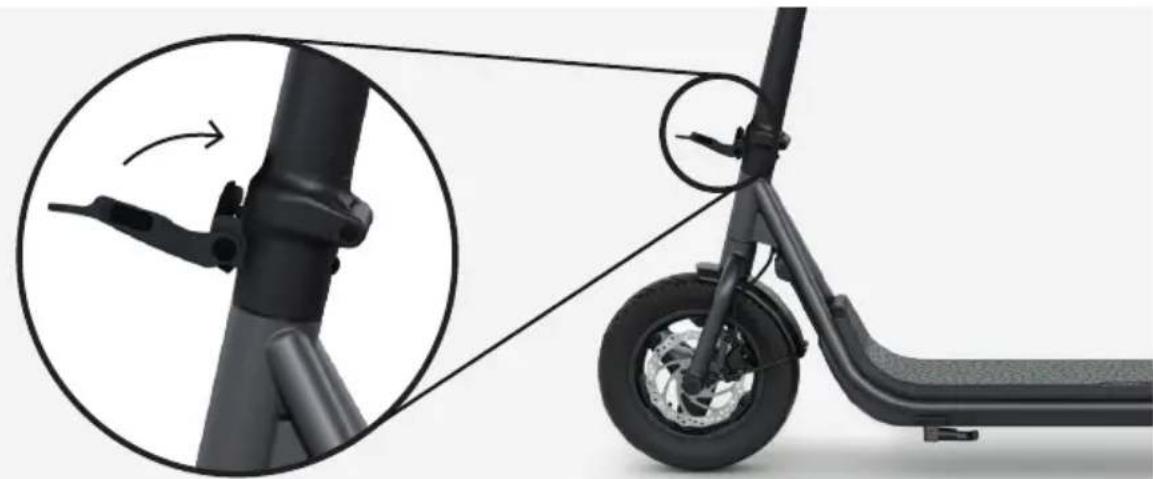
natural_image
Side profile of a black electric scooter with visible wheel and side-mounted sensor, showing mechanical components and a close-up inset (no text or symbols)- Lift the lever (K) towards the steering tube (B) until the safety catch (L) audibly engages. The scooter is now in locking step 2.
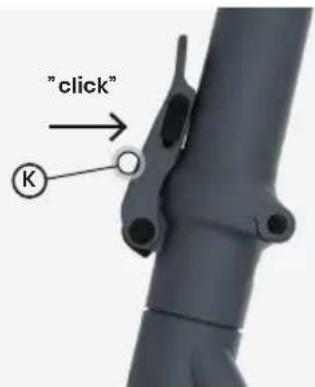
text_image
"click" K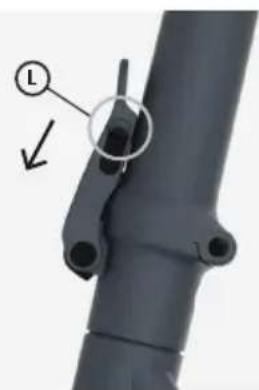
natural_image
Close-up of a dark mechanical pipe joint with a labeled component (L) and an arrow pointing to a hole (no text or symbols beyond the label)- Make sure that the safety catch (I) is in the closed position.
Open
Closed
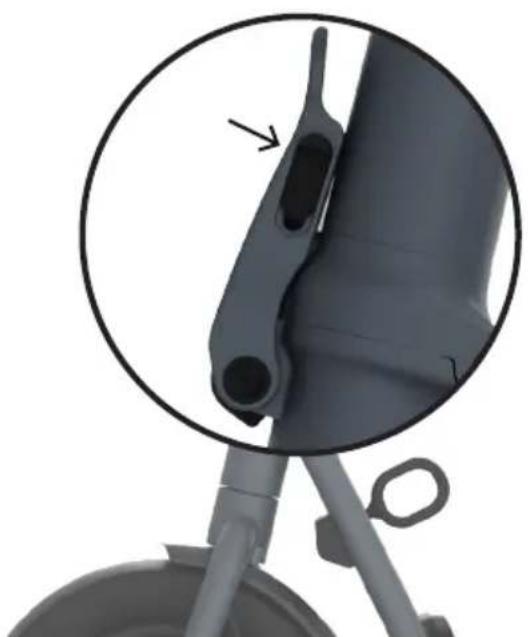
natural_image
Close-up of a mechanical device with a circular inset highlighting a component (no text or symbols visible)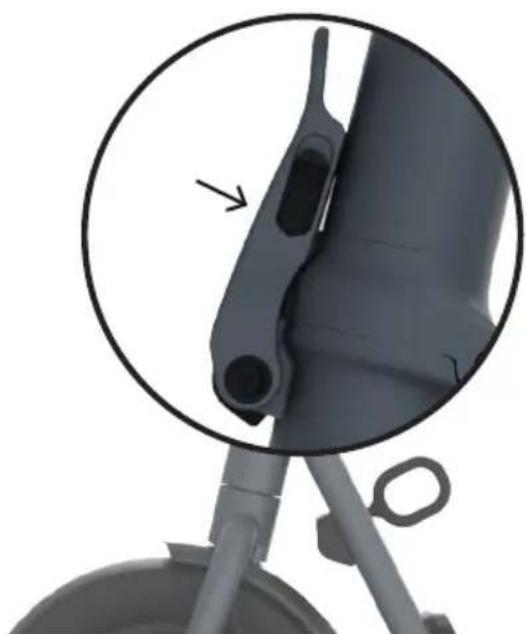
natural_image
Close-up of a mechanical component with a circular inset highlighting a specific part (no text or symbols visible)Accident risk!
The folding mechanism is only correctly closed when the folding lever (K) of the folding mechanism is in complete contact with the steering tube (B). If the folding mechanism or part of it cannot be closed securely, contact our service department immediately!
Folding
- Push the safety catch (L) on the folding lever (K) upwards.
- Pull the folding lever (K) outward.
- Press the folding lever (K) down until the lock releases.
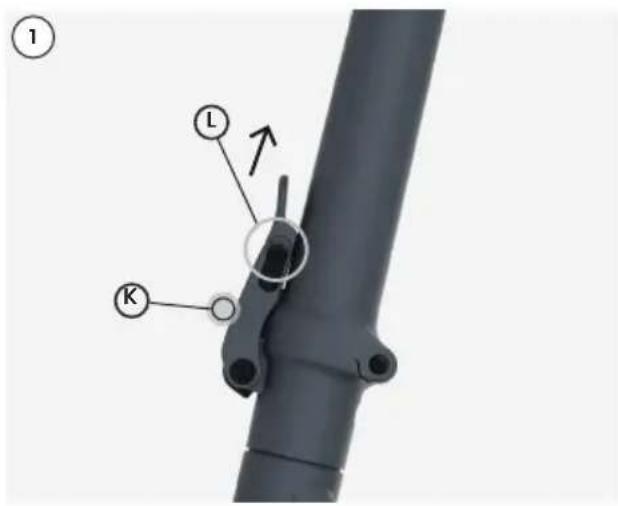
text_image
① L K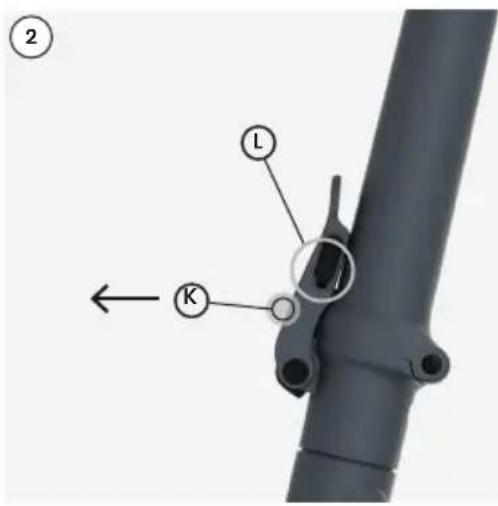
text_image
② L K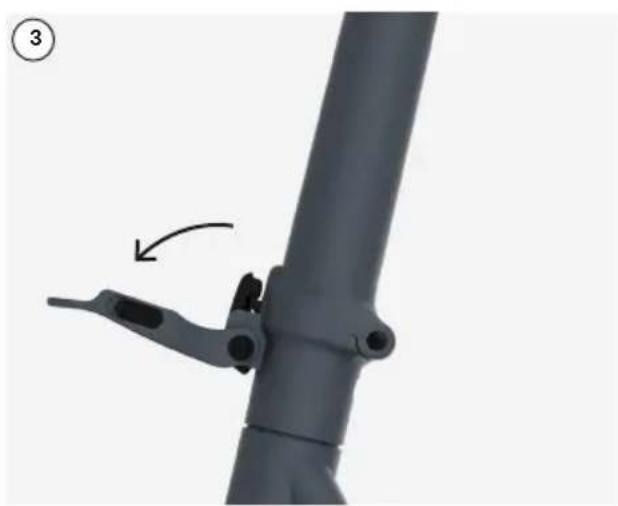
natural_image
Mechanical assembly diagram showing a lever mechanism with a curved arrow indicating motion (no text or symbols present)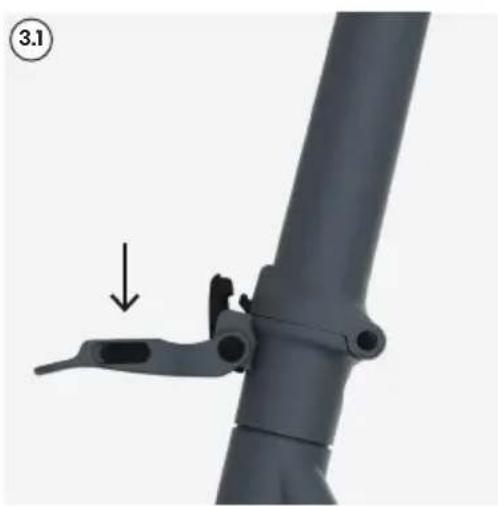
natural_image
Close-up of a gray mechanical lever assembly with a black handle and arrow indicating a step (no text or symbols)- Fold the steering tube (B) down and attach the transport bracket (M) over the steering head (A).
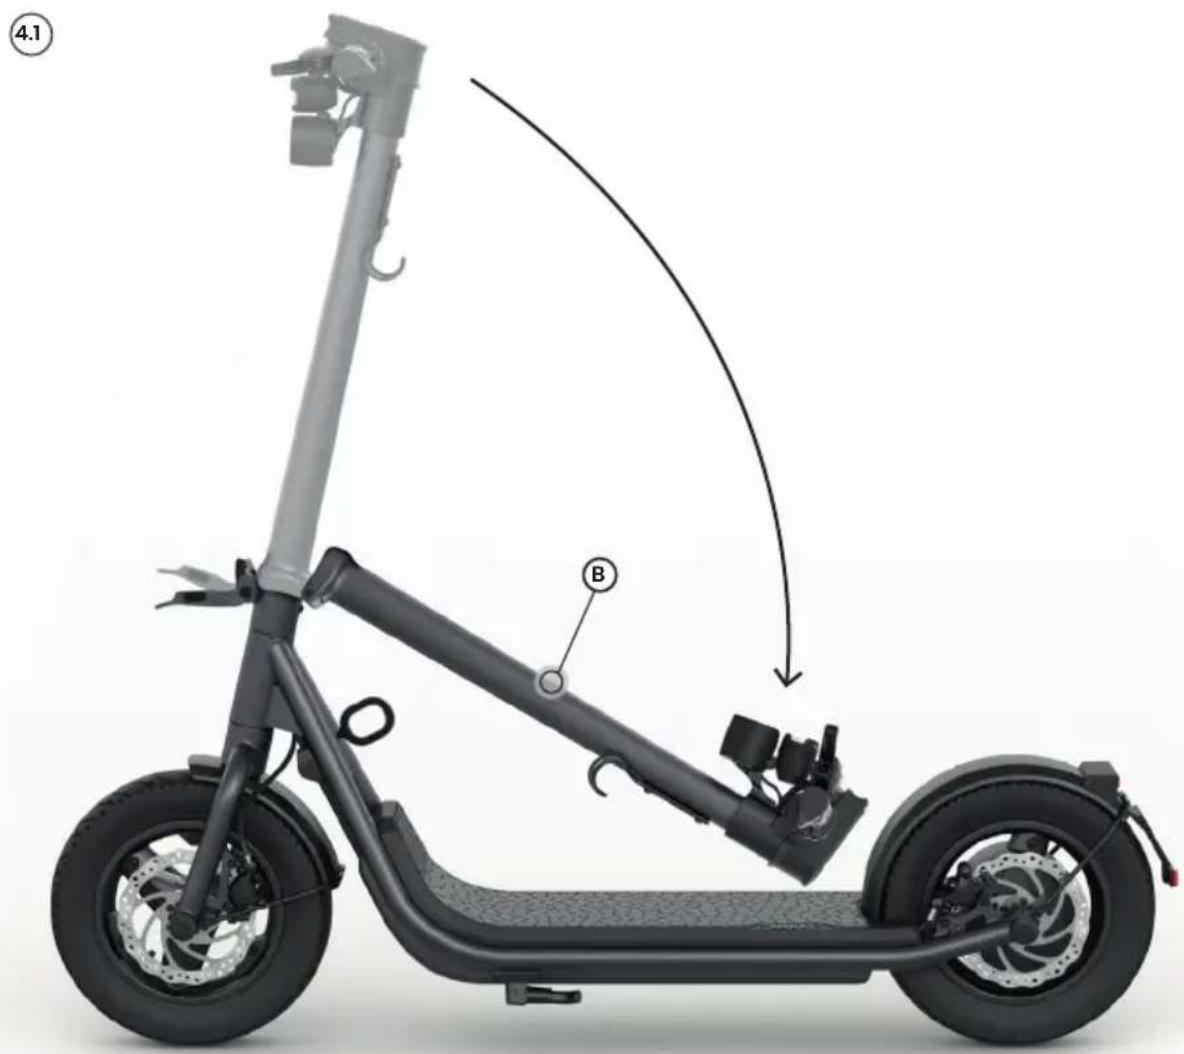
text_image
4.1 B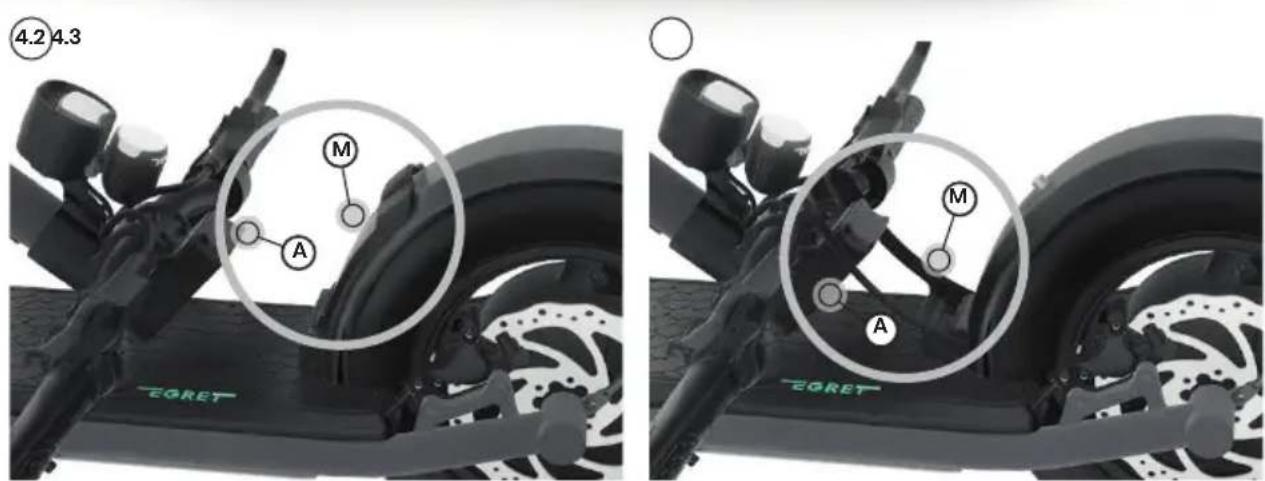
text_image
4.2 4.3 M A EORET EORET- The scooter can now be lifted by the steering tube.
Lock
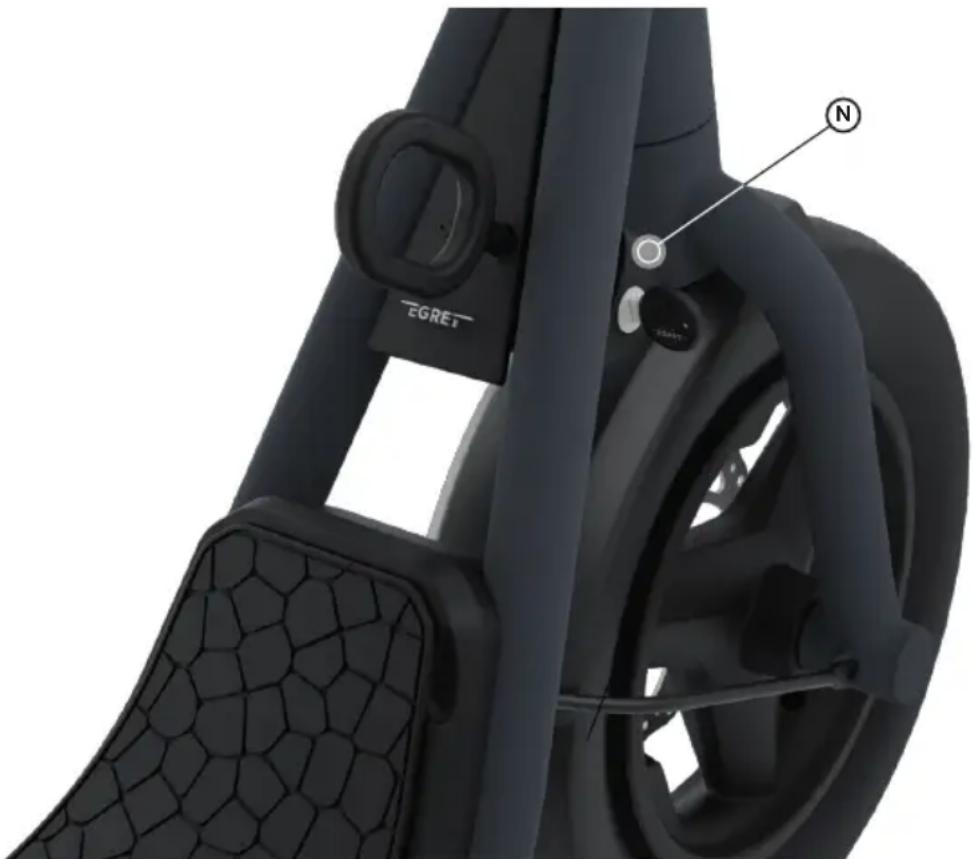
The Egret X is equipped with a lock mechanism (N) bulit into tje frame.
natural_image
Close-up of a black Egret bicycle wheel assembly with hexagonal base and circular head (no text or symbols visible)You can use the pin provided with a conventional bicycle lock.
Alternatively, the lock can be used with the "Egret mate by tex-lock" (not included).
There is a 4-digit key number on the key. Write down this code on the enclosed card and keep it safe. In case of loss, you can order a new key using our service form.
Charging
- Connect the charger to the power outlet.
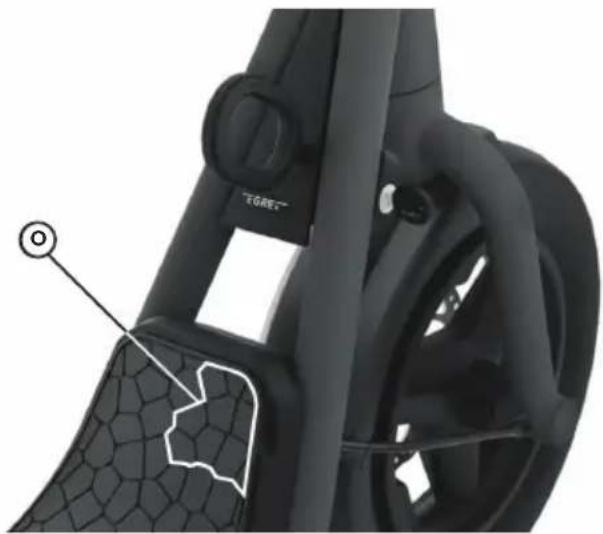
The charge socket (O) on the scooter is located on the front right side of the footboard under the rubber mat.
closed open
natural_image
Close-up of a black mechanical component with visible cracks and a circular mark, no text or symbols present.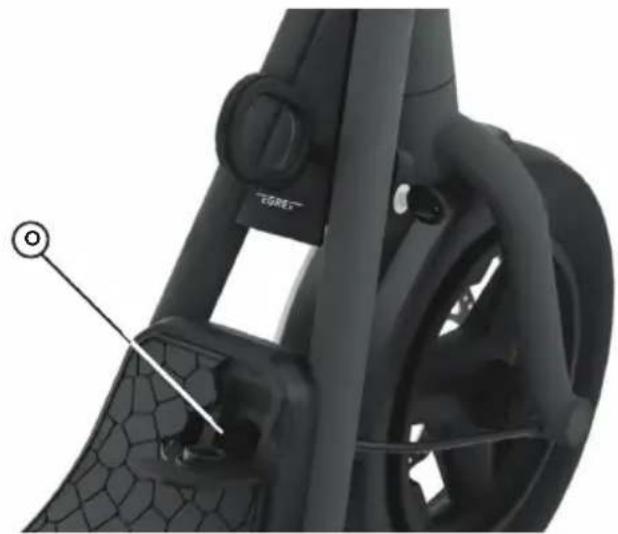
natural_image
Close-up of a black bicycle steering wheel with visible hub and mounting bracket (no text or symbols)- Open the protective cap of the charge socket (O).
- Connect the charging cable to the Egret scooter when it is switched off.
- The LED light on the charger will switch to red as soon as the charging process has started.
- The LED light on the charger will switch to green as soon as the charging process has ended.
- Unplug the charging cable.
- Close the protective cap to protect the charging socket from water.
- Disconnect the charger from the power outlet.
Before using your Egret for the first time, ensure that the battery is fully charged using the power supply unit provided.
Deep sleep mode
The Li-Ion battery is equipped with a deep sleep mode. This function serves to protect the battery from deep discharge. If the scooter is in deep sleep mode, it cannot be started as usual by pressing the "On/Off Button". To wake up the scooter again from deep sleep mode, connect the charger for approx. 15 seconds. The scooter is now ready for use again as usual.
Pay attention to the instructions for protecting the battery described on page 37, as even the deep sleep mode is not 100% prevention from a deep discharge.
Deep sleep mode is activated according to the charge level of the battery.
These are:
State of charge: 80%-100%, no deep sleep mode
State of charge: 40%-80%, deep sleep mode after 30 days
State of charge: 20%-40%, deep sleep mode after 7 days
Charge level: below 20%, deep sleep mode after 48 hours.
Switching the scooter on and off
Switching on
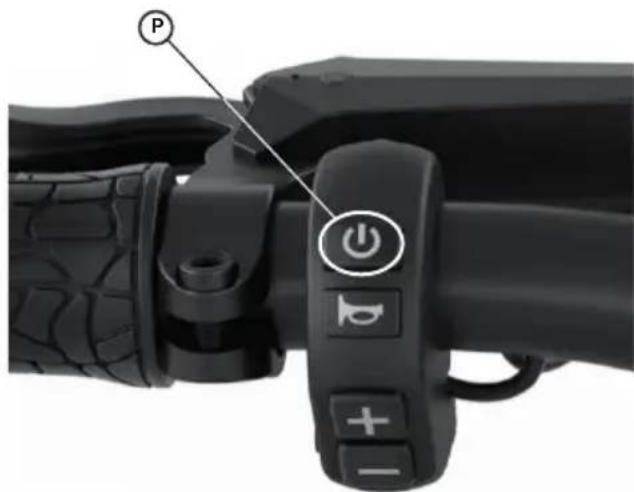
To switch the scooter on, press the
'On/Off' button (P) for approx. 2 seconds.
Switching off
To switch the scooter off, press the
'On/Off' button (P) for approx. 2 seconds.
text_image
P PowerFirst start of your Egret
Before starting your Egret for the first time, download the My-Egret app.

text_image
Download on the App Store GET IT ON Google Play
text_image
QR code image containing encoded data, no visible human-readable text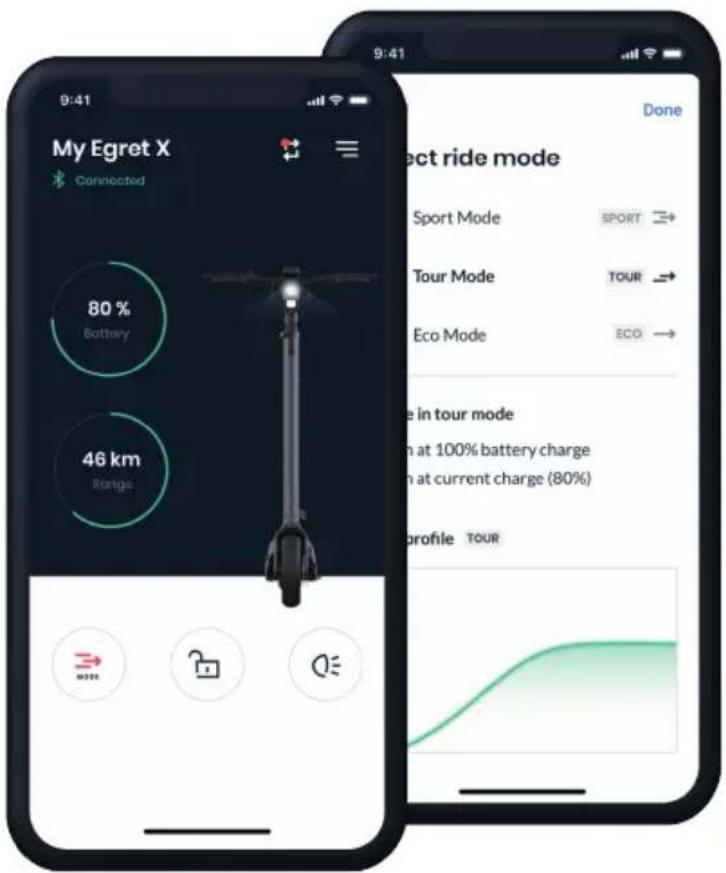
text_image
My Egret X Connected 80% Battery 46 km Range 9:41 9:41 Done Elect ride mode Sport Mode SPORT → Tour Mode TOUR → Eco Mode ECO → Use in tour mode on at 100% battery charge on at current charge (80%) profile TOURNow create a My-Egret account. Once this is confirmed, follow the instructions in the app to connect it to your Egret. Now switch on the scooter.
Entering a PIN
When you start your Egret for the first time, you will be asked to enter a four-digit PIN. The digit that is currently active in the program flashes.
Press the 'Plus' or 'Minus' button to change the number. Press the 'On/Off' button to move to the next number.
When you have entered all four digits of the PIN, press the 'On/Off' button. The numbers now flash for you to check them. Press the 'On/Off' button again to confirm the PIN. Press the 'Plus' or 'Minus' button to jump back to the first digit and change the PIN.
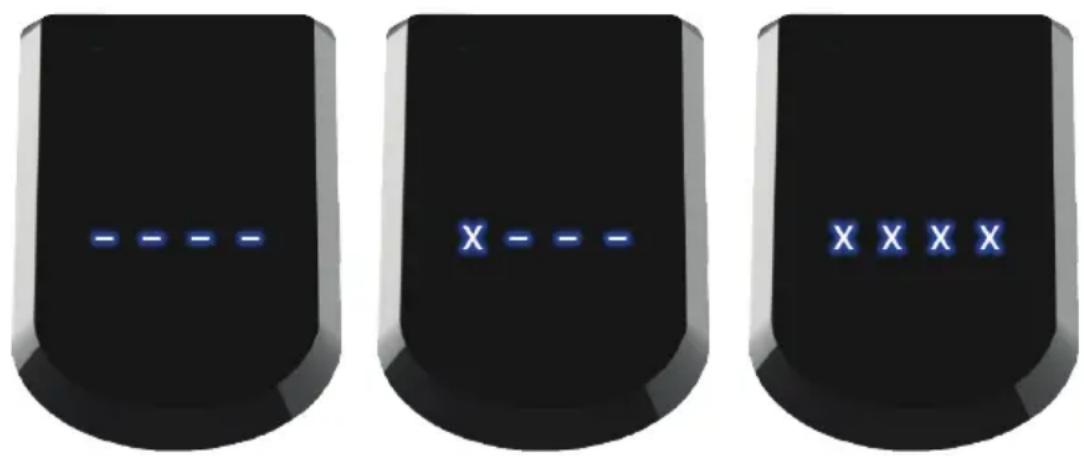
This PIN is now saved in your Egret. Please make a note of your PIN and keep it in a safe place. You will need the PIN to lock your scooter and to operate the menu.
Setting up the app
After entering the PIN for the first time, your Egret will automatically be in pairing mode for five minutes. This switches off after the five minutes or when the Egret is restarted. You can activate the pairing mode at any time via the menu as described on page 54. If the scooter is paired with the app, the blue radio symbol lights up.
Resetting the PIN
You can reset your PIN if you forget it. To do so, connect the scooter to your charger and switch the scooter on. Then press the 'Plus' button and the 'Minus' button. Hold this combination for 10 seconds. You can then enter a new PIN for your Egret.
Switching the lights on and off
Switching the lights on
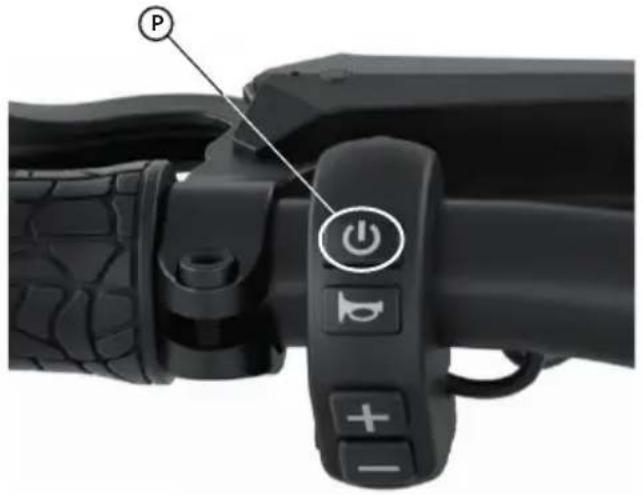
To switch on the lights on the scooter, press the 'On/Off' button (P) for approx. 0.5 seconds.
Switching the lights off
To switch off the lights on the scooter, press the 'On/Off' button (P) for approx. 0.5 seconds.
text_image
P PowerAccelerating
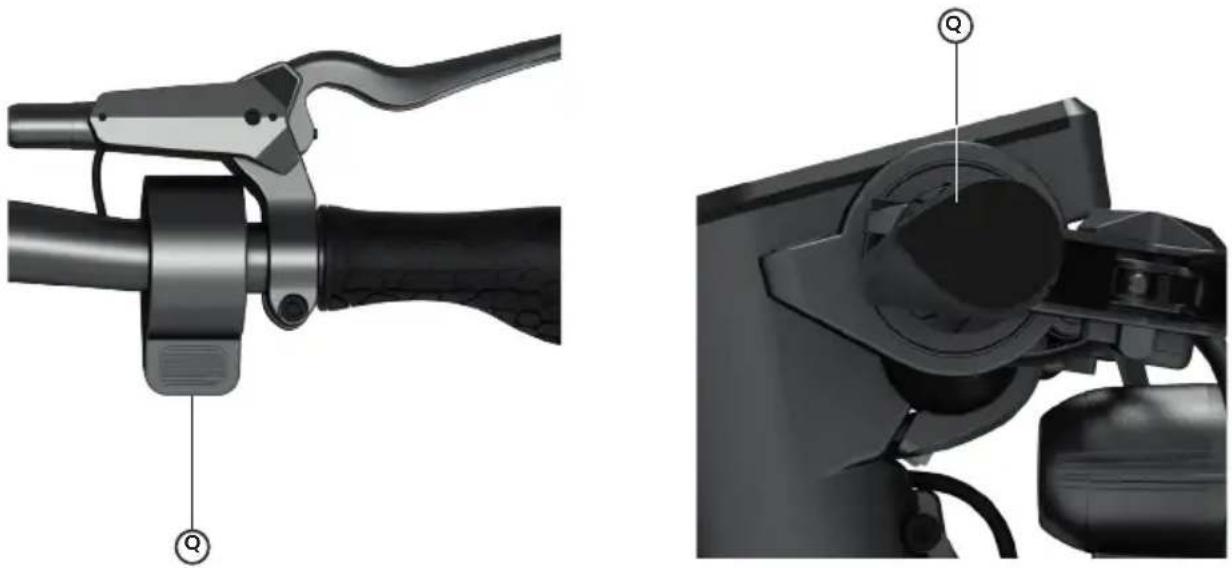
Slowly push the throttle (Q) down with your thumb to accelerate. The further you push the throttle, the more the scooter will accelerate. The less you push it, the slower the acceleration will be.
natural_image
Technical illustration of a mechanical device showing two views: top view with handle and clamping mechanism, bottom view with internal components (no text or symbols)To set the Egret moving, you need to push the scooter above 3 km/h. The motor assistance does not switch on until you exceed this speed.
3 km/h
Brakes
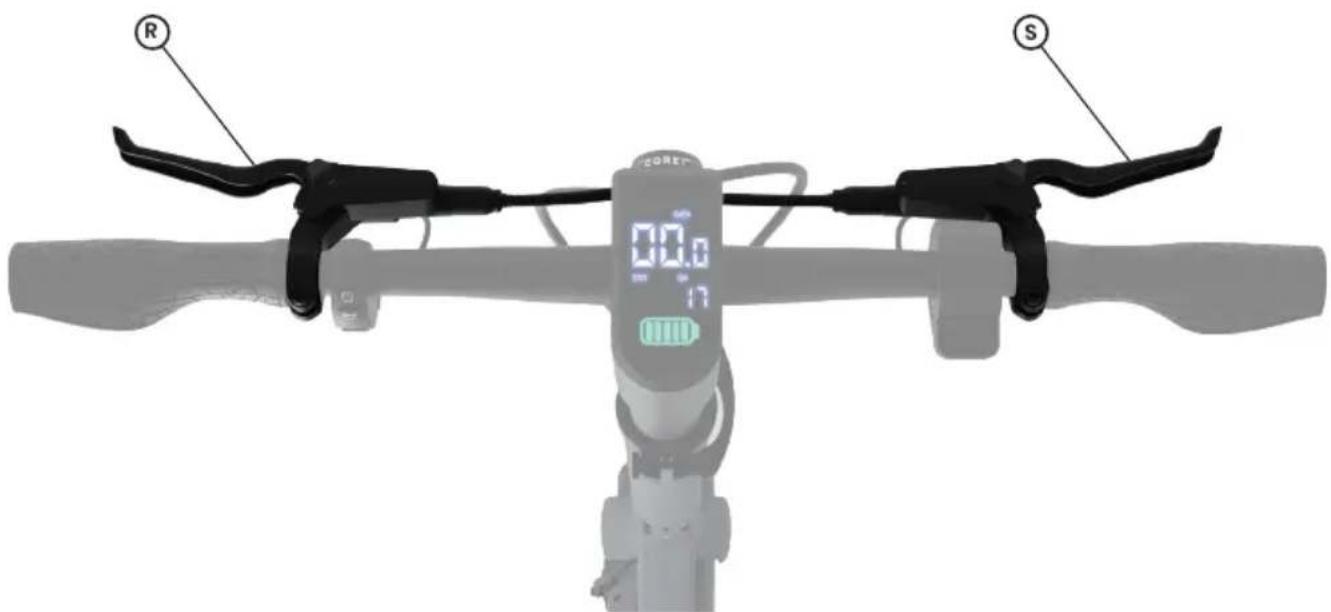
Front brake
Pull the left brake lever (R), to engage the front disc brake to slow the scooter down.
Rear brake
Pull the right brake lever (S), to engage the rear disc brake to slow the scooter down.
text_image
R 00.0 17 SDanger when braking!
Sudden braking may cause the front and/or rear wheel to lock. This may lead to falls and accidents with serious injuries and material damage.
Riding modes
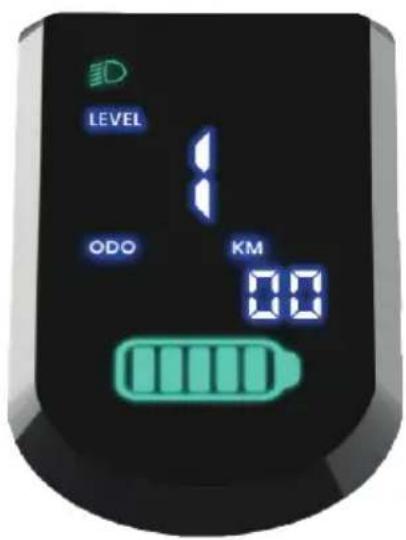
3 riding modes Level 1 (ECO): Maximum range in energy-saving mode Level 2 (TOUR): Maximum comfort in balanced mode Level 3 (SPORT): Maximum fun in sporty mode
The selected riding mode is shown in the centre display area:
text_image
LEVEL ODO KM 88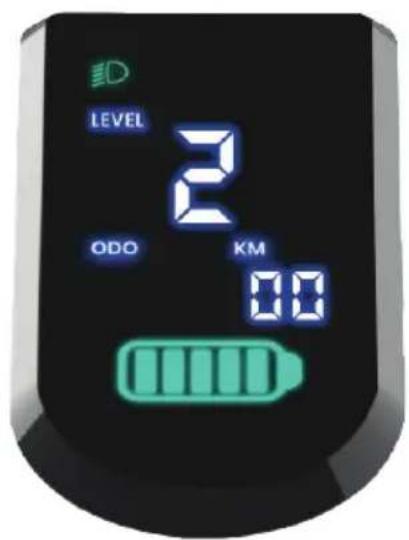
text_image
LEVEL 2 ODO KM 0.8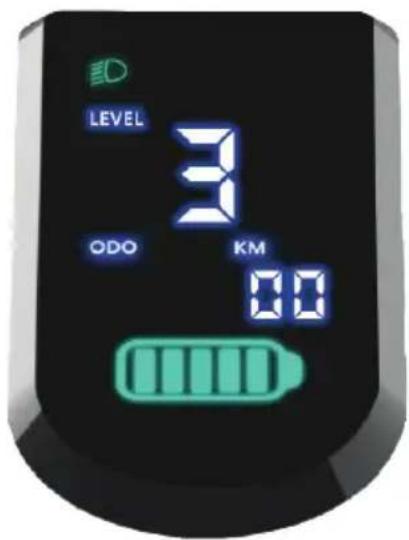
text_image
LEVEL 3 ODO KM 00Increasing the riding mode
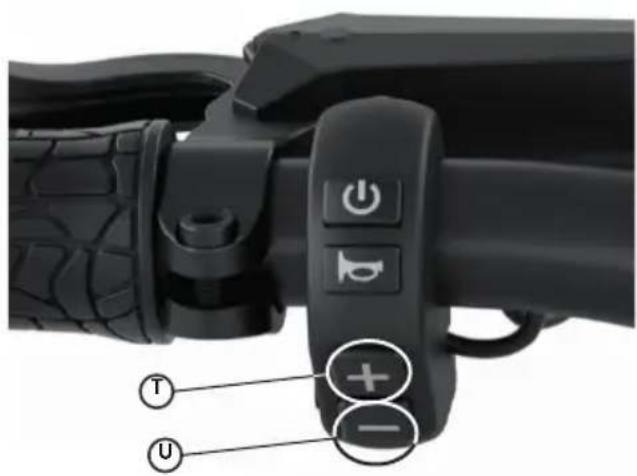
To increase the riding mode, press the 'Plus' button (T). Your scooter will now run in the next higher riding mode.
Decreasing the riding mode
To decrease the riding mode, press the 'Minus' button (U). Your scooter will now run in the next lower riding mode.
text_image
Close-up of a black handheld device with labeled buttons and control buttons, showing symbols for T, U, and polarity indicators.Horn
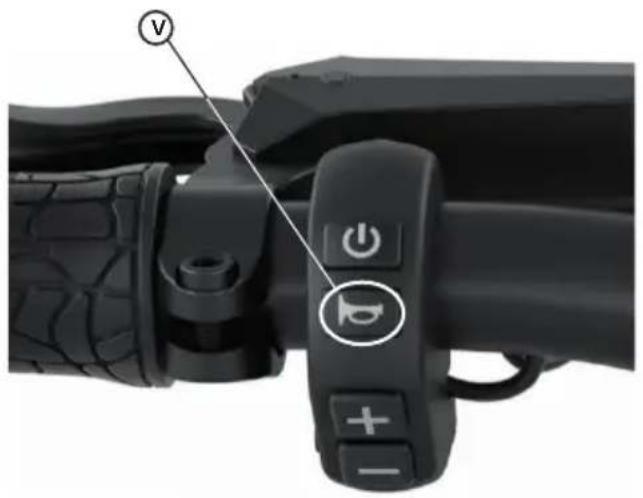
To sound the horn, press the 'Horn' button (V).
Menu
To go to the menu, press the 'Plus' button (T) and the 'Minus' button (U) at the same time for around 2 seconds. PIN entry is the same as described in the section 'Starting the Egret for the first time and entering a PIN'.
Menu navigation
To move the cursor to the next menu item, press the 'On/Off' button (P).
Exiting the Menu (save)
To leave the menu and save the settings you have made, press the 'Plus' button (T) and the 'Minus' button (T) at the same time for around 2 seconds.
If you do not want to save the changes to the settings, you can press the 'On/Off' button (P) to re-start the scooter.
text_image
Close-up of a black bicycle brake lever with labeled buttons and a switch, showing a circular icon with 'v' pointing to the grip.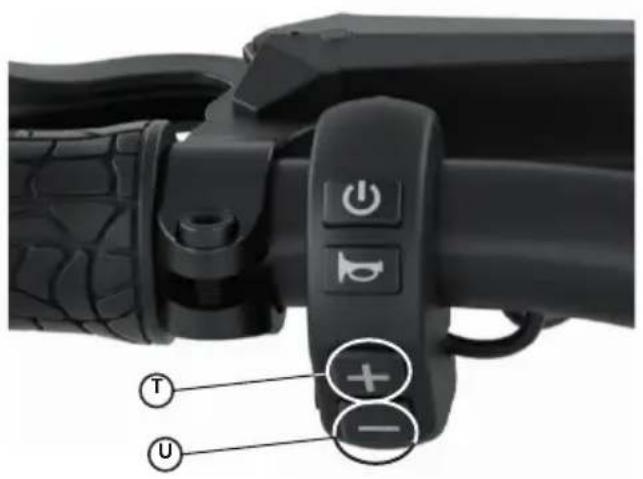
text_image
Close-up of a black handheld device with labeled buttons and control buttons, showing symbols for T and U.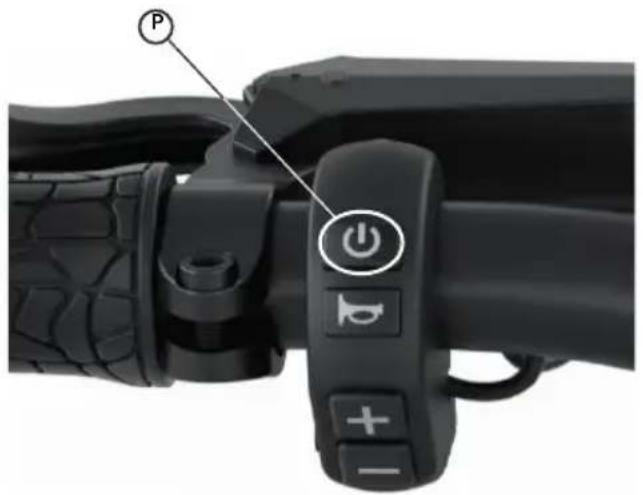
text_image
Close-up of a black handheld device with labeled buttons and a power button, showing a hand cursor and control knob.Display
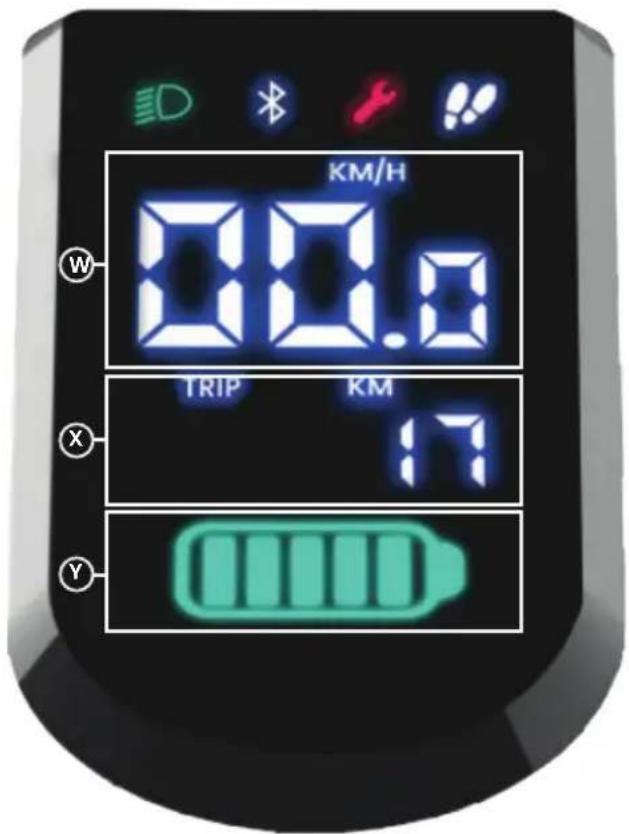
Speed display
The current speed (W) is displayed as soon as the scooter is switched on.
Mileage (ODO/TRIP)
The distance travelled (X) is shown below the speed display.
To switch back and forth between the total distance travelled (ODO) and the daily distance travelled (Trip), press the 'Plus' button (T) for approx. 2 seconds.
To reset the daily distance travelled (Trip), press the 'Minus' button (Y) for approx. 2 seconds.
Battery status
The battery status (Y) is displayed below the mileage.
text_image
KM/H 00.0 TRIP KM 17 YOthersymbols
text_image
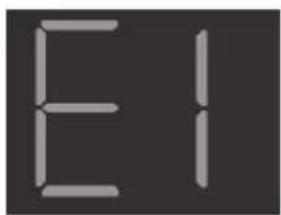
E1Error
This warning message appears on the display when an error occurs. Please contact our service team at
www.my-egret.com
Menu
SET1: PIN lock on/off To activate the PIN lock, press the 'Plus' or 'Minus' button.
SET2: Change PIN Press the 'Plus' or 'Minus' button to enter change mode.
The process for changing the numbers is the same as when the scooter is started for the first time. (see page 49)
SET3: km/h or mph To switch between km/h and mph, press the 'Plus' or 'Minus' button.
SET4: Bluetooth pairing To activate Bluetooth pairing, press the 'Plus' or 'Minus' button.
It remains active for 5 minutes. Note: If you leave the settings menu, the Bluetooth pairing is switched off.
SET5: Bluetooth on/off Default setting: The Bluetooth interface is active. Press the 'Plus' or 'Minus' button to switch it off.
SET6: Display brightness When the light is switched off, the bright
ness is always set to 100%. When switching on the light, the brightness of the display is automatically dimmed. In the menu you can set how much the display should be dimmed. To do this, press the “plus key” for a brighter display and the “minus key” for a darker display.
SET7: Pedestrian mode Pedestrian mode The scooter has a pedestrian mode. Activate the mode so that the scooter moves at walking speed. Press the "plus key" or "minus key" to exit pedestrian mode.
Data sheet
| Egret XStVZO-Version(German Road Traffic Regulations) | Egret XInternational-Version | |
| Maximum speedRange | 20 km/h 1 25 km/hup to 60 km | |
| Charging timeMax. load | 100 % 5:30 Std.120 kg | |
| Scooter weightMax. total weight | 21 kg141 kg | |
| Rated powerMaximum power | 500 watts900 watts | |
| Battery (Li-Ion)Battery capacity (max.) | 48 V 14 Ah672 Wh | |
| Tyre sizeAir pressure (ideal) | 12,5"-pneumatic tyres2,5 bar | |
| Braking | Front and rear 160 mmhydraulic disc brakes | |
| ThrottleLights | Thumb throttleIntegrated on front and rear | |
| Water resistanceSize when unfolded | IPX5128 x 62 x 118 cm | |
| Maximum rider heightMinimum rider height | 1,95 m1,4 m | |
Voluntary service documentation
Serial number of vehicle
(Mandatory)
Service-100 km km:
Date, signature, dealer stamp
Service-500 km km:
Date, signature, dealer stamp
Service-1. year km: ____
Date, signature, dealer stamp
Service-2. year km: ____
Date, signature, dealer stamp
Service-3. year km: ____
Date, signature, dealer stamp
Service-4. year km:
Date, signature, dealer stamp
Service-5. year km:
Date, signature, dealer stamp
Service-6. year km:
Date, signature, dealer stamp
ENGLISH (Translation) 29-58
FRANCAIS (Traduction) 59-87
Table des matières
natural_image
Exterior view of a modern electric scooter (no signage or text on the scooter body)Composants Egret X

text_image
Labeled diagram of an electric scooter with numbered components for identification and assembly reference.text_image
Diagram of a modern electric scooter with labeled components A, B, and C for assembly or maintenance.text_image
Labeled diagram of a mechanical device with parts marked E and D, showing components like a cable, hook, and camera.natural_image
Mechanical bicycle lever assembly with labeled parts (no text or symbols beyond label)text_image
Technical diagram of a vehicle tire assembly with labeled parts including tire, bracket, and wrench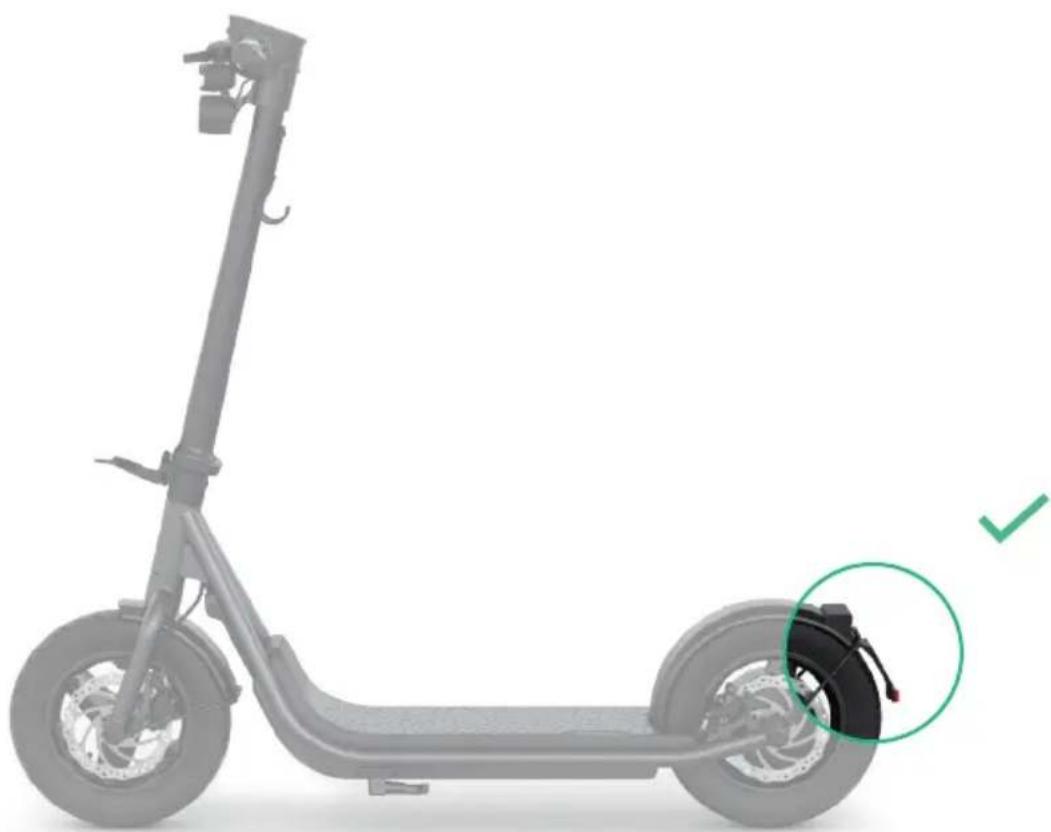
natural_image
Side view of a gray electric scooter with visible battery pack and wheel assembly (no text or symbols)Mécanisme de pliage
Dépliage
text_image
Diagram of an electric scooter with labeled components including battery, suspension, and wheelbase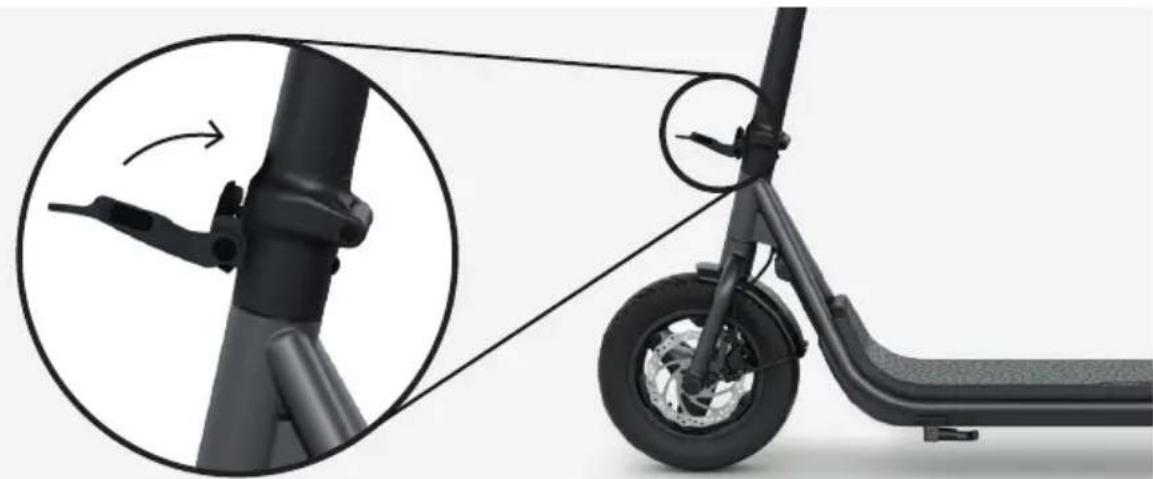
natural_image
Side view of a black electric scooter with a close-up inset showing the wheel and handle mechanism (no text or symbols)text_image
"click" K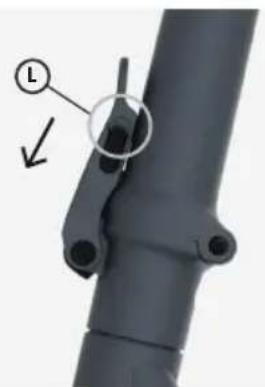
natural_image
Close-up of a mechanical pipe joint with a labeled component (no text or symbols visible)natural_image
Close-up of a mechanical device with a circular inset highlighting a component (no text or symbols visible)Risque de chute !
natural_image
Mechanical assembly diagram showing a lever mechanism with a curved arrow indicating motion (no text or symbols present)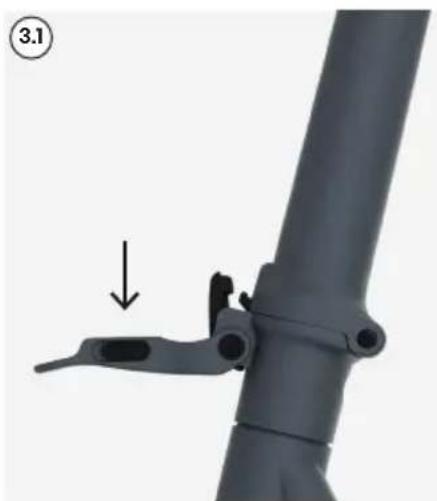
natural_image
Close-up of a gray mechanical lever handle assembly with a black clip and arrow indicating a step (no text or symbols)text_image
4.2 4.3 M A EGRET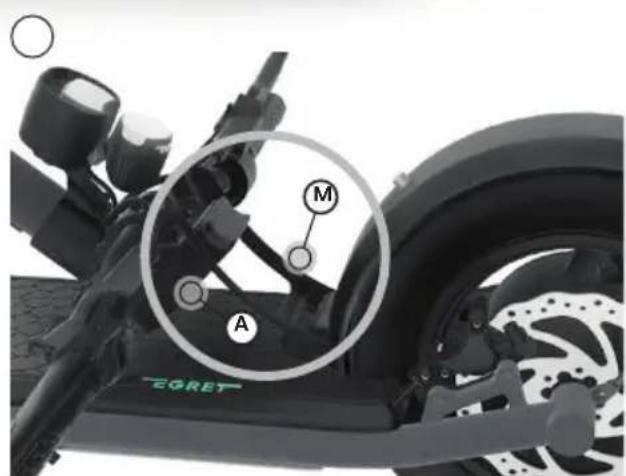
text_image
M A EGRETnatural_image
Close-up of a black Egret bicycle steering wheel with hexagonal base and circular head (no text or symbols visible)natural_image
Close-up of a black mechanical component with a cracked surface and a circular mark labeled 'O' (no readable text or symbols beyond the label)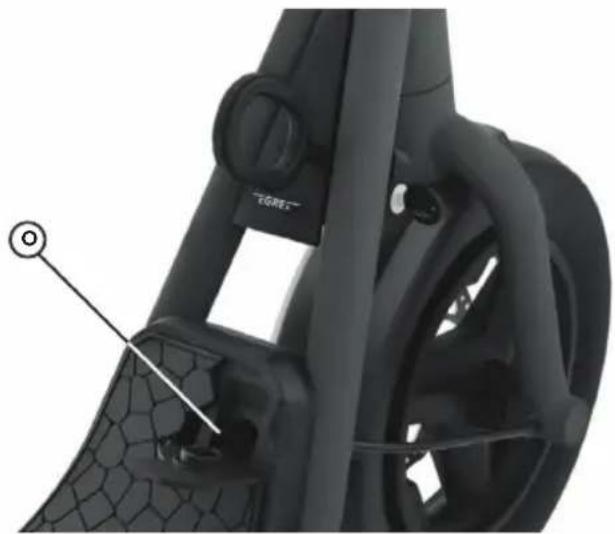
natural_image
Close-up of a black bicycle wheel assembly with visible mesh and mounting features (no text or symbols)text_image
Download on the App Store GET IT ON Google Play
text_image
QR code image containing encoded data, no visible human-readable text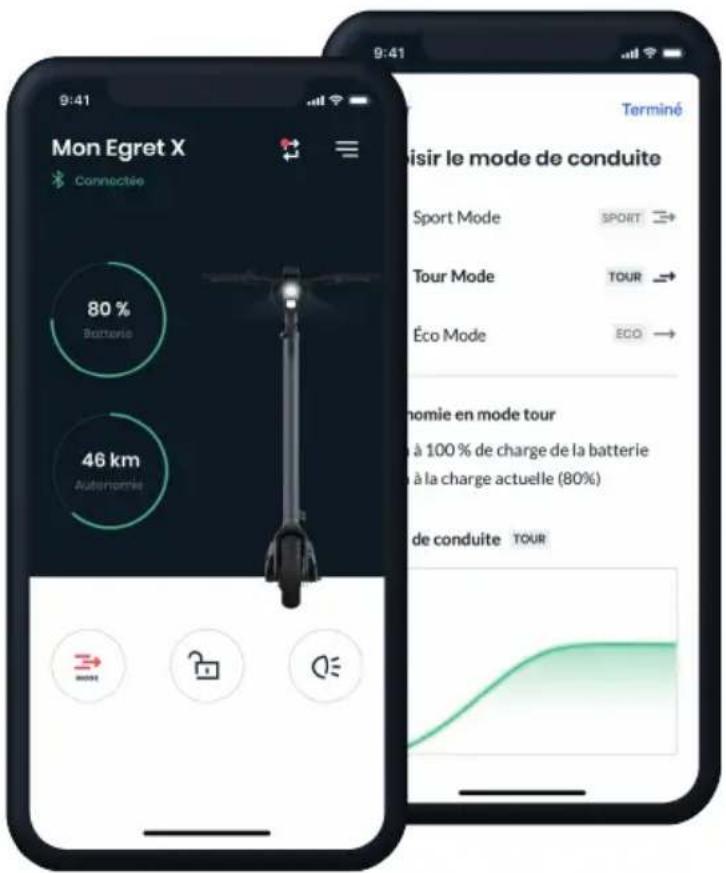
natural_image
Close-up of a black electronic device with three blue indicator lights on the side (no text or symbols visible)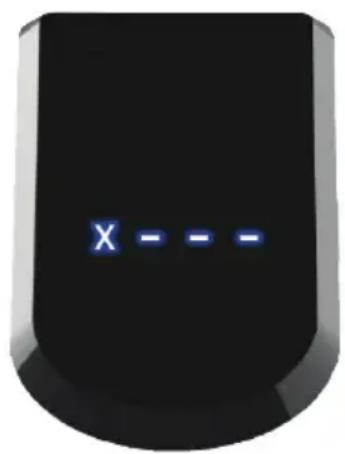
text_image
X - - -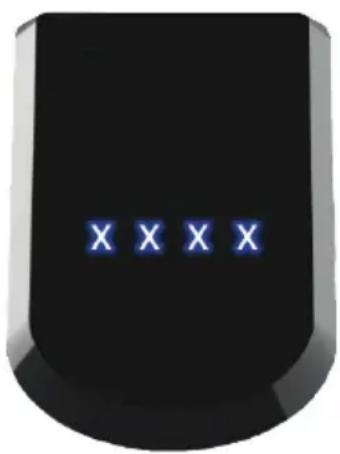
text_image
XXXXnatural_image
Technical illustration of a mechanical device showing two views: top view with handle and lever, bottom view with internal components (no text or symbols)text_image
R 00.0 17 Stext_image
Close-up of a camera control interface with labeled buttons and buttons, showing symbols for positive and negative inputs.Sonnette
text_image
Close-up of a black handheld device with labeled buttons and a circular icon indicating 'v'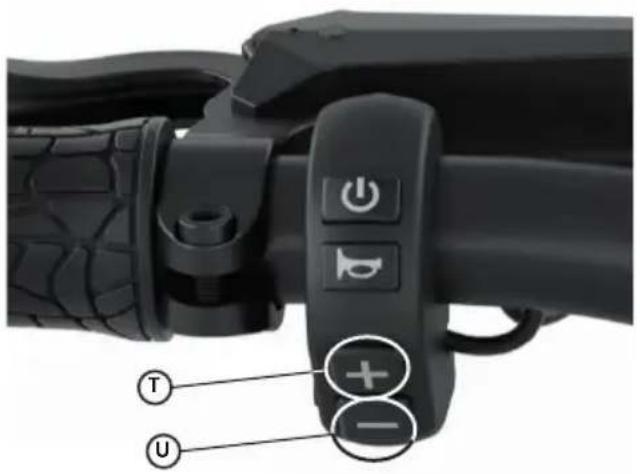
text_image
Close-up of a black handheld device's grip and control buttons with labeled indicators (T, U) pointing to key functions.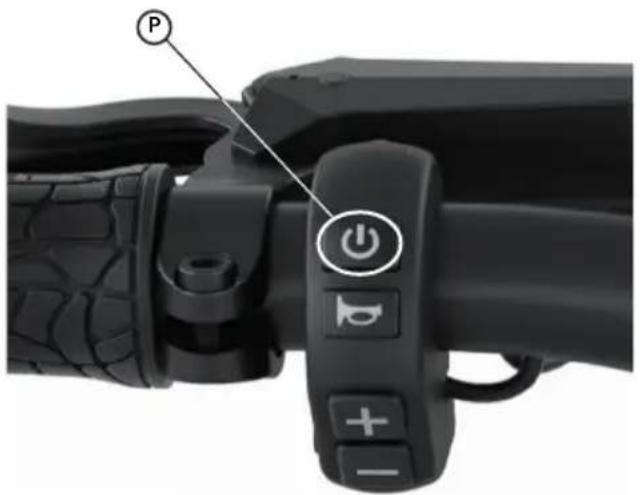
text_image
P PowerÉcran
EU DECLARATION OF CONFORMITY
DÉCLARATION DE CONFORMITÉ UE
is responsible for technical documents in accordance with machinery directive and hereby declare that the product
Is in accordance with the relevant provisions of the following EC directives including all associated modifications:
ROHS-Richtlinie 2011/65/EU | Restriction of Hazardous Substances Directive 2011/65/EU | Directive RoHS 2011/65/EU | Directiva RoHS
2011/65/EU
RED-Richtlinie 2014/53/EU | Radio Equipment Directive 2014/53/EU | Directive RED 2014/53/EU | Directiva RED 2014/53/EU
Folgende Normen/technische Spezifikationen kamen zur Anwendung: | And that the following standards and/or technical specifications have been applied as applicable | Et que les normes suivantes et/ou les spécifications techniques sont appliquées conformément | Y que se han
The manufacturer alone is responsible for the issue of this declaration of conformity
Florian Walberg, CEO
Hamburg, 01.12.2022
EU DECLARATION OF CONFORMITY
DÉCLARATION DE CONFORMITÉ UE
is responsible for technical documents and hereby declare that the product
Is in accordance with the relevant provisions of the following EC directives including all associated modifications:
ROHS-Richtlinie 2011/65/EU | Restriction of Hazardous Substances Directive 2011/65/EU | Directive RoHS 2011/65/EU | Directiva RoHS
2011/65/EU
The manufacturer alone is responsible for the issue of this declaration of conformity
Florian Walberg, CEO
Hamburg, 01.12.2022
EU DECLARATION OF CONFORMITY
DÉCLARATION DE CONFORMITÉ UE
is responsible for technical documents and hereby declare that the product
Fast Charger BC303480050
Is in accordance with the relevant provisions of the following EC directives including all associated modifications:
ROHS-Richtlinie 2011/65/EU | Restriction of Hazardous Substances Directive 2011/65/EU | Directive RoHS 2011/65/EU | Directiva RoHS
2011/65/EU
The manufacturer alone is responsible for the issue of this declaration of conformity
Florian Walberg, CEO
Hamburg, 01.12.2022