
VS4215 - Wall mount VENOM - Free user manual and instructions
Find the device manual for free VS4215 VENOM in PDF.


User questions about VS4215 VENOM
0 question about this device. Answer the ones you know or ask your own.
Ask a new question about this device
Download the instructions for your Wall mount in PDF format for free! Find your manual VS4215 - VENOM and take your electronic device back in hand. On this page are published all the documents necessary for the use of your device. VS4215 by VENOM.
USER MANUAL VS4215 VENOM
For use with Meta Quest 2, 3 & 3S
VS4215
www.venomuk.com

text_image
vennomHelpline Information:
The helpline is a one-to-one live service.
Hours: 9.00am - 4.30pm Monday to Friday
Tel: +44 (0) 1763 284181
Email: customerservice@venomuk.com
Website: www.venomuk.com
To ensure that your call is handled quickly and efficiently please check that you have the model number VS4215 and any other relevant information regarding your product at the time of your call.
Please retain these instructions for future use.

natural_image
Abstract gradient of purple diagonal stripes on white background (no text or symbols)
text_image
venom
natural_image
Abstract geometric pattern with four vertical purple parallelograms on white background (no text or symbols)
text_image
VONOM
EN: IMPORTANT INFORMATION
Care and Maintenance
Your device is a product of superior design and craftsmanship and should be treated with care. The suggestions below will help you to protect your warranty coverage.
- Keep your device out of the reach of small children.
- Keep the device dry. Precipitation, humidity and all types of liquid or moisture can contain minerals that will comode electronic circuits. If your device does get wet, allow it to dry completely.
- Do not use or store the device in dusty, dirty areas, as moving parts and electronic components of your device can be damaged.
- Do not use or store the device in hot areas. High temperatures can shorten the life of electronic devices, damage batteries and warp or melt certain plastics.
- Do not use or store the device in cold areas. When the device returns to its normal temperature, moisture can form inside the device and damage electronic circuit boards.
- Do not short circuit the battery.
- Do not drop, knock or shake the device. Rough handling can break internal circuit boards and fine mechanics.
- Do not use harsh chemicals, cleaning solvents or strong detergents to clean the device. All of the previous suggestions apply equally to your device, battery, charger or any enhancements.
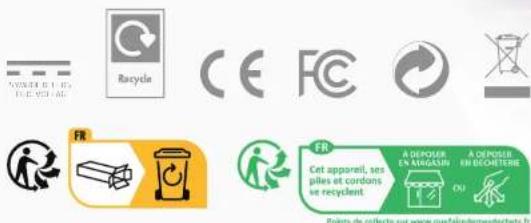
- The crossed out wheelia bin symbol on the product means that under the WEEE regulations, all consumer and household electrical and electronic products should not be mixed with general household waste as it may contain environmentally hazardous substances. For environmentally responsible recovery, recycling and treatment of the product, contact your local authority for details of your nearest designated collection point where it will be accepted free of charge.

FR: INFORMATION IMPORTANT
natural_image
Abstract red and white diagonal stripes on a gradient background (no text or symbols)
text_image
VONOMnatural_image
Red and white diagonal stripe pattern on a solid background (no text or symbols)
text_image
venomnatural_image
Abstract red and white diagonal stripes on a gradient background (no text or symbols)ENGLISH
UNIVERSAL LED DISPLAY STAND
For use with Meta Quest 2, 3 & 3S Model number: VS4215
USER GUIDE
CONTENTS:
A 1 x Head Strap Support
B 1 x Headphone hanger
C 1 x Main Support
D 1 x USB Type-C Cable
E 2 x Controller cradles
F 1 x Base
G 1 x LED platform
INSTALLATION
- Unbox all the components and check carefully if there are any missing parts.
- Slot the Main Support into the Base.
- Insert the two Controller Cradles into the underside of the LED Platform.
- Rotate the two Controller Cradles down to lock them into the correct position.
- Connect the Main Support with the LED Platform.
- Slot the Head Strap Support into the Headphone Hanger.
- Connect the Headphone Hanger to the top of the Main Support.
- Connect your Power Adapter (not included) using the USB Type-C port at the back of the LED Platform.
- Plug the Type-C Cable supplied into the output port on the side of the LED Platform, then connect the other end to your headset charging port. Once you hear a beep, charging starts automatically.
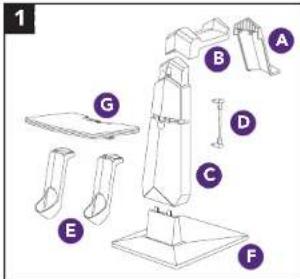
text_image
1 B A G D C E F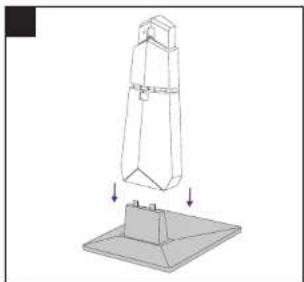
natural_image
Technical line drawing of a mechanical component with downward arrows indicating assembly or force (no text or symbols)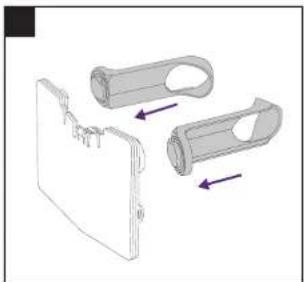
natural_image
Technical illustration of two mechanical components with directional arrows indicating assembly or movement (no text or symbols present)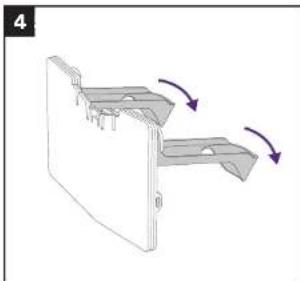
natural_image
Diagram of a mechanical component with directional arrows indicating motion (no text or symbols)
natural_image
3D mechanical assembly diagram showing a table with curved legs and a vertical post mounted on a base, with directional arrows indicating motion (no text or symbols)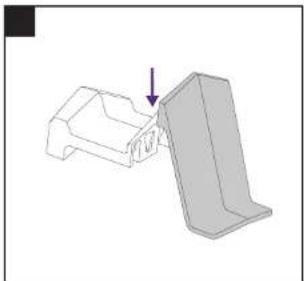
natural_image
3D mechanical part diagram showing a bracket and a flat plate with an arrow indicating direction (no text or symbols)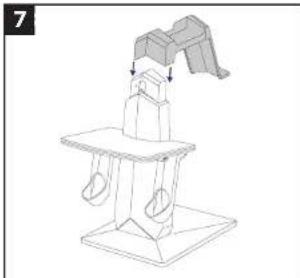
natural_image
Line drawing of a mechanical device with a stand and support structure (no text or symbols)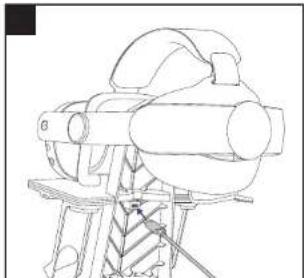
natural_image
Technical line drawing of a mechanical device with no visible text or symbols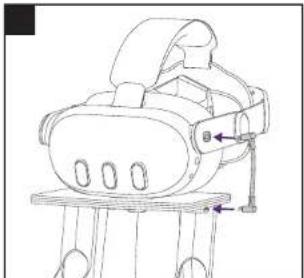
natural_image
Line drawing of a mechanical device with a handle and mounting base (no text or symbols)ENGLISH
UNIVERSAL LED DISPLAY STAND
For use with Meta Quest 2, 3 & 3S Model number: VS4215
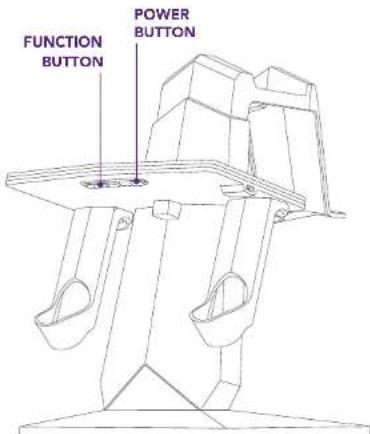
POWER BUTTON
- To turn LED light on, short press the Power Button once.
- To turn LED light off, long press the Power Button.
- To adjust the brightness of LED light in the Single Colour effect, short press the Power Button, and there are 3 levels to select.
- After turning off the Stand, the LED light will be turned off and the last selected light effect will be saved.
- When turning on the Stand again, it will resume the last light effect setting.
text_image
FUNCTION BUTTON POWER BUTTONFUNCTION BUTTON
- The Function Button is a dual select button. To switch between different light effects, short press it when LED light is on.
- To switch to previous effects, short press the right hand side of the Function Button.
- To switch to the next effect, short press the left hand side of the Function Button.
LIGHT FUNCTIONS
- 6-Colour-Chasing Effect
- 6-Color-Auto-Pulsing Effect
- Single Colour-Red
- Single Colour-Orange
- Single Colour-Yellow
- Single Colour-Cyan
- Single Colour-Blue
- Single Colour-Violet
- Single Colour Pulsing-Red
- Single Colour Pulsing-Orange
- Single Colour Pulsing-Yellow
- Single Colour Pulsing-Cyan
- Single Colour Pulsing-Blue
- Single Colour Pulsing-Violet
CARE & MAINTENANCE
Your device is a product of superior design and craftsmanship and should be treated with care. The suggestions below will help you to protect your warranty coverage:
- Keep your device out of the reach of small children.
- Keep the device dry. Precipitation, humidity and all types of liquid or moisture can contain minerals that will corrode electronic circuits. If your device does get wet, allow it to dry completely.
- Do not use or store the device in dusty, dirty areas as moving parts and electronic components of your device can be damaged.
- Do not use or store the device in hot areas. High temperatures can shorten the life of electronic devices, damage batteries and warp or melt certain plastics.

- Do not use or store the device in cold areas. When the device returns to its normal temperature, moisture can form inside the device and damage electronic circuit boards.
- Regularly clean the dock of dust, dirt and debris with a clean dry cloth to ensure a secure electrical connection.
- Never charge devices on bedding or insulating materials, or they may overheat.
www.venomuk.com

natural_image
Abstract gradient of purple and white diagonal stripes (no text or symbols)Venom
Venom products conform to the following where applicable:
Solution House, Sandon Road, Therfield, Hertfordshire, SG8 9RE
www.venomuk.com