
32BR50C - Monitor LG - Free user manual and instructions
Find the device manual for free 32BR50C LG in PDF.

User questions about 32BR50C LG
0 question about this device. Answer the ones you know or ask your own.
Ask a new question about this device
Download the instructions for your Monitor in PDF format for free! Find your manual 32BR50C - LG and take your electronic device back in hand. On this page are published all the documents necessary for the use of your device. 32BR50C by LG.
USER MANUAL 32BR50C LG
(LED Computer Monitor\*)
* LG LED Monitor applies LCD screen with LED backlights.
This product is a computer monitor and not for television purpose.
Please read this manual carefully before operating your set and retain it for future reference.
32MR50C
32BR50C
www.lg.com
Copyright ©2023 LG Electronics Inc. All Rights Reserved.
TABLE OF CONTENTS
ASSEMBLING AND PREPARING 4
- Installing....5
Moving and Lifting the Monitor ....5
Installing on a Table 6
Using the Kensington Lock....6
Installing on the Wall 7
- Product Description....9
How to Use the Joystick Button....10
Adjusting the Angle ....10
- Supported Software....11
USING THE MONITOR....11
- Connecting to a PC 12
D-SUB Connection....12
HDMI Connection 12
- Connecting Peripherals ....13
Headphones Connection ....13
USER SETTINGS 13
- Activating the Main Menu....13
Main Menu Features....14
Menu Settings....14
[Quick Settings]....15
[Input]....15
[Picture]....16
[General]....18
PRODUCT SPECIFICATION....19
- Support Mode ....21
(Preset Mode, D-SUB/ HDMI)....21
TROUBLESHOOTING 22
LICENSE 24
ASSEMBLING AND PREPARING

CAUTION
• Always use genuine LG components to ensure safety and product performance.
• The product warranty will not cover damage or injury caused by the use of unauthorised components.
• It is recommended that use the supplied components.
- If you use generic cables not certified by LG, the screen may not display or there may be image noises.
- The product figures and screen displays used in this manual are examples to help consumers use the product and may differ from the actual product.
- Do not apply foreign substances (oils, lubricants, etc.) to the screw parts when assembling the product. (Doing so may damage the product.)
- Applying excessive force when tightening screws may cause damage to the monitor. Damage caused in this way will not be covered by the product warranty.
- Do not carry the monitor upside down by just holding the base. This may cause the monitor to fall off the stand and could result in personal injury.
- When lifting or moving the monitor, do not touch the monitor screen. The force applied to the monitor screen may cause damage to it.
NOTE
• The components may look different from those illustrated here.
- Without prior notice, all product information and specifications contained in this manual are subject to change to improve the performance of the product.
- To purchase optional accessories, visit an electronics store or an online shopping site, or contact the retailer from which you purchased the product.
• The power cord provided may differ depending upon the region.
Installing
Moving and Lifting the Monitor
When moving or lifting the monitor, follow these instructions to prevent the monitor from being scratched or damaged and to ensure safe transportation, regardless of its shape or size.
- Place the monitor in the original box or packing material before attempting to move it.
- Before moving or lifting the monitor, disconnect the power cord and all other cables.
- Hold the bottom and side of the monitor frame firmly. Do not hold the panel itself.
- When holding the monitor, the screen should face away from you to prevent it from being scratched.
- When transporting the monitor, do not expose the monitor to shock or excessive vibration.
- When moving the monitor, keep it upright and never turn the monitor on its side or tilt it sideways.


CAUTION
- Avoid touching the monitor screen as much as possible.
- This may result in damage to the screen or some of the pixels used to create images.
Installing on a Table
- Lift the monitor and place it on the table in an upright position. Place the monitor at least 100 mm away from the wall to ensure sufficient ventilation.
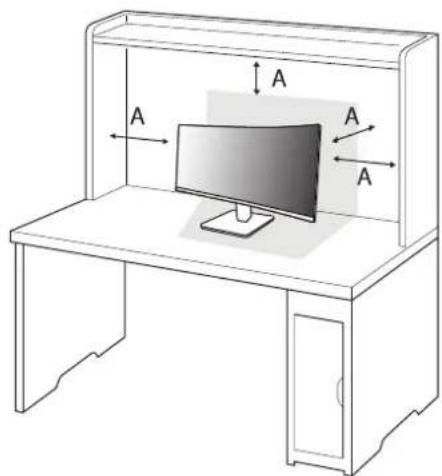
A: 100 mm

CAUTION
- Unplug the power cord before moving or installing the monitor. There is risk of electric shock.
- Make sure to use the power cord that is provided in the product package and connect it to a grounded power outlet.
- If you need another power cord, please contact your local dealer or the nearest retail store.
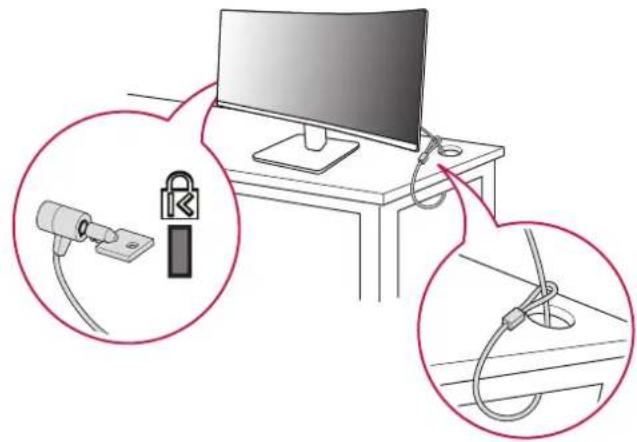
Using the Kensington Lock
For more information on installation and usage, refer to the Kensington lock owner's manual or visit the website at http://www.kensington.com.
Connect the monitor to a table using the Kensington security system cable.
natural_image
Illustration of a computer monitor connected to cable, with two magnified insets showing cable and ring components (no text or symbols)NOTE
• The Kensington security system is optional. You can obtain optional accessories from most electronics stores.
Installing on the Wall
This monitor meets the specifications for the wall mount plate or other compatible devices.
Install the monitor at least 100 mm away from the wall and leave about 100 mm of space at each side of the monitor to ensure sufficient ventilation. Detailed installation instructions can be obtained from your local retail store. Alternatively, please refer to the manual for how to install and set up a tilting wall mounting bracket.
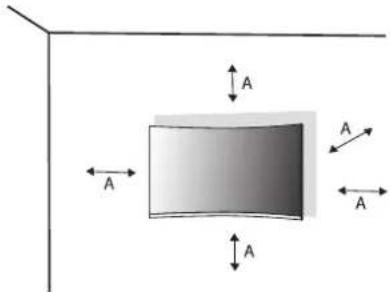
A: 100 mm
Installing the Wall Mount Plate
To install the monitor to a wall, attach a wall mounting bracket (optional) to the back of the monitor. Make sure that the wall mounting bracket is securely fixed to the monitor and to the wall.
| Wall Mount (mm) 100 x 100 | |
| Standard screw M4 x L10 | |
| Number of screws 4 | |
| Wall Mount Plate (Optional) LSW149 | 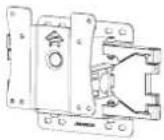 |
NOTE
• Use the screws specified by VESA standards.
- The wall mount kit includes the installation guide and all necessary parts.
- The wall mounting bracket is optional. You can obtain optional accessories from your local dealer.
- The length of the screw may differ for each wall mounting bracket. If you use screws longer than the standard length, it may damage the inside of the product.
- For more information, please refer to the user manual for the wall mounting bracket.
- Be careful not to apply too much force while mounting the wall mount plate as it may cause damage to the screen.
- Remove the stand before installing the monitor on a wall mount by performing the stand attachment in reverse.
CAUTION
- Unplug the power cord before moving or installing the monitor to avoid electric shock.
- Installing the monitor on the ceiling or on a slanted wall may result in the monitor falling off, which could lead to injury. Use an authorised LG wall mount and contact the local dealer or qualified personnel.
- To prevent injury, this apparatus must be securely attached to the wall in accordance with the installation instructions.
- Applying excessive force when tightening screws may cause damage to the monitor. Damage caused in this way will not be covered by the product warranty.
- Use the wall mounting bracket and screws that conform to VESA standards. Damage caused by the use or misuse of inappropriate components will not be covered by the product warranty.
- When measured from the back of the monitor, the length of each installed screw must be 8 mm or less.
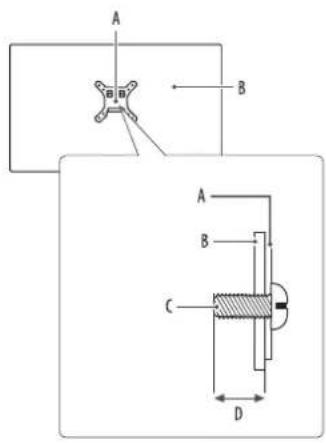
A: Wall Mount Plate
B: Back of the Monitor
c: Standard screw
D: Max. 8 mm
Product Description
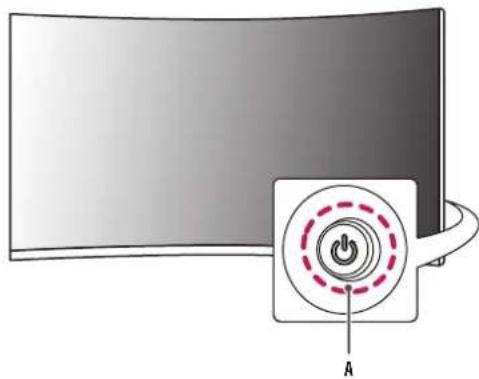
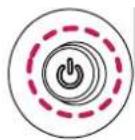
natural_image
Illustration of a computer monitor with a power button icon and label 'A' (no text or symbols on the device itself)A: Joystick Button
How to Use the Joystick Button
You can easily control the functions of the monitor by pressing the joystick button or moving it left/right/up/down with your finger.
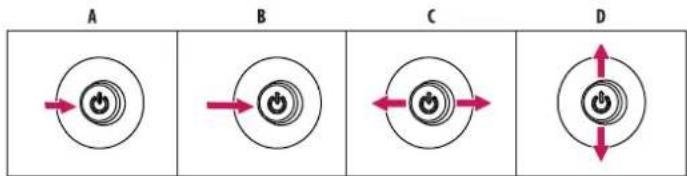
Basic Functions
flowchart
graph LR
    A["Power Symbol"] --> B["Current Indicator"]
    B --> C["Power Symbol"]
    C --> D["Current Indicator"]
    D --> A
    style A fill:#f9f,stroke:#333
    style B fill:#f9f,stroke:#333
    style C fill:#f9f,stroke:#333
    style D fill:#f9f,stroke:#333
A (Power on): Press the joystick button once with your finger to turn on the monitor.
B (Power off): Press and hold the joystick button once more than 5 seconds with your finger to turn off the monitor.
C (Volume control): You can control the volume by moving the joystick button left/right.
D (Controls screen brightness): You can control the screen's brightness by moving the joystick button up/down.
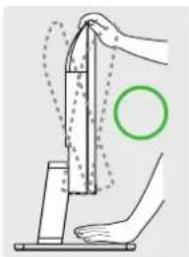
Adjusting the Angle
1 Place the monitor mounted on the stand base in an upright position.
2 Adjust the angle of the screen.
The angle of the screen can be adjusted forward or backward from -5^ to 20^ for a comfortable viewing experience.

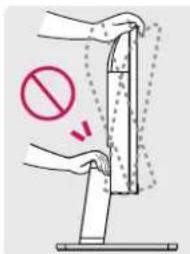
WARNING
- To avoid injury to the fingers when adjusting the screen, do not hold the lower part of the monitor's frame as illustrated below.
- Be careful not to touch or press the screen area when adjusting the angle of the monitor.
natural_image
Illustration of a hand using a vertical tool to lift a surface, with a green circle highlighting the point of motion (no text or symbols present)
Supported Software
You can download and install the latest version from the LGE website (www.lg.com).
• Monitor Driv@mScreen Control
USING THE MONITOR
• Illustrations in this manual may differ from the actual product.
Press the joystick button, go to [Settings] > [Input], and then select the input option.
CAUTION
- If you use generic cables not certified by LG, the screen may not display or there may be image noises.
- Do not press the screen for a prolonged time. This may cause image distortion.
- Do not display a still image on the screen for a prolonged time. This may cause image retention. Use a PC screensaver if possible.
- When connecting the power cord to the outlet, use a grounded (3-hole) power strip or a grounded power outlet.
- The monitor may flicker when turned on in an area where the temperature is low. This is normal.
- Sometimes red, green, or blue spots may appear on the screen. This is normal.
- Make sure to use the supplied cable of the product. Otherwise, this may cause the device to malfunction.
Connecting to a PC
• This monitor supports the featured play.
* P/A feature that allows you to add a device to your computer without having to reconfigure anything or install any manual drivers.
D-SUB Connection
Transmits analog video signal from your PC to the monitor.
NOTE
Apple® Adapter
- For Apple Macintosh use, a separate plug adapter is needed. This adapter can be purchased at Apple*.
HDMI Connection
Transmits digital video and audio signals from your PC to the monitor.
NOTE
• Using a DVI to HDMI / DP (DisplayPort) to HDMI cable may cause compatibility issues.
- Use a certified cable with the HDMI logo attached. If you do not use a certified HDMI cable, the screen may not display or a connection error may occur.
• Recommended HDMI cable types
- High Speed HDMI/ ^TM cable
- High Speed HDMI/ ^TM cable with Ethernet
Connecting Peripherals
Headphones Connection
Connect peripherals to the monitor via the headphones port.
NOTE
• Peripheral devices are sold separately.
- Depending on the audio settings of the PC and external device, headphones and speaker functions may be limited.
- If you use angled earphones, it may cause a problem with connecting another external device to the monitor. Therefore, it is recommended to use straight earphones.


Angled Straight
(Recommend)
USER SETTINGS
NOTE
- Your monitor's OSD (On Screen Display) may differ slightly from that shown in this manual.
Activating the Main Menu
Joystick Button
1 Press the joystick button on the back of the monitor.
2 Move the joystick up/down and left/right to set the options.
3 Press the joystick button once more to exit the main menu.
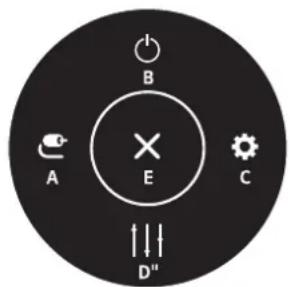
Main Menu Features
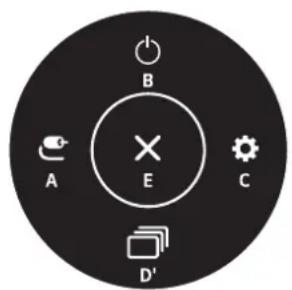
(for HDMI only) (for D-SUB only)
Menu Settings
1 To view the OSD menu, press the joystick button at the back of the monitor and then enter the [Settings].
2 Move the joystick up/down and left/right to set the options.
3 To return to the upper menu or set other menu items, move the joystick to ◀or pressing ( 🔍) it.
4 If you want to exit the OSD menu, move the joystick to ◀ until you exit.

[Quick Settings] [Input]

[Picture]

[General]

| Main Menu Description | |
| A: [Input] Sets input mode. | |
| B: [Power Off] Turns off the monitor. | |
| C: [Settings] Configures the screen settings. | |
| D': [Picture Mode] (for HDMI only) Sets the picture mode. | |
| D": [Auto Configuration] (for D-SUB only) Operate the Auto configuration for optimal display in D-SUB. | |
| E: [Exit] Exits the main menu. |
[Quick Settings]
[Settings] > [Quick Settings]
• [Brightness]: Adjusts the brightness of the screen.
• [Contrast]: Adjusts the contrast of the screen.
• [Volume]: Adjusts the volume level.
- You can adjust [Mute] / [Unmute] by moving the joystick button to ▼ in the [Volume] menu.
• [Auto Configuration]: Operate the Auto configuration for optimal display in D-SUB.
[Input]
[Settings] > [Input]
• [Input List]: Selects the input mode.
- [Aspect Ratio]: Adjusts the aspect ratio of the screen. The display may look the same for [Full Wide], and [Original] options at the recommended resolution (1920 x 1080).
- [Full Wide]: Displays the video in widescreen, regardless of the video signal input.
- [Original]: Displays video according to the aspect ratio of the video signal input.
- The menus may be disabled at the recommended resolution (1920 x 1080).
- [Auto Input Switch]: When [Auto Input Switch] is set to [On], display will automatically switch to new input when connected.
[Picture]
[Settings] > [Picture] > [Picture Mode]
• [Custom]: Allows the user to adjust each element.
- [Reader]: Optimises the screen for reading documents. You can brighten the screen in the OSD menu.
• [Photo]: Optimises the screen to view photos.
• [Cinema]: Optimises the screen to improve the visual effects of a video.
- [Color Weakness]: This mode is for users who cannot distinguish between red and green. It enables users with colour weakness to easily distinguish between the two colours.
- This is subsidiary for colour weakness user. Therefore if you feel uncomfortable with the screen, please turn off this function.
- This function can't distinguish some colours in some images.
• [Game]: Optimises the screen for gameplay.
NOTE
- If the [Picture Mode] is changed, the screen may flicker or the resolution of your PC screen may be affected.
[Settings] > [Picture] > [Picture Adjust]
• [Brightness]: Adjusts the brightness of the screen.
• [Contrast]: Adjusts the contrast of the screen.
• [Sharpness]: Adjusts the sharpness of the screen.
[SUPER RESOLUTION+]: Because this is a function to increase the sharpness of low resolution pictures, it is not recommended to use the function for normal text or for desktop icons. Doing so may result in unnecessarily high sharpness.
- [High]: Optimises the screen for crystal clear images. Best for high-definition video or games.
- [Middle]: Optimises the screen for comfortable viewing, with images at the middle level between the low and high modes.
- [Low]: Optimises the screen for smooth and natural images. Best for still images or images with less movement.
- [Off]: Displays in the most common setting. Disables [SUPER RESOLUTION+].
• [Black Level]: Sets the offset level (for HDMI only).
Offset: as a reference for a video signal, this is the darkest colour the monitor can display.
- [High]: Keeps the current contrast ratio of the screen.
- [Low]: Lowers the black levels and raises the white levels from the current contrast ratio of the screen.
[DFC] - On: Adjusts the brightness automatically according to the screen.
- Off: Disables the [DFC] feature.
[Settings] > [Picture] > [Game Adjust]
- [Response Time]: Sets a response time for displayed pictures based on the movement of the picture on the screen. For a normal environment, it is recommended that you use [Fast]. When there is a lot of motion, it is recommended that you use [Faster]. Setting to [Faster] may cause image sticking.
- [Faster]: Sets the response time to faster.
- [Fast]: Sets the response time to fast.
- [Normal]: Sets the response time to normal.
- [Off]: Does not use the response time improvement feature.
- [FreeSync]: Provides seamless and natural images by synchronizing the vertical frequency of the input signal with that of the output signal. Note that the screen flickering may occur intermittently in a specific gaming environment.
- Supported Interface: HDMI
- Supported Graphic Card: A graphic card that supports AMD's FreeSync is necessary.
- Supported Version: Make sure to update the graphic card to the latest driver.
- For more information and requirement, AMD website (www.amd.com).
- [Black Stabilizer]: You can control the black contrast to have better visibility in dark scenes. You can easily distinguish objects on dark game screens.
[Settings] > [Picture] > [Color Adjust]
• [Gamma]
- [Mode 1], [Mode 2], [Mode 3]: The higher the gamma value, the darker the image becomes. Likewise, the lower the gamma value, the lighter the image becomes.
- [Mode 4]: If you do not need to adjust the gamma settings, select [Mode 4].
• [Color Temp]: Set your own colour temperature.
- [Custom]: The user can customise the red, green and blue colour.
- [Warm]: Sets the screen colour to a reddish tone.
- [Medium]: Sets the screen colour to between a red and blue tone.
- [Cool]: Sets the screen colour to a bluish tone.
• [Red], [Green], [Blue]: You can customise the picture colour using [Red], [Green], and [Blue] colours.
[Settings] > [Picture] > [Configuration Adjust] (D-SUB only)
• [Horizontal]: To move image left and right.
• [Vertical]: To move image up and down.
[Clock]: To minimise any vertical bars or stripes visible on the screen background. The horizontal screen size will also change.
- [Phase]: To adjust the focus of the display. This item allows you to remove any horizontal noise and clear or sharpen the image of characters.
[Settings] > [Picture] > [Resolution] (D-SUB only)
- User can set the desired resolution. This option is enabled only when the screen resolution on your computer is set to the following (D-SUB only).
- 1024 x 768, 1280 x 768, 1360 x 768, 1366 x 768, off
- 1280 x 960, 1600 x 900, off
- 1440 x 900, 1600 x 900, off
[Settings] > [Picture] > [Picture Reset]
• Returns picture and colour to the default settings.
[General]
[Settings] > [General]
• [Language]: Sets the menu screen to the desired language.
• [SMART ENERGY SAVING]: Conserve energy by using luminance compensation algorithm.
- [High]: Saves energy using the high-efficiency [SMART ENERGY SAVING] feature.
- [Low]: Saves energy using the low-efficiency [SMART ENERGY SAVING] feature.
- [Off]: Disables the feature.
- The value of energy saving data may differ depending on panel and panel suppliers.
-
If you select the option of [SMART ENERGY SAVING] is [High] or [Low], monitor luminance become higher or lower depend on source.
-
[Automatic Standby]: If there is no operation on the monitor for a certain period of time, the monitor will automatically switch to standby mode.
- [OSD Lock]: This feature disables the configuration and adjustment of menus.
All features are disabled except [Brightness], [Contrast], [Volume] in [Quick Settings], [Input], [OSD Lock] and [Information] in [General].
• [Information]: The following display information will be shown; [Total Power On Time], [Resolution].
• [Reset]: Returns to the default settings.
PRODUCT SPECIFICATION
Specifications are subject to change without notice.
The symbol-means alternating current, and the symbol means direct current.
Colour Depth:
• 8-bit colour is supported.
Resolution
• Max Resolution:
- 1920 x 1080 @ 100 Hz (HDMI)
- 1920 x 1080 @ 75 Hz (D-SUB)
• Recommended Resolution:
- 1920 x 1080 @ 60 Hz
Environmental Conditions
- Operating Conditions
- Temperature: 0 °C to 40 °C
- Humidity: Less than 80%
Storing Conditions
- Temperature: -20 °C to 60 °C
- Humidity: Less than 85%
AC/DC Adapter
• Model: ADS-45FSQ-19 19032EPG-1
ADS-45FSQ-19 19032EPK-1
ADS-45FSQ-19 19032EPCU-1
ADS-45FSQ-19 19032EPI-1
ADS-45SQ-19-3 19032E
Manufacturer: SHENZHEN HONOR ELECTRONIC CO., LTD
- Input: 100-240 V\~ 50/60 Hz, 1.2 A
- Output: 19 V\~1.7 A
Power Sources
• Power Rating: 19 V -1.7 A
Dimensions: Monitor Size (Width x Depth x Height) (mm)
• With Stand: 708.2 x 233.4 x 512.4
• Without Stand: 708.2 x 92.2 x 421.4
Weight (kg) (Without Packaging)
• With Stand: 6.2
• Without Stand: 5.1
Support Mode
(Preset Mode, D-SUB/ HDMI)
| Resolution Horizontal Frequency (kHz) Vertical Frequency (Hz) Polarity (H/V) Remarks | ||||
| 640 x 480 31.469 59.94 -/- | ||||
| 640 x 480 37.50 75.0 -/- | ||||
| 720 x 400 31.469 70.086 -/+ | ||||
| 800 x 600 37.879 60.317 +/+ | ||||
| 800 x 600 46.875 75 +/+ | ||||
| 1024 x 768 48.363 60 | -/- | |||
| 1024 x 768 60.023 75.028 +/+ | ||||
| 1152 x 864 67.07 | 74.94 +/- | |||
| 1280 x 960 | 60 | 60 +/+ | ||
| 1280 x 720 44.772 59.855 -/+ | ||||
| 1280 x 800 49.702 59.81 -/+ | ||||
| 1280 x 1024 | 63.668 59.894 -/+ | |||
| 1280 x 1024 | 80.295 74.902 -/+ | |||
| 1440 x 900 55.935 59.887 -/+ | ||||
| 1680 x 1050 | 64.674 59.883 +/- | |||
| 1920 x 1080 67.5 | 60 +/+ | Recommended timing | ||
| 1920 x 1080 83.89 | 74.97 +/- | |||
| 1920 x 1080 110.0 | 100.0 +/- HDMI only | |||
TROUBLESHOOTING
Please refer to the list below if you experience any of the following issues during product use.
It may not be a malfunction.
Nothing is displayed on the screen.
• Is the monitor's power cord plugged in?
- Check if the power cord is correctly plugged into the power outlet.
• Is the monitor's adapter plugged in?
- Make sure to use the adapter that is provided in the product package.
- If the monitor is in sleep mode (standby mode), move the mouse, or press any key on the keyboard, to switch the display on.
- Check if the computer is turned on.
• Is the monitor powered on?
- Check if the input setting is correct. ([Settings] > [Input])
- Is the [The screen is not currently set to the recommended resolution.] message being displayed?
- This occurs when signals transferred from the PC (graphics card) are out of the recommended horizontal or vertical frequency range of the monitor. Please see the "PRODUCT SPECIFICATION" section of this manual to set the appropriate frequency.
• Is the [No Signal] message being displayed?
- This is displayed when the signal cable between the PC and the monitor is missing or disconnected. Check the cable and reconnect it.
• Is the [Out of Range] message being displayed?
- This occurs when signals transferred from the PC (graphics card) are out of the horizontal or vertical frequency range of the monitor. Please see the "PRODUCT SPECIFICATION" section of this manual to set the appropriate frequency.
Do you see an "Unrecognised monitor, Plugitor Found/EstAGE?"
• Have you installed the display driver?
- Be sure to install the display driver from our web site: https://www.lg.com.
- Make sure to check if the graphics card supports P1 of grantib play
The screen retains an image.
• Does image sticking occur even when the monitor is turned off?
- Displaying a still image for a prolonged time may cause damage to the screen, resulting in the retention of the image.
- To extend the lifetime of the monitor, use a screensaver.
Screen display is unstable and shaky. / Images displayed on the monitor leave shadow trails.
• Did you select the appropriate resolution?
- If the selected resolution is HDMI 1080i 60/50 Hz (interlaced), the screen may be flickering. Change the resolution to 1080p or the recommended resolution.
The display colour is abnormal.
• Does the display appear discoloured (16 colours)?
- Set the colour to 24 bit (true colour) or higher. (The settings may differ depending on the operating system (OS) you use.)
• Does the display colour appear unstable or monochrome?
- Check if the signal cable is connected properly. Reconnect the cable or reinsert the PC's graphics card.
• Are there spots on the screen?
- When using the monitor, pixilated spots (red, green, blue, white, or black) may appear on the screen. This is normal for an LCD screen. It is not an error, nor is it related to the monitor's performance.
Some features are disabled.
- Are some functions not available when you press the Menu button?
- The OSD is locked. Disable [OSD Lock] in [General].
No sound from the headphone port.
• Are images displayed without sound?
- Make sure that the headphone port connections are made properly.
- Try increasing the volume with the joystick.
- Set the audio output of the PC to the monitor you are using. (The settings may differ depending on the operating system (OS) you use.)
LICENSE
Each model has different licenses. Visit www.lg.com for more information on the license.

The terms HDMI, HDMI High-Definition Multimedia Interface, HDMI Trade Dress and the HDMI Logos are trademarks or registered trademarks of HDMI Licensing Administrator, Inc.

LG
Life's Good
The model and serial number of the product are located on the back and on one side of the product.
Record them below in case you ever need service.
Model
Serial No.
IMPORTANT PRECAUTIONS
This unit has been engineered and manufactured to ensure your personal safety, however improper use may result in potential electrical shock or fire hazards. In order to allow the proper operation of all safeguards incorporated in this display, observe the following basic rules for its installation, use, and servicing. All precautions and safety information apply to LCD and OLED models.
On Safety
Use only the power cord supplied with the unit. In case you use another power cord, make sure that it is certified by the applicable national standards if not being provided by the supplier. If the power cable is faulty in any way, please contact the manufacturer or the nearest authorized repair service provider for a replacement.
The appliance coupler is used as the disconnect device.
Please make sure the device is installed near the wall outlet to which it is connected and that the outlet is easily accessible.
Operate the display only from a power source indicated in the specifications of this manual or listed on the display. If you are not sure what type of power supply you have in your home, consult with your dealer.
Overloaded AC outlets and extension cords are dangerous. So are frayed power cords and broken plugs. They may result in a shock or fire hazard. Call your service technician for replacement.
As long as this unit is connected to the AC wall outlet, it is not disconnected from the AC power source even if the unit is turned off.
Do not Open the Display:
- There are no user serviceable components inside.
- There are Dangerous High Voltages inside, even when the power is OFF.
- Contact your dealer if the display is not operating properly.
To Avoid Personal Injury :
- Do not place the display on a sloping shelf unless properly secured.
- Use only a stand recommended by the manufacturer.
- Do not drop an object on or apply impact to the product. Do not throw any toys or objects on the product screen.
It can cause injury to human, problem to product and damage the display.
To Prevent Fire or Hazards:
- Always turn the display OFF if you leave the room for more than a short period of time. Never leave the display ON when leaving the house.
- Keep children from dropping or pushing objects into the display's cabinet openings. Some internal parts carry hazardous voltages.
- Do not add accessories that have not been designed for this display.
- When the display is to be left unattended for an extended period of time, unplug it from the wall outlet.
- In the presence of thunder and lightning, never touch the power cord and signal cable because it can be very dangerous. It can cause electric shock.
On Installation
Do not allow anything to rest upon or roll over the power cord, and do not place the display where the power cord is subject to damage.
Do not use this display near water such as near a bathtub, washbowl, kitchen sink, laundry tub, in a wet basement, or near a swimming pool.
Displays are provided with ventilation openings in the cabinet to allow the release of heat generated during operation. If these openings are blocked, built-up heat can cause failures which may result in a fire hazard.
Therefore, NEVER:
- Block the bottom ventilation slots by placing the display on a bed, sofa, rug, etc.
- Place the display in a built-in enclosure unless proper ventilation is provided.
- Cover the openings with cloth or other material.
- Place the display near or over a radiator or heat source.
Do not rub or strike the Active Matrix LCD with anything hard as this may scratch, mar, or damage the Active Matrix LCD permanently.
Do not press the LCD screen with your finger for a long time as this may cause some afterimages.
Some dot defects may appear as Red, Green or Blue spots on the screen.
However, this will have no impact or effect on the display performance.
If possible, use the recommended resolution to obtain the best image quality for your LCD display. If used under any mode except the recommended resolution, some scaled or processed images may appear on the screen. However, this is characteristic of the fixed-resolution LCD panel.
Displaying a still image for long time on the monitor may leave persistent image or stain on the monitor screen. To avoid this problem, use a screen saver and power off when this product is not used. Persistent image or stain caused by long time usage are not covered by the warranty on this product.
Do not shock or scratch the front and sides of the screen with metallic objects.
Otherwise, it may cause damage to the screen.
Make sure the panel faces forward and hold it with both hands to move. If you drop the product, the damaged product can cause electric shock or fire. Contact an authorized the service center for repair.
Avoid high temperatures and humidity.
Do not install this product on a wall if it could be exposed to oil or oil mist.
• This may damage the product and cause it to fall.
For displays with glossy bezels the user should consider the placement of the display as the bezel may cause disturbing reflections from surrounding light and bright surfaces.
Do not use products using high voltage around the Monitor. (ex. Electrical Swatter)
• Monitor may have malfunction as its electrical shock.
Precautions to the AC Adapter and Power
If water or any foreign substance goes inside the product (TV, monitor, power cord, or AC adapter), disconnect the power cord immediately and contact the service center.
- Otherwise, this may cause a fire or electric shock due to damage to the product.
Do not touch the power plug or AC adapter with wet hands. If the pins of the plug are wet or dusty, wipe and dry them before use.
- Otherwise, this may cause a fire or electric shock.
Make sure to completely insert the power cord into the AC adapter.
- If loosely connected, the poor connection may cause a fire or electric shock.
Be sure to use power cords and AC adapters provided or approved by LG Electronics, Inc. - The use of non-approved products may cause a fire or electric shock.
When unplugging the power cord, always pull it by the plug. Do not bend the power cord with excessive force.
- The power line can be damaged, which may cause electric shock or fire.
Be careful not to step or place heavy objects (electronic appliances, clothing, etc.) on the power cord or AC adapter. Be careful not to damage the power cord or AC adapter with sharp objects.
- Damaged power cords may cause a fire or electric shock.
Never disassemble, repair or modify the power cord or AC adapter.
• This may cause a fire or electric shock.
Be sure to keep the outlet, AC adapter, and pins of the power plug clean from dust and etc.
• This may cause a fire.
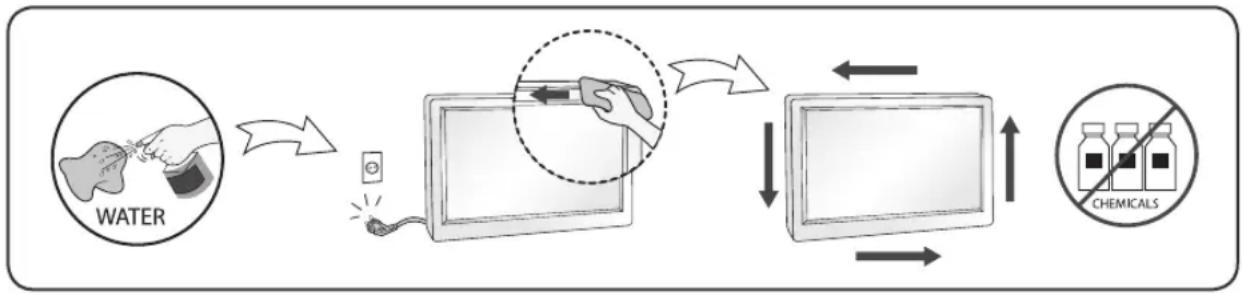
On Cleaning
- Unplug the display before cleaning the face of the display screen.
- Use a slightly damp (not wet) cloth. Do not use an aerosol directly on the display screen because over-spraying may cause electrical shock.
- When cleaning the product, unplug the power cord and scrub gently with a soft cloth to prevent scratching. Do not clean with a wet cloth or spray water or other liquids directly onto the product. An electric shock may occur. (Do not use chemicals such as benzene, paint thinners or alcohol)
- Spray water onto a soft cloth 2 to 4 times, and use it to clean the front frame; wipe in one direction only. Too much moisture may cause staining.
flowchart
graph LR
    A["WATER"] --> B["Reinjection"]
    B --> C["Filter"]
    C --> D["Extraction"]
    D --> E["Chemical Detection"]
    E --> F["Output"]
On Repacking
- Do not throw away the carton and packing materials. They make an ideal container in which to transport the unit. When shipping the unit to another location, repack it in its original material.
MASA TË RËNDËSISHME PARAPRAKE
flowchart
graph LR
    A["VODA"] --> B["Tube with a brush"]
    B --> C["Tube with arrow pointing to the screen"]
    C --> D["Tube with arrow pointing to the screen"]
    D --> E["Chemikäle"]
Balení
flowchart
graph LR
    A["VAND"] --> B["Initial VAND"]
    B --> C["Table with monitor"]
    C --> D["Monitor with KEMIKALIER"]
    D --> E["Output"]
Ompakning
flowchart
graph TD
    A["AGUA"] --> B["Injection"]
    B --> C["Image with magnified inset"]
    C --> D["Imaging with probe"]
    D --> E["Teaching screen"]
    E --> F["Quimicos"]
    F --> G["Output"]
    style A fill:#f9f,stroke:#333
    style G fill:#ccf,stroke:#333
Volver a embalar
flowchart
graph LR
    A["NEPO"] --> B["Close-up of device"]
    B --> C["Monitor with magnified view"]
    C --> D["Monitor with arrow indicating detection"]
    D --> E["XHMIKA"]
flowchart
graph LR
    A["ACQUA"] --> B["Injection"]
    B --> C["Chimeric Drug Use"]
    C --> D["Chimeric Products"]
    D --> E["Output"]
Imballaggio
flowchart
graph LR
    A["Hand applying dye"] --> B["Sample with sample"]
    B --> C["Device with sample"]
    C --> D["Table with monitor"]
    D --> E["Chemicals without chemical detection"]
Қайта орау кезінде
flowchart
graph LR
    A["Üdens"] --> B["Device with sensor"]
    B --> C["Patient with magnified inset"]
    C --> D["Treatment: Handheld device"]
    D --> E["Monitor with screen"]
    E --> F["Monitor with arrow"]
    F --> G["Monitor with arrow"]
    G --> H["Monitor with arrow"]
    H --> I["Kimikālijas"]
Par iepakojumu
flowchart
graph LR
    A["VANDENS"] --> B["Input: tissue injection"]
    B --> C["Image with magnified device"]
    C --> D["Treatment with hand near monitor"]
    D --> E["Output: Chemical sample with no chemical reaction"]
    E --> F["Product delivery"]
flowchart
graph LR
    A["WATER"] --> B["Gas washing"]
    B --> C["Device with magnified glass"]
    C --> D["Reaction with arrow"]
    D --> E["Chemical reaction with product"]
    E --> F["Output"]
Opnieuw inpakken
flowchart
graph LR
    A["VANN"] --> B["Device with probe"]
    B --> C["Interaction with monitor"]
    C --> D["KJEMIKALIER"]
    D --> E["Monitor with arrows indicating direction"]
Innpakking
- Ikke kast kartongen og/eller pakkematerialet. De er ideelle til innpakking hvis du skal transportere enheten senere. Når du skal sende enheten et sted, pakker du den inn i originalinnpakningen.
WAŻNE ŚRODKI OSTROŻNOŚCI
flowchart
graph LR
    A["APA"] --> B["Tube with a pen and probe"]
    B --> C["Table with magnified view"]
    C --> D["Chemicals Detection"]
    D --> E["Output"]
flowchart
graph LR
    A["VOYA"] --> B["Device with food item"]
    B --> C["Device with food item"]
    C --> D["Device with food item"]
    D --> E["XEMIKALIJE"]
O raspakivanju
- Nemojte da bacite kartonsku kutiju i materijal za pakovanje. Oni su idealni za transportovanje proizvoda. Prilikom transporta proizvoda na drugu lokaciju, ponovo ga zapakujte pomoću originalnog materijala.
DÔLEŽITÉ BEZPEČNOSTNÉ OPATRENIA
flowchart
graph LR
    A["VATTEN"] --> B["Injection"]
    B --> C["Injection"]
    C --> D["Monitor with Injection"]
    D --> E["Monitor with Monitoring"]
    E --> F["KEMIKALIER"]
flowchart
graph LR
    A["SU"] --> B["Device placement"]
    B --> C["IV Care with KIMYASALLARI"]
    C --> D["Access to monitor"]
    D --> E["Access to monitor with device placement"]
    E --> F["Access to monitor with device placement"]
    F --> G["Access to monitor with device placement"]
MUHIM EHTIYOT CHORALARI
Shaxsiy shikastlanishlarning oldini olish:
- To'g'ri mahkamlanmagan bo'lsa, displeyni qiya tokchalarga o'rnatmang.
- Faqat ishlab chiqaruvchi tomonidan tavsiya qilingan tayanchlardan foydalaning.
- Mahsulot ustiga buyumlarni tashlamang yoki uni hech qanday ta'sir ostiga qo'ymang. Mahsulot ekraniga o'yinchoqlar yoki boshqa buyumlarni otmang. Bu odamlarning jarohatlanishi, mahsulot bilan bog'liq muammolar va displayyning shikastlanishiga olib kelishi mumkin.
flowchart
graph LR
    A["SUV"] --> B["Input: UV exposure"]
    B --> C["Monitor with magnified view"]
    C --> D["Display screen with arrow pointing inward"]
    D --> E["Output: kimyoviy detection"]
flowchart
graph LR
    A["ÁGUA"] --> B["Water injection"]
    B --> C["Monitor with liquid transfer"]
    C --> D["Monitor with liquid transfer"]
    D --> E["Químicos injection"]
Empacotamento
natural_image
Cartoon illustration of a computer monitor with a sad face and a 'no' symbol, next to a battery (no text or symbols on the monitor itself)natural_image
Cartoon illustration of a computer monitor with a smiling face and a money bag, no text or symbols presentnatural_image
Cartoon illustration of a computer monitor with a sad face and raised arms, resting on a rectangular block (no text or symbols)natural_image
Cartoon illustration of a computer monitor with a sad face and surrounding tools (no text or symbols)natural_image
Cartoon illustration of a computer monitor with an angry face and steam lines (no text or symbols)natural_image
Cartoon illustration of a computer monitor with a sad face and a phone emitting sound waves (no text or symbols)natural_image
Cartoon illustration of a person holding a document with a computer monitor displaying a sad face (no text or symbols present)natural_image
Cartoon illustration of a computer monitor with a sad face and smoke, symbolizing stress or urgency (no text or symbols present)natural_image
Illustration of a child kicking a soccer ball while a distressed computer character is running away (no text or symbols)natural_image
Cartoon illustration of a smiling computer monitor character standing on a grater (no text or symbols)natural_image
Cartoon illustration of a distressed computer monitor character with arms raised and winking (no text or symbols)natural_image
Cartoon illustration of a computer monitor with a sad face and waving hands, sitting at a desk (no text or symbols)natural_image
Illustration of a smiling house with wind turbines and solar panels, no text or symbols presentnatural_image
Cartoon illustration of a computer monitor holding a 'no sign' and a window with sun (no text or symbols on the monitor or window)natural_image
Illustration of a computer monitor displaying a cartoon character with motion lines (no text or symbols)natural_image
Illustration of a cartoon kettle and a computer monitor with a smiling face, emitting bubbles (no text or symbols)natural_image
Cartoon illustration of a smiling computer monitor with arms and legs, floating on a surface (no text or symbols)natural_image
Cartoon illustration of a toilet and computer monitor with a sad face (no text or symbols)natural_image
Cartoon illustration of a smiling smartphone with a gear and a hand holding a device (no text or symbols)정격 전압에서 사용하세요.
natural_image
Illustration of a cartoon electric plug emitting sound waves to a device with a surprised face (no text or symbols)natural_image
Cartoon illustration of a distressed computer monitor with a sad face and a cloud above, no text or symbols present.natural_image
Cartoon illustration of a hand holding a power outlet with a computer monitor showing a sad face, no text or symbols present.natural_image
Illustration of a hand holding a small electronic device with a smiling face and a red arrow indicating rotation (no text or symbols)natural_image
Illustration of a USB cable connector with a red arrow indicating compression or disassembly (no text or symbols)natural_image
Coiled cable and electronic device with LG logo (no text or symbols on main subject)natural_image
Cartoon illustration of a smiling computer monitor with a phone connected to its right (no text or symbols)natural_image
Cartoon illustration of a smiling computer monitor with a phone connected to its right (no text or symbols)natural_image
Illustration of a person watching a whale on a computer monitor (no text or symbols present)natural_image
Illustration of a cartoon mouse pulling a smiling computer screen (no text or symbols)natural_image
Cartoon illustration of a computer monitor with a surprised face and a falling object (no text or symbols)natural_image
Cartoon illustration of a smiling computer monitor with hands reaching toward it, no text or symbols present.natural_image
Cartoon illustration of a smiling computer inside an open box (no text or symbols)natural_image
Illustration of two people holding a smiling computer monitor (no text or symbols present)natural_image
Cartoon illustration of a smiling computer monitor with a surprised expression (no text or symbols)natural_image
Cartoon illustration of a smiling computer monitor character with a paper airplane and speech bubble (no text or symbols)natural_image
Cartoon illustration of a baby and a man on a computer screen (no text or symbols)natural_image
Cartoon illustration of a computer monitor with a sad face and a red prohibition symbol, next to a window with water droplets (no text or symbols on main elements)물이 들어가거나 젖게하지 마세 요.
natural_image
Cartoon illustration of a sad face emerging from a smartphone with a thermometer and lightning bolts (no text or symbols)natural_image
Cartoon illustration of a computer monitor with a sad face and a warning symbol (no text or labels)natural_image
Illustration of a woman holding a cup with a smiley face beside a computer monitor (no text or symbols)natural_image
Cartoon illustration of a computer monitor displaying a sad face with an angry expression (no text or symbols)natural_image
Cartoon illustration of a smiling computer monitor holding a document (no text or symbols on the monitor or background)natural_image
Cartoon illustration of a smiling computer monitor with eyes closed and a hand pointing at it (no text or symbols)natural_image
Four cartoon-style computer monitors with smiling faces and curved arrows, each holding a hand (no text or symbols)natural_image
Cartoon illustration of a hand holding a spray bottle next to a computer monitor with an angry face, no text or symbols present.natural_image
Cartoon illustration of a smiling computer monitor with a smile and a desk lamp (no text or symbols)natural_image
Cartoon illustration of a man holding a paint can next to a computer monitor displaying a sad face (no text or symbols present)DDC is a communication channel over which the monitor automatically informs the host system (PC) about its capabilities.
DDC protocol
① DDC1/DDC2B
An uni-directional communication channel.
② DDC 2AB/DDC2B+/DDC2Bi
A bi-directional communication channel.
Note
- PC must support DDC functions to do this.
E-DDC (Enhanced DDC)
A protocol based on I²C and used on a bidirectional data channel between the display and host. This protocol accesses devices at I²C address of A0/A1 as well as the address 60. The 60 address is used as a segment register to allow larger amounts of data to be retrieved than is possible using DDC2B protocols. The protocol is compatible with DDC2B protocols.
DEUTSCH
DDC (Display Data Channel)
② DDC 2AB/DDC2B+/DDC2Bi
② DDC 2AB/DDC2B+/DDC2Bi
② DDC 2AB/DDC2B+/DDC2Bi
② DDC 2AB/DDC2B+/DDC2Bi
② DDC 2AB/DDC2B+/DDC2Bi
양방향 통신 채널.
주
② DDC 2AB/DDC2B+/DDC2Bi
双方向通信チャンネル。
注
② DDC 2AB/DDC2B+/DDC2Bi
Energy Saving Design
This program is designed to have computer equipment manufacturers build circuitry into their products to reduce power consumption when it is not in operation.
When this monitor is used with a PC on which a screen blanking software complying with the VESA Display Power Management Signalling (DPMS) Protocol is installed, it can conserve significant energy by reducing power consumption when it is not in operation.
There are 2 signal lines, 3 modes of operation.
: On Mode, Sleep Mode, Off Mode.
| Mode Definition | |
| On mode | The normal operation.When the monitor is on mode, being connected to a power source, it displays an image. |
| Sleep Mode | The reduced power state returns to on mode when the user moves the mouse or presses a key on the keyboard. |
| Off Mode | The lowest power consumption state returns to on mode when the user pushes a power switch. |
Note
- The energy saving Design monitors only work while connected to the computers that have energy saving features.
Programa de economia de energia
Mode activé (On), mode de veille (Sleep), mode désactivé (Off).
Unplug the monitor from the wall outlet and refer servicing to qualified service personnel when :
- The power cord or plug is damaged or frayed.
• Liquid has been spilled into the monitor. - The monitor has been exposed to rain or water.
- The monitor does not operate normally following the operating instructions. Adjust only those controls that are covered in the operating instructions. An improper adjustment of other controls may result in damage and often requires extensive work by a qualified technician to restore the monitor to normal operation.
- The monitor has been dropped or the cabinet has been damaged.
- The monitor exhibits a distinct change in performance.
- Snapping or popping from the monitor is continuous or frequent while the monitor is operating. It is normal for some monitors to make occasional sounds when being turned on or off, or when changing video modes.
Do not attempt to service the monitor yourself, as opening or removing covers may expose you to dangerous voltage or other hazards. Refer all servicing to qualified service personnel.