F7MSPD30S1 - Oven Fulgor Milano - Free user manual and instructions
Find the device manual for free F7MSPD30S1 Fulgor Milano in PDF.

| Brand | Fulgor Milano |
| Model | F7MSPD30S1 |
| Product Type | Built-in multifunction microwave oven |
| Dimensions (W x H x D) | 762 x 457 x 560 mm (30" x 18" x 22") |
| Weight | Approximately 45 kg |
| Power Supply | 120/240 V ~ 60 Hz, 3400 W |
| Microwave Power | 900 W |
| Grill Power | 1500 W |
| Convection Power | 1500 W |
| Cooking Functions | Traditional cooking, microwave, grill, convection, airfry, defrost, programmed recipes |
| Oven Capacity | Approximately 60 L |
| Cavity Material | Stainless steel with antibacterial coating |
| Control Type | Touch electronic with LCD screen |
| Special Functions | Timer, key lock, preheat, timed cooking, demo mode |
| Care and Cleaning | Manual cleaning with soft cloth, no steam cleaner, regular cleaning of seals |
| Safety | Child safety lock, door closure system, automatic stop in case of error |
| Spare Parts and Repairability | Repair by qualified technician, parts available via after-sales service |
| General Information | User manual in French, 112 pages, manufacturer's warranty |
Frequently Asked Questions - F7MSPD30S1 Fulgor Milano
Make sure the door is closed.
Test an empty dish for 30 seconds at full power: if it gets hot, do not use it.
AirFry crisps food with little oil.
The maximum time is 12 hours.
User questions about F7MSPD30S1 Fulgor Milano
0 question about this device. Answer the ones you know or ask your own.
Ask a new question about this device
Download the instructions for your Oven in PDF format for free! Find your manual F7MSPD30S1 - Fulgor Milano and take your electronic device back in hand. On this page are published all the documents necessary for the use of your device. F7MSPD30S1 by Fulgor Milano.
USER MANUAL F7MSPD30S1 Fulgor Milano
natural_image
Simple geometric diagram with a black rectangle inside a larger rectangle (no text or symbols)F6PSPD30**
F7DSPD30**
F7MSPD24**
F7MSPD30**
MICROWAVE OVEN
FOUR A MICRO-ONDES
HORNO MICROONDAS
EN INSTRUCTIONS FOR INSTALLATION AND USE
FR INSTRUCTIONS POUR L'INSTALLATION ET L'UTILISATION
- Do not attempt to operate this microwave oven with the door open since open-door operation can result in harmful exposure to microwave energy. It is important not to defeat or tamper with the safety interlocks.
- Do not place any object between the microwave oven front face and the door or allow soil or cleaner residue to accumulate on sealing surfaces.
- Do not operate the microwave oven if it is damaged. It is particularly important that the microwave oven door close properly and that there is no damage to the: (1) door (bent), (2) hinges and latches (broken or loosened), (3) door seals and sealing surfaces.
• The microwave oven should not be adjusted or repaired by anyone except properly qualified service personnel.
TABLE OF CONTENTS PAGE
1 -Warnings for Microwave Ovens 5
Food preparation 5
Pots and pans 5
Microwave power and duration 5
Packaging 5
Beverages 5
Foods for newborns 5
Foods with skin or peel 6
Drying foods 6
Oil 6
Causes of damage 6
First use 8
Assembling and disassembling the flat grill 8
Maintenance 9
Caring for Microwave Oven 9
Respect for the environment 9
2 -The Control Panel 10
Keypad 10
The Control Panel 10
3 -General Oven Information 11
Error codes 11
Beeps 11
Default Settings 11
F Failure Number Codes 11
Preheat 11
Locking the keyboard 11
Timer 11
4 -General Oven Tips 12
Preheating the Oven 12
Operational Suggestions 12
Operation with microwaves 12
Oven Condensation and Temperature 12
High Altitude Baking 12
5 -Getting Started 13
Instructions for initial switch-on 13
6 -User Settings 14
Language 14
Temperature & Weight 14
Time 14
Date 15
Brightness 15
TABLE OF CONTENTS PAGE
Volume 15
7 -System Setting 16
Event Log 16
Demo 16
8 -Starting Your Oven 17
Switching the oven on and off 17
Cooking Mode Tables 18
9 -Traditional Cooking 19
Changing the cooking mode 19
Changing temperature 19
Cooking mode quick menu 19
Pre-heating phase 19
10 -Time Oven Mode Operation 20
Cook Time 20
Stop Time 20
11 -Microwave Cooking 21
Timed Defrost Function 21
Weight Defrost Function 21
Microwave Function 21
Microwave + Grill Function 22
Microwave + Ring Function 22
During cooking 23
Changing Power Level (Watts) 23
Changing Time 23
Changing Temperature 23
Changing Weight 23
12 -Using Oven Lights 24
13 -Recipes 25
14 -For the Installer 27
Introduction 32
Tools you will need 32
Packaging 32
Power requirements 32
Choosing oven location 32
Steps for installation 32
3-Wire branch circuit (for US only) 33
4-Wire branch circuit (for US and CANADA) 33
15 -Solving Traditional Baking Problems 34
16 -Solving Operational Problems 35
17 - Assistance or Service 36
Service Data Record 36
Dear Customer,
We would like to thank you and congratulate you on your choice.
This new product has been carefully designed and built using top quality materials, and meticulously tested to ensure that it meets all your culinary requirements.
Please read and observe these simple instructions, which will enable you to achieve excellent results
from the very first time you use it.
This state-of-the-art appliance comes to you with our very best wishes.

IMPORTANT SAFETY INSTRUCTIONS
SAVE THESE INSTRUCTIONS


WARNING
NOTICE PACEMAKERS
Most pacemakers are shielded from interference from electronic products, including microwaves.
However, patients with pacemakers may wish to consult their physicians if they have concerns.
When using electrical appliances, basic precautions should be followed, including the following:

WARNING
To reduce the risk of burns, electric shock, fire, injury to persons, or exposure to excessive microwave energy, carefully observe the following:

SAFETY PRECAUTIONS
- Read all instructions before using this appliance.
- Read and follow the specific precautions in the PRECAUTIONS TO AVOID POSSIBLE EXPOSURE TO EXCESSIVE MICROWAVE ENERGY previous page.
- Be sure your appliance is properly installed and grounded by a qualified technician in accordance with the provided installation instructions.
• Install or locate this appliance only in accordance with the provided installation instructions. - Some products such as whole eggs and sealed containers – for example, closed glass jars can potentially explode and should not be heated in this oven. Such use of the oven could result in injury.
- Do not mount this appliance over a sink.
- This oven is not approved or tested for marine use.
- Do not operate this appliance if it is not working properly or if it has been damaged or dropped.

SAFETY PRECAUTIONS
- As with any appliance, close supervision is necessary when used by children.
- Use this appliance only for its intended use as described in this manual.
- Do not use corrosive chemicals or vapors in this appliance.
- This oven is specifically designed to heat, dry or cook food, and is not intended for laboratory or industrial use.
- This appliance must only be serviced by qualified service personnel. Contact nearest authorized service facility for examination, repair or adjustment.
- Do not cover or block any openings on the appliance.
- Do not store this appliance outdoors. Do not use this near a swimming pool, near a sink or in similar locations.
- Do not immerse cord in water.
- Keep conduit away from heated surfaces
• See door surface cleaning instructions in the Care and Cleaning of the Oven section of this manual.
• To reduce the risk of fire in the oven cavity: - Do not overcook food. Carefully attend appliance when paper, plastic, or other combustible materials are placed inside the oven to facilitate cooking.
- Remove wire twist-ties from paper or plastic bags before placing bag in oven.
- If materials inside the oven ignite, keep oven door closed, turn oven off, and disconnect the power cord, or shut off power at the fuse or circuit breaker.
- Do not use the oven for storage purposes. Do not leave paper products, cooking utensils, or food in the cavity when not in use.

SAFETY PRECAUTIONS
- Liquids, such as water, coffee or tea, are able to be overheated beyond the boiling point without appearing to be boiling. Visible bubbling or boiling when the container is removed from the microwave oven is not always present. THIS COULD RESULT IN VERY HOT LIQUIDS SUDDENLY BOILING OVER WHEN THE CONTAINER IS DISTURBED OR A SPOON OR OTHER UTENSIL IS INSERTED INTO THE LIQUID
- HOT CONTENTS CAN CAUSE SEVERE BURNS. DO NOT ALLOW CHILDREN TO USE THE MICROWAVE.
- This appliance is not intended for use by persons (Including children) with reduced physical, sensory or mental capabilities, or lack of experience and knowledge, unless they have been given supervision or instruction concerning use of the appliance by a person responsible for their safety. Children should be supervised to ensure that they do not play with the appliance.
- Utensils should be checked to ensure that they are suitable for use in microwave ovens.
- When heating food in plastic or paper containers, check the oven frequently due to the possibility of ignition.
- If smoke is observed, switch off or turn off at circuit breaker and keep the door closed in order to stifle any flames.
- Microwave heating of beverages can result in delayed eruptive boiling, therefore care has to be taken when handling the container.
- The contents of feeding bottles and baby food jars are to be stirred or shaken and the temperature is to be checked before consumption, in order to avoid burns.
- Eggs in their shell and whole hard-boiled eggs shall not be heated in microwave ovens since they may explode.
- During use the appliance becomes hot. Care should be taken to avoid touching heating elements inside the oven.
- The appliance must not be installed behind a decorative door in order to avoid overheating.

WARNING
If the door or door seals are damaged, the oven must not be operated until it has been repaired by a qualified person.
It is hazardous for anyone other than a qualified person to carry out any service or repair operation which involves the removal of any cover which gives protection against exposure to microwave energy.
Liquids or other foods must not be heated in sealed containers since they are liable to explode.
Only allow children to use the oven without supervision when adequate instructions have been given so that the child is able to use the oven in a safe way and understands the hazards of improper use.
Accessible parts may become hot during use young children should be kept at a safe distance.
Ensure that the appliance is switched off before replacing the lamp to avoid the possibility of electric shock.
Lamp replacement requires a qualified service person to perform.

ARCING
Arcing can occur during both speedcooking and microwave cooking. If you see arcing, press the CANCEL/OFF pad and correct the problem.
Arcing is the microwave term for sparks in the oven. Arcing is caused by:
- Metal or foil touching the side of the oven.
- Metal cookware or the wire oven rack used during either speedcook or microwave cooking
- Metal, such as twist-ties, poultry pins, or gold rimmed dishes, in the oven.
- Recycled paper towels containing small metal pieces being used in the oven.

ATTENTION
THE FULL WIDTH RECTANGULAR WIRE RACK AND PAN ARE INTENDED FOR USE WITH CONVENTIONAL COOKING MODES ONLY.
DO NOT USE THESE ACCESSORIES WITH ANY OF THE MICROWAVE FUNCTIONS. DOING SO WILL CAUSE ARCING AND WILL DAMAGE THE INTERIOR OF YOUR APPLIANCE AND WILL CREATE A RISK OF FIRE.
THE ONLY INCLUDED ACCESSORY THAT MAY BE USED WITH MICROWAVE FUNCTIONS IS THE ROUND METAL WIRE STAND.

ATTENTION
- For detailed explanation for cleaning the gasket seals of the doors of the cavity and adjacent parts see MAINTENANCE paragraph.
- The oven must be cleaned periodically and all food residues must be removed.
- Failure to keep the oven clean could cause deterioration of the surfaces that could reduce the life of the appliance and cause dangerous conditions.

ATTENTION
- Do not use rough abrasives or sharp metal scrapers to clean the glass door of the oven because they could scratch the surface and cause the glass to shatter.
- Do not operate the oven without the turntable in place. The turntable must be unrestricted so it can turn.
- During and after use, do not touch, or let clothing or other flammable materials contact any interior area of the oven; allow sufficient time for cooling first.
- Do not use steam cleaners to clean the appliance.
SAVE THESE INSTRUCTIONS
Food preparation
Danger of fire!
Only use the microwave function for the preparation of food to be eaten.
Any other uses can be dangerous or cause damage.
For example, heated slippers or pillows filled with grain or cereals can catch fire even several hours after being heated in the microwave.
Pots and pans
Danger of injury!
Porcelain and ceramic crockery can have small holes in the handles and cover.
There can be cavities hidden behind these holes. If water gets into these cavities, the crockery could break.
Do not use crockery that is unsuitable for microwave ovens.
Danger of burns!
The heat of the food can heat the dish. Always use a pot holder to remove dishes and accessories from the cooking chamber.
Microwave power and duration
Danger of fire!
Never set values that are too high for the microwave power or the cooking time. The food could catch fire and damage the appliance. Follow the guidance in these instructions.
Packaging
Danger of fire!
Never heat food in thermal packaging.
Food in containers made of plastic, paper or other inflammable materials must be watched constantly.
Danger of burns!
Air-tight packaging can explode. Follow the instructions shown on the package. Always use a pot holder to remove dishes.
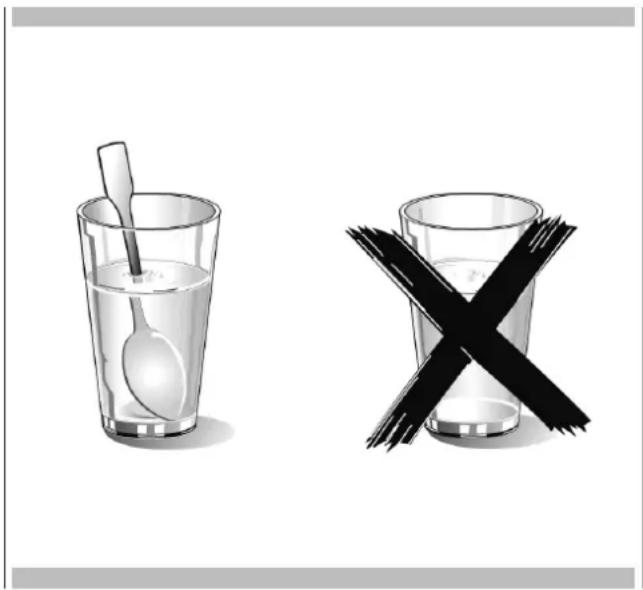
Beverages
Danger of burns!
When heating liquids, boiling can be delayed.
This means that the boiling temperature has been reached without forming the typical little steam bubbles. Even a slight knock can cause the sudden overflow of liquid or sprays.
When heating liquids, always put a spoon in the container to avoid delayed boiling.
Danger of explosion!
Never heat beverages or other types of food in covered containers.
Never heat alcoholic beverages excessively.
natural_image
Two glass bowls: one with a spoon inside, the other with a black X symbol crossed out (no text or labels)Foods for newborns
Danger of burns!
Never heat baby foods in a covered container. Always remove the cover or nipple.
When finished heating, always carefully shake or mix so that the heat is evenly distributed.
Test the temperature before giving the food to the baby.
Foods with skin or peel
Danger of burns!
Never cook eggs in the shell. Never heat hard-boiled eggs because they could explode even after the microwave is
turned off. This also goes for molluscs and crustaceans. In the case of fried eggs, first pierce the yolk. In the case of foods with a hard peel or skin like apples, tomatoes, potatoes or sausage, the food could explode due to the sealed nature of the skin. Pierce the peel or skin before cooking.
Drying foods
Danger of fire!
Never dry food using the microwave functions.
Foods with low water content Danger of fire!
Never defrost or heat foods with low water content, like bread, for too long or at an excessive power.
Oil
Danger of fire!
Never use the microwave to heat just oil.
Causes of damage
Juice leaking from fruit
When preparing sweets containing very juicy fruit, do not overfill the baking dish. Fruit juices that overflow the baking dish can leave indelible stains.
Technical breakdown
Never use enamelled baking dishes in the microwave because it could cause a technical breakdown.
Cooling with the door of the appliance open
The cooking chamber must only be cooled with the door closed. Check that nothing is stuck on the door of the appliance. Even if the door is only ajar, nearby cabinets can be damaged over time.
Very dirty gasket seal
If the gasket seal is very dirty, the door of the appliance does not close correctly during operation. The surfaces of nearby cabinets can be damaged. Always keep the gasket seal clean.
Using the door of the appliance as a support surface
Do not rest or lean on the open door of the appliance and do not put dishware or accessories on it.
Using the microwave without food in the chamber
Only turn on the microwave after you have put the food in the cooking chamber. Without food inside, the appliance can become overloaded. The only exception allowed are brief tests of dishware (in this regard, see the warnings about pots and pans).
Moist foods
Do not leave moist foods in the cooking chamber for extended periods of time.

IMPORTANT
The oven's identification plate is even accessible when the appliance is installed. This identification plate, which is visible when you open the door, shows all the information you will need when requesting parts or service for the appliance.
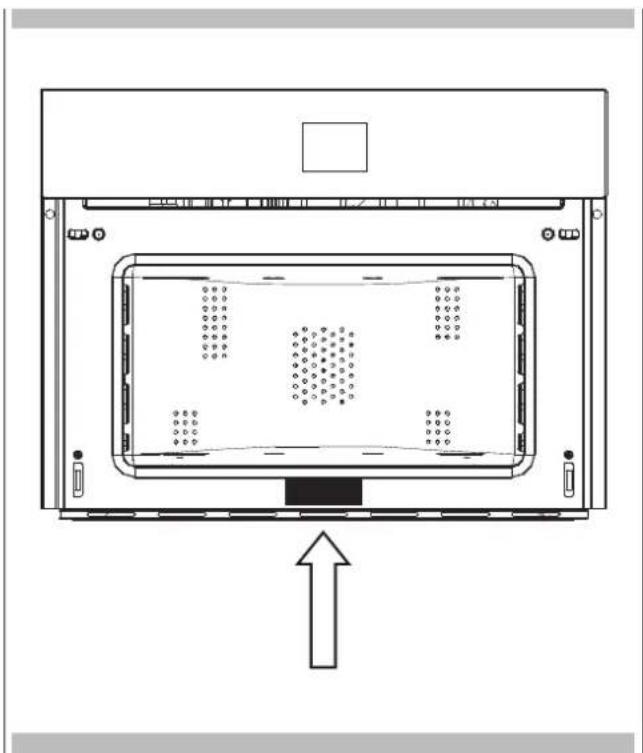
natural_image
Technical line drawing of a device interior with no visible text or symbolsNOTE: Alternatively, the rating label can be placed in the upper corner of the control panel.
First use
The oven should be thoroughly cleaned with soap and water and carefully rinsed.
Heat the oven for about 30 minutes at the maximum temperature; this eliminates all the residual manufacturing oils that could cause unpleasant odours during cooking. Use the circular plus fan function without accessories in the oven. Before using the accessories for the first time, clean them carefully with a very hot alkaline washing solution and a soft cloth.
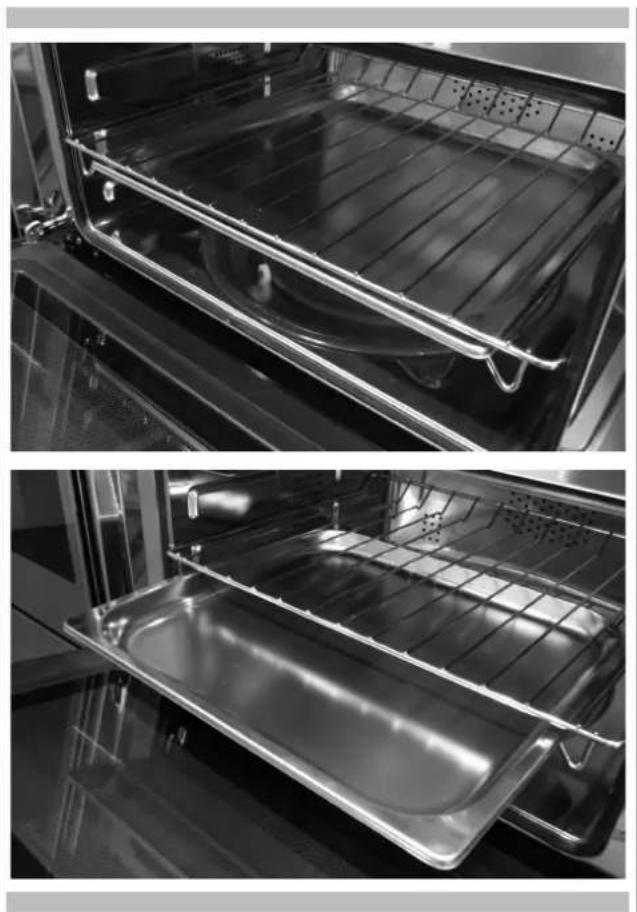
Assembling and disassembling the flat grill
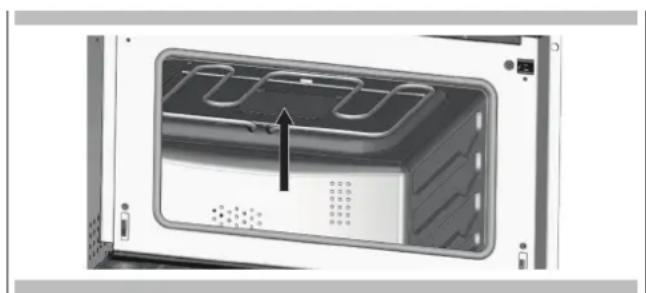
To remove the flat grill, pull the grill towards you until it stops and then lift, by tilting upwards, until it comes completely out.
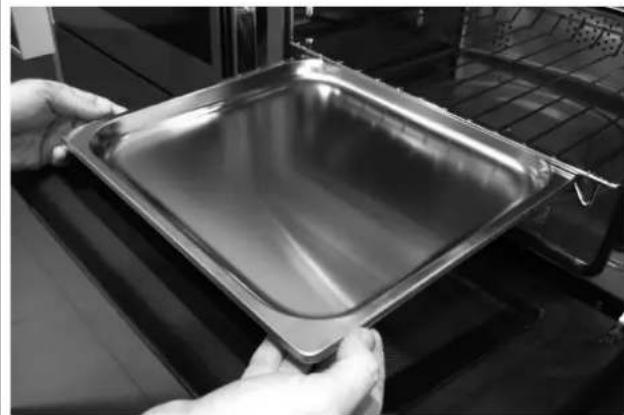
To put the flat grill back in, insert it at a 45-degree angle and then position it horizontally and push it all the way in to the end of the grill track. If the flat grill has a drip-pan (tray), to remove it, lift slightly and slide it towards you. To reinsert it, slide it back until it is correctly seated.
natural_image
Close-up of hands holding a square metal baking pan inside an oven (no text or symbols visible)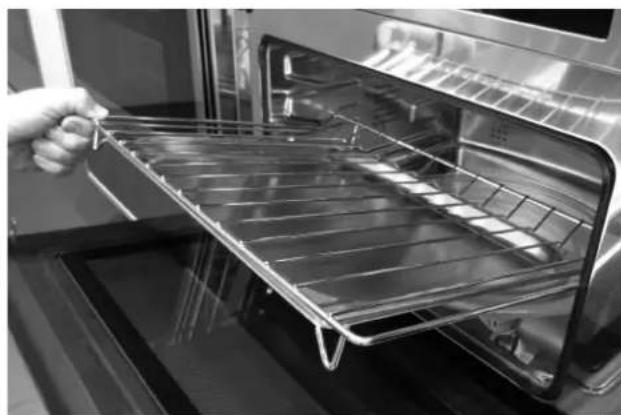
natural_image
Hand placing a metal tray into an oven (no text or symbols visible)
IMPORTANT
As a safety precaution, before cleaning the oven, it is recommended to turn off power to the unit at the breaker panel. In addition, avoid using overly acidic or alkaline substances such as lemon, vinegar, salt, tomatoes, etc.). Avoid using products containing chlorine, acids or abrasives. These units have stainless interiors.
MAINTENANCE
Caring for Microwave Oven
Any piece of equipment works better and lasts longer when maintained properly and kept clean. Cooking equipment is no exception. Your Microwave oven must be kept clean and maintained properly. Disconnect the power cord before cleaning or leave the door open to inactivate the oven during cleaning.
Exterior
The exterior should be wiped often with a soft damp cloth and polished with a soft dry cloth to maintain its beauty. There are also a variety of products designed especially for cleaning and shining the stainless exterior of the oven. We recommend that the cleaner be applied to a soft cloth and then carefully used on the stainless exterior rather than sprayed directly on to it.
Internal
Food spatters or spilled liquids stick to oven walls and between the seal and door surfaces. Although the oven interior has an antibacterial coating, it is best to wipe up spillovers with a damp cloth right away. Crumbs and spillovers will absorb microwave energy and lengthen cooking times and may even damage the oven. Use a damp cloth to wipe out crumbs that fall between the door and the frame. It is important to keep this area clean to assure a tight seal. Remove greasy spatters with a soapy cloth then rinse and dry. Do not use harsh detergent or abrasive cleaners.
Door Seal
The door and door seals should be kept clean. Use only warm, soapy water, rinse then dry thoroughly. DO NOT USE ABRASIVE MATERIALS, SUCH AS CLEANING POWDERS OR STEEL AND PLASTIC PADS. Metal parts will be easier to maintain if wiped frequently with a damp cloth.
Waveguide Cover
ATTENTION The waveguide cover, located on the inside top of the Microwave area, is made from mica, so it requires special care. Keep the waveguide cover clean to assure good microwave performance. Carefully wipe with a soft damp cloth any food spatters from the surface of the cover immediately after they occur. Built-up splashes may overheat and cause smoke or possibly catch fire.
Do not remove the waveguide cover.
natural_image
Interior view of a microwave oven with ventilation slots and a black arrow indicating airflow direction (no text or symbols)Respect for the environment
The documentation for this appliance is printed on paper bleached without chlorine or recycled paper to contribute to protecting the environment. The packaging was designed to prevent damage to the environment; they are ecological products that can be recovered or recycled.
Recycling the packing saves raw materials and reduces the volume of industrial and domestic waste.
natural_image
Recycling symbol composed of four arrows forming a circle, no text or labels presentTHE PACKING MATERIAL is 100% recyclable and marked with the recycling symbol. Dispose of in conformity with local law. The packing material (plastic bags, polystyrene parts, etc.) must be kept out of the reach of children because it is potentially dangerous.
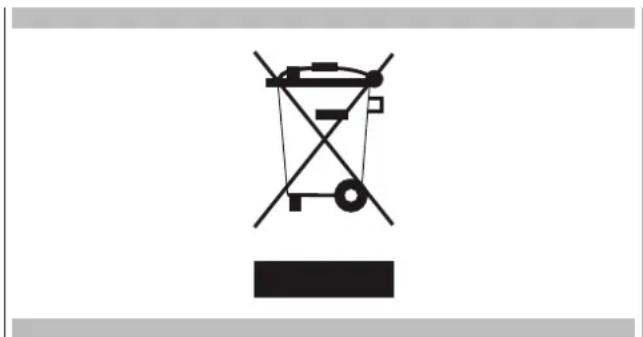
By making sure that this product is disposed of correctly, the user contributes to preventing potential negative consequences for the environment and health.
THE SYMBOL on the product or accompanying documentation indicates that this product must not be treated as domestic waste but must be delivered to a suitable collection point for the recycling of electrical and electronic equipment.
natural_image
Pure electrical circuit lines without any symbolsDISPOSAL MUST BE MADE in conformity with local laws on waste disposal.
FOR ADDITIONAL INFORMATION about the treatment, recovery and recycling of this product, contact the local office of competence, the domestic waste collection service or the store where the product was purchased.
EN 2 - The Control Panel
Your appliance could vary slightly compared to the illustrations below.
A - Function keypad
B - Display screen
C - Shortcut keypad (Professional models)
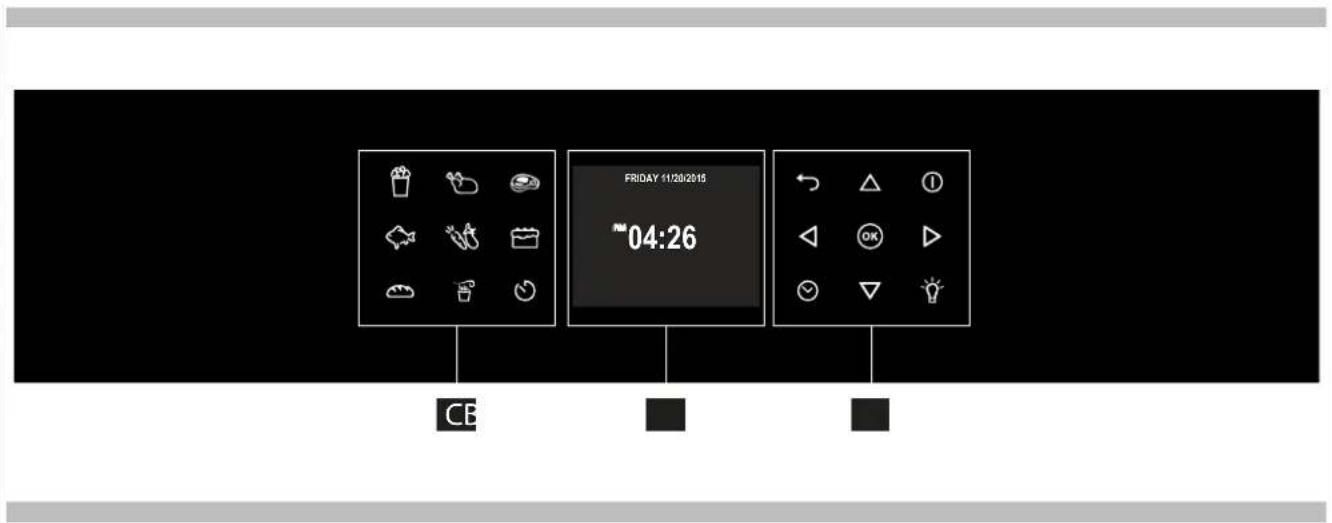
Keypad
To operate the key, touch gently. The keypad will not work if more than one key is pressed at the same time.
| - Movement arrows | |
| - To set the timer.- Enter the functions menu during cooking. | |
| - Switches the inner oven light on and off. The light cannot be switched on during the self-cleaning cycle. | |
| - Switches the oven on and off. | |
| - Confirms the settings and starts cooking operations. When pressed during a cooking operation, the function is placed in pause. Press again to restart. | |
| - Return to previous display page. Keep pressed to return to Home page |
The Control Panel
| MultifunctionMicrowaves | |
| Cooking mode quick menu | |
| AIRFRY or KEYLOCK(depends on model) | |
| Timer | |
Before using your oven for the first time remove all packing and foreign materials from the oven(s). Any material of this sort left inside may melt or burn when the appliance is used.
Error codes
This code appears in the event of the electronic control indicating a fault. When the error appears, the current function is blocked. If the type of error is related to a safety function, the oven becomes unusable and every time a start attempt is made, the same error appears (in which case call in the after-sales service), while if the error relates to a minor fault, after being restarted the oven can be used for the functions that do not involve the faulty part (e.g., a heating element).
Beeps
Confirms that the command has been received after a key has been pressed.
It also indicates that a time function has been completed (e.g. Timer or Timed Cooking). During the execution of a recipe, an acoustic signal warns the user that the oven is waiting for operation by the user (e.g., insert the dish or turn it over).
Beeps also signal an oven fault.
Default Settings
The cooking modes automatically select a suitable temperature when the cooking mode is selected, these can be changed when a different one is needed.
F Failure Number Codes
These codes are displayed when the electronic control detects a problem in the oven or in the electronics.
The error code is recorded in the Error Log in the Setup menu. This error can be communicated to the service technician so they can understand the possible cause of the problem in advance.
Preheat
Whenever a cooking mode is set and the oven is heating, the preheating starts, during this period, the current temperature is displayed together with the thermometer icon.
As soon as the 100% is reached, the control sounds an "end of preheat" tone and the current temperature value disappears.
Locking the keyboard
Hold the key for 3 seconds. Commands are now locked and a "Key icon" will be displayed.
Repeat the same operation for 3 seconds to unlock the keyboard.
NOTE: The power off operation is always available.
Timer

WARNING
The timer on your oven does not turn the appliance on or off, its only purpose is to alert you through the buzzer. When you want to turn off the oven automatically, use the end-of-cooking or delayed cooking function.
NOTE: Pressing the OFF button does not reset or stop the timer.
- Press the button √ and set the desired time using the arrows △ and confirm with the button . ☑ switch the selection between hours and minutes use the arrows ◀ ▶
- The time can be set from 1 minute to 12 hours and 59 minutes and, when set, the remaining time is always visible in the bottom status bar until the time expires or is reset.
- To change or cancel the time set, you must reset the timer by pressing and holding the button for a few seconds.
- Timer format when setting and counting down is HR:MIN with countdown timer display, switching into MIN:SEC during the last minute.
- When the time expires, the display shows 00:00 and the buzzer will sound for one minute or until the button is pressed.
Preheating the Oven
- Selecting a higher temperature does not shorten the preheat time.
- Preheating is necessary for good results when baking cakes, cookies, pastry and breads.
• Preheating will help to sear roasts and seal in meat juices. - Place oven racks in their proper position before preheating.
- During preheating, the selected cooking temperature is always displayed.
- A beep will confirm that the oven is preheated and the "current temperature" display will turn off.
Operational Suggestions
- Do not set pans on the open oven door.
- Use the interior oven lights to view the food through the oven door window rather than opening the door frequently.
Operation with microwaves
The microwaves are transformed into heat inside foods. The microwave oven can be used by itself or in combination with other types of heating. This section contains information about the dishware and instructions for setting the microwave oven.
WARNINGS FOR DISHWARE
Suitable dishware
You can use heat-resistant dishware made of glass, glass ceramic, porcelain, ceramic or refractory plastics. These materials are permeable to microwaves.
It is also possible to use normal plates. In this way, it won't be necessary to transfer the food.
Dishware with gold or silver decorations can only be used if the manufacture guarantees that they can be used in microwave ovens. Remember that, when using the oven in microwave mode, the dish must be placed on the rotating plate.
When using the oven in combination mode, it is preferable to place the dish to be cooked on the low, round grill, supported so that it is centred on the rotating plate.
Unsuitable dishware
Metal dishware cannot be used.
Metal is not permeable to microwaves. Food in metal containers will remain cold.
Warning! Metal components, such as spoons in glasses, must stay at least 2 cm from the walls of the oven and the inside of the door. In fact, sparks could seriously damage the inside of the glass door.
Warning! The flat grill must be removed when using the microwave and combined modes. Use it only with traditional oven functions.
Testing dishware
Never turn on the microwave oven before you have put in the food. The only exception allowed is testing dishware.
If you unsure if your dishware can be used in the microwave oven, we recommend performing the following test:
place the empty pot in the appliance for 12 - 1 minute at the maximum power. Check the temperature. The pot must be cool or slightly warm to the touch. If it is hot or there are sparks, the pot is not suitable.
Oven Condensation and Temperature
- It is normal for a certain amount of moisture to evaporate from the food during any cooking process. The amount depends on the moisture content of the food. The moisture may condense on any surface cooler than the inside of the oven, such as the control panel.
- Your new oven has an electronic temperature sensor that allows maintaining an accurate temperature.
High Altitude Baking
- When cooking at high altitude, recipes and cooking time will vary from the standard.
Instructions for initial switch-on
Once the oven has been connected to the power supply for the first time, the control automatically prepares for setting a number of user settings, which remain stored in case of any subsequent power cycle.
- Language
• Temperature & Weight Units - Time
- Date
Refer to the USER SETTING paragraph for setting instructions.
After making the user settings, the control moves automatically to the "Standby" display page.

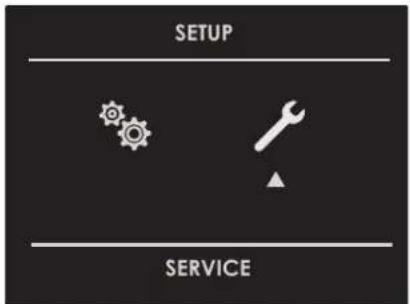
With the oven on, select the icon and confirm with the key to enter the SETTINGS menu. This menu permits personalizing the settings of your oven. To make access, no active cooking or any set time functions must be in progress.
NOTE: The Setting menù can never be set if any time function is already set: first delete all the active time functions.
- Press the keys ◀ to select the sub menu and confirm by means of the key.

- Use this menu to change the following settings: Press the keys to select the setting or change a sub menu from among the six available ones and confirm by means of the OK key.
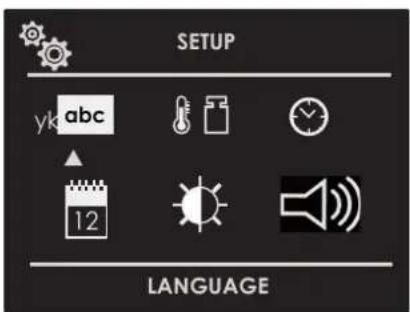
Language
Press the arrow key △ to select a language from among those available, and confirm with the dkey.

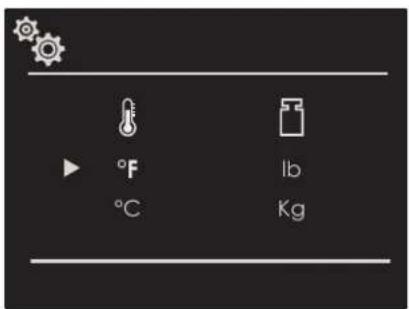
Temperature & Weight
Press the arrow key ◀ and to select one of the two temperature options "°C/°F" or weight options Kg/lb and confirm with the 🔊key.
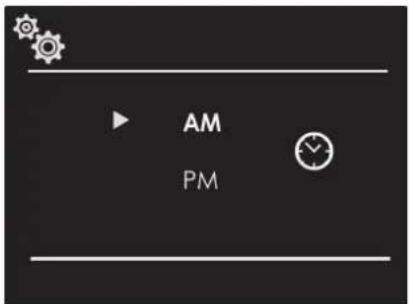
Time
Press the arrow key △ to select the time format between the options "12h AM/PM or 24h" and confirm with the okkey. Subsequently, set the time using the arrows △ and confirm with the okkey.


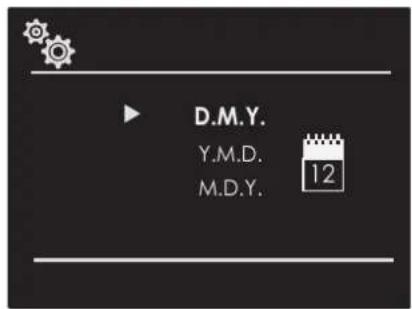
Date
Press the arrow key to select the date format from among the options "D.M.Y. - Y.M.D. - M.D.Y." and confirm with the okey. Subsequently set the value using the arrows and confirm with the dey.

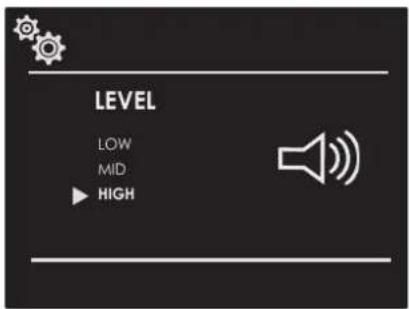
Volume
Press the arrow to select the desired volume level and confirm by pressing the key.
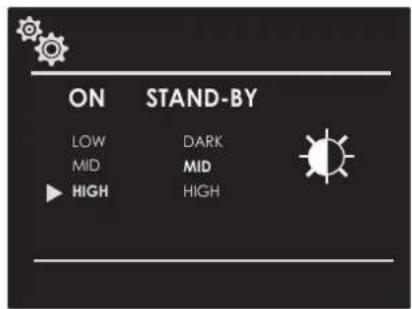
Brightness
Press the arrow key ◀ choose which luminosity setting to change between ON or STANDBY, then by means of the arrows △ select the required degree of luminosity and confirm with the OK key.
EN 7 - System Setting
With the oven on, select the icon and confirm with the key to enter the SETTINGS menu. This menu permits setting a number of parameters or special functions. It also permits accessing the error events list.
- Press the keys ◀ to select the sub menu and confirm with the Ⓞ key.
- Use this menu to change the following settings:
Press the keys △ ▽ to select the item to be set or to be displayed from among the three available ones and confirm with the OK key.
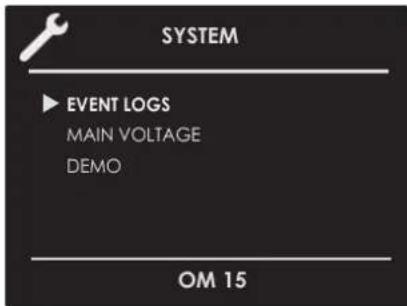
Event Log
The menu permits checking any recorded errors. These codes can be notified to the after-sales service.

Demo
The purpose of this function is to set the DEMO mode, which makes the oven useless for cooking but automatically performs a demonstration of functions.
- Press the keys ◀ to select the item ON.
- Confirm with the OK key.
- Press the Ⓐ key.
After about 30 seconds, the oven starts to operate in this mode.
To temporarily stop the DEMO function, simply keep any key pressed for a few seconds until the oven switches to standby. To start it again, press the Ⓓ key.
To disable the function, enter the DEMO display page and set OFF. Confirm using the OK key.
NOTE: Once set, the function remains enabled even if the oven is disconnected from the power mains.
NOTE: MAIN VOLTAGE will be a ghosted / greyed-out option if it is not applicable to your product
Switching the oven on and off

IMPORTANT
• The key does not stop the function.
• After switching off the oven, the cooling fan could continue to operate until the inner parts of the oven have cooled down.
• The microwave oven will also turn off when the door is opened. Close the door and touch the OK keypad to resume the cycle.
Press ① to switch the oven on and press again to switch it off. The oven returns to standby mode.
Multifunction Oven
Traditional Cooking


Microwave Cooking


TRUE CONVECTION (FAN HEAT)
RING & GRILL (FAN HEAT & GRILL)
CONVECTION BROIL (TURBO CONVECTIONAL HEAT
BROIL (ECO GRILL)
AIRFRY (dedicated key)
DEFROST BY TIME
DEFROST BY WEIGHT
MICROWAVE COOKING
MICROWAVE AND GRILL
MICROWAVE AND RING (MICROWAVE AND FAN HEAT)
-
Select the icon 📋 and press the key Select the appropriate cooking mode according to the food to be cooked using the arrows ◀ and confirm with the key . OK
-
On this display page, it is still possible to change the cooking mode by using the ◀ keys.
-
If the proposed temperature is correct, confirm with the OK key to start cooking, otherwise, if the key is not pressed within 10 seconds, the oven switches to automatic mode and the cooking mode icon becomes animated.
Cooking Mode Tables
| Traditional Cooking | |||
| COOKING MODE ICON TEMPERATURE | Min. Preset Max. | ||
| TRUE CONVECTION(FAN HEAT) |  | 120°F (50°C) 330°F (165°C) 445°F (230°C) | |
| RING & GRILL(FAN HEAT & GRILL) |  | 120°F (50°C) 410°F (210°C) 445°F (230°C) | |
| CONVECTION BROIL(TURBO CONVECTIONAL HEAT) |  | 120°F (50°C) 330°F (165°C) 445°F (230°C) | |
| BROIL(ECO GRILL) |  | 120°F (50°C) 390°F (200°C) 390°F (200°C) | |
| AIRFRY |  | 300°F (150°C) 350°F (175°C) 445°F (230°C) | |
| Microwave Cooking | |||||||||||
| COOKING MODE | ICON | SET | WEIGHT | WATT | TEMPERATURE | ||||||
| Min. | Preset | Max. | Min. | Preset | Max. | Min. | Preset | Max. | |||
| DEFROST BY TIME |  | 150 W | |||||||||
| DEFROST BY WEIGHT |  | Bread | 100 g | 500 g | 600 g | 150 W | |||||
| Vegetable | 100 g | 500 g | 1000 g | 150 W | |||||||
| Meat | 100 g | 500 g | 1500 g | 150 W | |||||||
| Fish | 100 g | 500 g | 800 g | 150 W | |||||||
| MICROWAVE COOKING |  | 150 W | 900 W | 900 W | |||||||
| MICROWAVE AND GRILL |  | 150W | 150 W | 390°F (200°C) | |||||||
| 300W | 300 W | ||||||||||
| 450W | 450 W | ||||||||||
| MICROWAVE AND RING (MICROWAVE AND FAN HEAT) |  | 150W | 150 W | 120°F (50°C) | 210°F (100°C) | 390°F (200°C) | |||||
| 300W | 300 W | ||||||||||
| 450W | 450 W | ||||||||||
Changing the cooking mode
- During untimed cooking, a cooking pause can be set by pressing the key.
All the settings of the suspended cooking operation remain stored and can be reactivated by pressing the same key again.
- To change the cooking mode while the oven is working, press the key and then the , key.
At this point, another cooking mode can be selected from among those available in the group by means of the arrows ◀ ▷
Changing temperature

IMPORTANT
- At the end of a function, the display screen shows the residual compartment heat temperature from the standby page.
- From the cooking mode preview display page, the temperature can be changed by means of the arrows △ subsequently confirming by means of the key.
- Once cooking has started, the temperature can in any case be changed, at any time, by means of the arrows
Cooking mode quick menu (Professional model)
The quick menu function allows you to rapidly select the most suitable cooking modes for the type of dish you want to cook.
| MAIN COURSES |  |  |  | |
| POULTRY |  |  | ||
| MEAT |  |  | ||
| FISH |  |  | ||
| VEGETABLES |  |  | ||
| DESSERTS |  |  | ||
| BREAD/PIZZA |  |  | ||
| POPCORN |  |  | ||
| MUG |  | | ||
| MUG DOUBLE |  |
Pre-heating phase
While the oven is in pre-heating phase, the current temperature is displayed underneath the cooking mode icon.
Just as soon as the set temperature is reached, an acoustic signal is heard and the current temperature indication disappears.
EN 10 - Time Oven Mode Operation
Be sure that the time-of-day clock is set to the correct time. The timed mode turns off the oven at the end of the cook time.

CAUTION
Never leave food in the oven for more than one hour before and after cooking. This could deteriorate the properties of the food itself.
NOTE: The maximum cooking time that can be set is 12 h.
Cook Time
Use the "Cook Time" function to operate the oven for a determinate period of time. The oven starts immediately and switches off automatically once the time has expired.
To Set a Timed Mode
- Select the cooking mode and temperature.
- There are two ways to set the function.
a) Select 📋 to set the duration and press Ⓞk
b) Select 📋 to set the stop time and press OK - After selecting one of the two above options, set the time by means of the arrows and confirm with the key
-
After pressing the OK key, cooking starts and the time cooking information is shown on the display page.
-
Cooking mode
- Temperature
- Cooking time
• End of cooking time
5 After cooking, the oven switches off and an acoustic signal warns that cooking has terminated.
To change the cooking time when the oven is already operating, simply press the ⬤ key and enter the new cooking time before pressing the ⏻ key again.
Stop Time
Use the "Stop Time" function to delay the start of timed cooking. Enter the cooking stop time and the oven will automatically calculate the start time. The oven switches on and off automatically.
NOTE : Delayed cooking is disabled in the RING & GRILL, CONVECTION BROIL and BROIL functions
To Delay the Start of a Timed Mode
1 First of all set the required timed cooking as indicated in the "COOK TIME" paragraph.
2 Select 📋 to set the stop time and press OK
3 Set the cooking stop time by means the arrows and confirm by means of the key.
4 After pressing the Ⓞ key, the function positions in standby and the postponed cooking details are shown on the screen.
- Cooking mode
- Temperature
- Cooking stop time
- Cooking start time
After cooking, the oven switches off and an acoustic signal warns that cooking has terminated.
To change the cooking time and stop time when the oven is already operating, simply press the key and enter the new cooking time or cooking stop time and press the key again.
NOTE: it is essential to carefully read the instructions and warnings to ensure correct use.

ATTENTION
Microwave functions will not start until the door has been closed. If the door is opened while the oven is on, the oven will go into pause mode and the message "DOOR OPEN" will appear on the display.
To restart the function, the door needs to be closed.
The function can be paused at any time using the key OK, when it is pressed again the function resumes.

Timed Defrost Function
Select the timed defrost icon using the arrows and press the key ⑨ then set the thawing time using the arrows △ and ▽
To start the function press the key OK
Once the function has been started, a countdown will be shown on the display. The time can be changed at any time using the arrows and
When the timer expires, the message "DEFROSTING FINISHED" will appear on the display.

Weight Defrost Function
Select the weight defrost icon using the arrows and press the key OK.
Select the type of meal using the arrows and then set the weight using the arrows and finally start defrost using the key OK
Following are types of meals and relative weights that can be set:
| MEAL | MIN Weight (g) | MAX Weight (g) | |
 | Bread Pizza Pasta Dishes | 100 600 | |
 | Vegetables 100 1000 | ||
 | Meat 100 1500 | ||
 | Seafood 100 800 | ||
The defrost time is calculated completely automatically and without needing to set any time parameters, based on the set type of meal and weight.
When defrost is complete, the message DEFROSTING FINISHED will appear on the display.

Microwave Function
Select the Microwave function icon using the arrows and press the key OK
If you wish to start the function immediately with a preset time of 30 sec and a preset output of 900W, press the key OK
If you wish to adjust the time and power level, open the sub-menu managed as follows:
• TIME: Select the icon adjust the time.
Time and use the keys △ and to
- MICROWAVE POWER: Select the icon and use the keys and to select the microwave power level setting from the 6 possible levels, 150W - 300W - 450W - 600W - 750W - 900W.
Once the new parameters have been set, press the key OK to start cooking.
Once cooking has started, a countdown will be shown on the display. The time can be changed at any time using the arrows △ and ▽
At the end of cooking, the message "END COOKING" will appear on the display and a tone will be emitted.

Microwave + Grill Function
Select the Microwave+Grill function icon using the arrows and press the key ① then set the thawing time using the arrows and . ▽
If you wish to start the function immediately with the preset time and a preset output of 300W, press the key OK
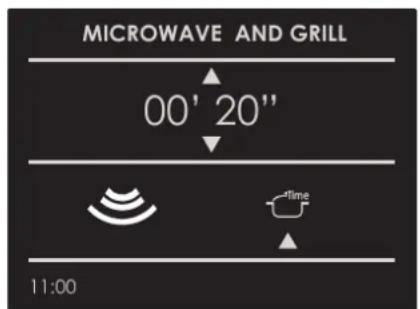
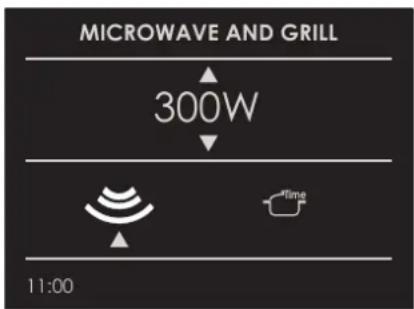
If you wish to adjust the power level, open the sub-menu managed as follows:
- MICROWAVE POWER: Select the icon and use the keys and to select the microwave output setting from the 3 possible levels, 150W - 300W - 450W.
Once the new parameter has been set, press the key OK to start cooking.
Once cooking has started, a countdown will be shown on the
display. The time can be changed at any time using the arrows and
At the end of cooking, the message "END COOKING" will appear on the display.

Microwave + Ring Function
Select the Microwave+Ring function icon using the arrows and press the key OK, then set the cooking time using the arrows △ and ▽
If you wish to start the function immediately with the preset time and temperature, with a preset microwave output of 300W, press the key OK
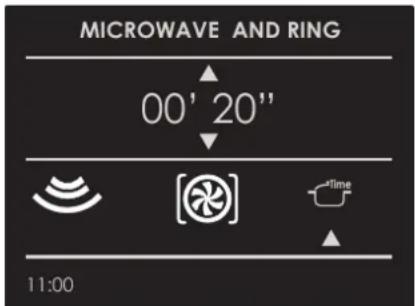
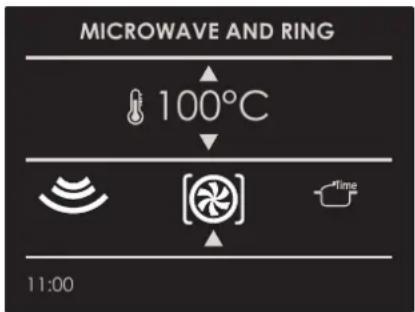
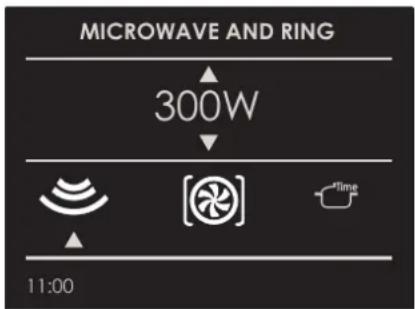
If you wish to adjust the temperature and power level, open the sub-menu managed as follows:
- TEMPERATURE: Select the icon Ⓞ and use the keys △ and ▽ to adjust the temperature between 120°F (50°C) and 390°F (200°C).
- MICROWAVE POWER: Select the icon and use the keys and to select the microwave power setting from the 3 possible levels, 150W - 300W - 450W.
Once the new parameters have been set, press the key Ⓞ to start cooking.
Once cooking has started, a countdown will be shown on the display. The time can be changed at any time using the arrows and
At the end of cooking, the message "END COOKING" will appear on the display.
During cooking Changing Power Level (Watts)
Press the icon 📊 and press the key Select the microwave icon and change the power wattage by means the arrows △ and confirm with the key ⚗K
Changing Time
Press the icon 📊ind press the key Select the time icon and change the time value by means the arrows △and confirm with the key OK
Changing Temperature
(only available for microwave and ring)
Press the icon 📊 and press the key Select the cooking mode icon and change the setting temperature by means the arrows △ ▽ and confirm with the key OK
Changing Weight
(only available for defrost by weight)
Press the icon 📊 and change the weight by means the arrows △ ▽ and confirm with the key OK
EN 12 - Using Oven Lights
A single light key activates the lights.
Touch 📞 turn lights on or off.
Oven lights turn on automatically when the door is opened.
When an oven is in use, oven lights turn on automatically when a mode is started.
Oven lights will turn off automatically when the oven mode is cancelled.
NOTE: Once switched on, even during cooking, the lights go off automatically after 3 minutes. To switch them back on, press the key or open the door.
The Recipe function of your oven gives you the chance to cook food without having to set the oven manually every time. By selecting a "SET" recipe, the cooking mode, the temperature and the time are automatically set according to the recipe selected from the menu.
| Recipe List Type of Food Food condition Recipes List Information displayed | ||||
| PRESET OR PERSONAL |  | FRESH | BREAD PIZZA FIRST | TYPE OF ACCESSORYLEVEL POSITIONFOOD WEIGHTCOOKING TIMEPREHEAT REQUIRED(YES/NO) |
| FROZEN | ||||
 | WHOLE | MEAT | ||
| IN PEICES | ||||
 | WHOLE | POULTRY | ||
| IN PEICES | ||||
 | WHOLE | FISH | ||
| IN PEICES | ||||
 | - | VEGETABLES | ||
| - | ||||
 | - | PIES | ||
| - | ||||
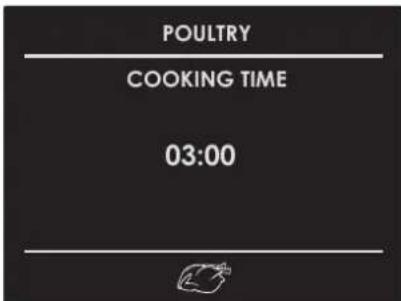
Select an already-set recipe:
- Switch the oven, select the icon 📋 and press the button . OK
- Using the arrows △ select the list between "PRESET" or "PERSONAL" and confirm by means of the okay.
- Choose the type of food to be cooked using the arrows △▽ and the arrows ◀ and confirm by means of the key
- Using the arrows △ choose between "FRESH" or "FROZEN" or in other cases between "WHOLE" or "IN PIECES" and confirm with the ☐key.
- Select the required recipe by means of the arrows △ and confirm using the okay.
- When the recipe is selected, the following display page appears on the screen:
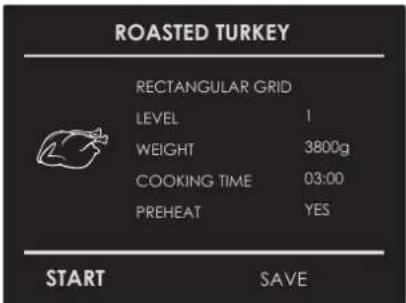
EN
- To start the recipe, confirm with the okay.
During a recipe, a number of acoustic and visual messages will ask you to perform the displayed operations. Simply follow the instructions on the screen.
- Upon completion, the oven switches off and an acoustic and visual signal warns that the recipe has completed.
Saving a personalized recipe:
Once a recipe has been selected, the "Time" and "Weight" setting can be changed and the recipe can be saved among the "PERSONAL" ones.
- Once a recipe has been selected, press the key △ and confirm by means of the □key.
- To change the weight, enter the desired weight by means of the arrows and confirm by means of the key
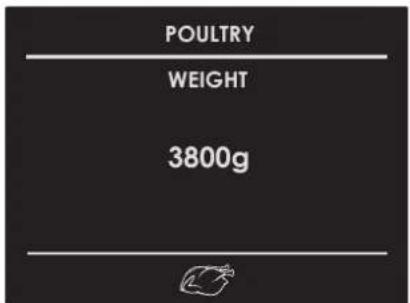
- The oven switches automatically to the cooking time. To change this time, use the arrows and confirm again by means of the clay.
- At this point, the recipe can be saved in the list of "PERSONAL" recipes by selecting "SAVE" and confirming by means of the OK key.

NOTE: If the time and weight values are changed and not saved straight away, at the end of the recipe, a message appears which asks whether you want to save it.
- To start the recipe press the okey.
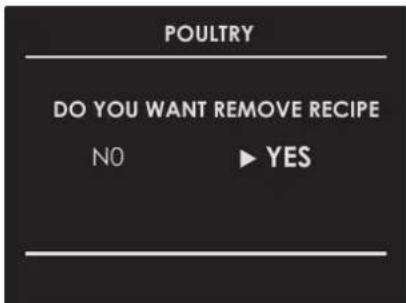
Cancelling a Personalized recipe:
- To eliminate a recipe from the list of personalized recipes, select the recipe.
- Press the key ◀ and select the choice and confirm with the Ⓞk key.
Air Fry Tips and Techniques
Air Fry is a unique cooking mode that is designed to produce foods with a crispier exterior than traditional oven cooking. Select Air Fry, then set the desired temperature and press Start. The temperature can be set between 300°F (150°C) and 445°F (230°C).
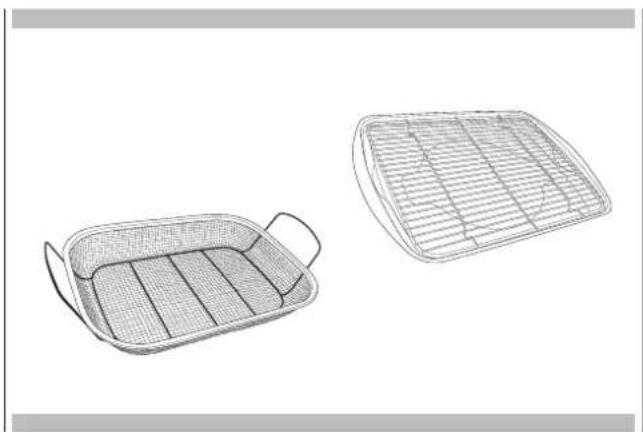
Air Fry Cookware Guidelines
- Only use broil safe cookware when using Air Fry mode.
-
Oven baking baskets and baking grids can also be used. A sheet pan should be placed on the rack below the foods to catch any drippings when using a baking basket.
-
The Air Fry mode is designed for cooking on a single rack.
- The Air Fry mode is designed to be used with oven preheating.
- Rack position 3 is recommended for most foods.
- When air frying foods with sauce, it is recommended to apply the sauce at the end of cooking.
- If foods are browning too quickly, try a lower rack position or lower oven set temperature.
- For packaged foods, use traditional oven cooking instructions for set temperature and expected cook time.
- It is not necessary to flip or stir food during cooking.
- Arrange food in a single layer on the pan, do not overload the pan.

natural_image
Line drawing of a square frame with rounded corners and a curved top edge (no text or symbols)Primary recommended cookware
natural_image
Line drawings of two woven baskets, one rectangular and one rectangular, with no text or symbols present.Alternate cookware options
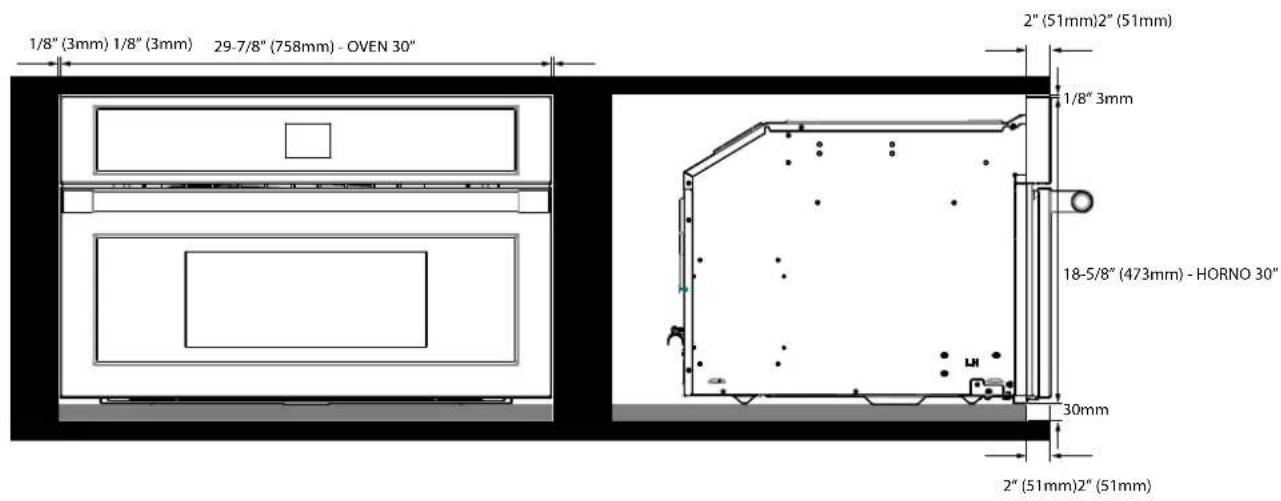
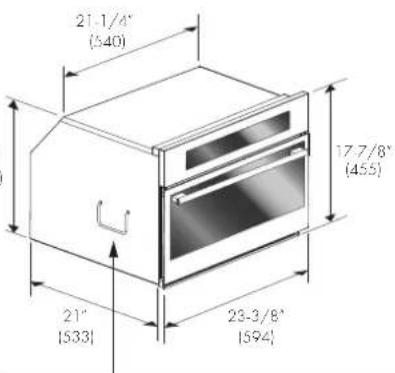
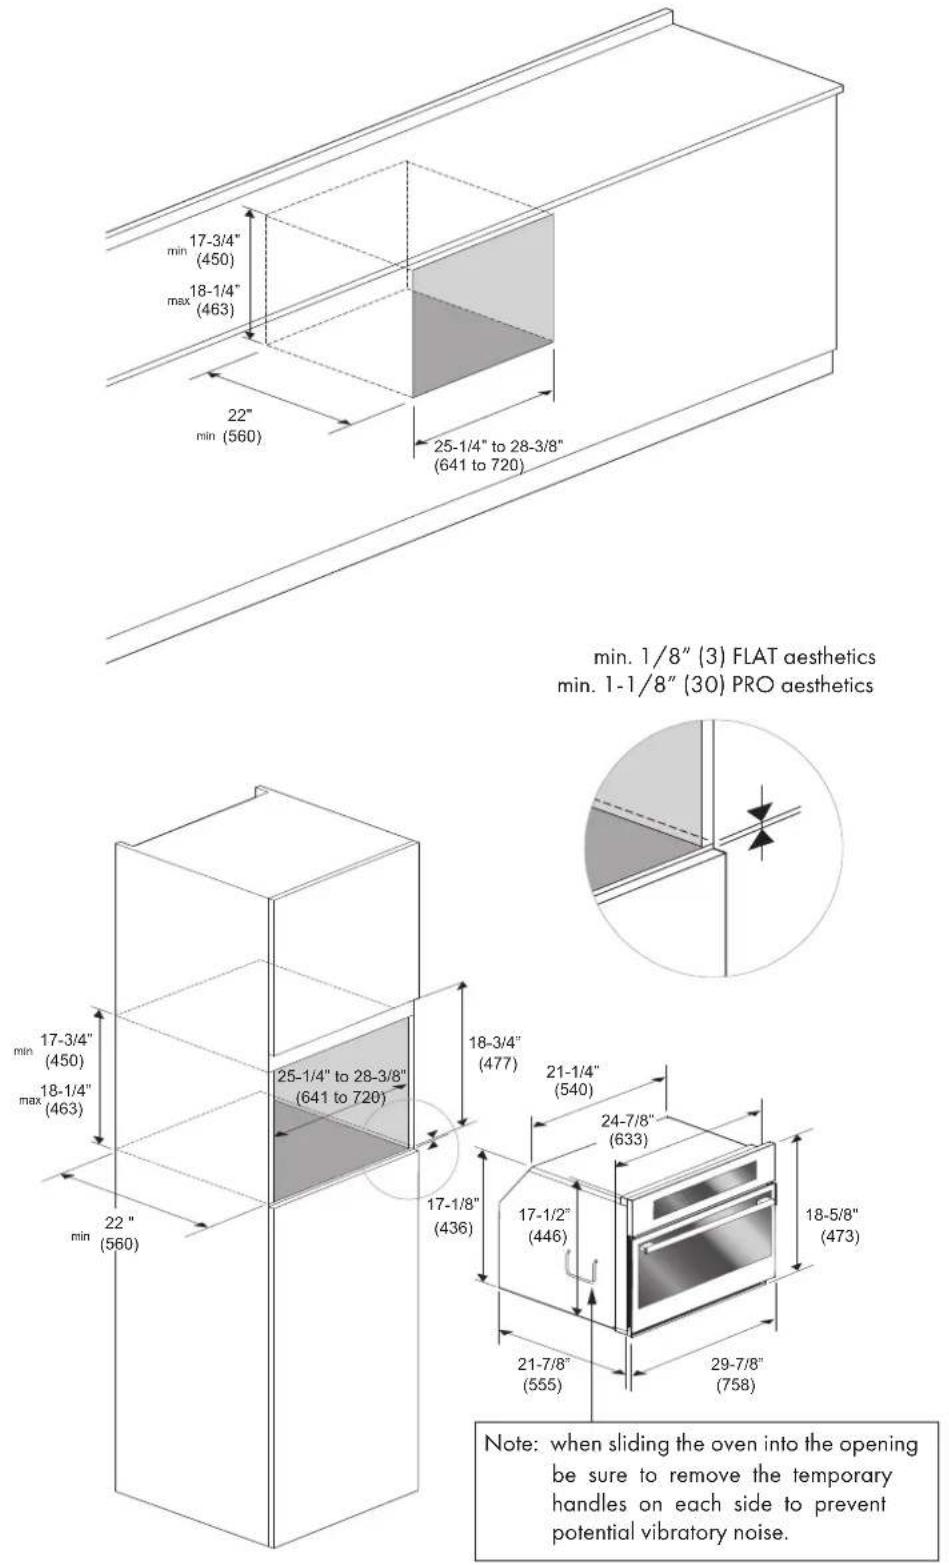
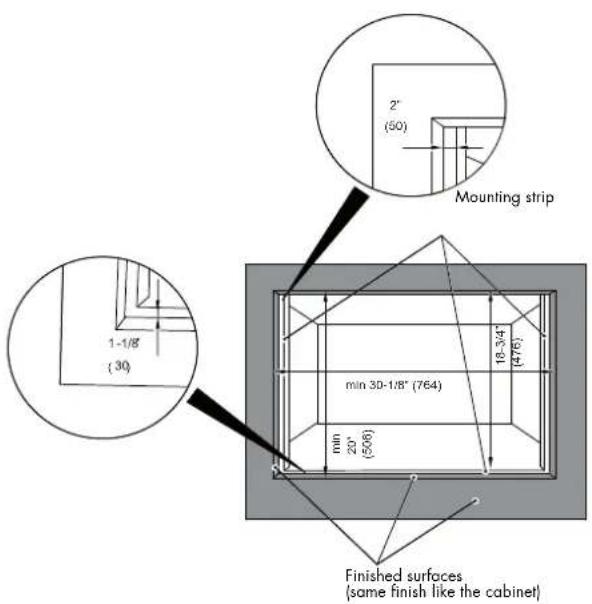
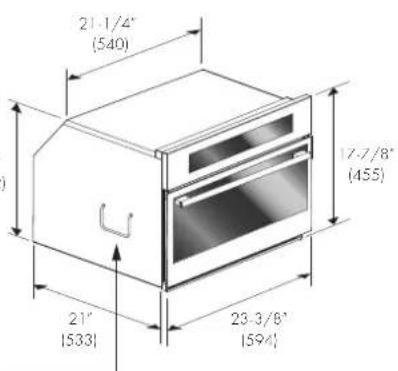
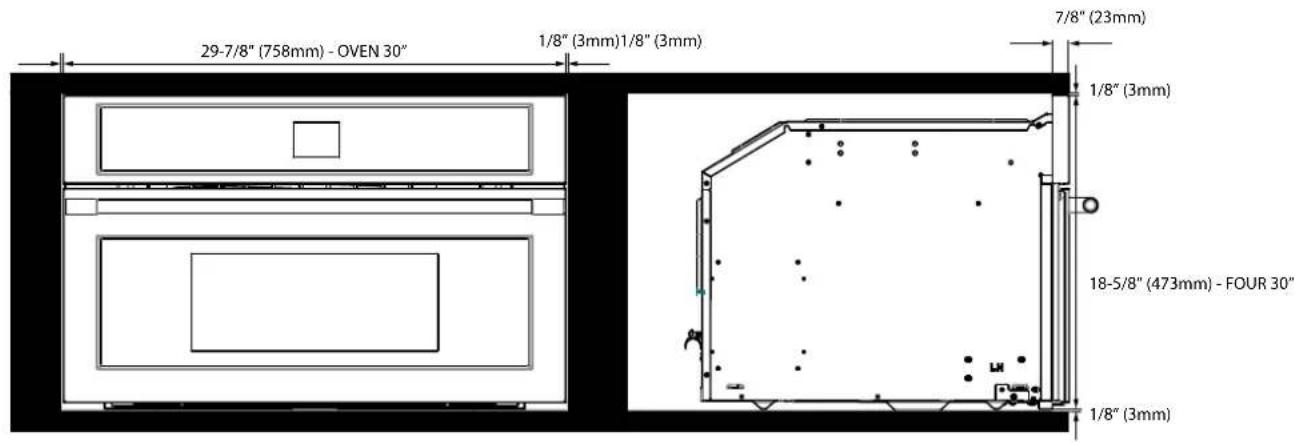
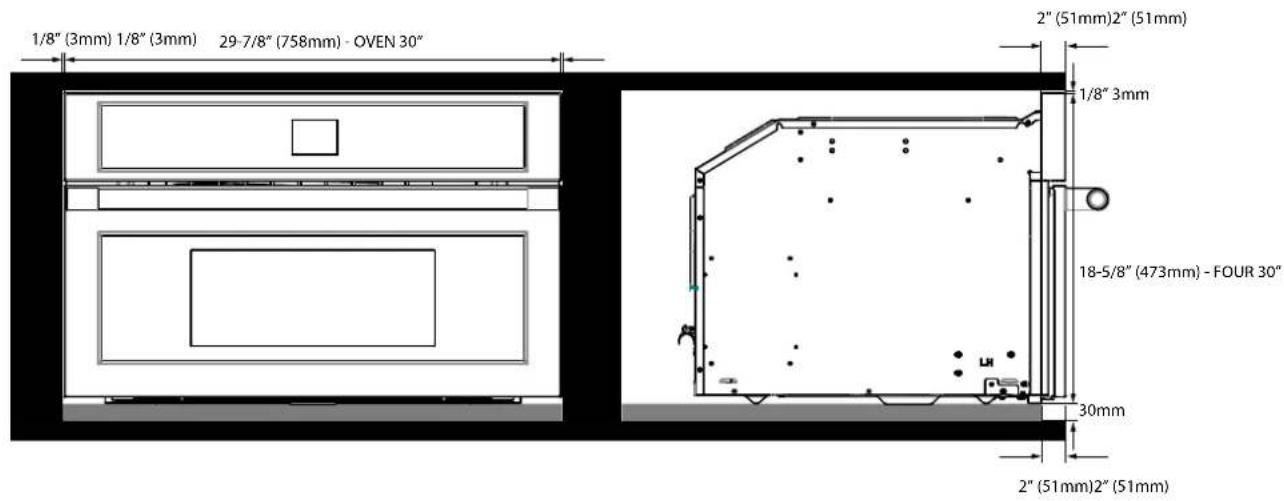
Dimensions and Cabinet Requirements
The oven can be installed under a work top or in a cooking column. Figure shows the installation dimensions.
Make sure that surrounding materials are heat resistant. Align the oven centrally with respect to the side walls of the furniture surrounding it and fix it in place with the screws provided.
CUTOUT 24" (60cm)
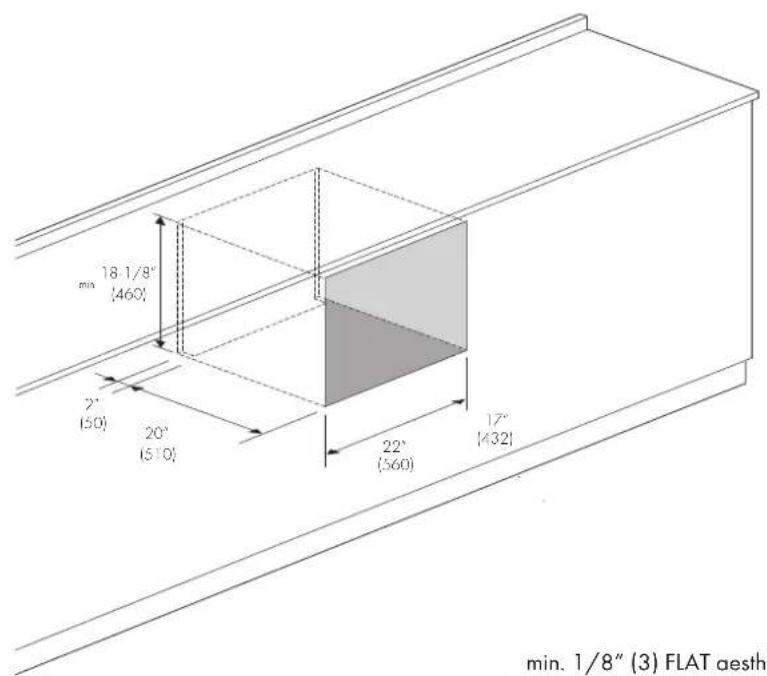
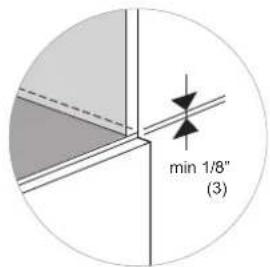
min. 1/8" (3) FLAT aesthetics min. 1-1/8" (30) PRO aesthetics
![17-3/4" [450] 2° [50] 20° [510] 22° (560) 17° (432)](/content/2026/04/743392/images/26ef2efd108a2f1bfd73565b1fc9e3ef16215bf4d8723131e5ada68364df37f2.jpg)
Note: when sliding the oven into the opening be sure to remove the temporary handles on each side to prevent potential vibratory noise.
CUTOUT 30" (75cm)
FLUSHMOUNT INSTALLATION
24" (60 cm)
FLAT

30" (75 cm)
FLAT PRO
24" (60 cm)
FLAT
30" (75 cm)
FLAT
PRO

WARNING
If the information in this manual is not followed exactly, a fire or explosion may result causing property damage, personal injury or death.
Introduction
Please read these instruction COMPLETELY AND CAREFULLY.
They will save you time and effort and help to ensure optimum oven performance.
Be sure to observe all WARNINGS.
These installations are intended for use by a qualified installer. In addition to these instructions, the oven shall be installed:
• In the United States, in accordance with the National Electric Code/State and Municipal codes and/or local codes.
- In Canada, in accordance with Canadian Electric Code C22.1 - latest edition/Provincial and Municipal codes and/or local codes.
These shall be carefully followed at all times.
NOTE: IF INSTALLING YOUR OVEN IN CANADA PLEASE CHECK TO MAKE SURE THAT YOU HAVE A MODEL WITH THE CANADIAN LISTING

MARK, AS SHOWN ABOVE:
Mark as shown above means the oven complies with both US and CANADIAN Standards.
Tools you will need
The following tools are needed to install your new oven:
- Pencil
• Phillips screwdriver - Level
• Wire cutters and wire stripper - Hand or saber saw
• 1" (2.5 cm) Hole saw - Drill and drill bit
• Safety gloves and goggles
• Volt meter (0-250VAC)
- Tape measure and straight edge or ruler
Packaging
Remove all tape and packaging before using the oven.
Destroy the packaging after unpacking the oven following the rules in force in your town. Never allow children to play with packaging material.
Power requirements
The oven must be supplied with the proper voltage and frequency. The oven is manufactured to be connected to a three-wire, single phase, 120/240V, 60 Hz AC electrical supply on a separate circuit fused in both sides of the line. A circuit breaker or time delay fuse sized not to exceed the circuit rating of the appliance specified on the rating plate located on the frame behind the door of the oven is recommended.
The oven must be supplied with copper or aluminum wires.
If aluminum wire is provided to connect oven to branch circuit, UL listed connectors for joining copper and aluminum must be used. Follow instructions provided with connectors.
If is recommended that you have the electrical wiring and hook-up of your oven performed by a qualified electrician.
After installation is complete have the electrician show you where the main disconnect is and which of the circuit breakers/fuses are for the oven.
Choosing oven location
Carefully select the location where the oven will be placed. The oven should be located for convenient use in the kitchen, but away from strong drafts.
Strong drafts may be caused by open doors or windows, or by heating and/or air conditioning vents or fans. Make sure that electrical power can be provided to the location selected.
Steps for installation
The following pages provided the necessary information for proper installation of the oven and are arranged as follows:
- Technical Data
• Installation Cutout Dimensions, Required Clearances and Mounting instructions for: - Under counter installation, Single Ove
- all installation, Single Oven
TECHNICAL DATA
Power supply 120-240 V\~, 60 H z 3400 W
Power supply 120-208 V\~, 60Hz 2700 W
Microwave power 900 W
Grill 1500 W
Convection 1500 W
Microwave frequency 2450 MHz
ELECTRICAL CONNECTION
Be sure your appliance is properly installed and grounded by a qualified technician. Ask your dealer to recommend a qualified technician or an authorized repair service.
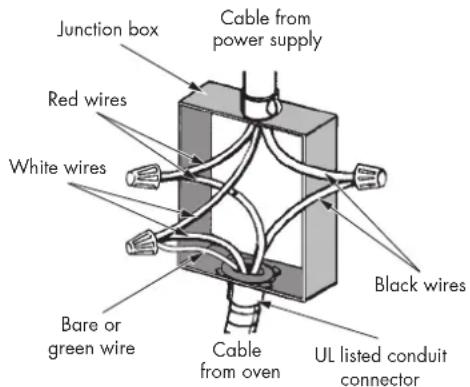
This appliance is manufactured is with a green GROUND wire connected to the oven body. After making sure that the power has been turned off, connect the flexible conduit from the oven to the junction box using a U.L. listed conduit connector. Figures A and B and the instructions provided below present the most common way of connecting the ovens.
Your local codes and ordinance, of course, take precedence over these instructions. Complete electrical connections according to local and national electrical codes.

WARNING
MEANS FOR DISCONNECTION MUST BE INCORPORATED IN THE FIXED WIRING IN ACCORDANCE WITH THE WIRING RULES.
GROUNDING INSTRUCTIONS
This appliance must be connected to a grounded, metallic, permanent wiring system, or an equipment grounding conductor should be run with the circuit conductors and connected to the equipment grounding terminal or lead on the appliance.
3-Wire branch circuit (for US only)
Refer to Figure A, where local codes allow the connection of GROUND wire from the oven to the branch circuit NEUTRAL wire (gray or white colored wire):
- If local codes permit, connect the green GROUND wire from the oven and the white wire from the oven to the branch circuit NEUTRAL wire (gray or white colored wire).
- Connect the red and black leads from the oven to the corresponding leads in the junction box.
GROUNDED NEUTRAL
A

WARNING
Risk of Electric Shock, frame grounded to neutral of appliance through a connection.
Ground through the neutral conductor is prohibited for new branch-circuit installation (1996 NEC); mobile homes; and recreation vehicles, or in an area where local codes prohibit grounding through the neutral conductor. For installations where grounding through the neutral conductor.
For installations where grounding through the neutral conductor is prohibited:
- Disconnect the ground from the neutral at free end of conduit;
- Use grounding terminal or lead to ground unit; and usual procedure.
4-Wire branch circuit (for US and CANADA)
Refer to Figure B:
- Connect the green GROUND wire from the oven to the GROUND wire in the junction box (bare or green colored wire).
- Connect the red and black leads from the oven to the corresponding leads in the junction box.
- Connect the white wire from the oven to the NEUTRAL (gray or white) wire in the junction box.
EN 15 - Solving Traditional Baking Problems
With either Bake or Convection Bake, poor results can occur for many reasons other than a malfunction of the oven. Check the chart below for causes of the most common problems. Since the size, shape and material of baking utensils directly affect the baking results, the best solution may be to replace old baking utensils that have darkened and warped with age and use.
| Baking Problem Cause | |
| Food browns unevenly - Oven not preheated | - Aluminum foil on oven rack or oven bottom- Baking utensil too large for recipe- Pans touching each other or oven walls |
| Food too brown on bottom - Oven not preheated | - Using glass, dull or darkened metal pans- Incorrect rack position- Pans touching each other or oven walls |
| Food is dry or has shrunk excessively - Oven temperature too low | - Oven not preheated- Oven door opened frequently- Tightly sealed with aluminum foil- Pan size too small |
| Food is baking or roasting too slowly - Oven temperature too low | - Oven not preheated- Oven door opened frequently- Tightly sealed with aluminum foil- Pan size too small |
| Pie crusts do not brown on bottom or have soggy crust - Baking time not long enough | - Using shiny steel pans- Incorrect rack position- Oven temperature is too low |
| Cakes pale, flat and may not be done inside - Oven temperature too low | - Incorrect baking time- Cake tested too soon- Oven door opened too often- Pan size may be too large |
| Cakes high in middle with crack on top - Baking temperature too high | - Baking time too long- Pans touching each other or oven walls- Incorrect rack position- Pan size too small |
| Pie crust edges too brown - Oven temperature too high | - Edges of crust too thin |
Before contacting service, check the following to avoid unnecessary service charges.
| Oven Problem Problem Solving Steps | |
| Other F__ Error appears in the display window. | Remove power and turn it back on again after a few seconds. If condition persists, note the code number (in the EVENT LOG list) and contact service. |
| The oven display stays OFF Turn off power at the main power supply (fuse or breaker box). Turn breaker back on.If condition persists, call an authorized service. | |
| Cooling fan continues to run after oven is turned off | The fan turns off automatically when the electronic components have cooled sufficiently. |
| Oven is not heating Check the circuit breaker or fuse box to your house. Make sure there is proper electrical power to the oven. Make sure the oven temperature has been selected. | |
| Oven is not cooking evenly | Refer to cooking charts for recommended rack position. Always reduce recipe temperature by 25°F (15°C) when baking with Convection Bake mode. |
| Clock and timer are not working properly | Make sure there is proper electrical power to the oven. See the Clock sections on page 14. |
| Excessive moisture Convection modes will eliminate any moisture in oven (this is one of the advantages of convection). | |
EN 17 - Assistance or Service
Before contacting service, please check "Troubleshooting." It may save you the cost of a service call.
If you still need help, follow the instructions below. When calling, please know the purchase date and the complete model and serial number of your appliance. This information will help us to better respond to your request.
Service Data Record
For serial tag location see Page 6. Now is a good time to write this information in the space provided below.
Keep your invoice for warranty validation.
Service Data Record
Model Number ____
Serial Number ____
Date of Installation or Occupancy ____

AVERTISSEMENT
PRÉCAUT IONS POUR ÉVITER LE RISQUE D'UNE EXPOSITION AUX MICRO-ONDES
natural_image
Two glassware illustrations: a spoon inside and a cross symbol crossed out (no text or symbols present)natural_image
Technical line drawing of a front view of a rectangular appliance with internal compartments and mounting points (no text or symbols)natural_image
Close-up of hands holding a square metal baking pan inside an oven (no text or symbols visible)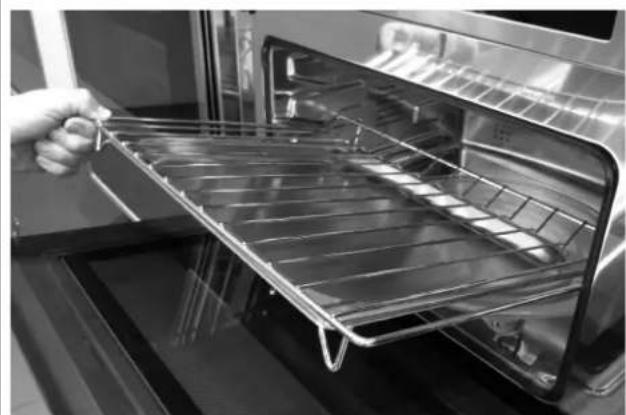
natural_image
Close-up of a hand holding a metal tray inside an oven (no text or symbols visible)
IMPORTANT
natural_image
Interior view of a server rack with internal compartments and ventilation slots (no text or symbols visible)natural_image
Recycling symbol composed of five gray arrows forming a triangle (no text or labels)Luminosité
natural_image
Line drawing of a square frame with rounded corners and a curved top edge (no text or symbols)natural_image
Two wire mesh baskets, one rectangular and one rectangular, shown against a plain background (no text or symbols)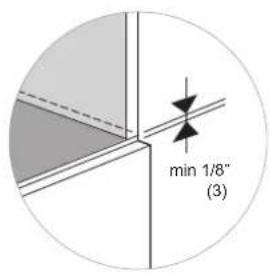
30" (75 cm)
FLAT
PRO

AVERTISSEMENT
Carefully select the location where the oven will be placed. The oven should be located for convenient use in the kitchen, but away from strong drafts.
Strong drafts may be caused by open doors or windows, or by heating and/or air conditioning vents or fans. Make sure that electrical power can be provided to the location selected.
Steps for installation
natural_image
Two glassware illustrations: a spoon inside and a cross symbol crossed out (no text or symbols present)natural_image
Technical line drawing of a device front view showing internal components and an upward arrow (no text or symbols)natural_image
Two-panel black-and-white photo showing interior views of an oven with transparent grilles and a filled tray (no text or symbols visible)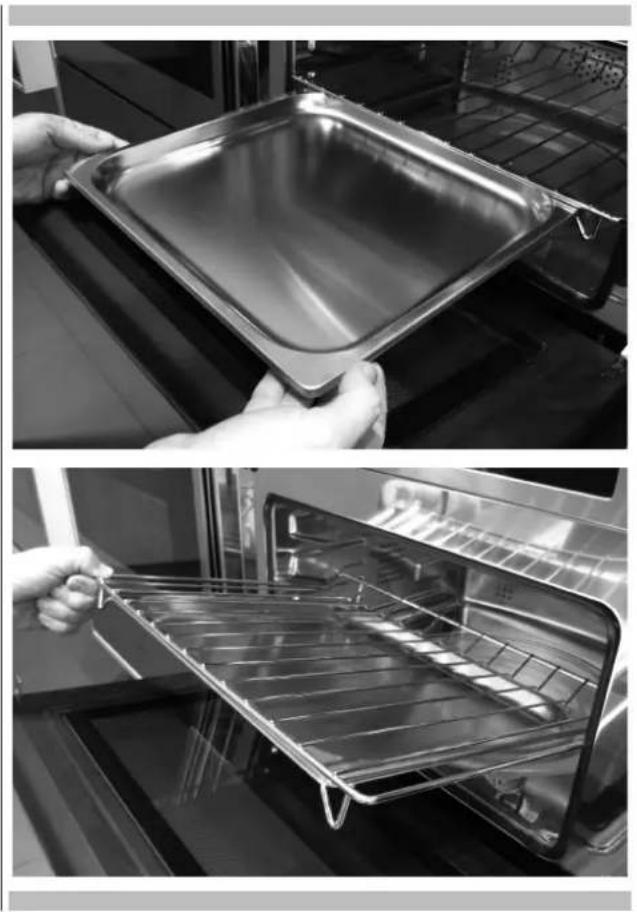
natural_image
Two-panel black-and-white photo showing hands holding a stainless steel baking tray and a closed oven with a metal rack inside (no text or symbols visible)
IMPORTANTE
natural_image
Interior view of a microwave oven with ventilation slots and a black arrow indicating a component (no text or symbols visible)natural_image
Recycling symbol with four arrows forming a circle, no text or labels presentnatural_image
Pure electrical circuit lines without any symbols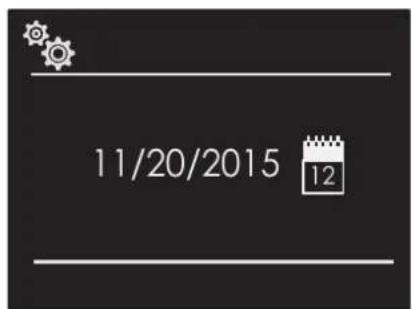
Brillo
natural_image
Line drawing of a square frame with rounded corners and a curved top edge (no text or symbols)natural_image
Line drawings of two woven baskets, one rectangular and one rectangular, with no text or symbols present.
30" (75 cm)
FLAT
PRO