
SJ-LE300E2XS-EU - Fridge SHARP - Free user manual and instructions
Find the device manual for free SJ-LE300E2XS-EU SHARP in PDF.

User questions about SJ-LE300E2XS-EU SHARP
0 question about this device. Answer the ones you know or ask your own.
Ask a new question about this device
Download the instructions for your Fridge in PDF format for free! Find your manual SJ-LE300E2XS-EU - SHARP and take your electronic device back in hand. On this page are published all the documents necessary for the use of your device. SJ-LE300E2XS-EU by SHARP.
USER MANUAL SJ-LE300E2XS-EU SHARP
SJ-LE300E2XS-EU SJ-LD300E2XS-EU
Fridge
User Manual
Bedienungsanleitung
Guide d'utilisation
Manuale per l'uso
Handleiding
Manual de Uso
Thank you for choosing this product.
This user manual contains important information on safety and instructions intended to assist you in the operation and maintenance of your appliance.
Please take the time to read this user manual before using your appliance and keep this book for future reference.
| Icon Type Meaning | ||
 | WARNING Serious injury or death risk | |
 | RISK OF ELECTRIC SHOCK Dangerous voltage risk | |
 | FIRE Warning; Risk of fire / flammable materials | |
 | CAUTION Injury or property damage risk | |
 | IMPORTANT Operating the system correctly | |
CONTENTS
1 SAFETY INSTRUCTIONS .... 3
1.1 General Safety Warnings ....3
1.2 Installation warnings....7
1.3 During Usage....7
2 DESCRIPTION OF THE APPLIANCE....9
3 USING THE APPLIANCE 9
3.1 Display and Control Panel....9
3.2 Operating your Fridge....9
3.2.1 Super Cool Mode....9
3.2.2 Economy Mode....10
3.2.3 Screen Saver Mode....10
3.2.4 Cooler Temperature Settings....11
3.2.5 Stand-By Mode....11
3.2.6 Door Open Alarm Function....11
3.3 Temperature Settings Warnings ....11
3.4 Temperature indicator....12
3.5 Accessories ....13
3.5.1 The Fresh Dial (In some models)....13
3.5.2 Adjustable Door Shelf (In some models) 13
3.5.3 Ultrafresh (If available) 14
4 FOOD STORAGE....14
4.1 Refrigerator Compartment....14
5 CLEANING AND MAINTENANCE....15
5.1 Defrosting 16
6 SHIPMENT AND REPOSITIONING....16
6.1 Transportation and Changing Positioning ....16
7 BEFORE CALLING AFTER-SALES SERVICE....17
8 TIPS FOR SAVING ENERGY....19
9 TECHNICAL DATA....19
10 INFORMATION FOR TEST INSTITUTES....20
11 CUSTOMER CARE AND SERVICE....20
1 SAFETY INSTRUCTIONS
1.1 General Safety Warnings
Read this user manual carefully.
⚠ WARNING: Keep ventilation openings, in the appliance enclosure or in the built-in structure, clear of obstruction.
⚠ WARNING: Do not use mechanical devices or other means to accelerate the defrosting process, other than those recommended by the manufacturer.
⚠ WARNING: Do not use electrical appliances inside the food storage compartments of the appliance, unless they are of the type recommended by the manufacturer.
⚠ WARNING: Do not damage the refrigerant circuit.
⚠ WARNING: When positioning the appliance, ensure the supply cord is not trapped or damaged.
⚠ WARNING: Do not locate multiple portable socket-outlets or portable power supplies at the rear of the appliance.
⚠ WARNING: In order to avoid any hazards resulting from the instability of the appliance, it must be fixed in accordance with the instructions.
⚠️ If your appliance uses R600a as a refrigerant (this information will be provided on the label of the cooler) you should take care during transportation and installation to prevent the cooler elements from being damaged. R600a is an environmentally friendly and
natural gas, but it is explosive. In the event of a leak due to damage of the cooler elements, move your fridge away from open flames or heat sources and ventilate the room where the appliance is located for a few minutes.
- While carrying and positioning the fridge, do not damage the cooler gas circuit.
- Do not store explosive substances such as aerosol cans with a flammable propellant in this appliance.
- This appliance is intended to be used in household and domestic applications such as:
-staff kitchen areas in shops, offices and other working environments.
-farm houses and by clients in hotels, motels and other residential type environments.
-bed and breakfast type environments;
-catering and similar non-retail applications.
- If the socket does not match the refrigerator plug, it must be replaced by the manufacturer, a service agent or similarly qualified persons in order to avoid a hazard.
-
A specially grounded plug has been connected to the power cable of your refrigerator. This plug should be used with a specially grounded socket of 16 amperes. If there is no such socket in your house, please have one installed by an authorised electrician.
-
This appliance can be used by children aged from 8 years and above and persons with reduced physical, sensory or mental capabilities or lack of experience and knowledge if they have been given supervision or instruction concerning use of the appliance in a safe way and understand the hazards involved. Children shall not play with the appliance. Cleaning and user maintenance shall not be made by children without supervision.
- Children aged from 3 to 8 years are allowed to load and unload refrigerating appliances. Children are not expected to perform cleaning or user maintenance of the appliance, very young children (0-3 years old) are not expected to use appliances, young children (3-8 years old) are not expected to use appliances safely unless continuous supervision is given, older children (8-14 years old) and vulnerable people can use appliances safely after they have been given appropriate supervision or instruction concerning use of the appliance. Very vulnerable people are not expected to use appliances safely unless continuous supervision is given.
- If the supply cord is damaged, it must be replaced by the manufacturer, an authorised service agent or similar qualified persons, in order to avoid a hazard.
- This appliance is not intended for use at altitudes exceeding 2000 m.
To avoid contamination of food, please respect the following instructions:
- Opening the door for long periods can cause a significant increase of the temperature in the compartments of the appliance.
- Clean regularly surfaces that can come in contact with food and accessible drainage systems
- Store raw meat and fish in suitable containers in the refrigerator, so that it is not in contact with or drip onto other food.
- Two-star frozen-food compartments are suitable for storing pre-frozen food, storing or making ice cream and making ice cubes.
- One-, two- and three-star compartments are not suitable for the freezing of fresh food.
- If the refrigerating appliance is left empty for long periods, switch off, defrost, clean, dry, and leave the door open to prevent mould developing within the appliance.
1.2 Installation warnings
Before using your fridge for the first time, please pay attention to the following points:
- The operating voltage for your fridge is 220-240 V at 50Hz.
- The plug must be accessible after installation.
- Your fridge may have an odour when it is operated for the first time. This is normal and the odour will fade when your fridge starts to cool.
- Before connecting your fridge, ensure that the information on the data plate (voltage and connected load) matches that of the mains electricity supply. If in doubt, consult a qualified electrician.
- Insert the plug into a socket with an efficient ground connection. If the socket has no ground contact or the plug does not match, we recommend you consult a qualified electrician for assistance.
- The appliance must be connected with a properly installed fused socket. The power supply (AC) and voltage at the operating point must match with the details on the name plate of the appliance (the name plate is located on the inside left of the appliance).
- We do not accept responsibility for any damages that occur due to ungrounded usage.
- Place your fridge where it will not be exposed to direct sunlight.
- Your fridge must never be used outdoors or exposed to rain.
- Your appliance must be at least 50 cm away from stoves, gas ovens and heater cores, and at least 5 cm away from electrical ovens.
- If your fridge is placed next to a deep freezer, there must be at least 2 cm between them to prevent humidity forming on the outer surface.
-
Do not cover the body or top of fridge with lace. This will affect the performance of your fridge.
-
Clearance of at least 150 mm is required at the top of your appliance. Do not place anything on top of your appliance.
- Do not place heavy items on the appliance.
- Clean the appliance thoroughly before use (see Cleaning and Maintenance).
- Before using your fridge, wipe all parts with a solution of warm water and a teaspoon of sodium bicarbonate. Then, rinse with clean water and dry. Return all parts to the fridge after cleaning.
- The installation procedure into a kitchen unit is given in the installation manual. This product is intended to be used in proper kitchen units only.
1.3 During Usage
- Do not connect your fridge to the mains electricity supply using an extension lead.
- Do not use damaged, torn or old plugs.
- Do not pull, bend or damage the cord.
- Do not use plug adapter.
- This appliance is designed for use by adults. Do not allow children to play with the appliance or hang off the door.
- Never touch the power cord/plug with wet hands. This may cause a short circuit or electric shock.
- Do not place explosive or flammable material in your fridge. Place drinks with high alcohol content vertically in the fridge compartment and make sure their tops are tightly closed.
Old and Out-of-order Fridges
- If your old fridge or freezer has a lock, break or remove the lock before discarding it, because children may get trapped inside it and may cause an accident.
- Old fridges and freezers contain isolation material and refrigerant with CFC. Therefore, take care not to harm environment when you are discarding your old fridges.
CE Declaration of conformity
We declare that our products meet the applicable European Directives, Decisions and Regulations and the requirements listed in the standards referenced.
Disposal
The symbol of the crossed-out wheeled bin shown on the product or its packaging means that the device must not be disposed of with other household waste but requires separate collection. You can dispose of the device free of charge at your local waste return and collection system. The addresses can be obtained from your responsible city council or local government. Regarding the return of waste electrical and electronic equipment (WEEE) at certain retailers free of charge, please contact your retailer.
Returned WEEE can be prepared for recycling to reduce waste and save resources. Please note that the device may contain substances which are harmful for the environment and human health if not used according to environmental protection standards. The separate collection and recycling of WEEE helps to prevent negative consequences for the environment and human health.
If possible, please remove all batteries and accumulators as well as all removable lamps before disposing of the device.
Please note that you are responsible for deleting all personal data on the device to be disposed of.
Packaging and the Environment
Packaging materials protect your machine from damage that may occur during transportation. The packaging materials are environmentally friendly as they are recyclable. The use of recycled material reduces raw material consumption and therefore decreases waste production.
Notes:
- Please read the instruction manual carefully before installing and using your appliance. We are not responsible for the damage occurred due to misuse.
- Follow all instructions on your appliance and instruction manual, and keep this manual in a safe place to resolve the problems that may occur in the future.
- This appliance is produced to be used in homes and it can only be used in domestic environments and for the specified purposes. It is not suitable for commercial or common use. Such use will cause the guarantee of the appliance to be cancelled and our company will not be responsible for any losses incurred.
- This appliance is produced to be used in houses and it is only suitable for cooling / storing foods. It is not suitable for commercial or common use and/or for storing substances except for food. Our company is not responsible for any losses incurred by inappropriate usage of the appliance.
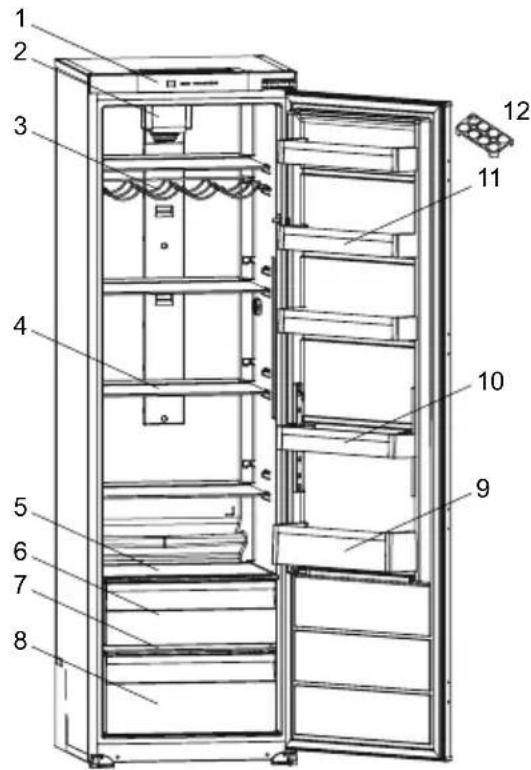
2 DESCRIPTION OF THE APPLIANCE
text_image
Technical diagram of an open refrigerator with numbered parts for identification
This presentation is only for information about the parts of the appliance. Parts may vary according to the appliance model.
1) Control panel
2) Turbo fan *
3) Wine rack *
4) Refrigerator shelves
5) Upper crisper cover *
6) Upper crisper *
7) Crisper cover
8) Crisper
9) Bottle shelf
11) Door shelves
12) Egg holder
Fresh Food Compartment (Fridge): Most efficient use of energy is ensured in the configuration with the drawers in the bottom part of the appliance, and shelves evenly distributed, position of door bins does not affect energy consumption.
3 USING THE APPLIANCE
3.1 Display and Control Panel

text_image
1 2 3 08 = | M | 6 5 4Using the Control Panel
- Fridge temperature setting
- It enables the setting value of cooler to be modified and super cool mode to be activated if desired. Cooler maybe set to 8, 6, 5, 4, 2 °C, and super cool mode.
- It enable the economy mode to be activated if desired.
- Economy mode indicator
- Super Cooling mode indicator
- Alarm indicator
3.2 Operating your Fridge
If your product has lighting

When the product is plugged in for the first time, the interior lights may turn on 1 minute late due to opening tests.
3.2.1 Super Cool Mode
Purpose
• To cool and store a large quantity of food in the fridge compartment.
• To quickly cool drinks.
How to use

text_image
04.0 | M |Press cooler set button (#2 on control panel diagram) until Super cool symbol (#5) will be seen on the screen. Buzzer will sound beep beep. Mode will be set.
During This Mode:
• Economy mode can not be selected.
- Super cool mode can be cancelled by the same operation of selecting.
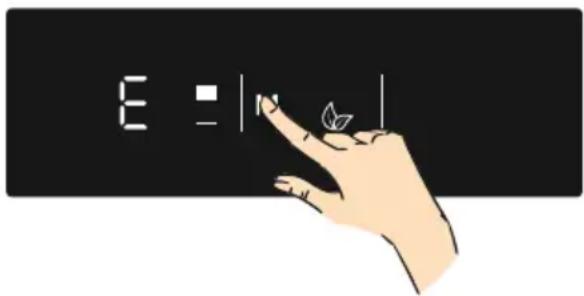
3.2.2 Economy Mode
Purpose
Energy savings. During periods of less frequent use (door opening) or absence from home, such as a holiday, Eco program can provide optimum temperature whilst saving power.
How to Use
text_image
E = |n|- Push "MODE" button (#3 on control panel diagram) until eco symbol appears.
- If no button is pressed for 1 second. Mode will be set. Eco symbol (#4) will blink 3 times. When mode is set, buzzer will sound beep beep.
- Cooler temperature segments (#1) will show "E".
- Economy symbol and E will light till mode finishes.
During this mode:
- Cooler may be adjusted. When economy mode will be cancelled, the selected setting values will proceed.
- Super cool mode can be selected. Economy mode is automatically cancelled and the selected mode is activated.
- To cancel, you will just need to press on mode button.
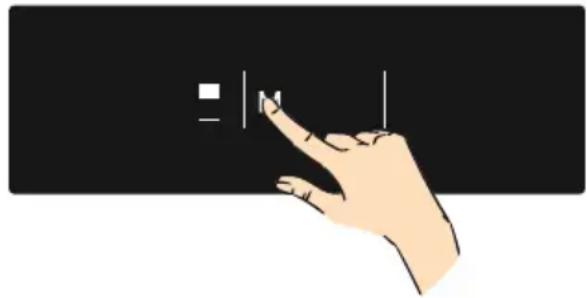
3.2.3 Screen Saver Mode
Purpose
This mode saves energy by switching off all control panel lighting when the panel is left inactive.
How to Use
natural_image
Illustration of a hand interacting with a black background, no text or symbols present- Screen saver mode will be activated automatically after 30 seconds.
- If you press any key while the lighting of the control panel is off, the current machine settings will reappear on the display to let you make any change you wish.
- If you do not cancel the screen saving mode or press any key for 30 seconds, control panel will remain off.
To deactivate the screen saving mode,
- To cancel the screen saving mode, first of all, you need to press any key to activate the keys and then press and hold the Mode button (#3 on control panel diagram) for 3 seconds.
- To active the screen saving mode, you need to press mode button simultaneously 3 seconds
- To reactivate screen saving mode, press and hold the Mode button (#3 on control panel diagram) for 3 seconds.
3.2.4 Cooler Temperature Settings
Initial temperature value for the cooler setting indicator is +4 °C.
- Press the cooler button once (#2 on control panel diagram).

text_image
04 | M |- When you first push this button, the last value will appear on the cooler setting indicator (#1).
- Whenever you press this button (#2 on control panel diagram), a lower temperature will be set. (+8 °C, +6 °C, +5 °C, +4 °C, +2 °C, and super cool)
- When you push the cooler set button until the super cool symbol (#5) appears, and if you do not push any button within 1 second, super cool will flash.
- If you continue to press the button (#2 on control panel diagram), it will restart from +8 °C.
- The temperature value selected before super cool mode or economy mode is activated and will remain the same when the mode is over or cancelled. The appliance continues to operate with this temperature value.
Recommended Temperature Values for Cooler
| When to adjust | Inner Temperature (°C) |
| For cooling the fridge at minimum capacity | 8 |
| In normal usage 4, 5, 6 | |
| For cooling the fridge at maximum capacity | 2 |
Note: Some built-in appliances may have a stand-by mode.
3.2.5 Stand-By Mode
Purpose
This mode can be used to save energy when you go on vacation.
How Would It Be Used?
*Select "8" set value.
*Push mode and cooler Set Button for 5 seconds.
*Display will show "St" "bY" on the screen.
During This Mode:
In stand-by mode; all components will be disabled.
If you push the display button, display will show "St" "bY" on the screen to show stand-by mode is active.
To cancel; push mode and cooler set button for 5 seconds.
After the mode is deactivated, an error code may light on the display because the product maybe not cool enough. The error code will turn off when the product reaches normal temperature.
3.2.6 Door Open Alarm Function
If fridge door is opened more than 2 minutes, appliance sounds ‘beep beep’.
3.3 Temperature Settings Warnings
- Your appliance is designed to operate in the ambient temperature ranges stated in the standards, according to the climate class stated in the information label. It is not recommended that your fridge is operated in the environments which are outside of the stated temperature ranges. This will reduce the cooling efficiency of the appliance.
- Temperature adjustments should be made according to the frequency of door openings, the quantity of food kept inside the appliance and the ambient temperature in the location of your appliance.
- When the appliance is first switched on, allow it to run for 24 hours in order to reach operating temperature. During this time, do not open the door and do not keep a large quantity of food inside.
- A 5 minute delay function is applied to prevent damage to the compressor of your appliance when connecting or disconnecting to mains, or when
an energy breakdown occurs. Your appliance will begin to operate normally after 5 minutes.
Climate class and meaning:
T (tropical): This refrigerating appliance is intended to be used at ambient temperatures ranging from 16 °C to 43 °C.
ST (subtropical): This refrigerating appliance is intended to be used at ambient temperatures ranging from 16 °C to 38 °C.
N (temperate): This refrigerating appliance is intended to be used at ambient temperatures ranging from 16 °C to 32 °C.
SN (extended temperate): This refrigerating appliance is intended to be used at ambient temperatures ranging from 10 °C to 32 °C.
3.4 Temperature indicator
In order to help you better set your refrigerator, we have equipped it with a temperature indicator located in the coldest area.
To better store the food in your refrigerator, especially in the coldest area, make sure the message "OK" appears on the temperature indicator. If « OK » does not appear, this means temperature has not been set properly
It may be difficult to see the indicator, make sure it is properly lit. Each time the temperature setting device is changed, wait for the stabilisation of the temperature inside the appliance before proceeding, if necessary, with a new temperature setting. Please change the position of the temperature setting device progressively and wait at least 12 hours before starting a new check and potential change.

NOTE: Following repeated openings (or prolonged opening) of the door or after putting fresh food into the appliance, it is normal for the indication "OK" not to appear in the temperature setting indicator. If there is an abnormal build up of ice crystals of ice crystals (bottom wall of the appliance) on the refrigerator compartment,

evaporator (overloaded appliance, high room temperature, frequent door openings), put the temperature setting device on a lower position until compressor off periods are obtained again.
Store food in the coldest area of the refrigerator.
Your foods will be better stored if you put them in the most appropriate cooling area. The coldest area is just above the crisper.
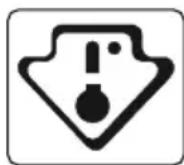
The following symbol indicates the coldest area of your refrigerator.
To be sure to have a low temperature in this area, make sure the shelf is located at the level of this symbol, as shown in the illustration.
The upper limit of the coldest area is indicated by the lower side of the
natural_image
Line drawing of a cabinet or rack with a handle and ladder, no text or symbols presentsticker (head of the arrow). The coldest area upper shelf must be at the same level with the arrow head. The coldest area is below this level.
As these shelves are removable, make sure they are always at the same level with these zone limits described on the stickers, in order to guarantee temperatures in this area.
The Turbo Fan (if available)
Do not block the air inlet and outlet openings when storing food, otherwise air circulation provided by the turbo fan will be impaired.
3.5 Accessories
Visual and text descriptions in the accessories section may vary according to the model of your appliance.
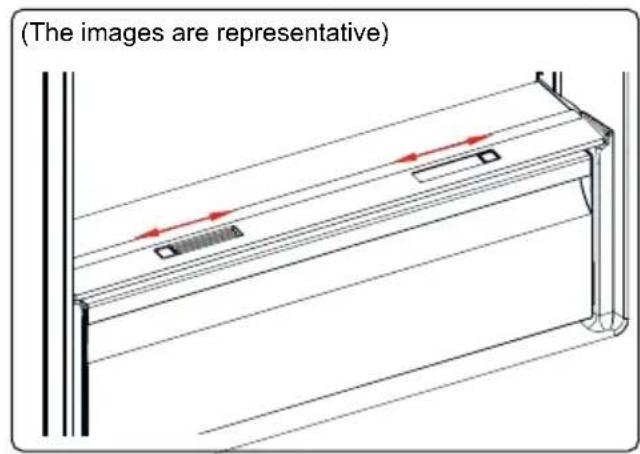
3.5.1 The Fresh Dial (In some models)
text_image
(The images are representative)or
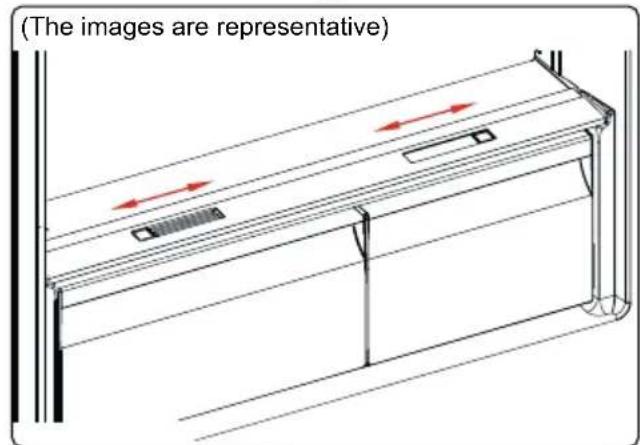
text_image
(The images are representative)If the crisper is full, the fresh dial located in front of the crisper should be opened. This allows the air in the crisper and the humidity rate to be controlled, to increase the life of food within.
The dial, located behind the shelf, must be opened if any condensation is seen on the glass shelf.
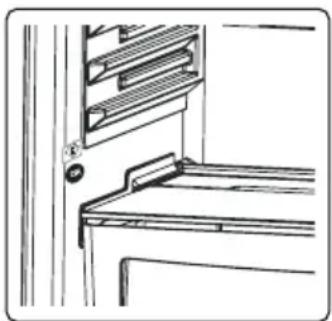
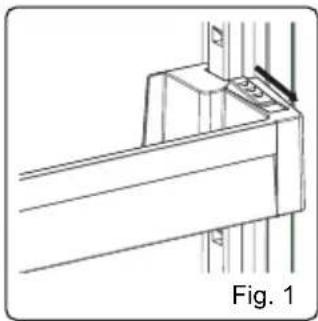
3.5.2 Adjustable Door Shelf (In some models)
Six different height adjustments can be made to provide storage areas that you need by adjustable door shelf.
To change the position of adjustable door shelf ;
Hold the bottom of the shelf and pull the
buttons on the side of the door shelf direction of arrow. (Fig.1)
Position door shelf the height you need by moving up and down. After you get the position that you want the door shelf, release the buttons on the side of the door shelf (Fig.2) Before releasing the door shelf, move up down and make sure the door shelf is fixed.
natural_image
Technical line drawing of a mechanical bracket assembly (no text or symbols)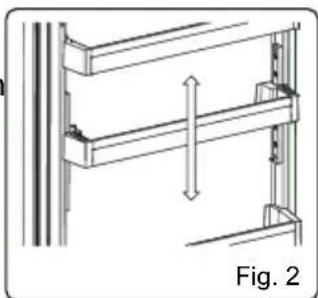
natural_image
Technical line drawing of a structural frame with vertical supports and a horizontal beam, labeled Fig. 2 (no text or symbols on the diagram itself)
Note: Before moving door shelf is loaded, you must hold the shelf by supporting the bottom. Otherwise, door shelf could fall off the rails due to the weight. So damage may occur on the door shelf or rails.
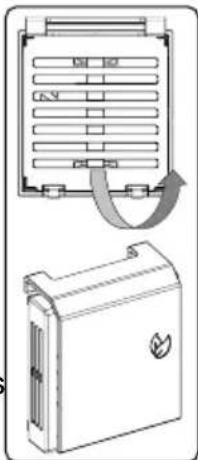
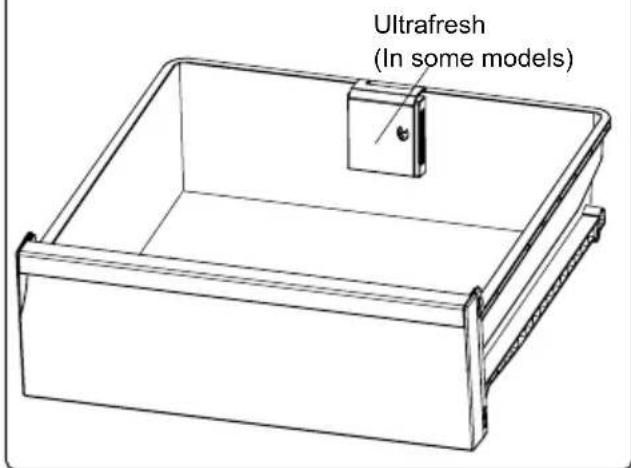
3.5.3 Ultrafresh (If available)
Ultrafresh technology helps to remove ethylene gas (a volatile organic compound released naturally from fresh foods) and unpleasant odors from the crisper.
In this way, food stays fresh for a longer time.
text_image
Technical diagram showing a ventilation system with airflow direction and component layout, including a labeled box with a checkmark.- Ultrafresh must be cleaned once in a year. The filter should be waited for 2 hours at 65^ C in a oven.
- To clean the filter, please remove the back cover of the filter box by pulling it in the direction of the arrow.
- The filter should not be washed with water or any detergent.
(The images are representative)
text_image
Ultrafresh (In some models)4 FOOD STORAGE
4.1 Refrigerator Compartment
For normal operating conditions, set the temperature of the cooler compartment to +4 or +6 °C.
- To reduce humidity and avoid the consequent formation of frost, always store liquids in sealed containers in the refrigerator. Frost tends to concentrate in the coldest parts of the evaporating liquid and, in time, your appliance will require more frequent defrosting.
- Cooked dishes must remain covered when they are kept in the fridge. Do not place warm foods in fridge. Place them when they are cool, otherwise the temperature/humidity inside the fridge will increases, reducing the fridge's efficiency.
- Make sure no items are in direct contact with the rear wall of the appliance as frost will develop and packaging will stick to it. Do not open the refrigerator door frequently.
• We recommend that meat and clean fish are loosely wrapped and stored on the glass shelf just above the vegetable bin where the air is cooler, as this provides the best storage conditions. - Store loose fruit and vegetable items in the crisper containers.
- Storing fruit and vegetables separately helps prevent ethylene-sensitive vegetables (green leaves, broccoli, carrot, etc.) being affected by ethylene-releaser fruits (banana, peach, apricot, fig etc.).
- Do not put wet vegetables into the refrigerator.
-
Storage time for all food products depends on the initial quality of the food and an uninterrupted refrigeration cycle before refrigerator storage.
• Water leaking from meat may contaminate other products in the refrigerator. You should package meat products and clean any leakages on the shelves. -
Do not put food in front of the air flow passage.
- Consume packaged foods before the recommended expiry date.
Do not allow food to come into contact with the temperature sensor, which is located in the refrigerator compartment, in order to keep the refrigerator compartment at optimum temperature.
- For normal working conditions, it will be sufficient to adjust the temperature setting of your refrigerator to +4 °C.
- The temperature of the fridge compartment should be in the range of 0-8 °C, fresh foods below 0 °C are iced and rotted, bacterial load increases above 8 °C, and spoils.
- Do not put hot food in the refrigerator immediately, wait for the temperature to pass outside. Hot foods increase the degree of your refrigerator and cause food poisoning and unnecessary spoiling of the food.
- Meat, fish, etc. should be store in the chiller compartment of the food, and the vegetable compartment is preferred for vegetables. (if available)
- To prevent cross contamination, meat products and fruit vegetables are not stored together.
- Foods should be placed in the refrigerator in closed containers or covered to prevent moisture and odors.
The table below is a quick guide to show you the most efficient way to store the major food groups in your refrigerator compartment.
| Food | Maximum storage time | How and where to store |
| Vegetables and fruits | 1 week Vegetable bin | |
| Meat and fish | 2 - 3 days | Wrap in plastic foil, bags, or in a meat container and store on the glass shelf |
| Fresh cheese | 3 - 4 days | On the designated door shelf |
| Food | Maximum storage time | How and where to store |
| Butter and margarine | 1 week | On the designated door shelf |
| Bottled products e.g. milk and yoghurt | Until the expiry date recommended by the producer | On the designated door shelf |
| Eggs 1 month | On the designated egg shelf | |
| Cooked food | 2 days All shelves |
NOTE:

Potatoes, onions and garlic should not be stored in the refrigerator.
5 CLEANING AND MAINTENANCE

Disconnect the unit from the power supply before cleaning.

Do not wash your appliance by pouring water on it.

Do not use abrasive products, detergents or soaps for cleaning the stance. After washing, rinse with clean or dry carefully. When you have had cleaning, reconnect the plug to the supply with dry hands.
- Make sure that no water enters the lamp housing and other electrical components.
- The appliance should be cleaned regularly using a solution of bicarbonate of soda and lukewarm water.
- Clean the accessories separately by hand with soap and water. Do not wash accessories in a dish washer.
- Clean the condenser with a brush at least twice a year. This will help you to save on energy costs and increase productivity.


The power supply must be disconnected during cleaning.
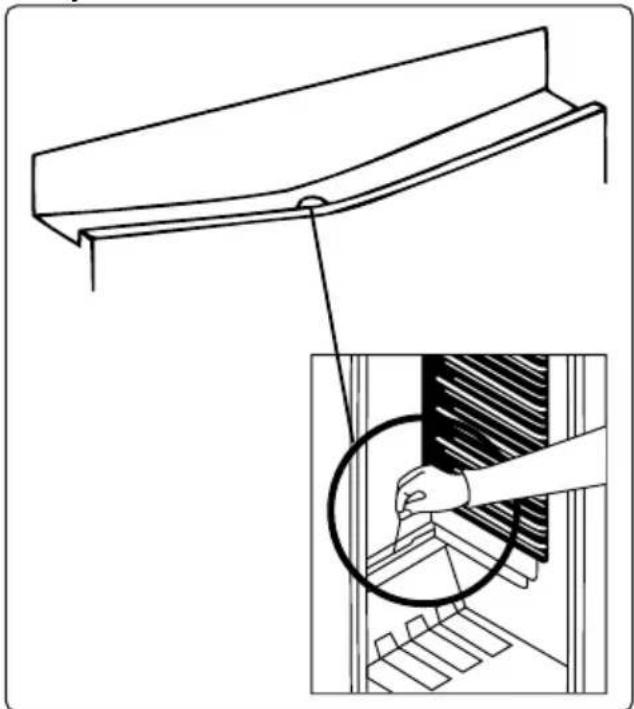
5.1 Defrosting
Defrosting the Refrigerator Compartment
natural_image
Technical line drawing of a mechanical component with an inset showing a hand holding a tool, no text or symbols present.- Defrosting occurs automatically in the refrigerator compartment during operation. The water is collected by the evaporation tray and evaporates automatically.
- The evaporation tray and the water drain hole should be cleaned periodically with the defrost drain plug to prevent the water from collecting at the bottom of the refrigerator instead of flowing out.
- You can also clean the drain hole by pouring half a glass of water down it.
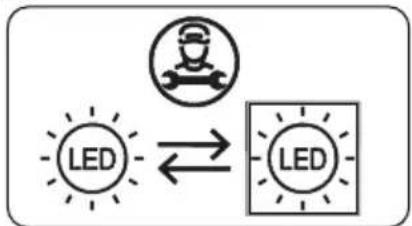
Replacing LED Lighting
To replace any of the LEDs, please contact the nearest Authorised Service Centre.

Note: The numbers and location of the LED strips may change according to model.
flowchart
graph TD
    A["LED"] <--> B["LED"]
If product equipped with LED lamp
This product contains a light source of energy efficiency class
If product equipped with LED Strip(s) or LED card(s)
This product contains a light source of energy efficiency class
6 SHIPMENTAND REPOSITIONING
6.1 Transportation and Changing Positioning
- The original packaging and foam may be kept for re-transportation (optional).
- Fasten your appliance with thick packaging, bands or strong cords and follow the instructions for transportation on the packaging.
- Remove all movable parts or fix them into the appliance against shocks using bands when re-positioning or transporting.

Always carry your appliance in the upright position.
7 BEFORE CALLING AFTER-SALES SERVICE
Errors
If you are experiencing problems with your refrigerator, please check the following before contacting the after-sales service.
| ERROR TYPE MEANING WHY WHAT TO DO | |||
| E01 Sensor warning | Call Service for assistance as soon as possible. | ||
| E02 Sensor warning | Call Service for assistance as soon as possible. | ||
| E03 Sensor warning | Call Service for assistance as soon as possible. | ||
| E06 Sensor warning | Call Service for assistance as soon as possible. | ||
| E07 Sensor warning | Call Service for assistance as soon as possible. | ||
| E08 Low Voltage Warning | Power supply to the device has dropped to below 170 V. | - This is not a device failure, this error helps to prevent damages to the compressor.- The voltage needs to be increased back to required levelsIf this warning continues an authorised technician needs to be contacted. | |
| E10 | Fridge compartment is not cold enough | Likely to occur after:- Long term power failure.- Hot food has been left in the fridge. | 1. Set the fridge temperature to a colder value or set Super Cool. This should remove the error code once the required temperature has been reached. Keep doors closed to improve time taken to reach the correct temperature.2. Please empty the location at the front area of air duct channel holes and avoid putting food close to the sensor.If this warning continues an authorised technician needs to be contacted. |
| E11 | Fridge compartment is too cold | Various | 1. Check is Super Cool mode is activated2. Reduce the fridge compartment temperature3. Check to see if vents are clear and not cloggedIf this warning continues an authorised technician needs to be contacted. |
If you are experiencing a problem with your appliance, please check the following before contacting the after-sales service.
Your appliance is not operating
Check if:
- There is power
- The plug is correctly placed in the socket
- The plug fuse or the mains fuse has blown
- The socket is defective. To check this, plug another working appliance into the same socket.
The appliance performs poorly
Check if:
• The appliance is overloaded
• The appliance door is closed properly
• There is any dust on the condenser
- There is enough space near the rear and side walls.
Your appliance is operating noisily
Normal noises
Cracking noise occurs:
• During automatic defrosting
- When the appliance is cooled or warmed (due to expansion of appliance material).
Short cracking noise occurs: When the thermostat switches the compressor on/off.
Motor noise: Indicates the compressor is operating normally. The compressor may cause more noise for a short time when it is first activated.
Bubbling noise and splash occurs:
Due to the flow of the refrigerant in the tubes of the system.
Water flowing noise occurs: Due to water flowing to the evaporation container. This noise is normal during defrosting.
Air blowing noise occurs: In some models during normal operation of the system due to the circulation of air.
The edges of the appliance in contact with the door joint are warm
Especially during summer (warm seasons), the surfaces in contact with the door joint may become warmer during the operation of the compressor, this is normal.
There is a build-up of humidity inside the appliance
Check if:
- All food is packed properly. Containers must be dry before being placed in the appliance.
- The appliance door is opened frequently. Humidity of the room enters the appliance when the doors are opened. Humidity increases faster when the doors are opened more frequently, especially if the humidity of the room is high.
The door does not open or close properly
Check if:
- There is food or packaging preventing the door from closing
• The door joints are broken or torn - Your appliance is on a level surface.
- The compressor can run loudly or the noise of the compressor/refrigerator may increase in some models during operating in some conditions such that the product is plugged in for the first time, depending on change in the ambient temperature or change of usage. That is normal; when the refrigerator reaches the required temperature, the noise decreases automatically.
Recommendations
- If the appliance is switched off or unplugged, wait at least 5 minutes before plugging the appliance in or restarting it in order to prevent damage to the compressor.
-
If you will not use your appliance for a long time (e.g. in summer holidays) unplug it. Clean your appliance according to chapter cleaning and leave the door open to prevent humidity and smell.
-
If a problem persists after you have followed all the above instructions, please consult the nearest authorised service centre.
- The appliance you have purchased is designed for domestic use only. It is not suitable for commercial or common use. If the consumer uses the appliance in a way that does not comply with this, we emphasise that the manufacturer and the dealer will not be responsible for any repair and failure within the guarantee period.
8 TIPS FOR SAVING ENERGY
- Install the appliance in a cool, well-ventilated room, but not in direct sunlight and not near a heat source (such as a radiator or oven) otherwise an insulating plate should be used.
- Allow warm food and drinks to cool before placing them inside the appliance.
- Place thawing food in the refrigerator compartment if available. The low temperature of the frozen food will help cool the refrigerator compartment while the food is thawing. This will save energy. Frozen food left to thaw outside of the appliance will result in a waste of energy.
- Drinks or other liquids should be covered when inside the appliance. If left uncovered, the humidity inside the appliance will increase, therefore the appliance uses more energy. Keeping drinks and other liquids covered helps preserve their smell and taste.
- Avoid keeping the doors open for long periods and opening the doors too frequently as warm air will enter the appliance and cause the compressor to switch on unnecessarily often.
- Keep the covers of the different temperature compartments (such as the crisper and chiller if available) closed.
- The door gasket must be clean and pliable. In case of wear, replace the gasket.
9 TECHNICALDATA
The technical information is situated in the rating plate on the internal side of the appliance and on the energy label.
The QR code on the energy label supplied with the appliance provides a web link to the information related to the performance of the appliance in the EU EPREL database.
Keep the energy label for reference together with the user manual and all other documents provided with this appliance. It is also possible to find the same information in EPREL using the link https://eprel.ec.europa.eu and the model name and product number that you find on the rating plate, the appliance.
See the link www.theenergylabel.eu for detailed information about the energy label.
10 INFORMATION FOR TEST INSTITUTES
Appliance for any EcoDesign verification shall be compliant with EN 62552.
Ventilation requirements, recess dimensions and minimum rear clearances shall be as stated in this User Manual at Chapter 2. Please contact the manufacturer for any other further information, including loading plans.
11 CUSTOMERCAREAND SERVICE
Always use original spare parts.
When contacting our Authorised Service Centre, ensure that you have the following data available: Model, Serial Number and Service Index.
The information can be found on the rating plate. You can find the rating label inside the fridge zone on the left lower side.
The original spare parts for some specific components are available for a minimum of 7 or 10 years, based on the type of component, from the placing on the market of the last unit of the model.
Visit our website to:
www.sharphome.eu
text_image
Technical diagram of an open refrigerator with numbered parts for identification
text_image
1 2 3 08 = | M | 6 5 4text_image
E ■ | x |natural_image
Illustration of a hand interacting with a finger, pointing at a black square (no text or symbols)natural_image
Line drawing of a cabinet or rack with a handle and side panel, no text or symbols presentnatural_image
Technical line drawing of a mechanical bracket or bracket assembly (no text or symbols)
text_image
Technical diagram showing a device with internal structure and a separate labeled component with a leaf symbol.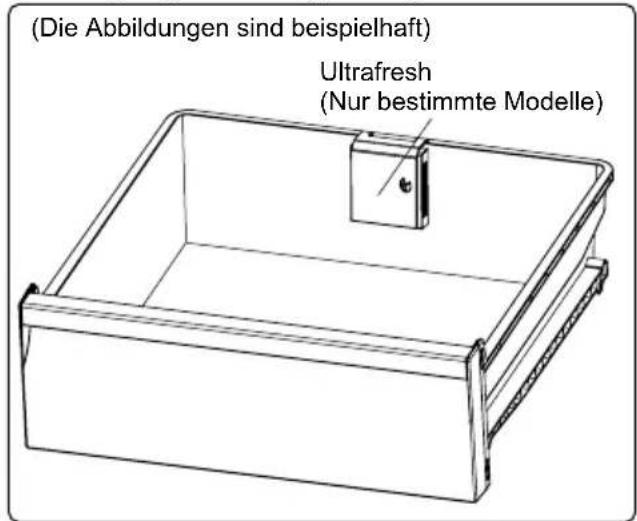
natural_image
Technical line drawing of a structural beam with an inset showing a hand holding a component (no text or symbols present)3.5 Accessoires ....57
text_image
Technical diagram of an open refrigerator with numbered compartments and labeled parts
text_image
1 2 3 08 = | M | 6 5 4text_image
04.0 | M |text_image
E = |n| |natural_image
Illustration of a hand interacting with a black screen displaying a white square (no text or symbols)This mode can be used to save energy when you go on vacation.
How Would It Be Used?
*Select "8" set value.
*Push mode and cooler Set Button for 5 seconds.
*Display will show "St" "bY" on the screen.
During This Mode:
In stand-by mode; all components will be disabled.
If you push the display button, display will show "St" "bY" on the screen to show stand-by mode is active.
To cancel; push mode and cooler set button for 5 seconds.
After the mode is deactivated, an error code may light on the display because the product maybe not cool enough. The error code will turn off when the product reaches normal temperature.
natural_image
Line drawing of a cabinet or rack with a handle and ladder, no text or symbols presentnatural_image
Technical line drawing of a mechanical bracket or bracket assembly (no text or symbols)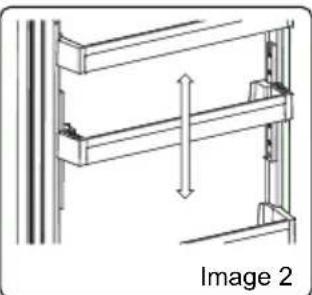
natural_image
Technical line drawing of a structural frame with vertical dimension and label 'Image 2' (no text or symbols on the diagram itself)
text_image
Diagram showing a device with labeled ports and a directional arrow indicating flow or movement.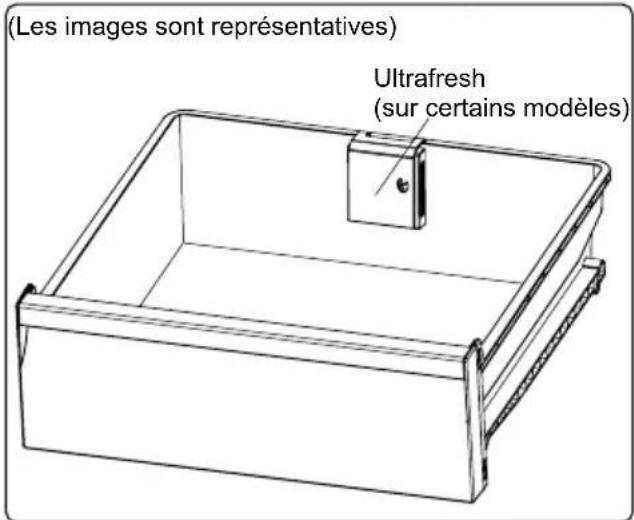
natural_image
Technical line drawing of a structural component with an inset showing a hand holding a circular object (no text or symbols present)2 BESCHRIJVING VAN HET APPARAAT 73
3 GEBRUIK VAN HET APPARAAT 73
2 BESCHRIJVING VAN HET APPARAAT

text_image
Technical diagram of an open refrigerator with numbered parts for identification
text_image
1 2 3 08 = | M | 6 5 4Bedieningspaneel
text_image
04.0 | M |3.2.3 Screensaverstand
Doel
natural_image
Illustration of a hand interacting with a black background, no text or symbols presentScreensaverstand deactiveren
natural_image
Line drawing of a cabinet or rack with ladder and handle (no text or symbols)natural_image
Technical line drawing of a mechanical bracket or bracket assembly (no text or symbols)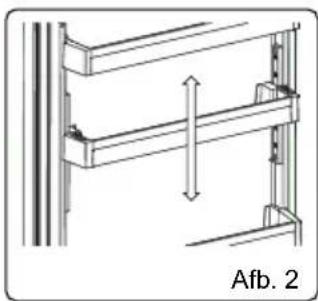
natural_image
Technical line drawing of a structural frame with vertical supports and horizontal beams, labeled 'Afb. 2' (no text or symbols on the diagram itself)text_image
Diagram showing a device with labeled ports and a directional arrow indicating rotation or movement.natural_image
Technical line drawing of a mechanical component with an inset showing a hand holding a circular component (no text or symbols present)-bed and breakfast e strutture analoghe;
text_image
Technical diagram of an open refrigerator with numbered parts for identification
text_image
1 2 3 08 = | M | 6 5 4text_image
04.0 | M |natural_image
Illustration of a hand interacting with a black screen displaying a white square and a vertical line (no text or symbols)natural_image
Line drawing of a cabinet or rack structure with no visible text or symbolsnatural_image
Technical line drawing of a door frame with directional arrows indicating movement (no text or symbols)0
natural_image
Technical line drawing of a cabinet or rack with directional arrows indicating movement (no text or symbols)natural_image
Technical line drawing of a mechanical bracket assembly (no text or symbols)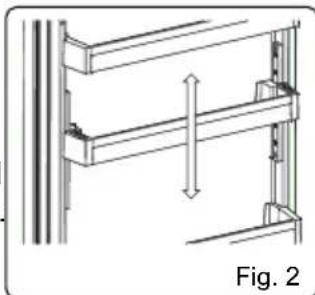
natural_image
Technical line drawing of a structural frame with vertical dimension arrow, labeled Fig. 2 (no text or symbols on the diagram itself)
text_image
Diagram showing a device with ventilation slots and airflow direction, including a labeled component with a flame icon.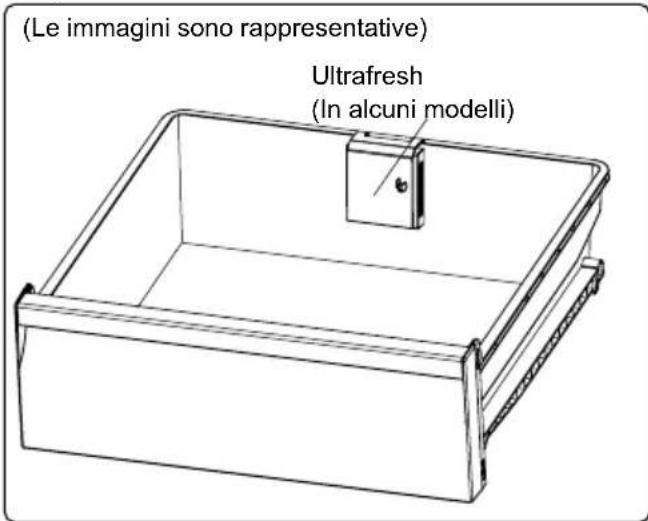
natural_image
Technical line drawing of a structural component with an inset showing a hand holding a circular object (no text or symbols present)text_image
Technical diagram of an open refrigerator with numbered parts for identification
text_image
1 2 3 08 = | M | 6 5 4text_image
04.0 | M |natural_image
Illustration of a hand interacting with a black screen displaying a white square and the letter 'N' (no text or symbols on the screen)natural_image
Line drawing of a cabinet or rack with a door and shelf, no text or symbols presentnatural_image
Technical line drawing of a structural bracket with mounting holes and a small inset detail labeled 'Fig. 1' (no text or symbols on the diagram itself)
text_image
Diagram showing airflow or ventilation system with labeled components and directional arrows indicating flow direction.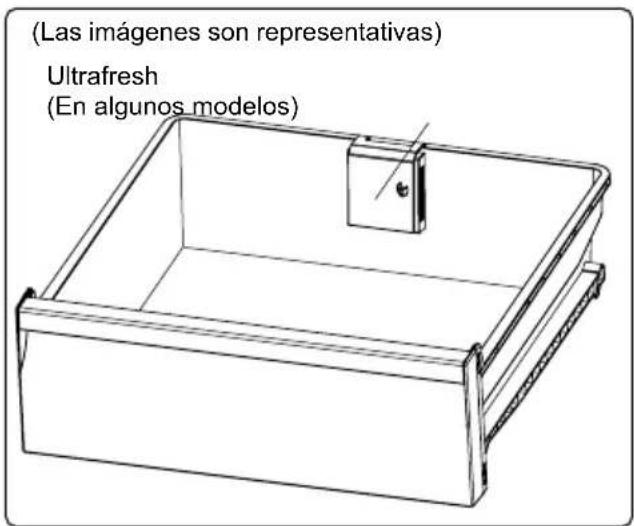
natural_image
Technical line drawing of a structural component with an inset showing a hand holding a circular object (no text or symbols present)flowchart
graph TD
    A["User Icon"] --> B["LED"]
    B --> C["LED"]
    C --> A


