
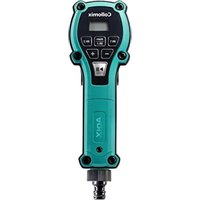
XQ1 - Cement mixer Collomix - Free user manual and instructions
Find the device manual for free XQ1 Collomix in PDF.


| Brand | Collomix |
| Model | XQ1 |
| Product type | Portable cement mixer |
| Voltage | 120 V AC |
| Frequency | 60 Hz |
| Rated power | 1100 W / 10 A |
| No-load speed (n0) | 0 - 930 rpm |
| Speed under load (nL) | 0 - 650 rpm |
| Agitator shaft thread | 5/8" x 16 UN |
| Maximum mixer diameter | 120 mm (4 3/4") |
| Weight (without mixer) | 4.3 kg (9.5 lb) |
| Protection class | II (double insulation) |
| Sound pressure level (LpA) | 83 dB(A) |
| Sound power level (LWA) | 91 dB(A) |
| Total vibration (mineral mixing) | 2.4 m/s² |
| Agitator attachment system | HEXAFIX (13 mm socket) |
| Main functions | Mixing of liquid and powdery materials (paints, mortars, adhesives) |
| Maintenance and cleaning | Clean after each use; lubricate HEXAFIX coupler; keep ventilation slots clean |
| Safety | On/Off switch with unlocking device; overload protection; use gloves and goggles |
| Delivery contents | 1 hand mixer, 1 agitator, 1 Hexafix coupler, 1 instruction manual, 1 safety instructions |
| Spare parts and repairability | Use only original Collomix accessories and spare parts; repairs by authorized service center |
Frequently Asked Questions - XQ1 Collomix
User questions about XQ1 Collomix
0 question about this device. Answer the ones you know or ask your own.
Ask a new question about this device
Download the instructions for your Cement mixer in PDF format for free! Find your manual XQ1 - Collomix and take your electronic device back in hand. On this page are published all the documents necessary for the use of your device. XQ1 by Collomix.
USER MANUAL XQ1 Collomix
EN Original Operating Instructions Electronic Hand-Mixer
natural_image
Pure mechanical component diagram without any text, numbers, or symbols

| XQ1 XQ4 XQ6 | |||
| LX 120 | ● | ● | ● |
Collomix DLX
natural_image
3D rendering of a mechanical impeller or turbine component with no visible text or symbols

XQ1 XQ4 XQ6
flowchart
graph TD
    A["Hexagon"] --> B["Hexagon"]
    B --> C["Hexagon"]
    C --> A
HEXAFIX
VIDEO

TUTORIAL
natural_image
Close-up of a mechanical tool with a hexagonal base and labeled component B, showing motion arrows (no readable text or symbols)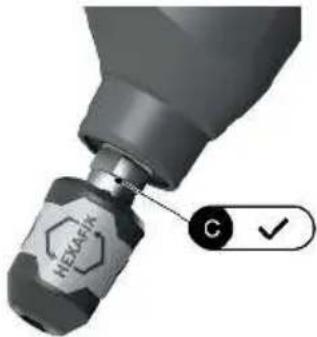

natural_image
Two simple upward and downward arrow shapes (no text or symbols)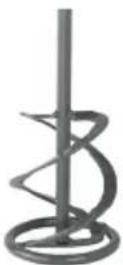
VIDEO

TUTORIAL
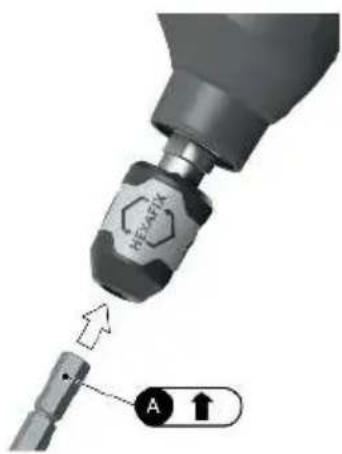
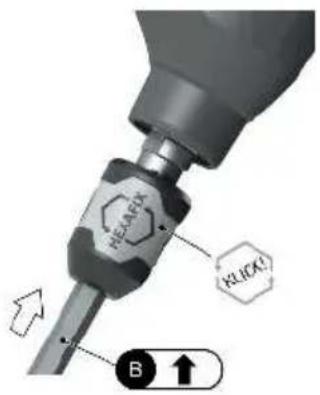
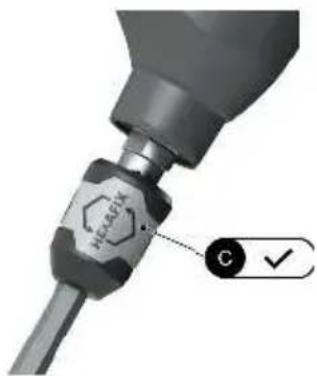
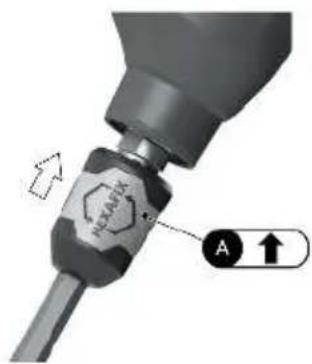
XQ1 XQ4 XQ6
Rated power/Current consumption: 1100 W / 10 amps 1400 W / 13.0 amps 1600 W / 14.8 amps
Power supply: 120 volts AC 120 volts AC 120 volts AC
| Frequency: | 60 Hz | 60 Hz | 60 Hz | |
| No-load speed: | n_0 = | 0 - 960 min ^-1 | ||
| Rpm under load: | n_L = | 0 - 650 min ^-1 | ||
| Controlled load speed: | n_L = | 400 min ^-1 or 550 min ^-1 or 700 min ^-1 | 300 min ^-1 to 750 min ^-1 | |
| Threaded spindle mixing shaft: | 5/8"x16 UN | 5/8"x16 UN | 5/8"x16 UN | |
| Maximum mixing tool diameter: | 120 mm / 4 ^3/4 " | 140 (150*) mm / 5 ^1/2 " | 170 mm / 6 ^3/4 " | |
| Weight w/o mixing tool: | 4,3 kg / 9.5 lb | 5,6 kg / 12.4 lb | 5,7 kg / 12.6 lb | |
| Protection class: | ☐ / II | ☐ / II | ☐ / II |
Machine components
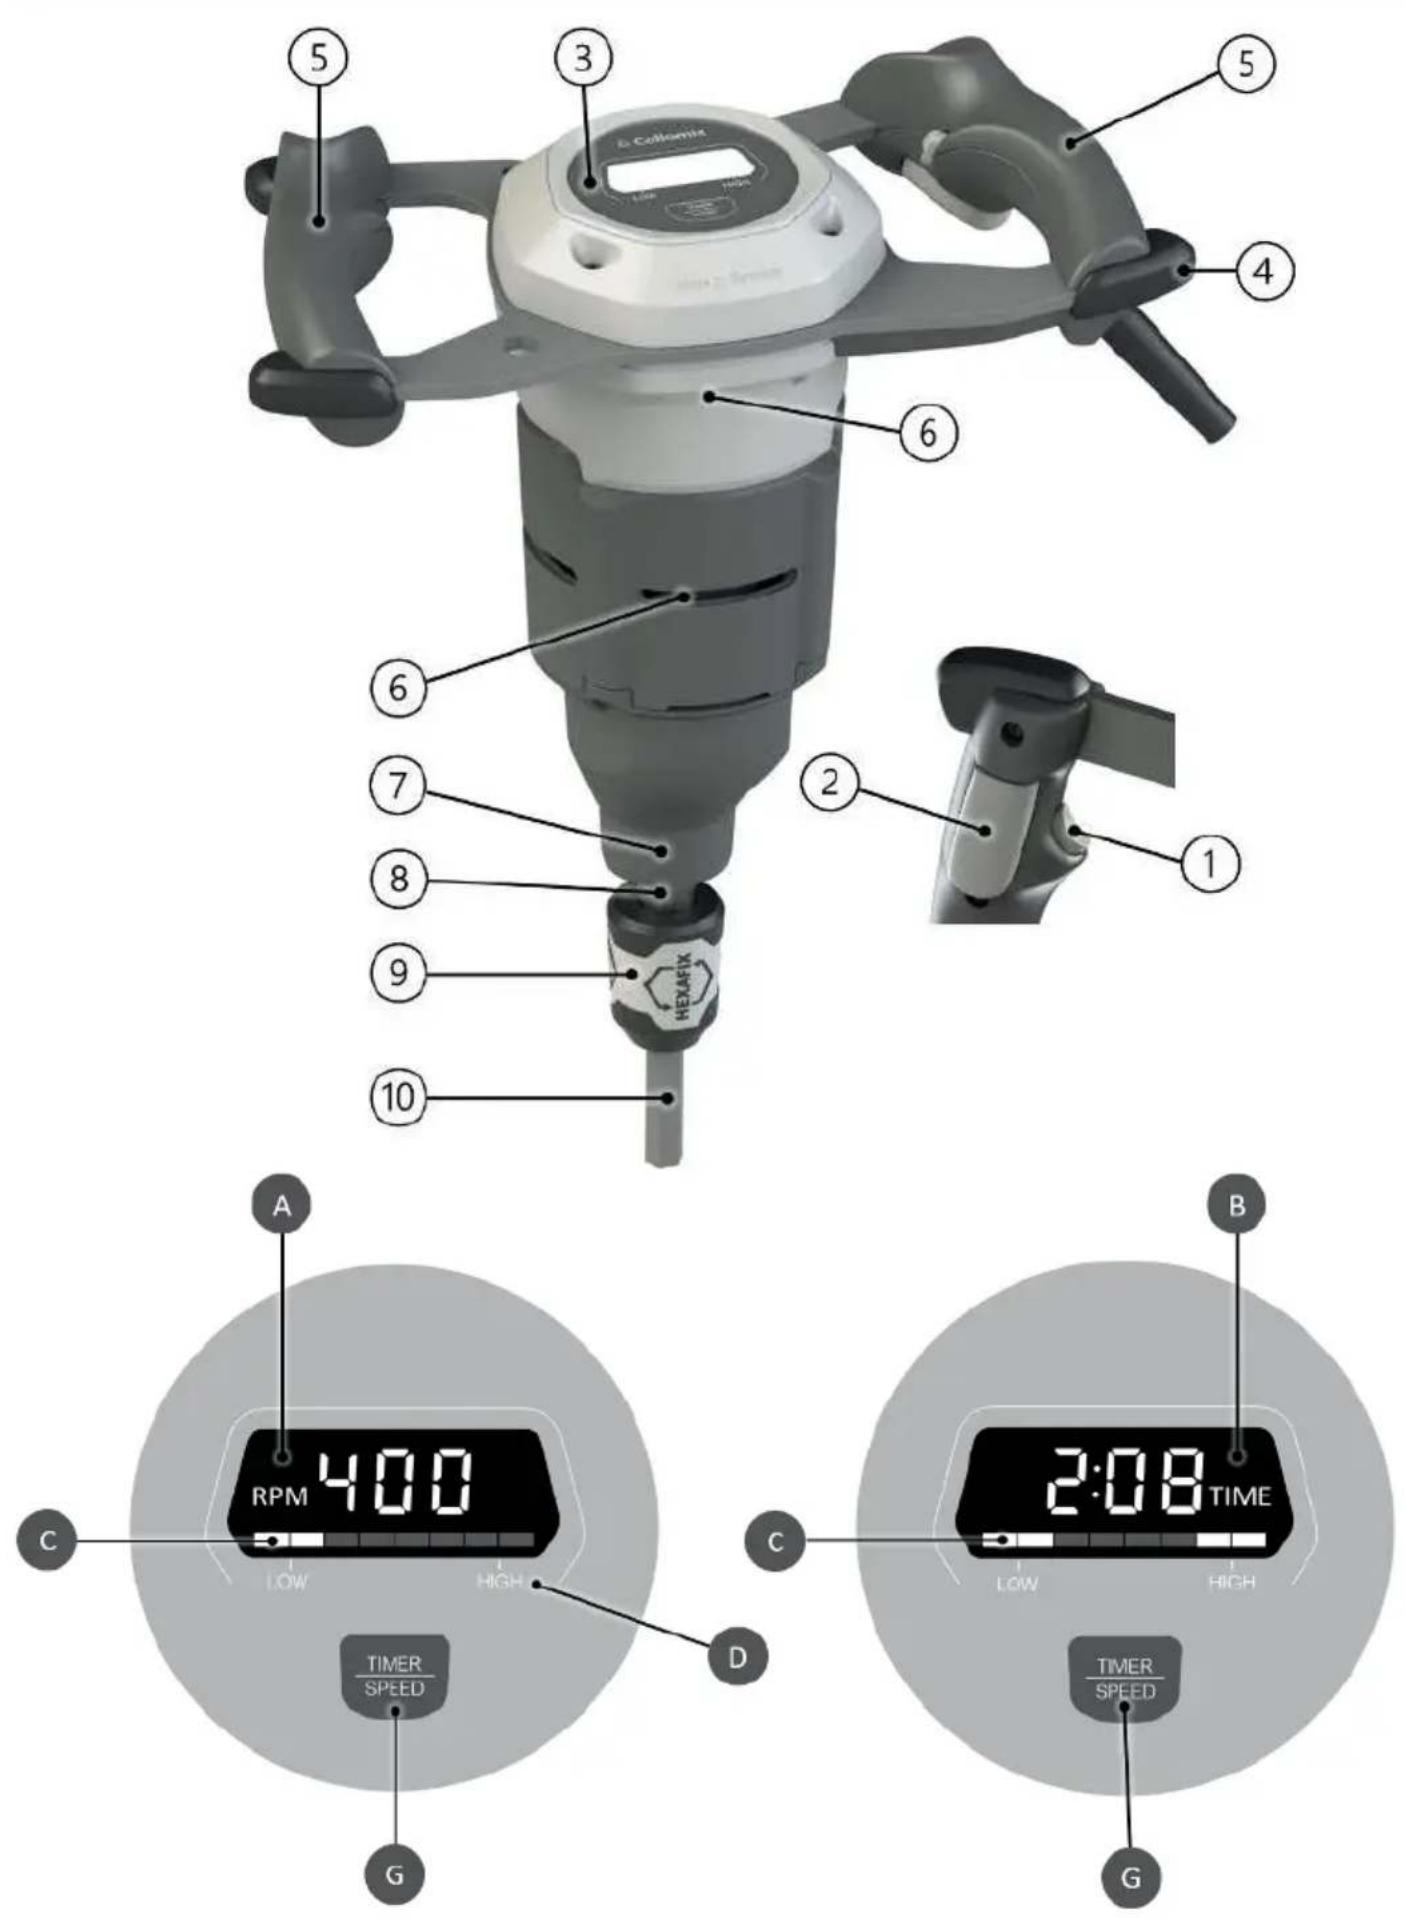
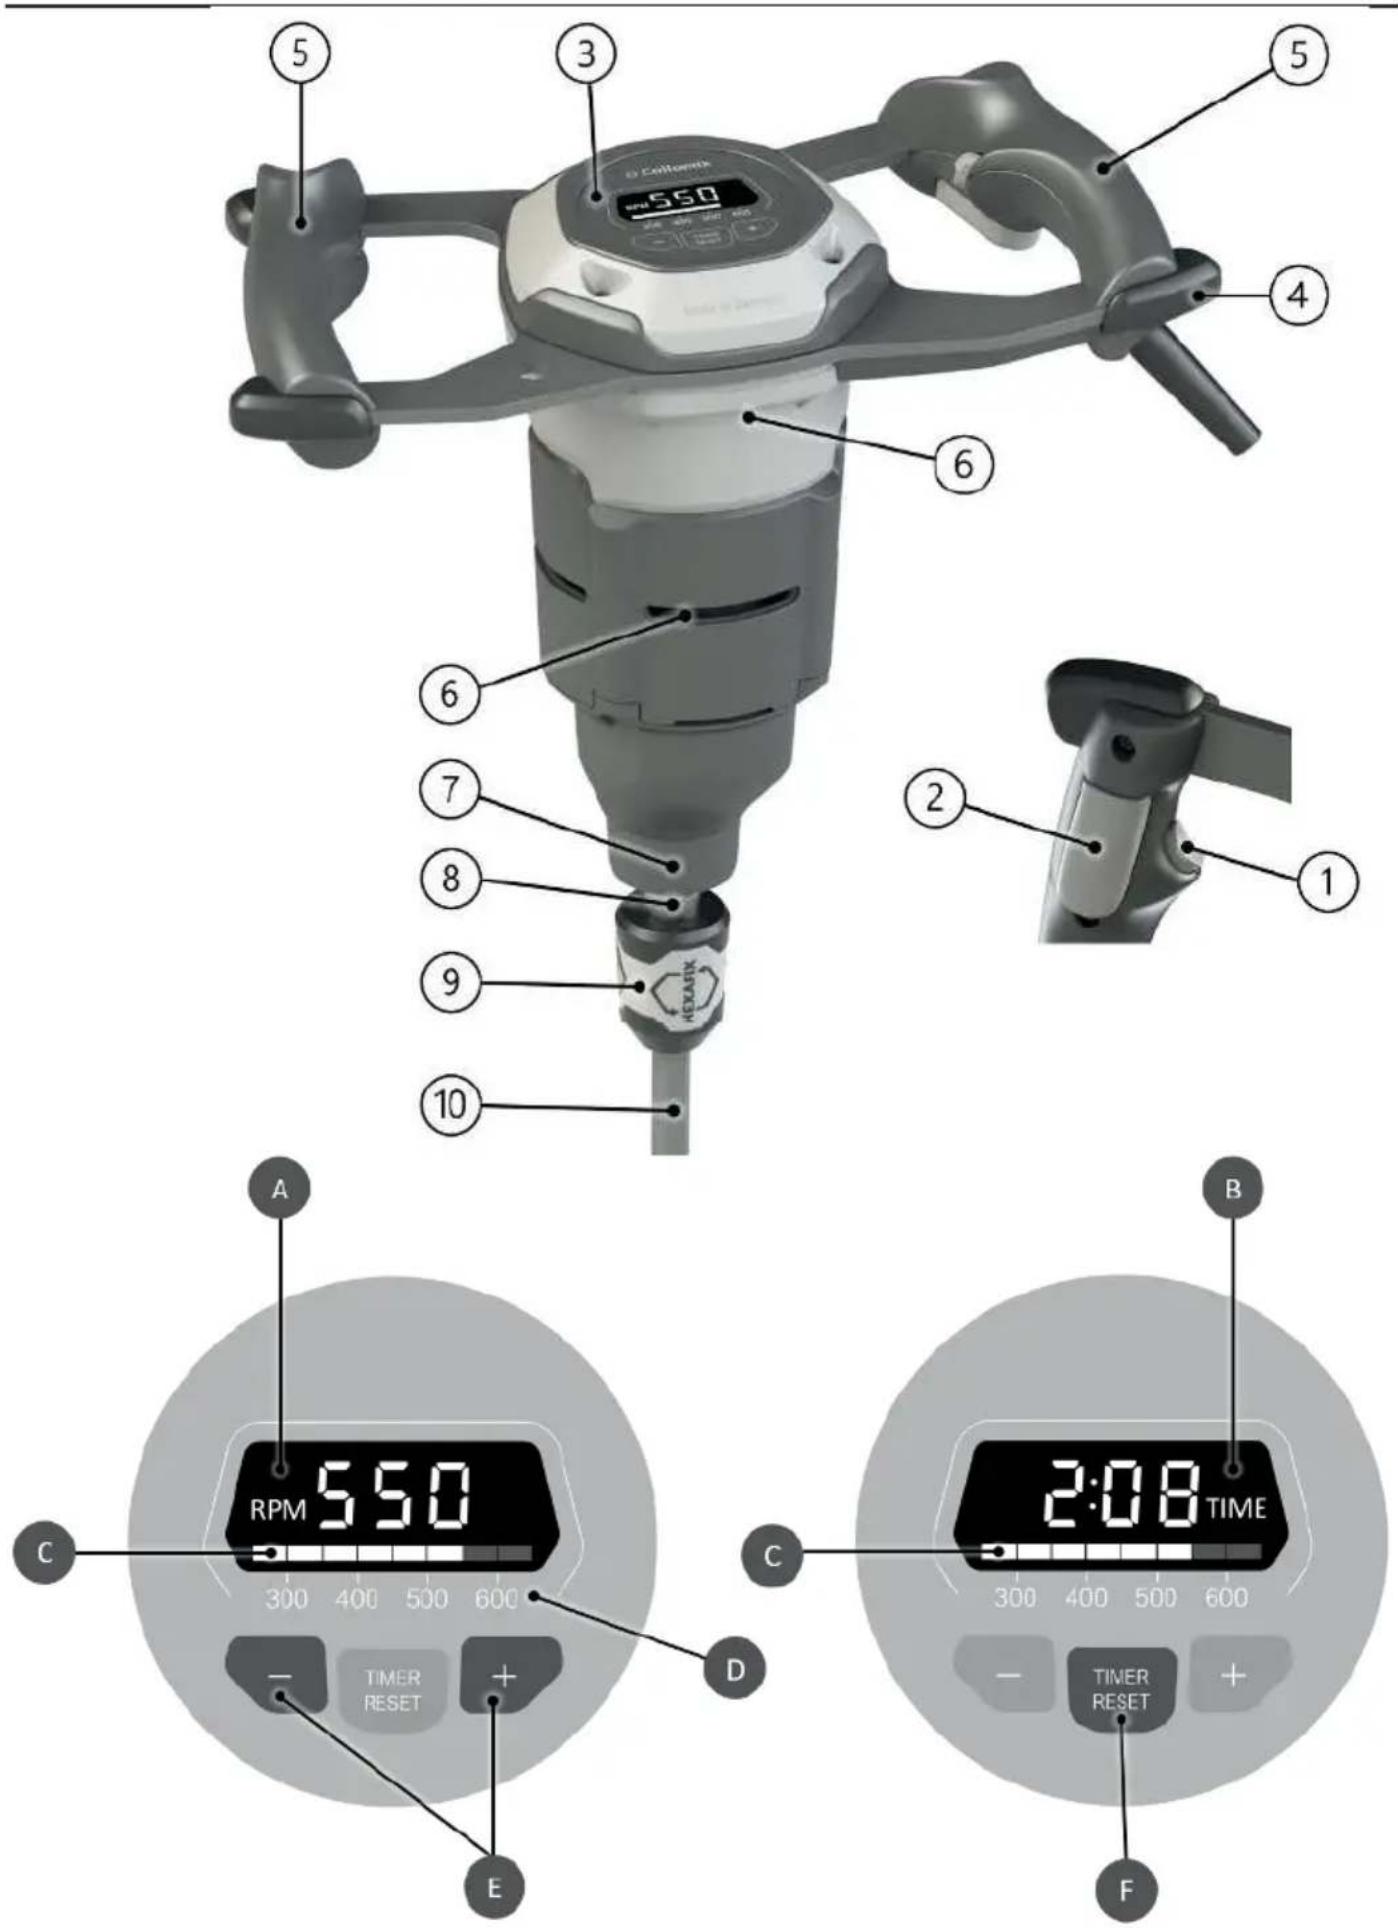
1 Release butt on for ON/OFF switch
2 ON/OFF switch
3 Display (XQ4/XQ6 only)
4 Handle frame with edge protecti on
5 Handles
6 Venti lati on slits
7 Neck of the machine
8 Machine shaft
9 HEXAFIX adapter
10 Mixing tool with HEXAFIX-shaft
Noise/vibrati on levels
Measured values determined in accordance with EN 62841. The A-weighted noise level of the machine is typically:
| Sound pressure level L_pA [dB(A)] | Sound power level L_WA [dB(A)] | |
| XQ1 | 83 dB(a) | 91 dB(a) |
| XQ4 | 82 dB(a) | 90 dB(a) |
| XQ6 | 83 dB(a) | 91 dB(a) |
| Uncertainty K = 3 dB | ||
Overall vibrati on level (for mixing of mineral materials)
| Emission level an [m/s2] | |
| XQ1 | 2,4 m/s2 |
| XQ4 | 3,1 m/s2 |
| XQ6 | 3,0 m/s2 |
| Uncertainty K = 1,5 m/s2 |

WARNING:
The measured values which are provided apply to new machines. Noise and vibrati on levels change with day-to-day use.

NOTE
The vibration level given in these instructions was measured in accordance with a standardized method of measurement as defined in EN 62841 and can be used for the purposes of comparing electrical tools with each other. It is also suitable for a preliminary estimation of vibration strain. The vibration level which is given represents vibration level for the primary use of the electrical tool. If, however, the electrical tool is used for any other purposes, with different plug-in tools or with insufficient maintenance, the vibration level may vary. This can result in a significantly higher level of vibration on strain over the work period as a whole.
For a precise esti mati on of the vibrati on strain the times when the machine is switched off have to be taken into account as well, as do the ti mes when it is running but is not actually being used. This can result in a significantly reduced level of vibrati on strain over the work period as a whole.
EU Declarati on of Conformity
We declare under our sole responsibility that this products *1) comply with the following standards or normative documents *2) as well as the provisions of the applicable directives *3). Technical documentation can be requested from *4) - for detailed information on see page 2.
Machine-specific safety instructions

WARNING: Read all safety warnings, instructors, illustrati ons and specifi cati ons provided with other tool. Failure to follow all instructi ons listed below result in electric shock, fi re and/or serious injury.
Save all warnings and instructi ons for future reference.
The term “power tool” in the warnings refers to your mains-operated (corded) power tool or batt ery-operated (cordless) power tool.
To be able to use the machine safely it is essential that you read the operating instructions and the safety instructions thoroughly and comply with all of them. The machine is to be used only by persons who have read the operating instructions and who are acquainted with the occupational safety and accident prevention on regulations in force in your country.

DANGER: In addition, you must also comply the general safety instructions also included with machine.
▶ Take care to ensure that the mains power supply corresponds to the specifications on the rating plate.
▶ Hold the power tool with both hands by the handles provided. Loss of control may result in injury.
▶ To avoid a dangerous atmosphere, ensure adequate ventilation when mixing flammable substances. Vapours formed may be inhaled or ignited by sparks generated by the power tool.
▶ Do not stir any food. Power tools and their insert tools are not designed for processing food.
▶ Keep the power cord away from the working area. The mains cable may get caught in the stirring basket.
▶ Ensure that the mixing bucket is firmly and safely positioned. An improperly secured bucket may move unexpectedly.
▶ Make sure that no liquid splashes against the housing of the power tool. Liquid entering the power tool can cause damage and electric shock.
▶ Follow the instructions and safety instructions for the material to be mixed. The material to be mixed may be harmful to health.
If the power tool falls into the material to be mixed, immediately unplug the power plug and have the power tool checked by qualified personnel. Reaching into the bucket with the power tool still hanging from the socket inside it can lead to an electric shock.
▶ Do not reach into the stirring container with your hands or insert any other objects while stirring. Contact with the paddle can cause serious injury.
▶ Only let the power tool run on and off in the stirring bucket. The paddle can spin around or bend in an uncontrolled manner.
Further safety instructions:
▶ Do not wind cables or leads around any parts of your body.
Do not use the machine with a damaged cable. Do this not touch the cable and pull out the power plug immediately. There is an increased risk of electric shock from damaged cables. If the mains power cable has to be replaced (because of damage or similar), ensure that it is replaced by the manufacturer or an authorized representative of the manufacturer (electrician) in order to avoid any risk to safety.
Hold the machine by the insulated grip surfaces when carrying out work where it may be possible for the plug-in tool to come into contact with concealed power cables or the machine's own mains power cable. Contact with a live cable may make metal components of the machine live as well and could cause an electric shock.
▶ Before starting up, check that the mixing rod is securely attached and rotates without a hitch.
▶ Only operate the machine and the mixing tool in perfect condition. Do not use damaged, bent or worn paddles.
It is not permitted to permanently fix the switches on the machine.
▶ If the sound pressure level should exceed 85 dB (A) where you are working, use ear protection!
We recommend that you wear work gloves and protective goggles when using the mixer. Regulations require that you wear close-fitting clothing.
▶ Always connect machines via a residual current device (RCD) with a rated residual current of 30 mA or less.
CALIFORNIA PROPOSITION 65 WARNING
WARNING
CANCER AND REPRODUCTIVE HARM
WWW.P65WARNINGS.CA.GOV
Grinding/cutting/drilling and other construction activities with power tools contains chemicals know to the State of California to cause cancer, birth defects and other reproductive harm. Some examples of these chemicals are:
- Lead from lead-based paints
• Crystalline silica from bricks
• Cement and other masonry products
• Arsenic and chromium from chemically treated lumber - Softener from rubber materials
Your risk from these exposures varies, depending on how often you do this type of work. To reduce your exposure to these chemicals: ALWAYS work in a well ventilated area, and work with approved safety equipment, such as dust masks that are specially designed to filter out microscopic particles, or use an appropriate dust extraction system with micro part filter linked to the machine, to filter out microscopic particles.

Read and observe the operati ng instructi ons for the machine before you start it up!

Always wear protecti ve goggles and ear protecti on while working.

It is advisable to wear a dust mask whenever working with materials which generate large amounts of dust.
Operation
▶ Check that the power supply shown on the rating plate is the same as the mains power supply.
XQ1
Always hold the machine with both hands.
Press the release butt on (1).
Press the ON/OFF switch (2).
The more pressure you apply to the ON/OFF switch, the faster the machine will run. The ON/OFF switch cannot be locked!
To stop working, release the ON/OFF switch.
Proper use
The machine is designed for mixing liquid and powder-based building products such as paints, mortar, adhesives, plaster and similar substances. Use the right mixing tool for the consistency of the material and the quantity to be mixed.
Please refer to the information in the technical data when choosing the size of mixing tool (diameter/mixing action). If the wrong mixing acti on or mixing tool diameter is selected, this may cause the machine/gear unit to become overloaded and lead to damage as a result. Please remember that a mixing tool with a mixing acti on from the top down puts a greater strain on the electrical tool than one with the reverse mixing acti on.
This electrical tool is not designed for use in conti nuous operati on.
Given the high torque levels generated by the machine, it must not be used as a power drill.
The machine must not be used for the preparation of foodstuff s.
The machine is not suitable for mixing materials containing graphite dust, brine or slurry. Mixing of these materials or substances may damage the machine beyond repair.
Assembly

DANGER: Always pull the power plug outlet before carrying out any work on the line.
Fitting the mixing tool mount:
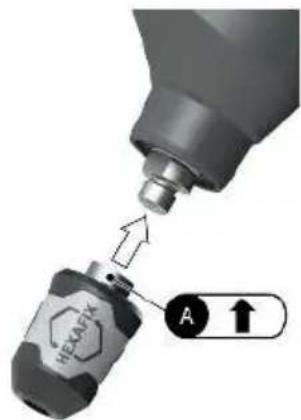
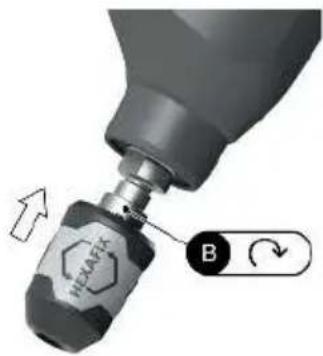
Take the HEXAFIX coupling supplied with the packaging and screw it to the male thread (5/8") of the machine shaft.
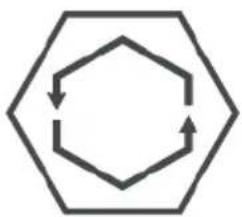
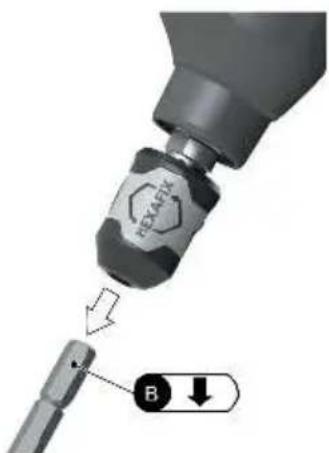
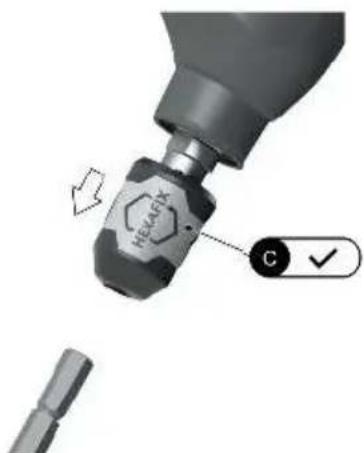
HEXAFIX (Fitting the mixing tool / tool change-over):
Insert the mixing tool with the HEXAFIX mount in the coupling until it locks. To release or change the mixing tools, simply pull back the handle-collar on the coupling and this releases the mixing tool.
XQ4 XQ6
When the machine is connected to the mains voltage, the last selected speed setting appears on the display (3). Always hold the machine with both hands.
XQ4: The LOW (400 rpm) or MED (550 rpm) or HIGH (700 rpm) speed can be selected by briefly pressing the TIMER / SPEED button (G).
XQ6: The +/- buttons (E) can be used to set the maximum speed in the range between 300 rpm and 750 rpm. To start the machine, first press the relase button (1).
The machine starts up when the ON/OFF switch (2) is subsequently pressed.
The display automatically switches to the time display (B) of the currently completed mixing time.
The set maximum speed (C) can still be recognised at the bottom edge via the bar display.
The more pressure you apply to the ON/OFF switch (2), the faster the machine will run.
The ON/OFF switch cannot be locked!
The speed increases until the set maximum is reached.
The measurement of the current mixing time only continues while the ON/OFF switch is being pressed.
To stop working, release the ON/OFF switch.
The measurement of the current mixing time is paused. The mixing time display can be set to 0:00 at any time:
XQ4: long press on TIMER / SPEED (G) button
XQ6: Press the TIMER RESET button (F)
If the machine stops for more than 1 minute, the machine automatically performs a RESET of the mixing time.
The last selected speed appears briefly in the display, after which the display changes to the mixing time display 0:00.
The maximum mixing time in the display is 9:59.
The display dims automatically after 20 seconds.
When any button is pressed, the display lights up again for better legibility.
If an error code (e.g. E06) appears on the display (only XQ4/XQ6), disconnect the machine from the mains by pulling out the plug and allow it to cool down if necessary. After reconnecting to the mains, the control unit restarts and deletes the error code.
Tips for safe working:
Always reduce the speed when submerging the mixing tool in the mixing material or lifting it out. Once mixing tool is fully submerged, increase the speed again to ensure that the motor is adequately cooled.
During mixing you should guide the machine around the mixing container. Continue mixing until all of mixing material is completely mixed. Please follow the processing instructions of the manufacturer of the material.
You work better and safer when the mixing tool used is clean, free of material residues and in perfect condition.
The greater the viscosity of the material, the greater the impact of the torque forces on the machine, so you should be prepared for this when you carry out your work.
If the mixing tool comes into contact with a surface (e.g. the bottom of the tub) while running, it may kick back.
Set the machine down resting on the guard handle after you have finished your mixing work.
For transportati on purposes the HEXAFIX mixing tool can be inserted through the hexagon punch-hole provided in the handle frame.
Care and maintenance

DANGER: Before you carry out any operations on machine, and especially when changing the mixing always pull out the power plug out fi rst.
Clean the machine and the mixing tool immediately after use. Remove any dirt with a dry cleaning cloth. We recommend that you use the Collomix MIXER CLEAN cleaning bucket for cleaning.
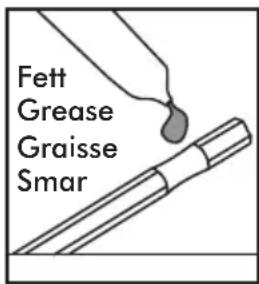
Keep the HEXAFIX coupling clean and freely moving at all times. Take the mixing tool out of the coupling after you have finished your work. Grease the hexagon mount of the coupling at regular intervals with suitable grease.
Keep the venti lati on slits clean and clear at all times so that the
machine can be properly cooled. Blocked venti lati on slits will lead to irreparable damage to the machine.
Make sure that the ON/OFF switch moves and releases smoothly at all times.
The machine is equipped with self-deactivating carbon brushes. This means that the machine will shut itself down once a certain level of wear is reached. The carbon brushes can be replaced by the authorized customer service center or by the Collomix Service center.
To avoid safety hazards, all repairs, in particular the replacement of the mains connecti on cable, must only be carried out by an approved workshop or by your Collomix Service!
Only use original Collomix accessories (e.g. mixer, adapter, extension) and spare parts. Suitable accessories, exploded drawings, spare parts lists for your machine and the form for repair orders can be found at the www.collomix.com
Disposal
The device, accessories and packaging should all be the consigned for environment-friendly recycling.
Electrical tools which have come to the end of their service lives must be made unusable by removing the mains power cable.
Do not dispose of electrical tools with household waste.
Warranty
The manufacturer provides a warranty within the framework of his terms and conditions of delivery accordance with the requirements of statutory/country-specific provisions. Should you need to make a claim under the warranty, please provide us with your invoice or delivery note.
On no account will any warranty claims be accepted if any repairs are carried out by third parties. In the event of any irregularities, please send the machine to us.
Complaints can only be accepted if the device is sent to the Collomix Service center undismantled.
The warranty does not apply to damages caused by normal wear, overloading, improper handling, unsuitable accessories or inadequate maintenance.
Any structural or functional modifications to the machine which are made without our agreement shall render the warranty and the Declaration of Conformity null and void.
Subject to change.
Content
1x Mixing machine
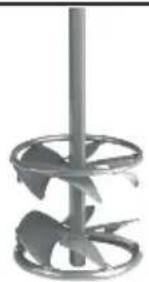
1x Mixing paddle
1x Hexafix adapter
1x Manual
1x General safety notes
Serviceadress USA and Canada:
Collomix North America Inc.
648 Crescent Court
Milwaukee, WI 53213
Phone: 414 471 3883
Fax: 414 918 8032
E-mail: al.karraker@collomix.com
www.collomix.us
Manufacturer:
Collomix GmbH - Daimlerstrasse 9
85080 Gaimersheim - Germany
EN
XQ1 XQ4 XQ6
Puissance nominale/courant absorbé : 1100 W / 10 amps 1400 W / 13.0 amps 1600 W / 14.8 amps
Collomix North America Inc.
648 Crescent Court
Milwaukee, WI 53213
Phone: 414 471 3883
Fax: 414 918 8032
E-Mail: al.karraker@collomix.com
www.collomix.us
Collomix North America Inc.
1648 Crescent Court
Milwaukee, WI 53213
Phone: 414 471 3883
Fax: 414 918 8032
E-Mail: al.karraker@collomix.com
www.collomix.us
Fabricante:
Collomix GmbH
Daimlerstraße 9
85080 Gaimersheim
Alemania

www.collomix.com
CALIFORNIA PROPOSITION 65 WARNING
WARNING
CANCER AND REPRODUCTIVE HARM WWW.P65WARNINGS.CA.GOV

FR


- Collomix DLX
- XQ1 XQ4 XQ6
- Machine components
- Noise/vibrati on levels
- WARNING:
- NOTE
- EU Declarati on of Conformity
- Machine-specific safety instructions
- Further safety instructions:
- CALIFORNIA PROPOSITION 65 WARNING
- WARNING
- CANCER AND REPRODUCTIVE HARM
- WWW.P65WARNINGS.CA.GOV
- Operation
- XQ1
- Proper use
- Assembly
- XQ4 XQ6
- Tips for safe working:
- Care and maintenance
- Disposal
- Warranty
- Content
Brand : Collomix
Model : XQ1
Category : Cement mixer