
TS8XL - Saw DEXTER - Free user manual and instructions
Find the device manual for free TS8XL DEXTER in PDF.

| Product Type | Table Saw |
| Brand | Dexter |
| Model | TS8XL |
| Power | 1500 W |
| Power Supply | 220-240 V~ 50 Hz |
| No-Load Speed | 5000 min⁻¹ |
| Saw Blade | ø 210 x 30 x 2.8 mm, 24 carbide teeth |
| Table Dimensions | 675 x 500 mm |
| Max. Cutting Height at 90° | 70 mm |
| Max. Cutting Height at 45° | 45 mm |
| Blade Tilt | 0° to 45° |
| Dust Extraction Connection | ø 35.5 mm |
| Weight | 14 kg |
| Sound Pressure Level | 99.6 dB(A) |
| Sound Power Level | 112.6 dB(A) |
| Protection Class | II |
| Operating Mode | S1 |
| Warranty | 2 years |
| Wear Parts | Carbon brushes, saw blade, table inserts |
| Included Accessories | Parallel guide, angle guide, push stick, clamping keys |
| Intended Use | Longitudinal and cross cutting of wood |
| Maintenance | Clean regularly, oil rotating parts monthly |
Frequently Asked Questions - TS8XL DEXTER
User questions about TS8XL DEXTER
0 question about this device. Answer the ones you know or ask your own.
Ask a new question about this device
Download the instructions for your Saw in PDF format for free! Find your manual TS8XL - DEXTER and take your electronic device back in hand. On this page are published all the documents necessary for the use of your device. TS8XL by DEXTER.
USER MANUAL TS8XL DEXTER
natural_image
Black and white photo of a Kicker Hard machine with metal frame and adjustable handle (no visible text or symbols)TS8XL
| DE | TischkreissägeOriginalbedienungsanleitung | 7 |
| GB | Table SawTranslation of original instruction manual | 22 |
| FR | Scie de tableTraduction des instructions d'origine | 35 |

natural_image
Close-up of a machine tool with a coiled cable and labeled component (no text or symbols beyond numbers)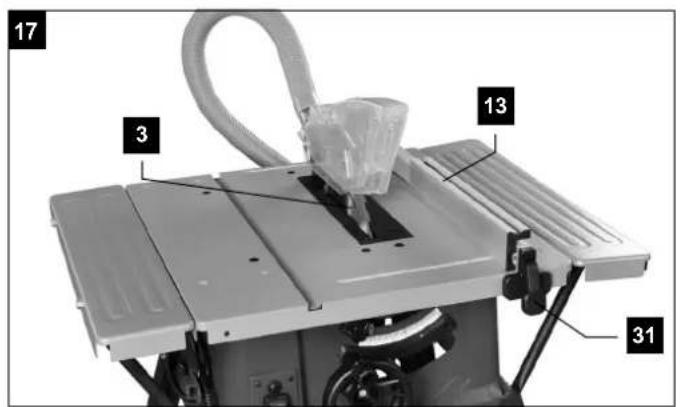

natural_image
Mechanical setup with a tool applying material to a flatbed tray, labeled with number 20 and 14 (no text or symbols on the object itself)21
natural_image
Close-up of a hand operating a machine with a hose and wooden panel, no visible text or symbols22
natural_image
Close-up of a hand using a machine to cut a wooden plank with a plastic cover, showing components numbered 7 and 32 (no text or symbols on the main subject)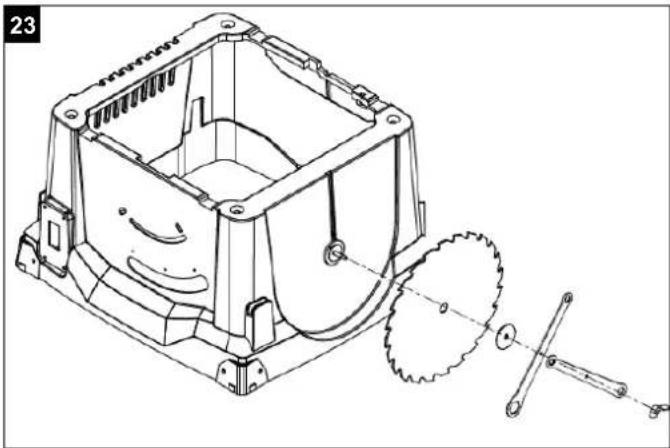
natural_image
Technical line drawing of a mechanical housing with a gear and tool, no text or symbols presentExplanation of the symbols on the equipment
 | Warning! Danger to life, risk of injury or damage to the tool are possible by ignoring!. |
 | Caution - Read the operating instructions to reduce the risk of inquiry |
 | Wear safety goggles! |
 | Wear ear-muffs! |
 | Wear a breathing mask! |
 | Important! Risk of injury. Never reach into the running saw blade! |
 | Protection class II |
Table of contents: Page:
- Introduction......24
- Device Description 24
- Unpacking 24
- Intended use....25
- Safety information 25
- Technical Data....29
- Before starting the equipment 30
- Construction 30
- Using the saw....31
- Operation....32
- Transport 33
- Maintenance....33
- Storage....33
- Electrical connection 33
- Disposal and recycling 34
- Troubleshooting....34
1. Introduction
Manufacturer:
LEROY MERLIN
Rue Chanzy
Lezennes 59712 LILLE Cedex 9
France
Dear customer,
We hope your new tool brings you much enjoyment and success.
Note:
According to the applicable product liability laws, the manufacturer of the device does not assume liability for damages to the product or damages caused by the product that occurs due to:
- Improper handling,
• Non-compliance of the operating instructions, - Repairs by third parties, not by authorized service technicians,
- Installation and replacement of non-original spare parts,
- Application other than specified,
- A breakdown of the electrical system that occurs due to the non-compliance of the electric regulations and VDE regulations 0100, DIN 57113 / VDE0113.
We recommend:
Read through the complete text in the operating instructions before installing and commissioning the device.
The operating instructions are intended to help the user to become familiar with the machine and take advantage of its application possibilities in accordance with the recommendations.
The operating instructions contain important information on how to operate the machine safely, professionally and economically, how to avoid danger, costly repairs, reduce downtimes and how to increase reliability and service life of the machine.
In addition to the safety regulations in the operating instructions, you have to meet the applicable regulations that apply for the operation of the machine in your country.
Keep the operating instructions package with the machine at all times and store it in a plastic cover to protect it from dirt and moisture. Read the instruction manual each time before operating the machine and carefully follow its information. The machine can only be operated by persons who were instructed concerning the operation of the machine and who are informed about the associated dangers. The minimum age requirement must be complied with.
In addition to the safety requirements in these operating instructions and your country's applicable regulations, you should observe the generally recognized technical rules concerning the operation of woodworking machines.
We accept no liability for damage or accidents which arise due to non-observance of these instructions and the safety information.
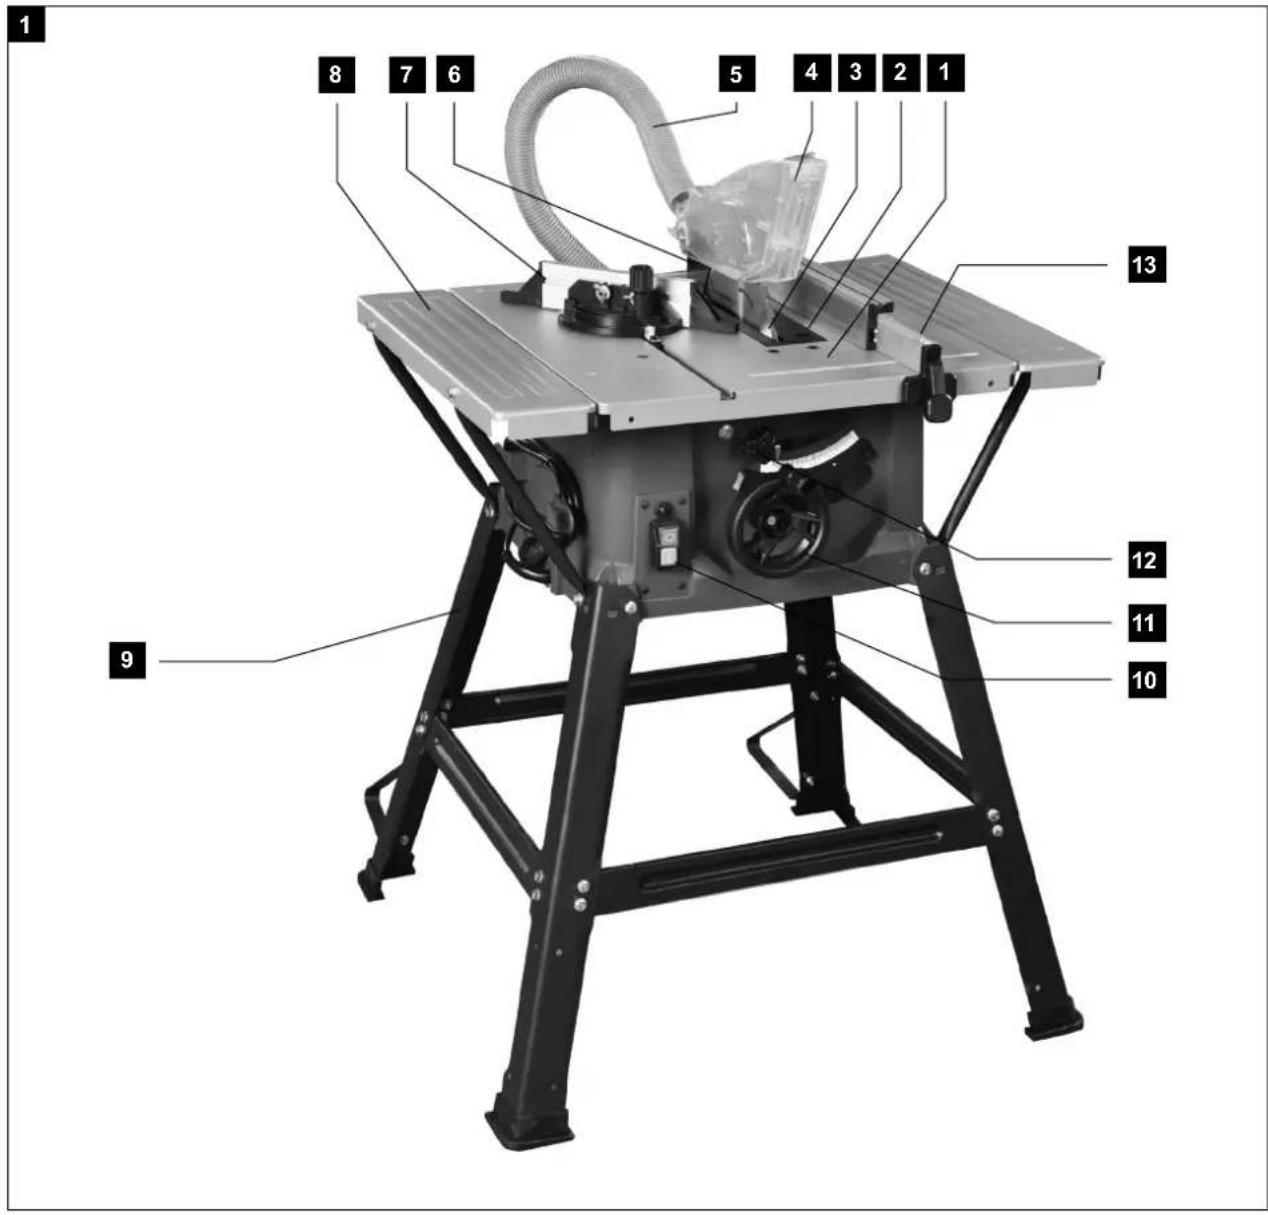
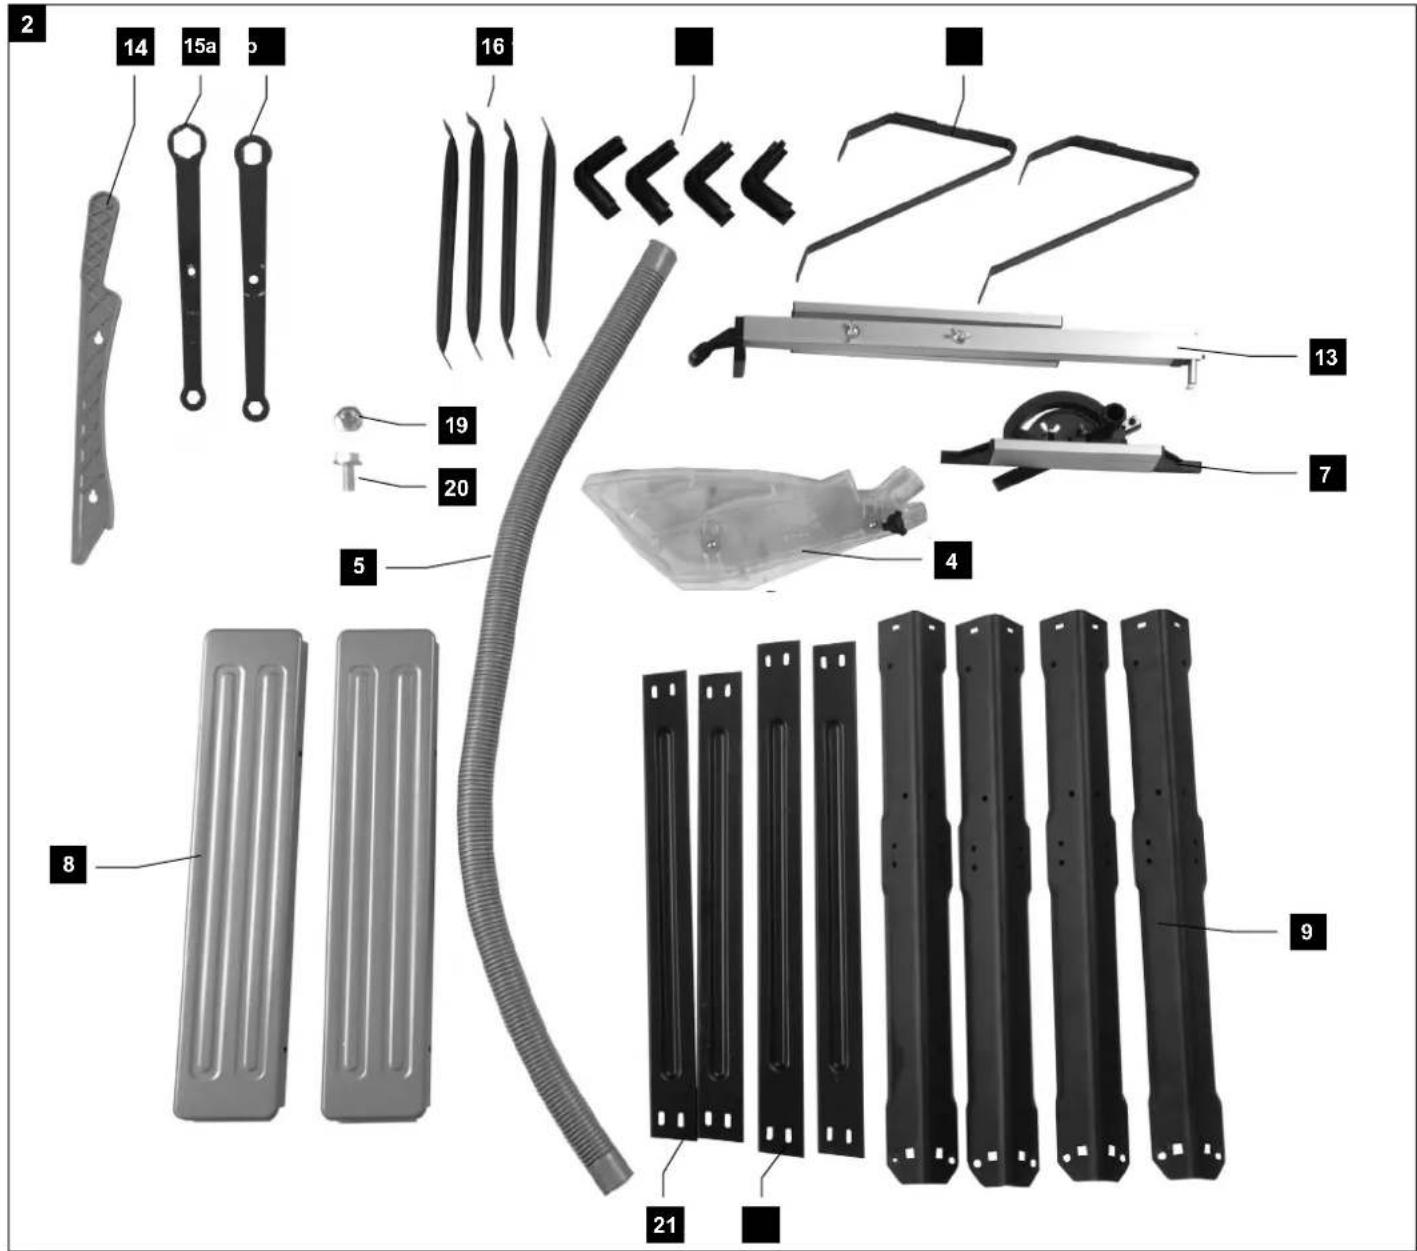
2. Device Description (Fig. 1-2)
- Saw table
- Table insert
- Saw blade
- Saw blade guard
- Suction hose
- Riving knife
- Transverse stop
- Table width extension
- Support
- On/off switch
- Hand wheel
- Locking handle
- Parallel stop
- Push rod
15a. Saw blade key
15b. Saw blade key - Strut
- Rubber
- Stand
- Hexagonal nut
- Hexagonal bolt
- Centre strut, short
- Centre strut, long
3. Unpacking
- Open the packaging and remove the device carefully.
- Remove the packaging material as well as the packaging and transport bracing (if available).
- Check that the delivery is complete.
- Check the device and accessory parts for transport damage.
- If possible, store the packaging until the warranty period has expired.
ATTENTION
The device and packaging materials are not toys! Children must not be allowed to play with plastic bags, film and small parts! There is a risk of swallowing and suffocation!
4. Intended use
The bench-type circular saw is designed for the slitting and cross-cutting of all types of timber, commensurate with the machine's size. The machine is not to be used for cutting any type of roundwood. The machine is to be used only for its prescribed purpose. Any use other than that mentioned is considered to be a case of misuse. The user/operator and not the manufacturer shall be liable for any damage or injury resulting such cases of misuse.
The machine is to be operated only with suitable saw blades.
It is prohibited to use any type of cutting-off wheel. To use the machine properly you must also observe the safety regulations, the assembly instructions and the operating instructions to be found in this manual. All persons who use and service the machine have to be acquainted with this manual and must be informed about its potential hazards. It is also imperative to observe the accident prevention regulations in force in your area.
The same applies for the general rules of occupational health and safety.
⚠️ Important!
When using the equipment, a few safety precautions must be observed to avoid injuries and damage. Please read the complete operating instructions and safety regulations with due care. Keep this manual in a safe place, so that the information is available at all times. If you give the equipment to any other person, hand over these operating instructions and safety regulations as well. We cannot accept any liability for damage or accidents which arise due to a failure to follow these instructions and the safety instructions. The manufacturer shall not be liable for any changes made to the machine nor for any damage resulting from such changes.
Even when the machine is used as prescribed it is still impossible to eliminate certain residual risk factors. The following hazards may arise in connection with the machine's construction and design:
- Contact with the saw blade in the uncovered saw zone.
- Reaching into the running saw blade (cut injuries).
- Kick-back of workpieces and parts of workpieces
- Saw blade fracturing.
- Catapulting of faulty carbide tips from the saw blade.
- Damage to hearing if essential ear-muffs are not worn.
- Harmful emissions of wood dust when the machine is used in closed rooms.
⚠️ Please note that our equipment has not been designed for use in commercial, trade or industrial applications. Our warranty will be voided if the machine is used in commercial, trade or industrial businesses or for equivalent purposes.
5. Safety information
General power tool safety warnings
⚠ WARNING: Read all safety warnings, instructions, illustrations and technical data provided with this power tool. Failure to follow the warnings and instructions may result in electric shock, fire and/or serious injury.
Save all warnings and instructions for future reference.
The term "power tool" in the warnings refers to your mains-operated (corded) power tool or battery-operated (cordless) power tool.
1) Work area safety
a) Keep work area clean and well lit. Cluttered or dark areas invite accidents.
b) Do not operate power tools in explosive atmospheres, such as in the presence of flammable liquids, gases or dust. Power tools create sparks which may ignite the dust or fumes.
c) Keep children and bystanders away while operating a power tool. Distractions can cause you to lose control.
2) Electrical safety
a) Power tool plugs must match the outlet. Never modify the plug in any way. Do not use any adapter plugs with earthed (grounded) power tools. Unmodified plugs and matching outlets will reduce risk of electric shock.
b) Avoid body contact with earthed or grounded surfaces, such as pipes, radiators, ranges and refrigerators. There is an increased risk of electric shock if your body is earthed or grounded.
c) Do not expose power tools to rain or wet conditions. Water entering a power tool will increase the risk of electric shock.
d) Do not abuse the cord. Never use the cord for carrying, pulling or unplugging the power tool. Keep cord away from heat, oil, sharp edges or moving parts. Damaged or entangled cords increase the risk of electric shock.
e) When operating a power tool outdoors, use an extension cord suitable for outdoor use. Use of a cord suitable for outdoor use reduces the risk of electric shock.
f) If operating a power tool in a damp location is unavoidable, use a residual current device (RCD) protected supply. Use of an RCD reduces the risk of electric shock.
3) Personal safety
a) Stay alert, watch what you are doing and use common sense when operating a power tool. Do not use a power tool while you are tired or under the influence of drugs, alcohol or medication. A moment of inattention while operating power tools may result in serious personal injury.
b) Use personal protective equipment. Always wear eye protection. Protective equipment such as a dust mask, non-skid safety shoes, hard hat or hearing protection used for appropriate conditions will reduce personal injuries.
c) Prevent unintentional starting. Ensure the switch is in the off-position before connecting to power source and/or battery pack, picking up or carrying the tool.
Carrying power tools with your finger on the switch or energising power tools that have the switch on invites accidents.
d) Remove any adjusting key or wrench before turning the power tool on. A wrench or a key left attached to a rotating part of the power tool may result in personal injury.
e) Do not overreach. Keep proper footing and balance at all times. This enables better control of the power tool in unexpected situations.
f) Dress properly. Do not wear loose clothing or jewellery. Keep your hair and clothing away from moving parts. Loose clothes, jewellery or long hair can be caught in moving parts.
g) If devices are provided for the connection of dust extraction and collection facilities, ensure these are connected and properly used. Use of dust collection can reduce dust-related hazards.
h) Do not let familiarity gained from frequent use of power tools allow you to become complacent and ignore power tool safety principles. A careless action can cause severe injury within a fraction of a second.
4) Power tool use and care
a) Do not force the power tool. Use the correct power tool for your application. The correct power tool will do the job better and safer at the rate for which it was designed.
b) Do not use the power tool if the switch does not turn it on and off. Any power tool that cannot be controlled with the switch is dangerous and must be repaired.
c) Disconnect the plug from the power source and/or remove the battery pack, if detachable, from the power tool before making any adjustments, changing parts of insert tools, or storing power tools. Such preventive safety measures reduce the risk of starting the power tool accidentally.
d) Store idle power tools out of the reach of children and do not allow persons unfamiliar with the power tool or these instructions to operate the power tool. Power tools are dangerous in the hands of untrained users.
e) Maintain power tools and insert tools. Check for misalignment or binding of moving parts, breakage of parts and any other condition that may affect the power tool's operation. If damaged, have the power tool repaired before use. Many accidents are caused by poorly maintained power tools.
f) Keep cutting tools sharp and clean. Properly maintained cutting tools with sharp cutting edges are less likely to bind and are easier to control.
g) Use the power tool, accessories and tool bits etc. in accordance with these instructions, taking into account the working conditions and the work to be performed. Use of the power tool for operations different from those intended could result in a hazardous situation.
h) Keep handles and grasping surfaces dry, clean and free from oil and grease. Slippery handles and grasping surfaces do not allow for safe handling and control of the tool in unexpected situations.
5) Service
a) Have your power tool serviced by a qualified repair person using only identical replacement parts. This will ensure that the safety of the power tool is maintained.
Warning! This electric tool generates an electromagnetic field during operation. This field can impair active or passive medical implants under certain conditions. In order to prevent the risk of serious or deadly injuries, we recommend that persons with medical implants consult with their physician and the manufacturer of the medical implant prior to operating the electric tool.
Safety instructions for table saws
Guarding related warnings
a) Keep guards in place. Guards must be in working order and be properly mounted. A guard that is loose, damaged, or is not functioning correctly must be repaired or replaced.
b) Always use saw blade guard, riving knife and for every through-cutting operation. For through-cutting operations where the saw blade cuts completely through the thickness of the workpiece, the guard and other safety devices help reduce the risk of injury.
c) After completing working procedures where the removal of the protective cover and/or riving knife is necessary (e.g. producing folds and rebating, cutting grooves or cutting with a turnover), the protective system must be immediately reattached. The guard helps to reduce the risk of injury.
d) Make sure the saw blade is not contacting the guard, riving knife or the workpiece before the switch is turned on. Inadvertent contact of these items with the saw blade could cause a hazardous condition.
e) Adjust the riving knife as described in this instruction manual. Incorrect spacing, positioning and alignment can make the riving knife ineffective in reducing the likelihood of kickback.
f) For the riving knife to work, they must be engaged in the workpiece. The riving knife are ineffective when cutting workpieces that are too short to be engaged with the riving knife. Under these conditions a kickback cannot be prevented by the riving knife.
g) Use the appropriate saw blade for the riving knife. For the riving knife to function properly, the saw blade diameter must match the appropriate riving knife and the body of the saw blade must be thinner than the thickness of the riving knife and the cutting width of the saw blade must be wider than the thickness of the riving knife.
Safety information for sawing
a) △ DANGER: Do not place your hands and fingers in the sawing area or close to the saw blade.
A moment of carelessness or a slip could steer your hand towards the saw blade and result in serious injuries.
b) Only guide the workpiece against the rotational direction of the saw blade or cutting tool. Guiding the workpiece in the same direction as the rotational direction of the saw blade above the table can lead to the workpiece and your hand being drawn into the saw blade.
c) When performing longitudinal cuts, never use the mitre stop to guide the workpiece, and when transverse cutting with the mitre stop never additionally use the parallel stop for longitudinal adjustment. Simultaneously guiding the workpiece with the parallel stop and mitre stop increases the probability that the saw blade will jam and kickback will result.
d) When performing longitudinal cuts, always apply the feed force to the workpiece between the stop rail and the saw blade. Use a push rod if the distance between the stop rail and saw blade is less than 150 mm, and a push block if the distance is less than 50 mm.
This type of working aid ensures that your hands remain a safe distance from the saw blade.
e) Only use the push rod provided by the manufacturer, or a push rod that has been produced in accordance with instructions. The push rod ensures a sufficient distance between the hand and saw blade.
f) Never use a damaged or partially sawn push rod. A damaged push rod may break and lead to your hand running into the saw blade.
g) Never work "freehand". Always use the parallel stop or the mitre stop to position and guide the workpiece. "Freehand" means supporting or guiding the workpiece with the hands, rather than using the parallel stop or mitre stop. Free-handed sawing leads to incorrect alignment, jamming and kickback.
h) Never reach around or over a turning saw blade. Reaching for a workpiece can lead to accidental contact with the rotating saw blade.
i) Support long and/or wide workpieces at the rear and/or side of the saw table, so that they remain horizontal. Long and/or wide workpieces tend to tilt at the edge of the saw table; this leads to a loss of control, jamming of the saw blade and kickback.
j) Guide the workpiece steadily and evenly. Do not bend or twist the workpiece. If the saw blade jams, switch off the electric tool immediately, unplug the mains plug and remedy the cause of the jam. If the saw blade is jammed by the workpiece, this can lead to kickback or block the motor.
k) Do not remove partially sawn material whilst the saw is running. Partially sawn material can stick between the saw blade and stop rail or in the protective cover, and may draw your fingers into the saw blade during removal. Switch the saw off and wait until the saw blade has come to a standstill, before removing the material.
I) For longitudinal cuts on workpieces that are thinner than 2 mm, use an additional parallel stop that is in contact with the table surface. Thin workpieces can wedge under the parallel stop and lead to kickback.
Kickback - causes and corresponding safety instructions
Kickback is a sudden reaction of the workpiece to a catching or jamming saw blade, or a cut created in the workpiece at an angle to the saw blade, or if part of the workpiece becomes jammed between the saw blade and the parallel stop, or another stationary object.
In the majority of cases, with kickback the workpiece is caught by the rear part of the saw blade, lifted off the saw table and thrust in the direction of the operator. Kickback is the result of incorrect or deficient use of the circular table saw. It can be prevented by suitable precautionary measures, as described in the following.
a) Never stand directly in line with the saw blade. Always stand at the side of the saw blade on which the stop rail is located. With kickback, the workpiece may be thrust at high speed towards those persons who stand in front of, or in line with the saw blade.
b) Never reach over or behind the saw blade to pull or support the workpiece. This can result in accidental contact with the saw blade, or kick-back can lead to your fingers being drawn into the saw blade.
c) Never hold and push the workpiece against the turning saw blade during sawing. Pushing the workpiece against the saw blade during sawing will lead to jamming and kickback.
d) Align the stop rail parallel to the saw blade.
A stop rail that is not aligned will push the workpiece against the saw blade and create kickback.
e) With concealed saw cuts (e.g. folds, grooves or slits in the turning process), use a thrust collar to guide the workpiece against the table and stop rail. Using a thrust collar, you are able to better control the workpiece in the event of kickback.
f) Apply particular caution when sawing assembled workpieces in areas that are not visible. The plunging saw blade can saw into objects that could cause a kickback.
g) Support large panels, in order to avoid the risk of kickback due to a jammed saw blade. Large panels may bend under their own weight. Panels must be supported in all areas where they overhang the table surface.
h) Apply particular caution when sawing workpieces that are twisted, knotted or warped, or that do not have a straight edge that can be used to guide them with a mitre stop or along a stop rail. A twisted, knotted or warped workpiece is unstable and results in incorrect alignment of the kerf with the saw blade, jamming and kickback.
i) Never saw multiple workpieces stacked on top of each other, or one behind the other. The saw blade could engage in one or more parts and result in kickback.
j) If you wish to restart a saw, the saw blade of which is inserted in a workpiece, centre the saw blade in the sawing gap so that the saw teeth are not hooked in the workpiece. If the saw blade is jammed, it can lift the workpiece and cause kickback when the saw is restarted.
k) Always keep saw blades clean, sharp and sufficiently set. Never use warped saw blades or saw blades with cracked or broken teeth. Sharp and correctly set saw blades minimise jamming, blocking and kickback.
Safety instructions for the operation of circular table saws
a) Switch off the circular table saw and disconnect it from the power supply before removing the table insert, changing the saw blade, implementing settings on the riving knife or the saw blade protective cover, and if the machine is left unattended. Precautionary measures serve to prevent accidents.
b) Never leave the circular table saw running unattended. Switch off the electric tool and do not leave it until it has come to a complete standstill. An unattended running saw poses an uncontrolled risk.
c) Set up the circular table saw in a location that is level and well ventilated, and where it can stand safely and remain balanced. The installation site must provide sufficient space for easily handling the size of your workpieces. Disorganised and unlit working areas, and uneven, slippery floors may lead to accidents.
d) Regularly remove chips and sawdust from beneath the saw table and/or from the dust extraction system. Accumulated sawdust is flammable and can self-ignite.
e) Secure the circular table saw. If a circular table saw is not secured correctly, it can move or topple.
f) Remove the adjustment tools, wood residues, etc. from the circular table saw before switching it on. Deflections and possible jams could be dangerous.
g) Always use the right size of saw blade and an appropriate location hole (e.g. diamond-shaped or round). Saw blades that do not fit with the mounting parts of the saw will run out-of-centre and result in a loss of control.
h) Never use damaged or incorrect saw blade mounting materials, such as flanges, washers, screws or nuts. These saw blade mounting materials have been specially designed for your saw, for optimum performance and operational safety.
i) Never stand on the circular table saw and do not use it as a step stool. Serious injuries can arise if the electric tool topples or if you accidentally come into contact with the saw blade.
j) Make sure that the saw blade is mounted in the correct direction of rotation. Do not use grinding discs or wire brushes with the circular table saw. Incorrect assembly of the saw blade or the use of accessories that have not been recommended can result in serious injuries.
Safety instructions for the handling of saw blades
1 Only use insertion tools if you have mastered their use.
2 Observe the maximum speed. The maximum speed specified on the insertion tool may not be exceeded. If specified, observe the speed range.
3 Observe the motor / saw blade direction of rotation.
4 Do not use any insertion tools with cracks. Sort out cracked insertion tools. Repairs are not permitted.
5 Clean grease, oil and water off of the clamping surfaces.
6 Do not use any loose reducing rings or bushes for the reducing of holes on saw blades.
7 Make sure that fixed reducer rings for securing the insertion tool have the same diameter and have at least 1/3 of the cutting diameter.
8 Make sure that fixed reducer rings are parallel to each other.
9 Handle insertion tool with caution. They are ideally stored in the originally package or special containers. Wear protective gloves in order to improve grip and to further reduce the risk of injury.
10 Prior to the use of insertion tools, make sure that all protective devices are properly fastened.
11 Prior to use, make sure that the insertion tool meets the technical requirements of this electric tool and is properly fastened.
12 Only use the supplied saw blade for sawing operations in wood, materials similar to wood, plastics and non-ferrous metals (except for magnesium and alloys containing magnesium).
13. Use the saw blade intended for the material to be processed.
14. Use only a saw blade with a diameter that matches the specifications on the saw.
15. Use only saw blades that are marked with an equal or higher rotational speed than that marked on the power tool.
16. Use only saw blades recommended by the manufacturer which conform to EN 847-1, if intended for cutting wood or similar materials.
17. Wear suitable personal protective equipment, such as:
– hearing protection;
- protective gloves when handling saw blades.
- Use only saw blades recommended by the manufacturer which conform to EN 847-1. Warning! When changing the saw blade, make sure that the cutting width is not smaller and the thickness of the saw blade is not greater than the thickness of the splitter.
- When sawing wood and plastics, avoid overheating the saw teeth. Reduce the feed speed to avoid the plastic melting.
Residual risks
The machine has been built according to the state of the art and the recognised technical safety requirements. However, individual residual risks can arise during operation.
- Health hazard due to electrical power, with the use of improper electrical connection cables.
- Furthermore, despite all precautions having been met, some non-obvious residual risks may still remain.
- Residual risks can be minimised if the „safety instructions“ and the „Proper use“ are observed along with the whole of the operating instructions.
- Do not load the machine unnecessarily: excessive pressure when sawing will quickly damage the saw blade, which results in reduced output of the machine in the processing and in cut precision.
- When cutting plastic material, please always use clamps: the parts which should be cut must always be fixed between the clamps.
- Avoid accidental starting of the machine: the operating button may not be pressed when inserting the plug in an outlet.
- Use the tool that is recommended in this manual. In doing so, your saw provides optimal performance.
- Hands may never enter the processing zone when the machine is in operation. Release the handle button and switch off the machine prior to any operations.
- Prior to any adjustment, maintenance or service work disconnect the mains power plug!
6. Technical Data
AC motor 220-240 V\~50 Hz
| performance 1500 Watt | |
| operating mode S1 | |
| Idle speed 5000 min | -1 |
| Hard-metal blade ø 210 x ø 30 x 2,8 mm | |
| Number of teeth 24 | |
| Thickness riving knife 2 mm | |
| table size 675 x 500 mm | |
| Cutting height max. 90° 70 mm | |
| Cutting height max. 45° 45 mm | |
| height adjustment 0 - 70 mm | |
| saw blade swivel 0 - 45° | |
| suction port ø 35.5 mm | |
| weight 14 kg | |
Noise values
The total noise values determined in accordance with IEC 62841.
| sound pressure level L_pA | 99.6 dB(A) |
| uncertainty K_pA | 3 dB |
| sound power level L_WA | 112.6 dB(A) |
| uncertainty K_WA | 3 dB |
Wear hearing protection.
The effects of noise can cause a loss of hearing. Total vibration values (vector sum - three directions) determined in accordance with EN 61029.
7. Before starting the equipment
- The equipment must be set up where it can stand securely.
- All covers and safety devices have to be properly fitted before the equipment is switched on.
- It must be possible for the blade to run freely.
- When working with wood that has been processed before, watch out for foreign bodies such as nails or screws, etc.
- Before you press the ON/OFF switch check that the saw blade is fitted correctly. Moving parts must run smoothly.
- Before you connect the equipment to the power supply make sure the data on the rating plate are identical to the mains data.
- Connect the machine to a properly installed protective contact socket, with at least 16A circuit breaker.
8. Construction
Important. Pull out the power plug before carrying out any maintenance, resetting or assembly work on the circular saw!
Place all parts supplied on a flat surface. Grouping equal parts.
Note: If compounds with a bolt (round head / or hexagon), hex nuts and washers are backed up, the washer must be fitted under the nut.
Insert screws each from outside to inside. Secure connections with nuts on the inside.
Note: Tighten the nuts and bolts during assembly only to the extent that they can not fall down. If you tighten the nuts and bolts prior to final assembly, final assembly can not be performed.
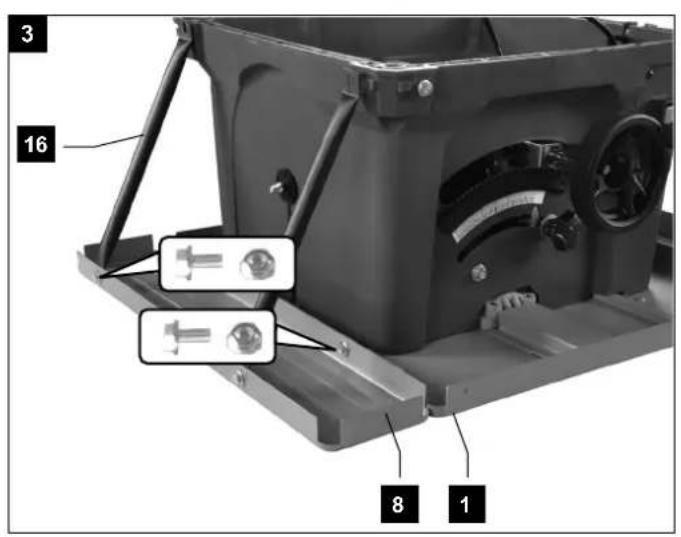
Mounting the bench extension (fig. 3)
- Turn the saw and place it on the floor with the bench facing down.
- Align the bench extension (8) flush with the saw bench (1).
- Push table extension (8) onto the sawing table (1) using the hex bolts (20) and loosely fasten the hex nuts (19). Repeat for the opposite side.
- Screw the support struts (16) to the table extensions (8) with the hex bolts (20) and the hex nuts (19)
- Subsequently, tighten all screws.
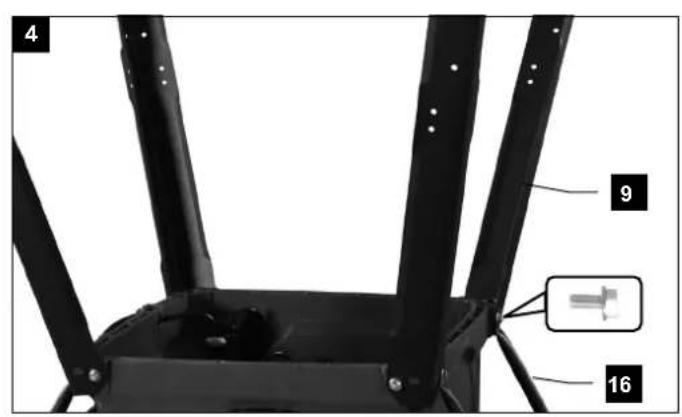
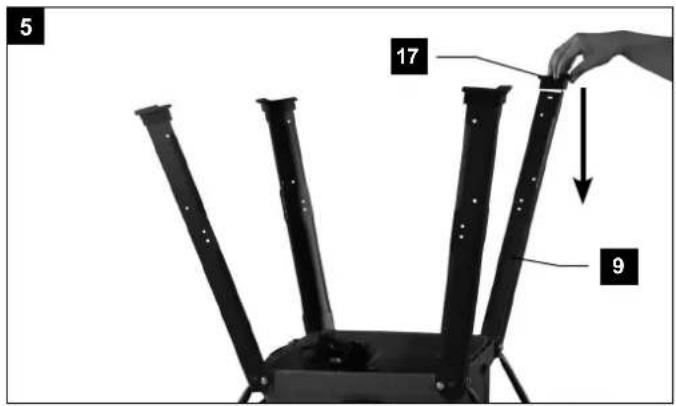
Mounting rack (fig. 4-7)
- Screw the four support legs (9) together with the support struts (16) onto the saw with the hex bolts (20) (fig. 4). For this use the saw blade key (15a/15b), part of the delivery contents (fig. 4).
- Now place the rubber feet (17) onto the support legs (9) (fig. 5).
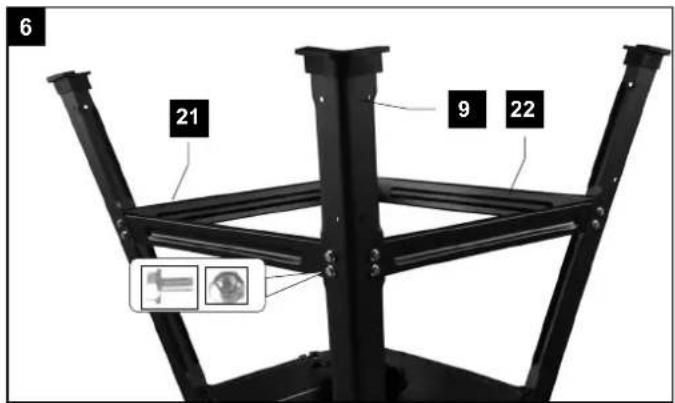
- Now, screw the long centre brace (22) and the short centre brace (21) onto the legs (9) using the hexagon head bolts (20) and the hexagon head nuts (19). Make sure that the same braces face each other. The long centre braces (22) must be mounted parallel to the operator's side of the saw. (Fig. 6).
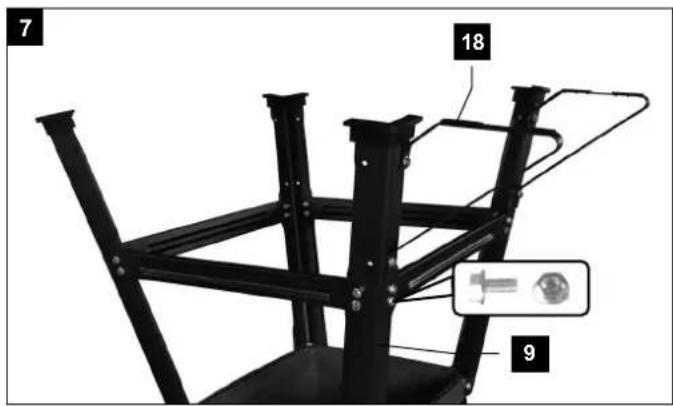
- Using two hex bolts (20) on each, loosely secure the and hex nuts (19) at the drill holes of the rear support legs of the support frame (18) (fig. 7).
Both support frames must be fastened to the back of the machine! - Then, tighten all the nuts and bolts of the under-frame.
Attention!
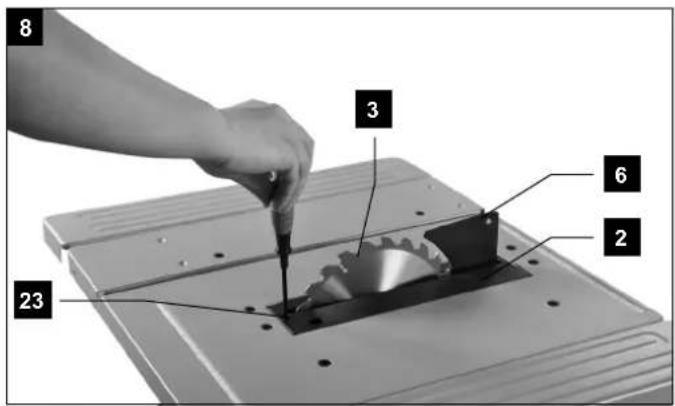
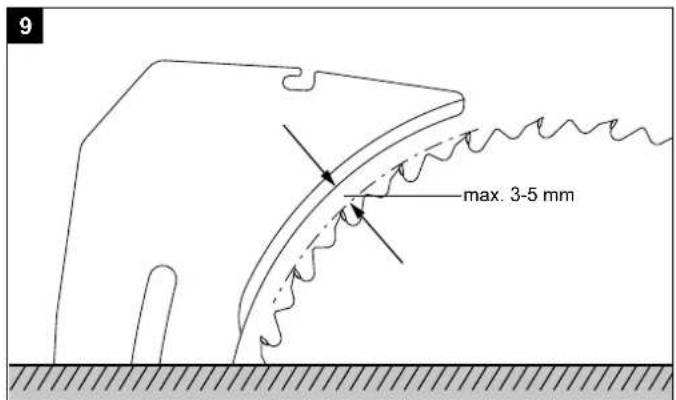
Setting / mounting the riving knife (figs. 8-10)
△ The setting Caution! Pull out the main plug! The setting of the riving knife (6) must be checked prior to commissioning of the riving knife (6) must be checked prior to commissioning.
- Set the saw blade (3) to the max. cutting depth, bring it to the 0^ position and lock it.
- Unfasten the bolt (23) from the bench insert (2) using a Phillips screwdriver, and remove bench insert (22) (fig. 8).
- The distance between the saw blade (3) and the riving knife (6) must be max. 5 mm. (Fig. 9)
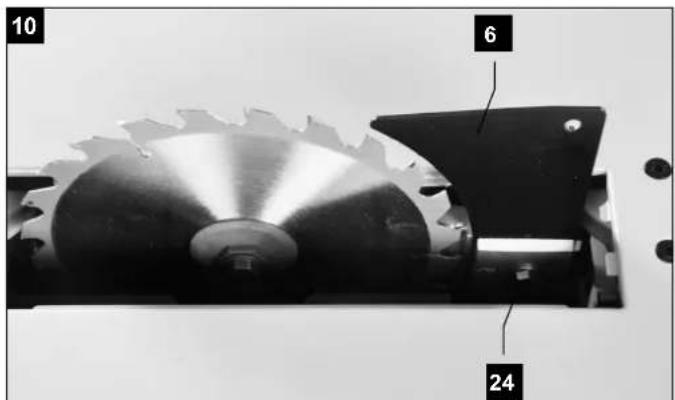
- Loosen the mounting bolt (24) in order to pull out the splitting wedge (6) until the right distance is adjusted (fig. 10).
- Tighten the mounting screw (24) again and mount the bench insert (2).
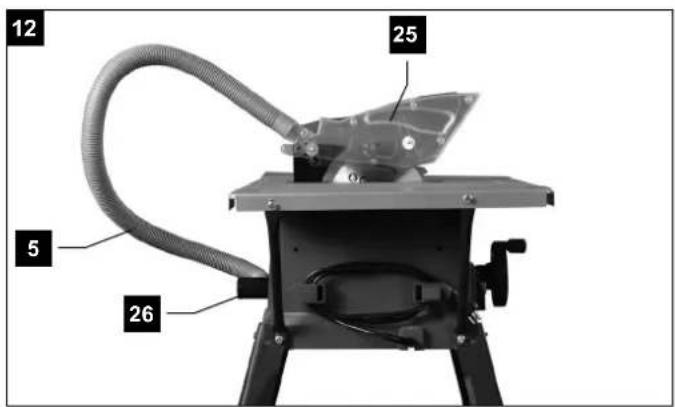
Mounting / dismounting the saw blade guard (fig. 11-12)
- Place the saw blade guard (4) along with the bolt (25) onto the riving knife (6) in a downwards direction so that the bolt sits firmly in the hole of the riving knife (6).
- Do not screw in the bolt (25) too tightly; the saw blade guard (4) must move freely.
- Plug the suction hose (5) onto the suction adapter (26) and the connecting piece of the saw blade guard (4). Connect a suitable splint collector onto the suction adapter (26).
- Disassembly is performed in reverse order.
Caution!
The saw blade guard (4) must be lowered onto the workpiece before starting the sawing operation.
Replacing the bench insert (fig. 8)
- In case of wear or damage, the bench insert (2) must be replaced; otherwise, there is an increased risk of injury.
- Unfasten the bolt (23) using a Phillips screwdriver.
- Take out the worn bench insert (2).
- The installation of the new bench insert is done in reverse order.
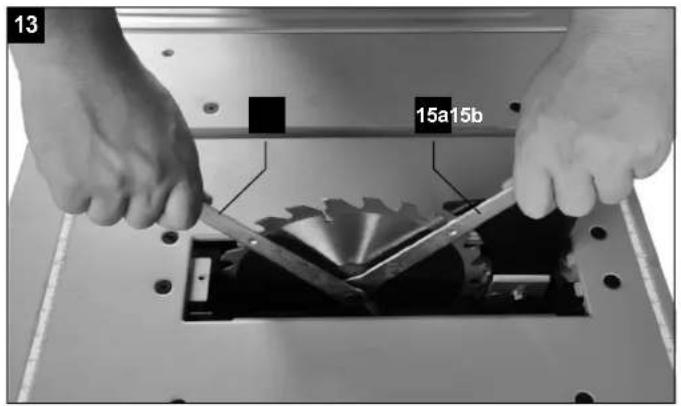
Installing / replacing the saw blade (fig. 13)
Caution! Pull out the main plug and wear safety gloves.
- Dismount the saw blade guard (4)
- Remove the bench insert (2)
-
Loosen the nut by placing a saw blade spanner (15b) on the nut while holding up another saw blade spanner (15a) on the motor shaft.
-
Caution! Turn the nut in the direction of rotation of the saw blade.
-
Remove the outer flange and remove the old blade inner flange.
-
Clean the saw blade flange thoroughly with a wire brush before mounting the new saw blade.
-
Insert the new saw blade in reverse order and tighten.
Caution! Note the direction of run, the cutting slope of the teeth must be in the direction of run, i.e. facing forward.
-
Remount and adjust the bench insert (2) and saw blade guard (4)
-
Before you start working again with the saw, check proper functioning of the safety equipment.
9. Using the saw
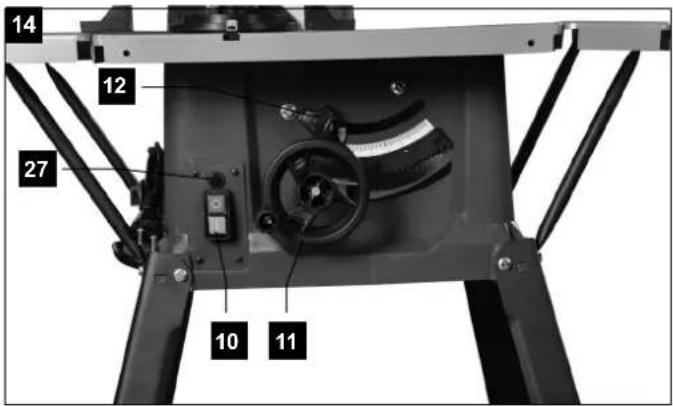
On/Off switch (Fig. 14)
- The saw can be switched on by pressing the green push button „I“. (10)
- The red push button „0“ (10) has to be pressed to switch off the saw.
- The saw can be switched on by pressing the green push button „I“. (10) - The red push button „0“ (10) has to be pressed to switch off the saw.
Overload protection (fig. 14)
This electrical power tool is provided with an overload protection. In case that the overload protection was initiated, proceed as follows:
- Disconnect the power tool from the power supply.
- Allow the power tool to cool down.
- Check the power tool carefully for possible damages.
- Have damages repaired before re-starting the power tool.
- Connect the power tool to the power supply.
- Push the overload switch (27).
- Turn on the power tool as described and put it into operation.
Cutting depth (fig. 14)
Turn the round handle (11) to set the blade (3) to the required cutting depth.
- Anticlockwise: smaller cutting depth
- Clockwise: larger cutting depth
After each new adjustment it is advisable to carry out a trial cut in order to check the set dimensions.
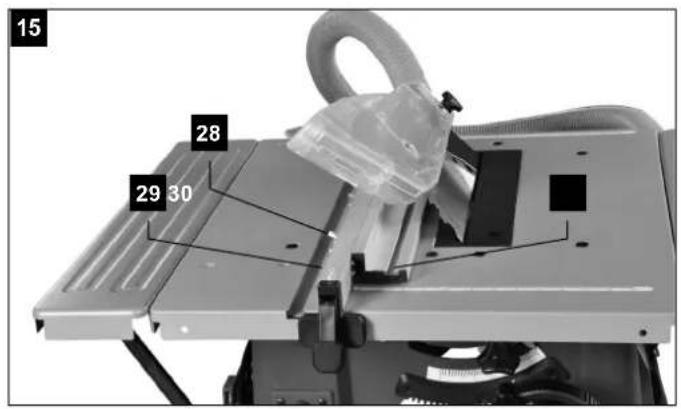
Setting the angle (fig. 14-15)
With the table saw you can make diagonal cuts to the left oriented to the stop bar from 0^ to 45^ .
△ Check before each cut, that between the stop bar (30), cross-stop (13) and the saw blade (5) a collision is not possible.
- Undo the fixing handle (13).
- Set the desired angle on the scale by pressing and turning the hand wheel (12).
- Lock the fixing handle (13) again in the required angle position.
Working with the rip fence
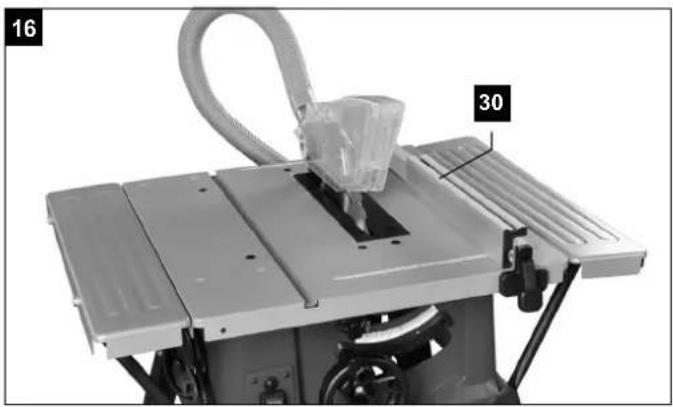
Setting the stop height (fig. 15-16)
- The stop rail (30) of the rip fence (13) has two guide surfaces with different heights.
- Depending on the thickness of the material to be cut, the stop rail (30) as shown in fig. 16 must be used for thick material (about 25mm workpiece thickness) and that shown in fig. 15 for thin material (less than 25mm workpiece thickness).
Turning the stop rail (fig. 15-16)
- Loosen the wing nuts (28) first for rotating the stop rail (30).
- Now, the stop rail (30) can be removed from the guide rail (29) and pushed over it again using the corresponding guide.
- Tighten the wing nuts (28) again.
- The stop rail (30) can be applied to the left or right of the guide rail (29) as needed. To this end, only install the bolts from the other side of the guide rail (29).
Setting the cutting width (fig. 17)
- The rip fence (13) must be used for longitudinal cutting of wood parts.
- The rip fence (13) should be mounted on the right side of the saw blade (3).
- Place the parallel stop (13) onto the saw table in a downwards direction.
- The parallel stop (13) can be set to the required dimension with the aid of the scale on the saw table.
- Clamp the parallel stop (13) securely with the lever (31).
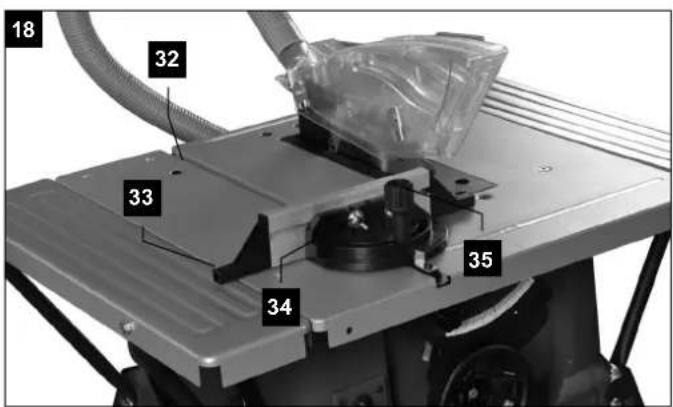
Transverse stop (fig. 18)
- Push the transverse stop (7) into a groove (32) of the saw bench.
- Loosen the handle screw (35).
- Turn the cross stop (7) until the desired angle is set. The arrow on the transverse stop is at the set angle.
- Tighten the knurled screw (35) again.
- The stop bar (33) can be moved on the transverse stop (13). Loosen the nuts (34) and push the stop rail (33) to the desired position. Tighten the nuts (34) again.
Caution!
- Do not push the stop rail (33) too far towards the saw blade.
- The distance between the stop rail (33) and saw blade (3) should be about 2 cm.
10. Operation
Working instructions
After each new adjustment it is advisable to carry out a trial cut in order to check the set dimensions. After switching on the saw, wait for the blade to reach its maximum speed of rotation before commencing with the cut.
Secure long workpieces against falling off at the end of the cut (e.g. with a roller stand etc.)
Take extra care when starting the cut!
Never use the equipment without the suction function.
Regularly check and clean the suction channels.
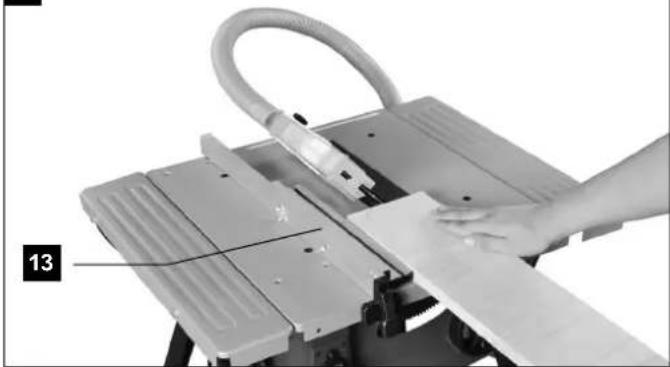
Making longitudinal cuts (fig. 19)
Longitudinal cutting (also known as slitting) is when you use the saw to cut along the grain of the wood.
Press one edge of the workpiece against the parallel stop (13) while the flat side lies on the saw table (1).
The blade guard (4) must always be lowered over the workpiece.
When you make a longitudinal cut, never adopt a working position that is in line with the cutting direction.
- Set the parallel stop (13) in accordance with the workpiece height and the desired width.
- Switch on the saw.
- Place your hands (with fingers closed) flat on the workpiece and push the workpiece along the parallel stop (13) and into the blade (3).
- Guide at the side with your left or right hand (depending on the position of the parallel stop) only as far as the front edge of the saw blade guard (4).
- Always push the workpiece through to the end of the splitter (6).
- The offcut piece remains on the saw table (1) until the blade (3) is back in its position of rest.
- Secure long workpieces against falling off at the end of the cut (e.g. with a roller stand etc.) (e.g. roller table etc.)
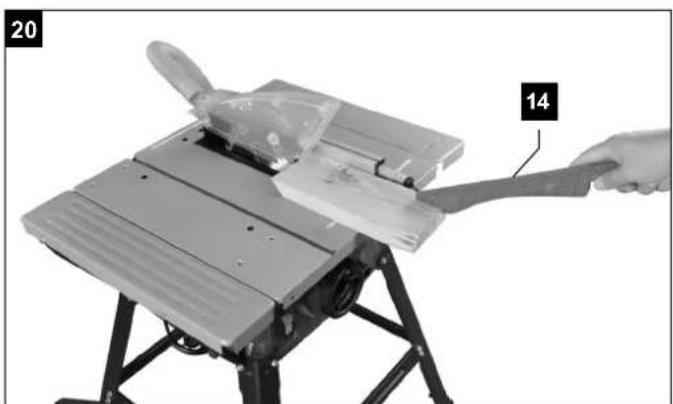
Cutting narrow workpieces (Fig. 20)
Be sure to use a push stick (14) when making longitudinal cuts in workpieces smaller than 120 mm in width. A push block is supplied with the saw! Replace a worn or damaged push stick immediately.
- Adjust the parallel stop to the width of workpiece you require.
- Feed in the workpiece with two hands. Always use the push stick (14) in the area of the saw blade.
- Always push the workpiece through to the end of the splitter.
⚠ Caution! With short workpieces, use the push stick from the beginning.
Making angular cuts (Fig. 21)
Angular cuts must always be made using the parallel stop (13).
- Set the blade to the desired angle.
- Set the parallel stop (13) in accordance with the workpiece width and height
- Carry out the cut in accordance with the workpiece width.
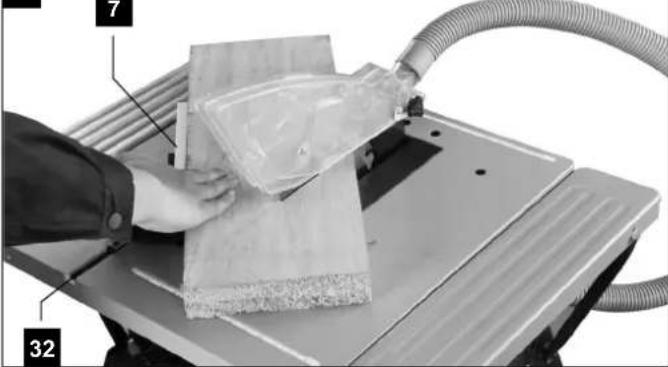
Making cross cuts (Fig. 22)
- Push the transverse stop (7) into the groove (32) of the saw table and set it to the required angle.
- Use the stop rail.
- Press the workpiece firmly against the cross stop (7).
- Switch on the saw.
- Push the cross stop (7) and the workpiece toward the blade in order to make the cut.
- Important:
Always hold the guided part of the workpiece. Never hold the part which is to be cut off.
- Push the cross stop (7) forward until the workpiece is cut all the way through.
- Switch off the saw again. Do not remove the offcut until the blade has stopped rotating.
Cutting particle boards
To prevent the cutting edges from cracking when working with particle boards, you should not set the saw blade (3) more than 5 mm greater than the thickness of the workpiece.
11. Transport
- Turn off the power tool before any transport and disconnect it from the power supply.
- Apply the power tool at least with two people, do not touch the table extensions.
- Protect the power tool from knocks, bumps and strong vibrations, such as during transport in vehicles.
- Secure the power tool against overturning and sliding.
- Never use the safety devices for handling or transporting purposes.
12. Maintenance
⚠ Warning! Prior to any adjustment, maintenance or service work disconnect the mains power plug!
General maintenance measures
- Keep all safety devices, air vents and the motor housing free of dirt and dust as far as possible. Wipe the equipment with a clean cloth or blow it down with compressed air at low pressure.
- We recommend that you clean the equipment immediately after you use it.
- Clean the equipment regularly with a damp cloth and some soft soap. Do not use cleaning agents or solvents; these may be aggressive to the plastic parts in the equipment. Ensure that no water can get into the interior of the equipment.
- In order to extend the service life of the tool, oil the rotary parts once monthly. Do not oil the motor.
Brush inspection
- In case of excessive sparking, have the carbon brushes checked only by a qualified electrician. Important. The carbon brushes should not be replaced by anyone but a qualified electrician.
Service information
Please note that the following parts of this product are subject to normal or natural wear and that the following parts are therefore also required for use as consumables.
Wear parts*: Carbon brush, saw blade, batteries, table liners, sliding stand, push handle, V-belts
* Not necessarily included in the scope of delivery!
13. Storage
Store the device and its accessories in a dark, dry and frost-proof place that is inaccessible to children. The optimum storage temperature is between 5 and 30°C.
Store the electrical tool in its original packaging. Cover the electrical tool in order to protect it from dust and moisture.
When the sawblade and key are not in use, they can be stored as in fig 23.
Store the operating manual with the electrical tool.
14. Electrical connection
The electrical motor installed is connected and ready for operation. The connection complies with the applicable VDE and DIN provisions.
The customer's mains connection as well as the extension cable used must also comply with these regulations.
Important information
In the event of an overloading the motor will switch itself off. After a cool-down period (time varies) the motor can be switched back on again.
Damaged electrical connection cable
The insulation on electrical connection cables is often damaged.
This may have the following causes:
• Passage points, where connection cables are passed through windows or doors.
- Kinks where the connection cable has been improperly fastened or routed.
- Places where the connection cables have been cut due to being driven over.
• Insulation damage due to being ripped out of the wall outlet.
- Cracks due to the insulation ageing.
Such damaged electrical connection cables must not be used and are life-threatening due to the insulation damage.
Check the electrical connection cables for damage regularly. Make sure that the connection cable does not hang on the power network during the inspection.
Electrical connection cables must comply with the applicable VDE and DIN provisions. Only use connection cables with the marking „H05VV-F“.
The printing of the type designation on the connection cable is mandatory.
AC motor
- The mains voltage must be 230 V\~
- Extension cables up to 25 m long must have a cross-section of 1.5 mm ^2 .
Connections and repairs of electrical equipment may only be carried out by an electrician.
Please provide the following information in the event of any enquiries:
Type of current for the motor
- Motor data - type plate
• Machine data - type plate
15. Disposal and recycling
The equipment is supplied in packaging to prevent it from being damaged in transit. The raw materials in this packaging can be reused or recycled. The equipment and its accessories are made of various types of material, such as metal and plastic. Defective components must be disposed of as special waste. Ask your dealer or your local council.
Old devices must not be disposed of with household waste!

This symbol indicates that this product must not be disposed of together with domestic waste in compliance with the Directive (2012/19/EU) pertaining to waste electrical and electronic equipment (WEEE). This product must be disposed of at a designated collection point. This can occur, for example, by handing it in at an authorised collecting point for the recycling of waste electrical and electronic equipment. Improper handling of waste equipment may have negative consequences for the environment and human health due to potentially hazardous substances that are often contained in electrical and electronic equipment.
By properly disposing of this product, you are also contributing to the effective use of natural resources. You can obtain information on collection points for waste equipment from your municipal administration, public waste disposal authority, an authorised body for the disposal of waste electrical and electronic equipment or your waste disposal company.
16. Troubleshooting
| Problem Possible Cause Help | ||
| Saw blade gets loose after turning off the motor | Fastening nut tightened insufficientlyTighten fastening nut, left-handed thread | |
| Motor does not startFailure of mains fuseExtension cable defectConnections on the motor or switch defectMotor or switch defective | Check the mains fuse.See “Electrical Connection” in the operating manualHave it checked by an electricianHave it checked by an electrician | |
| Motor wrong direction of rotationCapacitor defectiveincorrect connection | Have it checked by an electricianHave electrician exchange the polarity of the wall socket | |
| No motor output turns off automaticallyCross-section of the extension line is insufficientOverload by dull saw blade, | see Electrical connectionChange saw blade | |
| Burns on the cutting surfaceBlunt saw bladewrong saw blade | Sharpen saw blade, replaceReplace saw blade | |
- Protection auditive ;

- Est conforme aux directives:
2006/42/CE Directive Machine ;
2011/65/UE Directive RoHS

- Explanation of the symbols on the equipment
- Table of contents: Page:
- Introduction
- Manufacturer:
- Dear customer,
- Note:
- We recommend:
- Device Description (Fig. 1-2)
- Unpacking
- ATTENTION
- Intended use
- ⚠️ Important!
- Safety information
- General power tool safety warnings
- 1) Work area safety
- 2) Electrical safety
- 3) Personal safety
- 4) Power tool use and care
- 5) Service
- Safety instructions for table saws
- Guarding related warnings
- Safety information for sawing
- Kickback - causes and corresponding safety instructions
- Safety instructions for the operation of circular table saws
- Safety instructions for the handling of saw blades
- Residual risks
- Technical Data
- Noise values
- Wear hearing protection.
- Before starting the equipment
- Construction
- Mounting the bench extension (fig. 3)
- Mounting rack (fig. 4-7)
- Attention!
- Setting / mounting the riving knife (figs. 8-10)
- Mounting / dismounting the saw blade guard (fig. 11-12)
- Caution!
- Replacing the bench insert (fig. 8)
- Installing / replacing the saw blade (fig. 13)
- Caution! Pull out the main plug and wear safety gloves.
- Using the saw
- On/Off switch (Fig. 14)
- Overload protection (fig. 14)
- Cutting depth (fig. 14)
- Setting the angle (fig. 14-15)
- Working with the rip fence
- Setting the stop height (fig. 15-16)
- Turning the stop rail (fig. 15-16)
- Setting the cutting width (fig. 17)
- Transverse stop (fig. 18)
- Operation
- Working instructions
- Making longitudinal cuts (fig. 19)
- Cutting narrow workpieces (Fig. 20)
- Making angular cuts (Fig. 21)
- Making cross cuts (Fig. 22)
- Always hold the guided part of the workpiece. Never hold the part which is to be cut off.
- Cutting particle boards
- Transport
- Maintenance
- General maintenance measures
- Brush inspection
- Service information
- Storage
- Electrical connection
- Important information
- Damaged electrical connection cable
- AC motor
- Disposal and recycling
- Old devices must not be disposed of with household waste!
- Troubleshooting
Brand : DEXTER
Model : TS8XL
Category : Saw