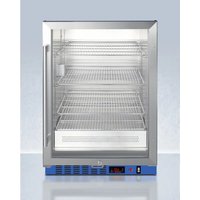
PTHC65GUCLHD - Towel warmers Accucold - Free user manual and instructions
Find the device manual for free PTHC65GUCLHD Accucold in PDF.


| Product Type | Towel Warmer |
| Brand | Accucold |
| Model | PTHC65GUCLHD |
| Power Supply | 120 V AC ~ 60 Hz, 15 A |
| Maximum Temperature | 140 °F (60 °C) |
| Adjustable Temperature Range | 90 °F to 140 °F (32 °C to 60 °C) |
| Capacity | Multiple towels or blankets (leave 1 inch space between items) |
| Installation | Freestanding or built-in (UC models); spacing required: 5 in (127 mm) around for freestanding, 1 in (25 mm) sides/top and 2 in (51 mm) rear for built-in |
| Safety Features | Built-in circuit breaker, grounded plug, circuit breaker shutdown in case of overload |
| Maintenance | Interior cleaning with warm water and baking soda; exterior with soapy water; do not use abrasive products |
| Warranty | 1 year limited (parts and labor in contiguous 48 states) |
| Customer Service | Felix Storch, Inc., 770 Garrison Avenue, Bronx, NY 10474, Phone: (718) 893-3900, www.accucold.com |
| Weight | Not specified in manual |
| Dimensions | Not specified in manual |
Frequently Asked Questions - PTHC65GUCLHD Accucold
User questions about PTHC65GUCLHD Accucold
0 question about this device. Answer the ones you know or ask your own.
Ask a new question about this device
Download the instructions for your Towel warmers in PDF format for free! Find your manual PTHC65GUCLHD - Accucold and take your electronic device back in hand. On this page are published all the documents necessary for the use of your device. PTHC65GUCLHD by Accucold.
USER MANUAL PTHC65GUCLHD Accucold
natural_image
Front view of a stainless steel refrigerator with multiple white folded towels on the shelves (no visible text or labels)MODELS:
PTHC65G Series
PTHC125G Series
PTHC155G Series
PTHC65GUC Series
User Manual
BEFORE USE, PLEASE READ AND FOLLOW ALL SAFETY RULES AND OPERATING INSTRUCTIONS
Important Safeguards 3
Installation 4-5
Before Using the Warming Cabinet 4
Installing your Appliance 4
Reversing the Door Swing 5
Installing the Door Handle 5
Operation 6
Loading the Warming Cabinet 6
Turning on the Warming Cabinet 6
Turning off the Warming Cabinet 6
Reducing the Set Point Temperature 6
Cleaning and Maintenance 7
Cleaning 7
Extended Downtime 7
Moving your Appliance 7
Energy Saving Tips 7
Preventive Maintenance 7
Troubleshooting 8
Wiring Diagram 9
Limited Warranty 10
French Translation of this Manual 11-20
IMPORTANT SAFEGUARDS
Your safety and the safety of others are very important to us. We have provided several important safety messages in this manual. Read all safety messages and always obey them when operating this appliance. Serious injury or even death may result if you do not follow these instructions.

WARNING
To reduce the risk of fire, electric shock, or injury when using this appliance, follow these basic precautions:
Use two or more people to move and install this appliance.
Plug into a grounded 3-prong outlet.
Do not remove the grounding prong, or use a 3/2 adapter.
For free-standing installation, allow at least 5 inches (127mm) of space between the back, top, and sides of the unit. For recessed or built-in installation (units with "UC" in the model number), leave an air gap of at least 1 inch (25.4 mm) on each side and top and 2 inches (51mm) at the rear.
Use care not to plug into outlets controlled by wall switches.
Disconnect power before servicing.
After service, replace all parts and panels before operating.
Do not store or use gasoline or other flammable items in the area of this or any appliance, as the fumes can create a fire hazard or explosion.
Use nonflammable cleaners.
Never unplug your appliance by pulling on the power cord. Always grip the plug firmly and pull straight out from the socket.
Be careful not to roll over or damage the cord when moving the appliance.
Do not pinch, knot, or bend the power cord in any manner.
If the supply cord is damaged, it must be replaced by the manufacturer, its service agent, or similarly qualified persons in order to avoid a hazard.
Unplug the appliance before making repairs or cleaning.
To prevent injury or damage, any repairs or adjustments should be done by only a qualified technician. In particular, do not attempt to remove the control panel, since this could result in electric shock.
This appliance is not meant to exceed a temperature of 140^ F ( 60^ C). Do not raise the set temperature in an attempt to increase the rate of heating. Allow several hours for the content of the cabinet to reach the desired temperature.
Be aware that the temperature of the contents of the warming cabinet may be higher than the displayed temperature. Always check the temperature of the heated blankets and towels before using.
DANGER: Risk of child entrapment!
Child entrapment and suffocation are not problems of the past. Junked or abandoned appliances are still dangerous, even if they will “just sit in the garage a few days”.
Before you throw away your old icemaker or any appliance:
Remove the door.
Leave the shelves in place so that children may not easily climb inside.
- SAVE THESE INSTRUCTIONS –
INSTALLATION
Before Using the Warming Cabinet
Remove the exterior and interior packaging.
Check to be sure the shelves are installed and that the strips of tape holding them in place have been removed.
Level the appliance with the adjustable legs provided.
The circuit breaker on the control panel should be in the OFF position.
Clean the interior surfaces with lukewarm water using a soft cloth. Any plastic odor that you notice when you first open the doors will dissipate once the appliance is operating.
Installing the Appliance
For free-standing installation, allow at least 5 inches (127mm) of space between the back, top, and sides of the unit. For recessed or built-in installation (units with "UC" in the model number), leave an air gap of at least 1" (25.4 mm) on each side and top and 2" (51mm) at the rear.
Place your appliance on a floor that is strong enough to support it when it is fully loaded. Be sure the appliance is level. (Level your warming cabinet by adjusting the legs at the front.)
Leave at least 2 inches of space between the back of the unit and the wall behind, which allows for proper air circulation.
Plug the unit into a 120V AC 60Hz electrical source. The fuse or circuit breaker should be rated for 15 amperes.
The unit is designed to be used in a stable environment where the ideal ambient temperature is 72^ F or less. Extremely warm or cold ambient temperatures may cause the appliance to perform improperly.
Avoid locating the warming cabinet in moist areas.
This appliance is equipped with a three-prong plug and is grounded to eliminate electrical hazards. In order to make it effective, the unit must be plugged into a grounded electrical outlet.
A short power-supply cord (or short detachable power-supply cord) is provided to reduce risk resulting from becoming entangled in or tripping over a longer cord.
Extension cords (or longer detachable power-supply cord) are available and may be used if care is exercised in their use.
If an extension cord (or a long detachable power-supply cord) is used:
The marked electrical rating of the detachable power-supply cord or extension cord should be at least as great as the electrical rating of the appliance;
○ If the appliance is of grounded type, the extension cord should be a grounding type 3-wire cord; and
The cord should be arranged so that it will not drape over the countertop or tabletop where it can be tripped over, snagged, or pulled on unintentionally (especially by children).
Reversing the Door Swing (Only applicable to the PTH65G Series)
The door of the warming cabinet can be hinged on either side so that the door swing can be suited to the location of the installation. In order to reverse the position of the door hinges, refer to the disassembly diagrams below this procedure.
- Lay the warming cabinet onto its backside, being careful to set it onto a blanket or another soft surface.
- Remove the screws holding the bottom hinge, and remove the hinge.
- Slide the door downward, being careful to remove the door pin attaching the door to the upper hinge.
- Set the door aside.
- Remove the screws holding the upper hinge to the warming cabinet.
- Remove the hinge covers from the opposite side of the cabinet.
- Move the upper hinge to the opposite of the cabinet, and tighten with screws.
- Replace the door pin on the opposite side of the door, and slide the door pin into the upper hinge.
- Rest the door against the warming cabinet, and attach the lower hinge to the cabinet and door.
- If the door is not hanging straight, loosen the top hinge, adjust the door until it is straight and retighten the screws.
Installing the Door Handle
This appliance may include a stainless-steel door handle that is not required to operate the unit. To install the handle, follow these steps:
- Pull away the door gasket in area where the handle is to be installed. The gasket is easily displaced by the hand. No tools are necessary.
- Using a flathead screwdriver, remove the two pre-installed decorative plugs from the back of the door. Save the decorative plugs for future use.
-
Insert the two Phillips head handle screws through the gasket side of the door frame until the screws pass through the door frame.
-
Align the handle with the screws installed in Step 3. Tighten the screws using the Phillips head screwdriver until the handle is both flush and secured tightly against the door frame. DO NOT over-tighten, as this will cause damage to the handle assembly.
-
Replace the door gasket to its original position.
OPERATION
NOTE: This appliance is designed to heat towels and blankets to temperatures of up to 140^ F. The process of heating the contents from an ambient room temperature of 72^ F up to 140^ F can take an average of 4 hours, depending on the amount of contents. When loading items into the cabinet for heating, be sure there is a minimum of 1" of space between the items and the walls to allow for proper circulation of air.
Loading the Warning Cabinet
Place the articles to be warmed into the cabinet, and close the door. Items may be stacked, but be sure adequate space is left for air circulation, as noted above. Be sure the door is closed securely.
CAUTION: DO NOT store blankets on the bottom shelf on the unit. Blankets stored here will block the heating module and affect the performance of the unit.
Turning on the Warming Cabinet
Switch the circuit breaker on the control panel to the RESET position. The following will happen:
The temperature controller will light up and display the warming cabinet temperature.
The heating element will turn on, as indicated by the red indicator light on the control panel. It will cycle on and off with the heating element.
The temperature will start to rise.
The temperature will gradually rise to the factory setting of 120^ F from an ambient room temperature of 72^ F.
NOTE: The LED display on the control panel normally shows the cabinet temperature.
When the cabinet reaches 120^ F, the heating element will turn off (the red light goes out), then turns on again when the cabinet's temperature drops by 2-3^ F. This condition will continue until the equipment is turned off intentionally or:
Some internal or external factor causes the current to exceed 15 amperes, in which case the circuit breaker will trip off.
When operating correctly, the warming cabinet will always maintain temperatures within two degrees of its set point (factory-set at 120^ F).
Turning off the Warming Cabinet
To turn off the appliance, switch the circuit breaker on the control panel to OFF.
Reducing the Set Point Temperature
The operating temperature is factory-set to 120^ F, but you can reduce this "Set Point" by following this procedure:
- Press and release the SET button. The display temperature will flash.
- Press either the UP or DOWN arrow on the control panel to reach the desired temperature (Set Point).
NOTE: The temperature range for this unit is factory set from 90^ F to 140^ F.
CLEANING AND MAINTENANCE
Cleaning
Unplug the appliance and remove all contents. Wash the interior liner with a solution of warm water and baking soda (two tablespoons per quart). Then rinse and wipe. Do not use soaps, detergents, scouring powder, spray cleaners or the like on the liner, as these may cause odors in the cabinet.
Wash shelves in a mild detergent solution and dry with a soft cloth.
Wipe the exterior surface with a soft cloth dampened with soapy water and then dry with a soft cloth. A spray appliance cleaner may be used for the exterior only.
Use only lukewarm soapy water to clean the door gasket.
Never use acids, chemical thinner, gasoline, benzene or the like for cleaning any part of the appliance. Boiling water and benzene may deform or damage plastic parts.
Extended Downtime
If the appliance will not be used for several months, empty it, and unplug the power cord. Clean and dry the interior thoroughly. To prevent odor and mold growth, leave the door open slightly, blocking it open if necessary.
Moving Your Appliance
Remove or securely tape down all loose items inside the warming cabinet.
Tape the door shut.
Be sure the appliance is kept in the upright position during transportation. Also protect the outside of the appliance with a blanket or similar item.
Energy-Saving Tips
To allow proper air circulation, keep a space around the walls and fan when loading the cabinet. Add or remove as many items as needed at one time, and close the door as soon as possible.
Preventive Maintenance
Twice a year, place a thermometer near the fan inlet of the cabinet in order to check the accuracy of the temperature setting. The actual temperature should be within plus or minus 3 Fahrenheit degrees of the set temperature.
TROUBLESHOOTING
You can easily solve many common problems with your appliance, saving you the cost of a possible service call. Try the suggestions below to see if you can solve the problem before calling a service technician.
TROUBLESHOOTING GUIDE
| Problem | Possible Cause |
| Appliance does not get warm. | Not plugged in; power is off.The circuit breaker has tripped or fuse has blown. Door is not closed. |
| Appliance turns on but does not reach the set temperature. | Allow up to several hours of operating time for the unit to come to temperature. |
| The door will not close properly. | The appliance is not level.The door was reversed and not properly re-installed.The gasket is dirty.The shelves are out of position. |
If your appliance shows other symptoms than those described above, or if you have checked all items listed as the cause and the problem still exists, then call Accucold® Customer Service at 1-888-4-MEDLAB.
WIRING DIAGRAM
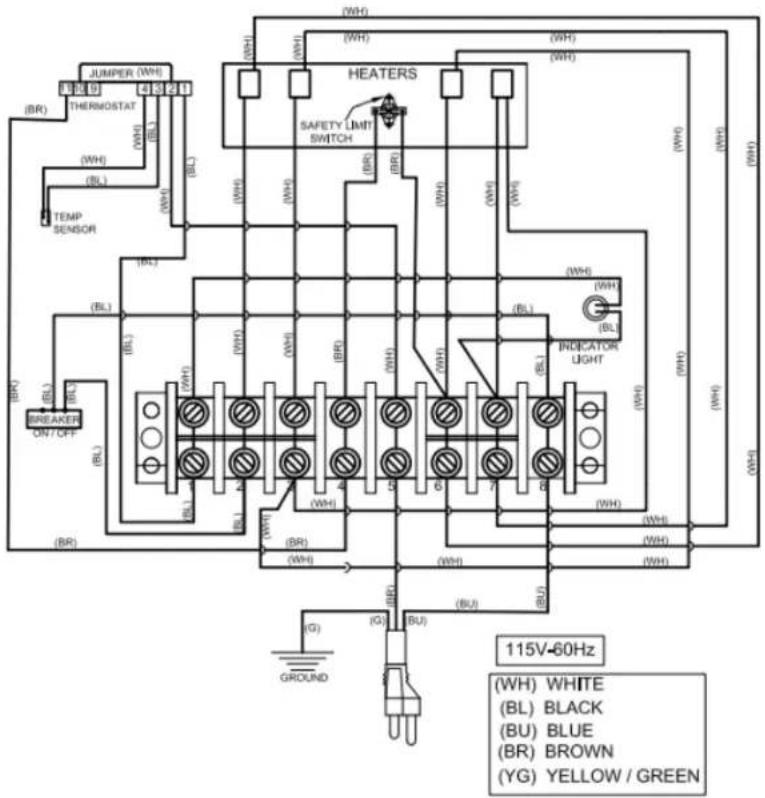
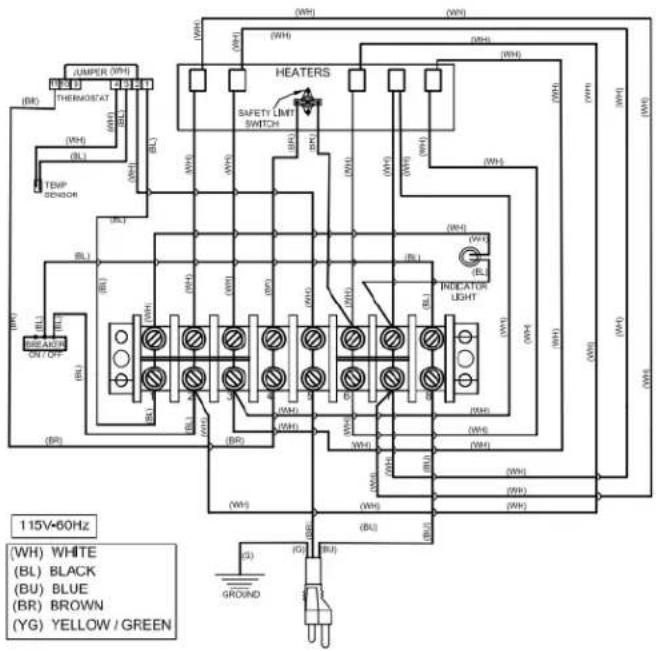
LIMITED
WARRANTY
ONE YEAR LIMITED WARRANTY
Within the 48 contiguous United States, for one year from the date of purchase, when this appliance is operated and maintained according to instructions attached to or furnished with the product, warrantor will pay for factory-specified parts and repair labor to correct defects in materials or workmanship. Service must be provided by a designated service company. Outside the 48 states, all parts are warranted for one year from manufacturing defects. Plastic parts, shelves and cabinets are warranted to be manufactured to commercially acceptable standards, and are not covered from damage during handling or breakage.
ITEMS WARRANTOR WILL NOT PAY FOR:
- Service calls to correct the installation of your appliance, to instruct you how to use your appliance, to replace or repair fuses or to correct wiring or plumbing.
- Service calls to repair or replace appliance light bulbs or broken shelves. Consumable parts (such as filters) are excluded from warranty coverage.
- Damage resulting from accident, alteration, misuse, abuse, fire, flood, acts of God, improper installation, installation not in accordance with electrical or plumbing codes, or use of products not approved by warrantor.
- Replacement parts or repair labor costs for units operated outside the United States.
- Repairs to parts or systems resulting from unauthorized modifications made to the appliance.
- Expenses for travel and transportation for product service in remote locations.
- The removal and reinstallation of your appliance if it is installed in an inaccessible location or is not installed in accordance with published installation instructions.
DISCLAIMER OF IMPLIED WARRANTIES – LIMITATION OF REMEDIES
CUSTOMER'S SOLE AND EXCLUSIVE REMEDY UNDER THIS LIMITED WARRANTY SHALL BE PRODUCT REPAIRAS PROVIDED HEREIN. IMPLIED WARRANTIES, INCLUDING WARRANTIES OF MERCHANTABILITY OR FITNESS FOR A PARTICULAR PURPOSE, ARE LIMITED TO ONE YEAR. WARRANTOR SHALL NOT BE LIABLE FOR INCIDENTAL OR CONSEQUENTIAL DAMAGES. SOME STATES DO NOT ALLOW THE EXCLUSION OR LIMITATION OF INCIDENTAL OR CONSEQUENTIAL DAMAGES, OR LIMITATIONS ON THE DURATION OF
IMPLIED WARRANTIES OF MERCHANTABILITY OR FITNESS, SO THESE EXCLUSIONS OR LIMITATIONS MAY NOT APPLY TO YOU. THIS WARRANTY GIVES YOU SPECIFIC LEGAL RIGHTS AND YOU MAY ALSO HAVE OTHER RIGHTS, WHICH VARY FROM STATE TO STATE.

WARNING: This product can expose you to chemicals including Nickel (Metallic) which is known to the State of California to cause cancer.
For more information go to www.P65Warnings.ca.gov
Note: Nickel is a component in all stainless steel and some other metallic compositions.
Felix Storch, Inc.
770 Garrison Avenue
Bronx, NY 10474
Phone: (718) 893-3900
Fax: (718) 842-3093
www.accucold.com


For parts and accessory ordering, troubleshooting, and helpful hints, visit: www.accucold.com/support
Revised May 2020
TABLE DES MATIERES
www.accucold.com/support
- Important Safeguards 3
- Installation 4-5
- Operation 6
- Cleaning and Maintenance 7
- Troubleshooting 8
- Wiring Diagram 9
- Limited Warranty 10
- French Translation of this Manual 11-20
- IMPORTANT SAFEGUARDS
- WARNING
- DANGER: Risk of child entrapment!
- Before you throw away your old icemaker or any appliance:
- - SAVE THESE INSTRUCTIONS –
- INSTALLATION
- Before Using the Warming Cabinet
- Installing the Appliance
- Reversing the Door Swing (Only applicable to the PTH65G Series)
- Installing the Door Handle
- OPERATION
- Loading the Warning Cabinet
- Turning on the Warming Cabinet
- Turning off the Warming Cabinet
- Reducing the Set Point Temperature
- CLEANING AND MAINTENANCE
- Cleaning
- Extended Downtime
- Moving Your Appliance
- Energy-Saving Tips
- Preventive Maintenance
- TROUBLESHOOTING
- WARRANTY
- ONE YEAR LIMITED WARRANTY
- ITEMS WARRANTOR WILL NOT PAY FOR:
- DISCLAIMER OF IMPLIED WARRANTIES – LIMITATION OF REMEDIES
- TABLE DES MATIERES
Brand : Accucold
Model : PTHC65GUCLHD
Category : Towel warmers