LX-P9373A - Kitchen storage Vevor - Free user manual and instructions
Find the device manual for free LX-P9373A Vevor in PDF.

| Product Type | Wall-mounted or countertop spice rack |
| Model | LX-P9373 / LX-P9373A |
| Brand | Vevor |
| Maximum load capacity | 10 kg |
| Installation | On a flat, solid surface or fixed to the wall with screws |
| Recommended space | Approximately 100 mm of free space at the front and above |
| Cleaning | With a damp cloth and warm water; do not use in dishwasher |
| Prohibited cleaning products | Abrasive cleaners, steel wool, hard brushes |
| Safety - Heat source | Do not place near a flame or heat source |
| Safety - Children | Keep out of reach of children; do not let children play with it |
| Safety - Surfaces | Do not sit or stand on the product |
| Safety - Perishable food | Do not store above or below perishable food near a heat source |
| Intended use | Household use only, not for commercial or industrial use |
| Included accessories | Mounting screws and installation accessories (depending on configuration) |
| Maintenance before storage | Clean, dry, and store in a dry place away from dust |
| Material | Metal (stainless steel or alloy) and plastic (estimated) |
| Approximate dimensions | Not specified in the manual (estimated: 30 x 20 x 40 cm) |
| Approximate weight | Not specified (estimated: 2-3 kg) |
| Warranty | Technical support and electronic warranty certificate at www.vevor.com/support |
Frequently Asked Questions - LX-P9373A Vevor
User questions about LX-P9373A Vevor
0 question about this device. Answer the ones you know or ask your own.
Ask a new question about this device
Download the instructions for your Kitchen storage in PDF format for free! Find your manual LX-P9373A - Vevor and take your electronic device back in hand. On this page are published all the documents necessary for the use of your device. LX-P9373A by Vevor.
USER MANUAL LX-P9373A Vevor
Technical Support and E-Warranty Certificate www.vevor.com/support
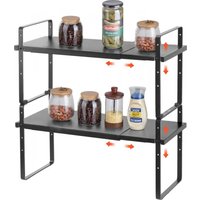
SPICE RACK
MODEL: LX-P9373 / LX-P9373A
We continue to be committed to provide you tools with competitive price. "Save Half", "Half Price" or any other similar expressions used by us only represents an estimate of savings you might benefit from buying certain tools with us compared to the major top brands and does not necessarily mean to co all categories of tools offered by us. You are kindly reminded to verify carefully when you are placing an order with us if you are actually Saving Half in comparison with the top major brands.
MODEL: LX-P9373 / LX-P9373A
NEED HELP? CONTACT US!
Have product questions? Need technical support? Please feel free to contact us:
Technical Support and E-Warranty Certificate www.vevor.com/support
This is the original instruction, please read all manual instructions carefully before operating. VEVOR reserves a clear interpretation of o user manual. The appearance of the product shall be subject to the product you received. Please forgive us that we won't inform you ag there are any technology or software updates on our product.

Warning-To reduce the risk of injury, user must read instructions manual carefully.
WARNING!
Please use different installation accessories according different installation positions.
IMPORTANT SAFEGUARDS
Thank you for using this product. In order to make sure that you can operam machine correctly, read this instruction carefully before operation and keep it properly for future reference. Please be sure to read the precautions and saf rules in this page to ensure your safe use.This manual will outline safety wa and precautions, operating, maintenance and cleaning. The warnings and instructions reviewed in this manual cannot cover all possible conditions and situations that may occur. Caution and common sense are not built into this product, since we believe that the uses will comply with these codes.
Please read ALL the instructions before using your machine.
- DO NOT let children, minors, or pets get close to or touch the product.
- Using any accessories or attachments that are not provided or recommend by the manufacturer may cause injury.
- Do not attempt to modify the product in any way.
- If the product is not to be used for a long period of time, clean and store it in a dry and safe place.
- KEEP IT OUT OF CHILDREN'S REACH.
- Avoid using it in the presence of flammable liquids, gases, dust or other explosive situations.
- Children shall not play with the machine alone. Children shall only make cleaning and user maintenance with supervision.
- Make sure that the product is always placed on a firm, level support.
- The machine should be located in an open area with good ventilation, aw from trees and fences.
- While every effort has been made in the manufacture of your machine to remove any sharp edge, you should handle all components with care in order to avoid accidental injury.
- Keep fire extinguisher within a safe and accessible distance and make sure
those operating the machine are trained to use it.
12. Keep away from flammable material and fluids such as petroleum, alcohol diesel fuel, kerosene and charcoal lighter fluid or vehicles while in use.
13. DO NOT CLEAN IT WITH ANY ABRASIVE MATERIAL.
14. This machine is intended for domestic cooking only. It is not designed for commercial or industrial purposes.
15. Perishable food, plastic items and aerosols may be affected by heat and should not be stored above or below the machine unit.
16. Do not place clothes above the machine and avoid using it as a clothes
17. The maximum load capacity of the product is 10Kg , and the heavy object should be evenly placed.
WARNING! Cannot stand or sit on the product.
WARNING! Remove all packaging materials and keep them for future use. Packaging materials are not a toy.
WARNING! Don't let children play with the packaging materials. If they swallow the packaging materials, they will suffocate!
WARNING! Keep children and pets away. Children must not operate or plan near this machine.
WARNING! Failure to follow instructions could result in death, serious bone injury, and property loss.
WARNING: This appliance is not intended for use by young or infirm persons unless supervised by a responsible person to ensure that they use the appliance safely. Young children should be supervised to ensure that they do not play with the product. Pets should stay away from the product.
ATTENTION! The product cannot be placed in the dishwasher for cleaning
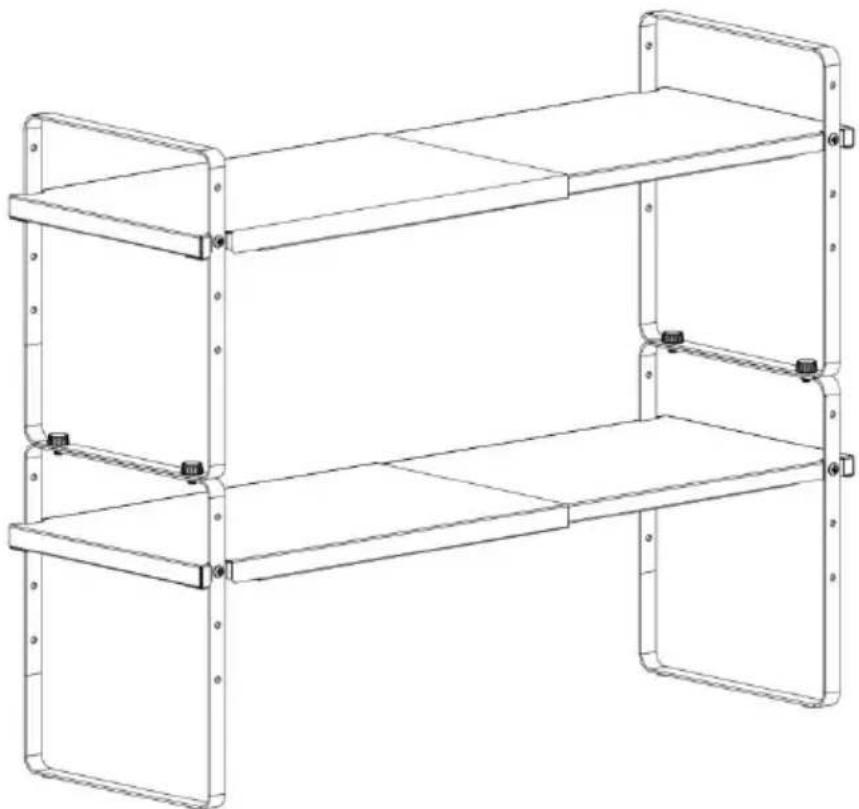
INSTALLATION STEPS
Before using the appliance for the first time, peel off any promotional material packaging materials, and check that the cooking plates are clean and free of If necessary, wipe them over with a damp cloth. Spread over with an absorb kitchen towel and wipe off any excess oil. When your product is heated for time, it may emit slight smoke or odor, which is normal for many product, a not affect the safety of your product.
WARNING! The product cannot be placed near or on a fire source, otherwise it will deform and burn!
ATTENTION! Ensure that the product is placed on a horizontal and sturdy platform, or secured to the wall with screws.
ATTENTION! Before each use, the handle must be checked for looseness and the handle and screws must be kept tight.
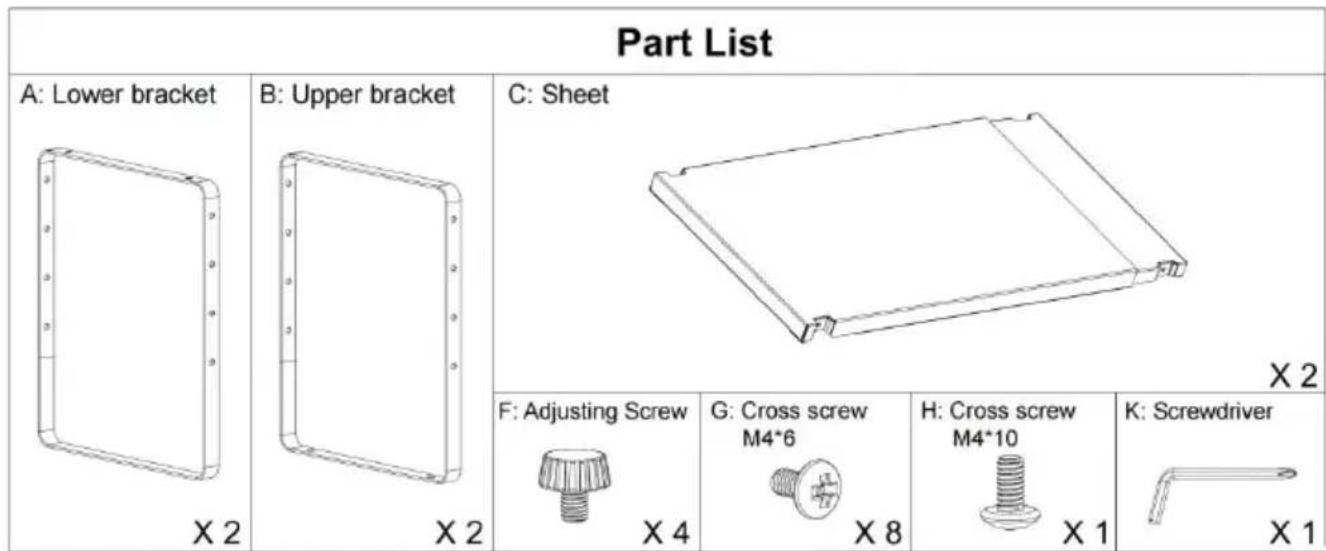
NOTE: The quantity of parts shown in the manual is the actual usage a unused parts are spare parts.
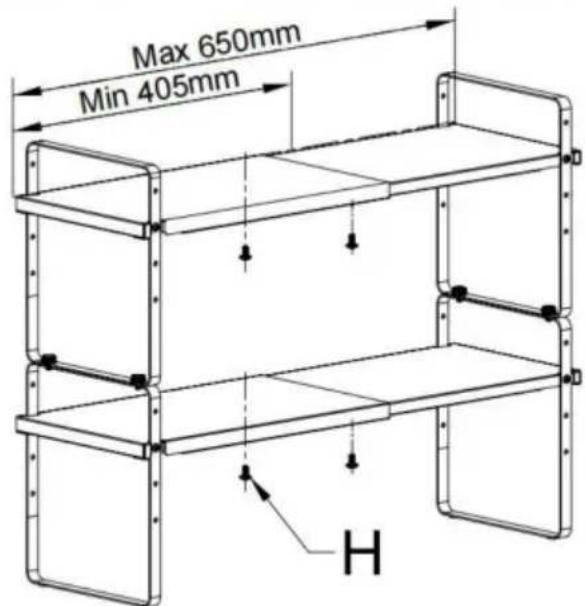
ATTENTION! Approximately 100mm of space needs to be reserved at the front and upper ends of the product for easy use.
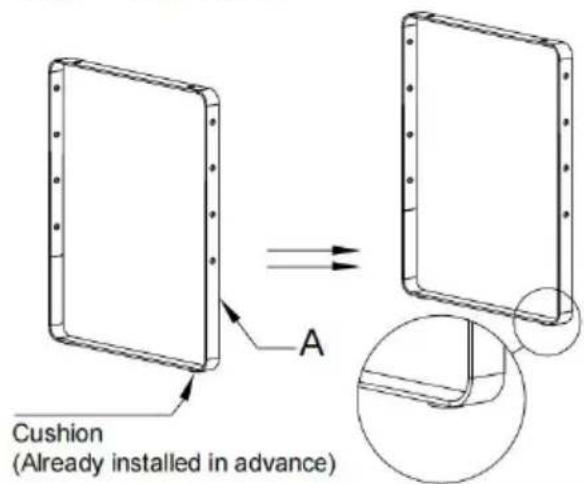
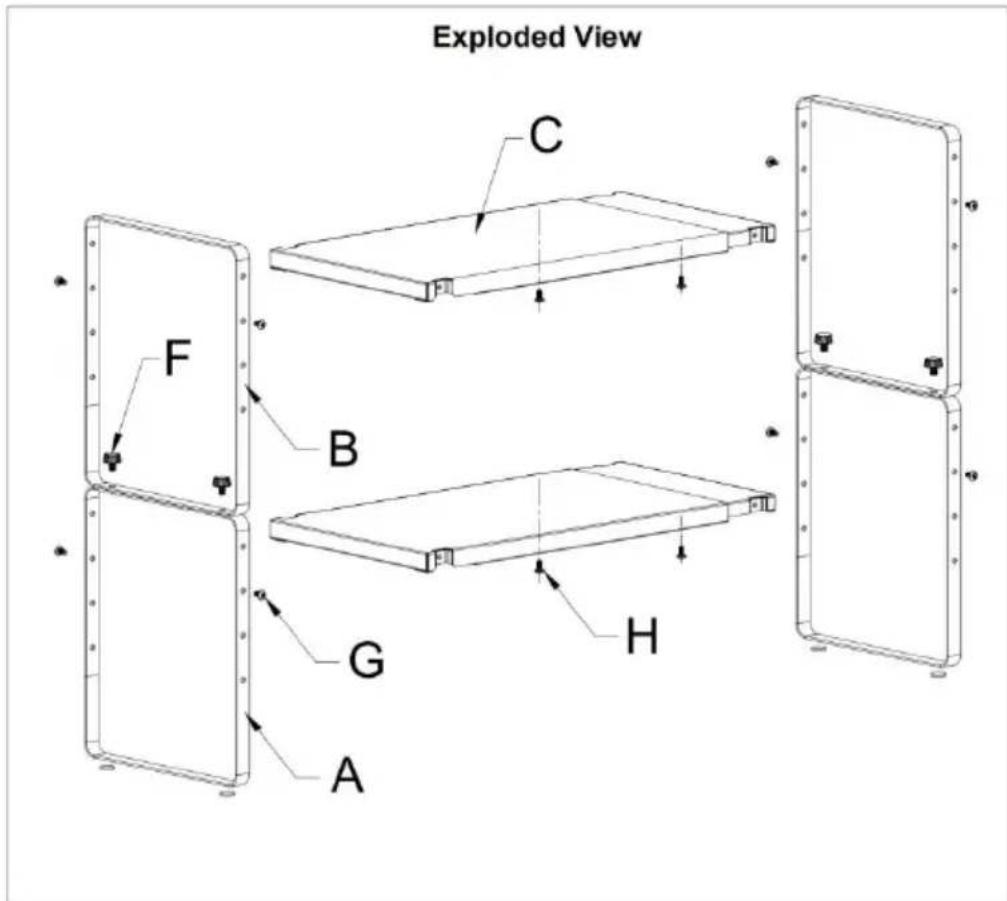
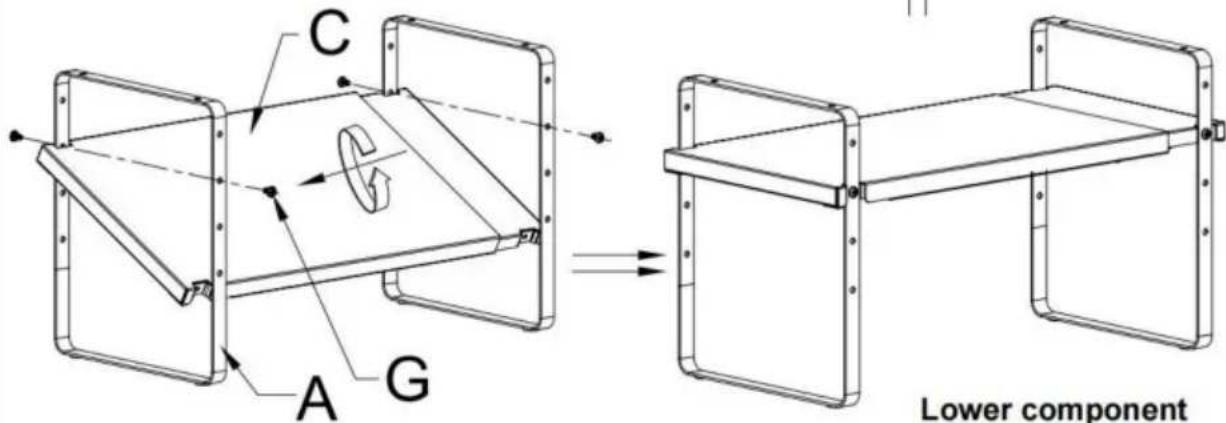
Step1: Lower bracket
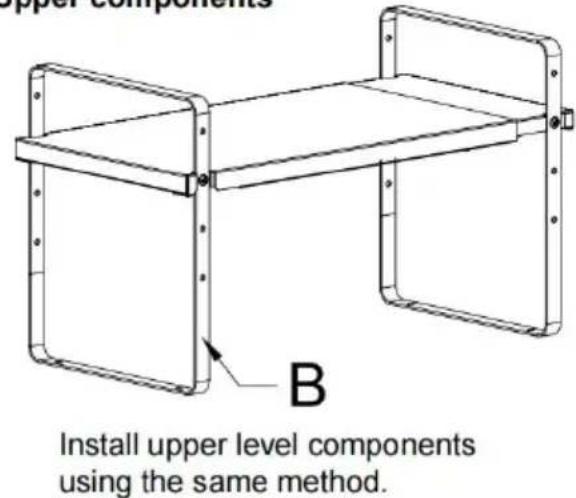
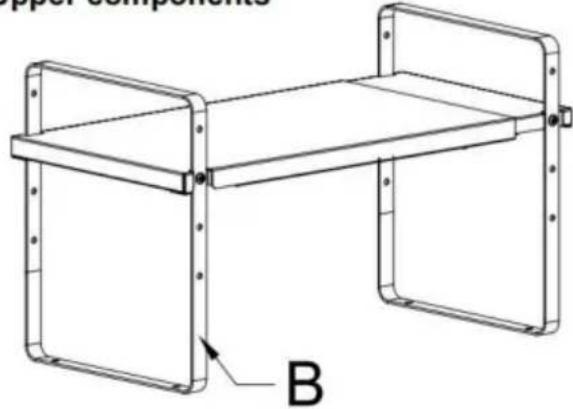
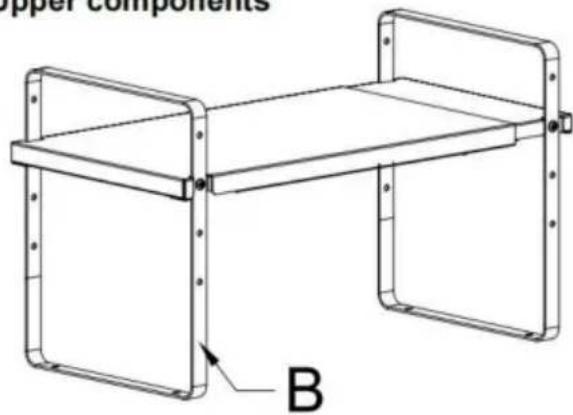
Upper components

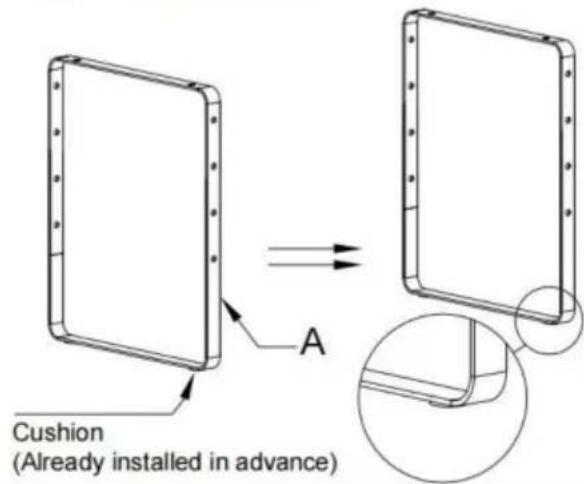
Step2: Tum the laminated board to the slot and use G to tightly install C and A
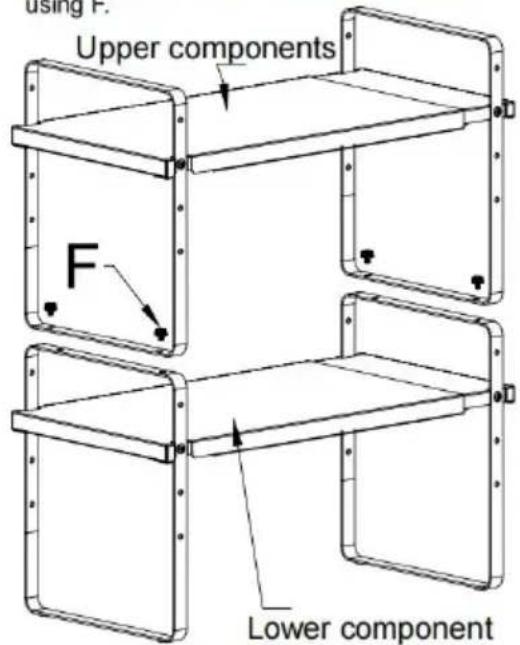
Step3: Install the upper and lower layers together using F.
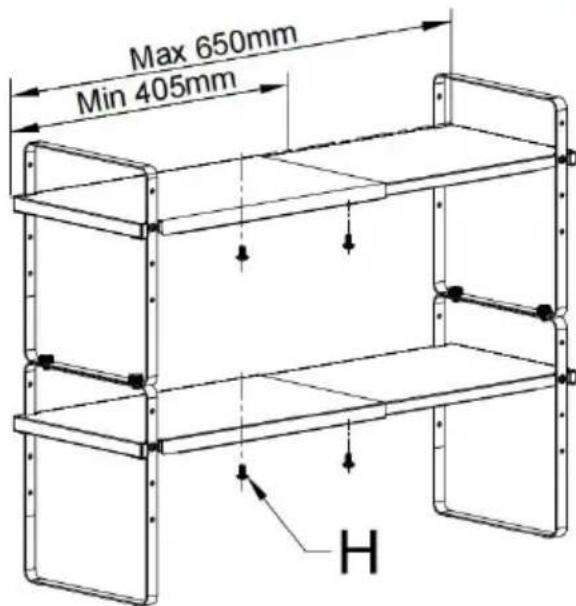
Step4: If you want to adjust the length, loosen H and stretch it to the appropriate length, then tighten H again.
CLEANING AND STORAGE
- Please remove the items placed on top before cleaning.
- Product can be cleaned using a dishcloth, warm water and a commercial detergent. Avoid using abrasive cleaners, and wire wool and brushes as these may scratch the surface.
- Before storage, always make sure the product is cool and dry.
- Store the appliance in a dry and clean area.
ATTENTION! The product cannot be placed in the dishwasher for cleaning. Manufacturer: Shanghaiuxinmuyeyouxiangonsi
Address: Shuangchenglu 803nong11hao1602A-1609shi, baoshanqu, shanghai 200000 CN.
Imported to AUS: SIHAO PTY LTD. 1 ROKEVA STREETEASTWOOD NSW 2122 Australia
Imported to USA: Sanven Technology Ltd. Suite 250, 9166 Anaheim Place, Rancho Cucamonga, CA 91730

YH CONSULTING LIMITED.
C/O YH Consulting Limited Office 147,
Centurion House, London Road,
Staines-upon-Thames, Surrey, TW18 4AX
E-CrossStu GmbH
Mainzer Landstr.69,
60329 Frankfurt am Main.
VEVOR
TOUGH TOOLS, HALF PRICE
Technical Support and E-Warranty Certificate
www.vevor.com/support
VEVOR®
TOUGH TOOLS, HALF PRICE
Assistance technique et certificat de garantie electronique www.vevor.com/support
PORTE-ÉPICES
MODELE: LX-P9373 / LX-P9373A
Step1: Lower bracket

Upper components
Install upper level components using the same method.

Step2: Turn the laminated board to the slot and use G to tightly install C and A

Step3: Install the upper and lower layers together using F.
Step4: If you want to adjust the length, loosen H and stretch it to the appropriate length, then tighten H again.
C/O YH Consulting Limited Bureau 147,
Maison Centurion, London Road,
Staines-upon-Thames, Surrey, TW18 4AX
E-CrossStu GmbH
Mainzer Landstr.69,

Step1: Lower bracket

Upper components
Install upper level components using the same method.

Step2: Turn the laminated board to the slot and use G to tightly install C and A

Step3: Install the upper and lower layers together using F.

Step4: If you want to adjust the length, loosen H and stretch it to the appropriate length, then tighten H again.
C/O YH Consulting Limited Buro 147,
Centurion House, London Road,
Staines-upon-Thames, Surrey, TW18 4AX
E-CrossStu GmbH
Mainzer Landstr.69,
60329 Frankfurt am Main.
VEVOR
TOUGH TOOLS, HALF PRICE

Step1: Lower bracket
Upper components
Install upper level components using the same method.

Step2: Turn the laminated board to the slot and use G to tightly install C and A

Step3: Install the upper and lower layers together using F.

Step4: If you want to adjust the length, loosen H and stretch it to the appropriate length, then tighten H again.
PULIZIA E STOCCAGGIO
Importato in Australia: SIHAO PTY LTD. 1 ROKEVA STREETEASTWOOD NSW 2122Australia
C/O YH Consulting Limited Ufficio 147,
Casa del Centurione, London Road,
Staines-upon-Thames, Surrey, TW18 4AX

E-CrossStu GmbH
Mainzer Landstr.69,
60329 FrancofortesulMeno.
VEVOR
TOUGH TOOLS, HALF PRICE
elettronica www.vevor.com/support
VEVOR®
TOUGH TOOLS, HALF PRICE
Soporte专业技术o y certificate de garantia electrònica www.vevor.com/support
ESTANTE DE ESPECIAS
MODELO: LX-P9373 / LX-P9373A
Seguimos comprometidos a proportionarle herramentas a precios competitivos.

Step1: Lower bracket

Upper components
Install upper level components using the same method.
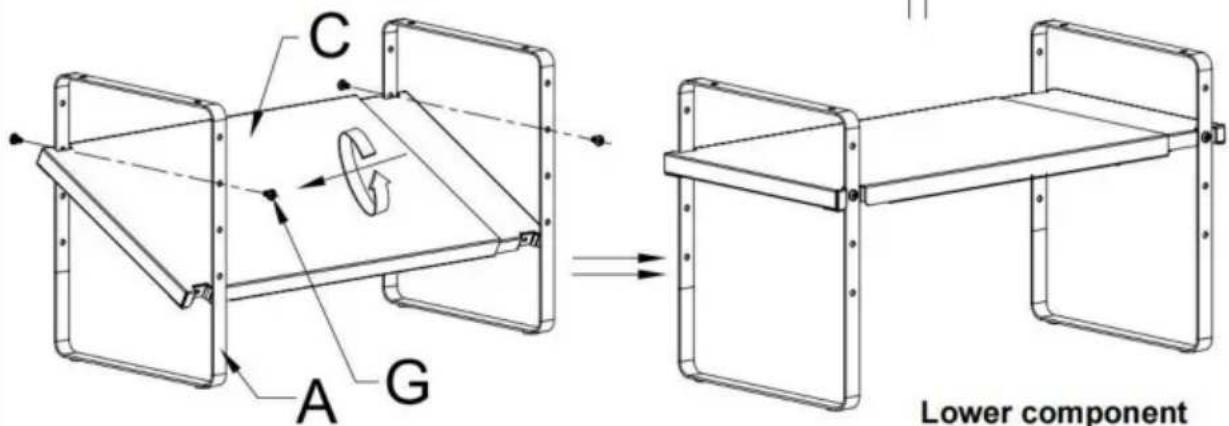
Step2: Turn the laminated board to the slot and use G to tightly install C and A

Step3: Install the upper and lower layers together using F.

Step4: If you want to adjust the length, loosen H and stretch it to the appropriate length, then tighten H again.
LIMPIEZA Y ALMACENAMIENTO
Casa Centurión, London Road,
Staines upon Thames, Surrey, TW18 4AX
E-CrossStu GmbH
Mainzer Landstr.69,

Step1: Lower bracket
Upper components
Install upper level components using the same method.

Step2: Turn the laminated board to the slot and use G to tightly install C and A

Step3: Install the upper and lower layers together using F.

Step4: If you want to adjust the length, loosen H and stretch it to the appropriate length, then tighten H again.
CZYSZCZENIE I PRZECHOWYWANIE
C/O YH Consulting Limited Biuro 147,
Dom Centuriona, London Road,
Staines-upon-Thames, Surrey, TW18 4AX
E-CrossStu GmbH
Mainzer Landstr.69,
60329 Frankfurt nad Menem.
VEVOR
TOUGH TOOLS, HALF PRICE
www.vevor.com/support
VEVOR®
TOUGH TOOLS, HALF PRICE
Technische ondersteuning en e-garantiecertificaat www.vevor.com/support
KRUIDENREK
MODEL: LX-P9373 / LX-P9373A

Step1: Lower bracket

Upper components
Install upper level components using the same method.

Step2: Turn the laminated board to the slot and use G to tightly install C and A

Step3: Install the upper and lower layers together using F.

Step4: If you want to adjust the length, loosen H and stretch it to the appropriate length, then tighten H again.
REINIGING EN OPSLAG
C/O YH Consulting Limited Kantoor 147,
Centurion House, London Road,
Staines-upon-Thames, Surrey, TW18 4AX
E-CrossStu GmbH
Mainzer Landstr.69,
60329 Frankfurt am Main.
VEVOR
TOUGH TOOLS, HALF PRICE
Technische ondersteuning en e-garantiecertificaat www.vevor.com/support
VEVOR®
TOUGH TOOLS, HALF PRICE

Step1: Lower bracket
Upper components

Install upper level components using the same method.
Step2: Turn the laminated board to the slot and use G to tightly install C and A

Step3: Install the upper and lower layers together using F.

Step4: If you want to adjust the length, loosen H and stretch it to the appropriate length, then tighten H again.
RENGÖRING OCH FÖRVARING
C/O YH Consulting Limited Office 147,
Centurion House, London Road,
Staines-upon-Thames, Surrey, TW18 4AX
E-CrossStu GmbH
Mainzer Landstr.69,
60329 Frankfurt am Main.
VEVOR
TOUGH TOOLS, HALF PRICE
www.vevor.com/support