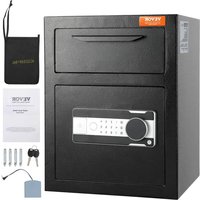
SS-1320CZ - Safe Vevor - Free user manual and instructions
Find the device manual for free SS-1320CZ Vevor in PDF.

| Product Type | Safe |
| Brand | Vevor |
| Model | SS-1320CZ |
| Dimensions (W x D x H) | 480 x 350 x 1320 mm |
| Power Supply | 4 AA alkaline batteries (4.2-7 V) |
| Password Capacity | 1 to 8 digits |
| Unlocking Types | Personal password, management password, emergency key, external power supply box |
| Alarm Function | Yes - vibrating alarm upon shock or 3 consecutive wrong passwords (1 minute duration) |
| Low Battery Indicator | Yes - flashing red light |
| Operating Temperature | Not specified |
| Material | Steel (estimated) |
| Weight | Not specified |
| Installation | Recommended to secure the safe to prevent tipping |
| Maintenance | Clean with a soft dry cloth. Do not use abrasive products. |
| Child Safety | Do not allow children to play with or near the safe |
| Certifications | Compliant with FCC Part 15 and European Directive 2012/19/EC |
| Package Contents | Safe, emergency key, external power supply box, user manual |
Frequently Asked Questions - SS-1320CZ Vevor
User questions about SS-1320CZ Vevor
0 question about this device. Answer the ones you know or ask your own.
Ask a new question about this device
Download the instructions for your Safe in PDF format for free! Find your manual SS-1320CZ - Vevor and take your electronic device back in hand. On this page are published all the documents necessary for the use of your device. SS-1320CZ by Vevor.
USER MANUAL SS-1320CZ Vevor
Upgrade · The Home Creator Way
SAFE BOX
USER MANUAL
MODEL:SS-1320CZ
MODEL:SS-1320CZ

natural_image
Line drawings of three different electrical cabinets with internal components, shown from front, top, and side views (no text or symbols present)This is the original instruction, please read all manual instructions carefully before operating. VEVOR reserves a clear interpretation of o user manual. The appearance of the product shall be subject to the product you received. Please forgive us that we won't inform you ag there are any technology or software updates on our product.
 | Warning-To reduce the risk of injury, user must read instructions manual carefully. |
 | This device complies with Part 15 of the FCC Rules. Operat subject to the following two conditions:(1)This device may not harmful interference, and (2)this device must accept any inter received, including interference that may cause undesired oper |
 | This product is subject to the provision of European Directive 2012/19/EC. The symbol showing a wheelie bin crossed through indicates that the product requires separate refuse collection in European Union. This applies to the product and all accessor marked with this symbol. Products marked as such may not discarded with normal domestic waste, but must be taken to collection point for recycling electrical and electronic devices |
WARNING
1. Danger of Tipping Over
• A child or adult can tip the safe and be killed or seriously injured
- Serious injury may occur to children and adults if the safe is not secured before installation.
- Children should not play with or around the safe at any time.
2. Please Do Not Put the Emergency Key, the External Power Bo The Safe BOX
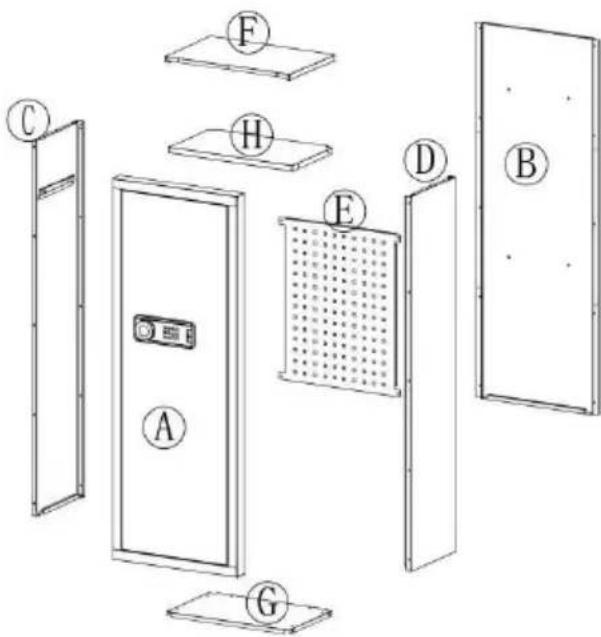
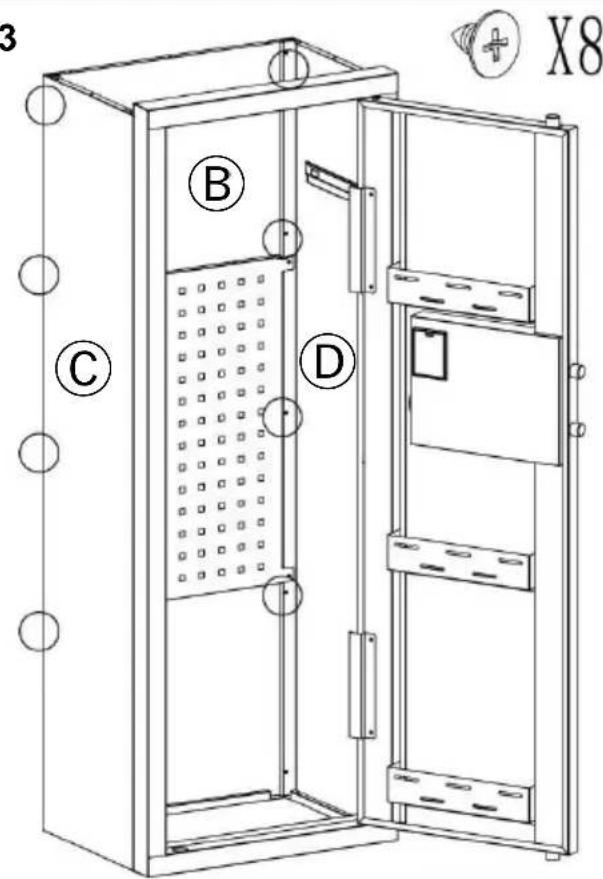
A X1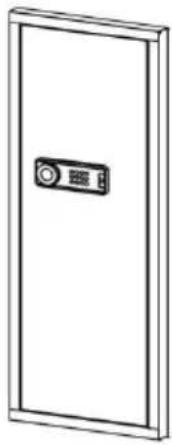 | B X1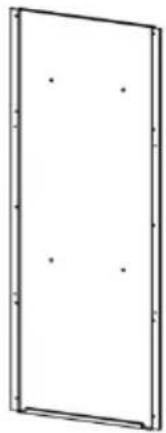 | C X1 | D X1 | ||||
| E X1 | F X1 | G X1 | H X1 | ||||
Gun bracket | Buttstock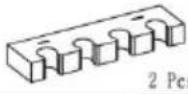 | Self tapping thread 42 Pcs 42 Pcs | Plastic Snap-fit 10Pes 10Pes | Peg 5 Pcs 5 Pcs | |||
Scrowdriver 1 PCS 1 PCS | Gloves 1 PCS 1 PCS | Expansion bolt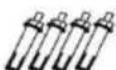 4 PCS 4 PCS | Key[265K]2 PCS | Instructions 1 PCS 1 PCS | Battery box 1 PCS 1 PCS | ||
INSTRUCTIONS
STEP 1

natural_image
Simple circular diagram with vertical lines and two small symbols inside, no text or labels present.
HEAVY! You may need assistance with this step.

natural_image
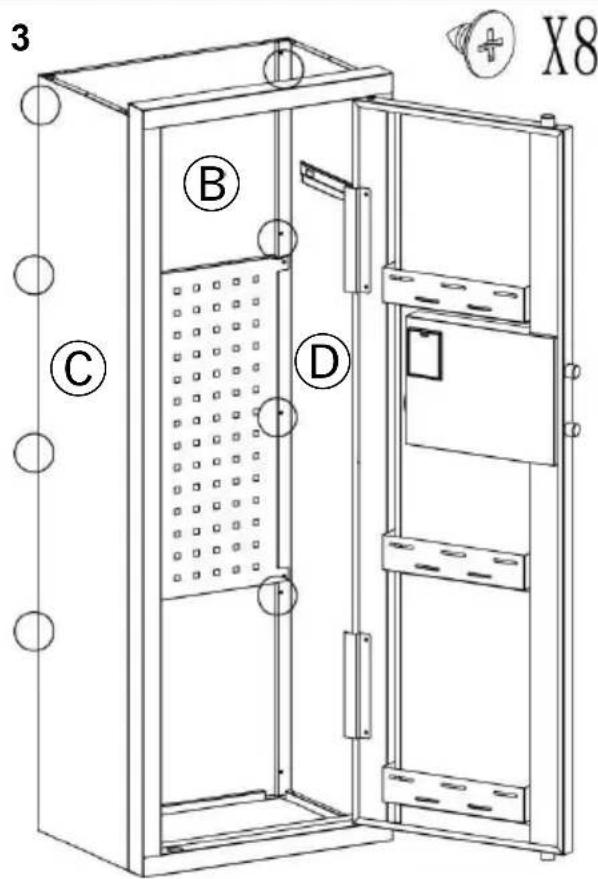
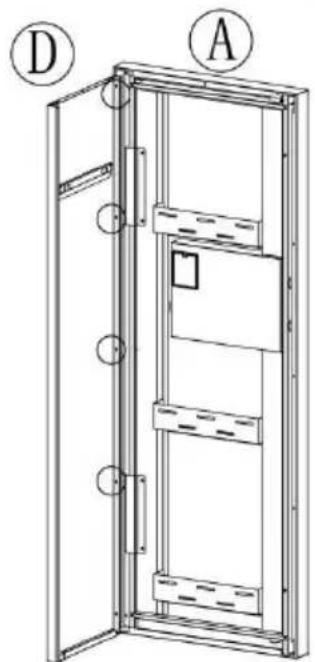
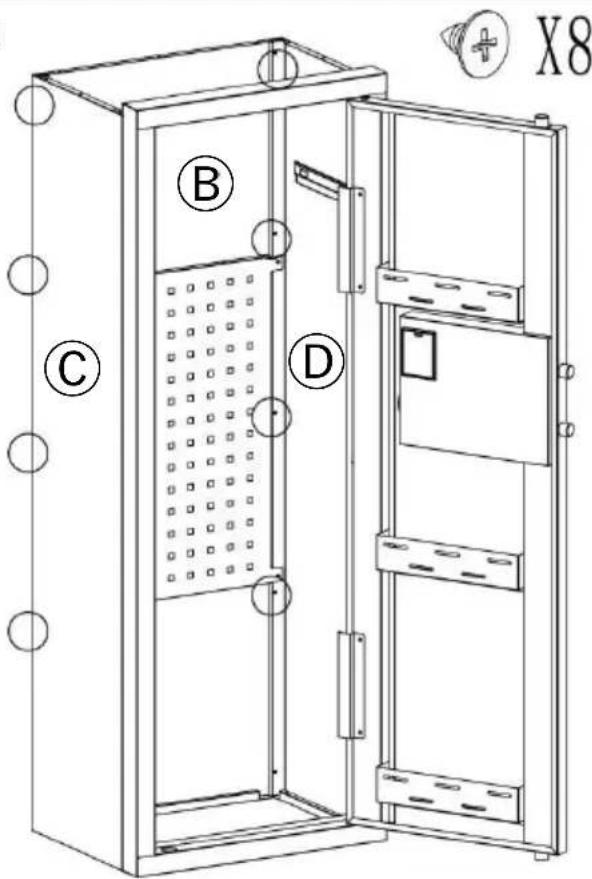
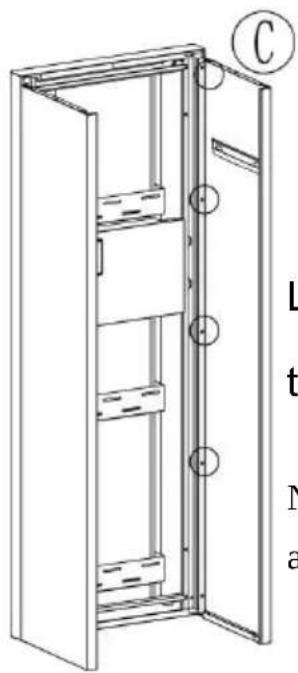
Technical line drawing of a door with labeled components (A and D), showing internal compartments and mounting holes (no text or symbols beyond labels)X8
natural_image
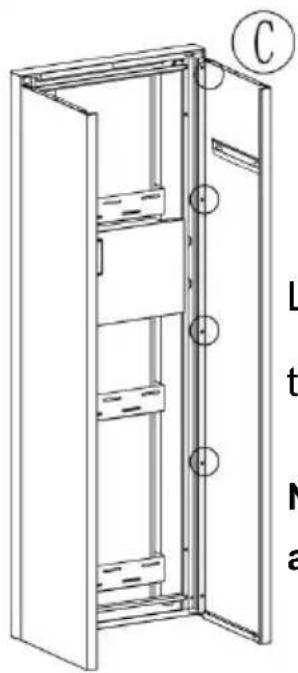
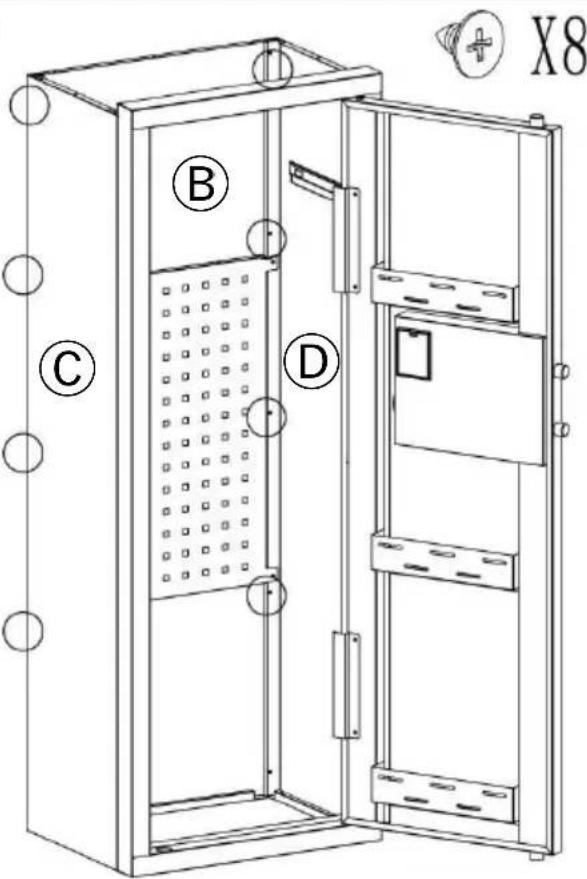
Technical line drawing of a cabinet with open door and internal compartments (no text or symbols)Link Ⓐ, Ⓒ, Ⓓ with Self tapping threads.
Note:The bottom screws are not installed.
STEP 2

Link Ⓑ, Ⓔ with Self tapping threads.

X4
STEP 3

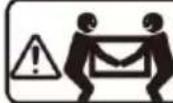
HEAVY! You may need assistance with this step.
Link Ⓑ, Ⓒ, Ⓓ with Self tapping threads.
Note:The bottom screws are not installed.
STEP 4

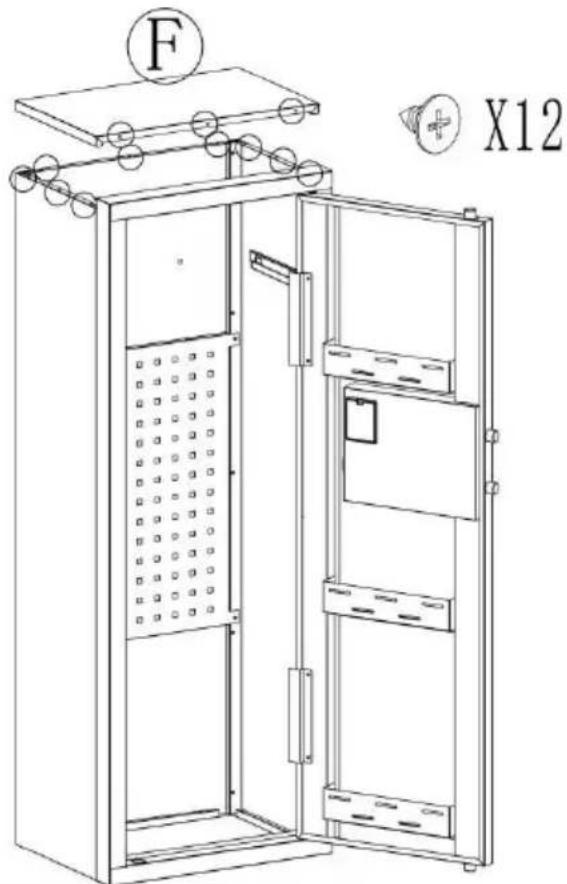
Install Ⓕ and secure with Self tapping thread
STEP 5
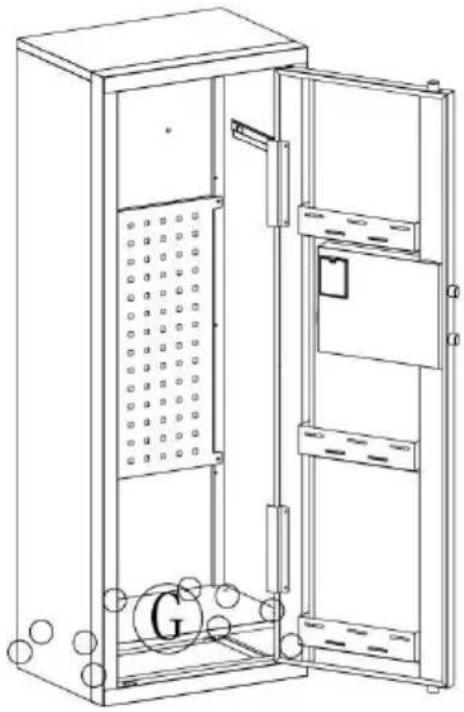
natural_image
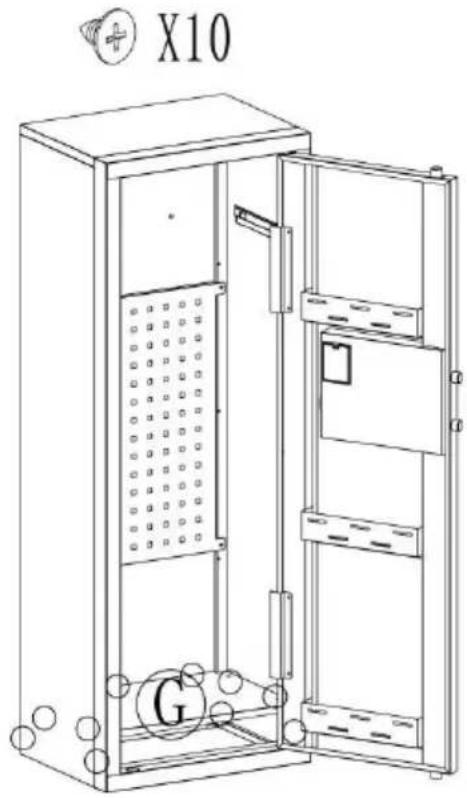
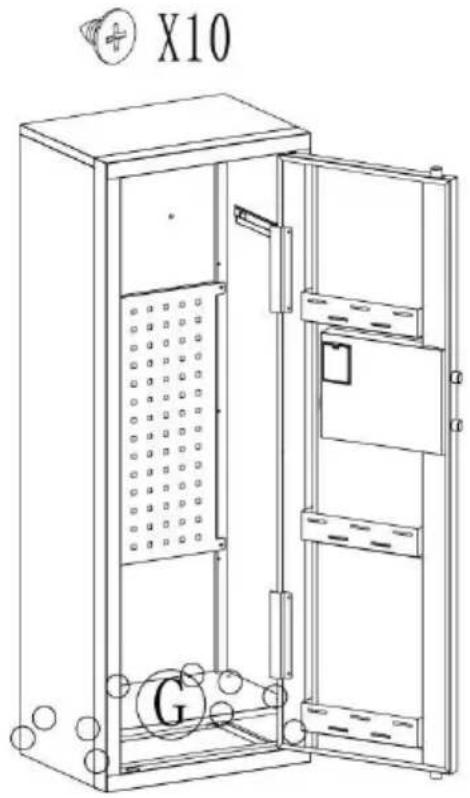
Line drawing of an open electrical cabinet with internal compartments and labeled components (no text or symbols beyond basic diagram)Install Ⓖ and secure
with Self tapping thread
STEP 6
OPENING YOUR SAFE FOR THE FIRST TIME
Open the door for the first time, use the configured emergency key to the door. The operation steps are as follows:
| 1. Press down to open the emergency lock cover. | 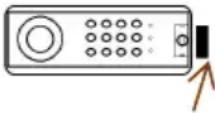 | 4. Install the battery and open the battery case |
| 2. Insert the emergency key into the keyhole ar push it to rotate 65° counterclockwise. |  | 5. Make sure the battery matches ‘+ and ‘-’ in the box.(not including 4 alkaline 1.5V batteries) |
| 3. Turn the handle clockwise and the safe door opens. | 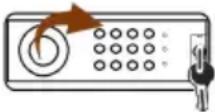 | 6. Weak power, emergency method start:Emergency key |
DESCRIPTION:
- This product has 2 sets of passwords. Factory original pass "1234", factory management password: "12456".
- Yellow: normal reminder, or wrong password reminder.
- Green: unlock and light up for 6-7 seconds.
- Red: low battery indicator.
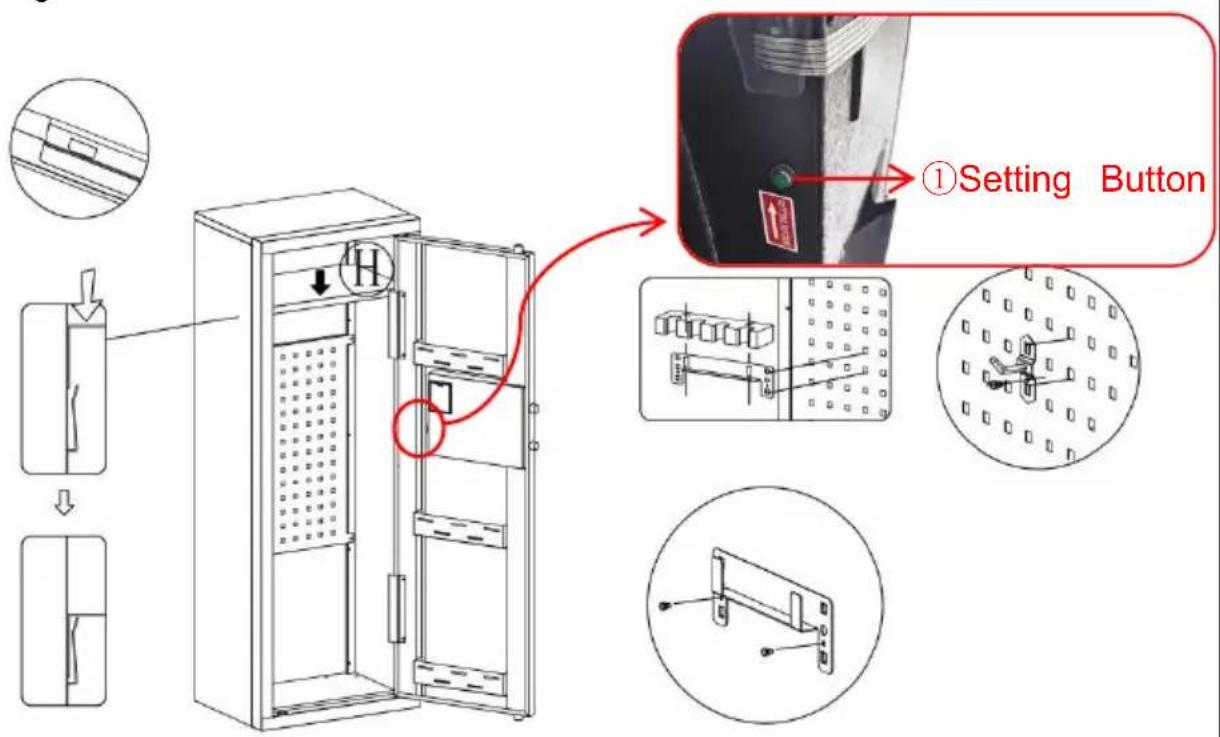
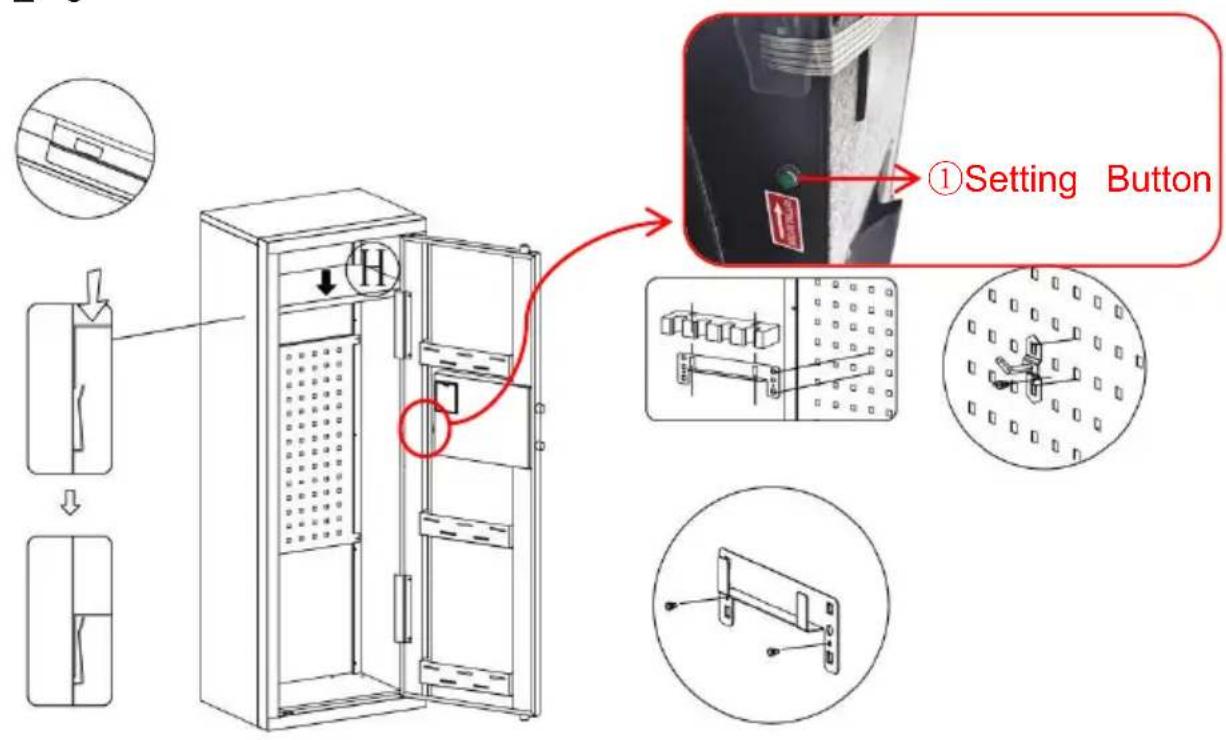
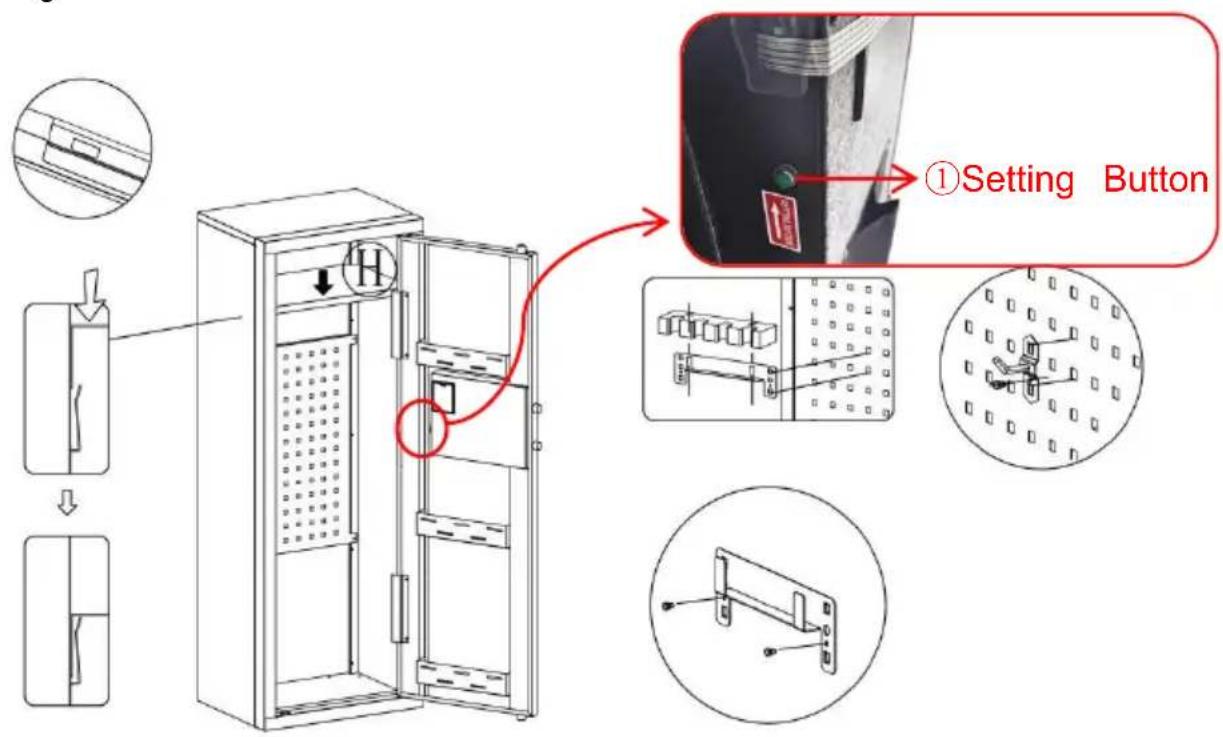
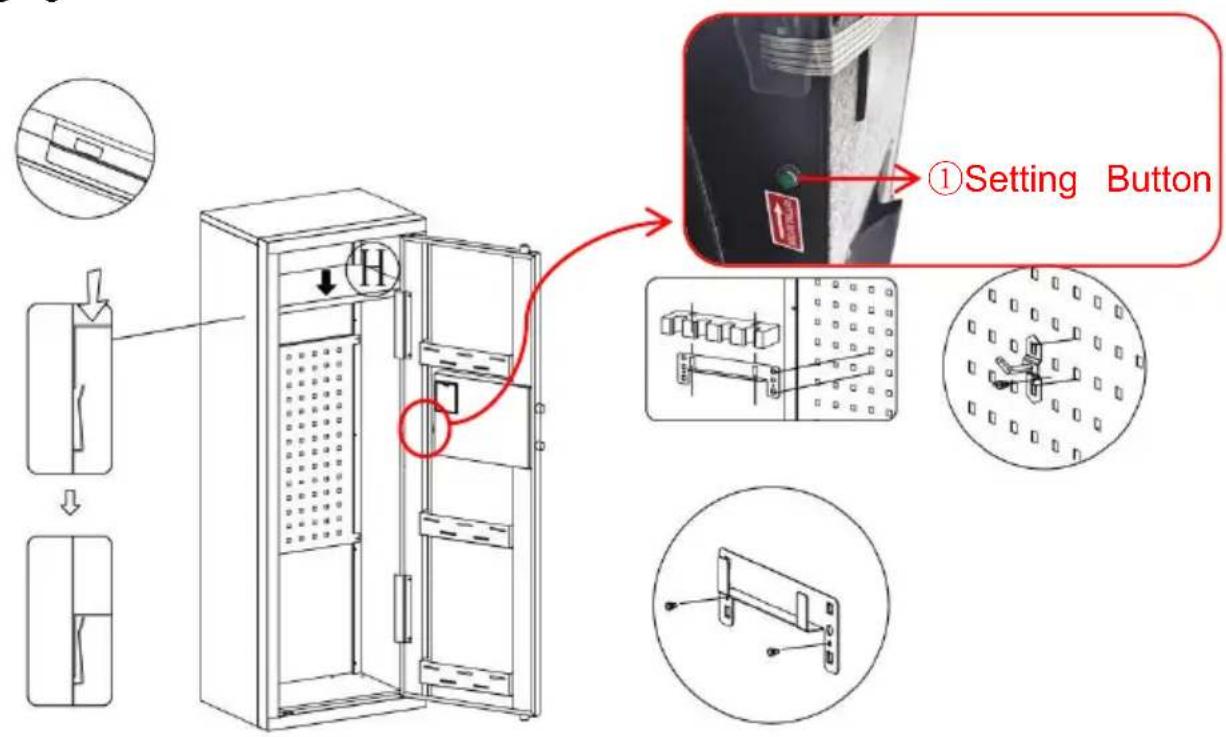
PERSONAL PASSWORD SETTING
- In the state of opening the door, press the internal setting button of the buzzer will sound twice, and the yellow indicator light will be on.
- Enter any new 1-8 digit password within 3 seconds. Press "#" or "*" confirm. If the buzzer sounds twice and the yellow light goes off, the pa has been set successfully.
- Notice: After your password is set, please test the new password to make
sure it is valid. If you enter the wrong password, the yellow light will lig and three beeps will sound, just re-enter the correct password.
MANAGE PASSWORD SETTINGS
- In the state of opening the door, press the number key "0" twice "00" then press the internal setting button of the door. The buzzer sounds twi yellow indicator light is on,
- Enter any new 1-8 digit password within 3 seconds. Press "#" or "*" confirm, the buzzer will sound twice and the yellow indicator light will off shows the management password has been set successfully.
Notice: Do not set personal password same with management code.
THREE WAYS TO OPEN THE SAFE
-
Emergency Key + Knob: For the first time, forget the password, and battery is out of power. Insert the emergency key vertically, turn it to the and at the same time turn the knob to the right to open.
-
Password + Knob: Daily unlock. Enter the personal password or management password, press "#" or "*", and then turn the knob to the r open.
-
Password + Knob + External Power Box: The internal battery is dead key is damaged or lost. Insert the external power box, enter the personal password or management password, press "#" or "*", and then turn the to the right to open.
LOW BATTERY ALERT
- If the battery voltage is below 4.8V, the red light will come on and t warning will flash.
- If the battery voltage is below 3.8V, user operation is prohibited. 6 be will indicate that the battery is low and needs to be replaced.
VIGILANCE SETTING AND DEACTIVATION
- Alarm on setting: In the standby state, press the "*" key, buzzer will once, and the yellow indicator light. Then it starts the vibrating alarm state
- Conditions for the automatic alarm to sound: ①The safe will alarm wh hit by a certain external force or vibration; ②Enter the wrong password t consecutive times.
- The duration of the alarm sound: automatically stop after 1 minute.
- Alarm cancellation setting: ①Enter the correct password, the green indicator light is on. It immediately cancels the alarm sound and turn off vibration alarm; ②Open the door with the key and take out a battery.
TECHNICAL PARAMETERS
| Model | SS-1320CZ |
| Working Voltage Range | 4.2-7 V |
| Working Power | Four 5th "AA" alkaline batteries |
| Product Size | 480*350*1320mm |
Manufacturer: Shanghaimuxinmuyeyouxiangongsi
Address: Shuangchenglu 803nong11hao1602A-1609shi, baoshanqu, shanghai 200000 CN.
Imported to AUS: SIHAO PTY LTD. 1 ROKEVA STREETEASTWOOD NSW 2122 Australia
Imported to USA: Sanven Technology Ltd. Suite 250, 9166 Anaheim Place, Rancho Cucamonga, CA 91730
| UK | REP |
YH CONSULTING LIMITED. C/O YH Consulting
Limited Office 147, Centurion House, London
Road, Staines-upon-Thames, Surrey, TW18 4AX
| EC | REP |
E-CrossStu GmbH
Mainzer Landstr.69,
60329 Frankfurt am Main.

VEVOR
Upgrade · The Home Creator Way
COFFRE-FORT
MANUEL D'UTILISATION
MODÈLE : SS - 1320 C Z
MODÈLE : SS - 1320 C Z

natural_image
Line drawings of three different types of electrical cabinets, one open with a grid-patterned panel, one closed with a control panel and indicator lights (no text or symbols)A X1 | B X1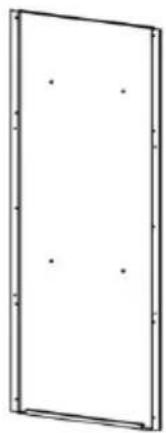 | C X1 | D X1 | ||||
| E X1 | F X1 | G X1 | H X1 | ||||
Gun bracket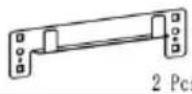 | Buttstock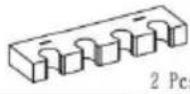 | Self tapping thread 42 Pcs 42 Pcs | Plastic Snap-fit 10Pcs 10Pcs | Peg 5 Pcs 5 Pcs | |||
Scrowdriver 1 PCS 1 PCS | Gloves 1 PCS 1 PCS | Expansion bolt 4 PCS 4 PCS | Key 2 PCS 2 PCS | Instructions 1 PCS 1 PCS | Battery box 1 PCS 1 PCS | ||
INSTRUCTIONS
ÉTAPE 1
natural_image
Simple circular diagram with vertical lines and two small symbols inside, no text or labels present.
HEAVY! You may need assistance with this step.

natural_image
Technical line drawing of a door with labeled components (A and D), showing internal compartments and mounting holes (no text or symbols beyond labels)X8

natural_image
Technical line drawing of a cabinet with open door and internal compartments (no text or symbols)Link Ⓐ, Ⓒ, Ⓓ with Self tapping threads.
Note:The bottom screws are not installed.
ÉTAPE 2

Link Ⓑ, Ⓔ with Self tapping threads.

X4
ÉTAPE 3

HEAVY! You may need assistance with this step.
Link Ⓑ, Ⓒ, Ⓓ with Self tapping threads.
Note:The bottom screws are not installed.
ÉTAPE 4

Install Ⓕ and secure with Self tapping thread
ÉTAPE 5

natural_image
Line drawing of an open electrical cabinet with internal compartments and labeled components (no text or symbols beyond basic diagram)Install Ⓖ and secure with Self tapping thread
ÉTAPE 6
OPENING YOUR SAFE FOR THE FIRST TIME
THREE WAYS TO OPEN THE SAFE
Lieu, Rancho Cucamonga, CA 91730
| UK | REP |
YH CONSULTING LIMITED. C/O YH Consulting
Limited Office 147, Centurion House, London
Road, Staines-upon-Thames, Surrey, TW18 4AX
| EC | REP |
E-CrossStu GmbH
Mainzer Landstr.69,
60329 Frankfurt am Main.

VEVOR
Upgrade · The Home Creator Way
SAFE
BENUTZERHANDBUCH
MODELL: SS - 1320 C Z
MODELL: SS - 1320 C Z

natural_image
Line drawings of three different types of electrical cabinets, one open with a grid-patterned panel, one closed with a control panel and indicator lights (no text or symbols)| A X1 | B X1 | C X1 | D X1 | ||||
| E X1 | F X1 | G X1 | H X1 | ||||
| Gun bracket | Buttstock | Self tapping thread | Plastic Snap-fit | Peg5 Pcs | |||
| Scrowdriver1 PCS | Gloves1 PCS | Expansion bolt4 PCS | Key2 PCS | Instructions1 PCS | Battery box1 PCS | ||
INSTRUCTIONS
SCHRITT 1

natural_image
Simple circular diagram with vertical lines and two small symbols inside, no text or labels present.
HEAVY! You may need assistance with this step.

natural_image
Technical line drawing of a door with labeled components (A and D), showing internal compartments and mounting holes (no text or symbols beyond labels)X8

natural_image
Technical line drawing of a cabinet with open door and internal compartments (no text or symbols)Link Ⓐ, Ⓒ, Ⓓ with Self tapping threads.
Note:The bottom screws are not installed.
SCHRITT 2

Link Ⓑ, Ⓔ with Self tapping threads.

X4
SCHRITT


HEAVY! You may need assistance with this step.
Link Ⓑ, Ⓒ, Ⓓ with Self tapping threads.
Note:The bottom screws are not installed.
SCHRITT 4
natural_image
Line drawing of an open industrial cabinet with labeled components and mounting holes (no text or symbols beyond labels)Install Ⓕ and secure with Self tapping thread
SCHRITT 5

X10
natural_image
Technical line drawing of an open electrical cabinet with internal compartments and labeled components (no text or symbols beyond basic labels)Install Ⓖ and secure
with Self tapping thread
SCHRITT 6

OPENING YOUR SAFE FOR THE FIRST TIME
- This product has 2 sets of passwords. Factory original pass "1234", factory management password: "12456".
- Yellow: normal reminder, or wrong password reminder.
- Green: unlock and light up for 6-7 seconds.
- Red: low battery indicator.
PERSONAL PASSWORD SETTING
THREE WAYS TO OPEN THE SAFE
YH CONSULTING LIMITED. C/O YH Consulting
Limited Office 147, Centurion House, London
Road, Staines-upon-Thames, Surrey, TW18 4AX
| EC | REP |
E-CrossStu GmbH
Mainzer Landstr.69,
60329 Frankfurt am Main.

VEVOR
Upgrade · The Home Creator Way
CASSETTA DI SICUREZZA
MANUALE D'USO
MODELLO:SS - 1320 C Z
MODELLO:SS - 1320 C Z

natural_image
Line drawings of three different types of electrical cabinets, one open with a grid-patterned panel, one closed with a control panel and indicator lights (no text or symbols)A X1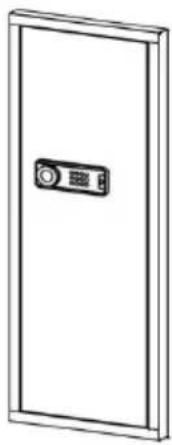 | B X1 | C X1 | D X1 | ||||
| E X1 | F X1 | G X1 | H X1 | ||||
| Gun bracket | Buttstock | Self tapping thread42 Pcs | Plastic Snap-fit[5KBX]10Pcs | Peg 5 Pcs 5 Pcs | |||
| Scrowdriver1 PCS | Gloves1 PCS | Expansion bolt[5xc6]4 PCS | Key[2c3D]2 PCS | Instructions 1 PCS 1 PCS | Battery box[5cch]1 PCS | ||
INSTRUCTIONS
PASSO 1

natural_image
Simple circular diagram with vertical lines and two small symbols inside, no text or labels present.
HEAVY! You may need assistance with this step.

natural_image
Technical line drawing of a door with labeled components (A and D), showing internal compartments and mounting holes (no text or symbols beyond labels)X8

natural_image
Technical line drawing of a cabinet with open door and internal compartments (no text or symbols)Link Ⓐ, Ⓒ, Ⓓ with Self tapping threads.
Note:The bottom screws are not installed.
PASSO 2

Link Ⓑ, Ⓔ with Self tapping threads.

X4
PASSO 3


HEAVY! You may need assistance with this step.
Link Ⓑ, Ⓒ, Ⓓ with Self tapping threads.
Note:The bottom screws are not installed.
PASSO 4

Install Ⓕ and secure with Self tapping thread
PASSO 5

natural_image
Line drawing of an open electrical cabinet with labeled components and mounting holes (no text or symbols beyond basic labels)Install Ⓖ and secure with Self tapping thread
PASSO 6

OPENING YOUR SAFE FOR THE FIRST TIME
- This product has 2 sets of passwords. Factory original pass "1234", factory management password: "12456".
- Yellow: normal reminder, or wrong password reminder.
- Green: unlock and light up for 6-7 seconds.
- Red: low battery indicator.
PERSONAL PASSWORD SETTING
THREE WAYS TO OPEN THE SAFE
YH CONSULTING LIMITED. C/O YH Consulting
Limited Office 147, Centurion House, London
Road, Staines-upon-Thames, Surrey, TW18 4AX
| EC | REP |
E-CrossStu GmbH
Mainzer Landstr.69,
60329 Frankfurt am Main.

VEVOR
Upgrade · The Home Creator Way
CAJA DE SEGURIDAD
MANUAL DEL USUARIO
MODELO: SS - 1320 C Z
MODELO: SS - 1320 C Z

natural_image
Line drawings of three different types of electrical cabinets, one open with a grid-patterned panel, one closed with a control panel and indicator lights (no text or symbols)| A X1 | B X1 | C X1 | D X1 | ||||
| E X1 | F X1 | G X1 | H X1 | ||||
| Gun bracket | Buttstock | Self tapping thread | Plastic Snap-fit[3c63] | Peg5 Pcs | |||
| Scrowdriver1 PCS | Gloves1 PCS | Expansion bolt[cgwk]4 PCS | Key2 PCS | Instructions1 PCS | Battery box1 PCS | ||
INSTRUCTIONS
PASO 1

natural_image
Simple circular diagram with vertical lines and two small symbols inside, no text or labels present.
HEAVY! You may need assistance with this step.

natural_image
Technical line drawing of a door with labeled components (A and D), showing internal compartments and mounting holes (no text or symbols beyond labels)X8

natural_image
Technical line drawing of a cabinet with open door and internal compartments (no text or symbols)Link Ⓐ, Ⓒ, Ⓓ with Self tapping threads.
Note:The bottom screws are not installed.
PASO 2

Link Ⓑ, Ⓔ with Self tapping threads.

X4
PASO 3

HEAVY! You may need assistance with this step.
Link Ⓑ, Ⓒ, Ⓓ with Self tapping threads.
Note:The bottom screws are not installed.
PASO 4

Install Ⓕ and secure with Self tapping thread
PASO 5
natural_image
Line drawing of an open electrical cabinet with labeled components and mounting holes (no text or symbols beyond basic labels)Install Ⓖ and secure with Self tapping thread
PASO 6
OPENING YOUR SAFE FOR THE FIRST TIME
- This product has 2 sets of passwords. Factory original pass "1234", factory management password: "12456".
- Yellow: normal reminder, or wrong password reminder.
- Green: unlock and light up for 6-7 seconds.
- Red: low battery indicator.
PERSONAL PASSWORD SETTING
THREE WAYS TO OPEN THE SAFE
YH CONSULTING LIMITED. C/O YH Consulting
Limited Office 147, Centurion House, London
Road, Staines-upon-Thames, Surrey, TW18 4AX
| EC | REP |
E-CrossStu GmbH
Mainzer Landstr.69,
60329 Frankfurt am Main.

VEVOR
Upgrade · The Home Creator Way
SEJF
INSTRUKCJA OBSŁUGI
MODEL:SS - 1320 C Z
MODEL:SS - 1320 C Z
natural_image
Line drawings of three different types of electrical cabinets, one open with a grid-patterned panel, one closed with a control panel and indicator lights (no text or symbols)| A X1 | B X1 | C X1 | D X1 | ||||
| E X1 | F X1 | G X1 | H X1 | ||||
| Gun bracket | Buttstock | Self tapping thread | Plastic Snap-fit | Peg5 Pcs | |||
| Scrowdriver1 PCS | Gloves1 PCS | Expansion bolt 4 PCS 4 PCS | Key2 PCS | Instructions1 PCS | Battery box1 PCS | ||
INSTRUCTIONS
KROK 1

natural_image
Simple circular diagram with vertical lines and two small symbols inside, no text or labels present.
HEAVY! You may need assistance with this step.
natural_image
Technical line drawing of a door with labeled components (A and D), showing internal compartments and mounting holes (no text or symbols beyond labels)X8

natural_image
Technical line drawing of a cabinet with open door and internal compartments (no text or symbols)Link Ⓐ, Ⓒ, Ⓓ with Self tapping threads.
Note:The bottom screws are not installed.
KROK 2

Link Ⓑ, Ⓔ with Self tapping threads.

X4
KROK 3


HEAVY! You may need assistance with this step.
Link Ⓑ, Ⓒ, Ⓓ with Self tapping threads.
Note:The bottom screws are not installed.
KROK 4

natural_image
Line drawing of an open industrial cabinet with labeled components and mounting holes (no text or symbols beyond labels)Install Ⓕ and secure with Self tapping thread
KROK 5

natural_image
Line drawing of an open electrical cabinet with internal compartments and labeled components (no text or symbols beyond basic diagram)Install Ⓖ and secure
with Self tapping thread
KROK 6

OPENING YOUR SAFE FOR THE FIRST TIME
- This product has 2 sets of passwords. Factory original pass "1234", factory management password: "12456".
- Yellow: normal reminder, or wrong password reminder.
- Green: unlock and light up for 6-7 seconds.
- Red: low battery indicator.
PERSONAL PASSWORD SETTING
THREE WAYS TO OPEN THE SAFE
YH CONSULTING LIMITED. C/O YH Consulting
Limited Office 147, Centurion House, London
Road, Staines-upon-Thames, Surrey, TW18 4AX
| EC | REP |
E-CrossStu GmbH
Mainzer Landstr.69,
60329 Frankfurt am Main.

VEVOR
Upgrade · The Home Creator Way
KLUIS
GEBRUIKERSHANDLEIDING
MODEL: SS - 1320 C Z
MODEL: SS - 1320 C Z

natural_image
Line drawings of three different types of electrical cabinets, one open with a grid-patterned panel, one closed with a control panel and indicator lights (no text or symbols)| A X1 | B X1 | C X1 | D X1 | ||||
| E X1 | F X1 | G X1 | H X1 | ||||
| Gun bracket | Buttstock | Self tapping thread 42 Pcs 42 Pcs | Plastic Snap-fit 10Pcs 10Pcs | Peg5 Pcs | |||
Scrowdriver 1 PCS 1 PCS | Gloves 1 PCS 1 PCS | Expansion bolt 4 PCS 4 PCS | Key2 PCS | Instructions1 PCS | Battery box 1 PCS 1 PCS | ||
INSTRUCTIONS
STAP 1

natural_image
Simple circular diagram with vertical lines and two small symbols inside, no text or labels present.
HEAVY! You may need assistance with this step.

natural_image
Technical line drawing of a door with labeled components (A and D), showing internal compartments and mounting holes (no text or symbols beyond labels)X8

natural_image
Technical line drawing of a cabinet with open door and internal compartments (no text or symbols)Link Ⓐ, Ⓒ, Ⓓ with Self tapping threads.
Note:The bottom screws are not installed.
STAP 2

Link Ⓑ, Ⓔ with Self tapping threads.

X4
STAP 3

HEAVY! You may need assistance with this step.
Link Ⓑ, Ⓒ, Ⓓ with Self tapping threads.
Note:The bottom screws are not installed.
STAP 4

Install Ⓕ and secure with Self tapping thread
STAP 5

natural_image
Technical line drawing of an open electrical cabinet with labeled components (no text or symbols beyond 'X10' and 'G')Install Ⓖ and secure
with Self tapping thread
STAP 6
OPENING YOUR SAFE FOR THE FIRST TIME
- This product has 2 sets of passwords. Factory original pass "1234", factory management password: "12456".
- Yellow: normal reminder, or wrong password reminder.
- Green: unlock and light up for 6-7 seconds.
- Red: low battery indicator.
PERSONAL PASSWORD SETTING
THREE WAYS TO OPEN THE SAFE
YH CONSULTING LIMITED. C/O YH Consulting
Limited Office 147, Centurion House, London
Road, Staines-upon-Thames, Surrey, TW18 4AX
| EC | REP |
E-CrossStu GmbH
Mainzer Landstr.69,
60329 Frankfurt am Main.

VEVOR
Upgrade · The Home Creator Way
KASSASKÅP
ANVÄNDARMANUAL
MODELL: SS - 1320 C Z
MODELL: SS - 1320 C Z

natural_image
Line drawings of three different types of electrical cabinets, one open with a grid-patterned panel, one closed with a control panel and indicator lights (no text or symbols)| A X1 | B X1 | C X1 | D X1 | ||||
| E X1 | F X1 | G X1 | H X1 | ||||
| Gun bracket | Buttstock | Self tapping thread42 Pcs | Plastic Snap-fit10Pcs | Peg5 Pcs | |||
| Scrowdriver1 PCS | Gloves1 PCS | Expansion bolt4 PCS | Key2 PCS | Instructions1 PCS | Battery box1 PCS | ||
INSTRUCTIONS
STEG 1

natural_image
Simple circular diagram with vertical lines and two small symbols inside, no text or labels present.
HEAVY! You may need assistance with this step.

natural_image
Technical line drawing of a door with labeled components (A and D), showing internal compartments and mounting holes (no text or symbols beyond labels)
X8
natural_image
Technical line drawing of a cabinet with open door and internal compartments (no text or symbols)Link Ⓐ, Ⓒ, Ⓓ with Self tapping threads.
Note: The bottom screws are not installed.
STEG 2
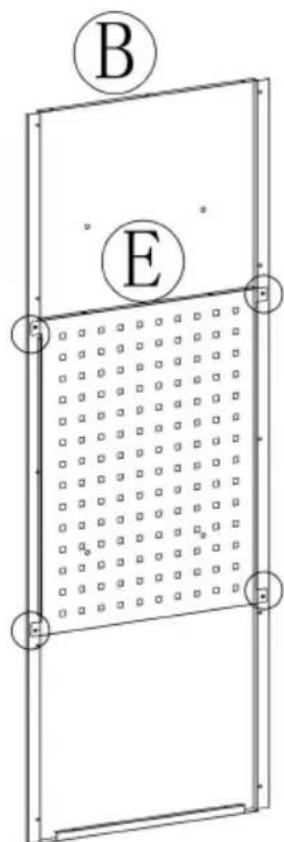
Link Ⓑ, Ⓔ with Self tapping threads.

X4
STEG 3

HEAVY! You may need assistance with this step.
Link Ⓑ, Ⓒ, Ⓓ with Self tapping threads.
Note:The bottom screws are not installed.
STEG 4

Install Ⓕ and secure with Self tapping thread
STEG 5

natural_image
Line drawing of an open electrical cabinet with labeled components and mounting holes (no text or symbols beyond basic labels)Install Ⓖ and secure with Self tapping thread
STEG 6
OPENING YOUR SAFE FOR THE FIRST TIME
- This product has 2 sets of passwords. Factory original pass "1234", factory management password: "12456".
- Yellow: normal reminder, or wrong password reminder.
- Green: unlock and light up for 6-7 seconds.
- Red: low battery indicator.
PERSONAL PASSWORD SETTING
THREE WAYS TO OPEN THE SAFE
YH CONSULTING LIMITED. C/O YH Consulting
Limited Office 147, Centurion House, London
Road, Staines-upon-Thames, Surrey, TW18 4AX
| EC | REP |
E-CrossStu GmbH
Mainzer Landstr.69,
60329 Frankfurt am Main.