
BERGSNÄS 606.078.83 - Fridge IKEA - Free user manual and instructions
Find the device manual for free BERGSNÄS 606.078.83 IKEA in PDF.

| Brand | IKEA |
| Model | BERGSNÄS 606.078.83 |
| Product type | Freestanding refrigerator-freezer |
| Height | 1880 mm (74 in) |
| Width | 595 mm (23 3/8 in) |
| Depth | 630 mm (24 3/4 in) |
| Net refrigerator volume | 224 L (7.91 ft³) |
| Net freezer volume | 85 L (3.00 ft³) |
| Energy class | E-star |
| Annual energy consumption | 389 kWh/year |
| Rated voltage | 115 V~ |
| Rated frequency | 60 Hz |
| Noise level | 42 dB (A) |
| Refrigerator defrost | Automatic |
| Freezer defrost | Automatic |
| Adjustable refrigerator temperature | 36°F – 46°F (5 steps) |
| Super refrigeration mode | Yes, manual activation, automatic shut-off after 24h |
| Interior lighting | LED (replacement by authorized technician) |
| Warranty | 5 years (except LAGAN/TILLREDA: 2 years) |
| Refrigerant | Isobutane (R600a) |
| Included accessories | Door bins, vegetable crispers, freezer drawers, glass shelves, spacing support |
| Cleaning | Soft damp cloth, mild detergent, do not use abrasive products or dishwasher for accessories |
Frequently Asked Questions - BERGSNÄS 606.078.83 IKEA
User questions about BERGSNÄS 606.078.83 IKEA
0 question about this device. Answer the ones you know or ask your own.
Ask a new question about this device
Download the instructions for your Fridge in PDF format for free! Find your manual BERGSNÄS 606.078.83 - IKEA and take your electronic device back in hand. On this page are published all the documents necessary for the use of your device. BERGSNÄS 606.078.83 by IKEA.
USER MANUAL BERGSNÄS 606.078.83 IKEA
You can find phone numbers of the IKEA appointed After Sales Service Providers at the end of this manual.
The electronic user manual is available at www.ikea.com.
FRANÇAIS
Safety information....4
Safety instructions 5
Installation....7
First use....8
Product description....9
Operation....10
Refrigerator compartment....11
Freezer compartment.... 12
Daily use....13
Cleaning and maintenance....13
Troubleshooting....14
Technical information....15
Environmental concerns 15
IKEA limited guarantee ....16
Safety information
Before the installation and use of the appliance, carefully read the supplied instructions. The manufacturer is not responsible if an incorrect installation or use causes injuries or damages. Always keep the instructions with the appliance for future reference.
Children and vulnerable people safety
- This appliance is not intended for use by persons (including children) with reduced physical, sensory or mental capabilities, or lack of experience and knowledge, unless they have been given supervision or instruction concerning use of the appliance by a person responsible for their safety.
• Children should be supervised to ensure that they do not play with the appliance.
- This appliance may be used by children between 3 and 8 years of age and persons with very extensive and complex disabilities, if they have been properly instructed.
• Children of less than 3 years of age should be kept away unless continuously supervised.
- Do not let children play with the appliance.
- Children shall not carry out cleaning and user maintenance of the appliance without supervision.
- Children aged from 3 to 8 years are allowed to load and unload refrigerating appliances.
- Keep all packaging away from children and dispose of it appropriately.
⚠ WARNING! Risk of child entrapment.
Before you throw away your old refrigerator or freezer:
- Take off the doors
- leave the shelves in place so that children may not easily climb inside.
General safety
- This appliance is intended to be used in household and similar applications such as:
- staff kitchen areas in shops, offices and other working environments;
- farm houses and by clients in hotels, motels and other residential type environments;
- bed and breakfast type environments;
- catering and similar non-retail applications.
⚠ WARNING! Keep ventilation openings, in the appliance enclosure or in the built-in structure, clear of obstruction.
⚠ WARNING! Do not use mechanical devices or other means to accelerate the defrosting process, other than those recommended by the manufacturer.
⚠ WARNING! Do not damage the refrigerant circuit.
⚠ WARNING! Do not use electrical appliances inside the food storage compartments of the appliance, unless they are of the type recommended by the manufacturer.
- Do not use water spray and steam to clean the appliance.
- Clean the appliance with a moist soft cloth. Only use neutral detergents.
Do not use abrasive products, abrasive cleaning pads, solvents or metal objects.
- Do not store explosive substances such as aerosol cans with a flammable propellant in this appliance.
- If the supply cord is damaged, it must be replaced by the manufacturer, its service agent or similarly qualified persons in order to avoid a hazard.
- When positioning the appliance, ensure the supply cord is not trapped or damaged.
- Do not locate multiple portable socket-outlets or portable power supplies at the rear of the appliance.
- Opening the door for long periods can cause a significant increase of the temperature in the compartments of the appliance.
-
Clean regularly surfaces that can come in contact with food and accessible drainage systems.
-
Store raw meat and fish in suitable containers in the refrigerator, so that it is not in contact with or does not drip onto other food.
- If the refrigerating appliance is left empty for long periods, switch off, defrost, clean, dry, and leave the door open to prevent mould developing within the appliance.
- This refrigerating appliance is not intended to be used as a built-in appliance.
- Two-star frozen-food compartments are suitable for storing pre-frozen food, storing or making ice-cream and making ice cubes.
- One-, two- and three-star compartments are not suitable for the freezing of fresh food.
• Light source in this product is replaceable only by qualified engineers.
⚠ WARNING! To avoid a hazard due to instability of the appliance, it must be fixed in accordance with the instructions.
Safety instructions
Installation
⚠ WARNING! Only a qualified person can install this appliance.
- Remove all the packaging.
- Do not install or use a damaged appliance.
- Follow the installation instructions supplied with the appliance.
- Always take care when moving the appliance as it is heavy. Always use safety gloves and enclosed footwear.
- Be careful not to damage the floors (e.g. parquet) when moving the appliance.
- Make sure the appliance is not near a heat source.
• Install and level the appliance on a floor strong enough to take its weight and in a place suitable for its size and use. - Make sure the air can circulate around the appliance.
- At first installation or after reversing the door wait at least 4 hours before connecting the appliance to the power supply. This is to allow the oil to flow back into the compressor.
-
Before carrying out any operations on the appliance (e.g. reversing the door), remove the plug from the power socket.
-
The rear of the appliance must stand against the wall.
- Do not install the appliance where there is direct sunlight.
- Do not install this appliance in areas that are too humid or too cold such as wine cellars.
Electrical connection
⚠ WARNING! Risk of fire and electrical shock.
⚠ WARNING! When positioning the appliance, ensure the supply cord is not trapped or damaged.
⚠ WARNING! Do not use multi-plug adapters or extension cables.
⚠ WARNING! Do not, under any circumstances, cut, remove, or bypass the grounding prong. Do not use extension cords or ungrounded (two prong) adapters.
- The appliance must be earthed. The appliance must be plugged into its own dedicated 115 Volt, 60 Hz., 15 Amp, AC only electrical outlet. The power cord of the appliance is equipped with a 3-prong grounding plug for your protection against electrical shock hazards. It must be
plugged directly into a properly grounded 3-prong receptacle. The receptacle must be installed in accordance with local codes and ordinances. Consult a qualified electrician. Avoid connecting refrigerator to a Ground Fault Interrupter (GFI) circuit.
- If there is a 2-prong standard wall socket, it is the responsibility of the customer to have this socket replaced with a correctly grounded 3-prong wall socket.
- Never unplug the appliance by pulling on the power cord. Always grip the plug firmly, and pull straight out from the receptacle to prevent damaging the power cord.
- Performance may be affected if the voltage varies by 10% or more. Operating the appliance with insufficient power can damage the compressor. Such damage is not covered under your warranty.
- Do not plug the appliance into an electrical outlet controlled by a wall switch or pull cord to prevent the appliance from being turned off accidentally.
- Make sure that the parameters on the rating plate are compatible with the electrical ratings of the mains power supply.
• Always use a correctly installed shockproof socket. - Make sure not to cause damage to the electrical components (e.g. mains plug, power cord, compressor). Contact the Authorised Service Centre or an electrician to change the electrical components.
- The power cord must stay below the level of the mains plug.
- Connect the mains plug to the mains socket only at the end of the installation. Make sure that there is access to the mains plug after the installation.
Use
⚠ WARNING! Risk of injury, burns, electrical shock or fire.
The appliance contains flammable gas, isobutane (R600a), a natural gas with a high level of environmental compatibility. Be careful not to cause damage to the refrigerant circuit containing isobutane.
- The surface of the compressor may become hot under normal operation. Do not touch it with hands.
- Do not change the specifications of this appliance.
- Do not put electrical appliances (e.g. ice cream makers) in the appliance unless they are stated applicable by the manufacturer.
- If damage occurs to the refrigerant circuit, make sure that there are no flames and sources of ignition in the room. Ventilate the room.
-
Do not let hot items touch the plastic parts of the appliance.
-
Do not store soft drinks in the freezer compartment to prevent burst or other losses.
- Do not store flammable gases or liquids in the appliance.
- Do not put flammable products or items that are wet with flammable products in, near or on the appliance.
- Do not touch the compressor or the condenser. They are hot.
- Do not remove or touch items from the frozen-food compartment if your hands are wet or damp.
- Do not swallow the contents (non-toxic) of the ice packs.
- Do not eat ice cubes or ice lollies immediately after taking them out of the freezer since they may cause cold burns.
- Do not freeze again food that has been thawed.
- Follow the storage instructions on the packaging of frozen food.
Internal lighting
⚠ WARNING! Risk of electric shock.
- The lamp is only for interior lighting of the appliance. Do not use it for house lighting.
Care and cleaning
⚠ WARNING! Risk of injury or damage to the appliance.
- Before maintenance, deactivate the appliance and disconnect the mains plug from the mains socket.
- This appliance contains hydrocarbons in the cooling unit. Only a qualified person can do the maintenance and the recharging of the unit.
Service
• To repair the appliance contact an Authorised Service Centre listed at the end of this manual.
- Use original spare parts only.
- Please note that self-repair or non-professional repair can have safety consequences and might void the guarantee.
Disposal
⚠ WARNING! Risk of injury or suffocation.
- Disconnect the appliance from the mains supply.
- Cut off the power cord and discard it.
- Remove the doors to prevent children and pets to be closed inside the appliance.
- The refrigerant circuit and the insulation materials of this appliance are ozone-friendly.
- The insulation foam contains flammable gas. Contact your municipal authority for information on how to discard the appliance correctly.
ENGLISH 7
- Do not cause damage to the part of the cooling unit that is near the heat exchanger.
• We strongly encourage responsible appliance recycling/disposal methods. Check with your utility company or visit www.energystar.gov/recycle for more information on recycling your old unit.
The manufacturer declines any liability for injury to persons or animals or damage to property if the above advice and precautions are not respected.
CFC/HCFC Disposal
Your old refrigerator may have a cooling system that used CFCs or HCFCs (chlorofluorocarbons or hydrochlorofluorocarbons). CFCs and HCFCs are believed to harm stratospheric ozone if released to the atmosphere. Other refrigerants may also cause harm to the environment if released to the atmosphere.
If you are throwing away your old refrigerator, make sure the refrigerant is removed for proper disposal by a qualified technician. If you intentionally release refrigerant, you may be subject to fines and imprisonment under provisions of environmental legislation.
State of California Proposition 65 Warnings
⚠ WARNING! This product can expose you to lead, a carcinogen and bisphenol A (BPA), a female reproductive and developmental toxicant. See www.P65Warnings.ca.gov.
Installation
⚠ WARNING! Before installing the appliance, carefully read the safety information in this booklet.
Installation checklist
Door
☐ Door seals completely to cabinet on all sides
□ Door is level
Levelling
☐ Refrigerator is level
Electrical power
□ Wait 4 hours
□ House power turned on
☐ Refrigerator plugged in
Final checks
□ Packing materials removed
☐ Refrigerator temperature set
Positioning
- Follow the separate Assembly Instructions to install this appliance.
- This appliance should be installed in a dry, well-ventilated indoor space.
-
Do not install this appliance:
-
outdoors;
- in an environment with dripping water;
- in rooms where there is a risk of frost.
For some models of appliances, some functional problems can occur when they operate outside the specified temperature ranges. The correct operation can only be guaranteed within the specified temperature ranges.
If you have any doubts regarding installation, please turn to the vendor, our customer service or the nearest Authorised Service Centre.
Location
To ensure best performance, install the appliance well away from sources of heat such as radiators, boilers, and direct sunlight. Make sure that air can circulate freely around the back of the cabinet.
Levelling the appliance
If the appliance tilts in some way, adjust the two feet at the front of the appliance to level the appliance. Refer to the separate Assembly Instructions for detailed instructions.
- Disconnect the mains plug of the appliance from the power socket.
- Turn the foot clockwise to raise the appliance. Turn the foot anticlockwise to lower the appliance.
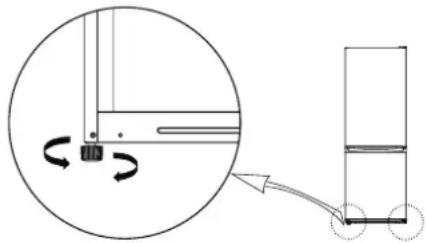
natural_image
Diagram showing a mechanical assembly with rotating components and a separate view of a vertical container (no text or symbols)Installing distance holder
⚠ WARNING! Serious or fatal crushing injuries can occur from appliance tip-over. ALWAYS secure this appliance to the wall using tip-over restraints.
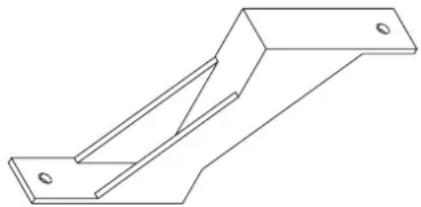
Use the supplied distance holder to fix the appliance to the wall for the following advantages. Refer to the separate Assembly Instructions for detailed installation.
- Allow enough space for air circulation between the appliance and the walls.
ENGLISH 8
- Secure the appliance to the wall for tip-over prevention.
natural_image
Isometric line drawing of a metal bracket with mounting holes (no text or symbols)Cleaning the appliance
Before using the appliance for the first time, clean the appliance to remove the typical smell of a brand-new product.
- Make sure the appliance is disconnected from the power supply.
- Wipe the interior with a soft, moistened cloth.
- Wash the internal accessories with lukewarm water and some neutral soap. Rinse and dry thoroughly.
CAUTION!
Do not use abrasive, chloride or acidic cleaning agents or solvents.
- Do not use scouring or abrasive sponges. The metallic surfaces may corrode.
- Never clean the accessories using a dishwasher. They may become deformed.
Electrical connection
⚠CAUTION! Any electrical work required to install this appliance should be carried out by a qualified electrician or competent person.
⚠ WARNING! This appliance must be earthed. Failure to follow these instructions can result in death, fire or electrical shock.
The manufacturer declines any liability should these safety measures not be observed.
First use
Connect the appliance to the power supply. The ideal food storage temperatures are already factory-set (intermediate).
Note: After being switched on, the appliance needs 4-5 hours in order to reach the correct temperature to store a typical volume of food.
Product description
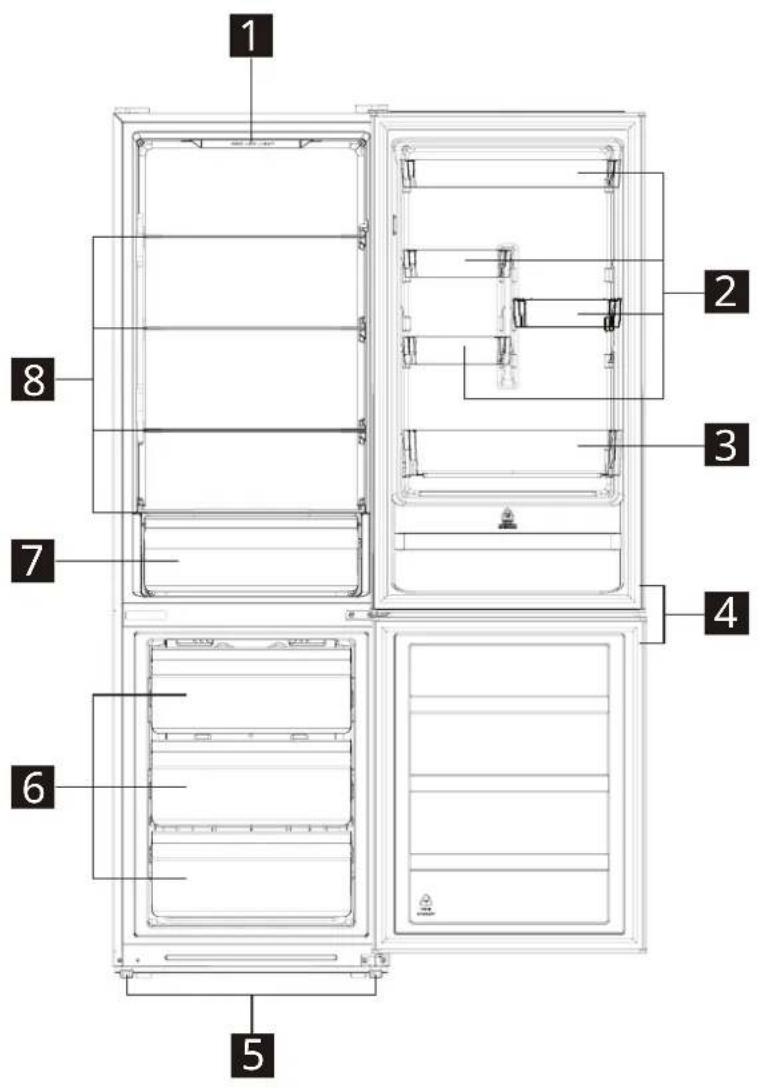
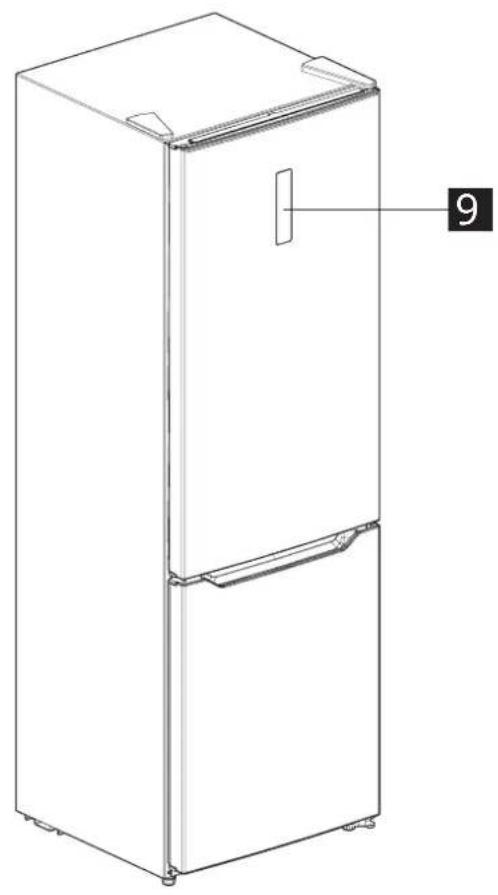
natural_image
Line drawing of a two-door refrigerator with labeled door number 9 (no text or symbols on the device itself)1 LED light
2 Door balconies
3 Bottle balcony
4 Door gaskets
5 Levelling feet
6 Freezer drawers
7 Crisper drawer
8 Glass shelves
9 Control panel
Operation
Control panel
Note: Do not use sharp objects to operate the control panel. They can scratch or damage the control panel.
Switching on
When you connect the mains plug to a power socket, the appliance switches on and starts operating.
Switching off
To switch off the appliance, disconnect the mains plug from the power socket.
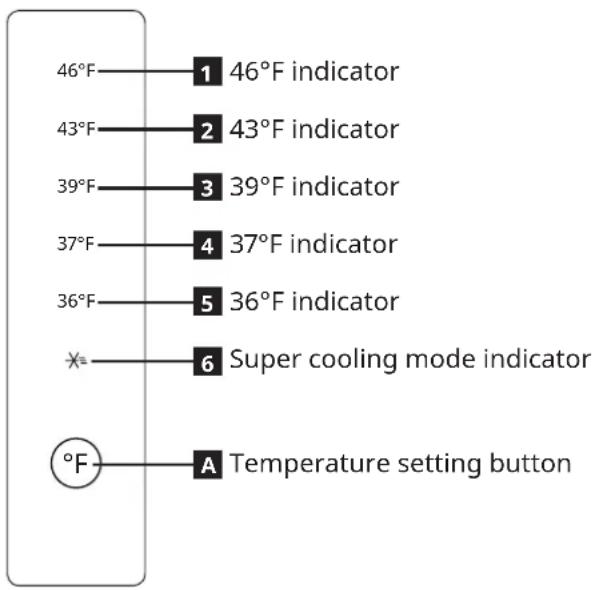
Display
- After you plug in the appliance, all indicators on the control panel will light up for 3 seconds. Then all indicators turn off except the indicator for the set temperature for the refrigerator compartment.
- During normal operation, the control panel indicates the set temperature for the refrigerator compartment.
In case of a known failure, one of the following pairs of indicators will light up.
| Indicator status Fault | |
| The 36°F and super cooling mode indicators (5 and 6) light up. | Refrigerator temperature sensor failure |
| The 37°F and super cooling mode indicators (4 and 6) light up. | Freezer defrosting temperature sensor failure |
| The 39°F and super cooling mode indicators (3 and 6) light up. | Ambient temperature sensor failure |
| The 39°F and 36°F indicators (3 and 5) light up. | Communication failure |
Note: If you see any of these pairs of indicators light up, contact an Authorised Service Centre for advice.
Setting the refrigerator temperature
Recommended temperature
Refrigerator compartment: +39°F (factory setting)
- You can set the temperature of the refrigerator compartment via the control panel.
- When the appliance is plugged in for the first time, it sets the temperature to 39^ F. When you plug in or switch on the appliance again, it sets the temperature to the last set temperature.
To set the refrigerator temperature, press the temperature setting button ( ^ F) one or more times until the indicator for your desired set temperature lights up.

flowchart
graph LR
    A["→ 46°F - 43°F"] --> B["→ ... → ✕="]
    B --> C["→"]
Tips:
- The lower the set temperature, the longer you can safely store your food and the more electricity the appliance consumes.
- The higher the set temperature, the quicker your stored food decays and the less electricity the appliance consumes.
Setting the freezer temperature
To set the freezer temperature, use the temperature setting slider located behind the crisper drawer.
- To decrease the temperature, move the slider upwards.
- To increase the temperature, move the slider downwards.
- To use the recommended temperature setting, move the slider to the middle position.
Super cooling mode
Note: The super cooling function is specifically designed to rapidly cool down newly placed food in the fridge compartment. If you have a significant amount of warm food, such as after grocery shopping, it is recommended to activate the super cooling function. By doing so, you can ensure quick cooling of the products and reduce the temperature rise, thereby effectively prolonging the preservation of all the other food items inside.
- To put the appliance into super cooling mode, press the temperature setting button ( ^① ) one or more times until the super cooling mode indicator ( ^② lights up.
- The appliance will automatically exit super cooling mode after being in this mode for 24 hours. To exit this mode earlier, press the temperature setting button (°F) to select your desired set temperature.
Memory function
The appliance has a memory function that is on in most cases. If you switch off or unplug the appliance, or in case of a power outage, it will resume its operation using the last used control panel settings after switching on again.
Similarly, after the appliance exits super cooling mode, it will continue to operate using the control panel settings used before entering that mode.
Notes:
- The appliance will not remember the elapsed time for super cooling mode. So, if it returns to super cooling mode after switching on again, it will always run this mode for 24 hours before exiting automatically.
- The appliance will turn on its memory function only after it has operated continuously for more than 30 minutes. So, if you switch it off after it has operated continuously for less than 30 minutes, it will not remember the last used control panel settings.
LED light
- The LED light inside the refrigerator compartment turns on when the refrigerator door opens and turns off when the door closes.
Refrigerator compartment
Hints for fresh food refrigeration
- Cover or wrap the food, particularly if it has a strong flavor.
- Position the food so that air can circulate freely around it.
- For best performance, leave enough space in the refrigerator compartment for air to circulate around the packages. Also leave enough room at the front so the door can close tightly.
- Do not store warm food or evaporating liquids in the refrigerator.
- Meat (all types): wrap in suitable packaging and place on the glass shelf above the vegetable drawer. Store meat for at most 1-2 days.
- Cooked foods and cold dishes: cover and place on any shelf.
- Fruit and vegetables: clean thoroughly and place in the vegetable drawer. Bananas, potatoes, onions and garlic must not be kept in the refrigerator if not packed.
- Butter and cheese: place in special airtight containers or wrap in aluminum foil or polythene bags to exclude as much air as possible.
- Bottles: close with caps and place on the door balconies.
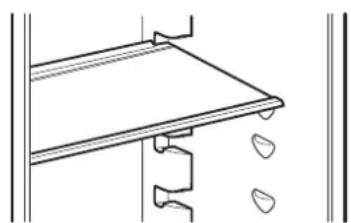
Door balconies
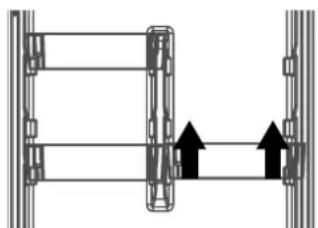
natural_image
Pure mechanical assembly diagram showing two vertical components connected by a horizontal bar, with arrows indicating direction of movement (no text or symbols)Picture for reference only
- All the door balconies are removable.
- You can install the three balconies in the middle at different heights to cater for food packages of different sizes.
- To remove a balcony, slowly lift both sides of it until it comes free.
Note: To avoid damaging the balconies, do not try to lift them out with too much force.
Glass shelves
natural_image
Pure technical line drawing of a mechanical assembly or mounting bracket without any text, numbers, or symbolsPicture for reference only
- The walls of the refrigerator are equipped with a series of runners so that the safety glass shelves can be positioned as desired.
- To remove a shelf, lift the back of it, then slide it out.
- To fit a shelf, align the two sides of it with the runners, then push it all the way back until it stops.
Crisper drawer

natural_image
Line drawing of a rectangular plastic container or tray with a side shelf (no text or symbols)Picture for reference only
- The crisper drawer is the best storage location for keeping fruit and vegetables fresh and firm.
• To remove the drawer, pull it outwards until it stops, then lift the front it and pull it out.
• To fit a drawer, align the two sides of it with the runners, then push it all the way back until it stops.
Tip: Fruit sensitive to cold (e.g. pineapple, banana, papaya and citrus fruit) and vegetables sensitive to cold (e.g. aubergines, cucumbers, zucchini, peppers, tomatoes and potatoes) should be stored outside the refrigerator at temperatures of about 8-12°C for optimum preservation of quality and flavor.
Freezer compartment
The freezer compartment is suitable for freezing fresh food and storing frozen and deep-frozen food for a long time. The freezing process takes 24 hours. During this period do not add any other food to be frozen.
Hints for freezing fresh food
- The quantity of fresh food that can be frozen in 24 hours is shown on the rating plate.
- When first starting-up or after a period out of use, before putting the products in the compartment let the appliance run for at least 2 hours on a colder setting.
- Do not allow fresh, unfrozen food to touch food which is already frozen, thus avoiding a rise in temperature of the latter.
- Wrap food to protect it from any water, humidity or condensation; this will prevent the spread of any odours in the refrigerator, while also ensuring better storage of frozen food.
- Lean foods store better and longer than fatty ones; salt reduces the storage life of food.
- Never place warm food in the freezer. Cooling hot foods before freezing saves energy and prolongs the life of the appliance.
- Do not refreeze partially thawed food.
• Note: Never put bottled food or drinks in the frozen-food compartment. - For best performance, leave enough space in the frozen-food compartment for air to circulate around the packages. Also leave enough room at the front so the door can close tightly.
Hints for storing frozen food
To obtain the best performance from this appliance, you should:
• Make sure that the commercially frozen foodstuffs were adequately stored by the retailer.
- Make sure that frozen foodstuffs are transferred from the food store to the frozen-food compartment in the shortest possible time.
- Do not open the door frequently or leave it open longer than absolutely necessary.
- Once defrosted, food deteriorates rapidly and cannot be refrozen.
- Do not exceed the storage period indicated by the food manufacturer.
Thawing
Deep-frozen or frozen food, prior to being used, can be thawed in the refrigerator compartment or at room temperature, depending on the time available for this operation.
Small pieces may even be cooked still frozen, directly from the frozen-food compartment: in this case, cooking will take longer.
⚠ WARNING! In the event of accidental defrosting, for example the power has been off for longer than the temperature rising time shown on the rating plate of the appliance, the defrosted food must be consumed quickly or cooked immediately and then re-frozen (after being cooked).
Freezer drawers
To remove a freezer drawer, pull it outwards until it stops, then lift the front it and pull it out.
Notes:
• To maximize the available space, you can use the freezer compartment without inserting the drawers. However, as the amount of food in the compartment increases, the energy consumption also increases.
• After placing food in the compartment, make sure the freezer compartment door closes properly.
Daily use
To lower the energy consumed by the appliance, follow these tips:
• Install the appliance in a dry, well-ventilated room far away from any heat source (e.g. radiator, cooker, etc.) and in a place not exposed directly to the sun. If required, use an insulating plate.
- To guarantee adequate ventilation follow installation instructions.
- Insufficient ventilation on back of the product increases energy consumption and decreases cooling efficiency.
- The internal temperatures of the appliance may be affected by the ambient temperature, frequency of door opening, as well as location of the appliance. Temperature setting should take into consideration these factors.
- Allow warm food and drinks to cool down before placing in the appliance.
- Do not obstruct the fan (if available) with food items.
• After placing or removing food, ensure you close the door properly, especially the freezer door. - Reduce to a minimum door opening.
- When thawing frozen food, place them in the refrigerator. The low temperature of the frozen products cools the food in the refrigerator.
- Positioning of the shelves in the refrigerator has no impact on the efficient usage of energy. Food should be placed on the shelves in such way to ensure proper air circulation (food should not touch each other and distance between food and rear wall should be kept).
- Damaged gaskets must be replaced as soon as possible.
Cleaning and maintenance
General tips
- Before servicing or cleaning the appliance, unplug it from the mains or disconnect the power supply.
- Regularly clean the appliance with a cloth and a solution of warm water and neutral detergent specifically formulated for refrigerator interiors. Do not use abrasive cleaners or tools.
CAUTION! Make sure that no water enters the lighting housing, electronic display housing or any other electrical parts.
CAUTION! The refrigerator accessories must not be placed in a dishwasher.
Cleaning the door gaskets
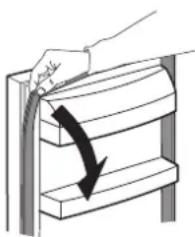
natural_image
Diagram showing a hand pressing down a curved wooden structure with a black arrow indicating downward motion (no text or symbols)- The door gaskets can be removed for cleaning purposes.
- Wipe or wash the door gaskets with clear water and dry thoroughly with a cloth. Then reinstall it correctly.
- Keep the door gaskets free of oil and grease.
- Do not fold the gaskets.
Defrosting the refrigerator compartment
The appliance is equipped with an automatic defrosting function. Manual defrosting is not required.
Defrosting the freezer compartment
The appliance is equipped with an automatic defrosting function. There will be no buildup of frost when it is in operation, neither on the internal walls, nor on the foods. Manual defrosting is not required.
If you do not use the appliance for a prolonged period
- Switch off the appliance.
- Disconnect the appliance from the power supply.
- Remove all food.
- Clean the appliance.
- Leave the doors open just enough to allow air to circulate inside the compartments. This will prevent the formation of mould and unpleasant odours.
In the event of a power cut
- Keep the doors of the appliance closed. This will allow the food to stay cold as long as possible.
- If food has defrosted even partially, do not re-freeze it. Consume within 24 hours.
Replacing the lighting
The appliance is equipped with an LED light for interior lighting.
Only an authorized technician is allowed to replace the lighting device. Please contact your Authorised Service Centre. For a quicker service, always refer to the full list of Authorised Service Centres located at the end of this manual and call the corresponding phone numbers.
Troubleshooting
| Problem Possible causes Solutions | ||
| The control panel is switched off and/or the appliance does not work. | There may be a problem with the power supply to the appliance. | Ensure that:· There is no power cut.· The power plug is properly inserted in the socket and the bipolar power switch, if present, is set to the correct position (on).· The household electrical system protection devices are in good working order.· The power supply cable is not damaged.· You have switched on the appliance. |
| The inside light does not work.· | The light is broken.· Failure of a component. | Refer to “Replacing the lighting”. |
| Temperature inside the compartments is not low enough. | There could be various causes (see the solutions in the next column). | Ensure that:· The doors are closed properly.· The appliance is not installed near a heat source.· The temperature is set appropriately.· Air circulation inside the appliance is not obstructed in any way (see the installation instructions). |
| The front edge of the refrigerator next to the seal is hot. | This is not a problem. It prevents condensation from forming. | No solution is required. |
| The temperature inside the refrigerator compartment is too low. | · The set temperature is too low.· Refrigerator temperature sensor malfunctions. | · If no food in the compartment is frozen, set a higher temperature.· If some or all food in the compartment has become frozen, contact an authorized Service Centre. |
| There is frost buildup in the freezer compartment. | The freezer compartment door does not close properly. | Ensure the door closes properly. |
| A pair of LED indicators on the control panel light up. | Refer to “Display” in “Operation” chapter. | Refer to “Display” in “Operation” chapter. |
| The door does not close completely. | Refer to “Closing the door”. Refer to “Closing the door”. | Refer to “Closing the door”. |
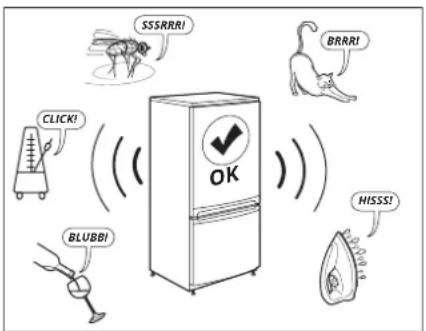
Normal noises
It is normal for the refrigeration system to produce some noises, such as gurgling and hissing.
Closing the door
| If Do | |
| Door gaskets are dirty. Clean them. | |
| Door gaskets are damaged. | Contact the After Sales Service to replace them. |
| The door is blocked by shelves, drawers, food items, etc. | Position correctly or remove the objects that block the door. |
| The appliance is not level. | Level the appliance. Refer to “Levelling the appliance”, or the separate Assembly Instructions. |
| The door is not aligned with the cabinet. | Adjust the door. Refer to the separate Assembly Instructions. |
Before contacting the After-sales Service:
Restart the appliance to see if the fault has been remedied. If it persists, switch the appliance off again and repeat the operation after an hour.
If your appliance still does not work properly after carrying out the checks listed in the troubleshooting guide and switching the appliance on again, contact the After-sales Service, clearly explaining the problem and specifying:
• the nature of the problem
• the date of purchase
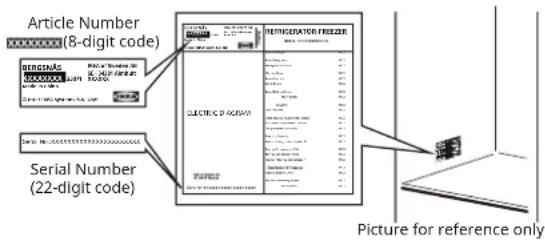
- the model and serial number of the appliance
The article number and serial number are shown on the rating plate on the internal left side of the appliance.
Technical information
| Product category | |
| Product type Refrigerator-Freezer | |
| Installation type Freestanding | |
| Product dimensions | |
| Height 74" (1880 mm) | |
| Width 23 3/8" (595 mm) | |
| Depth 24 3/4" (630 mm) | |
| Net volume | |
| Fridge 7.91 cu.ft. (224 L) | |
| Freezer 3.00 cu.ft. (85 L) | |
| Defrost system | |
| Fridge Automatic | |
| Freezer Automatic | |
| Other specifications | |
| Energy consumption 389 kWh/a | |
| Noise level | 42 dB(A) |
| Energy class | E-star |
| Rated voltage | 115 V~ |
| Rated frequency | 60 Hz |
Environmental concerns
Recyclable materials are marked with the symbol ⚙.
Put the packing materials in relevant containers to recycle them.
Keep the packing materials (plastic bags, polystyrene parts, etc.) out of the reach of children, as they are a potential source of danger.
Help protect the environment and human health by recycling waste of electrical and electronic appliances.
Do not dispose of this product with the household waste. Return the product to your local recycling facility or contact your municipal office.
IKEA limited guarantee
How long is the IKEA guarantee valid?
This guarantee is valid for five (5) years from the original date of purchase of your appliance at IKEA, unless the appliance is named LAGAN or TILLREDA in which case two (2) years of guarantee apply. The original sales receipt is required as proof of purchase. If service work is carried out under guarantee, this will not extend the guarantee period for the appliance.
Who will execute the service?
IKEA "Service Provider" will provide the service through its own service operations or authorized service partner network.
What does this guarantee cover?
The guarantee covers faults of the appliance which have been caused by faulty construction or material faults from the date of purchase from IKEA. This guarantee applies to domestic use only. Some exceptions not guaranteed are specified under the headline "What is not covered under this guarantee?" Within the guarantee period, the costs to remedy the fault (e.g., repairs, parts, labour and travel) will be covered, provided that the appliance is accessible for repair without special expenditure. On these conditions the local regulations are applicable. Replaced parts become the property of IKEA.
What will IKEA do to correct the problem?
IKEA appointed Service Provider will examine the product and decide, at its sole discretion, if it is covered under this guarantee. If considered covered, IKEA Service Provider or its authorized service partner through its own service operations, will then, at its sole discretion, either repair the defective product or replace it with the same or a comparable product.
What is not covered under this guarantee?
• Normal wear and tear.
- Deliberate or negligent damage, damage caused by failure to observe operating instructions, incorrect installation or by connection to the wrong voltage, damage caused by chemical or electro-chemical reaction, rust, corrosion or water damage including but not limited to damage caused by excessive lime in the water supply, damage caused by abnormal environmental conditions.
- Consumable parts including batteries and lamps.
- Non-functional and decorative parts which do not affect normal use of the appliance, including any scratches and possible colour differences.
- Accidental damage caused by foreign objects or substances and cleaning or unblocking of filters, drainage systems or soap drawers.
- Damage to the following parts: ceramic glass, accessories, crockery and cutlery baskets, feed and drainage pipes, seals, lamps and lamp covers, screens, knobs, casings and parts of casings. Unless such damages can be proved to have been caused by production faults.
- Cases where no fault could be found during a technician's visit.
- Repairs not carried out by our appointed service providers and/or an authorized service contractual partner or where non-original parts have been used.
- Repairs caused by installation which is faulty or not according to specification.
- The use of the appliance in a non-domestic environment i.e. professional use.
- Transportation damages. If a customer transports the product to his home or another address, IKEA is not liable for any damage that may occur during transport. However, if IKEA delivers the product to the customer's delivery address, then damage to the product that occurs during this delivery will be covered by IKEA.
- Cost for carrying out the initial installation of the IKEA appliance. However, if an IKEA appointed service provider or its authorized service partner repairs or replaces the appliance under the terms of this guarantee, the appointed service provider or its authorized service partner will reinstall the repaired appliance or install the replacement, if necessary.
How country law applies
The IKEA guarantee gives you specific legal rights, and you may also have other rights which vary from state to state or jurisdiction to jurisdiction. However these conditions do not limit in any way consumer rights described in the local legislation.
Area of validity
For appliances which are purchased in United States or Canada, or moved to one of the mentioned countries, the services will be provided in the framework of the guarantee conditions normal in the new country.
An obligation to carry out services in the framework of the guarantee exists only if the appliance complies and is installed in accordance with:
- the technical specifications of the country in which the guarantee claim is made;
- the Assembly Instructions and User Manual Safety Information.
The dedicated AFTER SALES for IKEA appliances
Please don't hesitate to contact IKEA appointed After Sales Service Provider to:
• make a service request under this guarantee;
- ask for clarifications on installation of the IKEA appliance in the dedicated IKEA kitchen furniture;
- ask for clarification on functions of IKEA appliances.
You can find phone numbers of the IKEA appointed After Sales Service Providers at the end of this manual.
To ensure that we provide you with the best assistance, please read carefully the Assembly Instructions and/or the User Manual before contacting us.
How to reach us if you need our service
In order to provide you a quicker service, we recommend to use the specific phone numbers listed on this manual. Always refer to the numbers listed in the booklet of the specific appliance you need an assistance for.
Please also always refer to the IKEA article number (8 digit code) placed on the rating plate of your appliance.
SAVE THE SALES RECEIPT!
It is your proof of purchase and required for the guarantee to apply. The sales receipt also reports the IKEA name and article number (8 digit code) for each of the appliances you have purchased.
Do you need extra help?
For any additional questions not related to After Sales of your appliances, please contact our nearest IKEA store call centre. We recommend you read the appliance documentation carefully before contacting us.
Sommaire
natural_image
Diagram showing a mechanical assembly with rotating components and a separate circular view of a vertical component (no text or symbols)Installation du support de distanciation
natural_image
Technical line drawing of a mechanical bracket or bracket (no text or symbols)natural_image
Line drawing of a two-door refrigerator with labeled door number 9 (no text or symbols on the device itself)natural_image
Diagram of a vehicle suspension system with arrows indicating movement directions (no text or labels)natural_image
Pure technical line drawing of a mechanical assembly without any text, numbers, or symbolsnatural_image
Technical line drawing of a rectangular plastic container or tray (no text or symbols)natural_image
Diagram showing a hand pressing down on a curved wooden shelf with a black arrow indicating rotation (no text or symbols)natural_image
Diagram showing a mechanical assembly with rotating components and a separate view of a vertical container (no text or symbols)natural_image
Pure technical line drawing of a mechanical bracket or bracket (no text or symbols)natural_image
Line drawing of a refrigerator with front panel and side door, labeled with number 9 (no text or symbols on the device itself)natural_image
Diagram of a vehicle suspension system with arrows indicating movement directions (no text or labels)natural_image
Pure technical line drawing of a mechanical assembly without any text, numbers, or symbolsnatural_image
Line drawing of a rectangular plastic container or tray with a side tab (no text or symbols)natural_image
Diagram showing a hand pressing down on a curved wooden shelf with a black arrow indicating downward motion (no text or symbols)Website IKEA.us/appliancesupport
Sitio web :
CANADA - CANADA - CANADÁ
Phone number