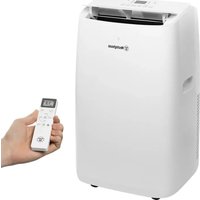
WPac14000s - Air Conditioning WESTINGHOUSE - Free user manual and instructions
Find the device manual for free WPac14000s WESTINGHOUSE in PDF.


| Product type | Monoblock mobile air conditioner |
| Brand | Westinghouse |
| Model | WPac14000s (cooling only) |
| Power supply | 115 V ~ / 60 Hz |
| Cooling capacity | 8 150 Btu/h |
| Power consumption (cooling) | 1 060 W |
| Rated current | 12.0 A |
| CEER | 7.3 Btu/Wh |
| Air flow | 370 m³/h (218 CFM) |
| Noise level | 52 dB(A) |
| Refrigerant | R32, charge 0.29 kg (10.23 oz) |
| Protection rating | IPX0 |
| Max. pressure suction / discharge | 3.8 MPa / 5.5 MPa |
| Weight (approx.) | 50 kg (110 lb) |
| Operating modes | Cooling, fan, dehumidification, auto, sleep |
| Fan speeds | High, low, auto |
| Remote control | Yes (range 7 m) |
| Wi-Fi connectivity | Yes (Westinghouse app) |
| Timer | Programmable on/off (30 min to 24 h) |
| Oscillation function | Yes (motorized louvers) |
| Air filter | Washable, cleaning recommended every 3 months |
| Condensate drainage | Manual (bottom plug) or continuous (hose in dehumidification mode) |
| Safety device | LCDI (leakage current detection) and grounding |
| Warranty | 1 year parts and labor, 5 years compressor |
Frequently Asked Questions - WPac14000s WESTINGHOUSE
User questions about WPac14000s WESTINGHOUSE
0 question about this device. Answer the ones you know or ask your own.
Ask a new question about this device
Download the instructions for your Air Conditioning in PDF format for free! Find your manual WPac14000s - WESTINGHOUSE and take your electronic device back in hand. On this page are published all the documents necessary for the use of your device. WPac14000s by WESTINGHOUSE.
USER MANUAL WPac14000s WESTINGHOUSE
natural_image
Line drawing of a Westinghouse air purifier device with control panel and wheels (no text or symbols on body)WPac14000s/WPac14000h
PORTABLE AIR CONDITIONER
DO NOT RETURN THIS PRODUCT TO THE STORE
If you have questions or need assistance, please call customer service at 855-944-3571.
Introduction....2-3
Safety 4-6
Electrical....7
Components 8
Assembly....9-11
Operation....12-17
Care and maintenance 18-20
Troubleshooting....20
Warranty 21
Service Hotline/Company Address....Back Page
INTRODUCTION
WARNING This product and substances that may become airborne from its use may contain chemicals, including lead, known to the State of California to cause cancer, birth defects, or other reproductive harm. Wash hands after handling.
DISCLAIMERS
All information, illustrations, and specifications in this manual were in effect at the time of publishing. The illustrations used in this manual are intended as representative reference views only. We reserve the right to make any specification or design change without notice.
ALL RIGHTS RESERVED
All rights reserved. No reproduction allowed in any form without written permission from Westinghouse Outdoor Power Equipment.

⚠️DANGER Read this manual before using or performing maintenance on this product. Failure to follow the instructions and safety precautions in this manual can result in serious injury or death.
UPDATES
The latest User Manual for your Westinghouse products can be found under our support tab. wpowereq.com/pages/manuals
Or scan the following QR code with your smartphone camera to be directed to the link.

PRODUCT REGISTRATION
For trouble-free warranty coverage, it is important to register your Westinghouse product.
You can register by:
- Completing and mailing the product registration card included in the carton.
- Registering your product on-line at: wpowereq.com/pages/warranty-registration
- Scanning the above QR code with your smartphone camera to be directed to the mobile registration link.
For Your Records
Date of Purchase: ____
Model Number: ____
Serial Number:
Place of Purchase: ____
- Sending the following product information to:
Westinghouse Outdoor Power
Warranty registration
777 Manor Park Drive
Columbus, OH 43228
IMPORTANT: Keep your purchase receipt for trouble-free warranty coverage.

SPECIFICATIONS (WPac14000s)
Power Supply 115V\~/60Hz
Mode...... Cooling
Cooling Capacity 8150 Btu/h
Input Power 1060 W
Current....9.5A
CEER _sd 7.3 Btu/Wh
Rated Current 12.0A
Airflow Volume....370 m³/h (218 CFM)
Noise (sound pressure) 52 dB(A)
Refrigerant/Charge....R32/0.29kg (10.23 oz)
Ingress Protection....IPX0
Suction Maxium
Allowable Pressure....3.8 MPa (551 psig)
Discharge Maxium
Allowable Pressure....5.5 MPa (798 psig)
SPECIFICATIONS (WPac14000h)
Power Supply 115V\~/60Hz
Mode......Cooling and Heating
Cooling Capacity 8150 Btu/h
Input Power 1060 W
Current....9.5A
CEER_sd 7.3 Btu/Wh
Heating Capacity 10500 Btu/h
Heating Input Power 1075 Btu/h
Heating Current 9.6A
Rated Current 12.0A
Airflow Volume....370 m³/h (218 CFM)
Noise (sound pressure) 52 dB(A)
Refrigerant/Charge....R32/0.29kg (10.23 oz)
Ingress Protection....IPX0
Suction Maxium
Allowable Pressure....3.8 MPa (551 psig)
Discharge Maxium
Allowable Pressure....5.5 MPa (798 psig)
WARNING
NEVER operate the air
conditioner without the filters in place. Doing so could damage the motor and reduce air quality.
NOTICE
ALWAYS drain water
condensation from the unit when not in use to prevent the possible formation of bacteria or mold. Using an air conditioner that has bacteria or mold can cause personal injury or illness. Be careful not to spill water when draining as this can create a slip and fall hazard.
NOTICE
Thank you for choosing
Westinghouse! PLEASE READ BEFORE RETURNING THIS PRODUCT FOR ANY REASON. If you have a question or experience a problem with your Westinghouse purchase, call us at 1-855-944-3571 to speak with an agent.
SAVE THIS MANUAL FOR FUTURE REFERENCE.
HAVE QUESTIONS?
Email us at service@wpowereq.com or call 1-855-944-3571
SAFETY DEFINITIONS
The words DANGER, WARNING, CAUTION, and NOTICE are used throughout this manual to highlight important information. Make sure that the meanings of this safety information is known to all who operate, perform maintenance on, or are near the pressure washer.

This safety alert symbol appears with most safety statements. It means attention, become alert, your safety is involved! Please read and abide by the message that follows the safety alerts symbol.
DANGER Indicates a hazardous situation which, if not avoided, will result in death or serious injury.
WARNING Indicates a hazardous situation which, if not avoided, could result in death or serious injury.
CAUTION Indicates a hazardous situation which, if not avoided, could result in minor or moderate injury.
NOTICE Indicates a situation which can cause damage to the pressure washer, personal property, and/or the environment, or cause the equipment to operate improperly.
NOTE: Indicates a procedure, practice or condition that should be followed for the pressure washer to function in the manner intended.
SAFETY SYMBOLS
Follow all safety information contained in this user's manual as well as the information on the product labeling.
| Symbol | Description |
 | Safety Alert Symbol |
 | Electrical Shock Hazard |
 | Fire Hazard |
 | Read Manufacturer's Instructions |
 | Do Not Operate in Wet Conditions |
 | Ground. Consult with electrician to determine grounding requirements before operation. |
WARNING
• Appliance filled with flammable greenhouse gases.
- Appliance shall be installed, operated and stored in a room with a floor area larger than 43 sq. ft. (4 sqm).
- The appliance shall be stored in a room without continuously operating ignition sources (for example: open flames, an operating gas appliance, or an operating electric heater.)
- The appliance shall be stored in a well-ventilated area where the room size corresponds to the room area as specified for operation.
- The appliance shall be stored so as to prevent mechanical damage from occurring.
- Ducts connected to an appliance shall not contain an ignition source.
- Keep any required ventilation openings clear of obstruction.
- Do not pierce or burn.
- Be aware that refrigerants may not contain an odor.
- Do not use means to accelerate the defrosting process or to clean, other than those recommended by the manufacturer.
- Servicing shall be performed only as recommended by the manufacturer.
- Should repair be necessary, contact your nearest customer service or an authorized service center. Any repairs carried out by unqualified personnel may be dangerous.
- Compliance with national gas regulations shall be observed.
- Read user manual.
IMPORTANT SAFEGUARDS
WARNING To reduce the risk of injury, the user must read and understand the instructions before using this product.
WARNING When using this product, basic, precautions should always be followed, including the following:
NOTICE This hermetically sealed system contains fluoridated greenhouse gases covered by the Kyoto Protocol.
- For specific information on the type, the amount and the CO_2 equivalent in tons of the fluorinated greenhouse gas, refer to the relevant label or name plate on the unit itself.
- Do not puncture or pierce this tool. Breaking the hermetic seal could potentially release greenhouse gases into the atmosphere.
GWP(Global Warming Potential): R410A: 2088, R134a: 1430, R290: 3, R32: 675.
- At the end of its useful life, this product should be disassembled and recycled by a certified technician in accordance with all applicable federal and local regulations. Check with the authority having local jurisdiction (AHJ) for a complete list of laws, regulations, and codes that may apply to you. Information in this manual should never be interpreted in a way that conflicts with any local, state, or federal laws. When in doubt, always abide by local laws.
● This appliance is for household use only.
- Disconnect the appliance from its power source during service and when replacing parts and cleaning.
- Don't force the appliance to do a job it was not designed for. Don't use it for a purpose not intended.
- To reduce the risk of electric shock, always make sure the LCDI plug is completely inserted into the outlet and never connect other appliances into the same outlet.
- Do not modify the appliance or the power cord. Any alteration or modification is misuse and could create a hazard leading to possible serious injury.
- Do not operate this appliance near heat sources such as stoves, heat registers, radiators, or other devices (including amplifiers) that produce heat.
- Do not abuse the cord. Don't carry or pull the appliance by the cord. Do not pull the cord when unplugging the appliance. Keep the cord away from heat sources, sharp edges, moving parts, or oils. Damaged cords increase the risk of electric shock.
- Do not modify the plug. This appliance has a grounding-type plug which has two blades and a grounding prong. The grounding prong is provided for your safety. The plug is designed to fit into a matching outlet. If the plug does not fit your outlet, consult a qualified electrician for replacement of the obsolete outlet. Do not under any circumstances cut or remove the prong.
- Do not expose the appliance to rain or operate in damp locations, and never direct streams of water at the device. If the device gets wet, unplug it immediately to reduce the risk of electric shock.
- Always transport your appliance in an upright position on all four casters and place on a stable, level surface during use. Do not tilt or tip the appliance; doing so could cause water condensation to move inside the unit and potentially make contact with electrical components. If the unit is transported laying on its side it should be stood up and left unplugged for 6 hours.
- Always use the switch on the control panel or remote controller to turn the unit off. Do not stop operation by unplugging the power cord.
- Do not touch the buttons on the control panel with your wet or damp fingers.
- Do not use hazardous chemicals to clean or come into contact with the unit. To prevent damage to the surface finish, use only a soft cloth to clean the appliance. Do not use wax, thinner, or a strong detergent. Do not use the unit in the presence of inflammable substance or vapour such as alcohol, insecticides, gasoline, etc.
- If the appliance is making unusual sounds or is emitting smoke or an unusual odor, unplug it immediately.
- Do not clean the unit with water. Water can enter the unit and damage the insulation, creating a shock hazard. If water enters the unit, unplug it immediately and contact Customer Service.
- Utilize two or more people to lift and install the unit.
- Install the appliance on a sturdy, level floor capable of supporting up to 110lbs (50kg). Installation on a weak or unlevel floor can result in the risk of property damage and personal injury.
SAVE THESE INSTRUCTIONS
WARNING
- Do not attempt to accelerate the defrosting process or to clean, other than those recommended by the manufacturer.
- Do not pierce or burn.
- The appliance shall be stored in a room without continuously operating ignition sources (for example: open flames, an operating gas appliance or an operating electric heater.
- Be aware that refrigerants may not contain an odor.
AVERTISSEMENT
This device complies with part 15 of the FCC Rules. Operation is subject to the following two conditions: (1) This device may not cause harmful interference, and (2) this device must accept any interference received, including interference that may cause undesired operation.
Any Changes or modifications not expressly approved by the party responsible for compliance could void the user's authority to operate the equipment.
NOTE: This equipment has been tested and found to comply with the limits for a Class B digital device, pursuant to part 15 of the FCC Rules. These limits are designed to provide reasonable protection against harmful interference in a residential installation. This equipment generates uses and can radiate radio frequency energy and, if not installed and used in accordance with the instructions, may cause harmful interference to radio communications. However, there is no guarantee that interference will not occur in a particular installation. If this equipment does cause harmful interference to radio or television reception, which can be determined by turning the equipment off and on, the user is encouraged to try to correct the interference by one or more of the following measures:
- Reorient or relocate the receiving antenna.
- Increase the separation between the equipment and receiver.
- Connect the equipment into an outlet on a circuit different from that to which the receiver is connected.
- Consult the dealer or an experienced radio/TV technician for help.
The distance between user and device should be no less than 20cm.
IC WARNING
This device complies with Industry Canada's license-exempt RSSs. Operation is subject to the following two conditions:
(1) This device may not cause interference; and
(2) This device must accept any interference, including interference that may cause undesired operation of the device.
This equipment complies with FCC radiation exposure limits set forth for an uncontrolled environment. This equipment should be installed and operated with minimum distance 20 cm between the radiator & your body.
This product must be grounded. Grounding creates a path of least resistance for electrical current in the case of a malfunction or breakdown which reduces the risk of electric shock. This appliance comes with an electrical cord that has an equipment-grounding conductor and a grounding plug. The plug is designed to fit into a matching outlet that is installed and grounded appropriately. Follow all local codes and ordinances.
If the plug does not fit your outlet, consult a qualified electrician for replacement of the obsolete outlet. Do not under any circumstances cut or remove the prong.
WARNING
If the power cord is damaged and needs to be repaired or replaced, take the appliance to an authorized service center. An improperly installed cord can create the risk of electric shock.
If the grounding instructions are not fully understood or if there is any uncertainty as to whether the product is correctly grounded, consult a licensed electrician or contact customer service. Have a damaged cord replaced or repaired immediatley.
AC MOTOR
The electric motor in this product was designed to work with a nominal 120V/60Hz AC power supply (average U.S. household circuit). It is not intended to operate on direct current (DC). A significant voltage drop will result in a loss of power and could damage the motor.
LEAKAGE DETECTION DEVICE
See Figure 1.
The power cord supplied with this air conditioner contains a current leakage detection device designed to reduce the risk of fire. In the event the power supply cord is damaged, it cannot be repaired and must be replaced with a new cord from the product manufacturer.
CAUTION
Risk of electric shock. Disconnect power before servicing the unit.
CAUTION
Please ensure that the unit is er servicing.
- Under no circumstances should this device be used to turn the air conditioner on or off.
- The “RESET” button must always be pushed in (engaged) for correct operation.
- The power supply cord must be replaced if it fails to reset when the "TEST" button is pushed in.
- If the power supply cord is damaged, it cannot be repaired. It must be replaced with a new cord obtained from the product manufacturer.
WARNING
Electrical shock hazard. Do not use ungronded power outlets. Do not use extension cord. Fire hazard from overheating. Please ensure power cord is fully plugged into wall socket to reduce electrical hazard.
FIG. 1
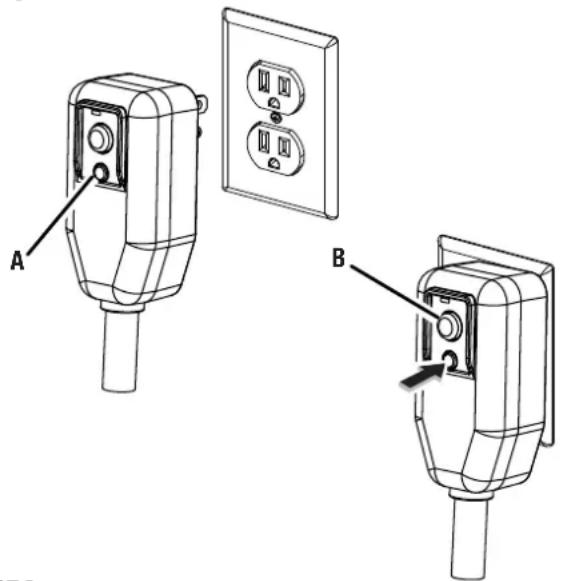
A - TEST Button
B - RESET Button
FIG. 2
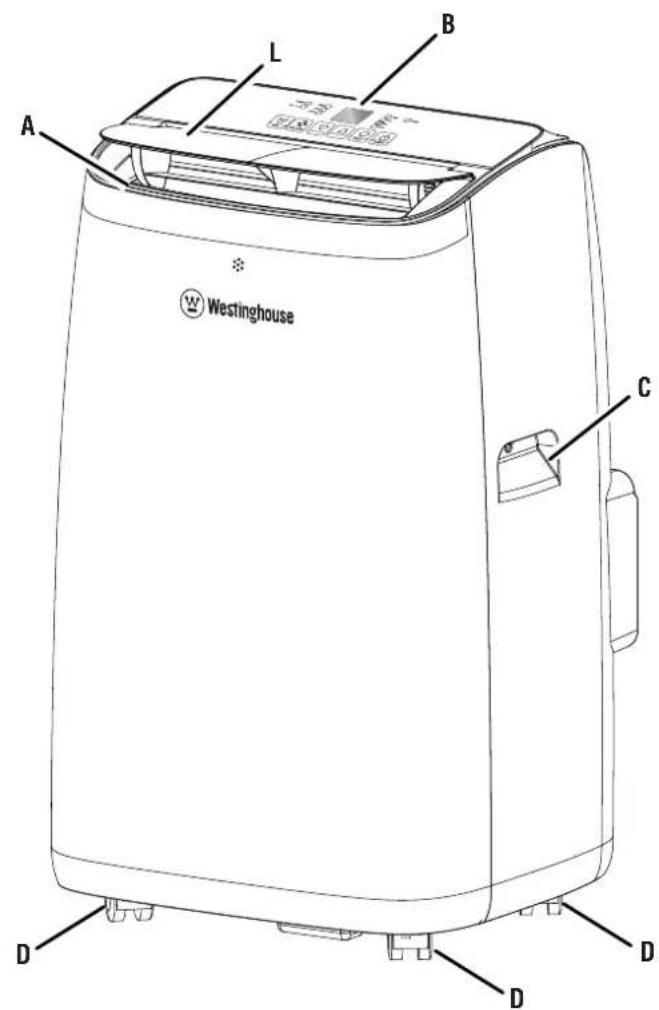
A - Air Outlet Grille
B - Control Panel
C - Carrying Handles
D - Casters
E - Air Filter
F - Upper Drain Plug
G - Exhaust Duct
H - Air Intake Grille
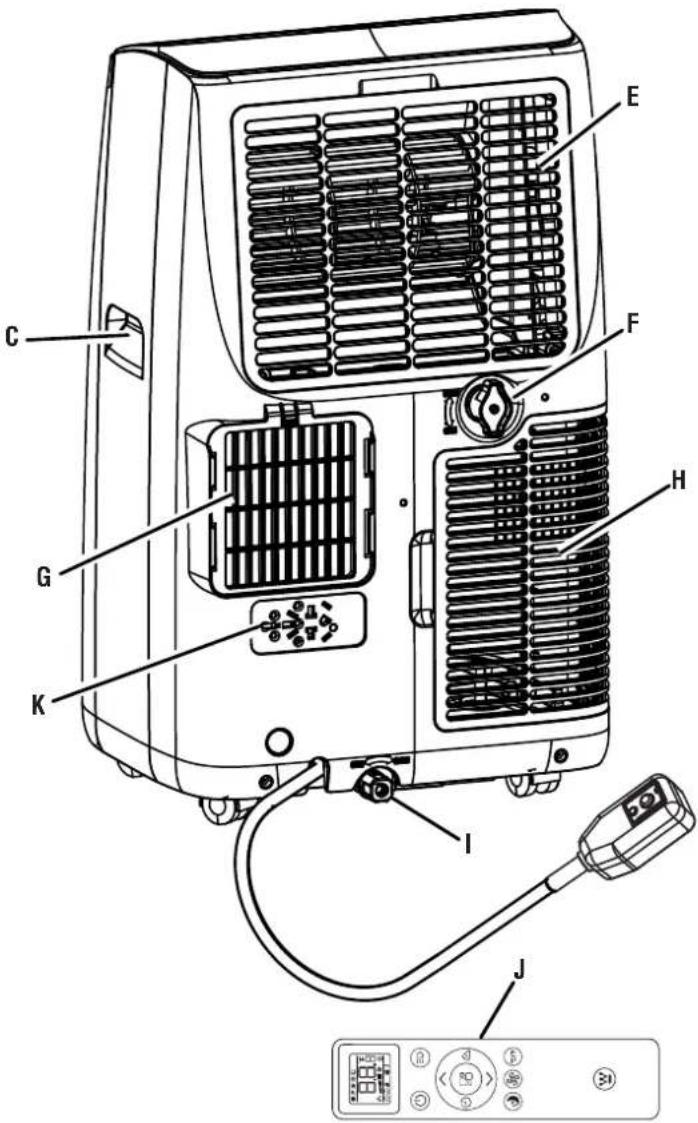
I - Lower Drain Plug
J - Remote Control
K - Cord Retainer
L - Louvers
UNDERSTANDING YOUR APPLIANCE
See Figure 2.
To reduce the risk of injury and product failure, read and understand the information in this user's manual as well as the information on the product labeling.
CASTERS
The casters make it easy to move the air conditioner from one location to another.
CONTROL PANEL
Use the control panel to turn the air conditioner on and off, switch modes, select fan speeds, and set timers.
CORD RETAINER
When not in use, plug the power cord into the cord retainer.
DRAIN PLUGS
Remove a drain plug to allow condensate water to drain from the unit.
EXHAUST DUCT
The exhaust duct directs warm air away from the unit and to the outside.
FILTERS
The filters protect the motor from debris and other items that can accumulate during use. Never run the air conditioner without filters in place.
REMOTE CONTROL
Use the remote control to operate the air conditioner from a distance.
REMOVING CARTON CONTENTS
WARNING
This product requires assembly.
Do not attempt to operate this product if any items in the INCLUDED LIST are already assembled when you remove the carton contents. These items are not assembled by the manufacturer and should require customer assembly. Using an improperly assembled product can be hazardous and could result in serious personal injury.
- Carefully open the carton.
- Remove and inspect the cartoon contents. Verify that all the items in the INCLUDED LIST are present and undamaged.
● Recycle or dispose of the packaging materials properly.
INCLUDED LIST
See Figure 3.
Air Conditioner, Hose Inlet, Exhaust Hose, Hose Outlet, Batteries (AAA), Drain Hose, Remote Control, Window Vent Kit, Foam Seal, and User Manual
If any parts are missing, contact our service team at service@wpowereq.com or call 1-855-944-3571.
FIG. 3
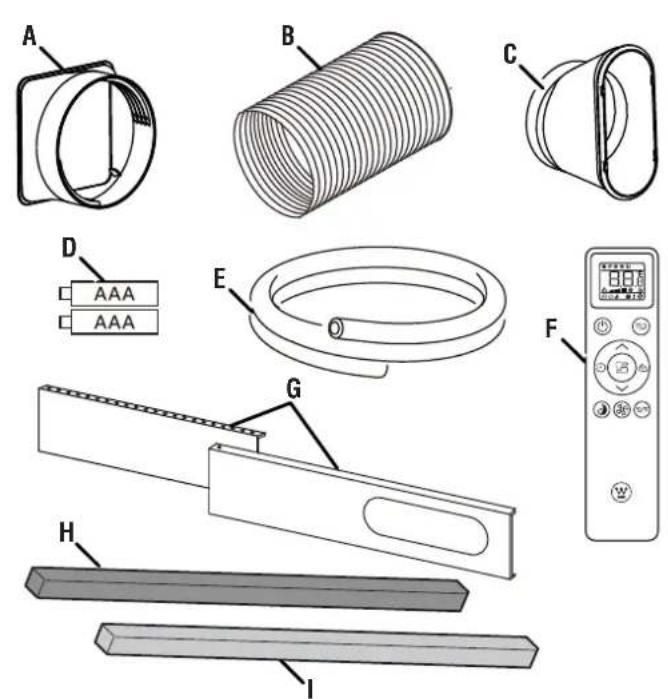
A - Hose Inlet
B - Exhaust Hose
C - Hose Outlet
D - Batteries (AAA)
E - Drain Hose
F - Remote Control
G - Window Vent Kit
H - Foam Seal (Adhesive)
G - Foam Seal (Non-Adhesive)
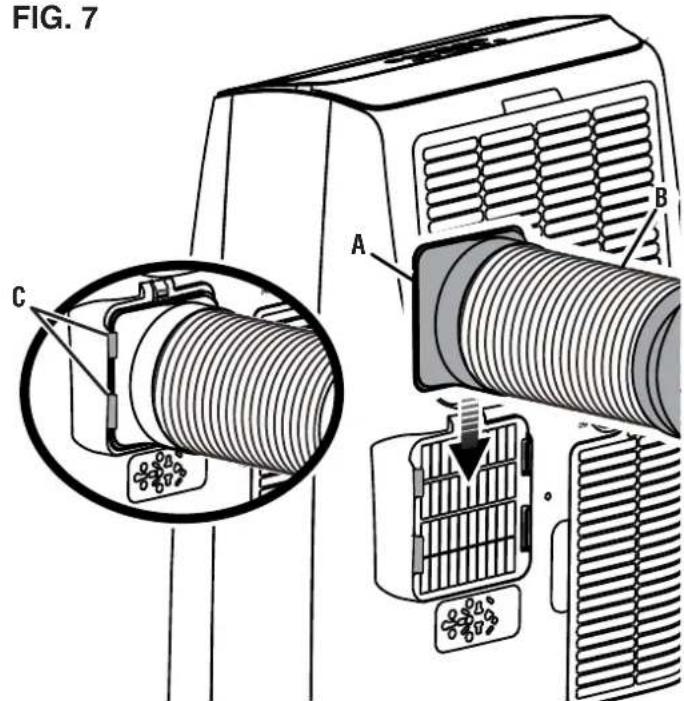
ATTACHING THE EXHAUST HOSE
See Figures 4 - 8
When installed, the exhaust hose should be as short as possible. Do not extend the hose or connect it with another exhaust hose.
● Unplug the air conditioner.
- Locate the exhaust duct on the backside of the unit.
- Depress the latch.
- Slide the hose inlet on the exhaust duct up and away from the air conditioner unit.
- Place the hose inlet on the end of the exhaust hose and turn clockwise to secure.
FIG. 4
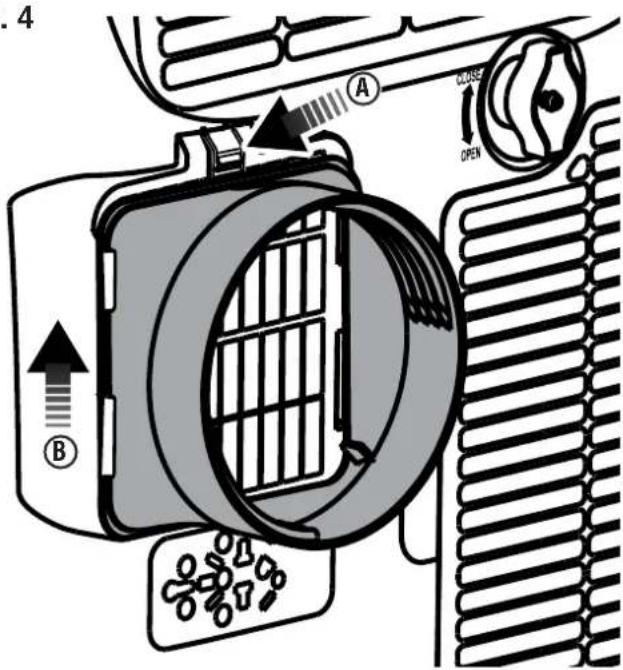
A - Depress Latch
B - Remove Hose Inlet
FIG. 5
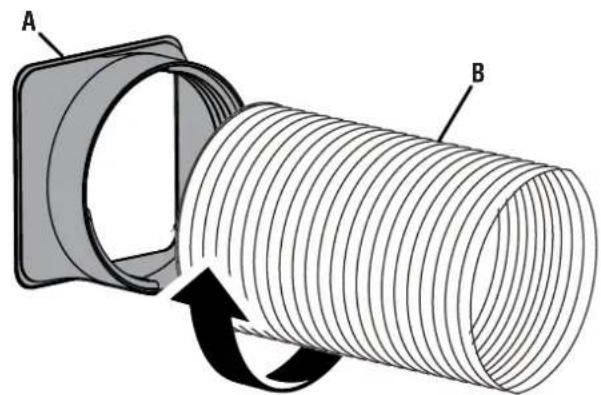
A - Hose Inlet
B - Exhaust Hose
- Place the hose outlet on the end of the exhaust hose and turn clockwise to secure.
- Slide the hose inlet into the grooves on either side of the exhaust duct.
- Apply slight downward pressure on the hose inlet until the latch snaps into place and the hose is secure.
- Route the other end of the exhaust hose to the window vent kit.
FIG. 6
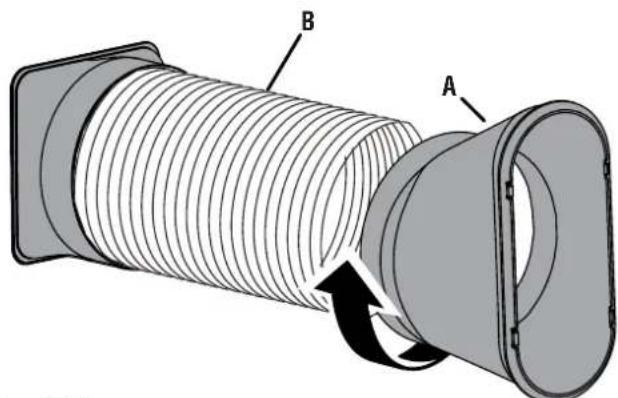
natural_image
Diagram of a coiled pipe with labeled components A and B, showing internal flow direction (no text or symbols beyond labels)A - Hose Outlet
B - Exhaust Hose
FIG. 7
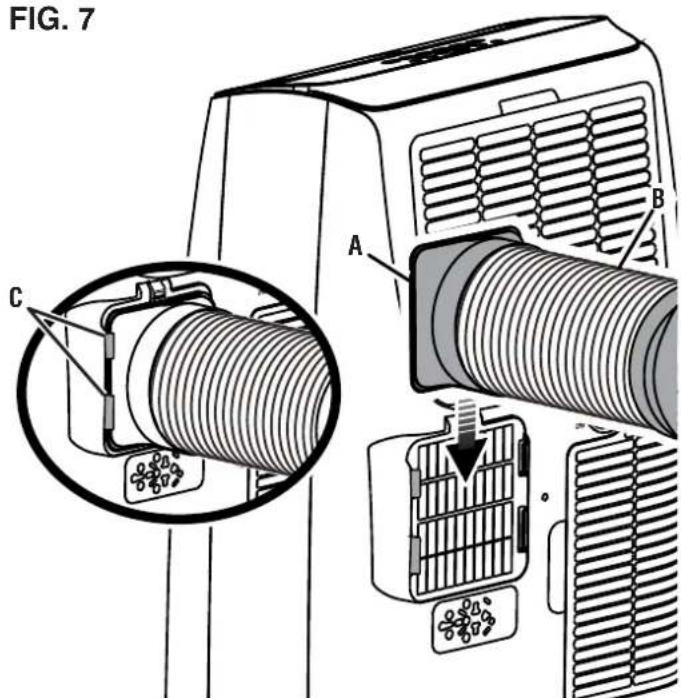
A - Hose Inlet
B - Exhaust Hose
C - Groove
INSTALLING THE WINDOW VENT KIT
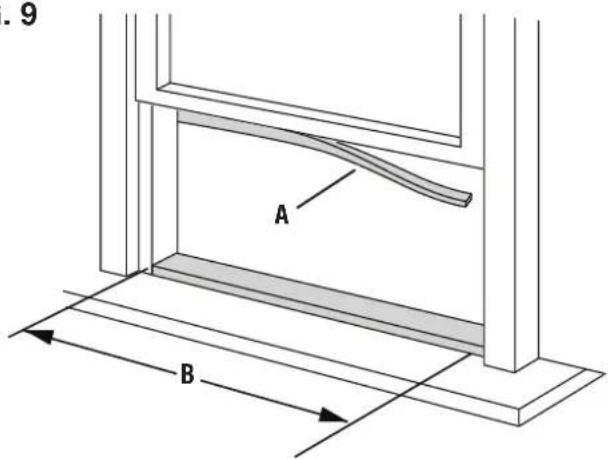
See Figures 9 - 15.
The following tools are recommended for installation, but are not included with the product: Phillips screwdriver, tape measure, knife, hacksaw, and foam seal (adhesive). The Window Vent Kit will fit inside most standard vertical and horizontal windows, however, you may need to add or cut panels for certain types of windows. If the kit is not wide enough for your window, you can purchase additional panels by contacting customer service. If the kit is too wide for your window, you can cut the fixed panel to the appropriate size. Do not cut the end of panel with the opening.
- Unplug the air conditioner.
- Open the window and measure the width or height inside the window frame.
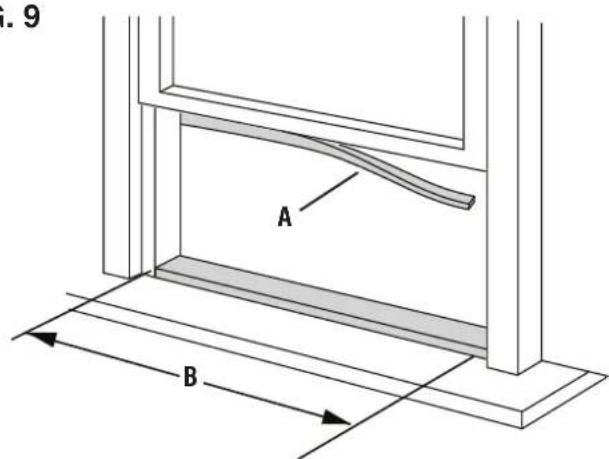
- Cut the foam seal (adhesive type) to the proper length and attach it to your horizontal (or vertical) sliding window.
FIG. 8
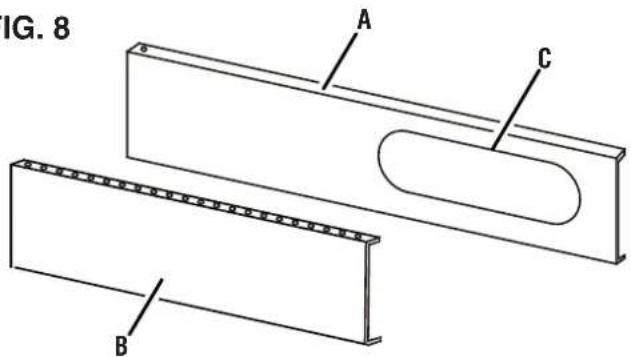
A - Fixed Panel
B - Sliding Panel
C - Opening
FIG. 9
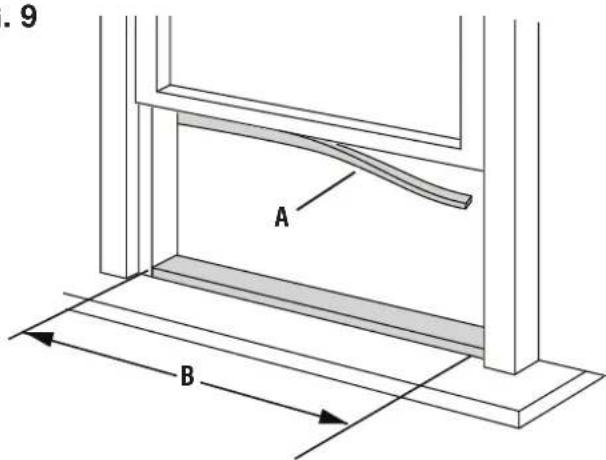
A - Foam Seal (Adhesive)
B - Width
- The window vent kit can be modified to fit different sized windows that open vertically or horizontally up to 39.9 in.
- If the window opening is less than 20.5 in., use a saw to cut the fixed panel to the appropriate size.
- If the window opening is larger than the fixed panel (20.5 in.), use sliding panels. Secure additional panels using screws.
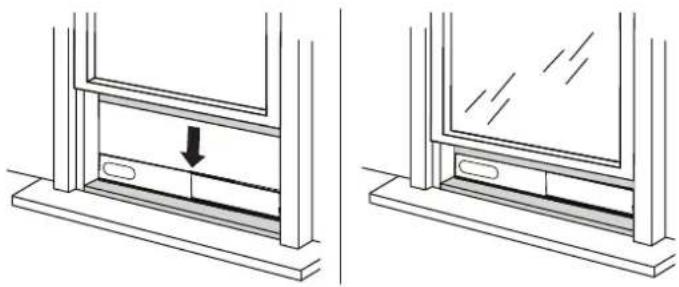
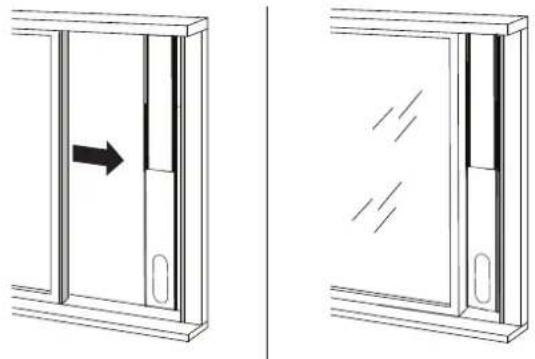
● Install the window vent kit into the window frame.
FIG. 10
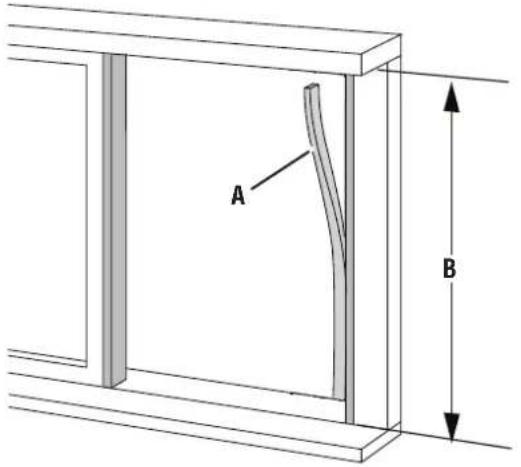
A - Foam Seal (Adhesive)
B - Height
FIG. 11
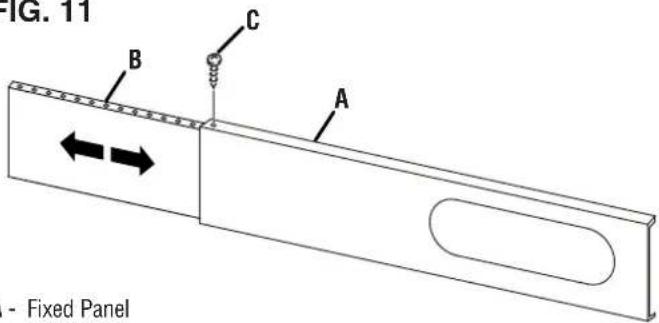
A - Fixed Panel
B - Sliding Panel
C - Screw
FIG. 12
HORIZONTAL INSTALLATION
natural_image
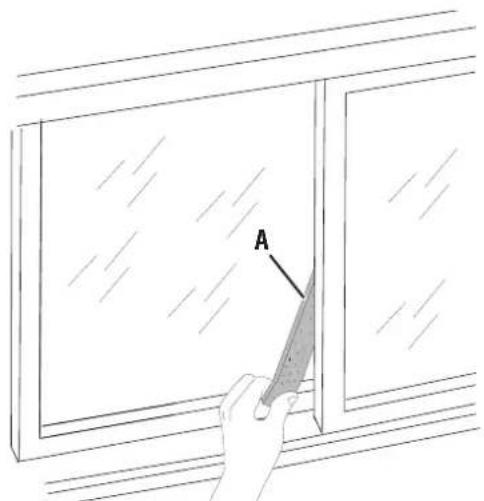
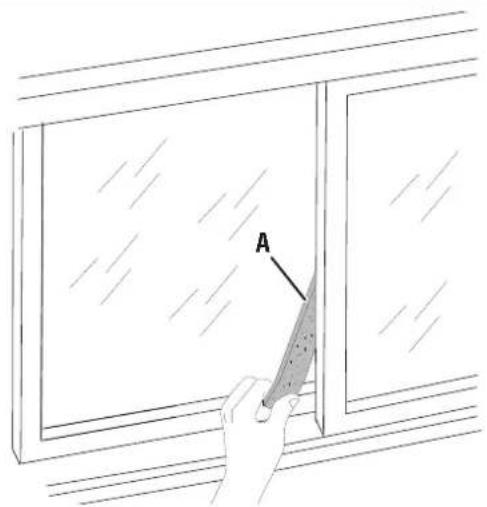
Technical line drawing showing two views of a window frame with a downward arrow indicating compression or clearance (no text or symbols)- Place the foam seal (non-adhesive type) between the glass and the window frame to prevent air and insects from getting into the room.
- Insert the hose outlet into the opening in the fixed panel.
NOTE: When the hose outlet is disconnected, cover the opening.
FIG. 13
VERTICAL INSTALLATION
natural_image
Diagram showing two views of a door frame with an arrow indicating direction, and a close-up of the interior panel with dashed lines suggesting motion or movement (no text or symbols)FIG. 14
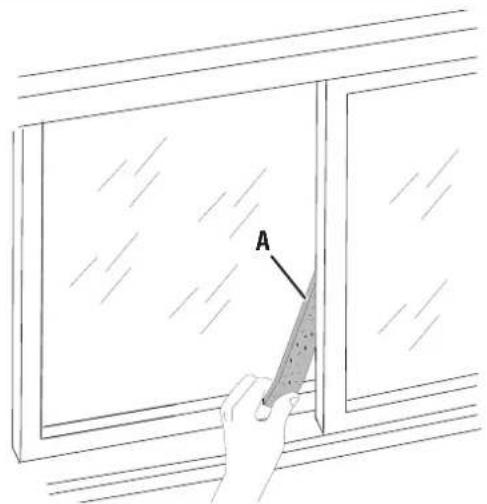
natural_image
Line drawing of a hand holding a triangular object against a window, with no text or symbols present.A - Foam Seal (Non-adhesive)
FIG. 15
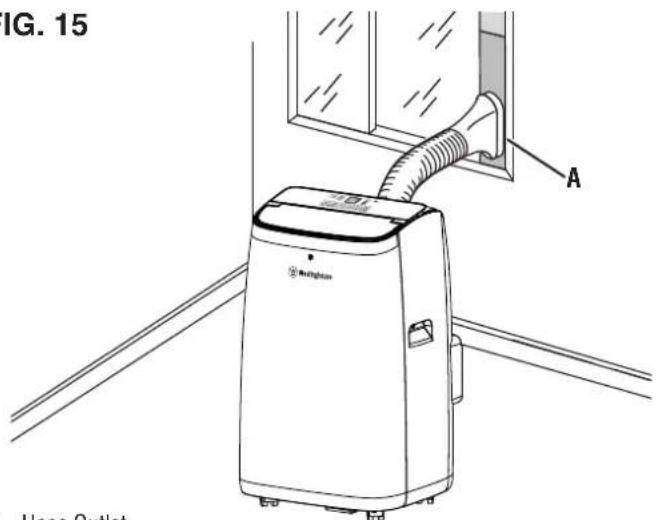
A - Hose Outlet
WARNING Do not alter or modify this product unless instructed to so in this manual or by the manufacturer. Do not use attachments or accessories that are not recommended for use with this product. Making unauthorized modifications and using incompatible accessories can damage the unit and may void your warranty.
WARNING Avoid tripping hazards. Do not place the cord in high traffic areas or try to hide it beneath rugs and carpets.
WARNING Make sure the drain plugs are securely in place before moving or operating the unit. Liquid spilling or leaking from the unit could result in electric shock, a slippery surface, or property damage.
WARNING NEVER operate the air conditioner without the filters in place. Doing so could damage the motor and reduce air quality.
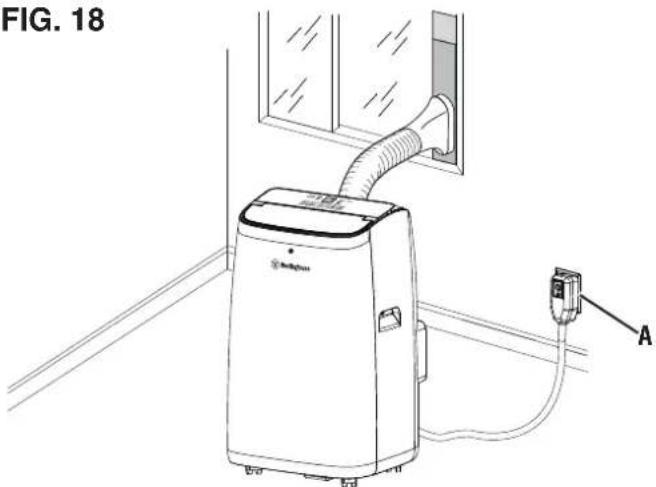
SELECTING A SUITABLE LOCATION
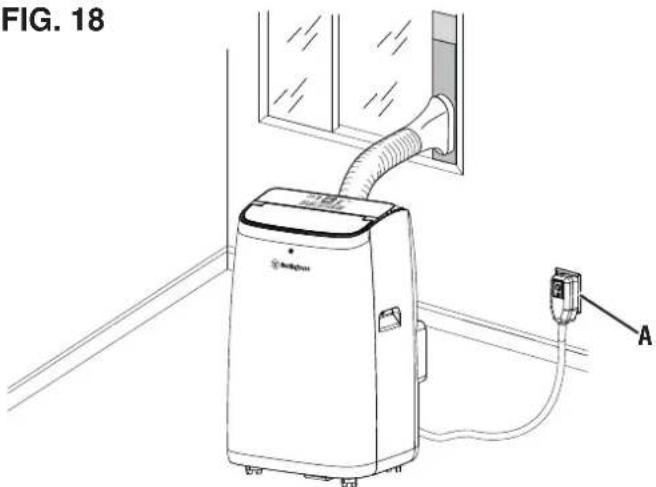
See Figures 16 - 19.
Use the following guidelines to select a location for the unit:
- The air conditioner must be operated within 64°F (18°C) and 95°F (35°C).
- Do not operate the air conditioner in a humid environment.
- This air conditioner is intended for residential use only and should be operated indoors.
- Do not place the appliance flush against a wall. For optimal performance, there should be at least 18 inches around and above the unit.
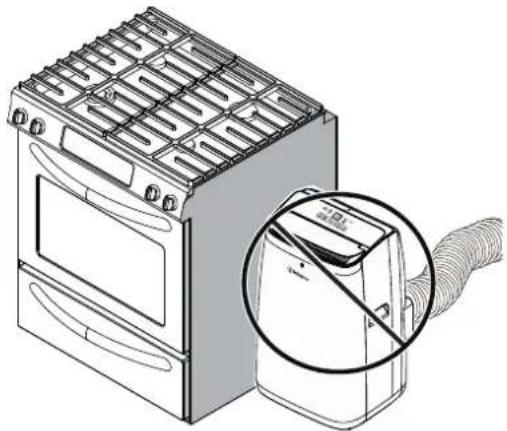
- Do not operate this appliance near heat sources such as stoves, heat registers, radiators, or other devices (including amplifiers) that produce heat.
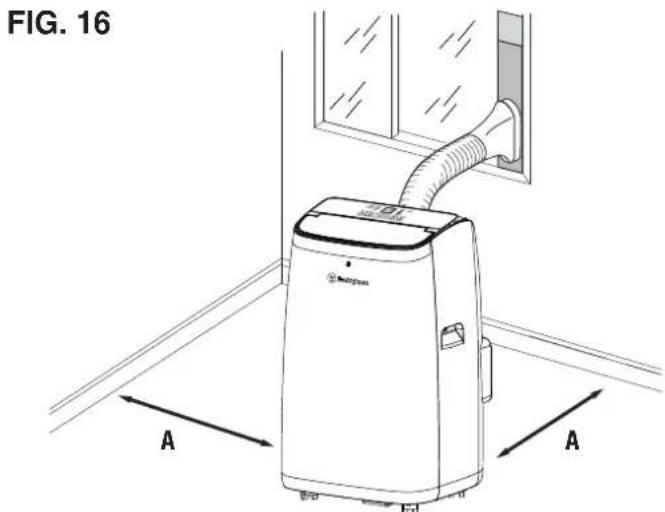
A - Leave 18 inches around and above the unit
- Keep air inlet and air outlet clean. Routinely inspect for debris and obstacles.
- The appliance must be positioned so that a grounded outlet is accessible.
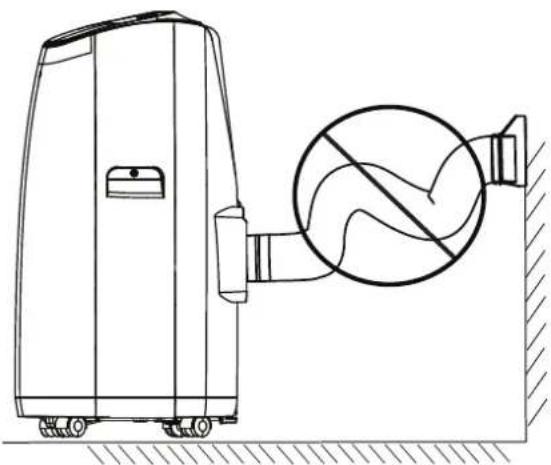
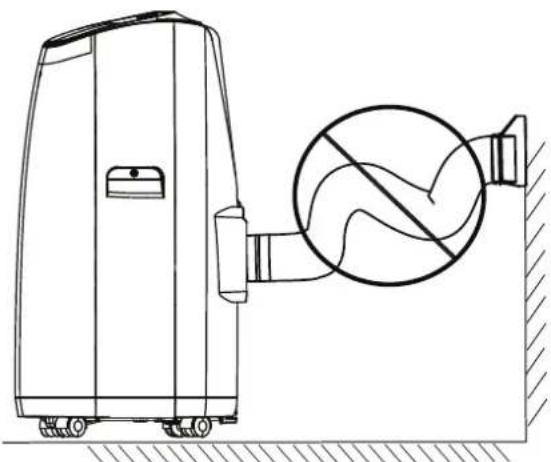
- The exhaust hose can extend, but it is the best to keep the length to the minimum required. Make sure the hose does not bend sharply or sag.
FIG. 17
natural_image
Illustration of a kitchen oven with ventilation grilles and a close-up of the interior panel showing a pipe (no text or symbols)FIG. 18
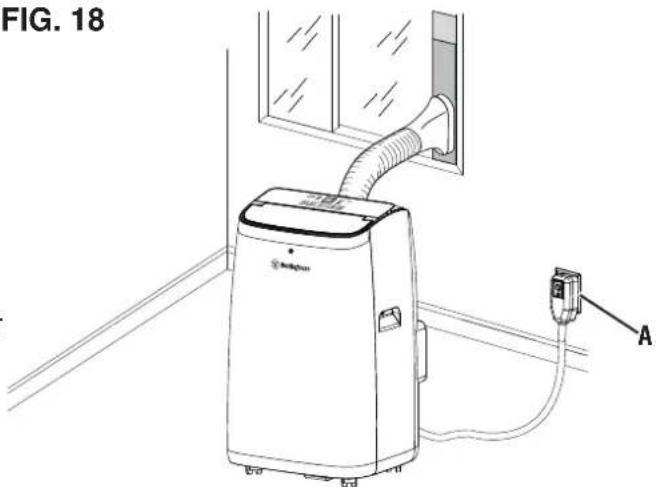
A - Grounded Outlet
FIG. 19
natural_image
Technical line drawing of a portable air purifier with a circular vent mechanism (no text or symbols)A - Do not let hose bend or sag
OPERATING THE AIR CONDITIONER
See Figures 20 - 21.
- Place the air conditioner in a suitable location.
● Plug the air conditioner into a grounded outlet.
NOTE: The power supply should be 120 V, AC only (normal household current), 60 Hz.
- Use the control panel or remote control to turn the air conditioner on, choose modes, or adjust settings. Refer to Using the Control Panel and Using the Remote Control later in this section.
NOTE: When the air conditioner is on, the digital display on the control panel will illuminate. - The distribution and direction of air flow can be adjusted by moving the louvers up and down.
NOTE: Use caution when moving the louvers. Using too much force can damage the unit. - When you are finished, use the control panel or remote control to turn the air conditioner off.
FIG. 20
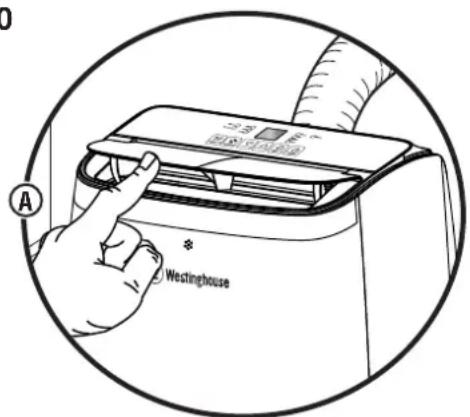
A - Adjust airflow
FIG. 21
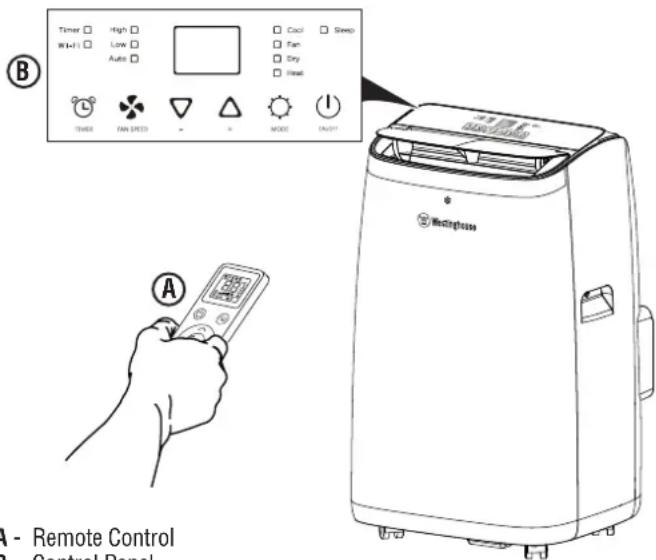
A - Remote Control B - Control Panel
NOTICE
ALWAYS drain water
condensation from the unit when not in use to prevent the possible formation of bacteria or mold. Using an air conditioner that has bacteria or mold can cause personal injury or illness. Be careful not to spill water when draining as this can create a slip and fall hazard.
USING THE CONTROL PANEL
See Figure 22.
Use the control panel to start and stop the air conditioner, select modes and change settings.
ON/OFF Button (☐)
Press the ON/OFF button (☐) to turn the appliance on and off. When activated, the unit will return to the last mode that was used.
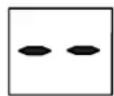
MODE Button (Φ)
Press the MODE button (☐ to cycle between Cool, Fan, Dry, Heat, and Smart Modes.
Cool Mode
In this mode, the fan and the compressor run at the same time. The display will show the set temperature.
- Press the MODE button (☐) until the "Cool" LED is lit.
- Select a temperature between 64°F and 90°F (18°C and 32°C) by pressing the UP (△ or DOWN ( ) button.
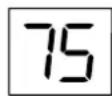
- Select your desired fan speed by pressing the FAN button (✗ Choose between High, Low, and Auto. Refer to corresponding LEDs above the FAN button (✗
NOTE: Do not attempt to cool your home quickly by selecting extremely low temperatures. Temperatures below 70^ F ( 21^ C) may cause the coils inside the unit to “freeze up” which will reduce air flow and decrease the effectiveness of the appliance.
Fan Mode
In this mode, the fan runs but the compressor does not. The display will show icons for high ( ) or low () speeds.
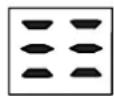
- Press the MODE button (○) until the "Fan" LED is lit.
- Select your desired fan speed by pressing the FAN button (✿).
NOTE: The exhaust hose is not required in this mode. Replace the hose when using the appliance in Cool or Dry mode.
Dry Mode
In this mode, the unit acts as a dehumidifier removing moisture from the air. The display will show the dry icon (d)
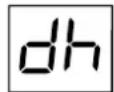
- Press the MODE button ( until the “Dry” LED is lit. - The fan speed will be selected automatically and cannot be adjusted.
When using dry mode, we recommend draining the tank continuously described in the Care and Maintenance section.
Heat Mode (WPac14000h Only)
In this mode, warm air flows out of the air outlet grille. The display will show the set temperature.
- Press the MODE button (💡) until the "Heat" LED is lit.
- Select a temperature between 55°F and 81°F (13°C and 27°C) by pressing the UP (4 or DOWN () button.
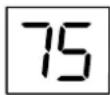
- Select your desired fan speed by pressing the FAN button (✗ Choose between High, Low, and Auto. Refer to corresponding LEDs above the FAN button (✗
NOTE: During heating, water is pulled from the air and collected inside the unit. Periodically or continuously drain the tank as described in the Care and Maintenance section. If the error code "ft" (full tank) appears in the display, drain the tank immediately. (Refer to Error Codes later in this section.)
Smart Mode
In this mode, the appliance automatically chooses whether to operate in cool, heat (WPac14000h Only), or fan mode.
- Press the MODE button (○) until the following images appear in the display.

flowchart
graph LR
    A["Icon"] --> B["Arrow"]
    B --> C["Arrow"]
    C --> D["Arrow"]
    D --> E["Arrow"]
- Select your desired fan speed by pressing the FAN button (✗). Choose between High, Low, and Auto. Refer to corresponding LEDs above the FAN button (✗).
NOTE: The unit operates in heat mode (WPac14000h Only) when the room temperature is below 20^ C( 68^ F), fan mode when the room temperature is from 68^ F ( 20^ C) to 73^ F( 23^ C), and cool mode when the room temperature is above 73^ F ( 23^ C).
UP/DOWN BUTTONS (4)
Press the UP (△) or DOWN (▽) button to select a temperature in cool or heat mode.
Temperature Units
The temperature can be displayed in Fahrenheit or Celsius. To change the units, start the appliance then press and hold both the UP (△and DOWN ( )buttons for three seconds.
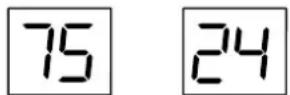
Fahrenheit Celsius
FAN Button ( ✿ )
Press the FAN button (✗) to cycle between fan speeds in cool, fan, heat, and smart mode.
TIMER Button (💡)
Use the TIMER button (☐) to program the air conditioner to start or stop at a certain time.
Timer ON
- Turn on the appliance and select your desired mode and setting. For example, you may select dry mode with high fan speed.
- Turn off the appliance.
- Press the TIMER button (💡) and wait for the display to flash.
- Use the UP (△) or DOWN (▽) button to set the time before the appliance starts. The timer can be adjusted in increments of 30 minutes up to 24 hours.
- After setting the timer, wait five seconds. The timer LED, above the TIMER button (☐), should light indicating the countdown has started.
FIG. 22
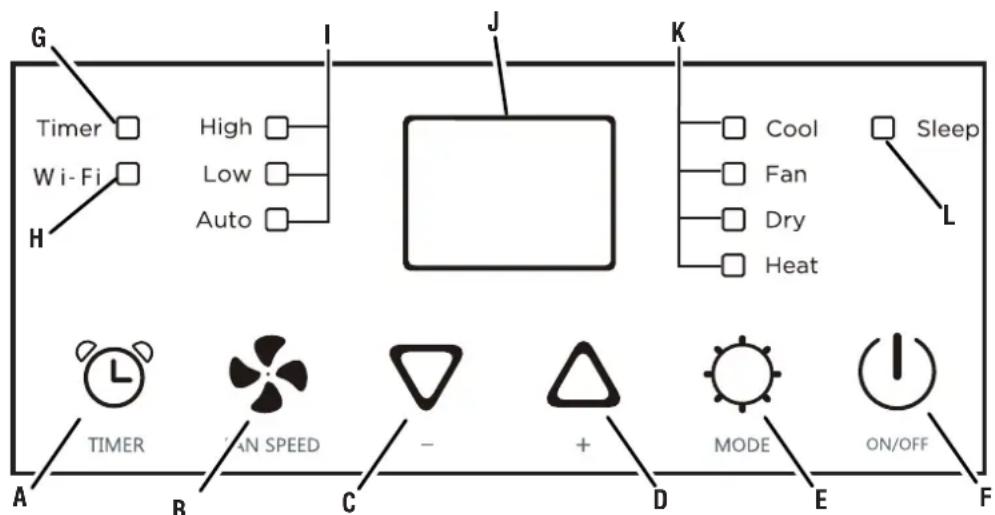
A - TIMER Button
B - FAN SPEED Button
C - DOWN Button
D - UP Button
E - MODE Button
F - ON/OFF Button
G - Timer LED
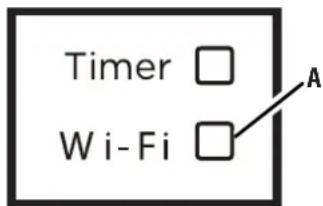
H - Wi-Fi LED
I - Fan Speed LEDs (High, Low, Auto)
J - Display
K - Mode LEDs (Cool, Fan, Dry, Heat)
L - Sleep LED
NOTE: The Timer ON function can be cancelled by pressing the TIMER button ( ) after the timer has been set. If the function is cancelled, the timer LED will turn off.
Timer OFF
- While the appliance is running, press the TIMER button (☐) and wait for the display to flash.
- Use the UP (△) or DOWN (▽) button to set the time before the appliance stops. The timer can be adjusted in increments of 30 minutes up to 24 hours.
- After setting the timer, wait five seconds. The timer LED, above the TIMER button (☐), should light indicating the countdown has started.
NOTE: The Timer OFF function can be cancelled by pressing the TIMER button ( ) after the timer has been set. If the function is cancelled, the timer LED will turn off.
ERROR CODES
This appliance has a self-diagnostic system to identify a number of malfunctions. Error messages appear on the display as shown.
| ERROR CODE SOLUTION | |
 PROBE FAILURE(Damaged Sensor) PROBE FAILURE(Damaged Sensor) | Unplug the appliance and contact customer service at 1 (855) 944-3571. |
 FULL TANK(Condensate Water Tank Full) FULL TANK(Condensate Water Tank Full) | Drain the collected water as described in the Care and Maintenance section. |
ADDING/REPLACING REMOTE BATTERIES
See Figure 23.
- Slide the battery cover off of the remote control.
● Install new AAA batteires (1.5V) into the remote control according to their polarity. - Replace the battery cover.
Use the remote control to operate the air conditioner from a distance. The remote must be within 23 ft. (7 meters) away from the appliance.
ON/OFF Button (J)
Press the ON/OFF button (Q) to turn the appliance on and off. When activated, the unit will return to the last mode that was used.
UP/DOWN BUTTONS (4)
Press the UP (△) or DOWN (▽) button to select a temperature in cool or heat mode.
Child Lock
- To activate the child lock, press and hold both the Up (△) and Down ( ) buttons for three seconds. While the child lock is active, the buttons on the remote control will be inactive. When active the child lock icon will display in the remote display.
- To deactivate the child lock, press and hold both the Up (4) and Down () buttons for three seconds.
FIG. 23
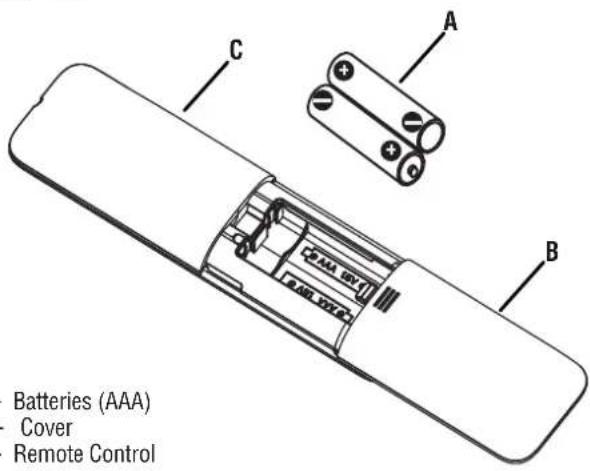
A - Batteries (AAA)
B - Cover
C - Remote Control
FIG. 24
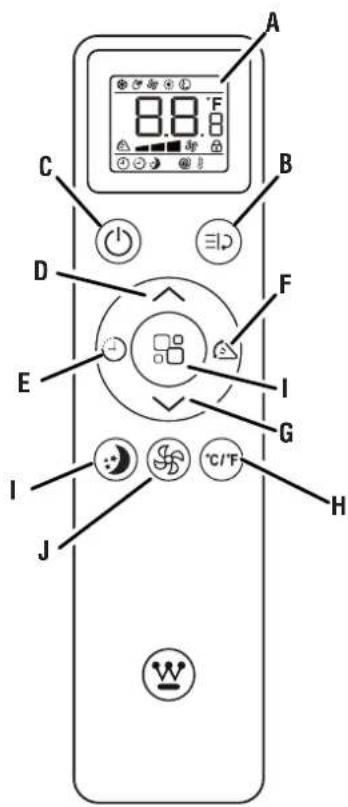
A - Display
B - FUNCTION Button
C - ON/OFF Button
D - UP Button
E - TIMER Button
F - SWING Button
G - DOWN Button
H - UNIT CHANGE Button
I - SLEEP Button
J - FAN Button
TIMER Button (∅)
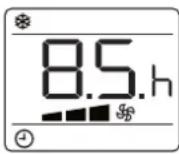
Use the TIMER button (9) to program the air conditioner to start or stop at a certain time. Refer to the instructions in the previous section to use the Timer OFF and Timer ON function. The Timer ON or Timer OFF icon and the remaining time will appear in the remote display.
SLEEP Button (2)
Press the SLEEP button (✗) to enter Sleep Mode. In Sleep Mode, the screen dims and the fan speed is reduced to the low. The Sleep icon will appear in the remote display.
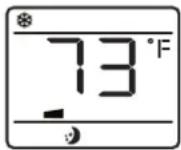
When in cool mode, the selected temperature will increase by 1^ F ( 1^ C) per hour in a two hour period. This new temperature will be maintained for the next six hours. Then the appliance will automatically turn off.
When in heat mode, the selected temperature will decrease by 1^ F ( 1^ C) per hour in a three hour period. This new temperature will be maintained for the next five hours. Then the appliance will automatically turn off.
To exit Sleep Mode, press the SLEEP button (→) on your remote.
FAN Button (✗)
Press the FAN button (✗) to cycle between fan speeds in cool, fan, and smart mode. The Fan Speed icons will appear in the remote display.
| LOW HIGH AUTO | |||
| $ | |||
FIG. 25
UNIT CHANGE Button (°C/°F)
Use the UNIT CHANGE button (°C/°F) to toggle between Fahrenheit and Celsius.
MODE Button (98)
Press the MODE button (88) to cycle between Cool, Dry, Heat, and Fan modes. Refer to the instructions in the previous section for information on the Cool, Fan, Dry, Heat, and Smart Modes.
| COOL | DRY | FAN | SMART |
SWING Button (△)
Press the SWING button (△) to make the louvers move up and down automatically. Press the SWING button (△) again to stop the movement of the louvers. The Swing Icon will appear in the remote display.
FUNCTION Button (≡)
Use the FUNCTION button (≡) to select the Turbo Function or the Follow Me Function.
Turbo Function
When the Turbo Function is activated, the temperature setting defaults to 64^ F ( 18^ C) and the fan speed is set to high. To activate the Turbo Function:
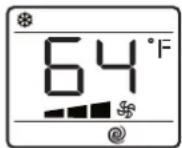
- Press the FUNCTION button (≡) and wait for the turbo icon to flash in the remote display.
- Press the FUNCTION button (≡) again to activate the Turbo Function. The turbo icon will stop flashing and remain in the remote display.
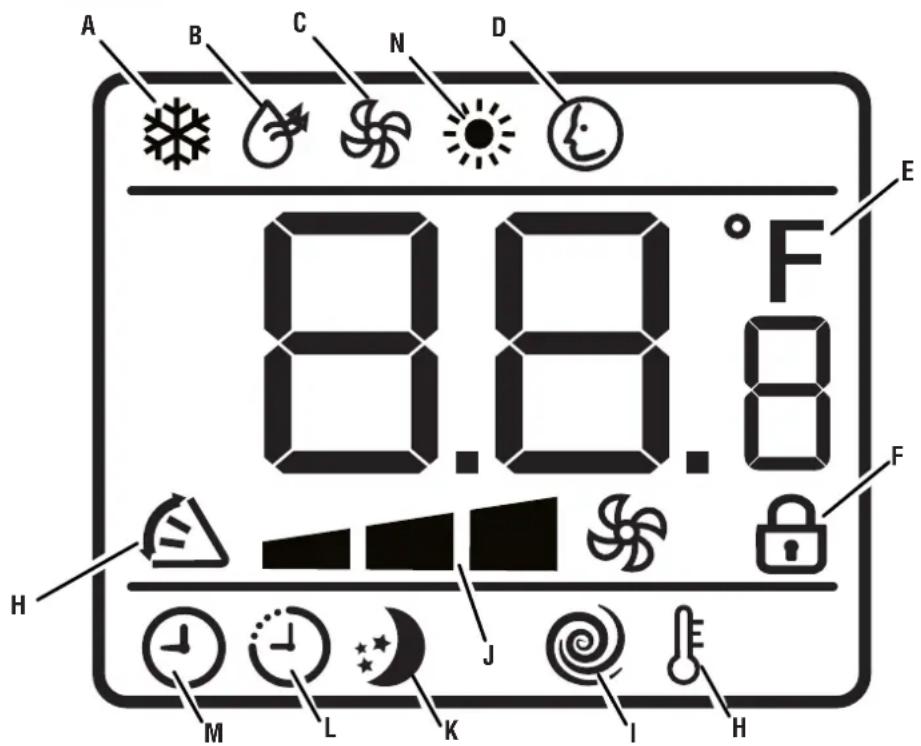
A - Cooling Icon
B - Dry Icon
C - Fan lcor
D - Smart Icon
E - Temperature Unit
F - Child Lock Icon
G - Swing Icon
H - Follow Me Icon
I - Turbo Icon
J - Fan Speed Icons (High, Low, Auto)
K - Sleep Icon
L - Timer OFF Icon
M - Timer ON Icon
N - Heat Icon
- To deactivate the Turbo Function, press the MODE button ( ) or the Up () or Down () button.
Follow Me Function
When the Follow Me Function is activated, the remote control will sense the temperature at its location and send that information back to the appliance. Once the signal is recieved, the temperature setting on the appliance will automatically adjust to match the temperature at the remote's location. To activate the Follow Me Function:
- Press the FUNCTION button (≡), then press either the Up (≠) or Down (≠) button until the Follow Me icon flashes on the remote control.
- Press the FUNCTION button (≡) again to activate the Follow Me Function. The Follow Me icon will stop flashing and remain in the remote display.
- To deactivate the Follow Me Function, press the FUNCTION button (≡) and then the Up (△) or Down (▽) button until the Follow Me icon flashes on the remote. Press the FUNCTION button (≡) again to confirm deactivation. The Follow Me icon will disappear from the display.
CONNECTING YOUR APPLIANCE TO A SMART PHONE
See Figure 26.
NOTICE
Scan the QR code for detailed instructions on connecting your appliance to your smart phone and directions for using the WESTINGHOUSE app.
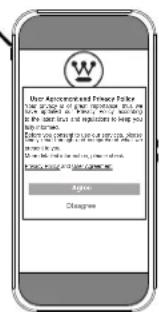
Your portable air conditioner can be controlled from almost anywhere using a smartphone or another connected device. To connect the air conditioner to your device, do the following:
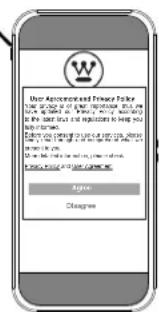
- Download the WESTINGHOUSE app from Google Play or the App Store. Follow the instructions in the app to set up an account.
NOTE: You must have the app installed and create an account before you can connect the appliance to your phone.
- Log into the WESTINGHOUSE app, follow the on-screen instructions to select your appliance and connect it to your phone.
- Once the devices are connected, you will be able to control your air conditioner through the WESTINGHOUSE app.
For details on operating the air conditioner from your phone, refer to the WESTINGHOUSE app or scan the QR code.
FIG. 26

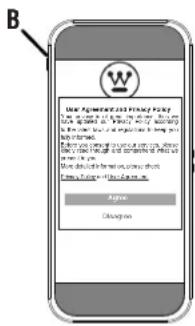
A - Wi-Fi LED
B - Smart Phone
natural_image
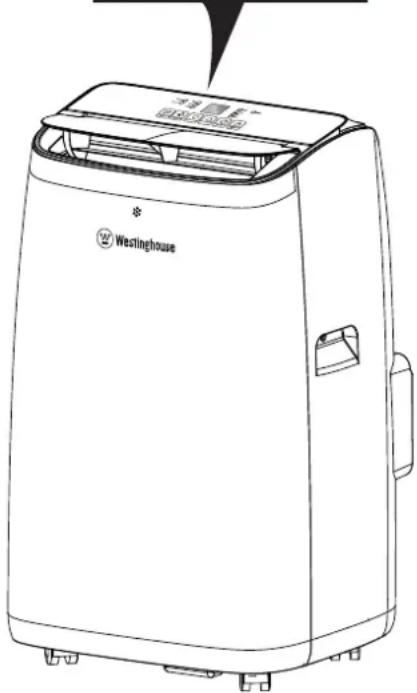
Line drawing of a portable air conditioner unit labeled 'Westinghouse' (no text or symbols on the device itself)TIPS FOR BEST USE
- Close the windows and doors in the room to be air conditioned.
- When using the air conditioner without the window vent kit, leave a door slightly open to improve ventilation.
- To reduce ambient heat and help the air conditioner work efficiently, partially close curtains and blinds to block direct exposure to the sun
● Never rest objects of any kind on the appliance. - Do not block the air inlet or outlet of the appliance. Reduced air flow will result in poor performance and could damage the unit.
● Make sure there are no heat sources in the room; - Never use the appliance in very damp rooms (laundries for example).
● Never use the appliance outdoors. - Make sure the appliance is standing on a level surface. If necessary, place the castor locks under the front wheels.
WARNING ALWAYS turn the air conditioner off and unplug it before performing maintenance.
To prolong the life of this product, follow the care and maintenance instructions in this section. Contact customer service before servicing any recall or warranty parts.
CLEANING THE HOUSING AND GRILLES
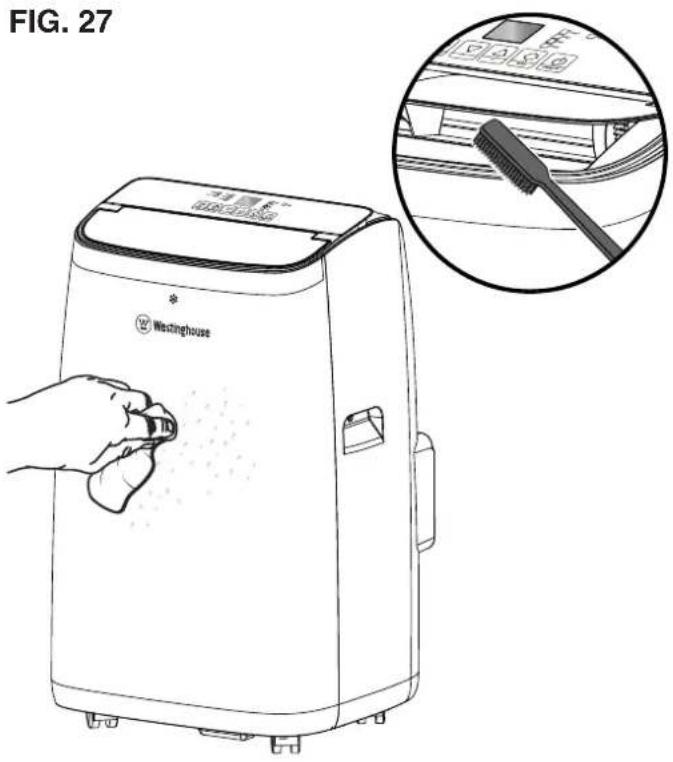
See Figure 27.
If there's light dust on the housing, use a soft towel to wipe it. If the housing is very dirty or greasy, use a soft cloth dampened with mild detergent and water. DO NOT allow water to drip in to the unit.
Use cleaner or soft brush to clean the air outlet and air intake grilles.
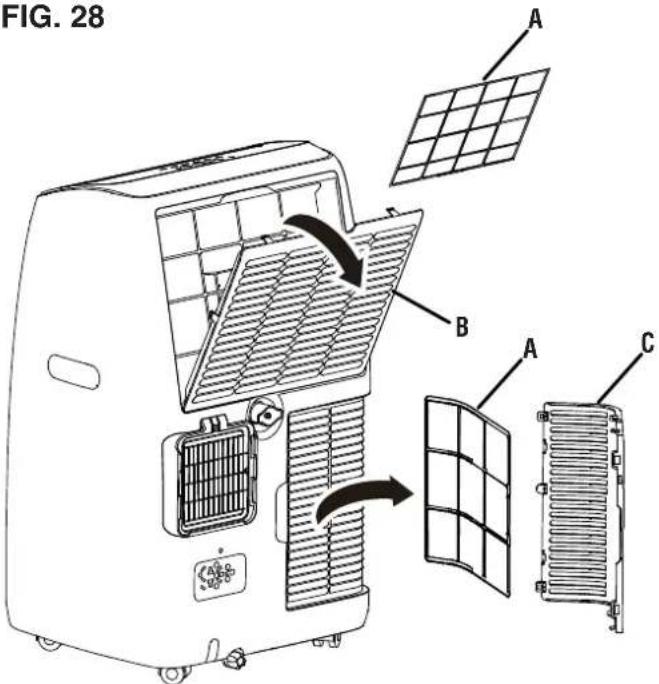
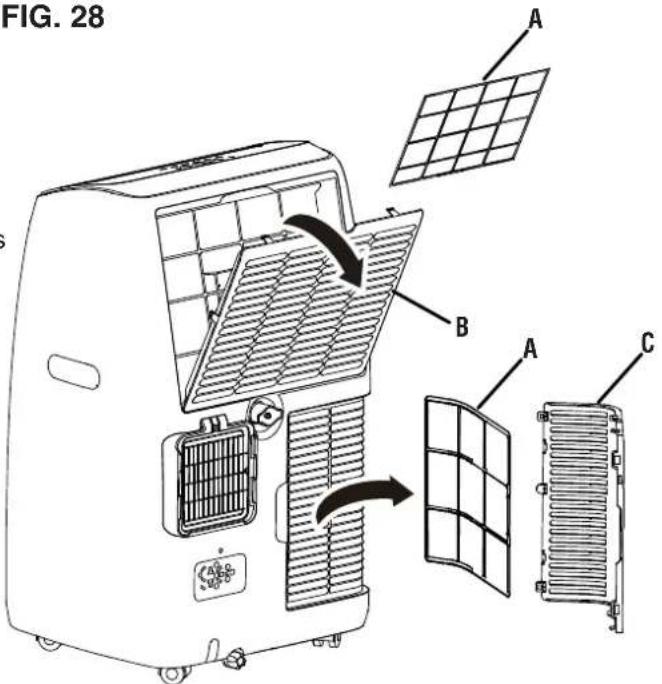
CLEANING THE AIR FILTERS
See Figure 28.
NOTICE
The filters should be cleaned once every three months. Clean the filters more frequently if the unit is used in dusty environments. Dirty air filters reduce air flow, decrease unit efficiency, and could prevent the unit from working properly.
- Unplug the air conditioner.
- Open the filter door and/or remove the air intake grille.
- Slide the filter away from the air conditioner unit.
- Clean the filter door and/or air intake grille using a cleaner or soft brush.
- Use a vacuum cleaner to clean the filter. If it is very dirty, clean it with warm water and a mild detergent. Do not use harsh chemicals or hot water.
NOTE: Allow the filter to dry completely before placing it back in the unit.
NOTICE
Allow filter to air dry. Do not attempt to dry filter with fire or forced air. Doing so could warp the frame of the filter or create a fire hazard.
- Replace the filter and close the filter door or replace the air intake grille.
WARNING
NEVER operate the air conditioner without the filters in place. Doing so could damage the motor and reduce air quality.
CLEANING THE EXHAUST DUCT
● Unplug the air conditioner.
- Remove the exhaust duct from the air conditioner and window panel if applicable.
- Clean the exhaust duct with warm water and a mild detergent.
- Allow the exhaust duct to dry and then reinstall.
DRAINING COLLECTED WATER
See Figures 29 - 30
WARNING
Be careful not to spill drain water and make sure the drain plug is completely in place before resuming operation. Liquid spilling or leaking from the unit could result in electric shock, a slippery surface, or property damage.
If too much water has built up inside the unit, the air conditioner stops running and "ft" (full tank) appears in the display. When this happens, the water condensation needs to be drained.

NOTE: You may need to drain the unit more frequently in areas with high humidity.
Manual draining in cool and dry modes:
● Unplug the air conditioner.
● Place a drain pan under the lower drain plug
- Remove the cap from the lower drain plug and allow the water to drain.
NOTE: Do not tilt the unit. Keep it vertical while draining.
● Reinstall the drain plug cap.
Continuous draining in dry mode:
● Unplug the air conditioner.
- Remove the cap from the upper drain plug.
NOTE: Some residual water condensation may spill. Use a towel to clean any spillage.
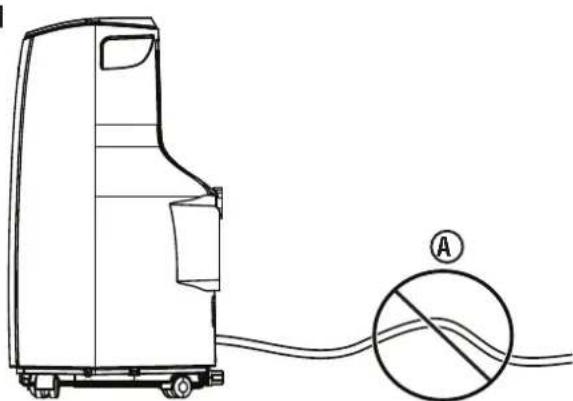
- Insert one end of a drain hose (1/2 in. diameter) [not supplied] or a garden hose (not supplied) into the upper drain plug and the other end into a bucket or floor drain.
- Plug in the air conditoiner and begin operation. The unit will drain continuously as it runs.
- When you are finished running the unit, stop and unplug the air conditioner.
- Remove the drain hose or garden hose (not supplied).
● Reinstall the drain plug cap.
FIG. 29
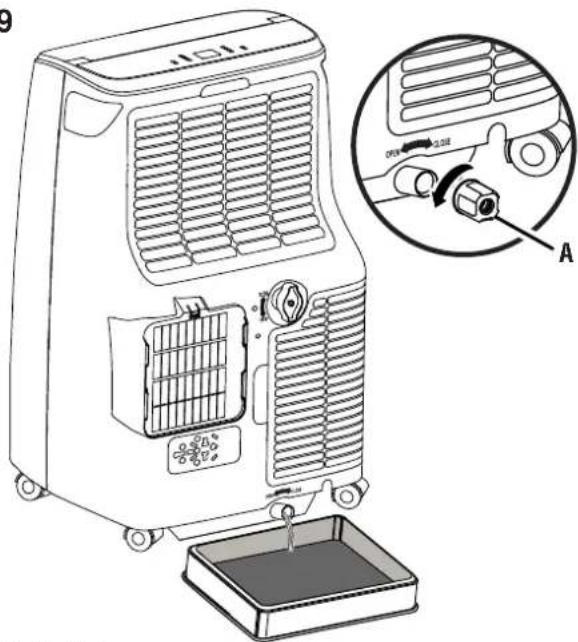
A - Lower Drain Plug
FIG. 30
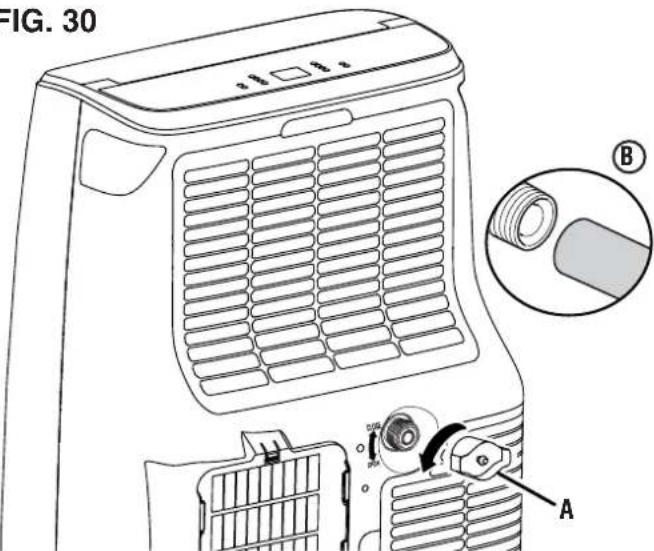
A - Upper Drain Plug
B - Connect Drain Hose
FIG. 31
natural_image
Line drawing of a portable air conditioner unit connected to a circular device with a circled symbol (no text or labels)A - All sections of the drain hose should be lower than the drain plug
Maintenance parts can be purchased directly from the factory. A partial list of maintenance parts is below. For a complete list of maintenance parts or for additional information email us at service@wpowereq.com or call 1-855-944-3571.
Air Filter (Upper) 81073000007
Air Filter (Lower) 81073000001
Exhaust Hose 810703229
Hose Inlet 810701997A
Hose Outlet 810702769
Remote Control 810900800K
Window Vent Kit (Sliding Panel and Fixed Panel) 810702837
Upper Drain Plug Cap 810701299A
Lower Drain Plug Cap 810701900 / 810701898B
Drain Hose....810700928F
Casters 810701160
WARNING Do not use attachments or accessories that are not recommended for use with this product. Making unauthorized modifications and using incompatible accessories can damage the unit and void your warranty.
TROUBLESHOOTING
| PROBLEM POSSIBLE | CAUSE CORRECTION | |
| The air conditioner does not start | No electricity Check power source | |
| Batteries in remote control need to be replaced | Replace batteries | |
| The power cord is not plugged in properly Remove and reconnect power cord | ||
| The LCDI on the power cord has tripped Reset the LCDI | ||
| Runs for a short time then stops | The temperature setting is too close to the room temperature | Lower the temperature setting |
| The air outlet is blocked Remove the blockage | ||
| The exhaust hose has sharp bends or sags Straighten the hose | ||
| The air conditioner starts but doesn’t cool | A door or window is open Close doors and windows | |
| The filters are dirty Clean the filters | ||
| The exhaust hose is not connected Attach the exhaust hose | ||
| The temperature setting is too high | Lower the temperature setting | |
| The air outlet or air intake is blocked | Remove blockage | |
| The room exceeds the recommended size | Move the unit to a smaller room | |
| Direct sunlight decreasing cooling effect | Cover windows with curtains or blinds | |
| The unit will not run and “ft” appears on the display | Excess water condensation is inside the tank. | Drain the tank. |
WESTINGHOUSE OUTDOOR POWER EQUIPMENT'S RESPONSIBILITY
Westinghouse Outdoor Power Equipment warrants to the original purchaser that its Westinghouse Outdoor Power Equipment line of portable air conditioners will be free from defects in material and workmanship. Under normal use and maintenance from the date of purchase, Westinghouse Outdoor Power Equipment agrees to repair or replace at Westinghouse Outdoor Power Equipment discretion, any defective product free of charge at any authorized Westinghouse Outdoor Power Equipment Authorized Service Dealer within the below listed applications, time periods, limitations, and exclusions. THIS LIMITED WARRANTY IS EXTENDED TO THE ORIGINAL PURCHASER ONLY AND IS NOT TRANSFERABLE TO SUBSEQUENT OWNERS. For a list of Westinghouse Outdoor Power Equipment Authorized Service Dealers refer to www.wpowereq.com or call 1-855-944-3571.
OWNER'S RESPONSIBILITY
To ensure trouble free warranty coverage it is important that you register your Westinghouse Outdoor Power Equipment portable air conditioner. You may register on-line at www.wpowereq.com, by automated phone at 1-855-944-3571, or by filling out and returning to Westinghouse Outdoor Power Equipment the warranty registration card supplied with your portable air conditioner. Registering your product confirms your warranty coverage and provides a direct link between you and Westinghouse Outdoor Power Equipment if we find it necessary to contact you.
Your receipt for purchase including date, model and serial number must be maintained and presented to a Westinghouse Outdoor Power Equipment Authorized Service Dealer for warranty service. Proof of purchase rests solely with you, the original purchaser.
You must demonstrate reasonable care and use and follow maintenance and storage guidelines prescribed in the operator's manual for your Westinghouse Outdoor Power Equipment unit. Should a product difficulty occur, you must, at your expense, deliver or ship your Westinghouse Outdoor Power Equipment unit to an Authorized Service Dealer for warranty repairs (which must occur within the applicable warranty period), and arrange for pick-up or return of your unit after the repairs have been made. For the Westinghouse Outdoor Power Equipment Authorized Service Dealer nearest to you, call Westinghouse Outdoor Power Equipment's automated phone at 1-855-944-3571 or may locate a Westinghouse Outdoor Power Equipment Authorized Service Dealer at www.wpowereq.com Should you require assistance or have questions concerning Westinghouse's Outdoor Power Equipment Warranty Statement, you can contact us through the web at www.wpowereq.com or call 1-855-944-3571.
PRODUCT WARRANTY APPLICATIONS & PRODUCT WARRANTY PERIODS
For the purpose of the limited warranty “Consumer Application” means use by the original purchaser for the purpose of personal residential household or recreational use.
Warranty: 1 year (12 months) for labor/1 year (12 months) for parts (manufacturing defects only)/and a total of 5 years (60 months) for compressor part only.
Westinghouse Outdoor Power Equipment may, at its discretion, replace the defective product with either a new or remanufactured unit equivalent to your original purchase during the warranty period.
If proof of purchase is not available to establish the purchase date nor is the equipment registered as suggested herein, the date of manufacturing as recorded by Westinghouse Outdoor Power Equipment will start the product warranty period.
EXCLUSIONS
Westinghouse Portable Air Conditioners that use non-Westinghouse replacement parts.
Costs of normal maintenance and adjustments.
Repairs or diagnostics performed by individuals other than Westinghouse Outdoor Power Equipment Authorized Dealers not authorized in writing by Westinghouse.
Products that have been purchased as refurbished, like new, or second-hand.
Failures caused by any external cause, including but not limited to, collision, theft, vandalism, riot, war, fire, freezing, lightning, earthquake, windstorm, hail, water, flood, tornado, or hurricane.
Damage related to rodent and/or insect infestation.
Failure as a result of improper installation and usage as described in the User's Manual.
Products that are modified or altered in a manner not authorized in writing by Westinghouse Outdoor Power Equipment.
Any incidental, consequential or indirect damages caused by defects in materials or workmanship, or any delay in repair or replacement of the defective part(s).
Failure due to misapplication.
Telephone, cellular phone, facsimile, internet access, or other communication expenses.
Expenses related to “customer instruction” or troubleshooting where no manufacturing defect is found.
Overnight freight or special shipping costs for replacement parts(s).
Overtime, holiday or emergency labor.
DISCLAIMER OF IMPLIED WARRANTIES
This limited warranty is in lieu of all other expressed or implied warranties, including any warranty of FITNESS FOR A PARTICULAR PURPOSE OR USE and any implied warranty MERCHANTABILITY otherwise applicable to Westinghouse Outdoor Power Equipment's line of Westinghouse's line of Portable Air Conditioners and its affiliated companies shall not be liable for any special, incidental or consequential damage, including lost profits. There are no warranties extended other than as provided herein. This limited warranty may be modified only by Westinghouse Outdoor Power Equipment. Any implied warranties allowed by law shall be limited in duration to the terms of the express warranty provided herein. Some states do not allow the exclusion or limitation of incidental or consequential damages, so the above limitation may not apply to you. This warranty gives you specific legal rights. You also have other rights from state to state. Westinghouse Outdoor Power Equipment's ONLY LIABILITY SHALL BE THE REPAIR OR REPLACEMENT AS STATED ABOVE. IN NO EVENT SHALL WESTINGHOUSE BE LIABLE FOR ANY INCIDENTAL OR CONSEQUENTIAL DAMAGES, EVEN IF SUCH DAMAGES ARE A DIRECT RESULT OF Westinghouse Outdoor Power Equipment's NEGLIGENCE. Some states do not allow the exclusion or limitation of incidental or consequential damages, so the above limitation may not apply to you. This warranty gives you specific legal rights and you may also have other rights from state to state.
This limited warranty is given by Westinghouse Outdoor Power Equipment (777 Manor Park Drive, Columbus, OH 43228).
WPac14000s / WPac14000h
Para su archivo
Westinghouse Outdoor Power
Warranty registration
777 Manor Park Drive
Columbus, OH 43228
A - Entrada de manguera
B - Manguera de escape
C - Salida de manguera
D - Pilas (AAA)
natural_image
3D diagram of a coiled pipe with labeled components A and B, showing internal flow direction (no text or symbols beyond labels)A - Salida de manguera
B - Manguera de escape
FIG. 7
A - Entrada de manguera
B - Manguera de escape
C - Ranura
A - Panel fijo
B - Panel deslizante
C - Apertura
FIG. 9
A - Sello de espuma (adhesivo)
B - Ancho
natural_image
Technical line drawing showing two views of a window frame with a downward arrow indicating compression or clearance (no text or symbols)natural_image
Diagram showing two window frame structures with a directional arrow and motion lines, no text or symbols present.FIG. 14
natural_image
Line drawing of an oven with ventilation grilles and a close-up of the interior air duct (no text or symbols)FIG. 18
A - Salida a tierra
FIG. 19
natural_image
Technical line drawing of a portable air purifier with a circular vent mechanism (no text or symbols)flowchart
graph LR
    A["Box with internal flow"] --> B["Box with internal flow"]
    B --> C["Box with internal flow"]
    C --> D["Box with internal flow"]
    D --> E["Box with internal flow"]
A - Pantalla
Función Turbo
B
A - LED de Wi-Fi
FIG. 28
natural_image
Line drawing of a portable air purifier connected to a cable with a circular symbol labeled A (no text or symbols on the device itself)WPac14000s/WPac14000h
CLIMATISEUR PORTATIF
MANUEL DE L'UTILISATEUR
NE PAS RETOURNER CE PRODUIT AU MAGASIN
Westinghouse Outdoor Power
Warranty registration
777 Manor Park Drive
Columbus, OH 43228
CARACTÉRISTIQUES (WPac14000s)
AVOIR DES QUESTIONS?
A - Entrée de tuyau
natural_image
3D diagram of a coiled pipe with labeled components A and B, showing internal flow direction (no text or symbols beyond labels)A - Sortie de tuyau
A - Panneau fixe
B - Panneau coulissant
C - Ouverture
FIG. 9
natural_image
Technical line drawing showing two views of a window frame with a downward arrow indicating compression or dislocation (no text or symbols present)natural_image
Diagram showing two views of a door frame with an arrow indicating direction, no text or symbols presentFIG. 14
SÉLECTION D'UN EMPLACEMENT APPROPRIÉ
natural_image
Illustration of a portable oven with ventilation grilles and a close-up of its internal air duct (no text or symbols)FIG. 18
natural_image
Technical line drawing of a portable air purifier with a circular vent mechanism (no text or symbols)A - Affichage
B - Bouton FONCTION
C - Bouton MARCHE/ARRÊT
D - Bouton HAUT
E - Bouton MINUTERIE
F - Bouton OSCILLANT
G - Bouton BAS
H - Bouton CHANGEMENT D'UNITÉ
I - Bouton VEILLE
J - Bouton VENTILATEUR
Bouton MARCHE/ARRÊT (1)
Bouton FONCTION (3)
B
A - Voyant Wi-Fi
B - Téléphone intelligent
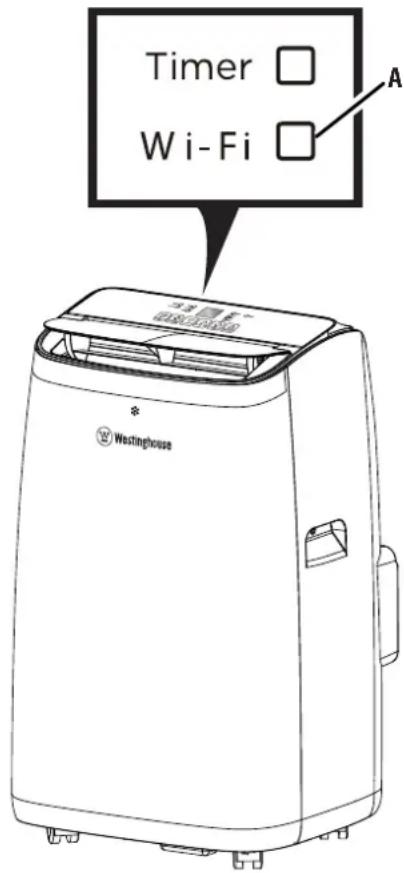
FIG. 28
natural_image
Line drawing of a portable air purifier connected to a cable with a circular symbol labeled A (no text or symbols on the device itself)APPLICATION AUX CONSOMMATEURS
www.WestinghouseOutdoorPower.com
Service Hotline: (855) 944-3571
777 Manor Park Drive
Columbus, OH 43228
and Westinghouse are trademarks of Westinghouse Electric Corporation.
Used under license by MWE Investments, LLC.
© 2022 MWE Investments, LLC All Rights Reserved.
- WPac14000s/WPac14000h
- PORTABLE AIR CONDITIONER
- INTRODUCTION
- DISCLAIMERS
- ALL RIGHTS RESERVED
- UPDATES
- PRODUCT REGISTRATION
- For Your Records
- Westinghouse Outdoor Power
- SPECIFICATIONS (WPac14000s)
- SPECIFICATIONS (WPac14000h)
- WARNING
- NOTICE
- HAVE QUESTIONS?
- Email us at service@wpowereq.com or call 1-855-944-3571
- SAFETY DEFINITIONS
- SAFETY SYMBOLS
- IMPORTANT SAFEGUARDS
- SAVE THESE INSTRUCTIONS
- AVERTISSEMENT
- IC WARNING
- AC MOTOR
- LEAKAGE DETECTION DEVICE
- See Figure 1.
- CAUTION
- UNDERSTANDING YOUR APPLIANCE
- See Figure 2.
- CASTERS
- CONTROL PANEL
- CORD RETAINER
- DRAIN PLUGS
- EXHAUST DUCT
- FILTERS
- REMOTE CONTROL
- REMOVING CARTON CONTENTS
- INCLUDED LIST
- See Figure 3.
- ATTACHING THE EXHAUST HOSE
- See Figures 4 - 8
- INSTALLING THE WINDOW VENT KIT
- See Figures 9 - 15.
- SELECTING A SUITABLE LOCATION
- See Figures 16 - 19.
- OPERATING THE AIR CONDITIONER
- See Figures 20 - 21.
- USING THE CONTROL PANEL
- See Figure 22.
- ON/OFF Button (☐)
- MODE Button (Φ)
- Cool Mode
- Fan Mode
- Dry Mode
- Heat Mode (WPac14000h Only)
- Smart Mode
- UP/DOWN BUTTONS (4)
- Temperature Units
- FAN Button ( ✿ )
- TIMER Button (💡)
- Timer ON
- Timer OFF
- ERROR CODES
- ADDING/REPLACING REMOTE BATTERIES
- See Figure 23.
- ON/OFF Button (J)
- Child Lock
- TIMER Button (∅)
- SLEEP Button (2)
- FAN Button (✗)
- UNIT CHANGE Button (°C/°F)
- MODE Button (98)
- SWING Button (△)
- FUNCTION Button (≡)
- Turbo Function
- Follow Me Function
- CONNECTING YOUR APPLIANCE TO A SMART PHONE
- TIPS FOR BEST USE
- CLEANING THE HOUSING AND GRILLES
- See Figure 27.
- CLEANING THE AIR FILTERS
- See Figure 28.
- CLEANING THE EXHAUST DUCT
- DRAINING COLLECTED WATER
- Manual draining in cool and dry modes:
- Continuous draining in dry mode:
- WESTINGHOUSE OUTDOOR POWER EQUIPMENT'S RESPONSIBILITY
- OWNER'S RESPONSIBILITY
- PRODUCT WARRANTY APPLICATIONS & PRODUCT WARRANTY PERIODS
- EXCLUSIONS
- DISCLAIMER OF IMPLIED WARRANTIES
- WPac14000s / WPac14000h
- Para su archivo
- Función Turbo
- CLIMATISEUR PORTATIF
- MANUEL DE L'UTILISATEUR
- NE PAS RETOURNER CE PRODUIT AU MAGASIN
- CARACTÉRISTIQUES (WPac14000s)
- AVOIR DES QUESTIONS?
- SÉLECTION D'UN EMPLACEMENT APPROPRIÉ
- Bouton MARCHE/ARRÊT (1)
- Bouton FONCTION (3)
- APPLICATION AUX CONSOMMATEURS
Brand : WESTINGHOUSE
Model : WPac14000s
Category : Air Conditioning