Aria X2 IPC - Industrial electronics Elation - Free user manual and instructions
Find the device manual for free Aria X2 IPC Elation in PDF.


| Product Type | Outdoor IP65 Wireless DMX Transceiver |
| Dimensions (L x W x H) | 164 x 215 x 42 mm (6.5 x 8.5 x 1.7 inches) |
| Weight | 1.23 kg (2.7 lb) |
| Power Supply | 100-240 V AC, 50/60 Hz |
| Power Consumption | 1.6 W (16 mA) at 100 V, 2.2 W (19 mA) at 120 V, 2.2 W (10 mA) at 230 V |
| Fuse | T1.25 A / 250 V (5 x 20 mm) |
| Ingress Protection | IP65 (dust-resistant and protected against low-pressure water jets) |
| Supported Radio Frequencies | 2.4 GHz, Sub-GHz (US: 906-924 MHz, EU: 868 MHz), Bluetooth 4.2 |
| Supported Protocols | DMX (RDM planned), proprietary 802.15.4 protocol, Aria X2 Mesh, Aria X2 series |
| Connectors | DMX 5-pin XLR input/output, lockable power input/output |
| Display and Control | LCD screen with 4 buttons (Mode, Enter, Up, Down) + LED indicators |
| Wireless Setup | Aria Bluetooth App (iOS) for remote configuration |
| Wireless Range | Up to 300 m line of sight (depending on conditions), Sub-GHz offers better range and penetration |
| Operating Modes | Transmitter (DMX to wireless), Receiver (wireless to DMX), Bridge |
| Installation | Wall or truss mounting (M12 thread), safety cable mandatory when suspended |
| Operating Temperature | -20 °C to 45 °C (-4 °F to 113 °F) |
| Max Operating Humidity | Less than 75% |
| Outdoor Maintenance | Optical and chassis inspection every 30 days, cleaning with soft cloth (no alcohol/solvents) |
| Indoor Maintenance | Inspect every 30 days: mechanisms, optics, fans, belts; use low-volume compressed air |
| IP Seal Test | After any repair: vacuum test (-5.8 psi) and pressure test (5.1 psi) for 30 s |
| Warranty | 2 years (US) against defects in materials and workmanship |
| Firmware Update | OTA (Over-the-Air) via app or USB port (not detailed) |
| Optional Accessories | Aria X2 Bridge, Tour Link Cable 5P10, M12 mounting brackets |
Frequently Asked Questions - Aria X2 IPC Elation
User questions about Aria X2 IPC Elation
0 question about this device. Answer the ones you know or ask your own.
Ask a new question about this device
Download the instructions for your Industrial electronics in PDF format for free! Find your manual Aria X2 IPC - Elation and take your electronic device back in hand. On this page are published all the documents necessary for the use of your device. Aria X2 IPC by Elation.
USER MANUAL Aria X2 IPC Elation
©2024 ELATION PROFESSIONAL all rights reserved. Information, specifications, diagrams, images, and instructions herein are subject to change without notice. ELATION PROFESSIONAL logo and identifying product names and numbers herein are trademarks of ELATION PROFESSIONAL. Copyright protection claimed includes all forms and matters of copyrightable materials and information now allowed by statutory or judicial law or hereinafter granted. Product names used in this document may be trademarks or registered trademarks of their respective companies and are hereby acknowledged. All non-ELATION brands and product names are trademarks or registered trademarks of their respective companies.
ELATION PROFESSIONAL and all affiliated companies hereby disclaim any and all liabilities for property, equipment, building, and electrical damages, injuries to any persons, and direct or indirect economic loss associated with the use or reliance of any information contained within this document, and/or as a result of the improper, unsafe, insufficient and negligent assembly, installation, rigging, and operation of this product.
Elation Professional USA I 6122 S. Eastern Ave. I Los Angeles, CA. 90040
323-582-3322 | www.elationlighting.com | info@elationlighting.com
Elation Professional B.V. I Junostraat 2 I 6468 EW Kerkrade, The Netherlands
+31 45 546 85 66 | www.elationlighting.eu | info@elationlighting.eu
Elation Professional Mexico I AV Santa Ana 30 | Parque Industrial Lerma, Lerma, Mexico 52000
+52 (728) 282-7070
DOCUMENT VERSION

Due to additional product features and/or enhancements, an updated version of this document may be available online. Please scan the QR Code with your mobile device or visit www.elationlighting.com for the latest revision/update of this manual, before installation and/or programming.
| Date | Document Version | Software Version > | Modes Notes | |
| 10/11/24 1 | 1.00 N/A Initial Release | |||
| 08/15/25 1 | 1.1 N/A N/A U | update FCC notice | ||
CONTENTS
General Information 4
IP65 Rated 5
Limited Warranty 6
Safety Guidelines 7
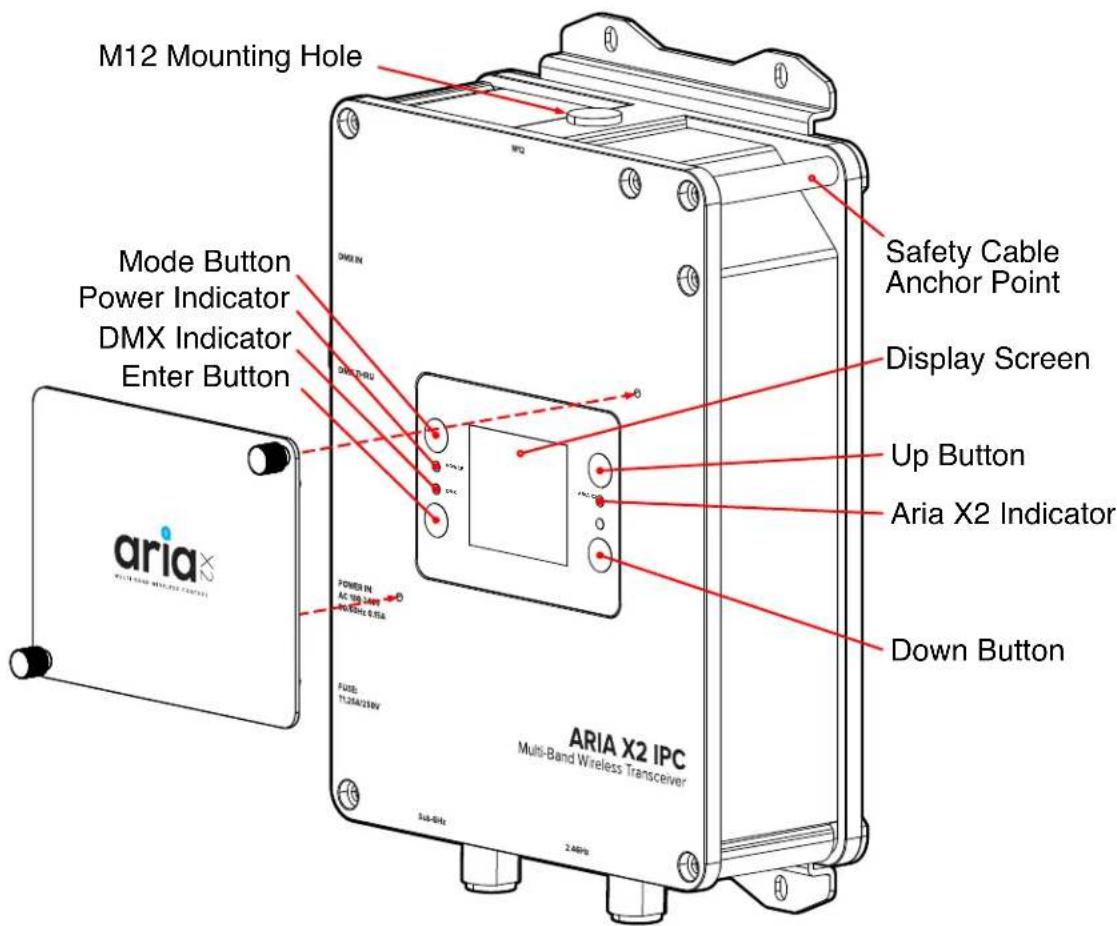
Overview 8
Connections 9
DMX Setup 10
Installation Guidelines 11
Setup Guidelines 14
System Menu 16
Frequency & Wireless Location Guidelines 18
Firmware Update 19
Maintenance 20
Torque Settings for Screws 21
IP Test Parameters 22
Specifications 23
Dimensions Drawings 24
Optional Accessories I FCC Statement 25
GENERAL INFORMATION
INTRODUCTION
Please read and understand the instructions in this manual carefully and thoroughly before attempting to operate this device. These instructions contain important safety and use information.
This product is intended for use by professionally trained personnel only, and is not suitable for private use.
Unpacking
Every device has been thoroughly tested and has been shipped in perfect operating condition. Carefully check the shipping carton for damage that may have occurred during shipping. If the carton is damaged, carefully inspect the device for damage, and be sure all accessories necessary to install and operate the device have arrived intact. In the event damage has been found or parts are missing, please contact our customer support team for further instructions. Please do not return this device to your dealer without first contacting customer support. Please do not discard the shipping carton in the trash. Please recycle whenever possible.
CUSTOMER SUPPORT
Contact ELATION Service for any product related service and support needs. Also visit forums.elationlighting.com with questions, comments or suggestions.
ELATION SERVICE USA - Monday - Friday 8:00am to 4:30pm PST 323-582-3322 | support@elationlighting.com
ELATION SERVICE EUROPE - Monday - Friday 08:30 to 17:00 CET +31 45 546 85 63 | support@elationlighting.eu
REPLACEMENT PARTS - please visit parts.elationlighting.com

IMPORTANT NOTICE!
THERE ARE NO USER SERVICEABLE PARTS INSIDE THIS UNIT.
DO NOT ATTEMPT ANY REPAIRS YOURSELF; DOING SO WILL Void YOUR MANUFACTURER'S WARRANTY. DAMAGES RESULTING FROM MODIFICATIONS TO THIS FIXTURE AND/OR THE DISREGARD OF SAFETY INSTRUCTIONS AND GUIDELINES IN THIS MANUAL Void THE MANUFACTURER'S WARRANTY AND ARE NOT SUBJECT TO WARRANTY CLAIMS AND/OR REPAIRS.
IP65 RATED
The International Protection (IP) rating system is commonly expressed as "IP" (Ingress Protection) followed by two numbers (i.e. IP65), where the numbers define the degree of protection. The first digit (Foreign Bodies Protection) indicates the extent of protection against particles entering the fixture, and the second digit (Water Protection) indicates the extent of protection against water entering the fixture. An IP65 rated lighting fixture is designed and tested to protect against the ingress of dust (6), and low-pressure water jets from any direction (5).
NOTE: THIS FIXTURE IS INTENDED FOR TEMPORARY OUTDOOR USE ONLY!
Maritime/Coastal Environment Installations: A coastal environment is seaside adjacent, and caustic to electronics through exposure to atomized salt-water and humidity, whereas maritime is anywhere within 5-miles of a coastal environment.

NOT suitable for maritime/coastal environment installations. Installing this fixture in a maritime/coastal environment may cause corrosion and/or excessive wear to the interior and/or exterior components of the fixture. Damages and/or performance issues resulting from installation in a maritime/coastal environment will void the manufactures warranty, and will NOT be subject to any warranty claims and/or repairs.
Maritime installations require additional preparation, and additional service intervals may be needed given the maritime use. In general, IP ratings presuppose freshwater conditions VS maritime conditions, which are typically more "caustic" to IP fixtures (both internally and externally). A duty-cycle may also be needed when units are not in use. During times of high humidity and colder temperatures, condensation may occur internally so the fixture may require a duty-cycle to bring it up to running temperature, allowing any accumulation of moisture to be expelled via the vent valve. Recommendations can change based on installation environmental circumstances. A waterproof dome or similar device is recommended for use in permanent outdoor installations. When using a dome, refer to manufacturer recommendations for duty-cycle.
NOTE: NOT ALL FEATURES LISTED ARE AVAILABLE ON ALL FIXTURES; THE FOLLOWING INSTRUCTIONS MAY NOT APPLY. CONTACT SUPPORT FOR ADDITIONAL DETAILS.
Exterior Maintenance: Inspect the exterior every 30-days. The unit must be powered off/disconnected. The chassis should be inspected for any signs of contaminants. Inspect optics to determine if the lens is obstructed, then clean optics and chassis accordingly. Based on initial finding, schedule maintenance accordingly, keeping in mind that exterior maintenance will be required. Even if the luminaires are NOT in use, maintenance will still be needed given its location (exterior use). The use of a durable type of wax on the chassis is recommended since it will help prevent contaminant build up. Inspect both power and data lines for any signs of contaminants or corrosion. Periodically reapplying di-electric grease, especially in coastal environments. If any signs of corrosion/contaminants are present, clean thoroughly, and/or replace connectors, then reapply di-electric grease. Typically, this should be done annually, or any time an opportunity presents itself. As a preventive measure, annual replacement of both vent valves is recommended. The vent valve membrane can become contaminated and/or clogged causing improper venting of humidity within the luminaire. Inspect all mounting hardware as a precaution.
Interior Maintenance: Inspect the interior every 30-days. The unit must be powered off/disconnected.
- Inspect zoom/focus mechanism, clean optics, lubricate linear bearings (Krytox oil) as needed, inspect belts for wear
- Inspect all rotating effect wheels, manually rotate them, note any resistance
- Inspect all remaining rotating belts for any wear
- Inspect all fans, clean as needed, check rotation, check connections
- Inspect CMY module, manually move flags and check for signs of resistance, and if needed, clean guide rods first, then reapply a thin layer of grease (moly lube)
- Clean interior with low-volume compressed air, then clean optics prior to reassembly of head covers
Although the base has limited moving parts, the pan belt should also be inspected for wear. Remember to always perform an IP test anytime a cover is removed.
There is no specific time frame regarding the routine replacement of parts such as belts/stepper motors, PCBs, or LEDs. These items should only be replaced on an as needed bases, except for cooling fans, which should be replaced once the luminaries reach 10,000-hours. This is a prophylactic measure intended to keep the unit running as cool as possible, insuring proper function of all internal components. A complete service breakdown is available, please contact service@elationlighting.com for any needed parts or manuals.
LIMITED WARRANTY (USA ONLY)
A. Elation Professional hereby warrants, to the original purchaser, Elation Professional products to be free of manufacturing defects in material and workmanship for a period of two years (730 days), and Elation Professional product rechargeable batteries to be free of manufacturing defects in material and workmanship for a period of six months (180 days), from the original date of purchase. This warranty excludes discharge lamps and all product accessories. This warranty shall be valid only if the product is purchased within the United States of America, including possessions and territories. It is the owner's responsibility to establish the date and place of purchase by acceptable evidence, at the time service is sought.
B. For warranty service, send the product only to the Elation Professional factory. All shipping charges must be pre-paid. If the requested repairs or service (including parts replacement) are within the terms of this warranty, Elation Professional will pay return shipping charges only to a designated point within the United States. If any product is sent, it must be shipped in its original package and packaging material. No accessories should be shipped with the product. If any accessories are shipped with the product, Elation Professional shall have no liability what so ever for loss and/or damage to any such accessories, nor for the safe return thereof.
C. This warranty is void if the product serial number and/or labels are altered or removed; if the product is modified in any manner which Elation Professional concludes, after inspection, affects the reliability of the product; if the product has been repaired or serviced by anyone other than the Elation Professional factory unless prior written authorization was issued to purchaser by Elation Professional; if the product is damaged because not properly maintained as set forth in the product instructions, guidelines and/or user manual.
D. This is not a service contract, and this warranty does not include any maintenance, cleaning or periodic check-up. During the periods as specified above, Elation Professional will replace defective parts at its expense, and will absorb all expenses for warranty service and repair labor by reason of defects in material or workmanship. The sole responsibility of Elation Professional under this warranty shall be limited to the repair of the product, or replacement thereof, including parts, at the sole discretion of Elation Professional. All products covered by this warranty were manufactured after January 1, 1990, and bare identifying marks to that effect.
E. Elation Professional reserves the right to make changes in design and/or performance improvements upon its products without any obligation to include these changes in any products theretofore manufactured.
F. No warranty, whether expressed or implied, is given or made with respect to any accessory supplied with the products described above. Except to the extent prohibited by applicable law, all implied warranties made by Elation Professional in connection with this product, including warranties of merchantability or fitness, are limited in duration to the warranty periods set forth above. And no warranties, whether expressed or implied, including warranties of merchantability or fitness, shall apply to this product after said periods have expired. The consumer's and/or dealer's sole remedy shall be such repair or replacement as is expressly provided above; and under no circumstances shall Elation Professional be liable for any loss and/or damage, direct and/or consequential, arising out of the use of, and/or the inability to use, this product.
G. This warranty is the only written warranty applicable to Elation Professional products and supersedes all prior warranties and written descriptions of warranty terms and conditions heretofore published.
WARRANTY RETURNS
All returned service items whether under warranty or not, must be freight pre-paid and accompany a return authorization (R.A.) number. The R.A. number must be clearly written on the outside of the return package. A brief description of the problem as well as the R.A. number must also be written down on a piece of paper and included in the shipping container. If the unit is under warranty, you must provide a copy of your proof of purchase invoice. Items returned without a R.A. number clearly marked on the outside of the package will be refused and returned at customer's expense. You may obtain a R.A. number by contacting customer support.
SAFETY GUIDELINES
This device is a sophisticated piece of electronic equipment. To guarantee a smooth operation, it is important to follow all instructions and guidelines in this manual. Elation Professional is not responsible for injury and/or damages resulting from the misuse of this device due to the disregard of the information printed in this manual. Only the original included parts and/or accessories for this device should be used. Any modifications to the device, included and/or accessories will void the original manufactures warranty and increase the risk of damage and/or personal injury.

PROTECTION CLASS 1 - FIXTURE MUST BE PROPERLY GROUNDED

THERE ARE NO USER SERVICEABLE PARTS INSIDE THIS UNIT.
DO NOT ATTEMPT ANY REPAIRS YOURSELF; DOING SO WILL Void YOUR MANUFACTURER'S WARRANTY. DAMAGES RESULTING FROM MODIFICATIONS TO THIS FIXTURE AND/OR THE DISREGARD OF SAFETY INSTRUCTIONS AND GUIDELINES IN THIS MANUAL Void THE MANUFACTURE'S WARRANTY AND ARE NOT SUBJECT TO ANY WARRANTY CLAIMS AND/OR REPAIRS.

DO NOT PLUG FIXTURE INTO A DIMMER PACK!
NEVER OPEN THIS FIXTURE WHILE IN USE!
UNPLUG POWER BEFORE SERVICING FIXTURE!
NEVER TOUCH FIXTURE DURING OPERATION, AS IT MAY BE HOT!
DO NOT shake the device; avoid brute force when installing and/or operating the device.
DO NOT operate the device if the power cord is frayed, crimped, damaged, and/or if any of the power cord connectors are damaged and do not insert into the fixture securely with ease.
NEVER force a power cord connector into the device. If the power cord or any of its connectors are damaged, replace it immediately with a new one of a similar power rating.
When installing the fixture in a suspended environment, always use mounting hardware that is no less than M10 x 25 mm, and always install the fixture with an appropriately rated safety cable.
Always disconnect the fixture from the main power source before performing any type of service and/or cleaning procedure.
Only handle the power cord by the plug end; never pull out the plug by tugging the wire portion of the cord.
During the initial operation of this fixture, light smoke or a smell may emit from the interior of the fixture. This is a normal process and is caused by excess paint in the interior of the casing burning off from the heat associated with the lamp and will decrease gradually over time.
Consistent operational breaks will ensure the fixture functions properly for many years.
ONLY Use the original packaging and materials to transport the fixture for service.
OVERVIEW
CONNECTIONS
AC CONNECTIONS
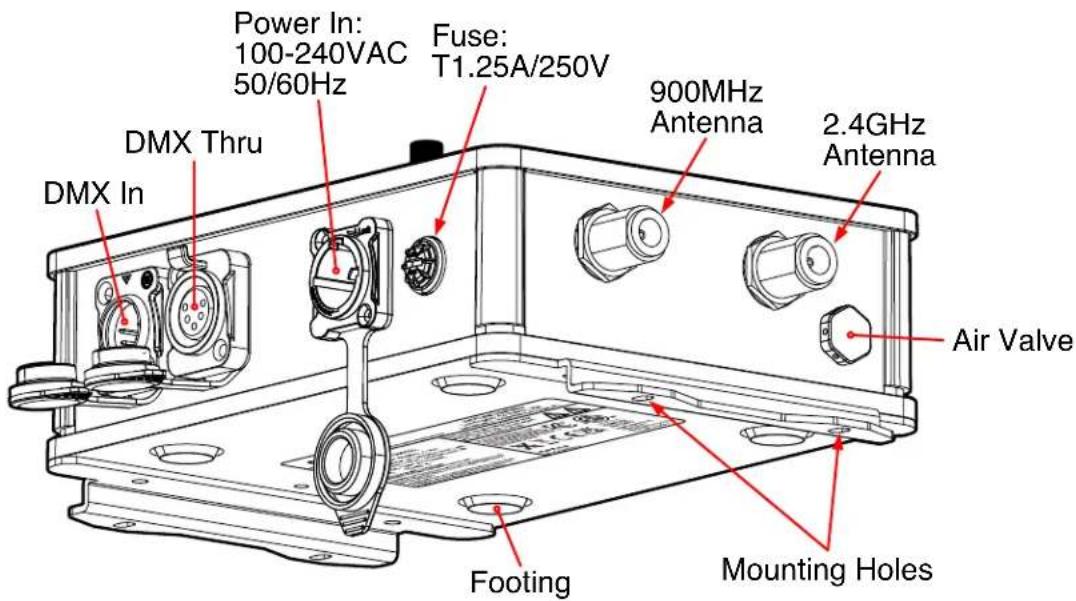
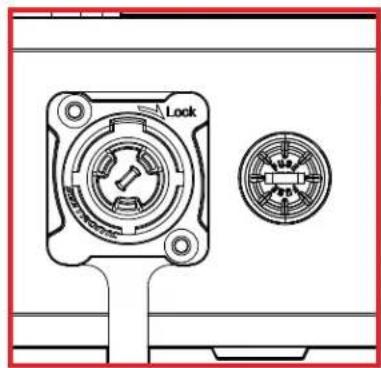
The Aria X2 IPC is rated for 100-240V 50/60Hz, and accepts AC mains power within that range. Do not connect it to power outside this range. Note that the device uses a T1.25A/250V fuse. Damage resulting from incorrect connection is not covered under warranty. A cable with a NEMA 15-5P plug is provided for use with the Aria X2 IPC in the USA and Canada. This approved cable must be used in North America.
DMX CONNECTIONS:
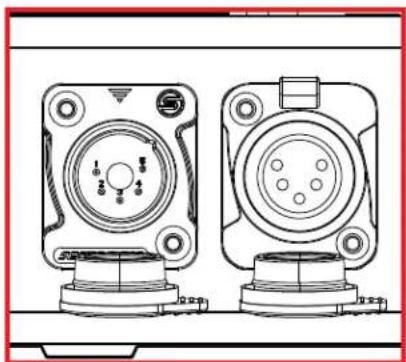
The DMX Input/Output connections are 5pin male/female XLR. The pin-out on the socket is pin 1 to shield, pin 2 to cold (-), and pin 3 to hot (+). Pins 4 and 5 are not used. Carefully connect DMX cables to the respective ports. To prevent damaging the DMX ports, provide strain relief and support. Avoid connecting FOH Snakes to the ports directly.
| PinConnection |
| 1 Com |
| 2 Data - |
| 3 Data + |
| 4 Not connected |
| 5 Not connected |
DMX SETUP
Transmitter Mode: When transmitting, the signal indicator turns orange. You can set either 2.4G or Sub-GHz to choose a different channel.
Receiver Mode: When you set the device to receiver mode with the same frequency (2.4G or Sub-GHz) and channel as the transmitter device, the LED indicator turns green. You can then control the lighting.
ARIA X2 IPC AS TRANSMITTER
When you connect the Aria X2 IPC to a DMX controller, the DMX signal indicator turns green. The indicator of the Aria X2 IPC turns orange, which indicates that it is in a transmitting status. Please note that the transmitting unit will automatically connect to other nearby Aria X2 Transceiver units that have been set to the same frequency setting.
ASSIGNING DEVICE LABELS
Devices can be assigned a custom label, in order to help distinguish individual devices from one another. To do so, use the encoder knob to navigate to the Label menu in the main menu, then select either Rename or Modify and enter in the desired label for the device.
- Rename allows the user to create a new label from scratch, starting with a completely blank label.
- Modify allows the user to begin with the label that is currently in use (which by factory default will be "Aria X2 T"), and make changes to that label.
INSTALLATION GUIDELINES

DISCONNECT POWER BEFORE PERFORMING ANY MAINTENANCE!
ELECTRICAL CONNECTIONS
A qualified electrician should be used for all electrical connections and/or installations.

USE CAUTION WHEN POWER LINKING OTHER MODEL DEVICES AS THE POWER CONSUMPTION OF OTHER MODEL DEVICES MAY EXCEED THE MAXIMUM POWER OUTPUT OF THIS DEVICE. CHECK SILK SCREEN FOR MAXIMUM AMPS.

THE ARIA X2 TRANSCEIVER IS DESIGNED TO BE TRUSS-MOUNTED; HOWEVER, IT CAN BE USED STAND-ALONE, WHERE THE DEVICE MUST SIT ON A FIRM FLAT SURFACE.
Device MUST be installed following all local, national, and country commercial electrical and construction codes and regulations.
POWER LINKING

USE CAUTION WHEN POWER LINKING AS THE POWER CONSUMPTION MAY EXCEED THE MAXIMUM POWER OUTPUT ON THIS DEVICE. CHECK SILK SCREEN FOR MAXIMUM AMPS.
INSTALLATION GUIDELINES
WALL MOUNT INSTALLATION
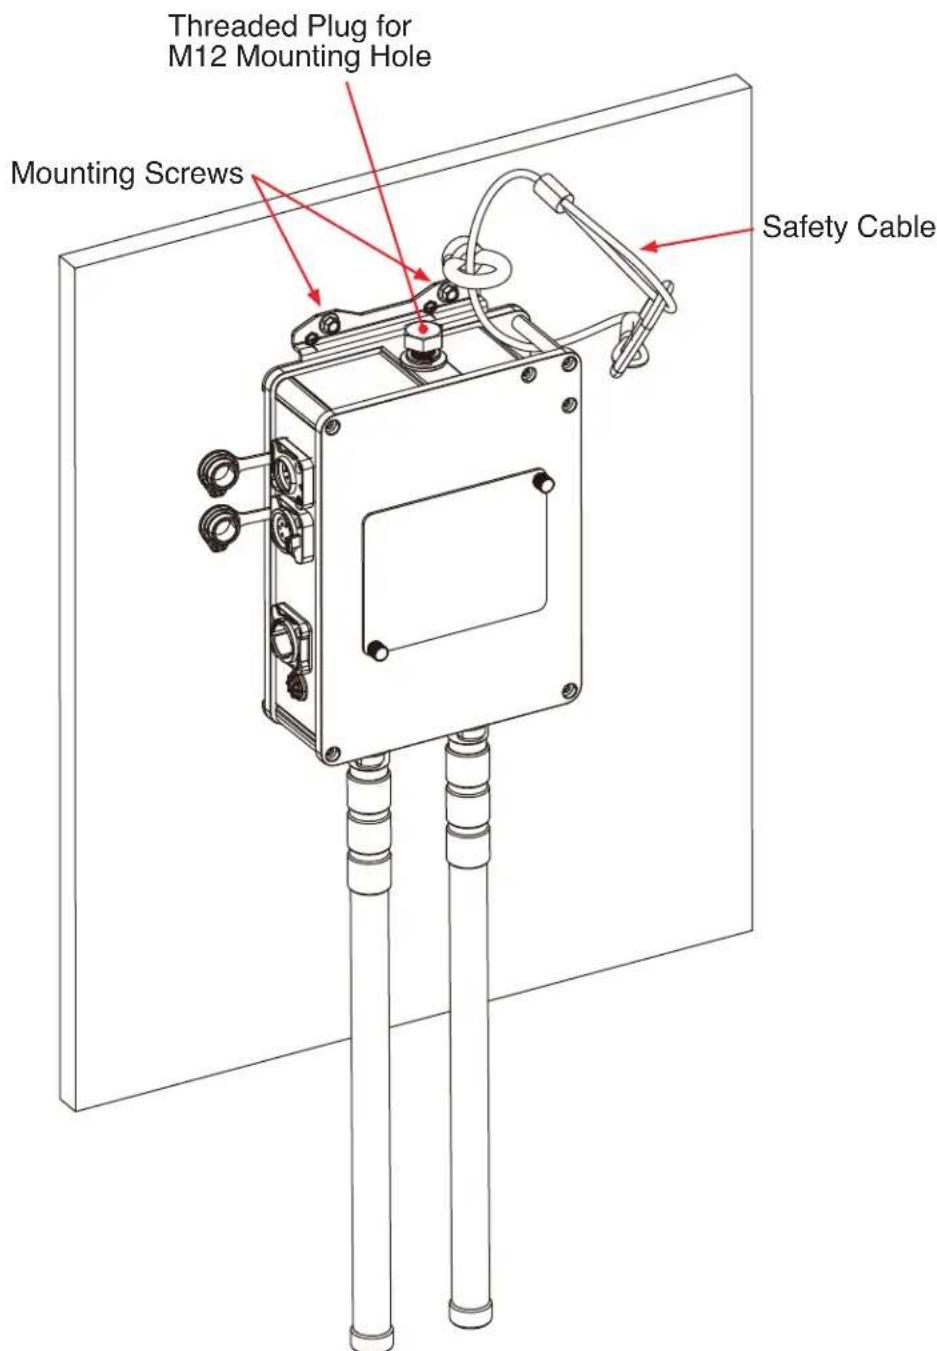
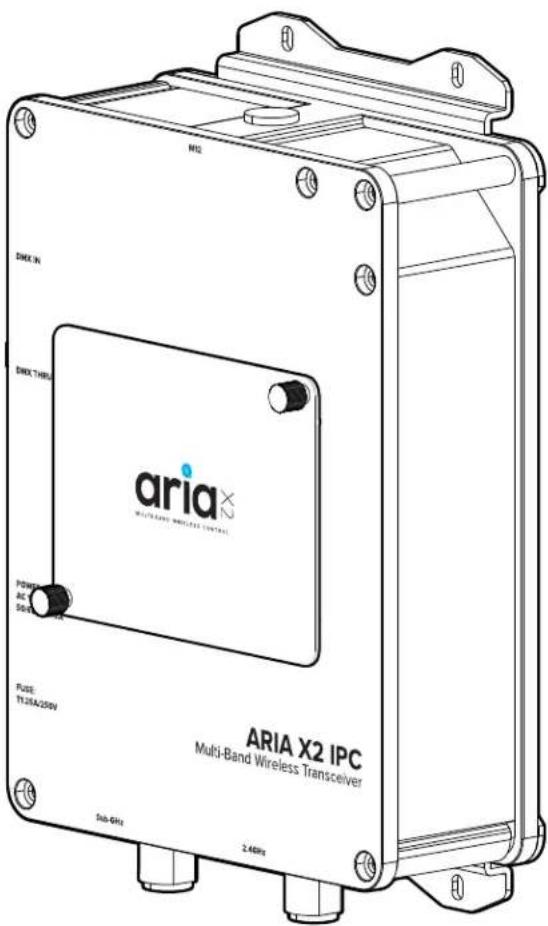
Insert the Safety Cable Loop through the M12 mounting hole located at the top of the device, as illustrated in the image below. Secure the device to the mounting surface using four mounting screws, each rated for the device's weight. It is crucial to consult with a certified equipment installer to verify that the mounting surface can adequately support the weight of the device, including any additional accessories and cables. Finally, thread an appropriately rated safety cable through the cable loop and fasten it to a stable anchorage point.
INSTALLATION GUIDELINES
TRUSS MOUNT INSTALLATION
Insert 18.8 steel M12x25mm bolt (not included) through the respective mounting hole of the clamp (not included), and then thread it into the matching 12M hole. The bolt must be threaded at least 18mm (0.7ins) into the fixture base.
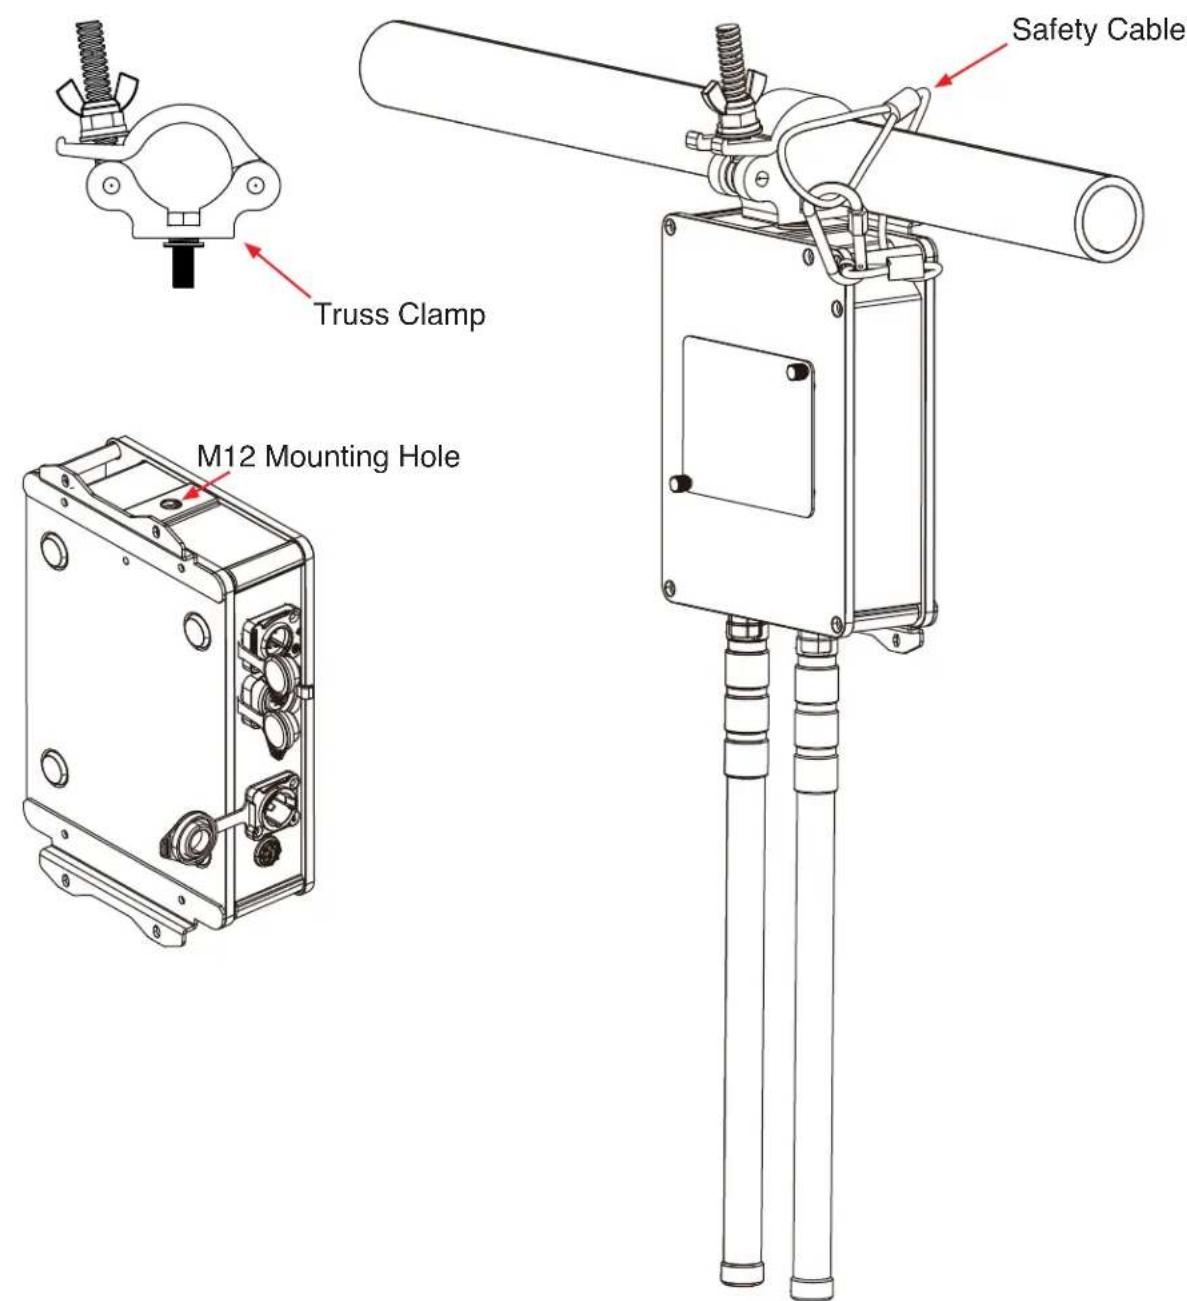

FALLING FIXTURES CAN CAUSE SEVERE INJURY OR SERIOUS EQUIPMENT DAMAGE! FOR THIS REASON, FIXTURES SHOULD BE INSTALLED AND INSPECTED ONLY BY QUALIFIED PERSONNEL. DO NOT INSTALL THE UNIT IF YOU LACK THE QUALIFICATIONS TO DO SO, OR IF YOU HAVE DOUBTS ABOUT THE SAFETY AND SECURITY OF THE INSTALLATION SETUP OR LOCATION!

ALWAYS ATTACH A SAFETY CABLE WHENEVER INSTALLING THIS FIXTURE IN A SUSPENDED ENVIRONMENT TO ENSURE THE FIXTURE WILL NOT FALL IF THE CLAMP FAILS.
SETUP GUIDELINES
GENERAL INFORMATION
The Aria Bluetooth app has the ability to connect wirelessly to any device that has Aria wireless DMX installed and has Bluetooth enabled.
Before installing the fixture in a remote location, double check that the fixture's main power is switched on, and that the Bluetooth function has been enabled in the fixture's system menu.
Certain fixtures may have Bluetooth disabled by default. If this function is disabled, then the fixture cannot be configured remotely using the Aria app, and will have to be configured directly from the fixture's control screen.
Additionally, the user should consider setting the fixture's No DMX setting to "Hold Last". This will allow the fixture to continue running using the current settings, even if the Aria app device moves out of range, the app is closed, or the signal is otherwise interrupted, minimizing disruption in the operation of the fixtures.
LEGACY DEVICES
Please note that legacy connected devices, such as those using E-Fly, or Magfly, are not compatible with this app. For such legacy devices, the use of a bridge is recommended, as the bridge can communicate with these devices via its SM220 protocol.
The Aria X2 BLE app is currently available from the Apple app store.
FIXTURE IDENTIFICATION
Aria compatible devices can be identified and connected via the Fixtures tab in the app. This tab displays a field of twenty-four buttons that can be assigned to Aria compatible devices that are within range, and the buttons will automatically be assigned to devices in the order in which they are discovered. If more than twenty-four units are within range, it may be necessary to use the filter feature to search for the desired fixture. Button location can be edited by selecting the configuration key, then the user can drag and drop the buttons to the desired location and hit save to keep changes. Once a device is known to the app, it can also be assigned to a particular button. From that point forward, the assigned device will always be assigned to that button location.
IMPORTANT NOTE: For version 0.65 or higher, a shared system password is required to connect to any device.
Unlike wireless DMX, Bluetooth is a connect first protocol. To connect to a device or fixture, tap the assigned button in the Fixtures tab. If the connection is successful, a green frame will appear around the button, indicating that the app was able to retrieve the current channel values from the fixture. The app must be connected to a fixture in order to use its channel controls or view and change settings. Please note that not all Aria devices have channel controls.
Additionally, each fixture can only be connected to one device with the app at any given time. Once a fixture is connected to the app installed on one device, any other devices will be blocked from connecting. As a result, when setting up a new fixture for the first time, best practice is to have only a single user with the app open within range, in order to ensure that the fixture pairs to the intended user's device.
SETUP GUIDELINES
DETECTED DEVICES
The second table section shows all Aria devices detected in range. A checkmark indicates the device is currently assigned to a button. If more than 24 devices are within range, the user may remove or add devices to the buttons list by tapping a row to check or uncheck a device. If all buttons are full, it will be necessary to uncheck a device before adding another.
Filter: The user can filter which Aria devices get button assignments by tapping "filter" at the top of the view. A popup will appear where the user can enter text to filter devices by username, model name, or manufacturer. Please note that these searches are case sensitive.
Note: If a device shows an asterisk (*) it means that there is no fixture profile currently available, and therefore there will be limited support available for that device. The user will still be able to connect and adjust channels if the device supports that feature, but the user will not be able to view how many channels the device has or the channel names.
SECURITY
Each fixture must have a password saved to be secure. When a new fixture is installed for the first time, its password will automatically be set to the app's system password on first connection. Once the password has been entered, the user will need to exit out to the main page containing the fixture buttons, then de-select and re-select the fixture to lock in the password. From that point forward only, controlling devices that use the correct password can connect to this fixture. This security is now required by law in most jurisdictions.
The app will detect any Aria capable fixture within range, even if the app does not have the password to that fixture and therefore cannot access that fixture. If that fixture is selected in the app, the green frame will momentarily appear around that fixture's button, but then disappear. This indicates that the fixture is visible but inaccessible.
SYSTEM MENU
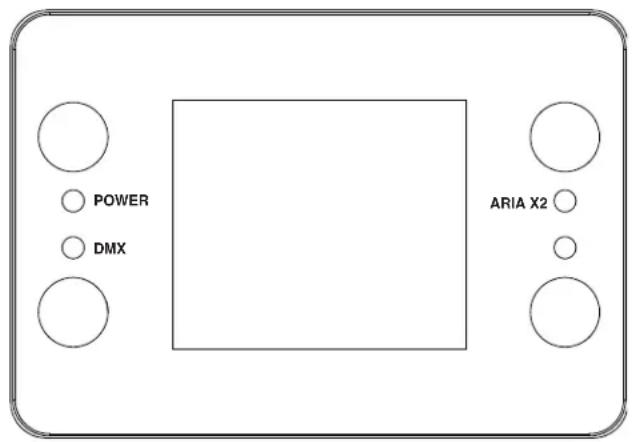
The Aria X2 IPC features an LCD display screen with 4 control buttons, which can be used to easily adjust any device settings. Button functions and locations are as described below:
- MODE (top left) - Cycles through main menu options, or returns to the main menu without making adjustments.
- ENTER (bottom left) - Selects the option currently displayed on the screen, and opens up the next sub-menu option if applicable.
UP (top right) / DOWN (bottom right) - Scrol1s up or down through the list of options for the currently selected menu.
Additionally, the control panel includes indicator lights that signify that the unit is receiving power and broadcasting/receiving over DMX, and or Aria X2.
SYSTEM MENU
| MAIN MENU OPTIONS / VALUES (Default Settings in BOLD) | |||
| Aria Settings | Frequency | 2.4GHz. | 2.4 GHzSub GHz US |
| Sub GHz EU | |||
| 2.4 GHz. CH 00~15 1 | |||
| Sub GHz CH 00~09 1 | |||
| Mesh ON/OFF OFF | |||
| Bluetooth ON/OFF ON | |||
| Display | Timeout OFF - 10 minutes OFF | ||
| Passcode Enable/Disable Disable | |||
| Edit Passcode Passcode xxx | |||
| Screen Rotation YES / NO / Auto Auto | |||
| Label | Rename | AaBbCcDd...()+0123456789 | Aria X2 T |
| Modify | |||
| Service | Passcode Factory Restore YES / NO | ||
| Information | Software Version | x.xx | |
| RDM UID | xxxxxx | ||
| Label xxxxxxx | |||
| ESC | |||
FREQUENCY & WIRELESS LOCATION GUIDELINES
2GHz Versus Sub-GHz Frequencies:
Sub-GHz frequencies provide superior reliability and range compared to higher frequencies, making them perfect for consistent communication across vast distances or in difficult conditions. Devices operating in the sub-GHz range, which refers to frequencies below 1 GHz, can transmit signals over significant distances and can penetrate physical barriers such as walls and buildings more effectively. Additionally, these frequencies experience less interference compared to those in the heavily congested 2.4-GHz band, which is commonly used by wireless devices.
In the United States, the 900 MHz band is a versatile frequency range that is utilized by various services, with the FCC overseeing its allocation and regulation.
In the European Union, the 868 MHz frequency is designated by ETSI as the Sub-GHz frequency.
In summary, if an application demands high data rates and more bandwidth in urban or densely populated areas where interference management is feasible, the 2.4 GHz frequency is a suitable choice. On the other hand, for applications requiring long-range communication and better obstacle penetration, particularly in rural or industrial settings with fewer regulatory constraints, a Sub-GHz frequency (<1 GHz) is a better option.
Installation Recommendations:
With the many factors that affect and/or interrupt a wireless signal such as walls, glass, metal, objects, and people, it is highly recommended to:
Install devices a minimum of 9.8 ft. (3m) above audiences and/or ground level where practical.
- Adjust the wireless antenna in a vertical upright position
- Position devices in direct line of sight of the controlling E-FLY device
Careful planning and testing of the selected installation location is critical to ensure optimum and reliable wireless operation.

9.8 ft (3m) Above Ground
FIRMWARE UPDATE
- First, turn on the fixture and ensure that Bluetooth is enabled.
- Next, open the Aria X2 app on your phone and press the 'Refresh' button. The app will search for devices and display the current software version of the fixture and Aria module.
- To update the fixture, press 'Update', select 'Aria X2', click 'Update Radios', then click 'Update Fixture'.
- Click the upload icon, select the fixture update file from your phone, and then click 'Update 1 Radio'. The fixture will begin updating, and after it finishes, the software file version and update date will be displayed.
- To update the Aria module, follow the same steps, but select 'Update Aria' instead.
MAINTENANCE GUIDELINES
DISCONNECT POWER BEFORE PERFORMING ANY MAINTENANCE!
FUSE REPLACEMENT
Locate and remove the unit's power cord. Once the cord has been removed, locate the fuse holder next to the power socket. Insert a flat-head screw driver into the slot, and gently turn the cover of the fuse holder. Remove the bad fuse, and replace with a new one. Double check silkscreen for fuse value (T1.25A/250V).
CLEANING
Frequent cleaning is recommended to ensure proper function, optimized light output, and an extended life. The frequency of cleaning depends on the environment in which the fixture operates: damp, smoky, or particularly dirty environments can cause greater accumulation of dirt on the fixture's optics. Clean the external lens surface periodically with a soft cloth to avoid dirt/debris accumulation.
NEVER use alcohol, solvents, or ammonia-based cleaners.
MAINTENANCE
Regular inspections are recommended to ensure proper function and extended life.
There are no user serviceable parts inside this fixture, please refer all other service issues to an authorized ADJ service technician. Should you need any spare parts, please order genuine parts from your local ADJ dealer.
Please refer to the following points during routine inspections:
- A detailed electrical check by an approved electrical engineer every three months, to make sure the circuit contacts are in good condition in order to prevent overheating.
- Be sure all screws and fasteners are securely tightened at all times. Loose screws may fall out during normal operation, resulting in damage or injury as larger parts could fall.
- Check for any deformations on the housing, rigging hardware, and rigging points (ceiling, suspension, trussing).
- Electric power supply cables must not show any damage, material fatigue, or sediments.
- NEVER remove the ground prong from the power cable.
TORQUE SETTINGS FOR SCREWS
IN ORDER TO MAINTAIN THE IP65 RATING ON THE LIGHTING FIXTURES, ALL SCREWS MUST BE TIGHTENED TO THE FOLLOWING TORQUE SPECIFICATION USING A TORQUE DRIVER.
Refer to the table and diagram below for torque specifications.
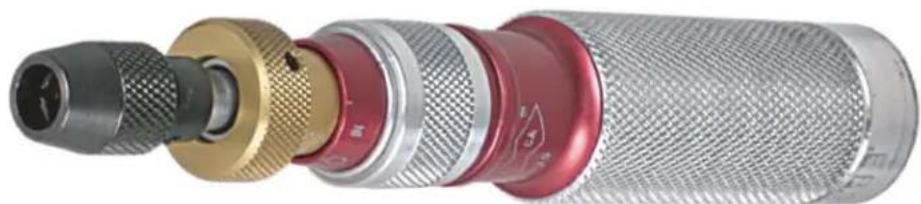
TORQUE DRIVERS (Recommended): UTICA TS-30 (shown)
ALTERNATE DRIVERS:
Proto J6107A
Wiha 28887

CAUTION! DO NOT OVER TORQUE SCREWS, AS THIS CAN CAUSE LEAKAGE ISSUES!
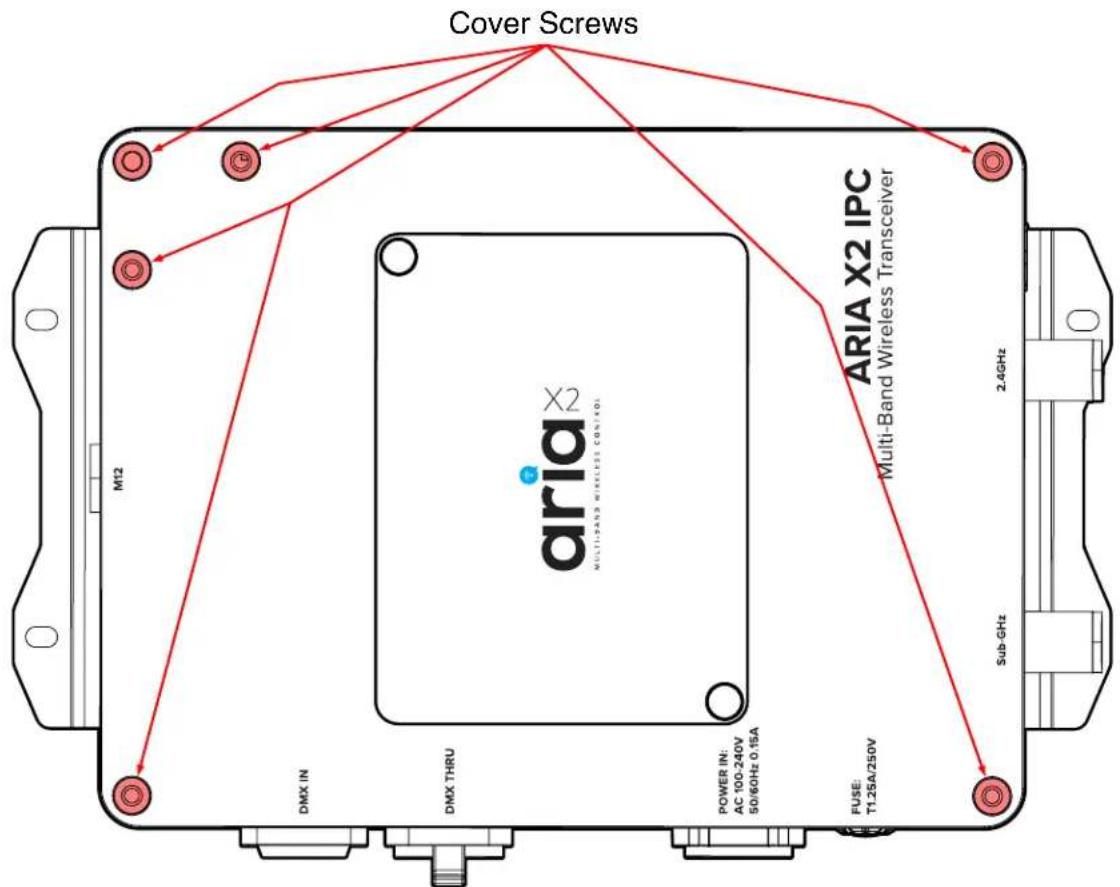
| LOCATION QUANTITY TORQUE | ||
| Cover 6 9.4 + 0.4 Lb-in (10.8 + 0.5 Kg-cm) | _ | |
IP TEST PARAMETERS
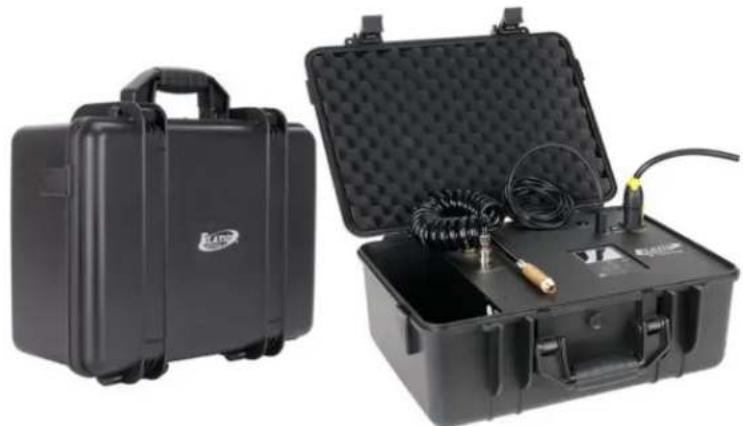
Following any repair or maintenance procedure that requires disassembly of the fixture, use Elation's IP Tester to confirm the IP integrity of the fixture. The air valve is located on the back panel next to the display screen, as shown in the diagram below. Please contact ADJ Service for information regarding the Elation IP Tester, or visit the product information page online at: https://www.elationlighting.com/ip-tester

CAUTION! THE USE OF PROTECTIVE GLOVES AND SAFETY GOGGLES IS STRONGLY RECOMMENDED WHILE PERFORMING THE IP PRESSURE TEST! AVOID PLACING YOUR FACE, EYES, HANDS, ETC IN CLOSE PROXIVITY TO THE FIXTURE'S LENS WHILE PERFORMING THE TEST!
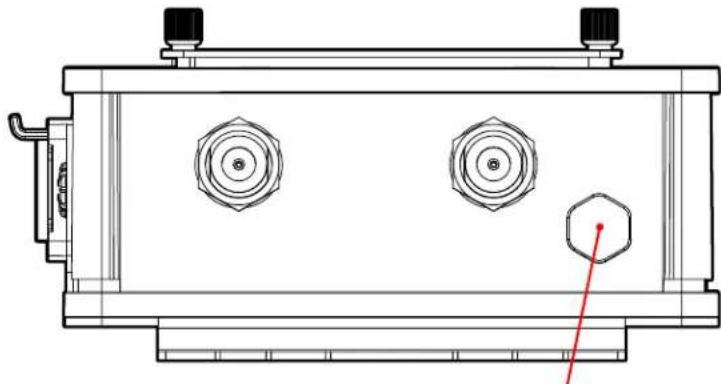
Air Valve
DE-HUMIDIFICATION: IP67 devices operating in high-humidity environments may experience residual fogging or condensation. Such fogging will not damage the device, and can be removed using the following procedure: position the unit with the air valve pointing upwards, then open the air valve and run the unit for 1-2 hours after reaching operating temperature. Then, while the fixture is still hot, reinstall the air valve and allow the unit to cool down. Please note that this procedure should be performed in a dry, air-conditioned environment. Avoid additional fogging by drying the device completely before placing into a road case.
| IP PRESSURE TESTING PARAMETERS | ||||
| Vacuum Test Target Value | Vacuum Test Minimum | Pressure Test Targete Value | Pressure Test Minimum Value | Hold Time |
| -5.8 psi (-40 KPa) | -5.1 psi (-35 KPa) | 5.1 psi (35 KPa) | 3.6 psi (25 KPa) | 30 sec |
SPECIFICATIONS
Features:
- Single DMX Universe
- Sub-GHz., 2.4 GHz, and Bluetooth
- Configuration via App (Coming Soon) or Front panel
- Wireless to DMX or DMX to Wireless
IP65 Housing
Supported Protocols:
- DMX (RDM is planned for future software release)
- Proprietary 802.15.4
- Aria X2 Mesh Protocol
- Bluetooth 4.2 (BLE)
- Aria X2 Serial Protocol (This is our proprietary serial protocol for communicating with a variety of fixtures.)
RF Characteristics:
Frequency range
-Bluetooth:2402-2480MHz
-Zigbee:2405-2480MHz
- Sub-GHz US: 906MHz-924MHz
Radio module: Aria X2
- Interference mitigation
- CSMA
- Adaptive frequency hopping (on the roadmap)
-OTA updates
Standards:
Health
- EN IEC 62311:2020
-
EN50665:2017
-BS EN IEC 62311:2020
-BS EN 50665:2017 -
Safety
-
EN IEC 62368-1: 2020+A11:2020
- BS EN IEC 62368-1: 2020+A11:2020
EMC
-ETSI EN 301489-1 V2.2.3 (2019-11)
-ETSI EN 301489-3V2.3.2 (2023-01)
-ETSI EN 301 489-17 V3.2.4 (2020-09)
- EN 55032:2015/A1:2020
- EN 55035:2017/A11:2020
- EN 61000-3-3:2013/A2:2021
- EN IEC 61000-3-2:2019/A1:2021
- BS EN 55032:2015/A1:2020
-BS EN 55035:2017/A11:2020
- BS EN 61000-3-3:2013/A2:2021
-BS EN IEC 61000-3-2:2019/A1:2021
Radio
- EN 300 220-1 V 3.1.1 (2017-02)
- EN 300 220-2 V 3.2.1 (2018-06)
- ETSI EN 300 328 V2.2.2 (2019-07)
Connectors:
- DMX: 5-pin XLR Input and Output
- Outdoor Locking Power Input and Output
Power:
Power Input: AC100-240V 50/60Hz
Power Consumption: 1.6W (16mA) @100V/60Hz, 2.2W (19mA) @120V/60Hz, 2.2W (10mA) @230V/50Hz
Power Fuse:T1.25A/250V.(5x20mm)
Physical:
IP65 Enclosure
- Front panel digital screen
M12 Threads
Max ambient operating temp range: -4°F to 113°F (-20°C to 45°C)
Max operating humidity: < 75%
Storage temperature: 77^ (25^)
Dimensions and Weight:
Length: 6.5" (164mm)
Width: 8.5" (215mm)
- Height: 1.7" (42mm)
3.5lbs (1.59kgs.)
DIMENSION DRAWINGS
Drawings not to scale
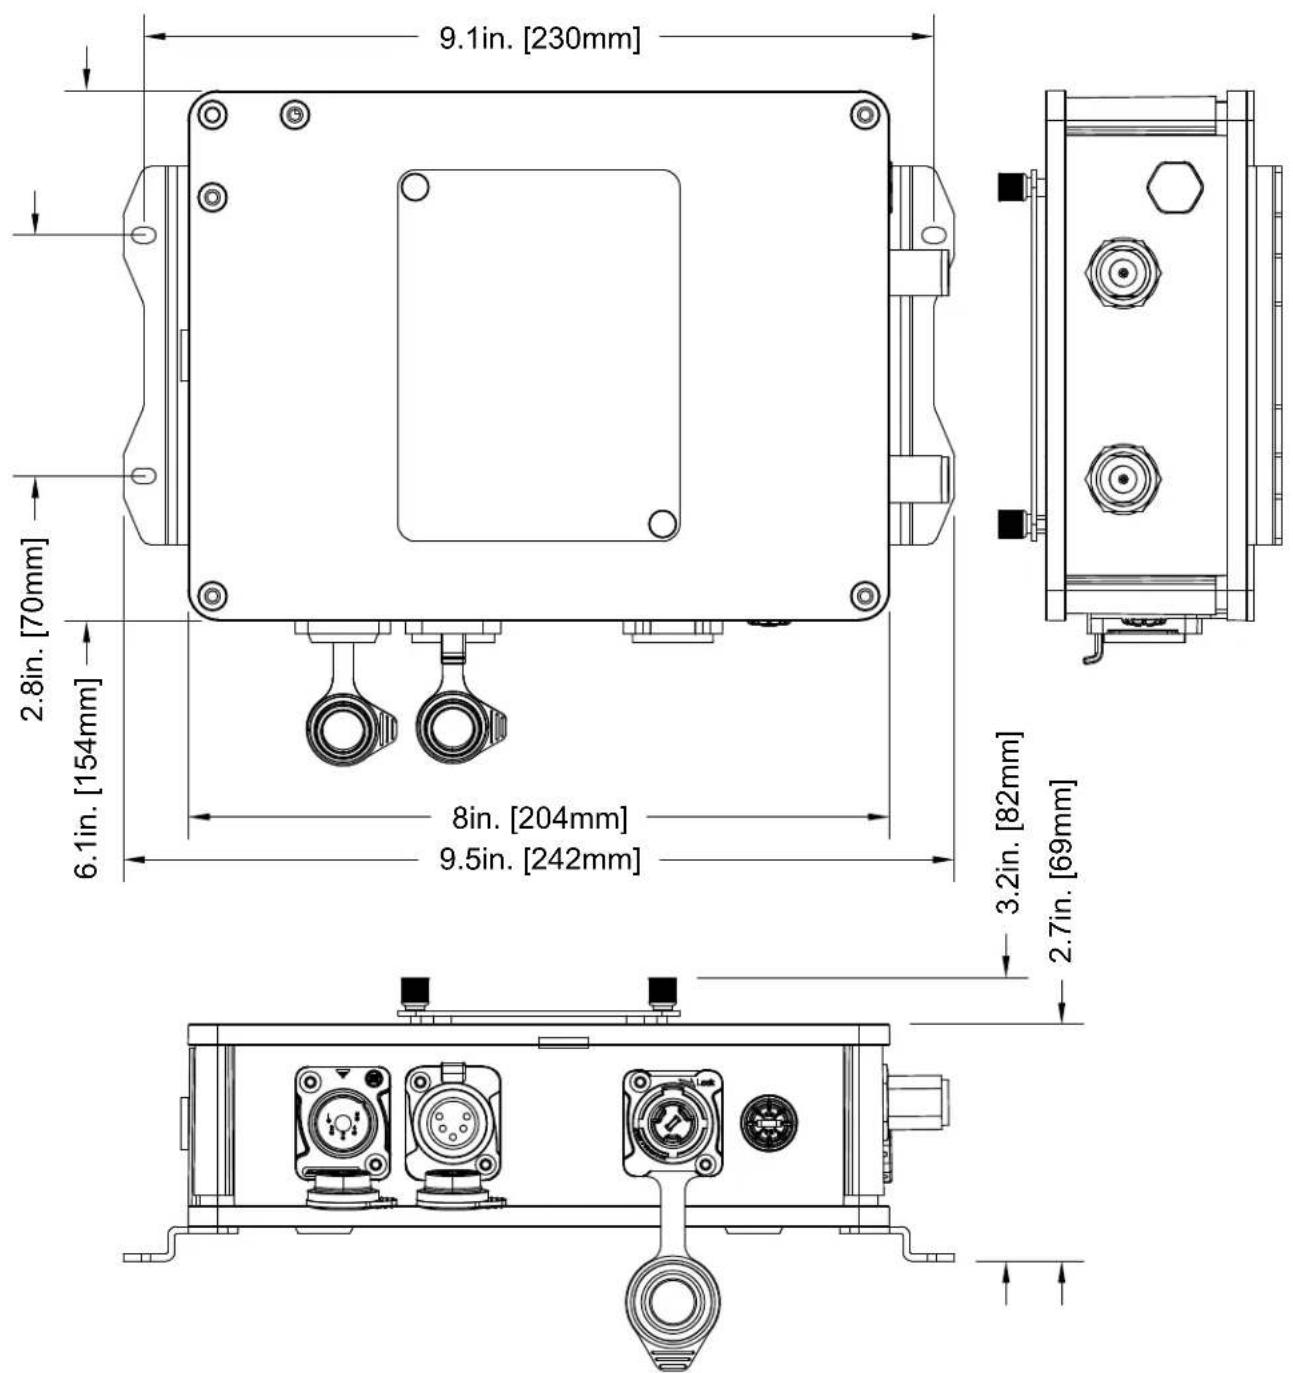
OPTIONAL ACCESSORIES
| ORDER CODE | ITEM | |
| US EU | ||
| AX2139 132100009 | 2 ARIA X2 IPC | |
| AX2113 132100009 | 0 ARIA X2 IPC BRIIDGE | |
| TOU027 N/A Tour Link 5P10 | ||
| Additional Cable Lengths Available | ||

FCC AND IC STATEMENT
This equipment complies with FCC's and IC's RF radiation exposure limits set forth for an uncontrolled environment. The antenna(s) used for this transmitter must be installed and operated to provide a separation distance of at least 20~cm from all persons and must not be collocated or operating in conjunction with any other antenna or transmitter. Installers must ensure that 20~cm separation distance will be maintained between the device and users.
This device contains licence-exempt transmitter(s)/receiver(s) that comply with Innovation, Science and Economic Development Canada's licence-exempt RSS(s). Operation is subject to the following two conditions:
- This device may not cause interference.
This device must accept any interference, including interference that may cause undesired operation of the device.
Changes or modifications to this unit not expressly approved by the party responsible for compliance could void the user's authority to operate the equipment.
NOTE: This equipment has been tested and found to comply with the limits for a Class B digital device, pursuant to Part 15 of the FCC Rules. These limits are designed to provide reasonable protection against harmful interference in a residential installation. This equipment generates, uses and can radiate radio frequency energy and, if not installed and used in accordance with the instructions, may cause harmful interference to radio communications.
However, there is no guarantee that interference will not occur in a particular installation. If this equipment does cause harmful interference to radio or television reception, which can be determined by turning the equipment off and on, the user is encouraged to try to correct the interference by one or more of the following measures:
- Reorient or relocate the receiving antenna.
- Increase the separation between the equipment and receiver.
- Connect the equipment into an outlet on a circuit different from that to which the receiver is connected.
- Consult the dealer or an experienced radio/TV technician for help.

arla
ARIA X2 IPC MANUEL DE L'UTILISATEUR
Elation Professional USA | 6122 S. Eastern Ave. | Los Angeles, CA. 90040
323-582-3322 | www.elationlighting.com | info@elationlighting.com
Elation Professional B.V. I Junostraat 2 I 6468 EW Kerkrade, The Netherlands
+31 45 546 85 66 | www.elationlighting.eu | info@elationlighting.eu
Elation Professional Mexico I AV Santa Ana 30 | Parque Industrial Lerma, Lerma, Mexico 52000
+52 (728) 282-7070
VERSION DU DOCUMENT
ELATION SERVICE USA - Monday - Friday 8:00am to 4:30pm PST 323-582-3322 | support@elationlighting.com
ELATION SERVICE EUROPE - Monday - Friday 08:30 to 17:00 CET +31 45 546 85 63 | support@elationlighting.eu
PIECES DE REMPLACEMENT - veuillez visitor parts.elationlighting.com

AVIS IMPORTANT!
CET APPAREIL NE CONTIENT AUCUNE PIECE REPARABLE PAR L'UTILISATEUR. N'ESSAYEZ PAS D'EAFFECTUER VOUS-MÉME UNE RÉPARATION. CELA ANNULERA LA GARANTIE DU FABRICANT. LES DOMMAGES RÉSULTANT DE MODIFICATIONS APPORTÉES À CET APPAREIL ET/OU DU NON-RESPECT DES CONSIGNES DE SECURITÉ ET DES DIRECTIVES CONTENUES DANS CE MANUEL ANNULENT LA GARANTIE DU FABRICANT ET NE SONT PAS SOUMIS À DES RÉCLAMATIONS ET/OU RÉPARATIONS AU TITRE DE LA GARANTIE.
CLASSE IP65
| PinConnection |
| 1 Com |
| 2 Data - |
| 3 Data + |
| 4 Not connected |
| 5 Not connected |

CONFIGURATION DMX
INSTRUCTION D'UTILISATION DE L'ARIA X2 IPC
- First, turn on the fixture and ensure that Bluetooth is enabled.
- Next, open the Aria X2 app on your phone and press the 'Refresh' button. The app will search for devices and display the current software version of the fixture and Aria module.
- To update the fixture, press 'Update', select 'Aria X2', click 'Update Radios', then click 'Update Fixture'.
- Click the upload icon, select the fixture update file from your phone, and then click 'Update 1 Radio'. The fixture will begin updating, and after it finishes, the software file version and update date will be displayed.
- To update the Aria module, follow the same steps, but select 'Update Aria' instead.
MAINTENANCE
DEBRANCHES L'ALIMENTATION AVANT D'EAFFECTUER Toute OPÉRATION D'ENTRETIEN !
REEMPLACEMENT DU FUSIBLE
ACCESSIONS OPTIONNELS
- DOCUMENT VERSION
- CONTENTS
- GENERAL INFORMATION
- INTRODUCTION
- Unpacking
- CUSTOMER SUPPORT
- IMPORTANT NOTICE!
- IP65 RATED
- NOTE: THIS FIXTURE IS INTENDED FOR TEMPORARY OUTDOOR USE ONLY!
- NOTE: NOT ALL FEATURES LISTED ARE AVAILABLE ON ALL FIXTURES; THE FOLLOWING INSTRUCTIONS MAY NOT APPLY. CONTACT SUPPORT FOR ADDITIONAL DETAILS.
- LIMITED WARRANTY (USA ONLY)
- WARRANTY RETURNS
- SAFETY GUIDELINES
- PROTECTION CLASS 1 - FIXTURE MUST BE PROPERLY GROUNDED
- OVERVIEW
- CONNECTIONS
- AC CONNECTIONS
- DMX CONNECTIONS:
- DMX SETUP
- ARIA X2 IPC AS TRANSMITTER
- ASSIGNING DEVICE LABELS
- INSTALLATION GUIDELINES
- ELECTRICAL CONNECTIONS
- POWER LINKING
- WALL MOUNT INSTALLATION
- TRUSS MOUNT INSTALLATION
- SETUP GUIDELINES
- LEGACY DEVICES
- FIXTURE IDENTIFICATION
- DETECTED DEVICES
- SECURITY
- SYSTEM MENU
- FREQUENCY & WIRELESS LOCATION GUIDELINES
- 2GHz Versus Sub-GHz Frequencies:
- Installation Recommendations:
- FIRMWARE UPDATE
- MAINTENANCE GUIDELINES
- DISCONNECT POWER BEFORE PERFORMING ANY MAINTENANCE!
- FUSE REPLACEMENT
- CLEANING
- MAINTENANCE
- TORQUE SETTINGS FOR SCREWS
- IP TEST PARAMETERS
- SPECIFICATIONS
- Features:
- Supported Protocols:
- RF Characteristics:
- Standards:
- Connectors:
- Power:
- Physical:
- Dimensions and Weight:
- DIMENSION DRAWINGS
- FCC AND IC STATEMENT
- arla
- ARIA X2 IPC MANUEL DE L'UTILISATEUR
- VERSION DU DOCUMENT
- AVIS IMPORTANT!
- CLASSE IP65
- CONFIGURATION DMX
- INSTRUCTION D'UTILISATION DE L'ARIA X2 IPC
- DEBRANCHES L'ALIMENTATION AVANT D'EAFFECTUER Toute OPÉRATION D'ENTRETIEN !
- REEMPLACEMENT DU FUSIBLE
- ACCESSIONS OPTIONNELS
Brand : Elation
Model : Aria X2 IPC
Category : Industrial electronics