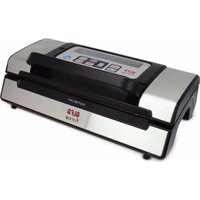
Force - Vacuum packaging machines ALFA - Free user manual and instructions
Find the device manual for free Force ALFA in PDF.


| Product Type | Vacuum Packaging Machine |
| Brand | ALFA |
| Model | Force |
| Main Functions | Automatic and manual vacuum, adjustable seal (dry, medium, extra), adjustable suction (medium, max), canister function, quick marinade, built-in cutter |
| Sealing Type | Double sealing bar |
| Cutting System | Bidirectional for rolls |
| Power Supply | 220-240 V ~ 50/60 Hz |
| Safety | Thermal protection, automatic stop, do not immerse |
| Maintenance | Clean with a damp cloth, do not use abrasive products |
| Available Spare Parts | Gaskets and sealing gaskets |
| Usage | Household use only |
| Max Consecutive Cycles | 10 (before 60-second pause) |
| Max Operating Temperature | 40°C |
Frequently Asked Questions - Force ALFA
User questions about Force ALFA
0 question about this device. Answer the ones you know or ask your own.
Ask a new question about this device
Download the instructions for your Vacuum packaging machines in PDF format for free! Find your manual Force - ALFA and take your electronic device back in hand. On this page are published all the documents necessary for the use of your device. Force by ALFA.
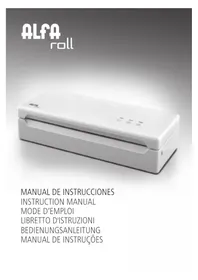
USER MANUAL Force ALFA
natural_image
Line drawing of a portable electronic device with control panel and display (no text or symbols)
natural_image
Repeating wavy black lines on white background (no text or symbols)
natural_image
Repeating wavy line pattern with no text or symbolsCONTENIDO / CONTENTS / CONTEÚDO / MATIÈRES
ES
The image is too blurry to recognize any text content.
Instructions and safety 6
Safety warnings 6
Function description ____ 6
Operating instructions 8
Cleaning and maintenance 9
Trouble shooting 9
Disposal process 10
The image is too blurry to recognize any text content.
natural_image
Repeating wavy line pattern with no text or symbols
natural_image
Repeating wavy line pattern with no text or symbols
natural_image
Repeating wavy line pattern with a circled number 1 at the center (no text or symbols beyond the number)natural_image
Wavy line pattern with a numbered circle at the center (no text or symbols)INSTRUCTIONS AND SAFETY
Thank you for choosing this product, which is designed to meet the highest standards of quality and reliability.
IMPORTANT
READ THIS MANUAL CAREFULLY BEFORE USING
SAVE THIS MANUAL FOR ANY FUTURE REFERENCE
Instructions should be considered as part of the product and must be maintained throughout the product life cycle.
If the equipment is transferred to another owner, all documentation must be submitted.
For a safe and proper use of the product, the user must carefully read the instructions and warnings in the manual as they provide important safety information and instructions for use and maintenance.
In case of loss of the instructions, contact the company at the following address:
Alfa Hogar, S.L.
info@alfahogar.com
SAFETY WARNINGS
-
Before using the product, check that the device is intact without visible damage. If in doubt, do not use the product and contact your dealer.
-
Keep the plastic bag in the package out of the reach of children: danger of suffocation.
-
Before connecting the product, make sure that the mains voltage data indicated on the sticker on the bottom of the product corresponds to the power supply.
-
This product should only be used for the purpose for which it was designed and in the manner indicated in the instructions. Any other use is not compliant and, therefore, is dangerous. The manufacturer is not liable for damages resulting from incorrect use.
-
This product can be used by children over 14 years of age.
-
The use and maintenance of this appliance may be performed by persons with reduced physical, sensory or mental capabilities or by inexperienced persons under the special supervision of an adult. Children should not play with the product.
-
Never leave the product unattended, turn it off after use and unplug it from the mains when not in use.
-
In case of malfunction, turn off the product without damaging it. For inquiries and repairs,
always contact your dealer.
- DO NOT plug, unplug or use the product with wet or damp hands or feet.
- DO NOT pull on the power cord or the unit to disconnect the plug from the power outlet.
- Treat the product carefully, protecting it from shock, extreme temperature variations, humidity, dust, sun and heat sources.
- Disconnect the plug from the outlet immediately after use and always before cleaning.
- If water falls on the product, do not attempt to take it, but immediately disconnect the plug from the power outlet.
- Attention! DO NOT interfere with the power cord for any reason. In the event of any damage, contact your dealer.
- Extend the cable over its entire length and keep it away from heat sources.
- Never use power supply adapters with different electrical requirements from the identification label attached to the unit.
- The machine is not protected against penetration of liquids.
- Do not touch the sealing strip when the product is on: danger of burns.
- NEVER immerse the product in water or other liquids.
- Avoid extreme fluctuations in temperature, humidity, dust, sun and heat sources.
ATTENTION! BEFORE USING THIS PRODUCT
- In extreme conditions of use (voltage 10% higher than nominal voltage and temperature around 40°C) intensive use of the machine could trigger automatic heat protection devices. In this case, it is necessary to wait until the device cools down before re-use.
- Do not perform more than 10 consecutive vacuum cycles. Beyond this limit, the thermal protection systems of the device can blow (we recommend waiting at least 60 seconds between two sealing processes).
- DO NOT store the machine with the handle blocked.
- This product is not suitable for professional use. Only domestic use is recommended.
FUNCTION DESCRIPTION
-
Vac&seal / Cancel: This button has two functions depending on the machine status:
-
At stand-by condition, it starts the automatic operation of vacuuming the bag and then automatically seals the bag when vacuum is complete.
-
At working (vacuuming or sealing operations) condition, it stops the machine.
-
Manual Vacuum: Press this button, and the device starts vacuuming. Undo, and it will stop.
This process can be repeated. Then press "manual seal" when meet desired pressure, turn to seal.
3.Sealing time: Three setting for choosing the best bag sealing time
- Dry mode: for dry bags and items without moisture, with a shorter heat sealing time.
- Medium mode: for wet bags or foods with a little moisture, with an moist heat sealing time.
- Extra mode: for wet bags or foods with very moisture, with an extended heat sealing time.
Default setting is Normal setting for dry bags and shorter sealing time.
-
Pressure: Two buttons for choice of different vacuum pressure:
-
Max. mode: for regular items storage in normal vacuum pressure.
-
Medium mode: for some soft & crushable items storage where less vacuum pressure is desired. Default setting is normal and high vacuum pressure.
-
Canister: To start vacuuming for canisters, jar lids, wine stoppers or other accessories through a hose.
-
Manual Seal: This button provides two functions:
-
To seal the open end of a bag without vacuuming air suction, used to make a bag from a bag roll.
-
When the automatic "Vac&Seal" function is in operation, this button stops the motor pump and immediately starts to seal the bag so that less vacuum pressure inside the bag can be controlled by the operator to avoid crushing for delicate items.
-
Marinate: Press to marinate food in a marinator bowl.
- Hose port: To insert the hose for canister and wine stopper before "marinates" or "canister" operations.
- Progress: This button is the numeric display apparatus and provides two functions
• Show that the progress of vacuuming
- Shows that the device is on and the lid is closed. When the LED winkles, please wait until it normally light, then you can start next operation.
-
Air Intake: Air intake connects with vacuum chamber and pump. Do not cover this intake when placing bag for vacuum and seal operations.
-
Vacuum chamber: Position the open end of the bag inside the chamber, draws air out of bag and catches any liquid overflow from the bag.
- Sealing strip: Place the bag to be sealed over this strip. Clean and dry or replace it when distorted or broken.
- Lower gasket: Keep air away by forming vacuum chamber with upper gasket in the vacuum chamber. Clean and dry or replace it when it is distorted or broken.
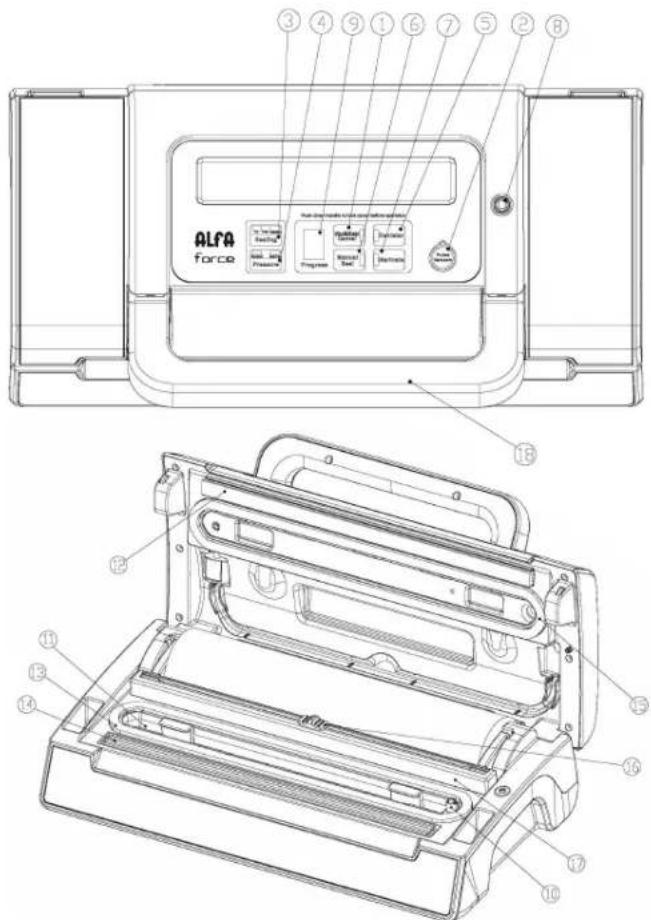
- Sealing element: Teflon-coated heating element which is hot and seals the bag.
- Upper gasket: Keep air away by forming vacuum chamber with lower gasket. Clean and dry or replace it when distorted or broken.
- Cutter: Press and slide in one direction or another to cut bags to a desired size.
- Cutter rack: Support the cutter to slide along
- Front handle: Press down to lock the cover. And rock to open the cover.
OPERATING INSTRUCTIONS
MAKING A BAG WITH BAG ROLL
- Open the top cover.
- Make sure the bag cutter is on one end of the cutter rack. Then put the cutter rack to the back.
- Pull out the bag to the suitable length you want.
- Put down the cutter rack and make sure it is on the right place of the bags, then slide the cutter from one end to the other end to cut the bag.
- Put one end of the bag on top of the sealing element into the bag fixture.
- Close the top cover and press tightly till you hear it click in place on both side.
- Press "Maunal Seal" button to start sealing the bags.
- Press the handle to open the cover and take the bag out of the machine. The bag is then done and is ready for vacuum sealing.
VACUUM PACKAGING WITH A BAG
- Put the items inside the bag. Use only the special designed vacuum bags supplied by us with vacuum channels.
- Clean and straighten the open end of the bag, make sure no dust, wrinkle or ripples.
- Place the open end of the bag within the vacuum chamber area. Make sure the air intake is not covered by the bag.
- Put the top cover down and press front handle to lock the top cover.
- Check the LED status of "Pressure" and the "Seal" to confirm sealing time depending on the moisture status of packed items (Max/Medium/Dry) and desired vacuum pressure (Max/Medium) according to the type of food.
6.Then press Vac&Seal button, the unit start to vacuum and will seal the bag automatically.
Note: This product provides very high vacuum pressure during vacuum packaging with a bag, in order to avoid crushing of the delicate item by the high vacuum pressure, observe the status of
the vacuum pressure inside the bag and switch the "Manual Seal" button immediately when the desired vacuum pressure is achieved. The pump will stop and change to heat-seal the bag.
- The vacuum packaging is done. Rock the handle to open the cover and take out the packed bags.
VACUUM PACKAGE IN A CANISTER & VACUUM BOWL
- Wipe the canister cover and base, and ensure they are clean and dry.
- Put the items into the canister and do not fill up too full so that the cover can be in good contact with the canister bowl rim. Clean the cover rim of the canister and bottom seal gasket of the canister cover.
- Insert one end of the hose into the air intake and another end of the hose into the center hole of the canister cover.
- Check the LED status of "Pressure" and make sure if it is in "Max" setting.
Press the canister button to start vacuuming. To ensure there is no air leaking between the cover and the canister, use your hand to push down the cover at the beginning of the vacuuming work. The machine will stop automatically when enough vacuum pressure is achieved.
- Take out the hose tube from the canister or bowl immediately first after the job is completed.
- In order to open the canister, you need to press the "Release" button on the canister cover.
Note:
- At the beginning of the vacuum packaging in a canister or a vacuum bowl, slightly press down the cover or on the hose adaptor to ensure no loose of the hose and to avoid air leaking through the gap between the cover and the canister top rim for a few seconds.
- To test vacuum, simply tug on the cover. It shall not move.
Instant marinade function
-
Take out the hose accessory from inside cover, insert it to canister port on unit and the center hole of canister cover.
-
Check the LED status of "Pressure" to confirm the desired vacuum pressure (Max/Medium) according to the type of food. The default option is Normal mode.
- Press Marinate button to start working. The indicator light during the course. It will release air automatically after finished vacuum, this is for 1 working cycle, this machine will total working for 5 cycles. It takes about 6 minutes to finish the process.
- When the indicator light crush out, the marinate process is completed. Pull off the hose accessory from canister port and canister cover.
Note:
- Do not press any button to interfere with the whole process
CORD STORAGE BOX
Put the power cord into the storage box when not use the machine which is in the back of the machine. Do not wrap the cord around the appliance.
CLEANING AND MAINTENANCE
Vacuum sealer
-
Always unplug the unit before cleaning.
-
Do not immerse in water or any other liquid.
-
Avoid using abrasive products or material to clean the unit, for they will scratch the surface.
-
Use a mild dishwashing soap and a warm, damp cloth to wipe away food residue or around components.
-
Dry thoroughly before using again.
Vacuum bags
-
Wash bags in warm water with a mild dishwashing soap
-
When wash bags in dishwasher, turn bags inside out and spread them over top rack of dishwasher, so entire surface is exposed to the washing water.
-
Dry thoroughly before reusing.
Important: To avoid possible illness, do not reuse bags after storing raw meats, raw fish or greasy foods. Do not reuse bags that have been microwaved or boiled.
Storing Your Vacuum Sealer:
-
Keep the unit in a flat and safe place, out of the reach of children.
-
Do remember to make sure the lid of appliance is unlocked when not in use and in storage. Keep the cover locked will distort the foam gaskets causing leaking.
TROUBLE SHOOTING
Nothing happens when I try to vacuum package
-
Check power cord to see if it is firmly plugged into electrical outlet.
-
Examine power cord for any damages.
-
See if electrical outlet is operative by plugging in another appliance.
-
If your appliance has a mode switch, make sure it is set to the correct mode. Refer to the above operating instructions
-
Make sure bag is placed correctly inside Vacuum chamber and beneath the air intake.
Air is not removed from the bag completely:
-
To seal properly, open end of bag should be resting entirely inside vacuum chamber area.
-
Check sealing strip and the foam gasket beneath the lid for debris and position. Make sure no breaking or distortion of the foam seal gaskets on both the cover and on the base around the vacuum chamber. Wipe clean and smooth them back into place.
-
Vacuum bag may have a leak. To test, seal the bag with some air in it, submerge in water, and apply pressure. Bubbles indicate a leak. Reseal or use another bag.
-
Uses only the specific vacuum bag with vacuum channels provided by the manufacturer.
-
Leaks along the seal which can be caused by wrinkles, debris crumbs, grease or liquids. Reopen bag, wipe the top inside of the bag and smooth it out along the sealing strip before resealing.
The machine does not turn to seal after vacuuming:
-
There is a vacuum pressure sensor built in this machine. The machine will not turn to seal automatically if the vacuum pressure inside the bag is not able to reach to the predetermined vacuum pressure. Check sealing strip and the foam gasket beneath the lid for debris and correct position. Wipe clean and smooth them back into place, and try again.
-
Make sure no breaking or distortion of the foam seal gaskets on both the cover and on the base around the vacuum chamber. Take it out from the groove, wash and dry it thoroughly, or replace with a new foam gasket (get it from where you brought or your nearest service center).
-
Vacuum bag may have a leak. To test, seal the bag with some air in it, submerge in water, and apply pressure. Bubbles indicate a leak. re-seal or use another bag.
-
Leaks along the seal which can be caused by wrinkles, debris crumbs, grease or liquids from the bag. Reopen bag, wipe the top inside of the bag and smooth it out along the sealing strip before resealing.
Air has re-entered into the bag after being sealed.
-
Leaks along the seal which can be caused by wrinkles, debris crumbs, grease or liquids. Reopen bag, wipe the top inside of the bag and smooth it out along the sealing strip before resealing.
-
The release of natural gases or fermentation form foods (such as fresh fruits and vegetables) may occur. Open bag, if you think food has begun to spoil, and discard food. Lack of refrigerator
or fluctuating temperatures in the refrigerator can cause food to spoil. If the food which is not spoil. Consume food immediately.
- Check the bag for a puncture or hole which may have released the vacuum. Do not vacuum packaging hard items with sharp points (like bones or cracks of nut shell). Cushion sharp edges in the contents of the bag with paper towels.
The bag melts:
Should sealing strip or sealing element be overheat and melt the bag, it may be necessary to lift the lid and allow sealing strip or heating element to cool for a few minutes.
The canister will not vacuum:
-
Make sure the adaptor was well connected both to the appliance and the canister firmly.
-
Check if the knob of the canister was on the position of "seal".
-
Press the lids OR on the hose adaptor at the very beginning of vacuuming to avoid leaking from the cover seal...
-
Check if there are significant damages or smashes, if yes, change it for a new one.
-
Check the function of the vacuum sealer.
-
Make sure the rim of the canister is clean enough. If all the above situations are excluded, please contact with the appointed service agency.
DISPOSAL PROCESS

This symbol on the product or its packaging indicates that this product should not be treated as household waste but must be delivered to a collection point for the recycling of electrical and electronic equipment (Dir. 2012/19 / UE-RAEE).
By ensuring that this product is disposed properly, you are helping to prevent potential negative consequences for the environment and the human health that could be caused by improper waste management of this product. Contact your local waste disposal service.

This product is adequate for domestic use.
Compliance is demonstrated by the CE marking on the device in relation to Directive 30/2014/EU regarding electromagnetic compatibility and 35/2014/EU for electrical equipment for use within certain voltage limits.
This product is an electronic instrument which has been verified to ensure, in the current state of technical knowledge, that it does not interfere with other devices placed around (electromagnetic compatibility) and to be safe if used in accordance with the instructions in the operating instructions. If the behavior of the device is abnormal, do not use it and contact the manufacturer.

INSTRUÇÕES E SEGURANÇA
INSTRUÇÕES PARA O USO
PROBLEMAS E SOLUÇÕES
natural_image
Line drawing of two rolled paper rolls (no text or symbols)Ref.: OMP2515000
2 Rollos de envasado 28cm x 6m

¡Escanéalo!
- CONTENIDO / CONTENTS / CONTEÚDO / MATIÈRES
- ES
- The image is too blurry to recognize any text content.
- INSTRUCTIONS AND SAFETY
- IMPORTANT
- READ THIS MANUAL CAREFULLY BEFORE USING
- SAVE THIS MANUAL FOR ANY FUTURE REFERENCE
- SAFETY WARNINGS
- ATTENTION! BEFORE USING THIS PRODUCT
- FUNCTION DESCRIPTION
- OPERATING INSTRUCTIONS
- MAKING A BAG WITH BAG ROLL
- VACUUM PACKAGING WITH A BAG
- VACUUM PACKAGE IN A CANISTER & VACUUM BOWL
- Instant marinade function
- CORD STORAGE BOX
- CLEANING AND MAINTENANCE
- Vacuum sealer
- Vacuum bags
- Storing Your Vacuum Sealer:
- TROUBLE SHOOTING
- Nothing happens when I try to vacuum package
- Air is not removed from the bag completely:
- The machine does not turn to seal after vacuuming:
- Air has re-entered into the bag after being sealed.
- The bag melts:
- The canister will not vacuum:
- DISPOSAL PROCESS
- INSTRUÇÕES E SEGURANÇA
- INSTRUÇÕES PARA O USO
Brand : ALFA
Model : Force
Category : Vacuum packaging machines