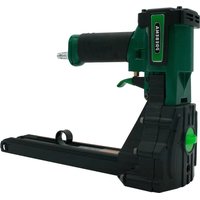
KTVH-B19D - Pneumatic stapler Prebena - Free user manual and instructions
Find the device manual for free KTVH-B19D Prebena in PDF.


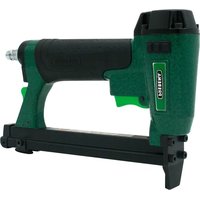
| Product type | Pneumatic carton stapler |
| Brand | Prebena |
| Model | KTVH-B19D |
| Dimensions (L x W x H) | 347 x 120 x 227 mm |
| Stapler weight | 2.05 kg |
| Operating pressure | 5 - 8.3 bar |
| Air consumption | 0.12 l/staple |
| Magazine type | Top loading |
| Trigger system | Sequential fire |
| Compatible fasteners | PREBENA staples type B and R (16-22 mm) |
| Operating temperature | -5 °C to +45 °C |
| Recommended accessories | Compressor, hose inner Ø 8 mm, PREBENA Spezial-Nagleröl oil |
| Maintenance and cleaning | Clean with dry or slightly damp cloth, oil regularly |
| Safety instructions | Wear PPE (goggles, helmet, clothing), disconnect before maintenance, do not point at yourself |
| Warranty | 1 year |
| Manufacturer | PREBENA Wilfried Bornemann GmbH & Co. KG |
| Sound level (LWA,1s) | 93 dB |
| Sound level (LpA,1s) | 89 dB |
Frequently Asked Questions - KTVH-B19D Prebena
User questions about KTVH-B19D Prebena
0 question about this device. Answer the ones you know or ask your own.
Ask a new question about this device
Download the instructions for your Pneumatic stapler in PDF format for free! Find your manual KTVH-B19D - Prebena and take your electronic device back in hand. On this page are published all the documents necessary for the use of your device. KTVH-B19D by Prebena.
USER MANUAL KTVH-B19D Prebena
natural_image
Black and white industrial tool device with multiple arms and control knobs (no visible text or symbols)Vorwort
GEFAHR
WARNING
VORSICHT

WARNUNG

WARNUNG
natural_image
Technical line drawing of a mechanical device with labeled parts (no readable text or symbols)! WARNING

VORSICHT
Magazin schließen
natural_image
Technical line drawing of a mechanical device with internal components and directional arrows (no text or symbols)WARNING
WARNING

Warnung
Nach dem Betrieb

WARNUNG

WARNUNG

WARNUNG

WARNUNG
This manual helps you to
• properly,
- safely and
- economically
use the following air-powered carton sealing staplers:
- KTVH-B19D
- KTVH-B22D
- KTVH-R19D
And use the following manually operated carton sealing staplers:
- KTVH-B19H
- KTVH-R19H
In this manual, these carton sealing staplers are abbreviated to "stapler unit".
We assume that each user of the stapling device has knowledge of air-powered equipment and the materials used. People without these skills must be trained by an experienced user in the operation of the stapler unit.
This manual addresses to the following people:
• People using this stapler unit,
• People cleaning this stapler unit or
• People who dispose of this stapler unit.
Each of these people must have taken not of and understood the contents of this manual.
This manual is part of the product. Always keep it close to the stapler unit. Pass on the manual, if you sell the stapler unit or make it available in any other way.
Table of Contents
Foreword 2
Table of Contents 3
Design characteristics 6
General design characteristics 6
Characteristics of hazard warnings 6
Characteristics of warnings to property or environmental damages . 7
Safety 8
Intended use 8
Improper use 8
Avoid risk of fatal injury....9
Avoid explosion hazards in air-powered stapler units 9
Avoid risks of injury....9
Avoid damage to the stapler unit....10
Description....11
Unit overview and delivery KTVH-B19D, KTVH-B22D, KTVH-R19D 11
Unit overview and delivery KTVH-B19H, KTVH-R19H .... 12
Mode of operation....13
Product features .... 13
Indicating labels on the stapler unit 13
Details on the nameplate....13
Accessories....14
Prepare stapler 15
Unpack stapler....15
Check the condition....16
Connect the stapler unit to the compressed air supply 17
Use with a gravity balancer 20
Operate stapler 21
Open the magazine 21
Insert fasteners 21
Close the magazine....23
Check function....24
Setting driving depths 25
Staple adjustment for pressure-operated staplers 27
Staple adjustment for manually-operated staplers 29
Check driving depths 30
Drive in the fasteners....30
Triggering air-powered stapler units 31
Triggering manually-operated stapler units 32
After operation....33
Disconnect compressed air supply 33
Remove compressed air hose (only for air-powered stapler units)....33
Emptying the magazine 33
Transport and store stapler 35
Packaging 35
Transport 35
Transport over short distances....35
Transport over long distances....37
Storage 37
Service stapler 38
Clean the housing and outer surfaces....38
Slight soiling ....38
Heavy soiling 39
Oil stapler unit....39
Faults 40
Remove jammed fasteners....40
Other faults 41
Fault overview....41
Order accessories 44
Reorder fasteners 44
Explanation of type designation ....44
Dispose stapler....46
Technical Data 47
Stapler unit KTVH-B19D, KTVH-B22D, KTVH-R19D 47
Stapler unit KTVH-B19H, KTVH-R19H 47
Manufacturer address....48
Warranty 49
Index 50
Design characteristics
General design characteristics
Various elements of the manual are provided with set design characteristics. This way you can easily distinguish whether it is normal text,
- enumerations or
▶ action steps.
i Tips contain additional information, such as specific information on the economic use of the stapler unit.
Characteristics of hazard warnings
All hazard warnings in this manual are based on the same pattern. There is a symbol on the left representing the type of hazard. To the right you can see another symbol and a signal word indicating the severity of hazard. Below is a description of safety hazard and information on how you can avoid this hazard.

HAZARD
Warnings containing the word HAZARD warn of hazards that directly cause serious injury or death.

WARNING
Warnings containing the word WARNING warn of hazards that could possibly cause serious injury or death.

CAUTION
Warnings containing the word CAUTION warn of hazards that could possibly cause minor or moderate injury.
Characteristics of warnings to property or environmental damages
ATTENTION
These warnings warn of hazards that cause property or environmental damages.
Safety
Observe and follow all warnings and instructions in this manual and on the stapler unit, when dealing with the stapler unit. The enclosed spare parts list is part of this manual.
Intended use
The stapler unit is used for sealing filled folding boxes made of cardboard materials. The use of the stapler unit to other materials is permitted only after consultation with the manufacturer. Intended use also includes compliance with accident prevention regulations and legal regulations and standards applicable at the site. Any other use is considered improper and may lead to damage or even personal injury.
Improper use
Improper use includes in particular operation
- by people without knowledge about the use of stapler units and materials used,
• of unauthorised altered stapler units,
• with accessories other than those specified in this - manual
• to compressed air sources not listed in this manual
PREBENA WILFRIED BORNEMANN GMBH & CO. KG assumes no liability for any damage caused by improper use.
Avoid risk of fatal injury
- Make sure that there are no body parts in the vicinity of the mouth opening during the triggering process and in every moment that the stapler unit is connected to the air supply.
- You may only trigger the stapler unit when the tool nose is pressed onto the material to be stapled.
- Do not let children play with packaging foils; there is risk of suffocation.
Avoid explosion hazards in air-powered stapler units
- Do not use the stapler unit in a potentially explosive atmosphere.
- Never operate the stapler unit with oxygen or other flammable gases or gas mixtures.
- Do not expose the compressor to temperatures above 100ircC .
Avoid risks of injury
- Keep the stapler unit out of the reach of children and other unauthorized people.
- Disconnect the stapler unit from the compressed air supply before transporting.
- Wear safety glasses, hearing protection and sturdy work clothes, when operating the stapler unit.
- Hold the stapler unit so that you cannot get hurt by a possible rebound.
- Use the stapler unit only if you have a secure footing.
Avoid damage to the stapler unit
- Never open the stapler unit. Always leave repair work to qualified personnel.
- Do not use the stapler unit, when it has been dropped or damaged. Have it checked by qualified personnel before operating it again.
- Do not connect the stapler unit to a compressed air supply, where the maximum operating pressure of 8 bar is exceeded.
- Assemble fixed mount stapler units only in securely anchored holders. The stapler unit should not be rotated or moved. The holder must not damage the stapler unit and its accessories.
Description
Unit overview and delivery KTVH-B19D, KTVH-B22D, KTVH-R19D
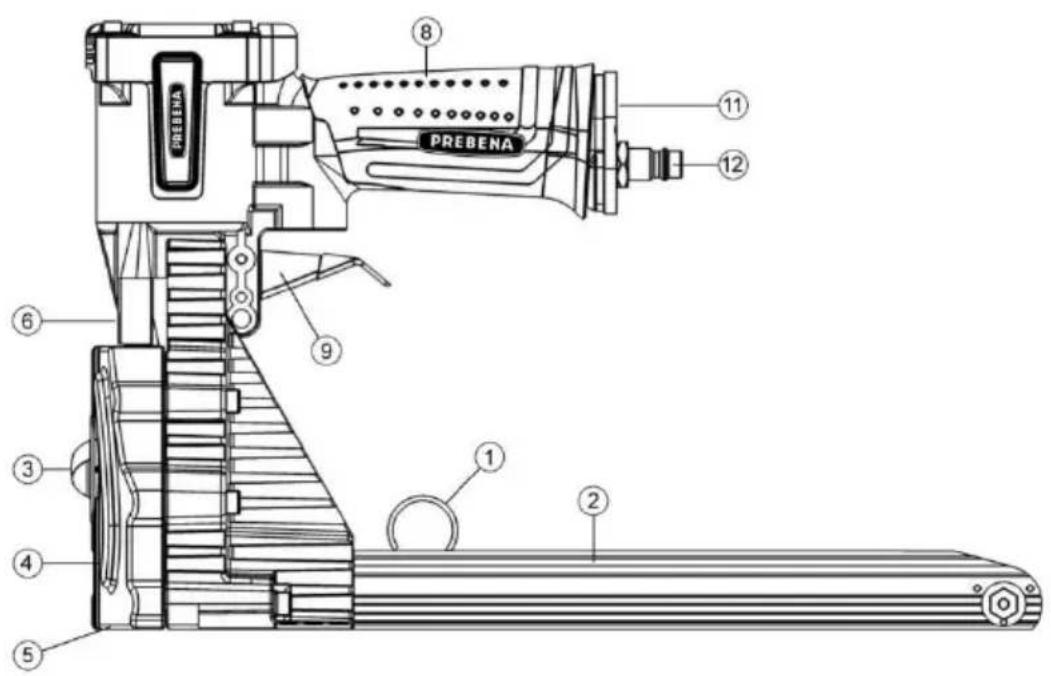
| No. | Explanation |
| 1 | Pusher |
| 2 | Magazine |
| 3 | Adjustment knob (depth adjustment) |
| 4 | Adjustment values (staple length adjustment) |
| 5 | Setscrew (fixing the staple length) |
| 6 | Adjusting disc (setting the bending form) |
| 8 | Handle |
| 9 | Release lever |
| 11 | Sound absorber |
| 12 | Compressed air connection |
Unit overview and delivery KTVH-B19H, KTVH-R19H
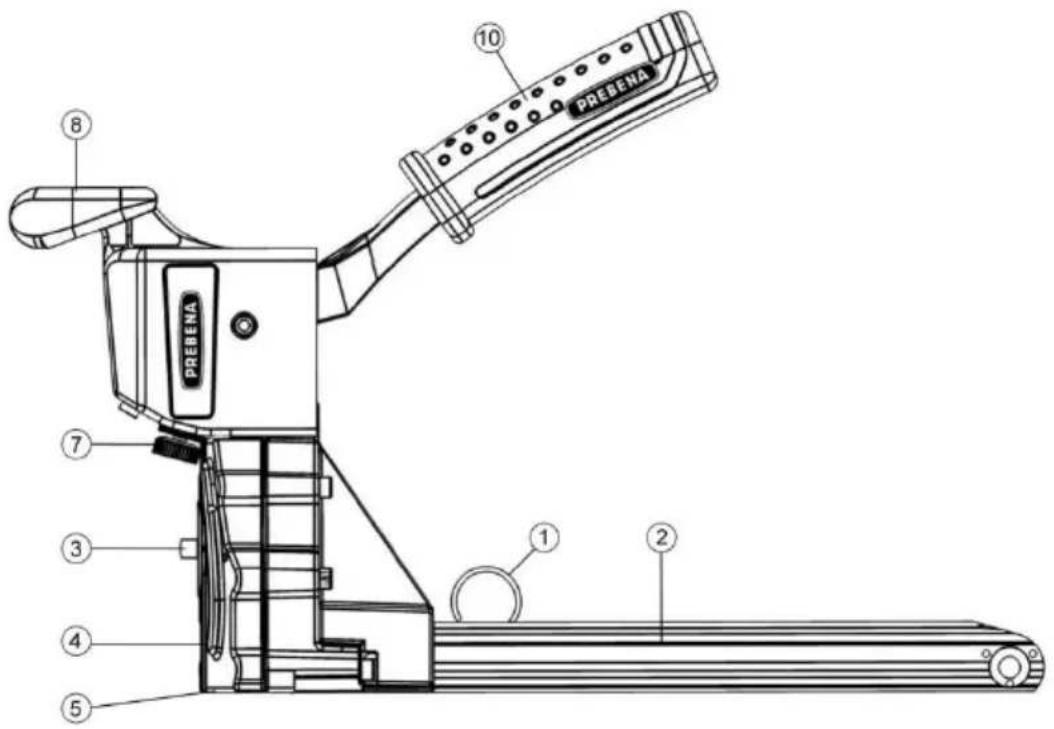
| No. | Explanation |
| 1 | Pusher |
| 2 | Magazine |
| 3 | Adjustment knob (depth adjustment |
| 4 | Adjustment values (staple length adjustment) |
| 5 | Setscrew (fixing the staple length) |
| 7 | Adjusting disc (setting the bending form) |
| 8 | Handle |
| 10 | Handle lever |
Mode of operation
The stapler unit is placed and triggered on the box to be closed. The staple is thereby driven into the box and bent there and anchored in the box. This way cardboard lid can be closed quickly and cleanly.
Excess pressure is derived by pressure relief valves.
You can adjust the stapler unit to be processed cardboard thickness and staple length.
Product features
The stapler unit has the following features:
• Magazine with top loader system,
- Adjustable driving depth of the staples,
- Adjustable bending images of the staples,
- Setting the staple lengths.
Indicating labels on the stapler unit
- The nameplate
Details on the nameplate
The nameplate is pasted on the inside front of the magazine holder. It contains the following details:
- the company name and full address of the manufacturer
- the name of the machine (DN - Type = Air-operated stapler unit or manually-operated stapler unit)
- the types name of the stapler unit
- the type name of usable fasteners
- the maximum allowable operating pressure (only for air-powered stapler units)
- the CE mark (The product conforms to the standards listed in the attached declaration.)
• the year of manufacture
Accessories
The following accessories are available for the stapler unit:
- Compressors for compressed air supply (not included),
- Spiral tube with 8 mm inner diameter and 4 m working length (not included),
- Compressed air hose set (not included),
- Hose reel (not included),
- Suspension eyelet for steady-state operation,
- Staples of Type B & Type R (see section "Order accessories" on page 44).
- PREBENA special nailer oil (not included).
The order numbers can be found in section "Order accessories" on page 44
Prepare stapler
Unpack stapler
▶ Remove the stapler unit from its packaging
▶ Remove all packaging material, such as foils, packing material and the packing carton.

WARNING
Choking hazard for children playing with packaging foils.
▶ Do not let children play with packaging foils.
▶ Keep packaging material out of the reach of children.
▶ Keep packing materials for future use.
▶ Store the carrying case for transporting the stapler.
The transport of the stapler unit is only permitted in the cardboard box.
Check the condition


WARNING
Risk of injury when operating a damaged stapler unit or not properly attached accessories.
▶ Check the condition of the stapler unit before use.
▶ Make sure that the stapler unit is in perfect condition.
▶ Check particularly the following points:
- All parts of the stapler unit and all accessories must be securely fastened.
- No parts of the stapler unit or accessory may have superficial damage such as scratches or dents.
- The hose line must be undamaged.

Scratches in the paint of the housing or the magazine are not considered damages.
▶ Do not connect a damaged stapler unit to a compressed air supply.
▶ Have a damaged stapler unit repaired by qualified personnel before operating it.
Connect the stapler unit to the compressed air supply
You can connect the stapler unit to a compressor or a compressed air system. (only valid for air-powered stapler units)
Operation with a compressor or a compressed air system is permitted only under the following conditions:
- The operating pressure of the compressor or compressed air system must be no more than 10% above the maximum operating pressure of the stapler unit. You can find information on the operating pressure of the stapler unit in this chapter on page 19.
- In compressed air systems with a higher pressure, a pressure-regulating valve (pressure reducing valve) with a downstream pressure-limiting valve must be installed in the compressed air supply.
- Compressed air must be filtered to be dry and lubricated with special PREBENA nailer oil.
-
A compressed air maintenance unit must be mounted on the clutch side at the suspension of the compressed air line to the stapler. This should contain
-
a filter,
- a water separator and
-
an oiler.
-
When using hose lengths over 10 m, it is not guaranteed that the drive-in device will be supplied with oil. We therefore recommend to add on working days two to five drops of the recommended oil into the air inlet of the device or to install a lubricator directly on the drive-in device.
- The compressed air system must also be able to maintain the operating pressure at the desired air extraction.
- The inner diameter of the air duct should be at least 8 mm.
- The connector for the stapler must be equipped with a quick coupling with NW 7.2 and with at least 6.5 mm inner diameter

CAUTION
The operation on compressed air systems that do not meet the aforementioned requirements may result in damage to the stapler unit.
▶ Operate the stapler unit only in suitable compressed air systems.
▶ Use the stapler unit only in perfect condition.
▶ Check the condition of the stapler unit (see page 16).
▶ Check the connection of the compressed air hose for debris and dirt, and clean it, if necessary.
▶ Set the operating pressure at the compressor pressure regulator at 5 - 8.3 bar.

WARNING
Accidentally triggering when connected to the compressed air supply can cause serious injury or death.
▶ Do not point the stapler unit at people or animals.
▶ Empty the magazine before connecting.

CAUTION
Damaged hoses can burst and cause injury.
▶ Check the compressed air system and the stapler unit for damages before connecting.
- Connect the stapler unit only to a functioning compressed air system.
ATTENTION
Damaged hoses can burst and cause property damage due to escaping air.
▶ Check the compressed air system and the stapler unit for damages before connecting.
- Connect the stapler unit only to a functioning compressed air system.
▶ Push the quick-release (1) of the compressed air hose to the connector (2) until it clicks into place.
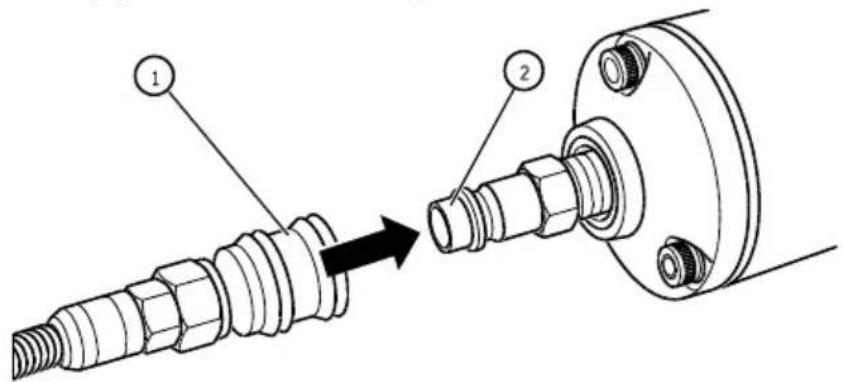
▶ Check the operating pressure at the pressure gauge of the compressor.
The maximum allowable operating pressure of the stapler unit is 8.3 bar.


WARNING
Danger of explosion if maximum operating pressure is exceeded.
▶ In this case, disconnect the air hose from the stapler unit immediately.
Use with a gravity balancer
You can use the air-powered stapler units with a gravity balancer. To attach the rope of the gravity balancer at the stapler unit, you must attach a suspension eyelet on the casing head. Proceed as follows:
▶ Remove the compressed air hose from the unit (see page 33).
▶ Empty the magazine (see page 33).
▶ Loosen and remove the two rear cylinder screws (15) on the housing head.
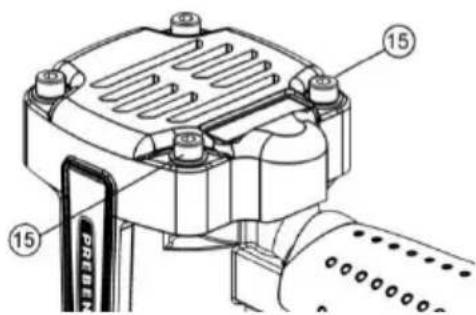
▶ Position the suspension eyelet (17) as shown below.
▶ Fasten the suspension eyelet (17) with the cylinder screws (15).
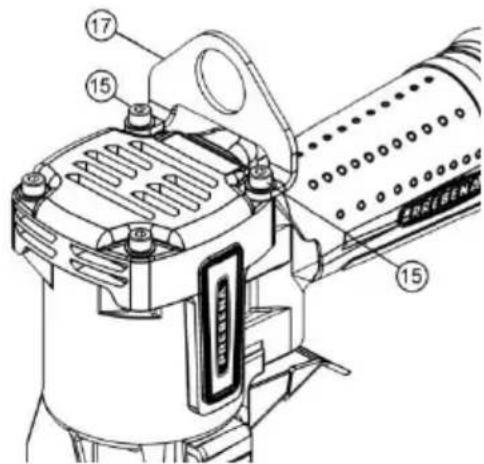
The suspension eyelet is now ready for use.
▶ Check the condition of the driving tool (see page 16)
The suspension eyelet (item number: Z85608001) is available as an accessory from PREBENA (see page 44)
Operate stapler
Open the magazine
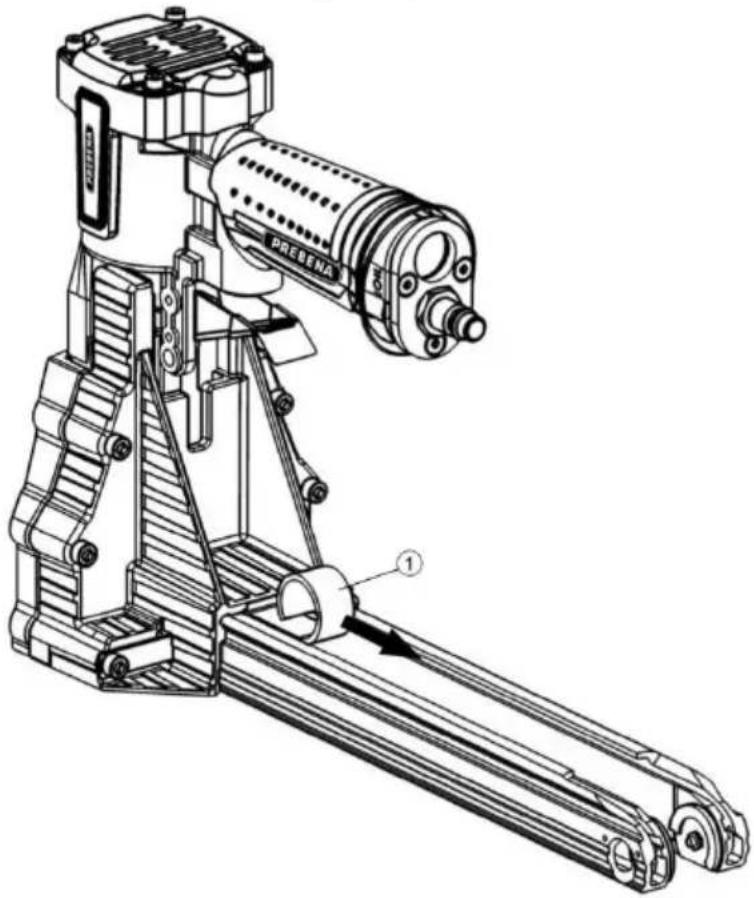
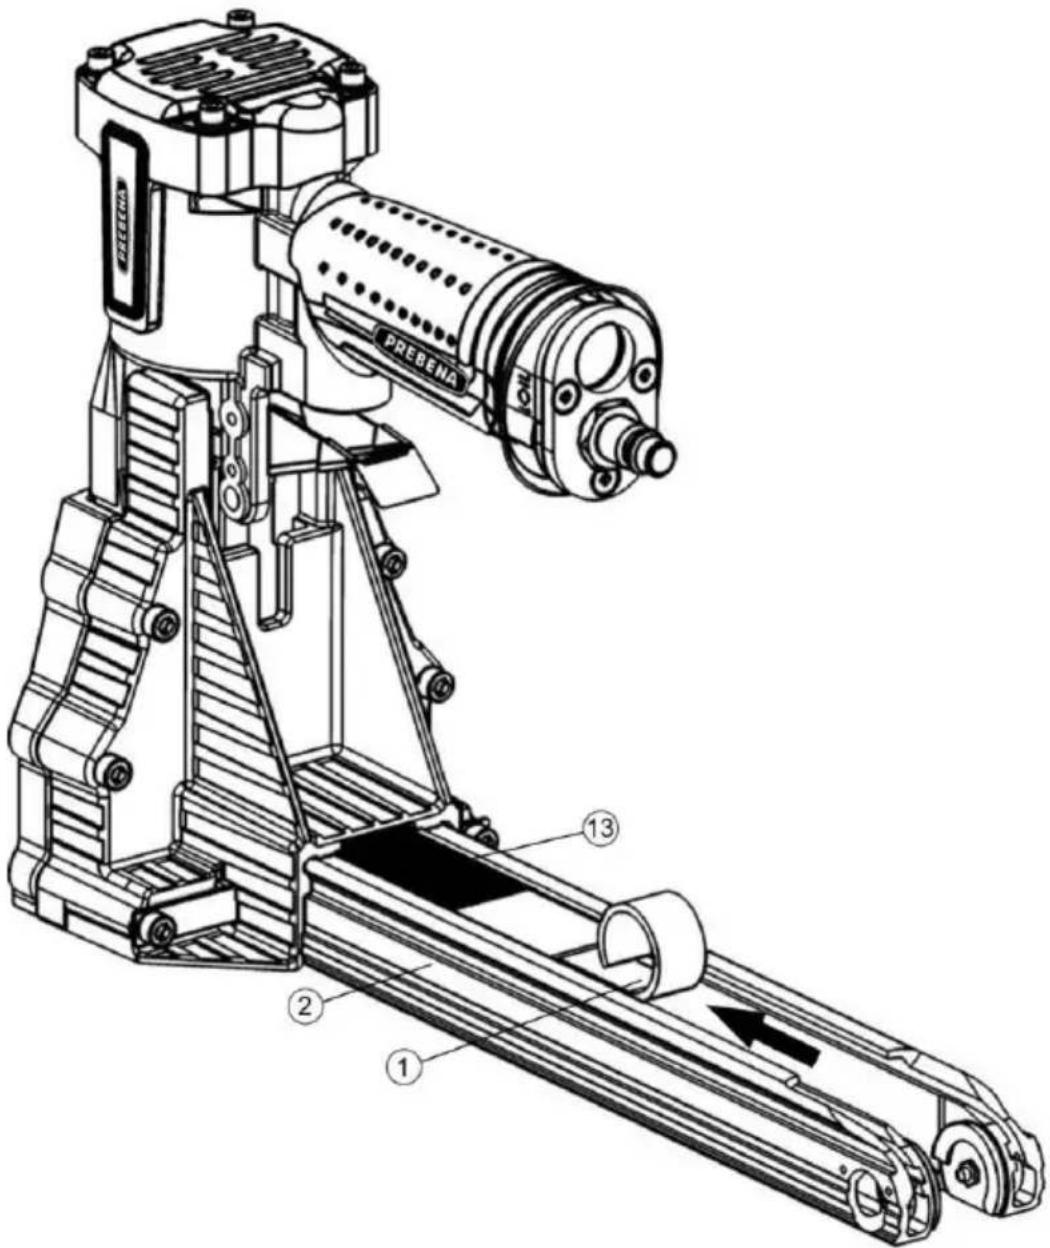
▶ To open the magazine, pull the pusher (1) according to the direction of the arrow to the back and place it at the magazine end around the pivot point on the bottom of the magazine.
natural_image
Technical line drawing of a mechanical device with labeled parts (no readable text or symbols)Insert fasteners

WARNING
Accidentally triggering when filling the magazine can cause serious injury or death.
▶ Do not point the stapler unit at yourself, other people or animals.

CAUTION
Wrong fasteners can lead to injuries that affect the proper function of the stapler unit or damage the stapler unit.
▶ Use only the PREBENA fasteners mentioned in the chapter "Order accessories" (see page 44).
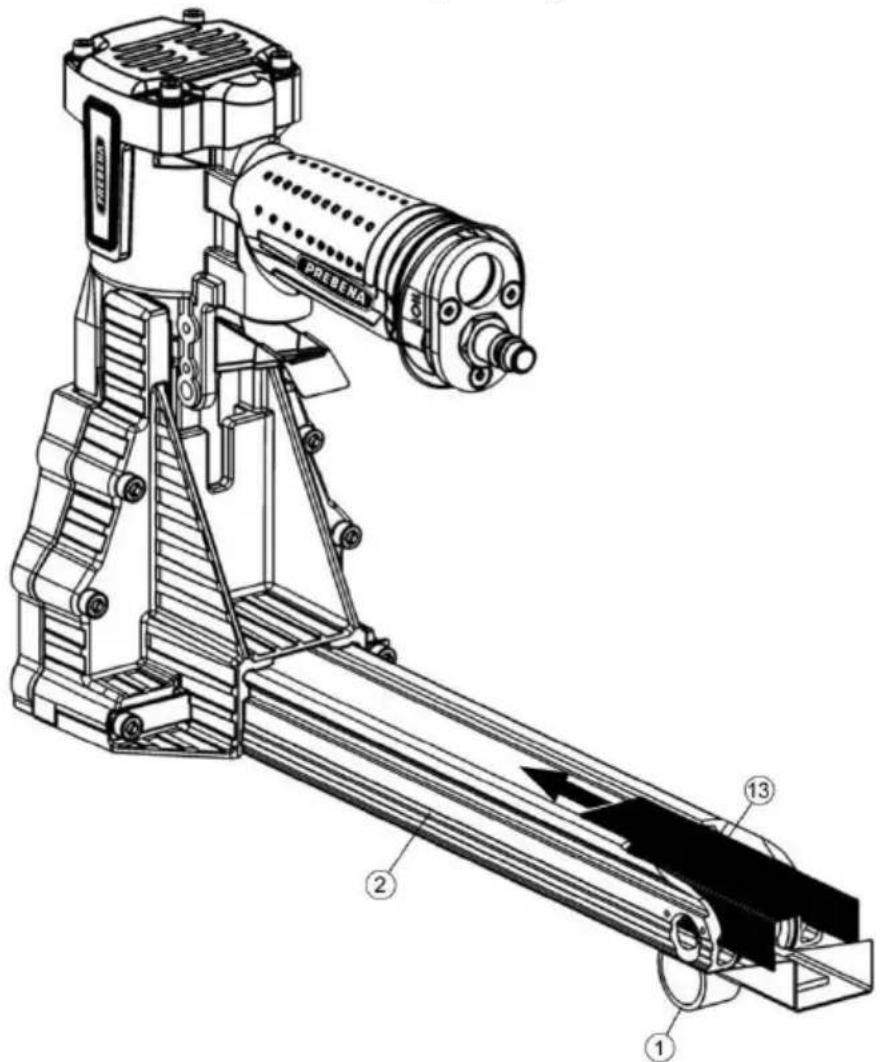
▶ Slide one or two stapler rods (13) from behind in the open magazine (2).
▶ Slide the fasteners (13) as far as possible according to the direction of the arrows pointing forward into the inlet.
Close the magazine
▶ To close the magazine (2), loosen the fixing of the pusher (1) and insert it slowly with the spring force against the fastener (13).
Check function
To ensure proper operation of the stapler unit, proceed as follows:
ATTENTION
▶ Observe the safety instructions in the chapter "Safety" on page 8.
▶ Place the mouth opening on a sample cardboard material with the thickness of the material to be processed.
Trigger the stapler device (see chapter "Drive in fasteners" on page 31).
▶ To do this, check the following properties:
- At each triggering a fastener must be driven in the cardboard material.
In order to obtain the desired bending image, change the staple setting (6/7) (see page 31), the depth setting (3) (see page 25) or the setting of staple length (9) (see page 26)
▶ W If necessary, repeat these steps.
The stapler unit is now ready for use.
Setting driving depths
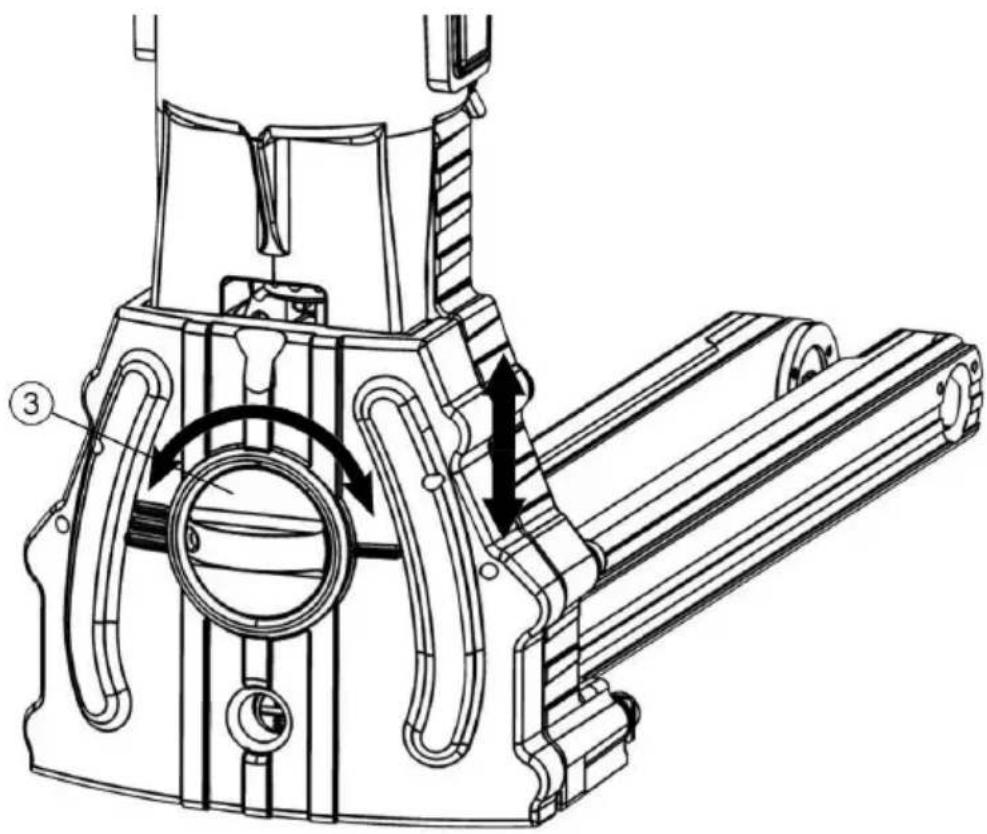
You can adjust the driving depth of the fastener into the cardboard materials by adjusting the depth setting of the adjusting knob (3).
▶ To reduce the driving depth, push the adjustment knob against the case and turn it to the right mark (/)
▶ To increase the driving depth, push the adjustment knob against the case and turn it to the left mark (///)
natural_image
Technical line drawing of a mechanical device with internal components and directional arrows (no text or symbols)Setting the staple length
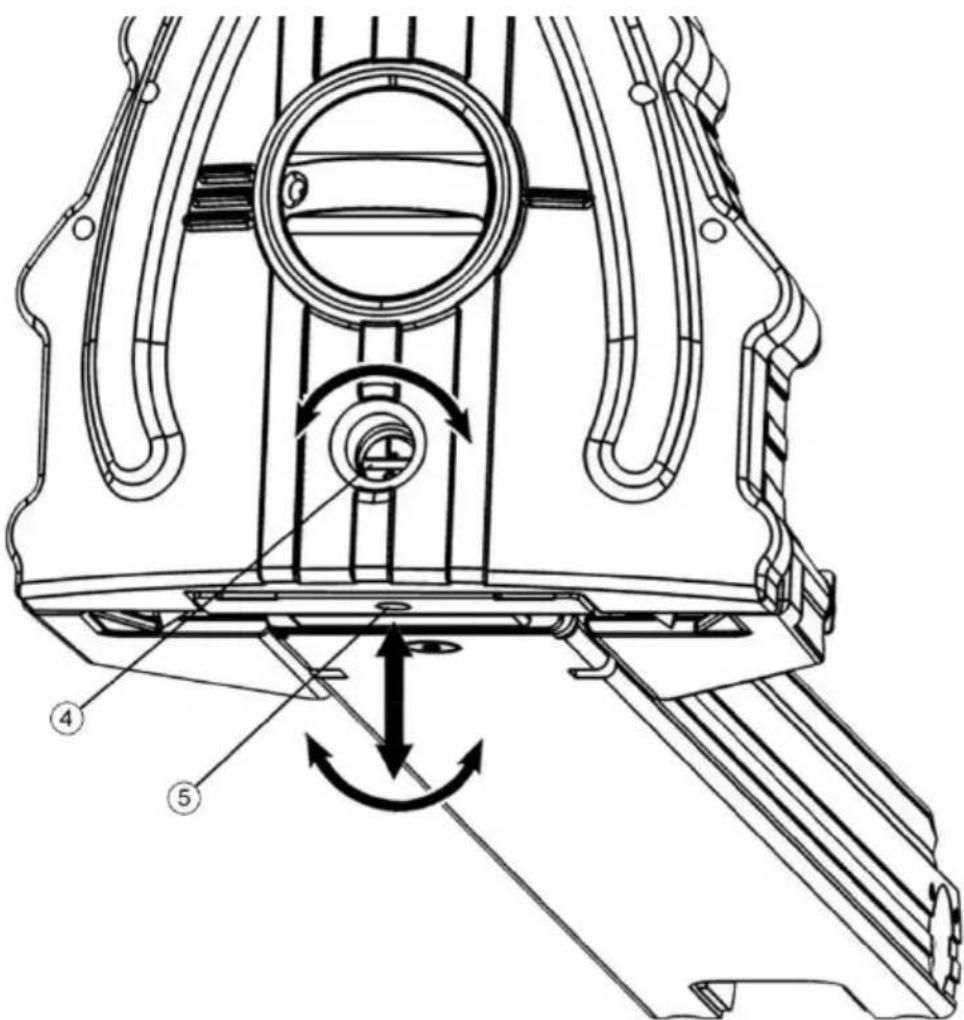
In order to achieve an optimal bending image you can adjust the stapler length of the stapler unit. Selection should be made between the S & L position.
▶ Loosen the setscrew (5).
▶ DTurn the adjusting shaft (4) to the respective position.
| Staple length | 16 mm | 19 mm |
| Position of adjusting shaft |  |  |
▶ Lock the adjusting shaft (4) again with the setscrew (5)
Staple adjustment for pressure-operated staplers
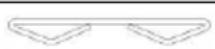
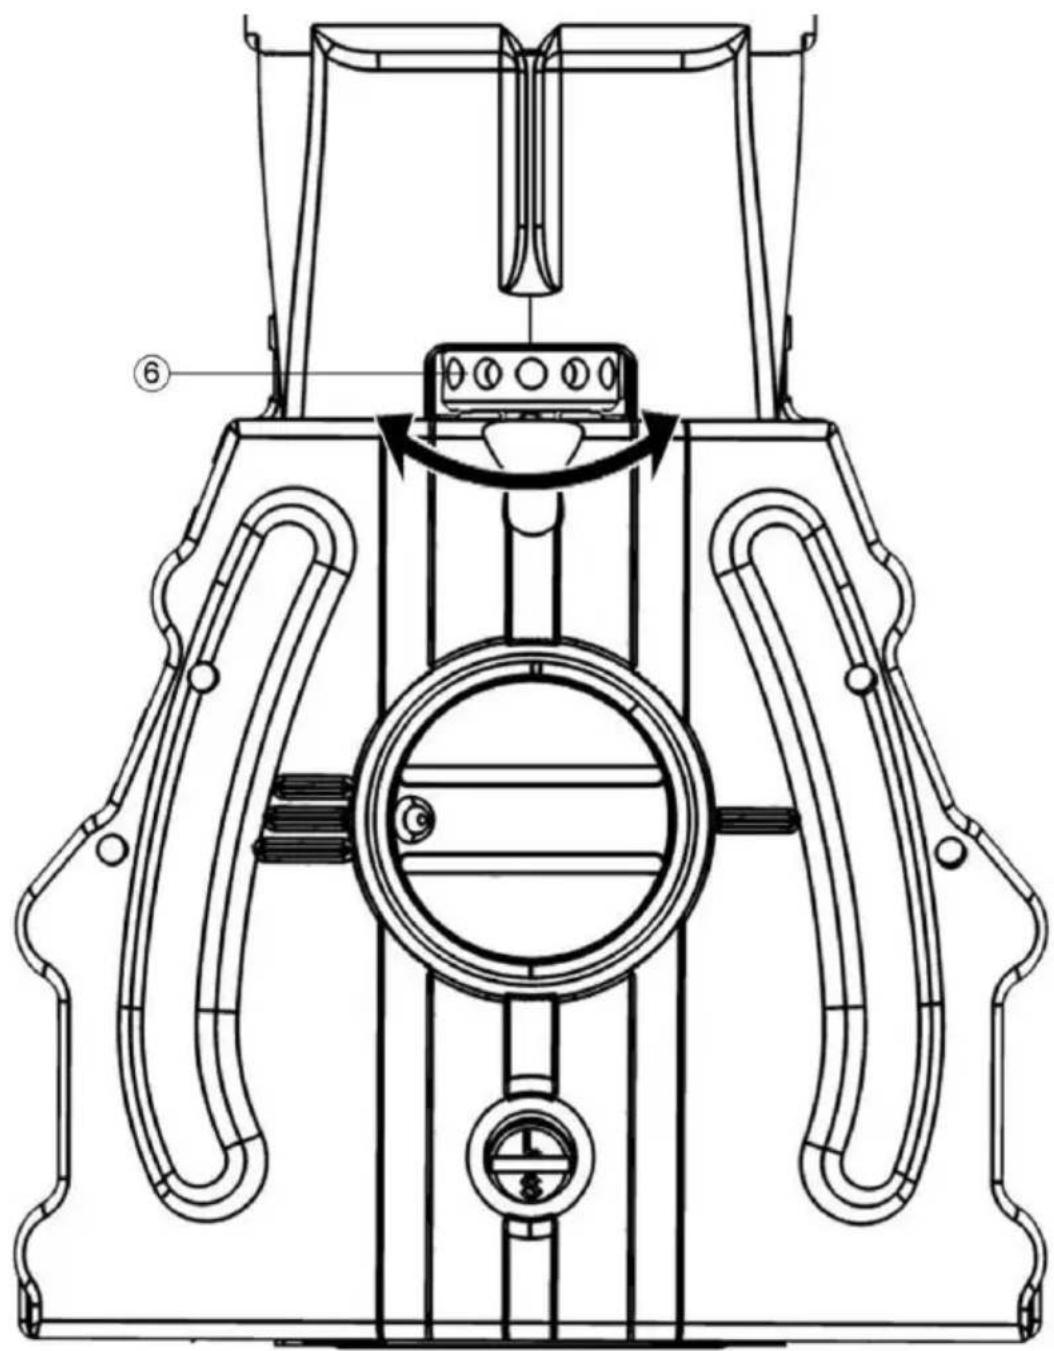
With the adjusting disc (6) the pressing of the stapler can be set. It is possible to bend the staple from very loose to very tight.
▶ Disconnect the stapler unit from the compressed air supply.
▶ Use a rod with a 3mm diameter of a 2.5mm Allen key.
▶ Turn the adjustment wheel (6) to the right to bend the staple very loosely.
▶ Turn the adjustment wheel (6) to the left to bend the staple very tightly.
| Position of the adjusting disc | 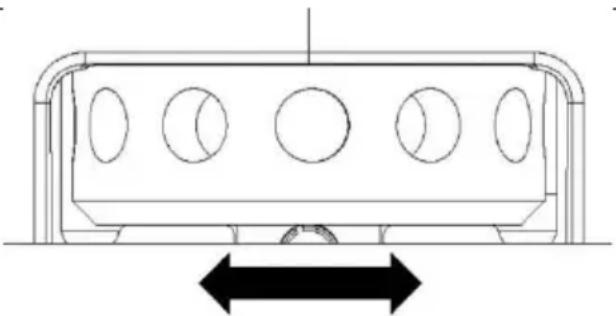 | ||
| Bending image of the staple | Tight | Standard | Loose |
 | |||
Staple adjustment for manually-operated staplers
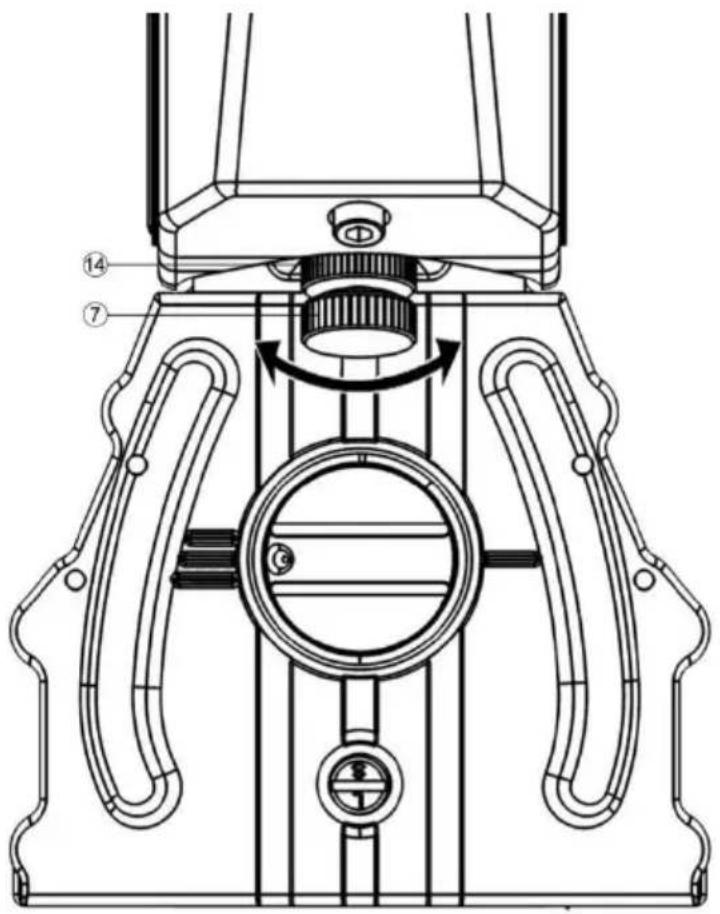
With the adjusting screw (7) the pressing of the stapler can be set. It is possible to bend the staple from very loose to very tight.
▶ Loosen the lock nut (14).
▶ Turn the adjustment screw (7) clockwise to bend the staple very loosely.
▶ Turn the adjustment screw (7) anti-clockwise to bend the staple very tightly.
▶ Then lock the adjusting screw (7) again with the lock nut (14)
| Position of the adjusting screw | 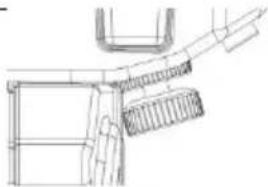 | 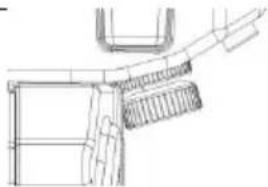 | 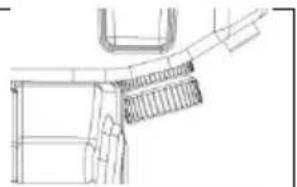 |
| Bending image of the staple | Tight | Standard | Loose |
Check driving depths
▶ Replace the stapler with the mouth of a cardboard material.
▶ Press the trigger button or the hand lever. A fastener is driven through the box and formed by both benders.
▶ Check the setting by a simple triggering on the sample material (see page 31).
▶ Repeat these steps until you have set the desired driving depth and staple bending.
Drive in the fasteners
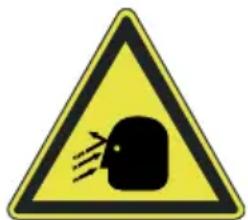

WARNING
During operation, eye damage or other injury may occur from flying splinters.
▶ Wear safety goggles during operation and suitable protective clothing.
▶ Comply with the applicable health and safety regulations.


WARNING
Hearing damage is possible due to loud noise operation.
▶ Wear suitable hearing protection.
▶ Comply with the applicable noise regulations.
▶ Select the lowest possible operating pressure.


WARNING
Risk of injury due to sliding and too deeply driven nails or due to rebound.
▶ Use the stapler unit only for cardboard materials.
▶ Hold the stapler during the stapling process with a firm grip.
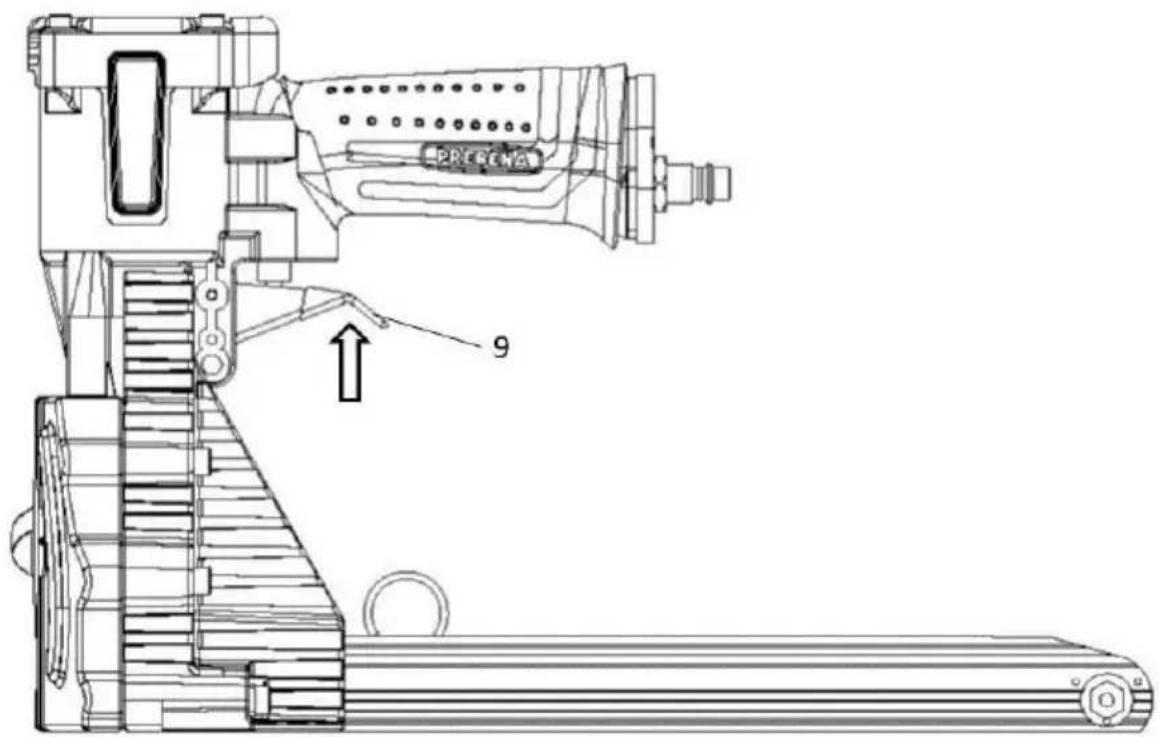
Triggering air-powered stapler units
▶ Replace the stapler with the mouth of a cardboard material.
▶ Press the trigger button. A fastener is driven through the box and formed by both benders.
▶ Check the setting by a simple triggering on the sample material (see page 30).
▶ Release the trigger (1).
▶ To drive in further fasteners, repeat these steps.
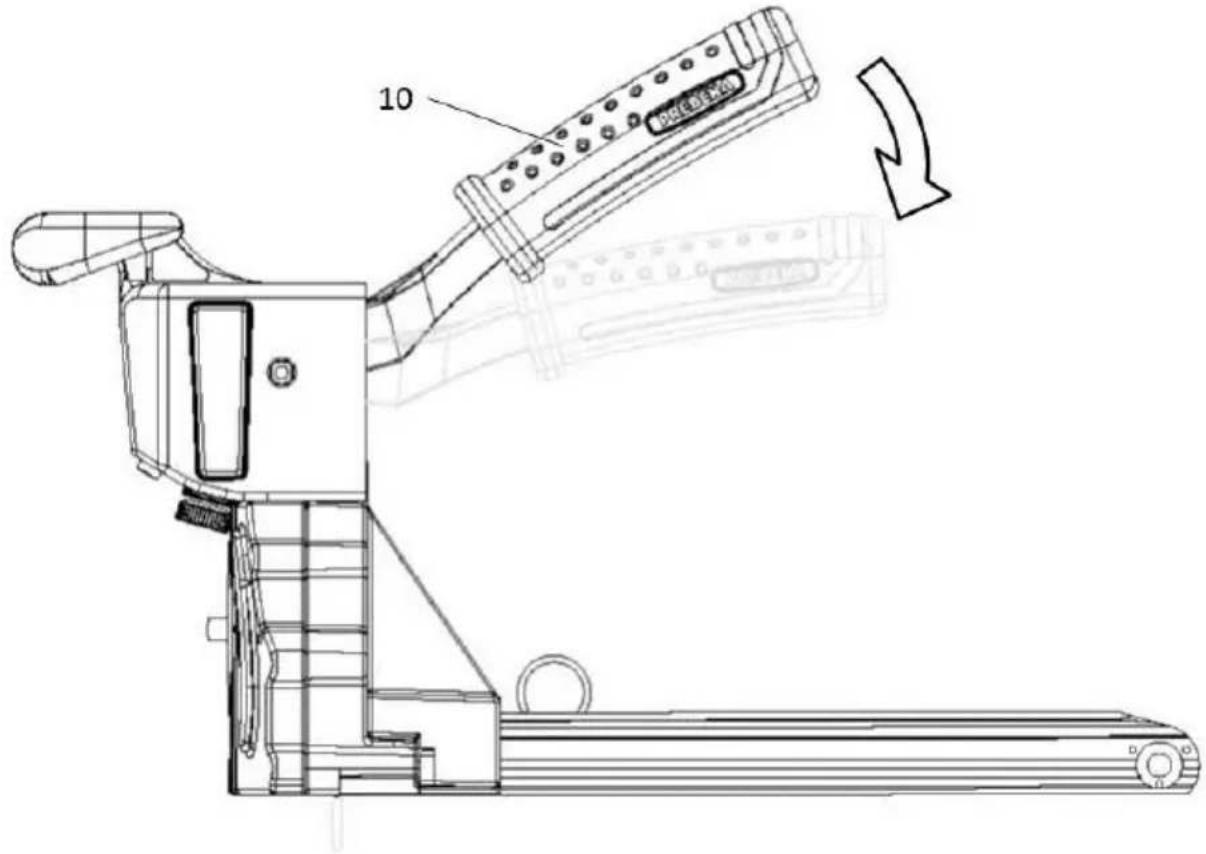
Triggering manually-operated stapler units
▶ Replace the stapler with the mouth of a cardboard material.
▶ Hold the handle (8) firmly.
▶ Press the hand lever (10) with the other hand and apply even pressure downwards until it stops.
A fastener is driven through the box and formed by both benders.
▶ Check the setting by a simple triggering on the sample material (see page 30).
▶ Move the hand lever (10) back into its original position.
▶ To drive in further fasteners, repeat these steps.
After operation
Carry out the steps described below after operation or during extended interruption of operation.
Disconnect compressed air supply
Remove compressed air hose (only for air-powered stapler units)
▶ Pull the quick release of the compressed air hose from the push-in nipples.
Quick release is now unlocked.
▶ Disconnect the compressed air hose from the connection from the stapler unit
The compressed air contained in the stapler unit escapes audibly.
Emptying the magazine
Remove the fasteners not used in the magazine, if you no longer use the stapler. To do this, proceed as follows:


WARNING
Accidentally triggering when emptying the magazine can cause serious injury or death.
▶ Disconnect the stapler unit from the compressed air supply (see page 33).
▶ Open the magazine (2) (see page 21).
▶ Slide the fasteners (13) remaining in the magazine to the back of the inlet.
▶ Remove the fasteners (13) remaining in the magazine (2).
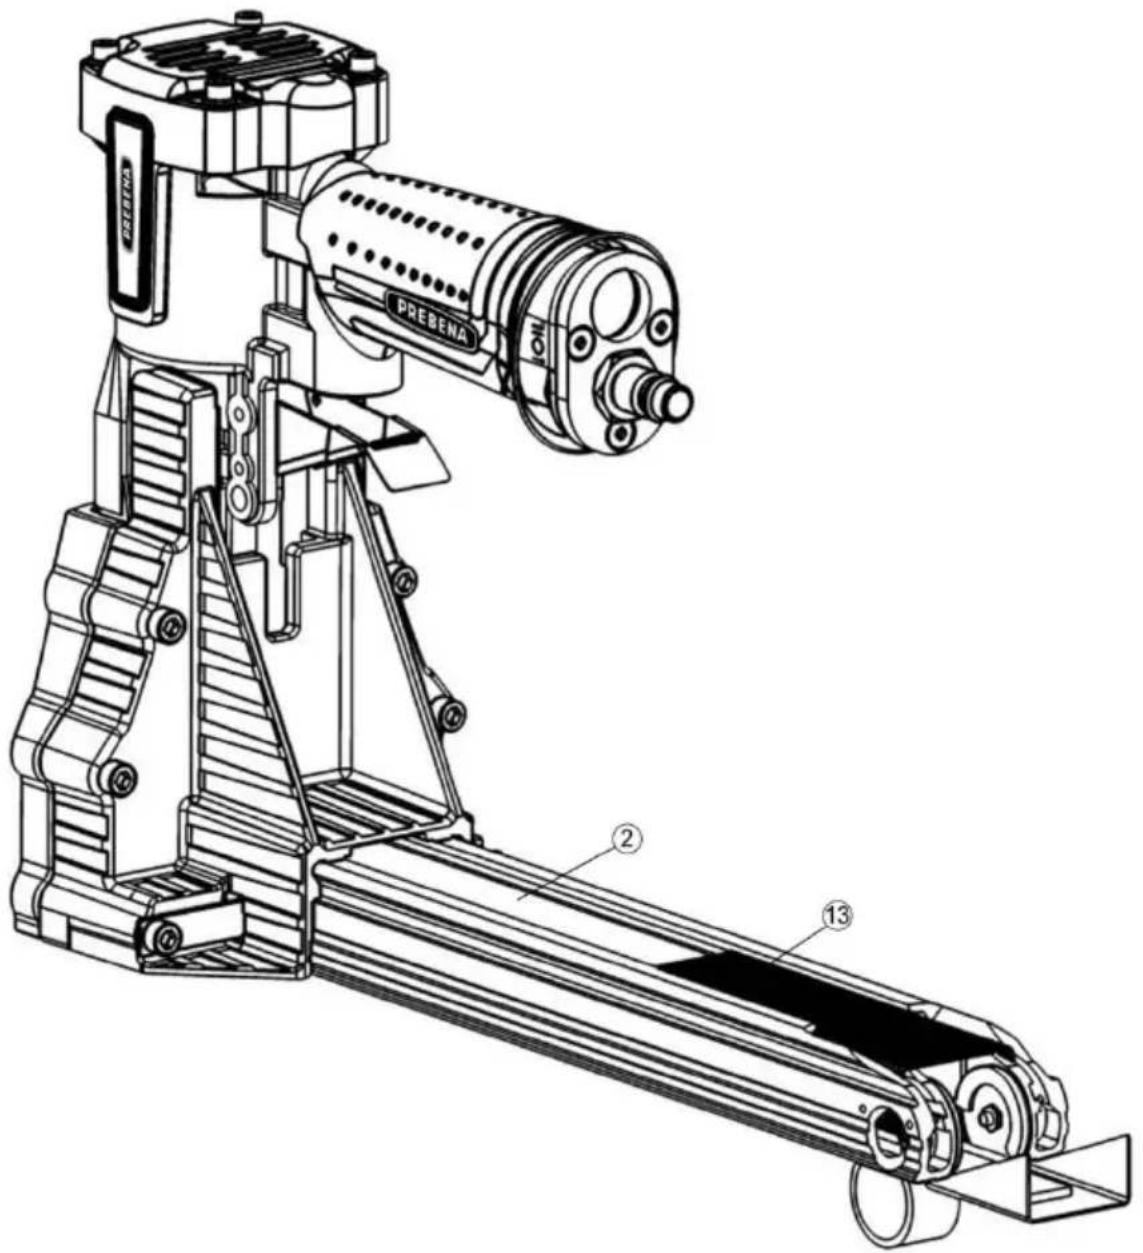
▶ Close the magazine (2) (see page 23).
Transport and store stapler
Packaging
Pack the stapler unit prior to storage or transport over the following distances:
• Distances longer than 10 m.
- Routes passing through unstable surface.
- Routes that are travelled in an unusual posture.
To do this, carry out the following preparatory steps:
▶ Disconnect the stapler unit from the compressed air feed (see page 33).
▶ Let the pressure escape completely from the stapler unit.
▶ Empty the magazine (see page 33).
▶ If necessary, clean the compressed air connections of foreign substances and impurities.
▶ Place the stapler unit in the carrying case.
▶ S Close the transport case and the latches for the lid.
Transport
The method of transport differs depending on whether you move the stapler unit over short or long distances.
Transport over short distances
Short distances are distances of up to 10 meters in length.


WARNING
Accidentally triggering can cause serious injury or death.
▶ Disconnect the stapler unit from the compressed air supply during each transportation (see page 33).
- Carry the stapler unit by the handle.
▶ Do not touch the trigger button during transport.
▶ Disconnect the stapler unit from the pressure supply (see page 33).
ATTENTION
Shock or impact can cause damage to the stapler unit.
▶ Do not drop the stapler unit.
▶ Protect the stapler unit from bumping on obstacles.
- Carry the stapler unit by the handle with the mouth opening facing down.
▶ Connect the compressed air supply again only at the new site.
Transport over long distances
The following distances are considered as "long distances" transporting the stapler device:
• Distances longer than 10 m,
- Routes passing through unstable surface and
- routes that are travelled in an unusual posture.
To transport the stapler over long distances, proceed as follows:
Pack the stapler unit in the supplied carrying case (see page 35).
▶ Carry the carrying case by the handle to the desired location.
- Place the carrying case only horizontally only, with the cover side facing up.
Storage
▶ Oil all metal parts of the stapler unit thinly with PREBENA special nailer oil.
▶ Pack the stapler unit in the carrying case (see page 35).
- Store the stapler unit at room temperature in a dry and dust-protected place.
Service stapler
The stapling device should be serviced only by persons who have the knowledge, skills and experience to do so. All work described herein may only be carried out by the customer service of the manufacturer or the manufacturer.

WARNING
Accidentally triggering when servicing the stapler unit can cause serious injury or death.
▶ Disconnect the compressed air supply before servicing the stapler device (see page 33).
▶ Empty the magazine prior to maintenance work (see page 33).
Clean the housing and outer surfaces
ATTENTION
The stapler unit or the accessories may be damaged due to unsuitable cleaning agents.
▶ To clean, use only a dry, slightly damp or a cloth moistened with mild soapy water.
Slight soiling
▶ Wipe the outside of the stapler unit with a dry cloth.
▶ Oil all metal parts of the stapler unit thinly with PREBENA special nailer oil.
Heavy soiling
▶ Wipe the outside of the stapler unit with a cloth slightly moistened with mild soapy water.
▶ Then wipe the outside with a cloth slightly moistened with tap water.
▶ Rub with a dry, soft cloth.
▶ Oil all metal parts of the stapler unit thinly with PREBENA special nailer oil.
Oil stapler unit
ATTENTION
Insufficient lubrication or using incorrect lubricants can damage the stapler unit.
▶ Use only PREBENA special nailer oil.
If no lubricator is mounted and the length of the air line to the stapler unit exceeds 10 m, sufficient lubrication is not guaranteed.
In these two cases, fill two to five drops PREBENA special nailer oil, one day prior to start of operation, directly into the connection for compressed air source.
ATTENTION
In case of spillage of lubrication oil, there is a risk of environmental damage.
▶ Bind any spillage of oil with a binding agent.
▶ Gather bound oil with a cloth.
▶ Dispose of the rag in accordance with the legal regulations applicable at the site.
Faults


WARNING
When operating a damaged or faulty stapler unit serious or fatal injuries may occur.
▶ Disconnect the stapler unit immediately from the compressed air supply in case of fault (see page 33).
▶ Empty the magazine (see page 33).
▶ Use the stapler unit only when the problem is resolved.
ATTENTION
The stapler unit can be damaged by unauthorized people during repairs.
▶ Make sure that repairs to the stapler unit are only performed by the manufacturer.
Remove jammed fasteners
To remove a jammed fastener, proceed as follows:
▶ Disconnect the stapler unit from the compressed air supply (see page 33).
▶ Empty the magazine (see page 33).
▶ Pull back the pusher and snap it on.
▶ Loosen the jam in the device with a thin pair of pliers or a screwdriver
▶ Move the pusher again carefully into position.
▶ Remove the jammed or deformed fasteners.
▶ Connect the compressed air supply (see page 17).
▶ Fill the magazine as described on page 20.
▶ Check the functioning of the stapler unit (see page 24).
If you cannot eliminate the fault, contact your dealer or the manufacturer (see page 48).
Other faults
If a fault occurs on the stapler unit that you cannot resolve by oiling and cleaning, you must notify PREBENA service.
▶ Do not make any repairs to the stapler unit.
▶ Make sure that all faults of the stapler unit are remedied by PREBENA service.
Fault overview
In the following overview, possible faults and the necessary measures are listed.
| Symptom | Possible cause | Corrective actions |
| The stapler unit loses air. | The mounting screws are loosened. | ▸ Tighten the mounting screws. |
| A seal is broken. | ▸ Contact customer service (see page 48). | |
| Fasteners are not fully driven. | The operating pressure is too low. | ▸ Increase operating pressure (see page 17). |
| The driver tip on the stapler unit is worn. | ▸ Contact customer service (see page 48). | |
| Triggering is not possible. | The operating pressure is too low. | ▸ Increase operating pressure of the compressed air system to the maximum allowable operating pressure.▸ Then trigger several times.▸ When triggered, set the desired operating pressure (see page 17). |
| The moving parts are glued together by lubricants after long storage. | ▸ Clean and re-oil the stapler unit (see page 39).▸ Setting the maximum operating pressure.▸ Then trigger several times.▸ When triggered, set the desired operating pressure (see page 17).▸ Otherwise, contact customer service (see page 48). | |
| Triggering without a fastener being driven in (blank firing). | The spring of the pusher is defective. | ▸ Contact customer service (see page 48). |
| The magazine is dirty. | ▸ Clean the magazine. | |
| Wrong fasteners are loaded in the magazine. | ▸ Empty the magazine.▸ Fill the magazine with PREBENA fasteners (from page 20). | |
| The stapler unit is not sufficiently lubricated. | ▸ Fill PREBENA special nailer oil into used compressed air supply.▸ Trigger a few times. | |
| The operating pressure is too low. | ▸ Increase operating pressure (see page 17). | |
| The piston with the driver is not returned to the initial position after the stapling operation. | ▸ Contact customer service (see page 48). | |
| The triggering process is not completed. | ▸ Contact customer service (see page 48). | |
| The driver is bent. | ▸ Contact customer service (see page 48). | |
| A fastener is jammed. | ▸ Remove jammed fasteners (see page 40).▸ Otherwise, contact customer service (see page 48). |
If despite all that you cannot eliminate the fault, contact your dealer or the manufacturer (see page 48).
Order accessories
Zubehör You can order some more accessories from the manufacturer (see page 44). Use only original accessories PREBENA or accessories approved by PREBENA for the operation of the stapler unit.
Reorder fasteners
The stapler unit may only be operated with the PREBENA fasteners stated on the respective nameplate.
Explanation of type designation
Example: B19 C LF
| Abbreviation | Explanation |
| B19 | PREBENA type and side length |
| C | Cutting tip; default is C = chisel cutting edge |
| LF | Quality of the wire; default is LF = bronzed steel |
i Other resin treatment or quality of the fastener wire on request. For more information on the type designation, contact PREBENA.
Stapler units KTVH-B19D and KTVH-B19H may be used only with type B PREBENA staples mentioned on the nameplate:
| Types | Wire dimensions | Length |
| B16 CLF | 0,92 mm x 2,18 mm | 14,70 mm |
| B19 CLF | 0,92 mm x 2,18 mm | 17,70 mm |
Stapler units KTVH-B22D may be used only with type B PREBENA staples mentioned on the nameplate:
| Types | Wire dimensions | Length |
| B19 CLF | 0,92 mm x 2,18 mm | 17,70 mm |
| B22 CLF | 0,92 mm x 2,18 mm | 21,50 mm |
Stapler units KTVH-R19D and KTVH-B19H may be used only with type R PREBENA staples mentioned on the nameplate:
| Types | Wire dimensions | Length |
| R16 CLF | 0,90 mm x 1,91 mm | 14,70 mm |
| R19 CLF | 0,90 mm x 1,91 mm | 18,10 mm |
Order more accessories
| Types | Order number |
| PREBENA special nailer oil | Z200.10 |
| Spiral hose with 9 mm inner diameter, 12 mm outer diameter, 4 m working length, 7.5 m stretched length | Z160.12 |
| Compressed air hose set with 9 mm inner diameter, 15 mm outer diameter, 10.0 m stretched length | Z200.20 |
| Compressed air hose reel with 8 mm inner diameter, 12 mm outer diameter, for a hose length of 30 m | Z180.00 |
| Suspension eyelet | Z85608001 |
Dispose stapler
ATTENTION
Environmental damage resulting from environmentally incompatible disposal.
▶ Clean the stapler unit prior to disposal (see page 38).
▶ Follow local regulations for disposal of oil.


Do not throw the stapler unit or parts thereof in any way in your normal household waste. If you wish to dispose of the stapler unit, send it to PREBENA.
The stapler unit is properly disposed by PREBENA. You can find contact details on page 48.
Technical Data
Stapler unit KTVH-B19D, KTVH-B22D, KTVH-R19D
| Dimensions (L × B × H): | 347 x 120 x 227 mm |
| Weight of stapler unit: | 2,05 kg |
| Carrying case dimensions (L × B × H): | 430 x 265 x 125 mm |
| Weight carrying case with content: | 2,70 kg |
| Working pressure: | 5 – 8,3 bar |
| Air consumption: | 0,12 l/ stapling |
| Magazine type: | Top loader |
| Triggering system: | Single triggering |
| Fasteners: | PREBENA staple Type B & R |
| Einsatztemperatur | -5 °C bis +45 °C |
| Storage/transport temperature: | Room temperature |
| Vibration value: | < 2,50 m/s2 |
| Noise values(according to DIN 12549: 1999) | LWA,1s = 93 dB |
| LpA,1s = 89 dB |
Stapler unit KTVH-B19H, KTVH-R19H
| Dimensions (L × B × H): | 410 x 122 x 288 mm |
| Weight of stapler unit: | 2,00 kg |
| Maße Transportkoffer (L × B × H): | 430 x 265 x 125 mm |
| Weight carrying case with content: | 2,65 kg |
| Magazine type: | Top loader |
| Fasteners: | PREBENA staple Type B & R |
| Storage/transport temperature: | Room temperature |
Manufacturer address
PREBENA
Fastening technology
Seestraße 20–26
D-63679 Schotten
Telephone: +49 (0) 60 44 / 96 01-0
Fax: +49 (0) 60 44 / 96 01-820
For the designated unit, PREBENA provides a 1-year warranty from date of purchase in accordance with the following guarantee conditions. PREBENA guarantees free of charge repair of defects caused by material or manufacturing faults. Malfunction or damage caused by improper use will not be considered to fall under free of charge warranty.
In addition, original PREBENA fasteners may only be used; in case of non-compliance product liability and thus the warranty becomes null and void. The warranty does not cover wearing parts such as O-rings, etc. It is at the discretion of PREBENA to effect the warranty by replacing the defective part or replacement delivery. Further claims are excluded.
To qualify for warranty, the completely filled out warranty card with dealer stamp and date of purchase must be enclosed or an invoice stating the data and information to be carried out in accordance with the warranty card. Shipping: The faulty unit must be sent to PREBENA carefully and break-proof packed and sufficiently stamped.

Warranty
Model Name:
Date of purchase:
Dealer:
(Stamp)
Index
A
Accessories Order accessories .... 44
Accessories 14
Aer operaon 33
Avoid damage to the stapler unit 10
Avoid explosion hazards ...... 9
Avoid risks of injury 9
C
Characteriscs of hazard warnings 6
Characteriscs of warnings to property or environmental damages .... 7
Check driving depths .... 30
Check funcon 24
Check the condion 16
Clean the housing and outer surfaces 38
Close the magazine 23
Connect to the compressed air supply.... 17
D
Descripon Mode of operaon .... 13
Nameplate 14
Unit overview and delivery KTVH-B19D, KTVH-B22D, KTVH-R19D.... 11
Unit overview and delivery KTVH-B19H, KTVH-R19H. 12
Descripon 11
Design characteriscs ...... 6
Details on the nameplate ..... 13
Disconnect to the compressed air supply 33
Dispose stapler.... 46
Drive in the fasteners...... 30
E
Emptying the magazine ...... 33
Explanaon of type designaon 44
F
Fault overview 41
Faults.... 40
G
General design characteriscs .. 6
/
Improper use 8
Indicang labels on the stapler unit.... 13
Insert fasteners 21
Intended use 8
M
Maintenance Heavy soiling .... 39
Oil stapler unit 39
Slight soiling 38
Maintenance 38
Manufacturer address 48
maximal allowable operang pressure 19
Mode of operaon 13
N
Nameplate 13
0
Oil stapler unit 39
Open the magazine.... 21
Operate stapler 21
P
Packaging 35
Prepare stapler....15
Product features 13
R
Remove jammed fastener.....40
Reorder fasteners 44
S
Safety 8
Set driving depths 25
Set the staple length ..... 26
Staple adjustment for manually-operated staplers .... 29
Staple adjustment for pressure-operated staplers 27
Storage 37
Suspension eyelet 20
T
Technical Data
KTVH-B19D, KTVH-B22D, KTVH-R19D....47
KTVH-B19H, KTVH-R19H.....47
Technical Data 47
Transport
over long distances.... 37 over short distances.... 35
Transport and store......35
Triggering air-powered stapler units....31
Triggering manually-operated stapler units....32
U
unpacking 15
Use with a gravity balancer.....20
W
Warranty 49
Prólogo
Grapadora KTVH-B19H, KTVH-R19H 47

PELIGRO

ADVERTENCIA
PRECAUCIÓN
ADVERTENCIA

ADVERTENCIA
natural_image
Technical line drawing of a mechanical device with labeled parts (no readable text or symbols)ADVERTENCIA
PRECAUCIÓN
Cerrar revista
natural_image
Technical line drawing of a mechanical device with internal components and directional arrows (no text or symbols)Ajuste de grapas en grapadoras accionadas por aire comprimidoFehler! Textmarke nicht definiert.
ADVERTENCIA
ADVERTENCIA

ADVERTENCIA
ADVERTENCIA

ADVERTENCIA
ADVERTENCIA
ADVERTENCIA
Grapadora KTVH-B19H, KTVH-R19H
DANGER
AVERTISSEMENT
ATTENTION
AVERTISSEMENT

AVERTISSEMENT
natural_image
Technical line drawing of a mechanical device with labeled parts (no readable text or symbols)AVERTISSEMENT
ATTENTION
Fermer le chargeur
natural_image
Technical line drawing of a mechanical device with internal components and directional arrows (no text or symbols)AVERTISSEMENT
AVERTISSEMENT

AVERTISSEMENT
AVERTISSEMENT
! AVERTISSEMENT
AVERTISSEMENT

AVERTISSEMENT
KTVH-B19H, KTVH-R19H ..... 47
Dysfonconnements

- Vorwort
- GEFAHR
- WARNING
- VORSICHT
- WARNUNG
- ! WARNING
- Magazin schließen
- Nach dem Betrieb
- Table of Contents
- Foreword 2
- Table of Contents 3
- Design characteristics 6
- Safety 8
- Description....11
- Prepare stapler 15
- Operate stapler 21
- After operation....33
- Transport and store stapler 35
- Service stapler 38
- Faults 40
- Order accessories 44
- Design characteristics
- General design characteristics
- Characteristics of hazard warnings
- HAZARD
- CAUTION
- Characteristics of warnings to property or environmental damages
- Safety
- Intended use
- Improper use
- Avoid risk of fatal injury
- Avoid explosion hazards in air-powered stapler units
- Avoid risks of injury
- Avoid damage to the stapler unit
- Description
- Unit overview and delivery KTVH-B19D, KTVH-B22D, KTVH-R19D
- Mode of operation
- Product features
- Indicating labels on the stapler unit
- Details on the nameplate
- Accessories
- Prepare stapler
- Unpack stapler
- Check the condition
- Connect the stapler unit to the compressed air supply
- ATTENTION
- Use with a gravity balancer
- Operate stapler
- Open the magazine
- Insert fasteners
- Close the magazine
- Check function
- Setting driving depths
- Setting the staple length
- Staple adjustment for pressure-operated staplers
- Staple adjustment for manually-operated staplers
- Check driving depths
- Drive in the fasteners
- Triggering air-powered stapler units
- Triggering manually-operated stapler units
- After operation
- Disconnect compressed air supply
- Remove compressed air hose (only for air-powered stapler units)
- Emptying the magazine
- Transport and store stapler
- Packaging
- Transport
- Transport over short distances
- Transport over long distances
- Storage
- Service stapler
- Clean the housing and outer surfaces
- Slight soiling
- Heavy soiling
- Oil stapler unit
- Faults
- Remove jammed fasteners
- Other faults
- Fault overview
- Order accessories
- Reorder fasteners
- Explanation of type designation
- Dispose stapler
- Technical Data
- Manufacturer address
- PREBENA
- Warranty
- Index
- A
- C
- D
- E
- F
- G
- /
- M
- N
- 0
- P
- R
- S
- T
- U
- W
- Prólogo
- PELIGRO
- ADVERTENCIA
- PRECAUCIÓN
- Cerrar revista
- Ajuste de grapas en grapadoras accionadas por aire comprimidoFehler! Textmarke nicht definiert.
- DANGER
- AVERTISSEMENT
- Fermer le chargeur
- ! AVERTISSEMENT
Brand : Prebena
Model : KTVH-B19D
Category : Pneumatic stapler