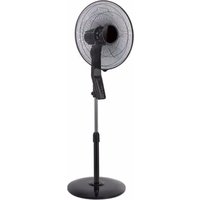
USER MANUAL FS01-16AR El Corte Inglés
natural_image
Line drawing of a standard 16-inch outdoor fan with a stand (no text or symbols)
natural_image
Diagram of a mechanical device with a lever and base, showing motion arrows (no text or symbols)
natural_image
Simple line drawing of a vertical pole with a black handle and base, no text or symbols present.
natural_image
Technical line drawings of a fan assembly showing front, side, top, and side views (no text or labels)
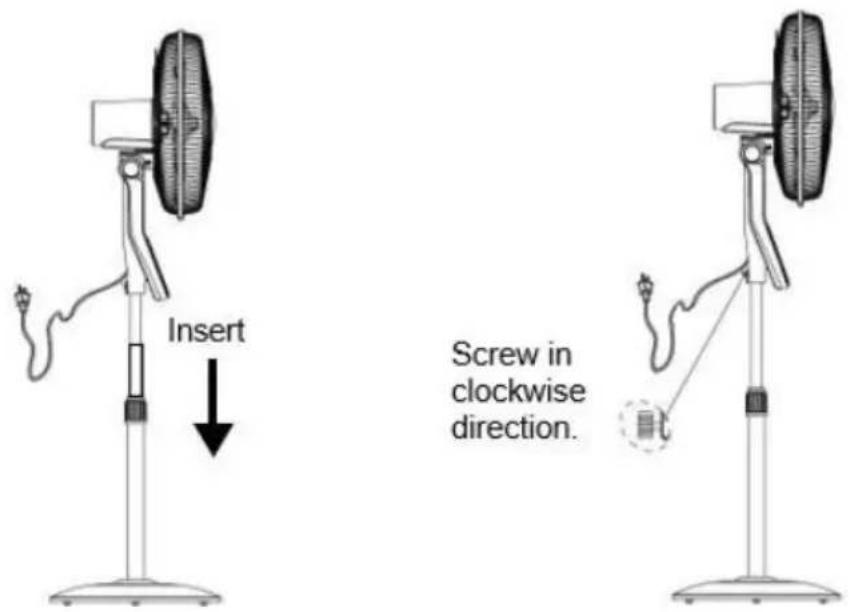
Screw in clockwise direction.
natural_image
Line drawing of a desktop microphone with a fan and stand, no text or symbols present
natural_image
Black background with five circular icons: power button, fan/fotor/pump, gear, clock, and smile (no text or symbols)
CAMBIO DE PILAS
natural_image
Line drawing of a standard 16-inch outdoor fan with a vertical post and stand (no text or symbols)
natural_image
Diagram of a mechanical device with a lever and base, showing motion arrows (no text or symbols)
natural_image
Simple line drawing of a vertical pole with a black handle and base, no text or symbols present.
natural_image
Technical line drawings of a fan assembly showing front, side, top, and side views (no text or labels)
natural_image
Black background with six circular icons representing different function buttons (power, fan, clock, smile) — no text or symbols present.
natural_image
Line drawing of a standard 16-inch electric fan with a stand (no text or symbols)
Read these instructions carefully and keep them for future consultation.
It will be the only way to get the best results and maximum safety of use.
WARNINGS
The product must be installed in accordance with the national wiring rules.
This unit is intended for household and domestic use only.
- Well assemble the product before use.
- Before connecting the appliance, checkthat:
- The supply voltage is the same as thenameplate,
- The power supply socket is suitable to the device,
-
The cable plug is adapted to the socket. The product is intended only for a socket with a main voltage of 220-240 volts (50-60 Hz).
-
Never insert fingers, pencils or other objects through the grid when the appliance is running.
-
Make sure the appliance is placed on a stable surface when in use.
-
Do not use your appliance near a window. The rain could cause an electrical shock.
-
Never leave the appliance running unattended.
-
For security reasons, you MUST always remove the plug from the outlet when not in use, before cleaning or before maintenance.
-
Do not use chemicals or detergents for cleaning, it could easily damage or deform your appliance.
-
Do not pull the cord to unplug from the socket.
-
Do not use the unit with a damaged cord or plug.
-
Never attempt to disassemble or repair the device yourself. In the case of repairs by someone not competent, the warranty is void.
-
Unplug the product when you move it.
-
Never run the product in the presence or within
reach of unsupervised children.
- The devices are not intended to be operated by means of an external timer or a separate remote control system.
- This appliance can be used by children aged from 8 years and above and persons with reduced physical, sensory or mental capabilities or lack of experience and knowledge if they have been given supervision or instruction concerning use of the appliance in a safe way and understand the hazards involved. Children shall not play with the appliance. Cleaning and user maintenance shall not be made by children without supervision. Cleaning and user maintenance shall not be made by children without supervision.
- This product complies with the requirements of Directives 2014/35/EU (repealing Directive 73/23/EEC amended by Directive 93/68/EEC) and 2014/30/EU (repealing Directive 89/336/EEC).
- WARNING !!! If the power cable is damaged, it must be replaced by the manufacturer, its after sales service or similar qualified persons in order to avoid a hazard.
- Ensure that the fan is Unplugged off from the supply mains before removing the guard for cleaning.
- It is forbidden to use the fan without the protective grills.
- This appliance is intended to be used indoor use only & household.
- Regarding the correct assembly of the fan, refer to page 25 of the corresponding instructions.
- For cleaning and maintenance instruction, refer to page 28 of the corresponding section.
- User instructions should be provided with the
device so that it can be used safely.
- The battery must be removed from the remote control before it is scrapped.
- The battery is to be disposed of safely.
- Regarding the information pertaining to the installation, handling, servicing, cleaning and disposal of the appliance, thanks to refer to the below paragraph of the manual.
DESCRIPTION
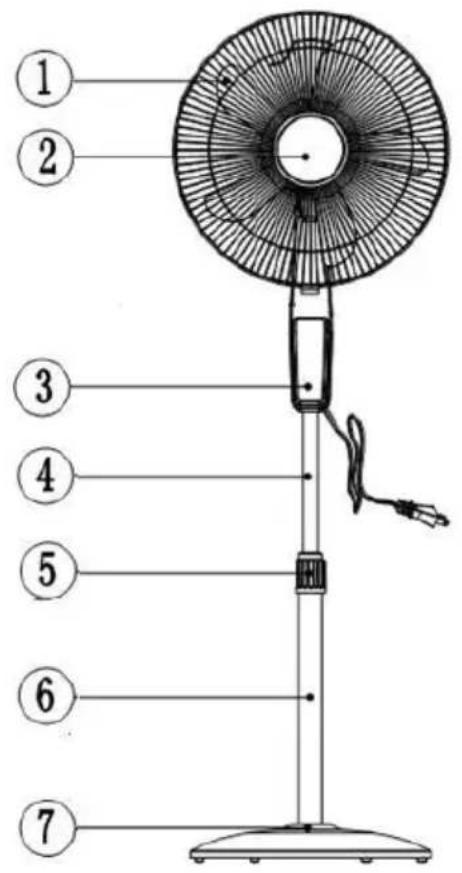
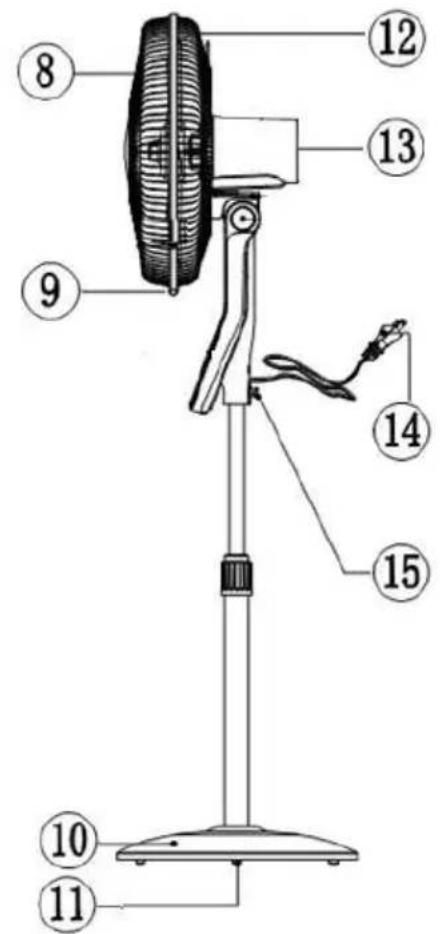
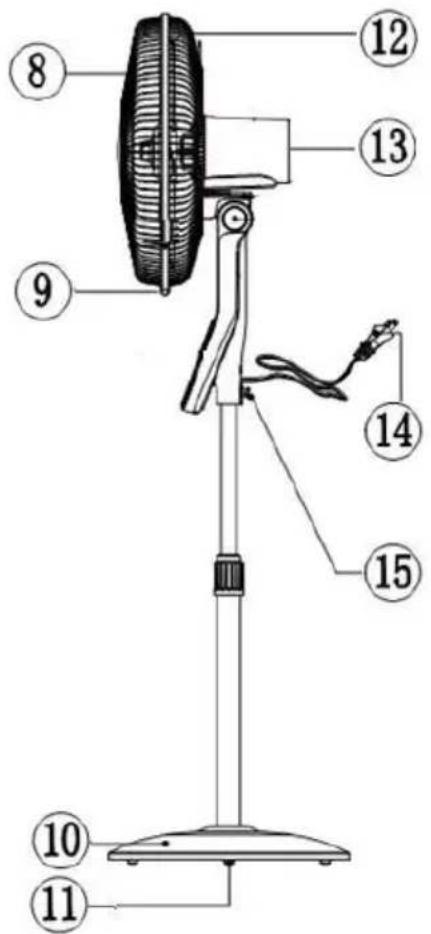
| 1. Blade2. Front grill3. Control panel4. Adjustable pole5. Rod fixing ring nut6. Lower tube7. Base decorative cap | 8. Front grill9. Ring screw10. Base11. Balance weight12. Rear grill13. Motor housing14. Power cord15. Fixing screw |
ASSEMBLY
natural_image
Four technical diagrams showing mechanical assembly steps with no visible text or symbols
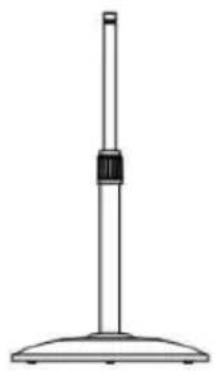
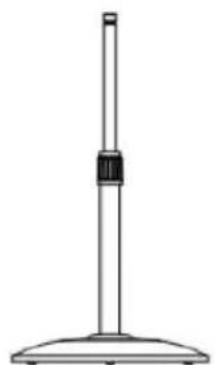
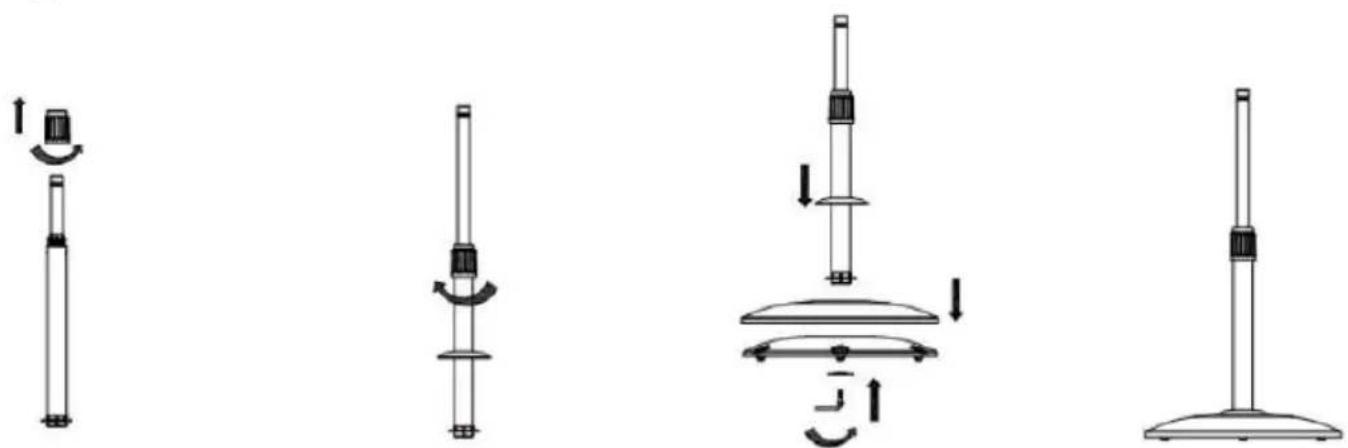
- Loosen and remove the rod fixing ring nut from the top of the lower tube. Slide the decorative cap from the base onto the tube. Replace and tighten the rod fixing ring.
- Then connect the tube assembly to the round base and positioned on the counterweight. From underneath, insert the washer and tighten the assembly using the supplied angle screw. Squeeze until it is properly locked.
- Slide the base decorative cap down over the assembly.
natural_image
Technical line drawings of a fan assembly showing front, side, top, and side views (no text or labels)
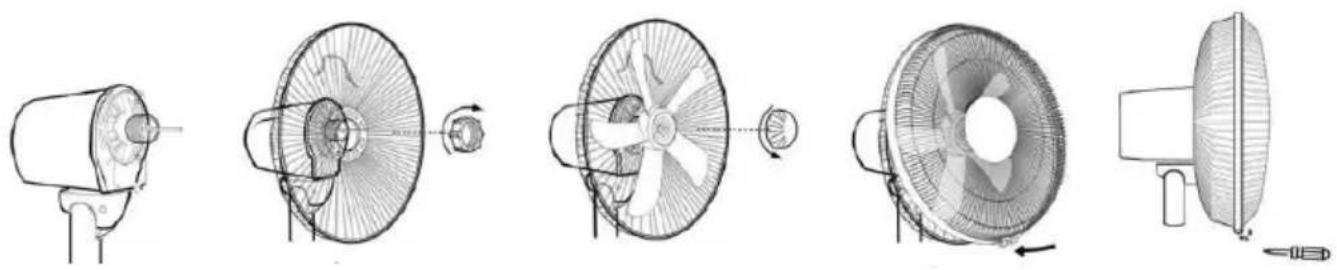
- Remove the lock nut from motor shaft. (anticlockwise).
- Place the rear grill on the motor housing, making sure to position the housing lugs in the guide holes of the grille.
• Firmly tighten (clockwise) the locknut to secure the rear grille.
- Place the fan blade on the motor shaft by placing the notches in the blade in the shaft passing through the motor shaft.
• Tighten with the reverse nut (counterclockwise and lock the blade securely).
- Place the front grille and install the plastic strapping ring around the grilles to hold them. Be sure to position the edges of the 2 grids in the 2 notches inside the strapping.
• Tighten the grid screw to secure the ring.
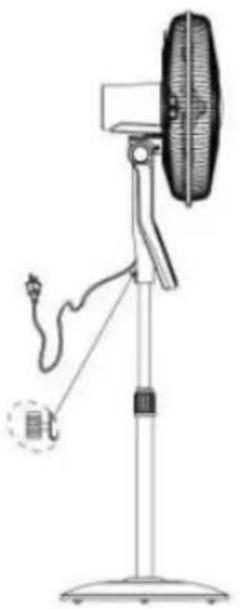
- Insert the inner tube in the main body (control panel) of the fan and fix it with the screw at the back.
OPERATING INSTRUCTIONS
WARNING: Keep all objects at least 1 meter from the front, sides and rear of the appliance.
IMPORTANT! DO NOT COVER THIS APPLIANCE!
Place the fan on a dry, level and solid surface.
OPERATION
• Plug the cord into a suitable wall outlet.
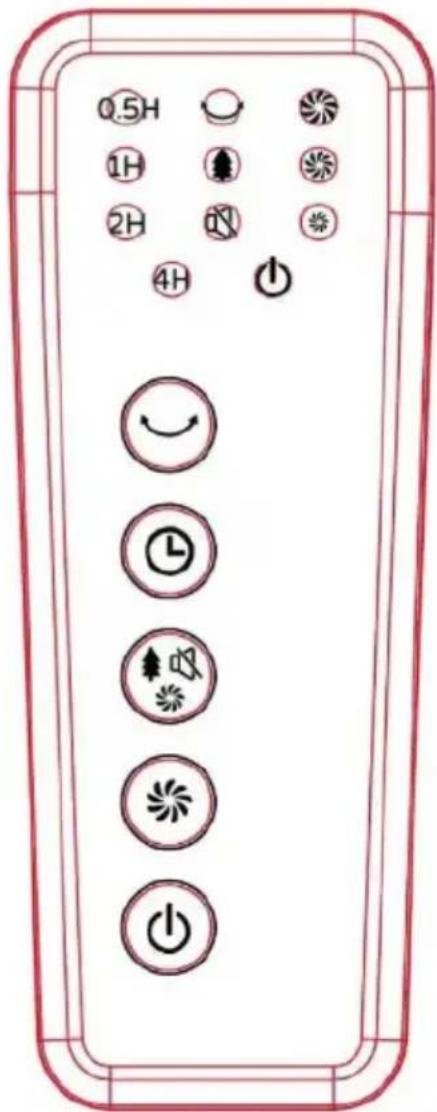
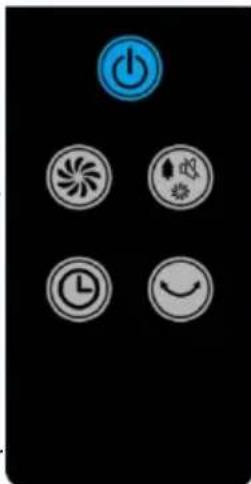
• press the button to turn on the fan.
- press the button-speed selection) to set a speed "Short", "Medium" or "High".
- press the button M (Mode) to set normal mode, "natural" or "silent".
- In mode "quiet": the fan runs at a predetermined-speedwithalowernoiselevel.indicatorlightsup
- In mode "natural": the fan changes rhythm randomly to give a sensation of natural breeze. indicator lights up ▲.
- Press the button ← (Oscillation) to activate the swing function.
- press the button (timer) to set the timer between 30 minutes and 7.5 hours. Each time you press the button, the time will increase by 30 minutes. Repeat the operation until the desired time is reached, with a maximum of 7.5 hours.
- Tilt Adjustment: It is possible to adjust the airflow by raising or lowering the fans.
REMOTE CONTROL
• All fan functions can be activated from the remote control.
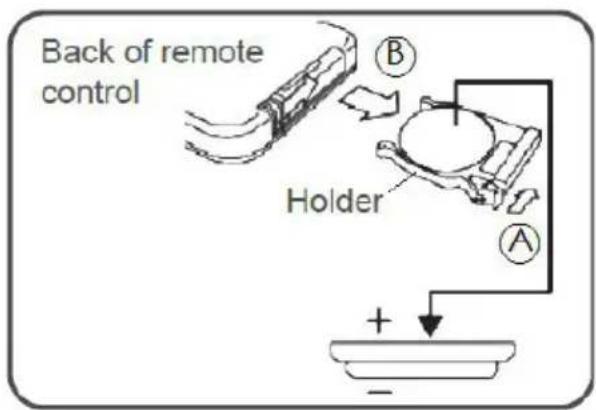
- It works with 1 button cell (CR2025) of 3 V included with the remote control. Used batteries must be recycled responsibly. Dispose of them in the collection containers provided for this purpose (consult your dealer) to protect the environment.
• Respect the polarity when inserting the Battery.
BATTERY REPLACEMENT
-
Remove the battery holder by pressing the locking tab A with your thumb and pulling it out as per arrow B.
-
Replace the battery with the same type and the (+) side facing up.
-
Gently push in the holder until securely locked into place.
natural_image
Black background with five circular icons: power button, fan/flow, refresh, clock, and smile (no text or symbols)
CAUTION: Danger of short circuit and electric shock if battery is incorrectly replaced. Replace batteries only with batteries of the same type or compatible.
CLEANING AND MAINTENANCE
- The fan requires regular cleaning to ensure trouble free operation.
- Ensure that the fan is switched off from the supply mains before removing the grill.
• Unplug the fan from the mains supply before cleaning.
• Use a damp cloth (not wet) to wipe the exterior of the fan to remove dust and dirt.
• Use a vacuum cleaner to remove dust and fluff from around the grills.
- Ensure the fan is dry before plugging back into the mains supply.
- Do not attempt to dismantle the fan. There are no user serviceable parts. For service or repair, contact an authorized electrical service technician.
TECHNICAL SPECIFICATIONS:
| Model n° FS01-16AR | |
| Power supply 220-240V~50-60Hz | |
| Power 60 W | |
| Class II | |
| Remote control battery CR2025, 3V | |
| Description Symbol Value Unit | | | |
| Maximum fan flow rate | F | 54.3 m | 3/min |
| Fan power input | P | 39.9 | W |
| Service value SV 1.4 (m | | | 3/min)/W |
| Off power consumption | POFF | 0,2 | W |
| Fan sound power level | LWA | 58 | dB(A) |
| Maximum air velocity | c | 3,2 metres/sec | |
| Measurement standard for service value | IEC 60879:1986 (corr. 1992)EN 500564: 2011EN60704-1: 2011+A11:2012EN IEC60704-2-7:2020 |
| Contact details for obtaining more information | El Corte Ingles, S.A.HERMOSILLA,11228009 MADRID España/Espanha/Spain |
DISPOSAL OF OLD ELECTRICAL APPLIANCES
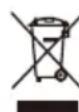
When the time comes to eliminate this product, please consider the environmental impact and take it to recognised recycling facility instead of disposing it with general household waste. Take the equipment to a waste disposal site. Plastic and metal parts that are used in the construction of this appliance can be separated into pure grade which allow recycling. Ask to your service centre for details. Everyone of us can participate on the environmental protection.

This product is Class II item, no earth line build in.
Royal Decree-Law 1/2007, of 16 November, grants goods of a durable nature a legal guarantee of 3 years.
Damage or faults caused by the following are excluded from the guarantee:
- Incorrect installation (voltage, gas or water pressure, electrical or water connections), reinstallations or housings made by the consumer without applying the correct instructions.
- Accidental causes such as falls, knocks, contact with liquids, insertion of foreign bodies, or any other cause of force majeure.
- Negligent, inadequate or non-domestic use, such as appliances installed in hairdressers, bars, restaurants, hotels, etc.
- Manipulation by technical services other than the official ones of the brand.
- Corrosion and/or rust caused by the normal wear and tear of the appliance or accelerated by adverse environmental conditions.
- Use of accessories or consumables which are not the original ones of the brand.
The following are also excluded from the guarantee:
- Components exposed to wear and tear due to normal use (light bulbs, seals, insulators, tubes, drains, etc.), from the sixth month, save manufacturing defects.
- Non-electromechanical components, aesthetic, plastic, glass or folding components, soap dishes, shelves, grilles, etc.
- Conservation services, cleaning, unblocking, change of direction of door, removal of foreign bodies, obstructions, recalibration or fifine-tuning, etc.
- Computer products: Elimination of viruses, restoration of programs for this reason, or the reinstallation of the hard disk because it has been wiped.
El Corte Ingleis