
X-Bee Drone 9.5 - Drone Overmax - Free user manual and instructions
Find the device manual for free X-Bee Drone 9.5 Overmax in PDF.

| Product type | Quadcopter drone |
| Brand | Overmax |
| Model | X-Bee Drone 9.5 |
| Category | Drone |
| Drone power supply | Rechargeable LiPo battery (included) |
| Controller power supply | 2 AA batteries (not included) |
| Recommended charger | USB mains adapter 5V, 2A (not included) |
| Flight time | Approximately 15-20 minutes (estimated) |
| Control range | Not specified |
| Camera | Integrated HD camera, adjustable angle 0-90° |
| Storage | MicroSD card up to 32 GB (not included) |
| GPS | Integrated, GPS and ATTI modes |
| Main functions | Photo/video, automatic takeoff/landing, return to home, Headless mode, gyroscope and compass calibration, altitude hold |
| Motors | Brushless |
| Speed | Two modes (high and low) |
| Wind resistance | Class 4, max 7.9 m/s |
| Minimum age | 14 years (adult supervision recommended until 18 years) |
| Maintenance and cleaning | Soft dry cloth, do not use water or chemicals |
| Safety | Do not touch rotating propellers, keep distance >20 cm, use outdoors away from obstacles and adverse weather |
| Spare parts | Propellers (marked A and B), battery, camera, landing gear |
| Operating temperature | 5°C to 40°C |
Frequently Asked Questions - X-Bee Drone 9.5 Overmax
User questions about X-Bee Drone 9.5 Overmax
0 question about this device. Answer the ones you know or ask your own.
Ask a new question about this device
Download the instructions for your Drone in PDF format for free! Find your manual X-Bee Drone 9.5 - Overmax and take your electronic device back in hand. On this page are published all the documents necessary for the use of your device. X-Bee Drone 9.5 by Overmax.
USER MANUAL X-Bee Drone 9.5 Overmax
natural_image
Black quadcopter drone with propellers and a circular head (no text or symbols visible)CE
EN: The product complies with requirements of EU directives.
Pursuant to the Directive 2012/19/EU, this product is subject to selective collection. The product must not be disposed of along with domestic waste as it may pose a threat to the environment and human health. The worn-out product must be handed over to the electrics and electronics recycling center.

Available on the
App Store

ANDROID APP ON
Google play
1
![[1] [2] [3] [4] [5]](/content/2026/04/730958/images/6e4367fdb48207adef2bffa47036318124cb5158ba898d0365c4279acff7a2a5.jpg)
![[6] [7] [8]](/content/2026/04/730958/images/be40e366e79de20b962a01227362443ef51eaff5454bc42edfcbfaccc6cb202e.jpg)
2
3
4
5
6
flowchart
graph TD
    A["Top Base Propeller"] --> B["Step 1: Down"]
    B --> C["Step 2: Down"]
    C --> D["Step 3: Down"]
    D --> E["Bottom Propeller"]
    style A fill:#f9f,stroke:#333
    style B fill:#ccf,stroke:#333
    style E fill:#cfc,stroke:#333
7
natural_image
Illustration of a hand using a tool to adjust or install a propeller component, with no visible text or symbols.8
9
natural_image
Technical line drawing showing a helicopter interior and hand holding a tool, both without any text or symbols.10

flowchart
graph LR
    A["Power Supply"] --> B["Device"]
    B --> C["USB Cable"]
    C --> D["Storage Unit"]
    D --> E["USB Cable"]
    E --> F["Storage Unit"]
11

natural_image
Three technical diagrams showing mechanical assembly steps: disassembly, press release, and rotation (no text or symbols)12
natural_image
Line drawing of a mechanical device with a curved arrow indicating motion or force (no text or symbols)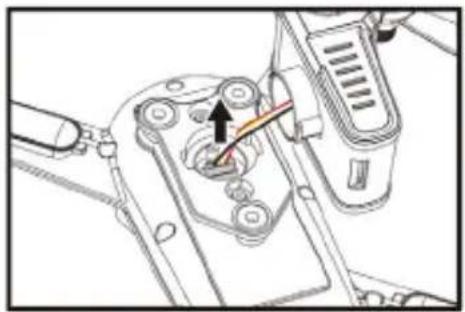
natural_image
Mechanical assembly diagram showing a component with a highlighted arrow and color-coded parts (no text or symbols)13
natural_image
Line drawing of a mechanical device with a circular checkmark indicating approval (no text or symbols present)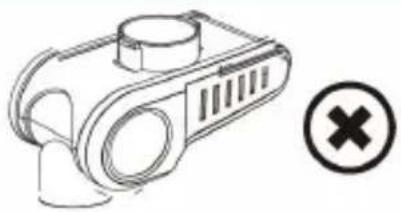
natural_image
Line drawing of a mechanical device with a circular symbol (×) and a cross mark, no text or labels present.14
natural_image
Diagram of a vehicle's rear view showing four wheels and a central body with a downward arrow indicating motion (no text or symbols)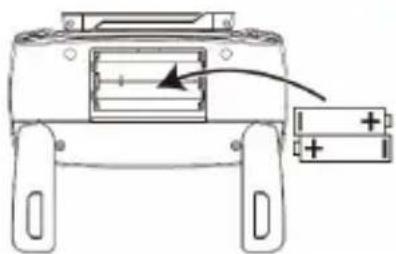
natural_image
Diagram of a battery pack with an arrow indicating direction, no text or symbols present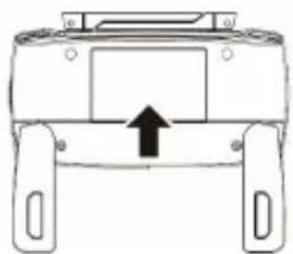
natural_image
Front view of a vehicle chassis with four legs and a central body, showing an upward arrow indicating motion (no text or symbols)15
16
17
18
19
natural_image
Line drawing of a quadcopter drone with propellers and a 8-second speedometer (no text or symbols on the drone body)20
natural_image
Line drawing of a quadcopter drone with propellers and a central body, showing rotational motion arrows (no text or symbols)21
natural_image
Diagram of a four-blade drone with propellers and directional arrows indicating rotation (no text or symbols)22


natural_image
Line drawing of a four-blade drone with propellers and labeled parts (C and D), no text or symbols present.23
24
natural_image
Top-down line drawing of a car interior showing dashboard, seats, and rear seats with no text or symbols25
26
27
OVERMAX
You • unlimited
Wprowadzenie
PL
Drogi Kliencie!
Thank you for placing trust in us and choosing Overmax.
Thanks to the use of high-quality materials and modern solutions, we provide you with a product perfect for everyday use. We are convinced that the product will satisfy your requirements as it has been designed with utmost care. Before you use the product, please read this manual carefully.
Should you have any remarks or questions concerning the product, please do not hesitate to contact us: pomoctechniczna@overmax.pl
Important
- The product is intended for persons aged 14 upwards and experienced in flying drones.
The use of the product by persons below the age of 18 must be supervised by adults only. The persons inexperienced in flying drones are advised to contact a person with more experience. - This product is intended for external use. Before you start using the product, make sure the space you have chosen is free from obstacles, and when you control the product, keep a safe distance from other people, animals and properties.
- Do not use the product near power lines, in public (crowded) places and enclosed areas.
- Do not use the product in unfavorable weather conditions: high temperatures, rain, fog, snow, frost and strong wind.
- Do not repair or modify the device. Only an authorized service technician is allowed to perform these operations.
- Do not start the device if you have noticed any damage.
- Do not use the device when it starts acting up, has been dropped or flooded, overheats extensively, is discolored or deformed, emits abnormal sounds and smells, and when other atypical circumstances occur. This being the case, contact the manufacturer's authorized service center.
- Do not use the device if your hands are wet.
EN
- Use the device away from sources of heat, high temperatures, hot surfaces, sources of ignition, naked flame, oils and sharp edges.
- Do not use the device in the inflammable, explosive or toxic atmosphere.
- Do not use chemicals and water to clean the device. The product must be cleaned with a soft and dry cloth.
- Do not use the device for other purposes than designed.
- To avoid potential fire risk, do not short-circuit battery terminals, do not place them in the compartment at variance with marking and do not puncture. Battery charging must always be supervised by an adult and out of reach of children.
- Do not leave the plugged device unattended.
- When charging is over, disconnect the battery from the feeder cable.
- After using, remove the battery from the drone and remote control.
- If batteries or storage batteries overheat extensively, stop using and charging them immediately. Otherwise, they may get deformed or ignite.
- Do not mix various types of batteries or use old (worn-out) and new batteries together. Flat batteries must be removed.
- Worn-out batteries must be disposed of in accordance with local regulations in designated places.
- Do not store full batteries because they may get damaged and their life gets shorter.
- To avoid injuries, do not touch rotating airscrews or other moving parts of the device.
- When using the drone, keep a distance of at least 20 cm from the device due to radio waves.
- It is users' obligation to make sure the product is safe both to themselves and their surrounding. The manufacturer, importer and distributor shall not be held responsible for potential damage and injuries arising from wrong use of the product.
BATTERY REMARKS
The drone uses a special battery (supplied), while the remote control uses 2 AA batteries (not included)
- The batteries of the same type must be used.
- Pay special attention to battery poles.
- Regular batteries must not be charged.
-
Do not mix old and new batteries.
-
Do not mix alkaline, zinc-carbon, nickel-cadmium batteries.
- Before you charge a battery, remove it from the device.
- Battery charging must be supervised by an adult only.
- Flat batteries must be removed from the device.
- Do not short-circuit battery terminals.
- The elements intended for battery charging must be checked regularly for potential damage of the cable, plugs, casing and other. In case of damage, do not use these elements.
EN
Description
Drone (fig. 1)
- Lights
- Brushless motor
- Chassis
-
Airscrew
-
Camera
- Battery
- Front light
- Rear light
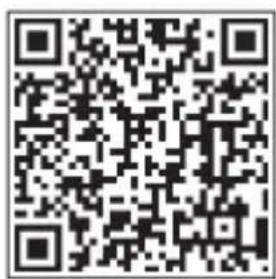
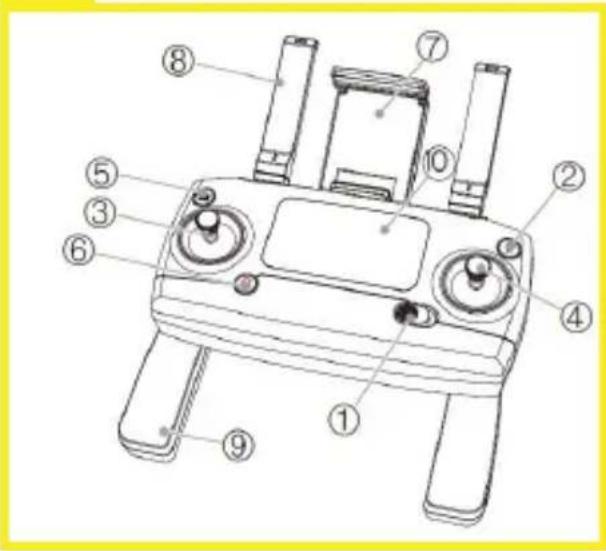
Controller (fig. 2 and 3)
- On/off switch
- Return key
- Left bar
- Right bar
- Photo/video
- Lock/unlock key
-
Mobile device grip
-
Aerial
- Controller grip
- LCD display
- Take off/land key
- Speed switch (high/low)
- Camera angle adjustment
- GPS / ATTI
Functions
Photo/video
Press the key (5) to take a photo. Hold this key to record a video.
EN
Quick take-off/landing
Press the key (11) to switch between quick take-off and landing modes.
Return
Press the return key (2) to make the drone return to the designated spot („home”). Press the key again to cancel the command.
Lock
Press (6) to switch motors off. Hold this key to unlock and switch motors off.
Speed change
Hold the key (12) to change the drone speed - high or low.
GPS / ATTI
Change key (14) setting:
OFF - ATTI mode
ON - GPS mode.
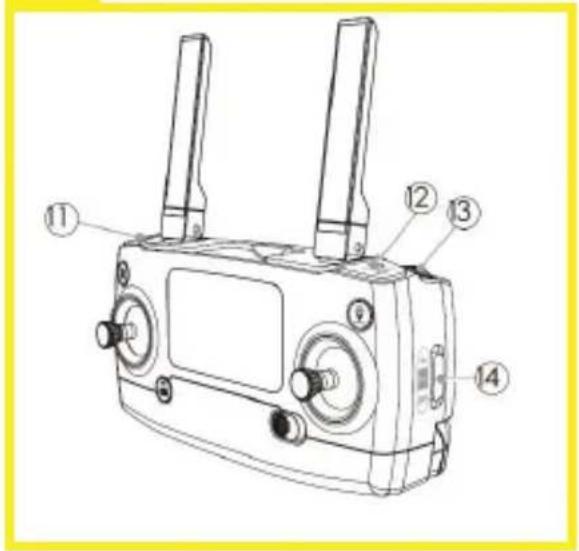
Camera angle (fig. 4)
Use a knob (13) to change the camera angle.
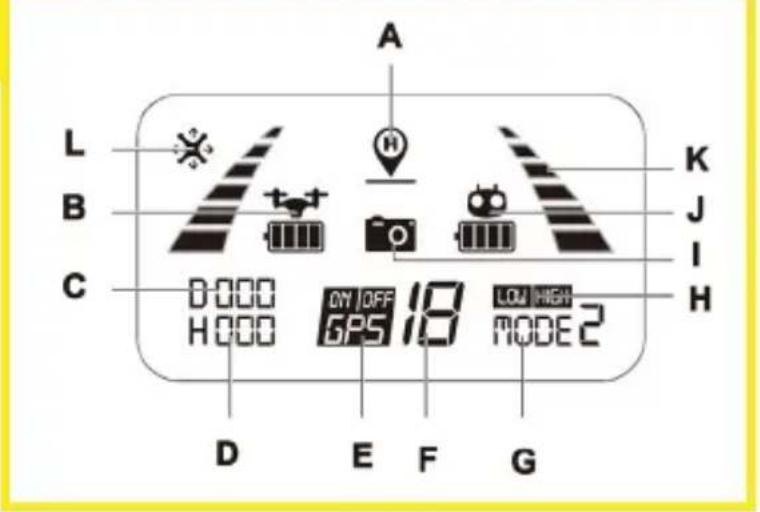
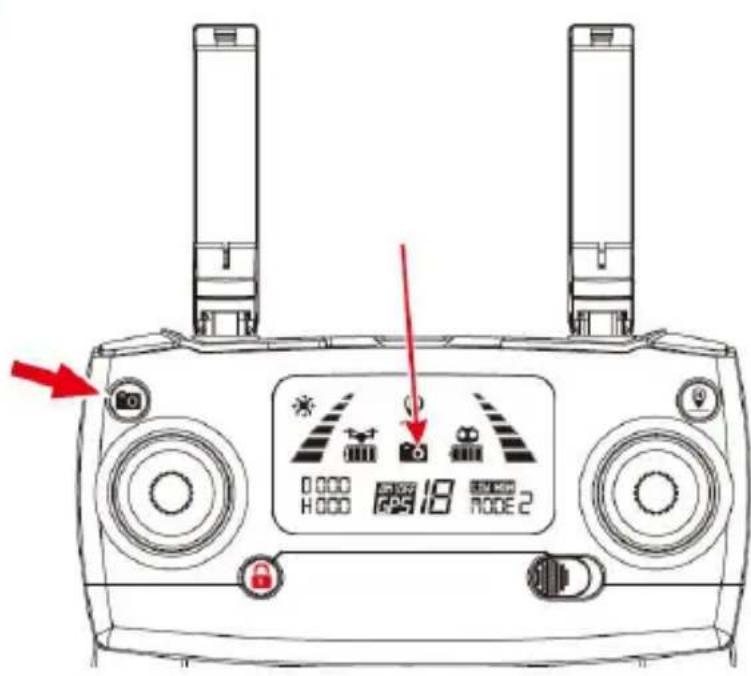
Display icons (fig. 5)
This icon remains visible until the drone successfully returns to the previously specified spot.
B - Drone battery status
It shows drone battery status.
C – Distance from „home”
It shows a distance between the drone and spot previously marked as „home”.
D - Height from „home”
It shows height between the drone and spot previously marked as „home”.
E - GPS
ON - active GPS mode
OFF - inactive GPS mode
F - Number of GPS satellites
When the drone connects to the sufficient number of satellites (at least 7), the drone take-off spot is saved in the memory as „home”.
G - Drone working mode
After take-off, the product enters „mode 2“ by default.
H - Speed mode
It indicates a selected drone flight speed mode - HIGH (high speed) or LOW (low speed).
I - Photo/video
After you have taken a photo, the camera icon glows on the display for a while.
When recording a video, this icon flashes until you finish recording.
J - Controller battery status
It shows controller battery status.
K - Signal strength indicator
The icon shows a signal strength received by the controller.
L - Headless mode / calibration
It indicates headless mode and device compass calibration.
Headless mode can be enabled in the mobile application.
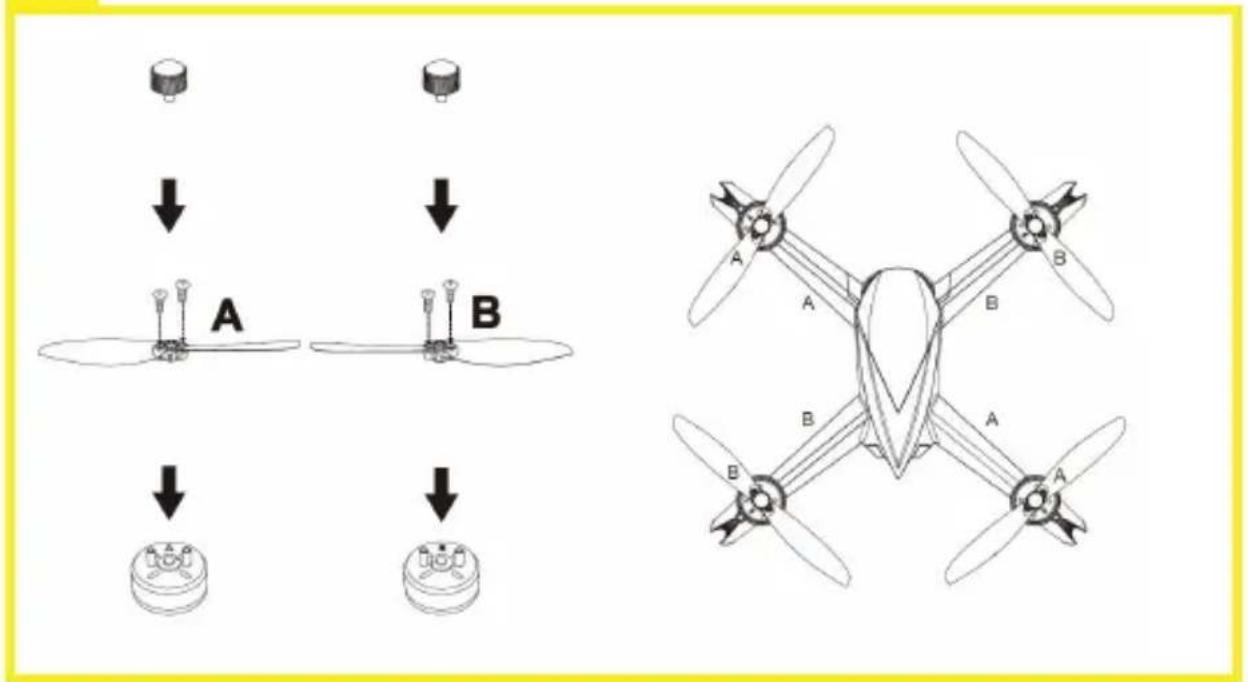
How to assemble and disassemble drone airscrews
Airscrews are marked as „A” and „B” - when assembling, pay special attention to this marking. To find tips on assembly, please see fig. 6.
A - How to assemble an airscrew rotating clockwise
Assemble the airscrew marked as A in the corresponding motor (see: fig. 6). Tighten up two screws with the use of a screwdriver and then put the protective cover on and screw it in anti-clockwise.
B - How to assemble an airscrew rotating anti-clockwise
Assemble the airscrew marked as B in the corresponding motor (see: fig. 6). Tighten up two screws with the use of a screwdriver and then put the protective cover on and screw it in clockwise.
If the assembly of the device is wrong, the product will not fly properly and may get damaged. Pay special attention to airscrews marking and their destination on the drone. Use airscrews from the set or purchase them directly from the manufacturer only.
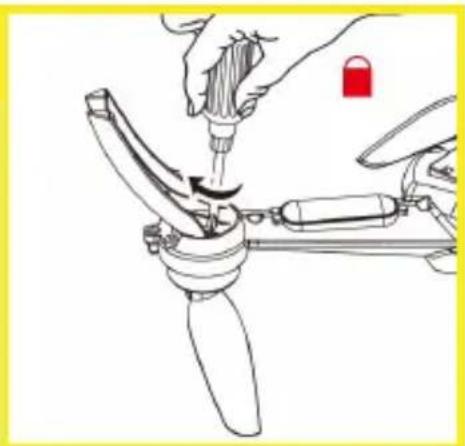
How to disassemble airscrews
Immobilize the motor with a palm, unscrew and remove the protective cover. Then unscrew both screws with the use of the screwdriver and finally remove the airscrew from the device.
How to assemble chassis legs
To assemble legs, screw them to the lower casing (fig. 7).
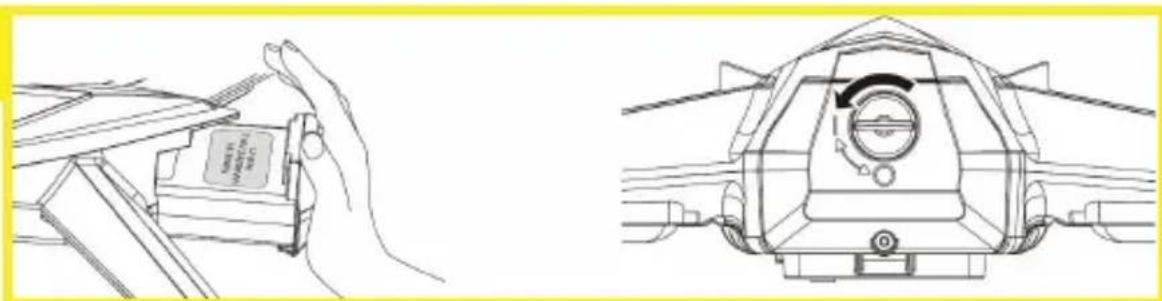
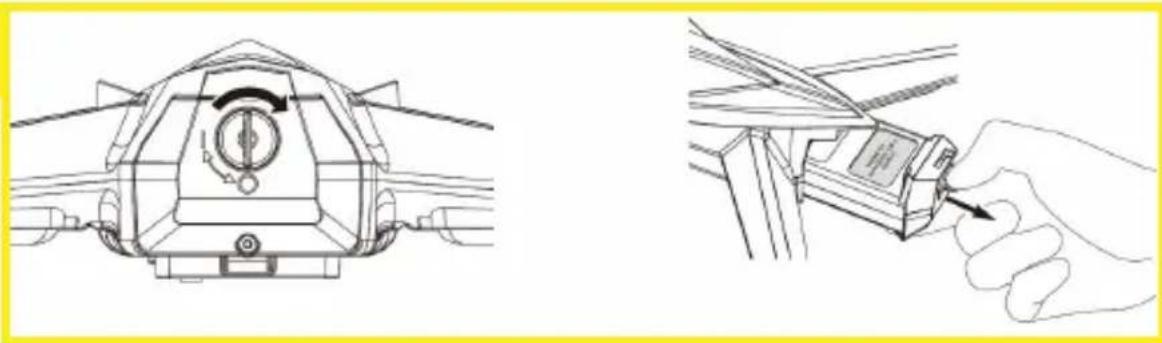
How to assemble batteries
Insert the battery in the compartment at the back of the drone and press it (fig. 8). The drone will activate (LED lights will go on and a sound will be emitted). Slide the battery lock into „O” position to secure it and make sure it has been fixed properly.
NOTE: Make sure the battery has been properly fixed in the drone, otherwise the flight safety may be affected. The drone may also crash due to power cut.
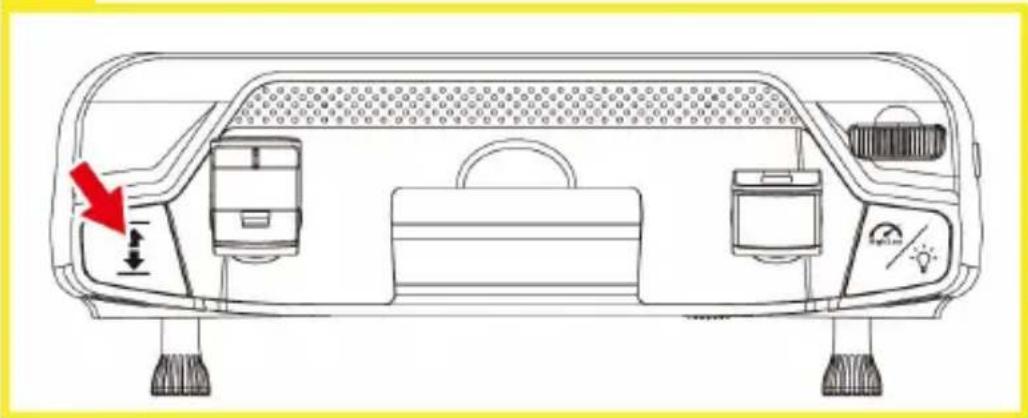
How to disassemble batteries
Slide the battery lock into „I” position and pull the battery to remove it (fig. 9). Do not touch the battery if your hands are wet.
How to charge batteries
See: fig. 10.
- Connect the USB cable to the USB power adaptor (feeder cable is not included).
- Connect second tip to the battery charger.
- Connect the battery to the battery charger.
When charging batteries, greed LEDs on both sides of the device flash, and red LED glows constantly.
When charging is over, both green and red LEDs glow constantly.
If the battery charger itself (without the battery) is connected to the AC adapter via the USB cable, or in the event of any malfunction of the device: red LED glows constantly and green lights on both sides of the device are off.
Use a feeder cable USB 5 V, 2A (not included). Other kinds of feeder cable may affect the product charging time. To charge, do not use PC USB ports. A failure to follow the battery charging instructions may lead to serious damage to the battery or charger.
After you have flown the drone, it is advisable to charge it for about two hours. If the drone is not used for a long time, it is advisable to make its battery flat and charge it fully at least once a month.
How to assemble the camera
- Insert a white camera plug in the drone port (see: fig. 11).
- Insert the camera bump in the drone hole at the angle of 90^ (perpendicularly to the longitudinal axis of the product).
- Turn the camera right to a regular position and make sure it has been mounted properly and is stable.
EN
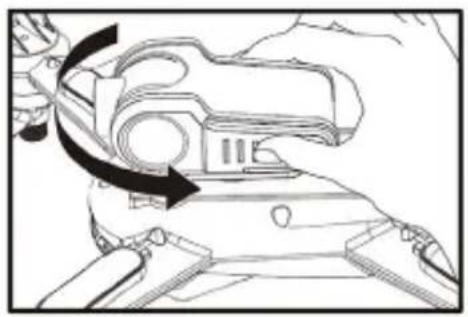
How to disassemble the camera
- Grab the camera and turn it left by 90^ (fig. 12).
- Gently pull and remove the camera from the port. Remove the camera plug.
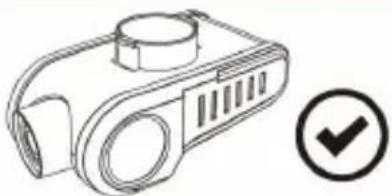
How to adjust the camera angle
You can adjust the camera angle by 90^ with the use of the knob (see: fig. 4). Turn the knob „up” (marked as A in the fig. 4) to lift the camera. Analogically, turn it „down” (marked as B in the fig. 4) to lower the camera.
Note: Before the drone lands, make sure the camera is positioned downwards (fig. 13).
How to assemble a battery in the remote control
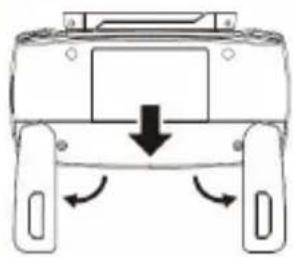
Open the battery cover, insert two AA batteries in the compartment in accordance with the pole marking and, next, close the cover (see fig. 14).
How to connect the remote control to the dron
Press and hold the lock key (6) and activate the controller by sliding the on/off key (see: fig. 15).
You can connect the remote control to the drone only if the controller is not connected to any other drone. If there are a few different kinds of drone and controller in one place, pairing must be performed one after another to avoid wrong pairing.
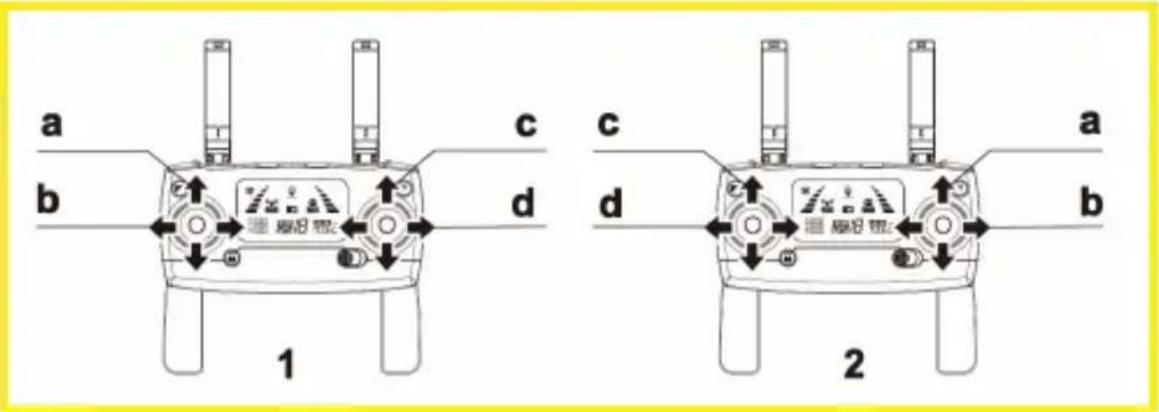
Control mode
The drone has two control modes which change position of left and right bar. By default, mode 2 is set (see: fig. 16).
A - Fly forward or backward
B - Turn left or right
C - Choke valve
D - Fly left or right
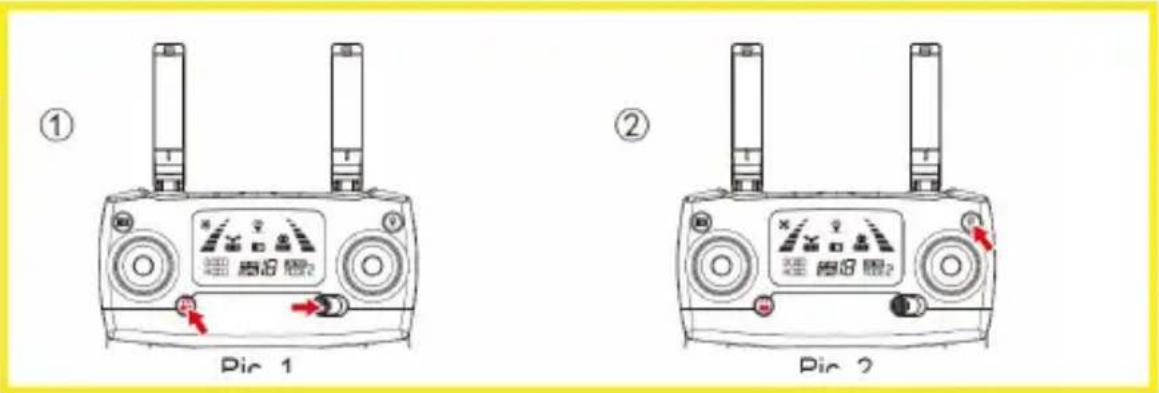
To change the mode:
- Press the lock key (6) and then activate the controller by sliding the on/off key (see: fig. 17).
- Press and hold the return key for about 3 seconds to select mode 1 or 2. The selected mode is displayed on the LCD screen (G). Press and hold the key to change the mode.
By default, the product operates in mode 2
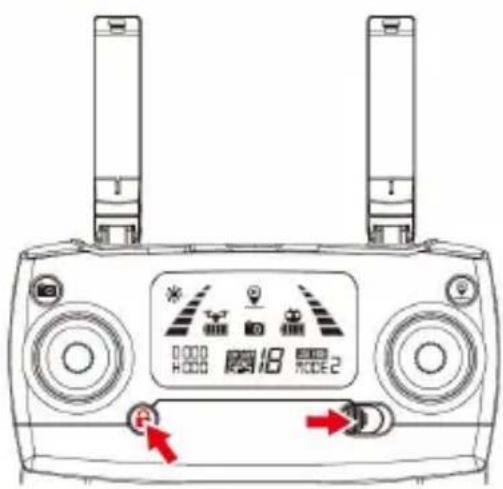
How to calibrate the gyroscope
After connecting to the remote control, place the drone on a flat and horizontal surface and then direct both bars on the remote control into the bottom left corner (fig. 18). When LEDs stop flashing in green, it means the calibration has been finished.
Note: the drone has already been calibrated. There is no need to re-calibrate it unless the drone has difficulty in taking off or completing the detection procedure.
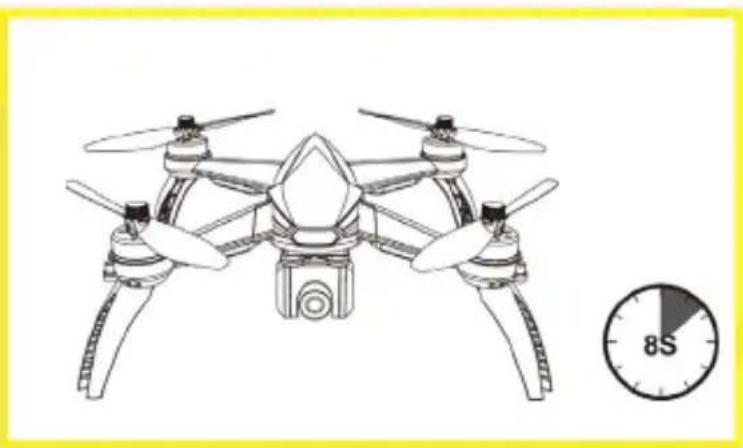
Detection mode
After connecting to the remote control, the drone starts detecting. Front and rear LEDs of the drone start flashing alternately in red, green and yellow. Make sure the drone stands on the flat and horizontal surface at this time.
EN
The process takes about 8 seconds. When it is finished, the remote control will send two short sounds and drone LEDs will start flashing alternately in yellow (fig. 19).
How to calibrate the compass
NOTE: Compass must be calibrated after the detection mode. The calibration must be performed before every flight as well as after you have replaced the battery.
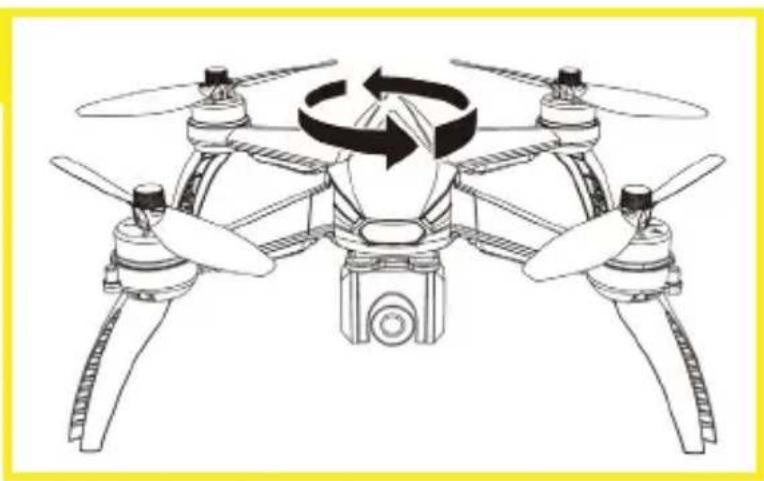
1. Horizontal calibration
Front and rear LEDs in the horizontal calibration mode will flash alternately in yellow. Keep the drone and rotate horizontally around its axis. Make about three rotations. When the calibration is successful, LEDs will flash in green (fig. 20).
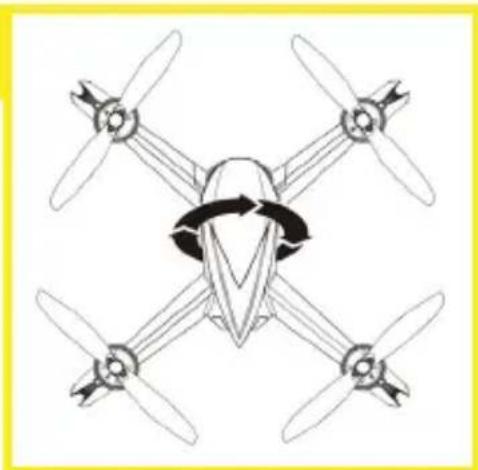
2. Vertical calibration
Front and rear LEDs in the vertical calibration mode will flash alternately in green. Keep the drone vertical (camera facing upwards) and rotate it around its axis. Make about three rotations. When the calibration is successful, LEDs will glow constantly (fig. 21).
NOTE:
- Do not calibrate the compass in a strong magnetic field.
- When calibrating, do not keep any magnetic items (e.g. keys, mobile phones).
- When calibrating, keep a distance from large metal items.
How to lock and unlock the drone
To lock and unlock the drone, you have to start the drone motors.
To unlock the drone press the lock key . briefly. Motors will start and the drone will be unlocked.
You can lock (stop motors) the drone in two ways:
- Hold the lock key for about 3 seconds. Motors will stop and the drone will be locked.
- After the drone has landed on the ground, direct the choke valve bar downwards for about 3 seconds. Motors will stop and the drone will be locked.
NOTE: Do not stop the drone motors with key during the flight because the drone will fall.
EN
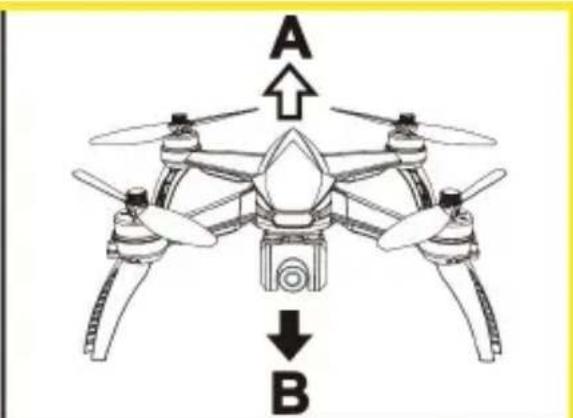
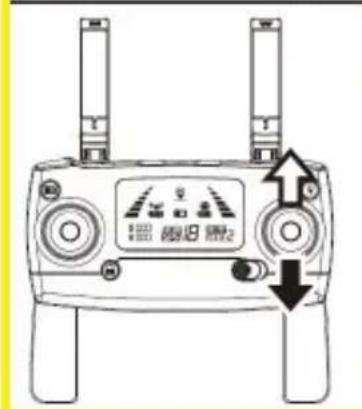
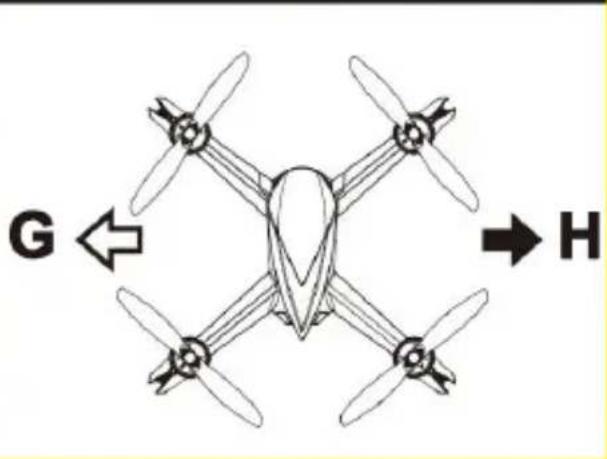
How to control the drone
To control the drone, move bars on the remote control, as presented in the figures.
The figures present bars in the default control mode 2.
| Fig. 22 | A - lift |
| B - drop | |
| C - fly forward | |
| D - fly backward | |
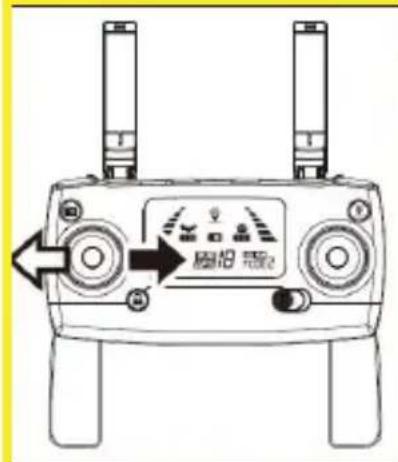
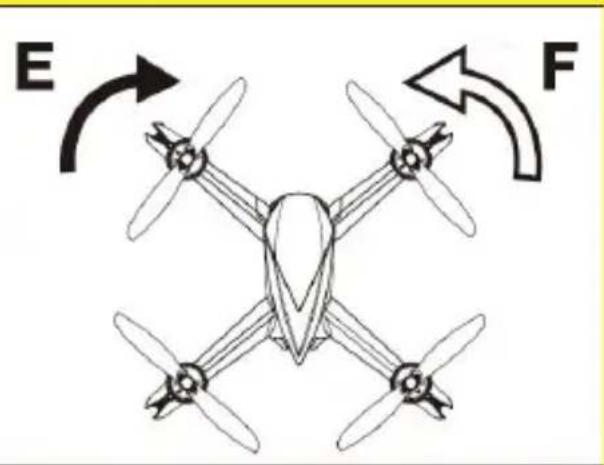
| Fig. 23 | E - turn right |
| F - turn left | |
| G - fly left | |
| H - fly right |
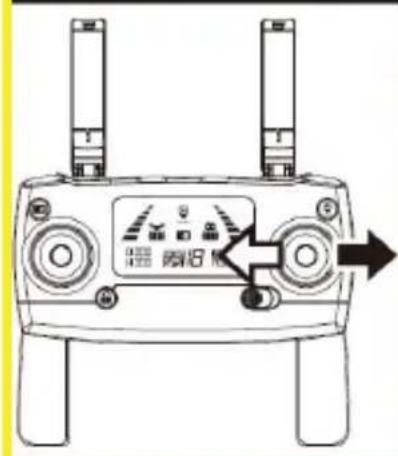
How to take off/land
- After you have started motors, press to make the drone take off automatically and keep a permanent altitude of 1.5 meters above the ground.
EN
- When flying, press, to make the drone land automatically.
See: fig. 24.
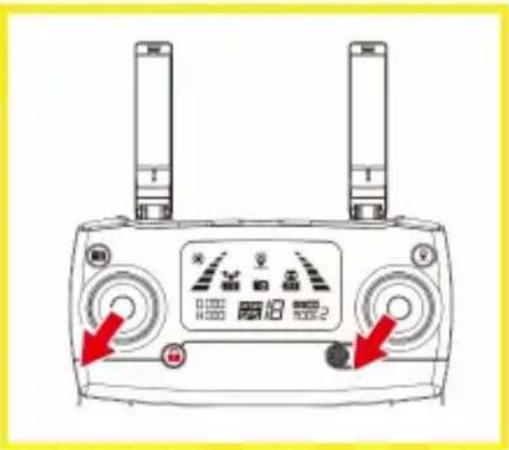
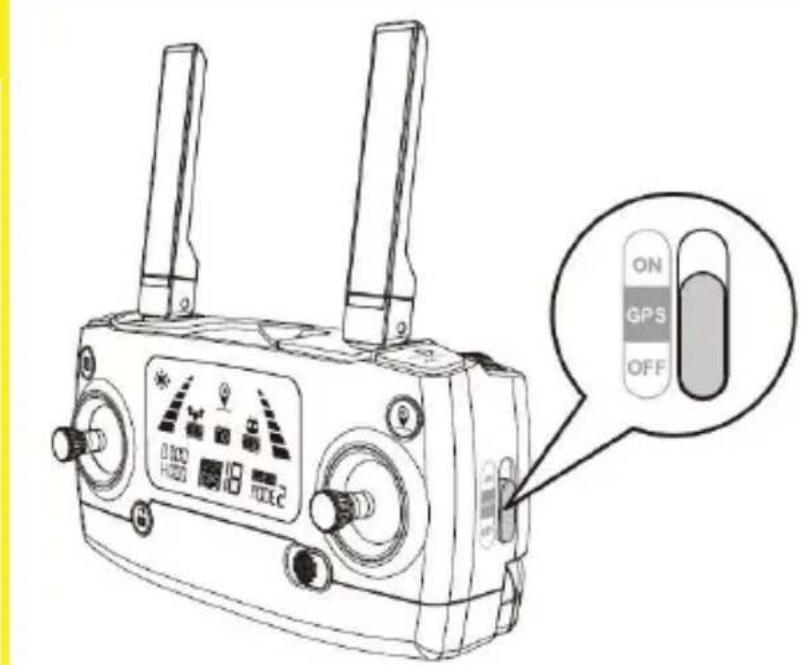
ATTI mode
To disable GPS, slide the remote control on/off switch as presented in fig. 25. In this mode, the drone does not use GPS to keep its position. To keep the altitude, the built-in altimeter is used. This mode is not precise and therefore you must be experienced and skilled at flying the drone.
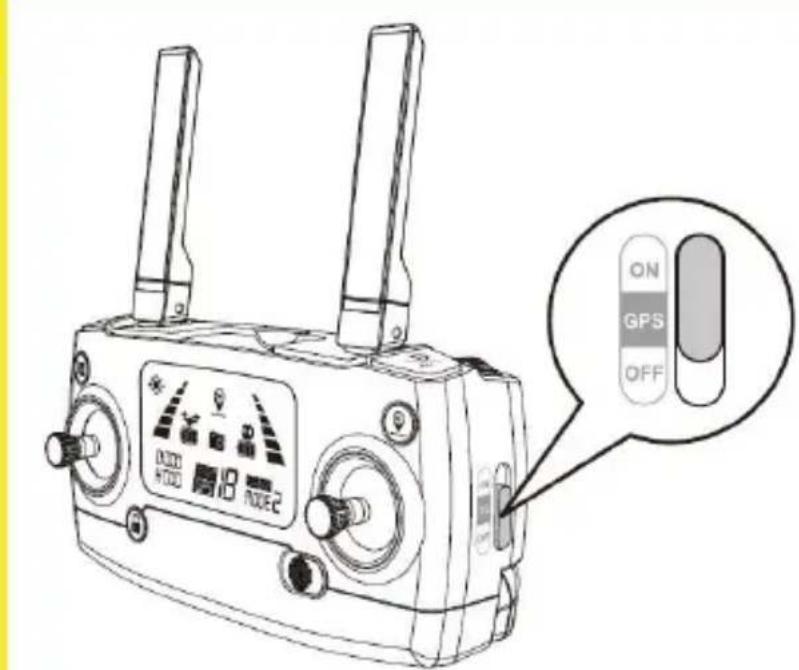
GPS mode
Turn GPS switch into position specified in fig. 27. In this mode, the drone will use GPS to keep its position.
How to return home
The return function is used to make the drone return to recently saved spot („home”). There are three modes of the function: smart return, emergency return and low-battery return.
The saved spot is the place in which the drone takes off. To make sure this spot is properly remembered, GPS signal must be strong enough (at least 7 connected satellites at the take-off).
1. Smart return
If GPS signal is available (more than 7 satellites) and starting point has been saved, press the return key. The drone will return to the saved spot. When returning, you can control the drone in order to avoid obstacles, for instance. Press the key again to leave the return function.
2. Emergency return
If GPS signal is good (more than 7 satellites) and starting point has been saved, the emergency return will be initiated automatically when the remote
control loses connection to the drone for more than 6 seconds. You can regain control over the drone if the remote control regains connection and you press the return key.
NOTE:
- During emergency return, you cannot control the drone to avoid obstacles.
- The drone will not return to the starting point if the GPS signal is poor (below 7 satellites).
- During smart return, if the user wants to move the drone higher than 15 m, the drone will stop ascending and initiate the emergency return procedure.
- If there is not a good GPS signal during the take-off (below 7 satellites), and the drone loses connection to the remote control for more than 6 seconds, the drone will start descending and lock after landing.
3. Low-battery return
This mode activates when the drone battery is so low than it may influence its ability to return to the spot marked as „home”.
When rear LEDs of the drone flash slowly, the battery indicator shows low battery status ( ), the remote control emits short sounds, while the drone is at the height of more than 30 meters or distance of more than 100 meters from the remote control, the drone will return to the starting point automatically.
When rear LEDs of the drone flash slowly, the battery indicator shows it is flat ( ✗ , the remote control emits short sounds, while the drone is at the height of more than 15 meters or at a distance of more than 15 meters from the remote control, the drone will return to the starting point automatically.
Due to flat battery, it is not possible to regain control when you press the return function during return.
Due to low battery, if the distance is 100 meters or less, you can cancel the return by pressing the return key during return.
Photo / video
EN
Press the camera key briefly to take a photo. The camera icon will glow for a while on the displa.
Hold the camera key for at least 2 seconds and the drone camera will start recording a video. A flashing icona 📋 shows up on the display. Hold the camera key longer to finish recording (see: fig. 27).
NOTE: when there is no memory card in the camera or the memory card is damaged, you cannot take pictures or record videos through a remote control key. In such situation this option is available through a smartphone app only. The memory card slot is on the rear of the camera. Maximum capacity of the MicroSD card: 32 GB.
Before first use
- Check if the battery of the remote control and drone is full.
- Check if the airscrews have been installed properly.
- Check if motors work properly after the drone has been unlocked.
How to start fast
- Pair the remote control with drone. Perform detection procedure.
- Calibrate the drone compass.
- Unlock the drone.
- Push the bar to lift the drone (A in fig. 22). Now you can control the route of the flight.
- Land the drone. Lock the drone.
- Remove the battery from the drone and switch the controller off.
How to pair the drone with the app
Switch the drone on. Enter WiFi settings on your mobile phone. Find and select the network called „drone4*****”. Enter the application - M RC PRO, and then press „Start” to see the real-time broadcast from the drone.
The drone uses 5GHz Wi-Fi. Make sure your device with application supports this standard, otherwise you will not be able to connect to the drone.
Controller status indicators
| Controller status Description | ||
| 1 | Signal strength indicator switches between strong and weak. | Controller loses signal. |
| 2 | Controller light indicators flash slowly, the remote control emits a sound, and battery indicator flashes on the LCD screen. | Flat battery of the controller, you have to charge it. |
| 3 | Battery indicator is as follows: , dadditionally it emits a sound. | The drone battery goes flat gradually. If the drone flight altitude exceeds 30 meters and the distance between the drone and controller exceeds 100 meters - the drone will return to the spot marked as „home”. |
| 4 | Battery indicator is as follows: and the device emits a constant long sound. | Drone battery is flat. The drone will return automatically if its altitude exceeds 15 m or its distance exceeds 15 m. If the distance is lower, the drone will land instantly. |
| 5 | The signal strength on the display shows fewer than two points or shows no point, the device emits a constant long sound. | 1. Distance between the drone and remote control is too long, which affects the signal quality.2. Drone battery has been removed after pairing with the remote control. |
Drone indicators
EN
| Drone status Description | ||
| 1 | Front and rear lights flash fast in yellow. | The drone is not connected to the remote control. |
| 2 | Front and rear lights flash alternately: in red, green and yellow. | The drone tries to connect to the remote control. |
| 3 | Front lights glow in red and rear lights in yellow | The drone is not connected to GPS. |
| 4 | Front lights glow in red and rear lights in green. | The drone is connected to GPS. |
| 5 | Front and rear lights flash in green. | The drone calibrates the gyroscope. |
| 6 | Front and rear lights flash alternately in yellow. | The drone is in the horizontal compass calibration mode. |
| 7 | Front and rear lights flash alternately in green. | The drone is in the vertical compass calibration mode. |
| 8 | Front lights glow in red, rear lights flash slowly in red. | The drone battery goes flat gradually, there is about 1/6 of the capacity. The icon shows up on the controller. |
| 9 | Front lights glow in red, rear lights flash fast in red. | Bateria drona jest wyczerpana, The drone battery is flat, there is about 1/9 of the capacity. The icon shows up on the controller. |
| 10 | Front and rear lights flash once every 1,5 sec. | Gyroscope issue. |
| 11 | Front and rear lights flash twice every 1,5 sec. | Barometer issue. |
| 12 | Front and rear lights flash three times every 1,5 sec. | Compass issue. |
| 13 | Front and rear lights flash four times every 1,5 sec. | GPS issue. |
Troubleshooting
| 1 After the flight, the drone cannot remain horizontal in the air, it tilts to one side. | Position the drone on a flat and horizontal surface. Calibrate the gyroscope. |
| 2 The drone vibrates abnormally. The airscrew may be deformed.Please replace it. | |
| 3 Impossible to unlock the drone,the light on the rear LED flashes fast. | The battery is about to go flat,please charge it. |
EN
How to clean and maintain
- Do not use chemicals to clean the drone.
- Do not use water to clean the drone.
- To clean the drone and its accessories, switch the device off, remove the battery and wipe with a dry cloth.
- The drone and its elements must be stored in a dry place, remember to keep it out of reach of children.
Note: Temperature fluctuations can cause water to condense in the device.
Device operating temperature: from 5°C to 40°C.
Class 4 wind resistance (max. 7.9 m/s).
The pictures are for reference only. The real design of the products may differ from the pictures presented.
OVERMAX
You • unlimited
Einleitung
Snelle start / landing
- CE
- OVERMAX
- Wprowadzenie
- Drogi Kliencie!
- Important
- EN
- BATTERY REMARKS
- Description
- Drone (fig. 1)
- Controller (fig. 2 and 3)
- Functions
- Photo/video
- Quick take-off/landing
- Return
- Lock
- Speed change
- GPS / ATTI
- Camera angle (fig. 4)
- Display icons (fig. 5)
- How to assemble and disassemble drone airscrews
- A - How to assemble an airscrew rotating clockwise
- B - How to assemble an airscrew rotating anti-clockwise
- How to disassemble airscrews
- How to assemble chassis legs
- How to assemble batteries
- How to disassemble batteries
- How to charge batteries
- How to assemble the camera
- How to disassemble the camera
- How to adjust the camera angle
- How to assemble a battery in the remote control
- How to connect the remote control to the dron
- Control mode
- To change the mode:
- How to calibrate the gyroscope
- Detection mode
- How to calibrate the compass
- Horizontal calibration
- Vertical calibration
- NOTE:
- How to lock and unlock the drone
- You can lock (stop motors) the drone in two ways:
- How to control the drone
- How to take off/land
- ATTI mode
- GPS mode
- How to return home
- Smart return
- Emergency return
- Low-battery return
- Photo / video
- Before first use
- How to start fast
- How to pair the drone with the app
- Drone indicators
- Troubleshooting
- How to clean and maintain
- Einleitung
- Snelle start / landing
Brand : Overmax
Model : X-Bee Drone 9.5
Category : Drone