
DO249SV - Vacuum Cleaner DOMO - Free user manual and instructions
Find the device manual for free DO249SV DOMO in PDF.


| Appliance type | 2-in-1 stick vacuum |
| Brand | DOMO |
| Model | DO249SV |
| Power supply | Rechargeable battery with mains adapter |
| Number of speeds | 3 (ECO, MED, HI) |
| Brush type | Motorized rotating brush for floors |
| Filter | Washable HEPA filter |
| Dustbin capacity | Approximately 0.5 L (not precisely specified) |
| Runtime | Variable depending on speed (not communicated) |
| Charging time | 24 h for first charge, 3 full charges recommended |
| Included accessories | Crevice tool, small dusting brush, charging station |
| Display screen | Battery indicator and suction power |
| Dustbin mode | Detachable for portable use |
| Automatic safety shut-off | Yes, in case of blockage or overload |
| Weight | Approximately 2.5 kg (estimate) |
| Warranty | 2 years |
| Customer service | +32 14 21 71 91 / info@linea2000.be |
| Cleaning the dustbin | Washable with water, must be dried |
| Brush maintenance | Removable and washable with water |
| Battery type | Lithium-ion (not specified, assumed) |
| Recycling | Battery and appliance recyclable at collection points |
Frequently Asked Questions - DO249SV DOMO
User questions about DO249SV DOMO
0 question about this device. Answer the ones you know or ask your own.
Ask a new question about this device
Download the instructions for your Vacuum Cleaner in PDF format for free! Find your manual DO249SV - DOMO and take your electronic device back in hand. On this page are published all the documents necessary for the use of your device. DO249SV by DOMO.
USER MANUAL DO249SV DOMO
natural_image
Exterior view of a modern electric vacuum cleaner (no text or symbols visible)EN Instruction booklet 2-in-1 Stick vacuum cleaner
Read all instructions carefully.
Save this instruction manual for future reference.
⚠PRODUCTSPECIFIEKE WAARSCHUWINGEN
natural_image
Mechanical assembly diagram showing a linkage mechanism with no text or symbolsMONTAGE OPLAADSTATION
natural_image
Technical line drawing of a mechanical component with two views: top shows a vertical bracket and bottom shows a rectangular base (no text or symbols)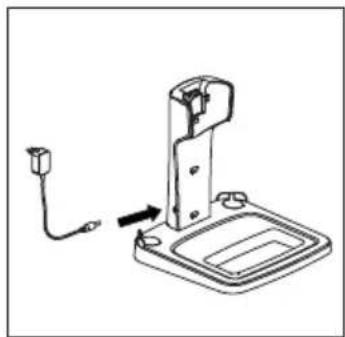
natural_image
Technical line drawing of a mechanical device with a cable and connector (no text or symbols)OPLADEN
natural_image
Close-up of a black and silver electric vacuum cleaner with blue control buttons and a white handle (no text or symbols visible)ACCESSOIRES
natural_image
Two black handheld vacuum cleaner units with clear blue glass and white tip, shown from different angles (no text or symbols visible)REINIGING EN ONDERHOUD
HET TOESTEL PROPER MAKEN
natural_image
Close-up of a handheld vacuum cleaner with a green handle and blue interior (no visible text or symbols)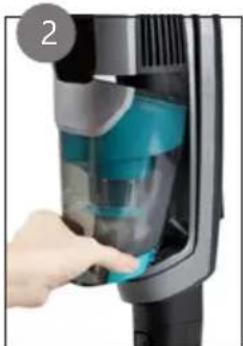
natural_image
Close-up of a hand pressing down on a blue-tinted industrial vacuum cleaner (no text or symbols visible)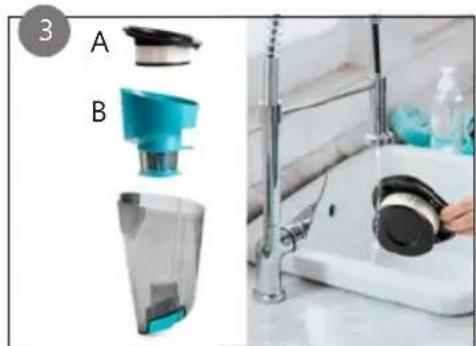
natural_image
Product photo showing a kitchen appliance with labeled parts (A and B) and a close-up of the kitchen sink (no visible text or symbols)natural_image
Close-up of a black and white hover cleaner with a handle and indicator lights (no text or symbols visible)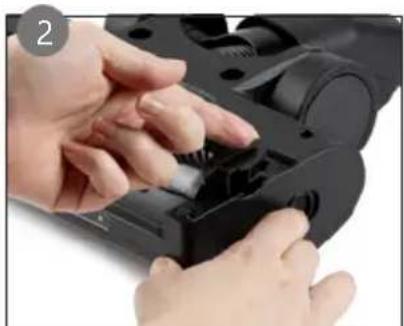
natural_image
Close-up of hands installing or adjusting a black plastic component (no visible text or symbols)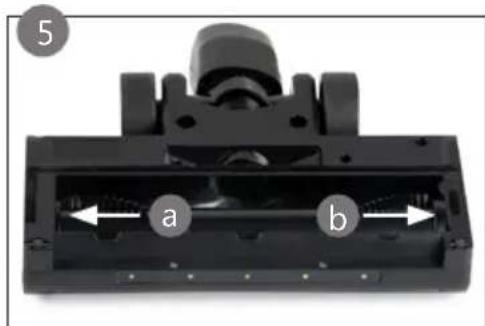
natural_image
Symbol of a trash bin with crossed lines indicating no waste or discharge (no text or numbers present)⚠️ AVERTISSEMENTS SPÉCIFIQUES AU PRODUIT
natural_image
Mechanical assembly diagram showing a linkage mechanism with motion arrows (no text or labels)MONTAGE DE LA STATION DE RECHARGE
natural_image
Technical line drawing showing two views of a mechanical device with a cable and connector (no text or symbols)CHARGE
natural_image
Close-up of a white and black electric vacuum cleaner with blue control panel (no visible text or symbols)ACCESSOIRES
natural_image
Two black handheld vacuum cleaner units with clear blue glass and white tip, shown from different angles (no text or symbols visible)NETTOYAGE ET ENTRETIEN
NETTOYER L'APPAREIL
natural_image
Close-up of a handheld vacuum cleaner with blue control buttons and a green handle (no text or symbols visible)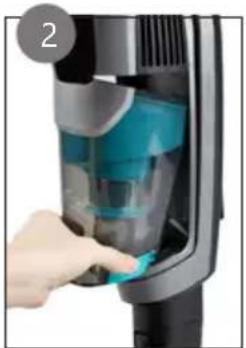
natural_image
Close-up of a hand pressing down on a blue-tinted industrial device component (no visible text or symbols)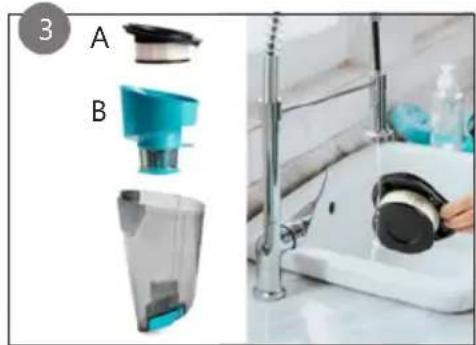
natural_image
Kitchen kitchen scene showing a cleaning brush and a hand washing a sink (no text or symbols visible)natural_image
Close-up of a black vacuum cleaner's head with LED lights, showing no text or symbols on the device itself.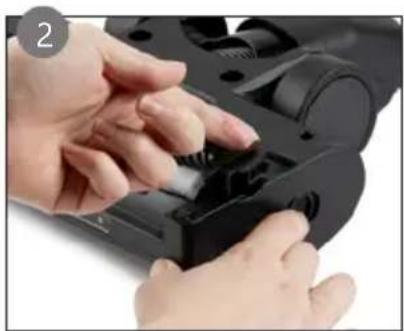
natural_image
Close-up of hands installing or adjusting a black plastic component (no visible text or symbols)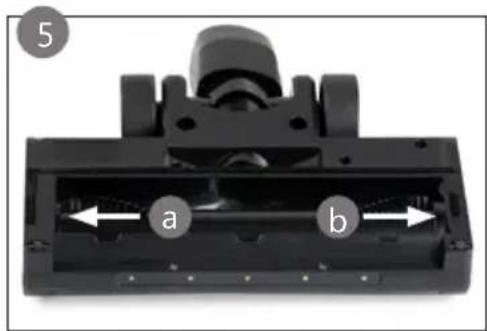
natural_image
Close-up of a mechanical component with labeled parts (a and b) and part number 5, showing internal structure without any readable text or symbols.natural_image
Symbol of a trash bin crossed with no text or numbers, representing waste sorting or disposal (no text present)natural_image
Technical line drawing of a mechanical component with two views: top shows a cylindrical part, bottom shows a rectangular base (no text or symbols)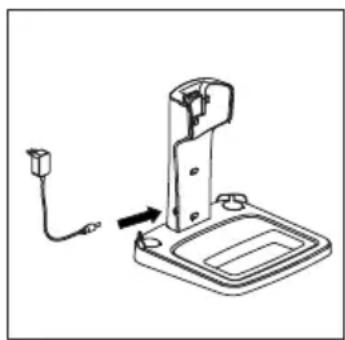
natural_image
Technical line drawing of a mechanical device with a cable and connector (no text or symbols)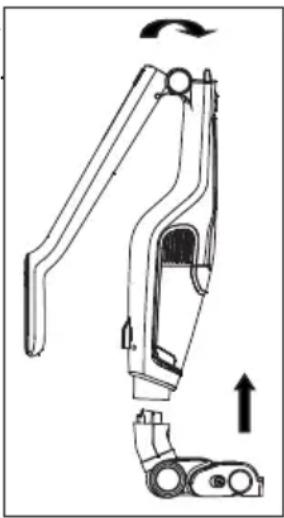
natural_image
Mechanical assembly diagram showing a lever mechanism with rotational and linear motion indicators (no text or labels)AUFLADEN
natural_image
Exterior view of a modern electric vacuum cleaner with blue control buttons and black handle (no text or symbols visible)ZUBEHÖR
natural_image
Two black handheld vacuum cleaner units with clear blue glass and white tip, shown from different angles (no text or symbols visible)natural_image
Close-up of a handheld vacuum cleaner with blue control buttons and a numbered callout (no text or symbols on the device itself)
natural_image
Close-up of a hand inserting a blue plastic bag into a vacuum cleaner's air vent (no text or symbols visible)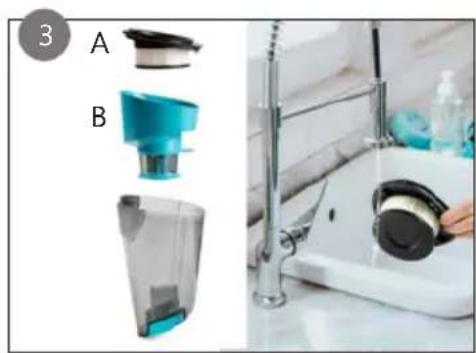
natural_image
Product photo showing a kitchen sink with a brush and cleaning tool, alongside a close-up of the brush (no visible text or symbols)
natural_image
Close-up of a black and white vacuum cleaner's head with a blue indicator light, showing no text or symbols on the device itself.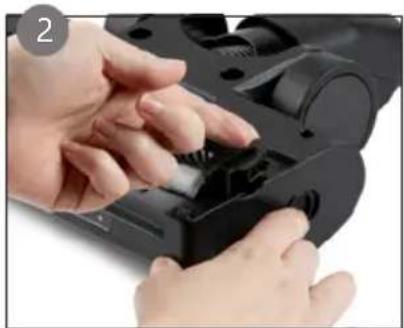
natural_image
Close-up of hands installing or adjusting a black plastic component (no visible text or symbols)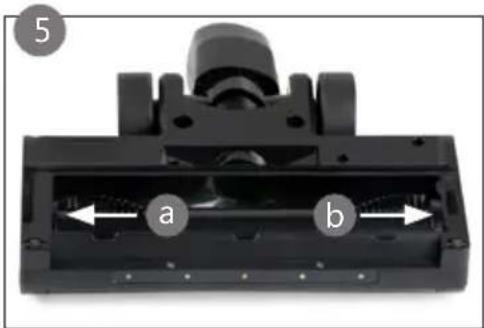
natural_image
Close-up of a mechanical component with labeled parts (a and b) and a numbered marker (5), no readable text or symbols beyond labels.natural_image
Symbol of a trash bin crossed with two crossed lines, no text or numbers presentThank you for your confidence in DOMO. We do hope you enjoy your new purchase. Before reaching you, all our products undergo a strict quality inspection. Should you still encounter problems with your appliance, then we are truly sorry and will do everything possible to resolve the situation quickly. Do not hesitate to contact our customer service. Our staff will do all they can to help you!
+32 14 21 71 91 info@linea2000.be

Monday - Thursday: 8.30 - 12.00 and 13.00 - 17.00
Friday: 8.30 - 12.00 and 13.00 - 16.30
This device has a warranty period of 2 years from the date of purchase. During this warranty period, the distributor will assume responsibility for any defects that can be shown to be the result of material, construction or manufacturing errors. Such defects will be remedied by repair or replacement of the device. The 2-year warranty period will be suspended during the repair period and will continue after the repair has taken place for the remaining duration of the warranty period. The warranty will be honoured if proof of purchase clearly showing the date of purchase is provided. If your device becomes defective within the 2-year warranty period, please return it with your proof of purchase to the store you purchased it from or follow the procedure of the relevant webshop if you bought it online.
The warranty does not cover damage to the device, accessories or parts caused by:
• normal wear and tear from use;
• non-compliance with the instructions for use, maintenance and cleaning in the manual;
- incorrect connection, e.g. electrical voltage too high;
- incorrect, heavy-handed or abnormal use;
• repairs or alterations carried out by the consumer or unauthorised third parties;
- use of parts or accessories not recommended nor supplied by the distributor.
SAFETY INSTRUCTIONS
When using electrical appliances, basic safety precautions should always be taken, including the following. Any injury or damage caused by failure to comply with these rules are at your own risk. Neither the manufacturer, importer, or the supplier may be held liable.
- Read all instructions carefully.
• Make sure all packaging materials and promotional stickers have been removed before using the appliance for the first time. Make sure children cannot play with the packaging materials. -
This appliance is only suitable for use in domestic and similar environments, such as:
-
staff kitchen areas in shops, offices and other working environments;
- farm houses;
- by clients in hotels, motels and other residential type environments;
• bed and breakfast type environments.
• Children should be supervised to ensure that they do not play with the appliance.
- This appliance can be used by children aged from 16 years and above and persons with reduced physical, sensory or mental capabilities or lack of experience and knowledge if they have been given supervision or instruction concerning use of the appliance in a safe way and understand the hazards involved.
• Children shall not play with the appliance.
- Cleaning and user maintenance shall not be made by children unless they are older than 16 or supervised.
- Keep the appliance and its cord out of reach of children younger than 16 years.
- All repairs should be carried out by the manufacturer or its aftersales service.
⚠️ELECTRICAL WARNINGS
- In order to avoid a hazard this appliance must not be supplied through an external switching device, such as a timer or a
separate remote control, or connected to a circuit that is regularly switched on and off by the utility.
- The appliance must be disconnected from its power source when not in use, during service and when replacing parts. If present, first turn all the buttons to the 'off' position, then pull the plug out of the socket by grasping the plug itself. Never pull the cord or appliance to remove the plug from the socket.
- Before use, check carefully that the electric tension and frequency of the power net at your home match the indications on the rating label of the appliance.
- The appliance must be plugged into an appropriate outlet that is installed in accordance with local installation regulations.
- Do not let the power supply cord hang over the edge of a counter, or touch hot surfaces.
- Keep the power cord away from hot parts and don't cover the appliance.
- Unwrap the cord completely to prevent overheating of the cord. Do not allow the power cord supply to run underneath or around the unit.
- For safety reasons, never use the appliance if the cord, plug, or appliance itself is damaged, or after a malfunction of the appliance. Return the appliance to the DOMO Service Department or its service agent for examination, repair, or electrical or mechanical adjustment. Do not try to repair the appliance yourself.
⚠️INSTALLATION
- Do not place near flammable materials, gases or explosives.
- Do not use or store this appliance outdoors.
• Always use the appliance on a steady, dry and level surface.
- Never place this appliance near a gas stove or electrical stove or in a place where it may come into contact with a warm appliance.
⚠ USE
- Do not use this appliance for other than intended use.
- Never leave the appliance unattended while it is functioning.
- Do not operate the appliance with wet hands.
- The use of accessories that are not recommended or sold by the manufacturer can cause fire, electrical shock or injuries. Only use the utensils delivered with the appliance.
⚠ CLEANING AND MAINTENANCE
- To protect against electrical shock or burns, do not immerse unit, cord, or plug in water or other liquid.
- Failure to maintain this appliance in a clean condition could adversely affect the life of the appliance and possibly result in a hazardous situation.
⚠PRODUCTSPECIFIC WARNINGS
- Do not use the vacuum cleaner to vacuum up detergents, liquids, needles, matches and other similar liquids, sharp objects or flammable objects.
- Do not use the vacuum cleaner to vacuum up cement, powder and other small particles. Avoid vacuuming large objects and items that could become entangled in the brush (long hair, plastic bags, string, etc.). Also avoid vacuuming up large objects. The vacuum cleaner could be clogged, the motor could overheat or other damage may occur.
- Make sure that the air intake or the floor suction opening do not become blocked.
- Make sure that the machine does not come into contact with liquids.
- First charge a new battery up completely.
- Pull the plug from the outlet when the vacuum cleaner is fully charged.
- This product contains a rechargeable battery. Batteries should be recycled. Do not drill into the battery or expose it to high temperatures; the battery could explode.
- Under extreme circumstances, there could be leakage of the battery.
- If the liquid from the battery comes into contact with the skin, remove all contaminated clothing and immediately wash the skin profusely with soap and water or take a shower. Contact a physician immediately if you continue to feel a burning sensation.
- If the liquid comes into contact with the eyes, rinse abundantly with water for at least 15 minutes until the irritation subsides and contact a doctor immediately.
- When inhaling any fumes that were released, immediately move into the fresh air and take a deep breath in and out.
Contact a doctor immediately if you experience shortness of breath, dizziness, or headaches.
- If a battery or the liquid from a battery is swallowed, seek medical assistance immediately. Try not to induce vomiting and do not eat or drink anything.
- Do not place foreign objects in the openings of your machine. Do not use the machine if an opening is blocked. Keep the machine free from dust, dirt, hair or anything that could reduce the air supply.
- Remove large and sharp objects from the floor to prevent damage to the plastic components, the brushes and the motor.
- Keep hair, loose clothing, fingers and other body parts away from openings and moving parts.
- Never use the appliance without filters. This will damage the motor and render it unusable.
SAVE THESE INSTRUCTIONS FOR FUTURE REFERENCE
All images and descriptions in this manual are purely indicative and may differ slightly from the actual device.
PARTS
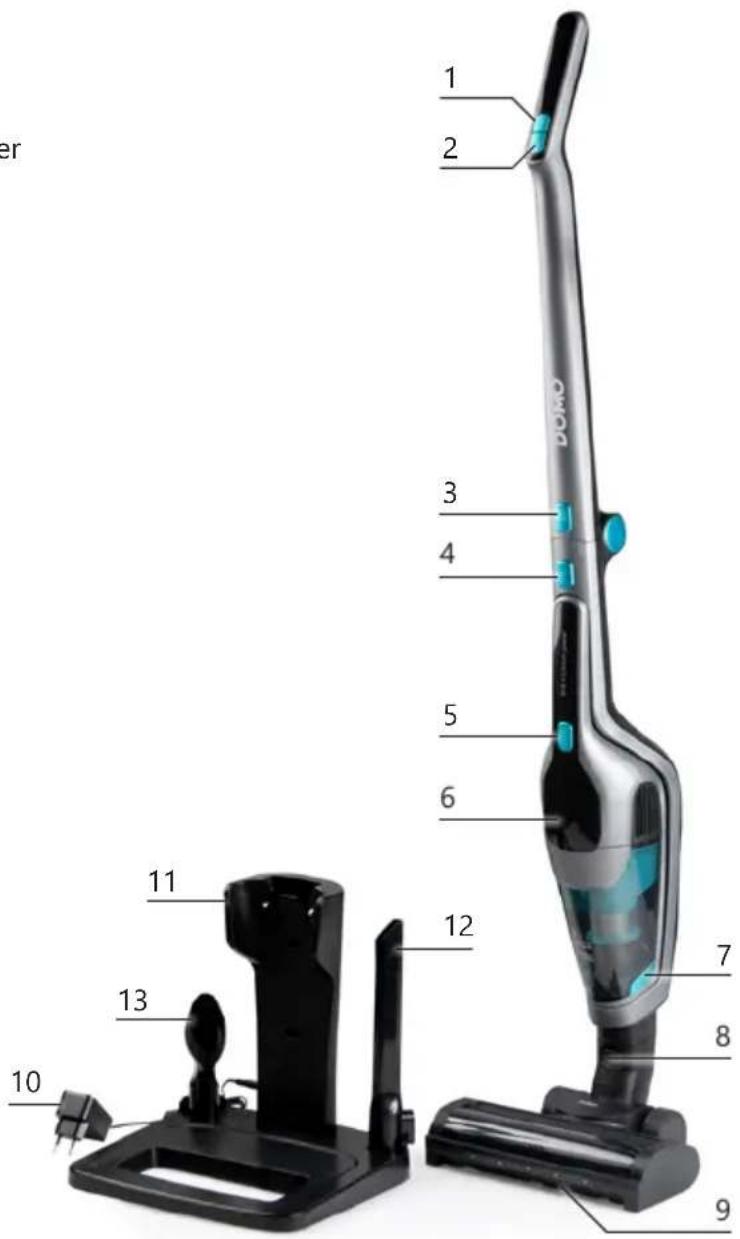
- On-off button
- Speed control
- Button to bend the handle
- Release button hand-held vacuum cleaner
- On-off button hand-held
- Display
- Unlock button for dust reservoir
- Release button floor nozzle
- Floor nozzle with rotating floor brush
- Adapter
- Charging station
- Crevice vacuum cleaner
- Dust brush
DISPLAY
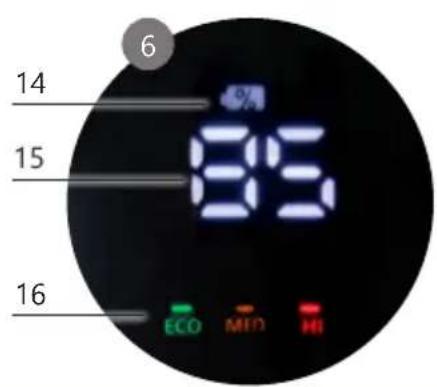
- Battery symbol
- Battery level indicator
- Suction power indicator
BEFORE THE FIRST USE
- Remove all packaging materials and any promotional stickers.
- Wipe the unit and all parts down with a soft, damp cloth.
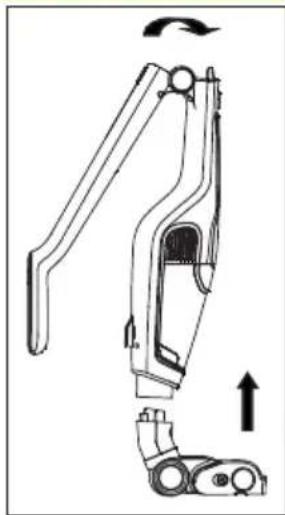
STICK VACUUM CLEANER ASSEMBLY
To set up the machine properly, please follow the steps below:
- Straighten the handle of the stick vacuum until it clicks into position.
- Make sure that the floor nozzle is clicked on tightly to the stick vacuum cleaner.
natural_image
Mechanical assembly diagram showing a linkage mechanism with motion indicators (no text or labels)CHARGING CRADLE ASSEMBLY
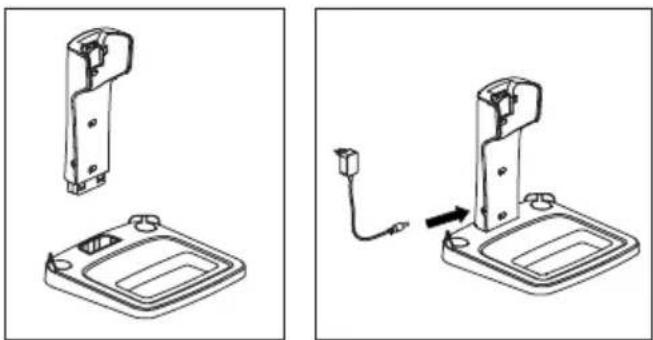
- Push the back of the charging cradle onto the base of the station until it clicks into position.
- The charging station has a holder for the accessories included.
- Attach the charger to the charging station via the in-built connector on the side and then plug the adapter into the wall socket.
natural_image
Technical line drawing showing two views of a mechanical device with a cable and connector (no text or symbols)CHARGING
- Place the hand-held vacuum into the stick vacuum cleaner.
- Put the stick vacuum cleaner into the charging station, so that the contact points on the vacuum cleaner are aligned with the contact points on the charging station. Push the vacuum cleaner and the charging station together so that the stick vacuum cleaner remains standing vertically on the station. Make sure it all is stable.
- The battery symbol will flash on and off while charging. The battery level indicator will now light up. The battery percentage will increase until fully charged at 100%. When fully charged, the battery symbol will stop flashing and remain lit.
- The machine cannot be started during charging.
REMARKS:
- Prior to first use, charge the machine for 24 hours in order to be able to utilize the full capacity of the battery.
- It is recommended that the battery be fully charged for the first three charges.
- The temperature while charging should be between 15 °C and 25 °C. Higher or lower temperatures reduce battery life.
- It is recommended that the vacuum cleaner be charged after each use regardless of the duration of the use.
- Do not charge the battery for extended periods. This can damage the battery. Disconnect the adapter once the battery is fully charged.
- The recommendation is to disconnect the adapter if the vacuum cleaner is not used for more than two months. To ensure a longer lifespan, the battery must be charged at least once every two months.
- The battery and adapter may become hot during charging. Take the necessary precautions to avoid coming into contact with it during this time.
USE
-
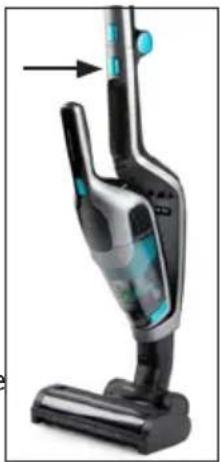
Press the on-off switch on the handle to turn the machine on. Press again to stop. When you switch on the machine, the rotating floor brush at the bottom of the floor nozzle will begin to turn. This will cause the dirt in the opening to be shifted and thereby vacuumed up. The dirt will be collected in the dust reservoir of the hand-held vacuum cleaner.
-
Press the speed control to increase or lower the suction power. You can choose between the following speeds:
-
ECO: low
- MED: medium
-
HI: high
-
Press the release button to remove the hand-held vacuum cleaner and only use the hand-held vacuum cleaner. To use just the hand-held vacuum, press the on-off switch on the hand-held vacuum cleaner. You cannot control the speed when used as a hand-held vacuum. The suction power of the hand-held vacuum is set to high (HI) by default.
-
When the battery is low (<10%), the battery symbol and "LO" will flash on and off on the display. The device will then switch itself off.
The machine is equipped with a safety which will ensure that the machine shuts itself off if, for example, objects which are too large are sucked up, or if fingers become tangled in the floor brush. This is for personal safety and to protect the motor. To reverse the floor brush, press the on/off button again.
natural_image
Close-up of a black and silver handheld vacuum cleaner with blue control buttons, mounted on a stand (no visible text or symbols)ACCESSORIES
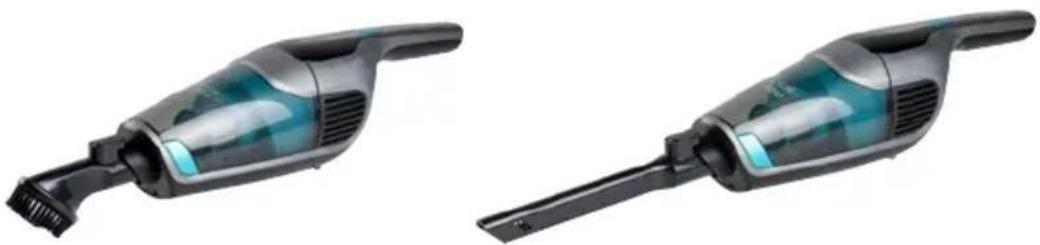
You can attach the following accessories to the hand-held vacuum:
- Dust brush: for furniture, bookshelves, curtains and hard to clean surfaces.
- Crevice vacuum cleaner: for crevices, corners, stairs, keyboards,...
natural_image
Two black handheld vacuum cleaner units with blue internal structure, shown from different angles (no text or symbols visible)CLEANING AND MAINTENANCE
CLEANING THE APPLIANCE
Clean the appliance with a slightly moist soft cloth. Dry the machine off well.
Do not immerse unit, cord, or plug in water or other liquid.
⚠️ Never use aggressive or abrasive cleaning agents.
CLEANING THE DUST RESERVOIR
Empty the dust container after each cleaning session;
-
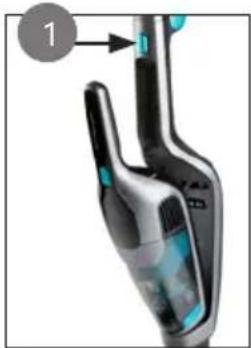
Remove the hand-held vacuum cleaner from the stick vacuum and press the release button on the dust reservoir on the hand-held vacuum cleaner.
-
Remove the dust reservoir from the motor section. Then take the filters out of the dust reservoir. Pull it towards you by the handle.
-
Empty the dust reservoir. Pull the HEPA filter out of the filter holder. The dust container, filter holder (B), and HEPA filter (A) may be cleaned under running water. Do take care to dry them completely before using them again in the machine.
-
Put the dry filters back in the dust container. Put the dust container back in the hand-held vacuum: first put the top back in position and then click the bottom into place.
natural_image
Close-up of a handheld vacuum cleaner with a hand gesture and blue control buttons (no visible text or symbols)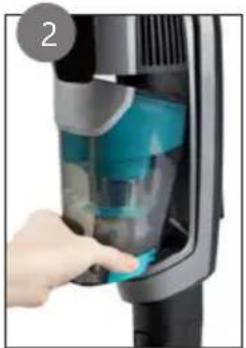
natural_image
Close-up of a hand inserting a blue plastic bag into a black industrial machine (no text or symbols visible)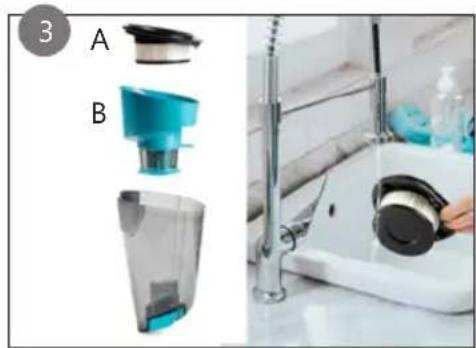
natural_image
Kitchen sink with cleaning tools and a kitchen sink, showing product images (no text or symbols visible)⚠️ We advise replacing the filters regularly to ensure an optimal operation of the machine. Dirty filters will reduce the suction power drastically. After every cleaning, clean the dust reservoir and the filters to extend the life span of your machine.
CLEANING THE FLOOR BRUSH
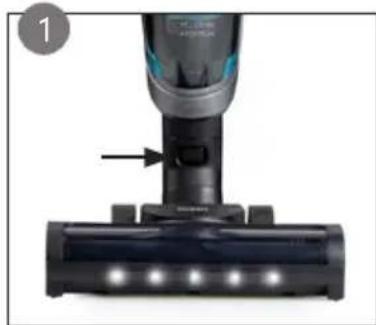
- Remove the floor nozzle from the upright vacuum cleaner. Press the release button at the back of the floor nozzle and remove it from the machine.
- Slide up the release on the right side of the floor nozzle and simultaneously remove the rotating floor brush from the floor nozzle. Use the tab to do this.
- Gently remove any hair and dirt from around the brush; do this by hand or carefully with a knife.
- The rotating floor brush may be rinsed off under running water. Make sure that it is completely dry before using it.
- To refit the brush, place the left side of the brush against the gear (a) and push the right side (b) until it clicks into place.
- Push the nozzle back onto the stick. The machine is now again ready for use.
natural_image
Close-up of a black vacuum cleaner's head with a blue handle and orange arrow pointing to the left side (no text or symbols visible)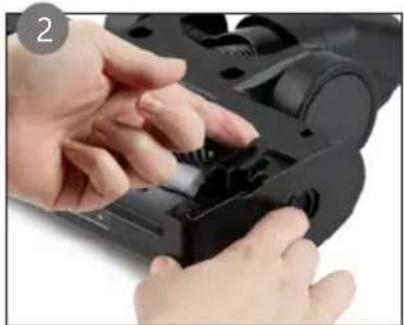
natural_image
Close-up of hands installing or adjusting a black plastic device component (no visible text or symbols)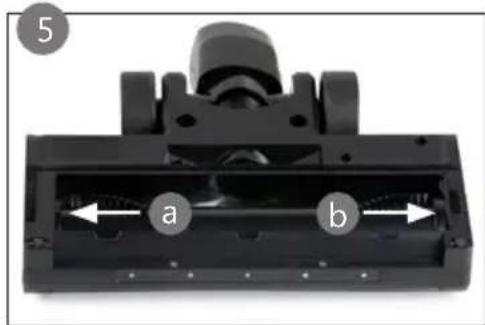
natural_image
Close-up of a mechanical device with labeled parts (a and b) and directional arrows, no readable text or symbols beyond labels⚠️ Stuck hairs can damage the machine or your floor. Always remove the hairs stuck on the brushes.
PROBLEMS AND SOLUTIONS
| PROBLEMS SOLUTIONS | |
| The machine does not start up. • The battery is empty. | Charge the machine.The hand-held vacuum cleaner is not correctly mounted on the stick vacuum cleaner. Make sure that the hand-held vacuum cleaner is correctly installed. |
| Loss of suction. • The filters are dirty/the dust reservoir is full. | Clean the machine as described in this manual. If necessary, replace the HEPA filter.The floor nozzle or tube is clogged. Turn off the vacuum cleaner and remove the object blocking the floor nozzle or tube. |
| The rotating floor brush is not rotating. | The floor brush is blocked. Turn off the vacuum cleaner and remove the object blocking the floor brush.The floor brush is assembled incorrectly.Follow the instructions to correctly assemble the floor brush as described in this manual. |
| The battery symbol and 'LO' is flashing. • The battery is empty. | Charge the machine. |
| The appliance does not charge any more. • Check that the hand-held vacuum is correctly placed in the stick vacuum cleaner.Insert the adapter plug correctly into the charging cradle. Plug the adapter into a working socket. | |
| The battery drains quickly. • Fully charge the appliance before using it.Check that there is no blockage in the floor nozzle and clean the filters and brush as described in the 'Cleaning and maintenance' section.The roller brush experiences more resistance on carpeting and the battery will run down faster than on a hard floor. This is normal. |
GUIDELINES
natural_image
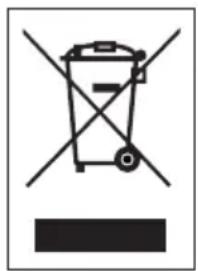
Symbol of a trash bin crossed with two crossed lines and a solid black rectangle below (no text or labels)This symbol on the product or on its packaging indicates that this product may not be treated as household waste. Instead it must be brought to the applicable collection point for recycling of electrical and electronic equipment. By ensuring this product is disposed of correctly, you will help prevent potential negative consequences for the environment and human health, which could otherwise be caused by inappropriate waste handling of this product. For more detailed information about recycling of this product, please contact your local city office, your household waste disposal service or the shop where you purchased the product.

The packaging is recyclable. Please treat the packaging ecologically.
REMOVABLE BATTERY
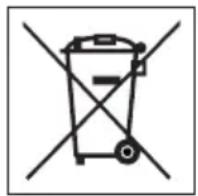
The appliance is battery-operated, and the battery must not be disposed of with household waste, even after use. You can take the appliance to a collection point for discarded electrical appliances (Recupel) in your neighbourhood (container park, specialist shop, etc.). Batteries contain substances that are dangerous to human health and to the environment.
Remove the battery from the appliance before disposal as described in this manual. Recycle the battery in accordance with local laws and regulations. Never pierce the battery or expose it to high temperatures; this may cause the battery to explode.

This appliance conforms to all European requirements in the areas of safety, health, and environmental protection.
The EU declaration concerning this appliance can be requested at any time from info@linea2000.be
GARANTIA
Estimado cliente,
natural_image
Mechanical assembly diagram showing a lever mechanism with motion indicators (no text or labels)MONTAJE DE LA BASE DE CARGA
natural_image
Technical line drawing of a mechanical component with two views: top shows a cylindrical part, bottom shows a rectangular base (no text or symbols)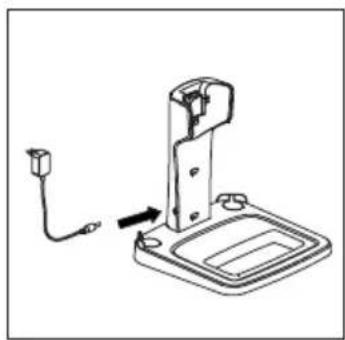
natural_image
Technical line drawing of a mechanical device with a cable and connector (no text or symbols)CARGA
natural_image
Close-up of a white and silver electric vacuum cleaner with blue control buttons, mounted on a black base (no visible text or symbols)ACCESORIOS
natural_image
Two black handheld vacuum cleaner units with blue internal structure, shown from different angles (no text or symbols visible)LIMPIEZA Y MANTENIMIENTO
LIMPIAR EL APARATO DE POLVO
natural_image
Close-up of a handheld electronic device with a green handle and display screen (no visible text or symbols)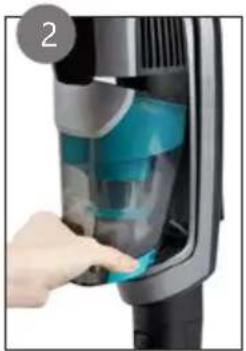
natural_image
Close-up of a hand placing a blue plastic bag into a black industrial machine (no visible text or symbols)
natural_image
Product photo showing kitchen cleaning tools including a hand mixer and a hand washing a sink (no text or symbols visible)natural_image
Close-up of a black and white hover cleaner with blue control panel and orange arrow indicator (no text or symbols)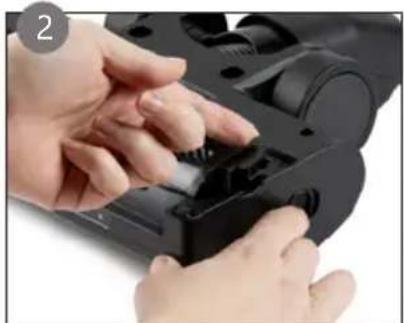
natural_image
Close-up of hands installing or adjusting a black plastic component (no visible text or symbols)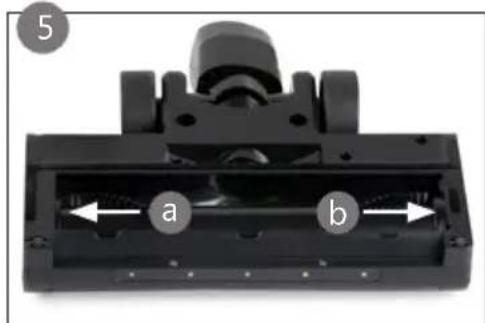
natural_image
Close-up of a black mechanical component with labeled parts (a and b), no visible text or symbols beyond labelsnatural_image
Symbol of a trash bin crossed with two crossed lines and a black rectangular base (no text or numbers present)natural_image
Mechanical assembly diagram showing a linkage mechanism with motion indicators (no text or labels)natural_image
Technical line drawing of a mechanical component with two views: top shows a cylindrical part, bottom shows a rectangular housing (no text or symbols)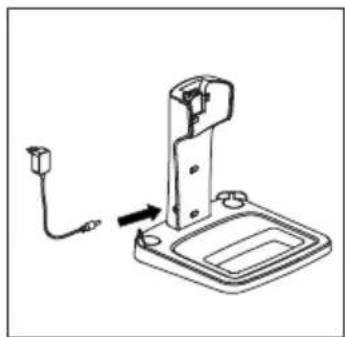
natural_image
Technical line drawing of a mechanical device with a cable and connector (no text or symbols)CARICAMENTO
natural_image
Exterior view of a modern electric vacuum cleaner (no text or symbols visible)ACCESSORI
natural_image
Two black handheld vacuum cleaner units with clear blue glass and white handle, shown from different angles (no text or symbols visible)natural_image
Close-up of a handheld electronic device with a green indicator light and blue control buttons (no visible text or symbols)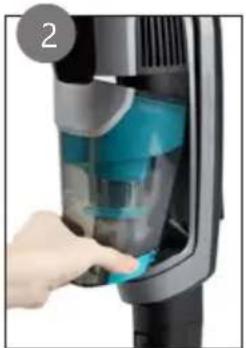
natural_image
Close-up of a hand pressing down on a blue-handled industrial vacuum cleaner device (no text or symbols visible)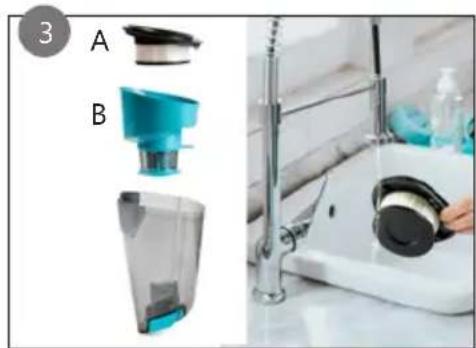
natural_image
Product photo showing kitchen cleaning tools including a brush and a water dispenser, with no visible text or symbols.natural_image
Close-up of a black vacuum cleaner's head with LED lights, showing no text or symbols on the device itself.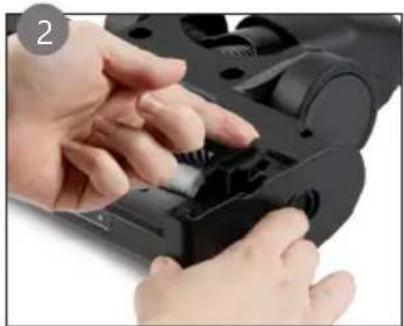
natural_image
Close-up of hands installing or adjusting a black plastic device component (no visible text or symbols)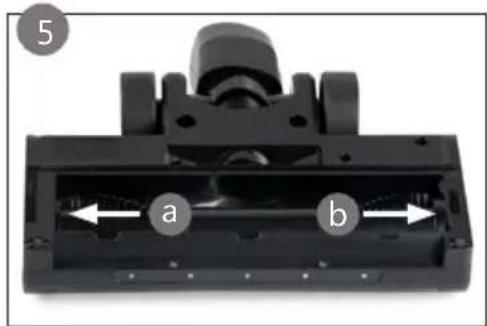
natural_image
Symbol of a trash bin crossed with a diagonal line, no text or numbers presentnatural_image
Mechanical assembly diagram showing a linkage mechanism with motion indicators (no text or labels)SESTAVA NABÍJECÍ KOLÉBKY
natural_image
Technical line drawing of a mechanical component with two views: top shows a bracket-like structure, bottom shows a rectangular housing (no text or symbols)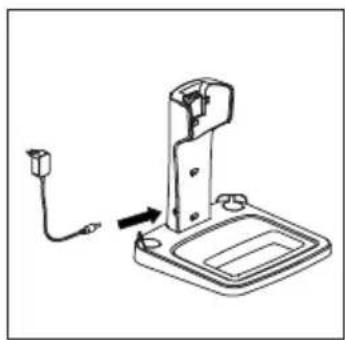
natural_image
Technical line drawing of a mechanical device with a cable and connector, no text or symbols presentNABÍJENÍ
natural_image
Close-up of a white and silver electric vacuum cleaner with blue control buttons, mounted on a black base (no visible text or symbols)PŘÍSLUŠENSTVÍ
natural_image
Two black handheld vacuum cleaner units with clear blue liquid, shown from different angles (no text or symbols visible)ČIŠTĚNÍ A ÚDRŽBA
ČIŠTĚNÍ PŘÍSTROJE
natural_image
Close-up of a hand holding a white handheld device with blue buttons and a small circular arrow labeled '1' pointing to it (no text or symbols on the device itself)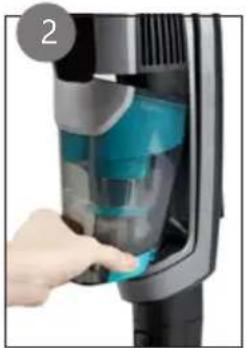
natural_image
Close-up of a hand inserting a blue plastic bag into a black industrial machine (no text or symbols visible)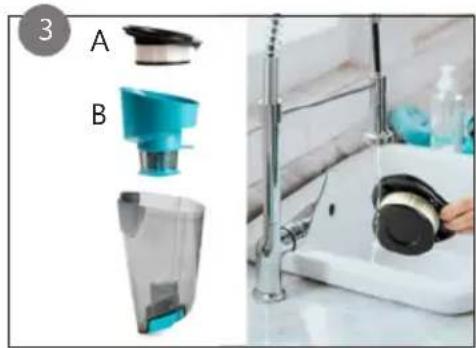
natural_image
Product photo showing kitchen cleaning tools including a brush and a washer (no visible text or symbols)natural_image
Close-up of a black vacuum cleaner's head with LED lights, showing no text or symbols on the device itself.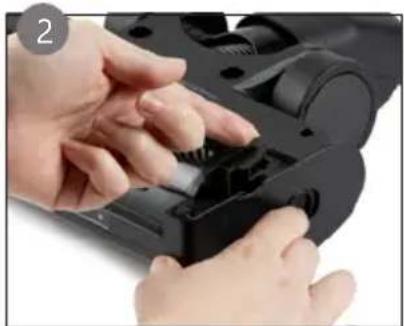
natural_image
Close-up of hands installing or adjusting a black plastic component (no visible text or symbols)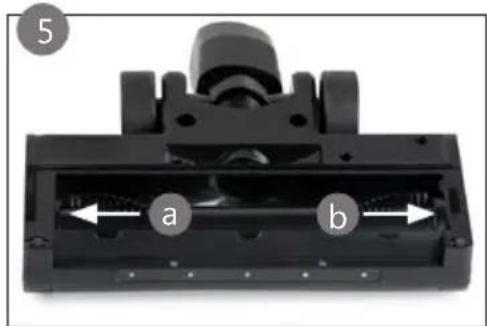
natural_image
Close-up of a mechanical component with labeled parts (a and b) and part number 5, showing internal structure without any readable text or symbols.natural_image
Symbol of a trash bin crossed with two crossed lines, no text or numbers presentnatural_image
Mechanical assembly diagram showing a linkage mechanism with motion indicators (no text or labels)ZOSTAVA NABÍJACEJ KOLÍSKY
natural_image
Technical line drawing of a mechanical component with two views: top shows a cylindrical part, bottom shows a rectangular base (no text or symbols)
natural_image
Technical line drawing of a mechanical device with a cable and connector (no text or symbols)NABÍJANIE
- Ručný vysávač musí byť vložený v tyčovom.
- Dajte tyčový vysávač do nabíjacej stanice tak, aby sa kontaktné body na vysávači spojili s kontaktnými bodmi na nabíjacej stanici. Zatlačte vysávač a nabíjaciu stanicu dohromady tak, že tyčový vysávač zostane stát zvisle na nabíjacej stanici. Uistite sa, že je všetko stabilný.
- Počas nabíjania bude symbol batérie blikat'. Potom sa rozsvieti indikátor stavu batérie. Percento batérie sa bude zvyšovať až do úplného nabitia na 100%. Po úplnom nabití prestane symbol batérie blikat' a zostane svietit'.
- Prístroj počas nabíjania nedá spustit.
POZNÁMKA:
natural_image
Close-up of a white and black electric vacuum cleaner with blue control buttons and a handle, mounted on a stand (no visible text or symbols)PRÍSLUŠENSTVO
natural_image
Two black handheld vacuum cleaner units with clear blue glass and white tip, shown from different angles (no text or symbols visible)ČISTENIE A ÚDRŽBA
ČISTENIE PRÍSTROJA
natural_image
Close-up of a handheld vacuum cleaner with blue-tinted handle and green handle (no visible text or symbols)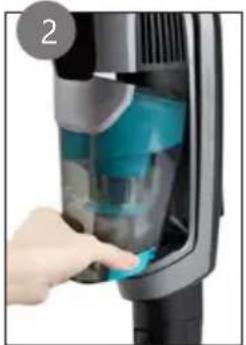
natural_image
Close-up of a hand inserting a blue plastic bag into a black industrial machine (no text or symbols visible)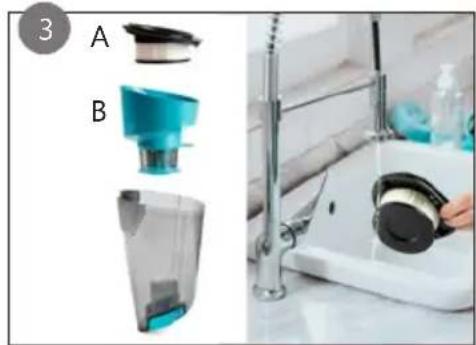
natural_image
Product photo showing a kitchen appliance with a brush and cleaning tool, alongside a close-up of the sink (no visible text or symbols)natural_image
Close-up of a black vacuum cleaner's head with a blue handle and orange arrow indicator (no text or symbols)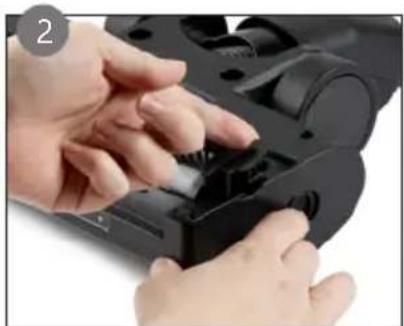
natural_image
Close-up of hands installing or adjusting a black plastic component (no visible text or symbols)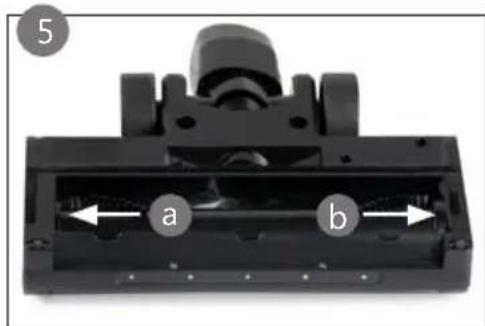
natural_image
Symbol of a trash bin with crossed lines indicating no waste or discharge, and a solid black rectangle below (no text or labels)natural_image
Symbol of a trash bin crossed out by two diagonal lines, representing no waste or discharge (no text or labels)VYBERATEL'NÉ/VYMENITEL'NÉ BATÉRIE
Looking for extra accessories or you have a broken piece?
ORDER the original DOMO accessories and parts on our webshop.
Webshop


natural_image
Stack of sheets of paper with a circular inset showing a small object, no visible text or symbols
natural_image
Two white plastic electrical connectors with ports and mounting brackets (no visible text or symbols)
natural_image
White rectangular container with black interior, no visible text or symbols
natural_image
Clear glass coffee maker with black handle and lid (no text or symbols visible)


- ⚠PRODUCTSPECIFIEKE WAARSCHUWINGEN
- MONTAGE OPLAADSTATION
- OPLADEN
- ACCESSOIRES
- REINIGING EN ONDERHOUD
- HET TOESTEL PROPER MAKEN
- ⚠️ AVERTISSEMENTS SPÉCIFIQUES AU PRODUIT
- MONTAGE DE LA STATION DE RECHARGE
- CHARGE
- NETTOYAGE ET ENTRETIEN
- NETTOYER L'APPAREIL
- AUFLADEN
- ZUBEHÖR
- SAFETY INSTRUCTIONS
- ⚠️ELECTRICAL WARNINGS
- ⚠️INSTALLATION
- ⚠ USE
- ⚠ CLEANING AND MAINTENANCE
- ⚠PRODUCTSPECIFIC WARNINGS
- SAVE THESE INSTRUCTIONS FOR FUTURE REFERENCE
- PARTS
- DISPLAY
- BEFORE THE FIRST USE
- STICK VACUUM CLEANER ASSEMBLY
- CHARGING CRADLE ASSEMBLY
- CHARGING
- REMARKS:
- USE
- ACCESSORIES
- CLEANING AND MAINTENANCE
- CLEANING THE APPLIANCE
- CLEANING THE DUST RESERVOIR
- CLEANING THE FLOOR BRUSH
- GUIDELINES
- REMOVABLE BATTERY
- GARANTIA
- MONTAJE DE LA BASE DE CARGA
- CARGA
- ACCESORIOS
- LIMPIEZA Y MANTENIMIENTO
- LIMPIAR EL APARATO DE POLVO
- CARICAMENTO
- ACCESSORI
- SESTAVA NABÍJECÍ KOLÉBKY
- NABÍJENÍ
- PŘÍSLUŠENSTVÍ
- ČIŠTĚNÍ A ÚDRŽBA
- ČIŠTĚNÍ PŘÍSTROJE
- ZOSTAVA NABÍJACEJ KOLÍSKY
- NABÍJANIE
- POZNÁMKA:
- PRÍSLUŠENSTVO
- ČISTENIE A ÚDRŽBA
- ČISTENIE PRÍSTROJA
Brand : DOMO
Model : DO249SV
Category : Vacuum Cleaner