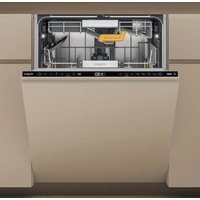
WH8IA15AM3TU0 - Dishwasher WHIRLPOOL - Free user manual and instructions
Find the device manual for free WH8IA15AM3TU0 WHIRLPOOL in PDF.


| Product type | Built-in dishwasher |
| Brand | Whirlpool |
| Model | WH8IA15AM3TU0 |
| Capacity | 15 standard place settings |
| Programs | Eco 50°, Intensive Auto 65°, Mixed Auto 55°, Quick Auto 50°, Quick 45°, Crystal 45°, Pre-wash, Self-Clean 65° |
| Options | Power Clean®, Half Load, Extra Dry, Silent, Turbo, Delayed Start, Antibacterial Rinse, Remaining Time on Floor, NaturalDry |
| Energy consumption (Eco cycle) | 0.55 kWh/cycle |
| Water consumption (Eco cycle) | 9.9 L/cycle |
| Dimensions (H x W x D) | 85 x 60 x 60 cm (estimated) |
| Weight | 50 kg (estimated) |
| Electrical supply | 220-240 V ~50 Hz, 10 A (estimated) |
| Noise level | 45 dB (estimated) |
| Drying system | NaturalDry (automatic door opening) |
| Special functions | Soil detection, water softener, interior light, floor projection |
| Maintenance | Filter cleaning, spray arm cleaning, descaling, salt and rinse aid refill |
| Safety | Alarms: water tap closed, descaling, leak (F8 E5) |
| Spare parts | Available via after-sales service and official website (up to 10 years) |
| General information | User manual available in PDF, scan QR code for details |
Frequently Asked Questions - WH8IA15AM3TU0 WHIRLPOOL
User questions about WH8IA15AM3TU0 WHIRLPOOL
0 question about this device. Answer the ones you know or ask your own.
Ask a new question about this device
Download the instructions for your Dishwasher in PDF format for free! Find your manual WH8IA15AM3TU0 - WHIRLPOOL and take your electronic device back in hand. On this page are published all the documents necessary for the use of your device. WH8IA15AM3TU0 by WHIRLPOOL.
USER MANUAL WH8IA15AM3TU0 WHIRLPOOL
THANK YOU FOR BUYING A WHIRLPOOL PRODUCT.
In order to receive a more complete assistance, please register your appliance on: www.whirlpool.eu/register
PLEASE SCAN THE QR CODE ON YOUR APPLIANCE IN ORDER TO HAVE MORE DETAILED INFORMATION

Before using the appliance carefully read Safety and Installation Instructions. After installation, please remember to remove all transport protection parts from the dishwasher.
CONTROL PANEL

text_image
1 2 3 4 5 6 7 8 9 10 11 12 13 14 15 16 17 18 19 20 21 22 Eco 50° 65° 55° 50° 45° 3 sec. 8:31 PONTS CLEAN 3 sec.- ON-OFF/Reset button with indicator light
- Eco program button with indicator light
- Auto Intensive program button with indicator light
- Auto Mixed program button with indicator light
- Auto Fast program button with indicator light
- Rapid program button with indicator light
- Crystals program button with indicator light/ Self-Clean program - 3 sec. press
- Prewash program button with indicator light
- Salt reservoir empty indicator light
- Rinse Aid reservoir empty indicator light
-
Display
-
Program number and remaining time indicator
- Closed water tap indicator light
- DESCALE indicator light
- Power Clean® option button with indicator light
- Half Load option button with indicator light
- Extra Dry option button with indicator light/ Settings - 3 sec. press
- Silent option button with indicator light
- Sani Rinse option button with indicator light
- Turbo option button with indicator light
- Delay option button with indicator light
- START/Pause button with indicator light
FIRST TIME USE
More information in the Daily Reference Guide on website.
SETTING MENU
- Switch on the appliance by pressing the ON-OFF ⏻ button.
- Hold the Settings ✪ (Extra Dry + ) button for 3 seconds, until you hear a beep and the display shows „SEt”.
- After one second the first available setting (letter, n ^1 b") will be displayed.
- Press Prewash program / Power Clean® option POWER CLEAN buttons to scroll through the list of available settings (see table below), then press START/Pause ▶ to view or change the value of currently selected setting.
- Press Prewash program 🤔 / Power Clean® option POWER CLEAN buttons to change the value, then press START/Pause ▶to save the new value.
- To change another setting, repeat points 2 and 5.
- Press ON-OFF (1) or wait 30 seconds to exit the menu.
| LETTER | SETTING | VALUES(Default - in bold)* |
| Cycle Counter - number of washing cycles carried out by the dishwasher. | Eg. 25 cycles: 25; Eg. 13.947 cycles: 13_947 (scrolling for 3 times) | |
| Water Hardness Level (see "SETTING THE WATER HARDNESS" and "WATER HARDNESS TABLE") | 1 | 2 | 3 | 4 | 5 | |
| Rinse Aid Level(see "ADJUSTING THE DOSAGE OF RINSE AID") | 0 | 1 | 2 | 3 | 4 | 5 | |
| NaturalDry (see "OPTIONS AND FUNCTIONS")“1" = On, "0" = Off | 1 | 0 | |
| Time on the floor (see "OPTIONS AND FUNCTIONS")“1" = On, "0" = Off | 1 | 0 | |
| Sound“1" = On, "0" = Off | 1 | 0 | |
| Internal Lights (see "OPTIONS AND FUNCTIONS")“1" = On, "0" = Off | 1 | 0 | |
| Factory Settings - press START/Pause to re-store to the factory default all the values of the settings included in the settings menu. | - |
*) The default value does not apply to the Cycle Counter.
FILLING THE SALT RESERVOIR
The use of salt prevents the formation of LIMESCALE on the dishes and on the machine's functional components. The salt reservoir is located in the lower part of the dishwasher (under the lower rack on the left side).
• It is mandatory that the salt reservoir never be empty.
• It is important to set the water hardness.
- Salt must be filled when the SALT REFILL indicator light S on the control panel is lit.
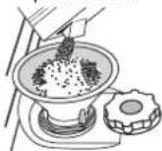
- Remove the lower rack and unscrew the reservoir cap (anticlockwise).
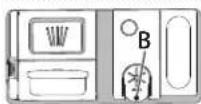
- Position the funnel (see figure) and fill the salt reservoir right up to its edge (approximately 0,5 kg); it is not unusual for a little water to leak out.
-
Only the first time you do this: fill the salt reservoir with water.
-
Remove the funnel and wipe any salt residue away from the opening.
Make sure the cap is screwed on tightly so that no detergent can get into the container during the wash program (this could damage the water softener beyond repair). Run a program every time as soon as you completed refilling the salt reservoir to avoid corrosion.
WATER SOFTENING SYSTEM
Water softener automatically reduces water hardness, consequently preventing scale buildup on the heater, contributing also to better cleaning efficiency. This system regenerates itself with salt, therefore it is required to refill the salt container when empty.
The frequency of regeneration depends on the water hardness level setting - regeneration takes place once per 4-6 Eco cycles with the water hardness level set to 3. The regeneration process occurs at the beginning of the cycle with additional fresh water.
• Single regeneration consumes \~3 L of water;
• Takes up to 5 additional minutes for the cycle;
• Consumes below 0.005kWh of energy.
FILLING THE RINSE AID DISPENSER
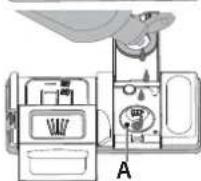
Rinse aid makes dish DRYING easier. The rinse aid dispenser A should be filled when the RINSE AID REFILL indicator light ✦ in the control panel is lit.
- Open the dispenser B by pressing and pulling up the tab on the lid.
- Pour in the rinse aid (max. 110 ml), making sure it does not overflow from the dispenser. If this happens, clean the spill immediately with a dry cloth.
- Press the lid down until you hear a click to close it. NEVER pour the rinse aid directly into the appliance tub.
FILLING THE DETERGENT DISPENSER
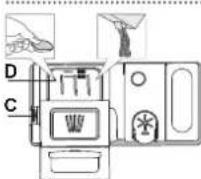
To open the detergent dispenser use the opening device C. Introduce the detergent into the dry dispenser D only. Place the amount of detergent for pre-washing directly inside the tub.
-
When measuring out the detergent refer to the mentioned earlier information to add the proper quantity. Inside the dispenser D, there are indications to help the detergent dosing.
-
Remove detergent residues from the edges of the dispenser and close the cover until it clicks.
- Close the lid of the detergent dispenser by pulling it up until the closing device is secured in place.
The detergent dispenser automatically opens up at the right time according to the program. Usage of detergent not designed for dishwashers may cause malfunction or damage to the appliance.
DISPLAY ON THE FLOOR
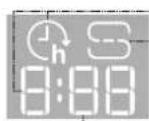
-1. Delay Time on the floor - indicator of the time left to the start of the cycle, when the Delay option is set
2. Salt reservoir empty - indicator light on the floor
3. Remaining Time on the floor - indicator of the time left to the end of the cycle
PROGRAMS TABLE
| Program | Programs description | Drying phase | NaturalDry | Available options *) | Duration of wash program (h: min)** | Water consumption (litres/cycle) | Energy consumption (kWh/cycle) | |
| Eco | Eco 50°- program is suitable to clean normally soiled tableware, that for this use, it is the most efficient program in terms of its combined energy and water consumption, and that it is used to assess compliance with the EU Ecodesign legislation. | √ | √ | POWER CLEAN ^1/2 ### + ### >> ### | 4:40 9.9 0.55 | |||
 | Auto Intensive 65° - Automatic program for heavily soiled dishes and pans. | Senses the level of soiling on the dishes and adjusts the program accordingly. When the sensor is detecting the soil level an animation appears in the display and the cycle duration is updated. | √ | √ | POWER CLEAN ^1/2 ### + ### >> ### | 2:25-3:10 17.0-25.0 1.30-1.70 | ||
 | Auto Mixed 55° - Automatic program for normally soiled dishes with dried food residues. | √ | √ | POWER CLEAN ^1/2 ### + ### >> ### | 1:20-3:20 7.5-20.5 0.75-1.20 | |||
 | Auto Fast 50° - Automatic program for normally and lightly soiled dishes. The everyday cycle that ensures optimal cleaning and drying performance in shorter time. | √ | √ | POWER CLEAN ^1/2 ### + ### >> ### | 1:00-1:50 8.0-16.0 0.70-1.10 | |||
 | Rapid 45° - Program is recommended for limited amount of lightly-soiled dishes with no dried food residues. Does not include the drying phase. | - | √ | ^1/2 ### + ### | 0:30-0:40 10.5-15.0 0.55-0.65 | |||
 | Crystals 45° - Program for delicate items, which are more sensitive to high temperatures, for example glasses and cups. | √ | √ | ^1/2 ### + ### | 1:40-1:50 12.5-17.0 0.95-1.20 | |||
 | Prewash - Use to refresh crockery planned to be washed later. No detergent is to be used with this program. | - | √ | ^1/2 | 0:12 4.5 0.10 | |||
 | Self-Clean 65° - Program to be used to perform maintenance of the dishwasher and water management system, to be carried out only when the dishwasher is EMPTY using specific detergents designed for dishwasher maintenance. | - | - | ### | 1:15 12.7 1.10 | |||
ECO program data is measured under laboratory conditions according to European Standard EN 60436:2020. Note for Test Laboratories: For information on comparative EN testing conditions, please send an email to the following address: dw_test_support@europeanappliances.com
Pre-treatment of the dishes is not needed before any of the programs.
*) Not all options can be used simultaneously.
**) Values given for programs other than the program Eco are indicative only. The actual time may vary depending on many factors such as temperature and pressure of the incoming water, room temperature, amount of detergent, quantity and type of load, load balancing, additional selected options and sensor calibration. The sensor calibration can increase program duration by up to 20 min.
OPTIONS AND FUNCTIONS
Please scan the QR code on your product in order to have more detailed information.
OPTIONS can be selected/ deselected, after choosing the program, directly by pressing the corresponding button (if available - the indicator lights up) (see CONTROL PANEL). If an option is not compatible with the selected program (see PROGRAMS TABLE), the corresponding LED flashes rapidly 3 times and beeps will sound. The option will not be enabled. An option can change time or water or energy consumption for the program.

POWER CLEAN® - Thanks to the additional power jets this option provides a more intensive and powerful wash in the lower rack, in the specific area. This option is recommended for washing pots and casseroles (Please refer to the Power Clean® loading section).

HALF LOAD - If there are not many dishes to be washed, HALF LOAD is used to save water, electricity or time, depending on the selected program. Remember to halve the amount of detergent.

+. EXTRA DRY - The higher temperature during the final rinse and the extended drying phase allow improved drying. The EXTRA DRY option results in the lengthening of the wash cycle.

SILENT - Suitable for night-time operation of the appliance. This option can be used to limit noise emission during wash phases. It will increase cycle time depending on base cycle selection.

SANI RINSE - This option can be used to sanitize washed dishes. It will increase the final rinse temperature and add antibacterial wash to the selected program. Ideal to clean crockery and feeding bottles. The dishwasher door must be kept shut for the entire duration of the program in order to guarantee reduction of germs. WARNING: the crockery and plates could be extremely hot at the end of the cycle.

TURBO - Thanks to the Turbo option you can reduce time up to 40% depending on the selected based program. Energy and water consumption are increased.

DELAY - The start of the program may be delayed for a period of time between 0:30 and 24 hours.
The DELAY function cannot be set once a program has been started.

SENSING - When the sensor is detecting the soil level an animation appears in the display (around 20 min.) and the cycle duration is updated. SENSING is for the level of soiling on the s present for all cycles (excepting Eco) adjusting the program

TIME ON THE FLOOR - A LED light projected on the floor indicates the time left to the end of the cycle. The light goes off every time the door is opened. The light goes off at the end of a cycle. This feature is active by default, but it is possible to deactivate it in the "SETTINGS MENU".
INTERNAL LIGHTS - When the feature is active the LEDs in the tub are automatically switched on/off as soon as the user open/close the door respectively. If the door remains opened for more than 10 min, the LEDs in the tub switch off (to turn them on again, the door has to be closed and opened again). This feature is active by default, but it is possible to deactivate it in the "SETTINGS MENU".
NaturalDry - It is a convection drying system which automatically opens the door during/after drying phase to ensure exceptional drying performance every day. Door opens at the temperature that is safe to your kitchen furniture, thus door will not be opened when the option of SANI RINSE is on. As additional steam protection, special designed protection foil is added together with the dishwasher.

DESCALE – Alarm - Limescale accumulation was detected on the internal components of the appliance. Check if the Water Hardnessing is at the correct value and salt is present in the salt container (see TIME USE), then use a descaling product (WPro brand is recommended) Self-Clean program. After a successful descaling, the icon will stop displayed.
If the actions above are not performed, product performance will deteriorate. DESCALE warning will start blinking and «dES» alarm will appear on the display. If still no action is taken, the appliance will only allow a certain number of cycles to be started (indicated during «dES» alarm display) and then will be BLOCKED to prevent component damage, with only the Self-Clean program available. Performing a full descaling will unblock the product. In the case of extremely high amounts of limescale, descaling may have to be performed twice to be efficient.

WATER TAP CLOSED - Alarm - Flashes when there is no inlet water or water tap is closed.
CYCLE COUNTER - This feature shows the number of cycles the dishwasher has performed.
For the number of cycles from 0-999, a fixed number will be displayed.
Example for 25 cycles.
When the cycle number is higher than 1000, the number will scroll in the display. The “_” represents the "", as for instance: 1.000 = 1_000, 13.947 = 13_947 (the number will scroll for 3 times).

After the cycle visualization, the display will return to visualize "r" NOTE: The dishwasher may have already performed about 30 cycles. This is due to the extended quality process carried out during production. It guarantees higher product quality.
LOADING THE RACKS
CAPACITY: 15 standard place-settings
TOP RACK
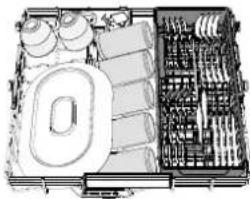
The top rack provides a targeted cleaning Wash Zone for bowls, mugs, even big plates and cutlery that you'd normally load in the lower racks, making extra space for the re
A separate arrangement of the cutlery makes collection easier after washing and improves washing and drying performance.
Knives and other utensils with sharp edges must be positioned with the blades facing downwards.
natural_image
Top-down schematic of a mechanical assembly with no visible text or symbols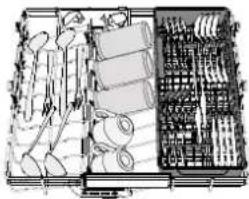
natural_image
Interior view of a mechanical assembly with tool, gears, and housing (no visible text or symbols)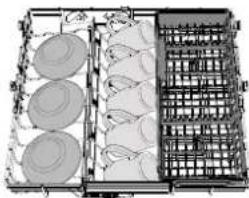
natural_image
Interior view of a food storage tray with circular dishes and a grid-patterned rack (no text or symbols visible)UPPER RACK
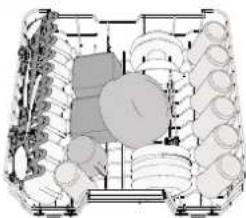
Load delicate and light dishes: glasses, cups, saucers, low salad bowls.
The upper rack has tip-up supports which can be used in a vertical position when arranging tea/ dessert saucers or in a lower position to load bowls and food containers.
(loading example for the upper rack)
natural_image
Architectural floor plan showing room layouts and structural elements (no text or labels)ADJUSTING THE HEIGHT OF THE UPPER RACK
The height of the upper rack can be adjusted: a high position to place bulky crockery in the lower basket and a low position to make the most of the tip-up supports by creating more space upwards and avoiding collision with the items loaded into the lower rack.
We strongly recommend that you do not adjust the height of the rack when it is loaded. NEVER raise or lower the basket on one side only.
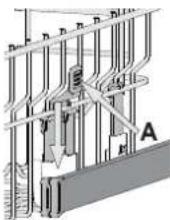
FOLDABLE FLAPS WITH ADJUSTABLE POSITION
The side foldable flaps can be folded or unfolded to optimize the arrangement of crockery inside the rack. Wine glasses can be placed safely in the foldable flaps by inserting the stem of each glass into the corresponding slots.
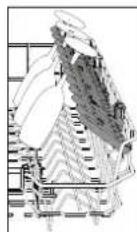
LOWER RACK
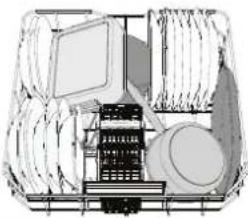
For pots, lids, plates, salad bowls, cutlery etc. Large plates and lids should ideally be placed at the sides to avoid interferences with the spray arm. The lower rack has tip-up supports which can be used in a vertical position when arranging plates or in a horizontal position (lower) to load pans and salad bowls easily.
(loading example for the lower rack)
natural_image
Technical line drawing of a mechanical assembly with components and no visible text or symbolsPOWER CLEAN®
Power Clean® uses the special water jets in the rear of cavity to wash more intensively the high dirty items. The lower rack has a Space Zone, a special pull-out support in the rear of the rack that frying pans or baking pans in upright position, placing the pots/casseroles faced to the Power C activate the POWER CLEAN on the panel.
CUTLERY BASKET
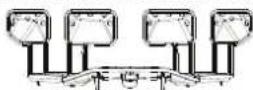
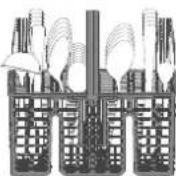
It is fitted with top grids for improved cutlery arrangement. It must only be positioned at the front of the lower rack. Knives and other utensils with sharp edges must be placed in the cutlery basket with the points facing downwards or they must be positioned horizontally in the tip-up compartments on the upper rack.
CARE AND MAINTENANCE
More information in the Daily Reference Guide on website.
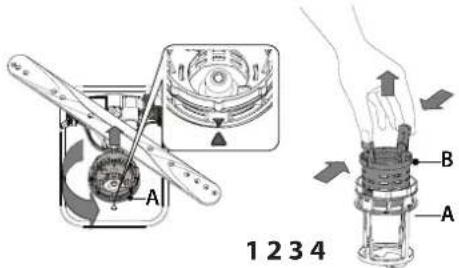
CLEANING THE FILTER ASSEMBLY
text_image
A 1 2 3 4 B A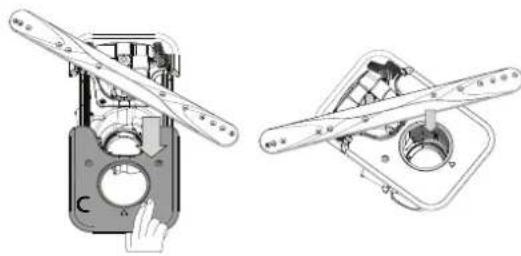
natural_image
Technical line drawing of a mechanical assembly with two views (top and side), no visible text or symbolsThe dishwasher must not be used without filters or if the filter is loose.
It is important when reinstalling the filter that the two triangles shown on the zoom meet (Fig 1). In case you find foreign objects (such as broken glass, porcelain, bones, fruit seeds etc.) please remove them carefully.
Inspect the trap and remove any food residues. NEVER REMOVE the wash-cycle pump protection (shown by an arrow) (Fig 4).
CLEANING THE SPRAY ARMS
natural_image
Technical line drawing of a mechanical assembly with internal components and a magnified inset (no text or symbols)On occasions, food residue may become encrusted onto the spray arms and block the holes used to spray the water. It is therefore recommended that you check the arms from time to time and clean them with a small non-metallic brush.
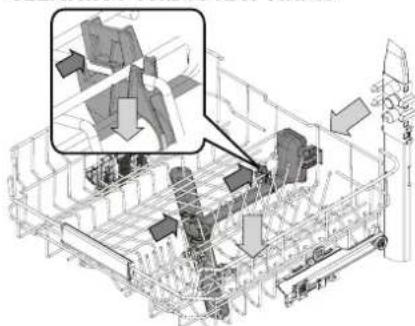
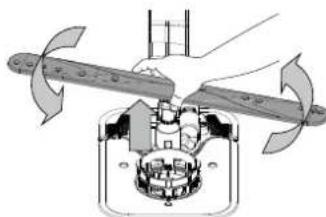
To remove the upper spray you must remove it together with the manifold.
The Top Rack has a fixed wash tube with all the wash nozzles facing upward. To clean it you can slide the rack out and with a tweezer remove items that may be lodged in the nozzles.
natural_image
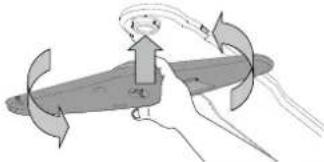
Mechanical assembly diagram showing two blades rotating around a central component (no text or symbols)The lower spray arm may be removed by pulling it upwards and rotating it anti-clockwise. Mounting back the spray arm is by pulling it down and rotating it clockwise.
natural_image
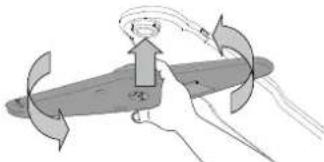
Diagram of a helicopter with directional arrows indicating flight or movement (no text or symbols)The ceiling spray arm may be removed by pressing it up and then rotating it anti-clockwise. Mounting back the spray arm is by pulling it upwards and rotating it clockwise.
TROUBLESHOOTING
Please scan the QR code on your product in order to have more detailed information.
In case your dishwasher doesn't work properly, check if the problem can be solved by going through the following list. For other errors or issues please contact authorized After-sales Service whose contact details can be found in the warranty booklet. Spare parts will be available for a period of either up to 7 or up to 10 years, according to the specific Regulation requirements.
| PROBLEMS POSSIBLE CAUSES SOLUTIONS | ||
| Descale indicator is lit or blinking;"dES" alarm is displayed. | Limescale is accumulating on internal components of the appliance. | Descal the appliance immediately using the Self Clean program and a commercially available descaling product (see OPTIONS AND FUNCTIONS). Refill the reservoir with salt. Check the water hardness setting. If the appliance is not descaled, it will stop functioning. |
| The dishwasher won't drain. Display shows: F7 E3 or F9 E1 | The filter is clogged with food residues or limescale | Clean the filter and descale the appliance (see CLEANING THE FILTER ASSEMBLY and DESCALE INSTRUCTION). |
| The drain hose is kinked. Check the drain hose (see | INSTALLATION INSTRUCTION). | |
| The sink drain pipe is blocked. Clean the sink drain | pipe. | |
| The dishwasher does not fill the water. The display shows: H2O and is lit; acoustic alarm sounds. | No water in the water supply or the tap is closed. | Make sure there is water in the water supply and the water tap is open. |
| The water inlet hose is kinked. | Check the inlet hose (see INSTALLATION). Open dishwasher door, press START/Pause button and close the door within 4 seconds. | |
| The screen in the water inlet hose is clogged; it is necessary to clean it. | Check and clean the screen in the water inlet hose. Open dishwasher door, press START/Pause button and close the door within 4 seconds. | |
| The dishwasher finishes the cycle prematurely. The display shows: F8 E3 | The filter is clogged with food residues or limescale. | Clean the filter and descale the appliance (see CLEANING THE FILTER ASSEMBLY and DESCALE INSTRUCTION). |
| Drain hose positioned too low or siphoning into the home sewage system. | Check if the end of the drain hose is placed at the correct height (see INSTALLATION). Check for siphoning into the home sewage system, and install a siphon breaker/air admittance valve if necessary. | |
| An excessive amount of foam is present. | The detergent has not been measured out correctly or it is not suitable for use in dishwashers (see FILLING THE DETERGENT DISPENSER). | |
| Air in the water supply. Check water supply for leaks | ks or other issues letting air inside. | |
| The dishes are not dried well. | Rinse aid is not present or the dosage is too low. | Make sure the rinse aid dispenser is filled (see FILLING THE RINSE AID DISPENSER). Multifunctional tablets only will not provide as good drying effects as the actual use of liquid rinse aid. |
| The dishes have been unloaded after the door was opened automatically but before the actual cycle end. | Make sure the cycle has ended before starting to unload the dishes (see DAILY USE). For even better drying results, it is recommended to let the dishes sit inside the dishwasher with the door open for additional 15 minutes after the cycle ends. | |
| The dishes are sitting too flat. | If you notice puddles of water inside cavities of cups, mugs or bowls, try loading the dishes (especially in the upper rack) providing more inclination to let larger amounts of water drip down before drying starts. | |
| The selected cycle does not have the drying phase. | Please check in the PROGRAMS TABLE if the selected program is equipped in the drying phase. A cycle without the drying phase may not deliver desired drying efficiency, so it is recommended to change cycle selection for the one that has the drying phase. | |
| The dishes are made of non-stick or plastic. Some water drops remaining on this type of material are normal. | ||
| Dishes and glasses are covered with limescale or a whit-ish film. | The salt reservoir is empty. | Refill the reservoir with salt as soon as possible. Using the appliance without salt may cause damage to its internal components. |
| The water hardness setting is too low. | Increase the setting (see WATER HARDNESS TABLE). | |
| The cap of the salt reservoir is not properly closed. | Check and close the salt reservoir cap. | |
| The rinse aid reservoir is empty or the rinse aid dosage is insufficient. | Refill the dispenser with rinse aid and check the dosage setting (for more information - see FILLING THE RINSE AID DISPENSER). | |
| The dishwasher shows F8 E5 | Valve is blocked or faulty. Close the water tap, if possible. Do not switch off the power supply. Call the service. | |
| Detergent leaks. | Depends on the liquid detergent used and can be emphasized in case of delay option is activated. | Small leaks will not cause machine malfunction and can be avoided by changing liquid deter-gent type or using tablets. |
Policies, standard documentation, ordering of spare parts and additional product information can be found by:
• Using QR code on your product.
- Visiting our website docs.whirlpool.eu/docs and parts-selfservice.europeanappliances.com
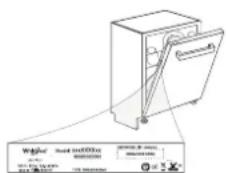
- Alternatively, contact our After-sales Service (See phone number in the warranty booklet). When contacting our After-sales Service, please state the codes provided on your product's identification plate.
The model information can be retrieved using the QR-Code reported in the energy label.
The label also includes the model identifier that can be used to consult the portal of the registry at https://eprel.ec.europa.eu.
^® /TM/ © 2024 Whirlpool, Produced under license

MERCI D'AVOIR CHOISI UN PRODUIT WHIRLPOOL.
text_image
Diagram of a refrigerator interior with labeled compartments and parts, showing front view and side view.OPTIONS ET FONCTIONS
natural_image
Illustration of a toolbox containing various tools and components, no text or symbols present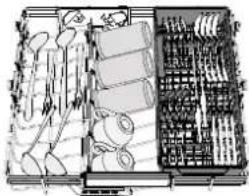
natural_image
Diagram of a mechanical assembly with exploded view and internal components (no text or labels)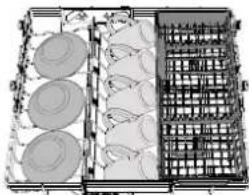
natural_image
Diagram of a multi-tiered storage unit with circular components and grid layout (no text or symbols)PANIER SUPÉRIEUR
natural_image
Architectural floor plan showing room layouts and structural elements (no text or labels)AJUSTER LA HAUTEUR DU PANIER SUPÉRIEUR
natural_image
Technical diagram of a mechanical or electrical component with multiple components and no visible text or symbolsnatural_image
Technical line drawing of mechanical components, showing assembly and mounting (no text or symbols)natural_image
Technical line drawing of a mechanical assembly with no visible text or symbolsnatural_image
Mechanical assembly diagram showing a rotating fan and housing components (no text or symbols)