ORM-14103-SIW - Washing machine Orima - Free user manual and instructions
Find the device manual for free ORM-14103-SIW Orima in PDF.


| Product type | Washing machine |
| Brand | Orima |
| Model | ORM-14103-SIW |
| Washing capacity (dry laundry) | 10 kg |
| Maximum spin speed | 1400 rpm |
| Number of programs | 15 |
| Electrical supply | 220-240 V~ / 50 Hz, 10 A, 2200 W |
| Water pressure | 0.1 - 1 MPa |
| Dimensions (H × W × D) | 845 × 597 × 582 mm |
| Display | Electronic with indicators |
| Auxiliary functions | Delayed start, prewash, extra rinse, anti-allergy, steam, Save+ Speed, dirt level selection, stain type |
| Child safety | Yes (key lock) |
| Half-load detection | Yes (automatic) |
| Filters to clean | Water inlet filter, drain pump filter |
| Recommended drum cleaning | Every 2 months (Cotton 90°C program or specific) |
| Water connection | Cold water (and hot water depending on model) |
| Energy class | Not specified (refer to energy label) |
| Eco 40-60 program | Yes (EU ecodesign compliant) |
| Emergency door opening | Yes (unlocking drawstring at bottom) |
| After-sales service | Contact authorized service (tel. 00351231467427) |
Frequently Asked Questions - ORM-14103-SIW Orima
User questions about ORM-14103-SIW Orima
0 question about this device. Answer the ones you know or ask your own.
Ask a new question about this device
Download the instructions for your Washing machine in PDF format for free! Find your manual ORM-14103-SIW - Orima and take your electronic device back in hand. On this page are published all the documents necessary for the use of your device. ORM-14103-SIW by Orima.
USER MANUAL ORM-14103-SIW Orima
facebook.com/orima.pt
natural_image
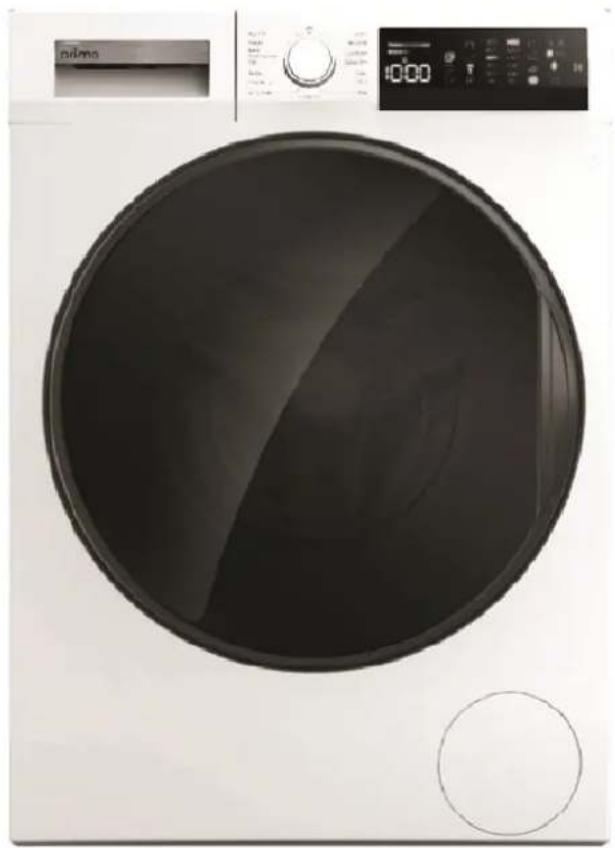
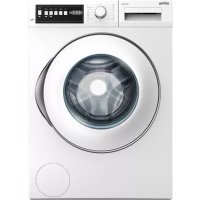
Front view of a white washing machine with a circular vent and control panel (no visible text or symbols)
MMA
MÁSIO MIRANDA DE ALMEIDA
MÁQ. LAVAR ROUPA
Washing | Machine Lavadora | Lave-Linge
ORM-14103-SIW
SERVIÇO DE APOIO AO CLIENTE
Apoio ao Cliente:
Tel.: (+351) 231 467 436 E: apoiocliente@orima.pt
Serviço Pós Venda:
Tel.: (+351) 231 467 427 E: assistencia@orima.pt
PT Obrigado por ter adquirido este produto ORIMA. Por favor leia atentamente este manual antes de começar a usar o aparelho.
UK Thank you for purchasing this ORIMA product. Please read this manual carefully before using the appliance.
FR Merci d'avoir acheté ce produit ORIMA. Veuillez lire attentivement ce manuel avant d'utiliser l'appareil.
ES Gracias por haber adquirido este produto ORIMA. Por favor lea atentamente este manual antes de empezar a usar el aparato.
2.1 Aparência Geral
3.2 Ajustar os Pés / Ajustar as Bases de Ajuste
natural_image
Line drawing of a washing machine with a circular vent and control panel (no text or symbols)natural_image
Diagram showing a pipe fitting with a cable and a close-up of the pipe structure (no text or symbols)natural_image
Line drawing of a washing machine with a close-up view of its internal components (no text or symbols)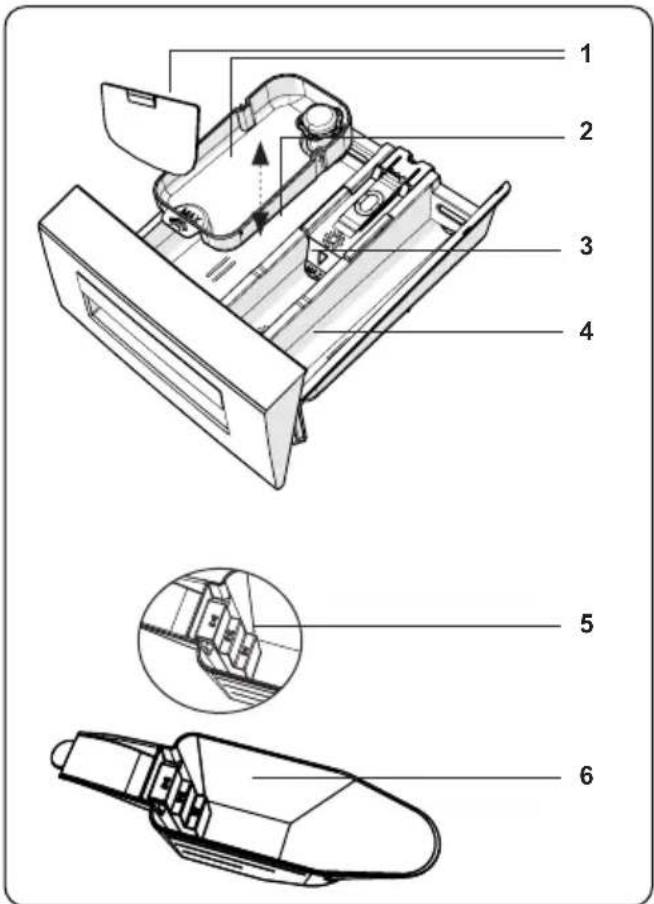
natural_image
Technical line drawings of a hand pump and its internal components (no text or symbols)natural_image
Technical line drawing of a mechanical device with two views: top shows a cylindrical component with internal features, bottom shows a multi-tiered cylindrical device (no text or symbols)natural_image
Technical line drawing of a mechanical device with cross-sectional and top views (no text or symbols)natural_image
Illustration of two washing machines side by side, one with a handle and the other with a handle (no text or symbols)natural_image
Illustration showing two steps of a hairpin installation: one with a plug, the other with a hand holding a screwdriver (no text or symbols present)natural_image
Illustration showing a wall-mounted electrical plug and a hand holding a hose, both without any text or symbols.natural_image
Technical illustration showing a mechanical component being adjusted for installation, with no visible text or symbols.natural_image
Technical line drawing of a mechanical device interior with no visible text or symbolsnatural_image
Mechanical assembly diagram showing a hand operating a red ring component with arrows indicating motion (no text or symbols)natural_image
Technical diagram of a mechanical device with arrows indicating assembly or movement, no visible text or symbolsnatural_image
Technical drawings of two mechanical components: a 3D panel with ribbed side and a cylindrical housing with internal structure (no text or symbols)1. Corpo
natural_image
Simple line drawing of a washing machine with no text or symbolsORM 14103 SIW
Thank you for choosing this product.
This User Manual contains important safety information and instructions on the operation and maintenance of your appliance.
Please take the time to read this User Manual before using your appliance and keep this book for future reference.
| Icon Type Meaning | |
 | WARNING Serious injury or death risk |
 | RISK OF ELECTRIC SHOCK Dangerous voltage risk |
 | FIRE Warning; Risk of fire / flammable materials |
 | CAUTION Injury or property damage risk |
 | IMPORTANT / NOTE Operating the system correctly |
CONTENTS
1.SAFETY INSTRUCTIONS .... 1
1.1 General Safety Warnings ....2
1.2 During Use 7
1.3 Packaging and Environment....8
1.4 Savings Information......8
2.TECHNICAL SPECIFICATIONS....10
2.1 General Appearance....10
2.2 Technical Specifications ....10
3.INSTALLATION....11
3.1 Removing the Transit Bolts....11
3.2 Adjusting the Feet / Adjusting Adjustable Stays....11
3.3 Electrical Connection....12
3.4 Water Inlet Hose Connection....12
3.5 Water Discharge Connection....13
4.CONTROL PANEL OVERVIEW....13
4.1 Detergent Drawer (*) 13
4.2 Sections 14
4.3 Program Dial....14
4.4 Electronic Display....14
5.USING YOUR WASHING MACHINE....15
5.1 Preparing Your Laundry....15
5.2 Putting Laundry in the Machine....15
5.3 Adding Detergent to the Machine....16
5.4 Operating Your Machine....16
5.5 Selecting a Programme....17
5.6 Half-Load Detection System....17
5.7 Auxiliary Functions ....17
5.8 Child Lock 22
5.9 If you want to pause/cancel a running program or add laundry: 22
5.10 Program End 22
6.PROGRAMME TABLE....23
6.1 Important Information ....26
7.CLEANING AND MAINTENANCE ....27
7.1 Warning 27
7.2 Water Inlet Filters 27
7.3 Pump Filter 28
7.4 Detergent Drawer 28
8.Body / Drum....29
9.TROUBLESHOOTING....30
10.AUTOMATIC FAULT WARNINGS AND WHAT TO DO ....31
1. SAFETY INSTRUCTIONS
| Operating voltage / frequency | (220-240) V~/50Hz |
| Total current (A) 10 | |
| Water pressure (Mpa) Maximum | 1 Mpa / Minimum 0. 1Mpa |
| Total power (W) | 2200 |
| Maximum washing capacity (dry laundry) (kg) | 10 |
- Do not install your machine on a carpet or such grounds that would prevent the ventilation of its base.
- The appliance is not intended for use by people (including children) with reduced physical, sensory or mental capabilities, or lack of experience and knowledge unless they have been given supervision or instruction concerning use of the appliance by a person responsible for their safety.
- Children of less than 3 years should be kept away unless continuously supervised.
- Call the nearest authorised service centre for a replacement if the power cord malfunctions.
- Use only the new water inlet hose thats is provided with your machine when connecting to water supply. Never use old, used or damaged water inlet hoses.
• Children should not play with the appliance. - Cleaning and user maintenance should not be made by children without supervision.
NOTE: For a softcopy of this user manual, please contact the following address: "washingmachine@standardtest.info". In your e-mail, please provide the model name and serial number (20 digits) which you can find on the appliance door.
Read this user manual carefully.
Your machine is for domestic use only. Using it for commercial purposes will cause your warranty to be cancelled.
This manual has been prepared for more than one model therefore your appliance may not have some of the features described within. For this reason, it is important to pay particular attention to any figures whilst reading the operating manual.
1.1 General Safety Warnings
- The necessary ambient temperature for operation of your Washing Machine is 15-25 °C.
- Where the temperature is below 0 °C, hoses may split or the electronic card may not operate correctly.
- Please ensure that garments loaded into your Washing Machine are free from foreign objects such as nails, needles, lighters and coins.
-
It is recommended that for your first wash, you select the 90° Cotton programme without laundry and half fill compartment II of the detergent drawer with a suitable detergent.
-
To avoid a buildup of detergent residue, only put softener or detergent in the drawer at the beginning of each wash.
- Unplug your Washing Machine and switch off the water supply if the Washing Machine is left unused for a long time. We also recommend that you leave the door open to prevent build up of humidity inside the Washing Machine.
- Some water may be left in your Washing Machine as a result of quality checks during production. This will not affect the operation of your Washing Machine.
- The packaging of the machine could be hazardous to children. Do not allow children to play with the packaging or small parts from the Washing Machine.
- Keep the packaging materials in a place where children cannot reach them, or dispose of them appropriately.
- Use pre-wash programs only for very dirty laundry.
⚠️Never open the detergent drawer while the machine is running.
- In the event of a breakdown, unplug the machine from the mains supply and turn the water supply off. Do not attempt to carry out any repairs. Always contact an authorised service agent.
- Do not exceed the maximum load for the washing programme you have chosen.
⚠️Never force the door open when your Washing Machine is running.
- Washing laundry containing flour may damage
your machine.
- Please follow the manufacturers' instructions regarding the use of fabric conditioner or any similar products that you intend to use in your Washing Machine.
- Make sure that the door of your Washing Machine is not restricted and can be opened fully.
Install your machine in a location that can be fully ventilated and preferably has constant air circulation.
Door emergency opening function
The door will remain locked when the machine is running, when the programme is not yet complete or in the event of a power cut.
To open the door;
-
Please turn off the machine. Take off the power plug from the mains socket.
-
To drain the waste water, follow the instructions given in cleaning the pump filter section.
-
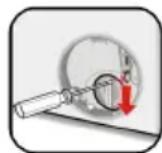
Pull down the emergency opening mechanism with the help of a tool and open the door at the same time.
-
If the door remains locked after being closed again, move the emergency opening handle to the open position.
Read these warnings. Follow the advice given to protect yourself and others from risks and fatal injuries.
RISK OF BURNS
⚠️Do not touch the drain hose or any discharged water while your Washing Machine is running. The
high temperatures involved pose a burn risk.
RISK OF DEATH FROM ELECTRICAL CURRENT
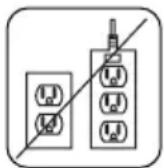
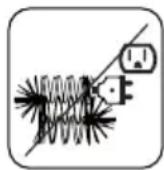
- Do not connect your Washing Machine to the mains electricity supply using an extension le
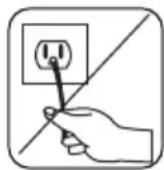
- Do not insert a damaged plug into a socket.
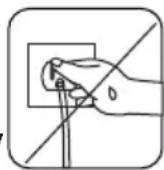
- Never remove the plug from the socket by pulling the cord. Always hold the plug.
- Never touch the power cord/plug with wet hands as this could cause a short circuit or electric shock.
- Do not touch your Washing Machine if your hands or feet are wet.
- A damaged power cord/plug can cause fire or give you an electric shock. When damaged it must be replaced, this should only be done by qualified personnel.
⚠️Risk of flooding
- Check the speed of water flow before placing the drain hose in a sink.
• Take necessary measures to prevent the hose from slipping.
• Water flow may dislodge the hose if it is not properly secured. Make sure the plug in your sink does not block the plug hole.
⚠️Danger of Fire
- Do not store inflammable liquids near your machine.
-
The sulphur content of paint removers may cause corrosion. Never use paint removing materials in your machine.
-
Never use products that contain solvents in your machine.
- Please ensure that garments loaded into your Washing Machine are free from foreign objects such as nails, needles, lighters and coins.
Risk of fire and explosion
⚠️Risk of falling and injury
- Do not climb on your Washing Machine.
- Make sure hoses and cables do not cause a trip hazard.
- Do not turn your Washing Machine upside down or on its side.
- Do not lift your Washing Machine using the door or detergent drawer.
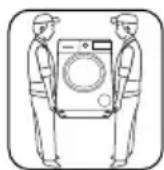
⚠️The machine must be carried by at least 2 people.
! Child safety
- Do not leave children unattended near the machine. Children might lock themselves in the machine resulting in risk of death.
- Do not allow children to touch the glass door during operation. The surface becomes extremely hot and may cause damage to skin.
- Keep packaging material away from children.
- Poisoning and irritation may occur if detergent and cleaning materials are consumed or come into contact with the skin and eyes. Kee cleaning materials out of the reach of children.
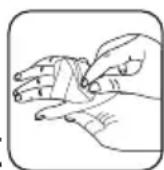
1.2 During Use
- Keep pets away from your machine.
- Please check the packaging of your machine before installation and the outer surface of the machine once the packaging has been removed. Do not operate the machine if it appears damaged or if the packaging has been opened.
- Your machine must only be installed by an authorised service agent. Installation by anyone other than an authorised agent may cause your warranty to be void.
- Children and persons with reduced physical, sensory or mental capabilities and lack of experience and knowledge should not use this appliance without supervision.
- Cleaning and user maintenance shall not be done by children without supervision.
- Only use your machine for laundry that is labelled as suitable for washing by the manufacturer.
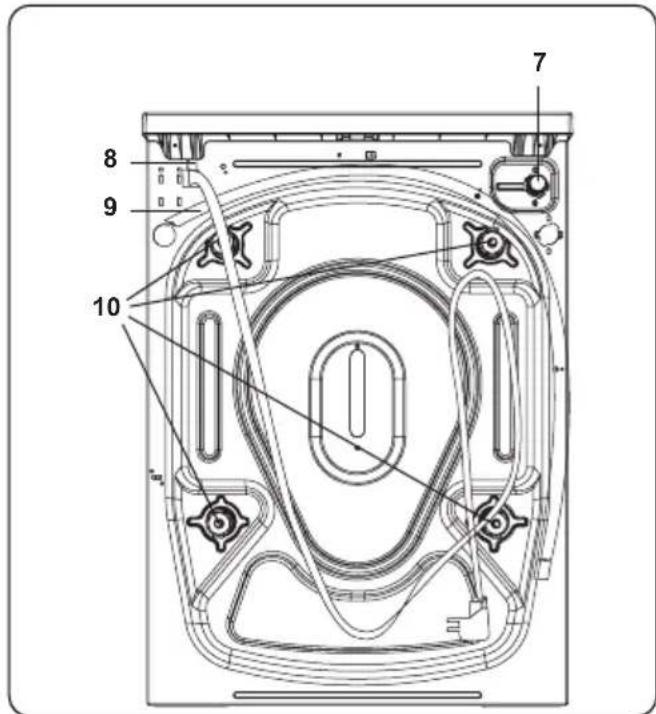
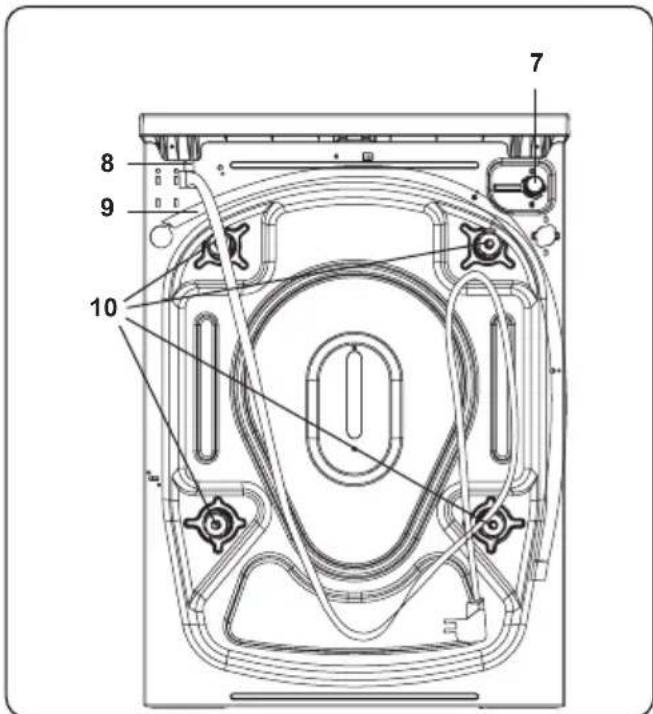
- Before operating the washing machine, remove the 4 transit bolts and rubber spacers from the rear of the machine. If the bolts are not removed they may cause heavy vibration, noise and malfunction of the machine and cause the guarantee to be void.
- Your warranty does not cover damage caused by external factors such as fire, flooding and other sources of damage.
- Please do not throw away this user manual; keep it for future reference and pass it onto the next owner.

NOTE: Specifications for the machine may vary
depending on the product purchased.
Replacement of drive belt, only by authorized service.
Only original spare belt must use.
1.3 Packaging and Environment
Removal of packaging materials
Packaging materials protect your machine from any damage that might occur during transportation. The packaging materials are environmentally friendly as they are recyclable. Use of recycled material reduces raw material consumption and decreases waste production.
1.4 Savings Information
Some important information to get the most efficient use out of your machine:
- Do not exceed the maximum load for the washing programme you have chosen. This will allow your machine to run in energy saving mode.
- Do not use the pre-wash feature for lightly soiled laundry. This will help you save on the amount of electricity and water consumed.
CE Declaration of conformity
We declare that our products meet the applicable European Directives, Decisions and Regulations and the requirements listed in the standards referenced.
Disposal of your old machine
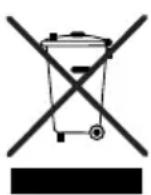
The symbol on the product or on its packaging indicates that this product may not be treated as household waste. Instead it shall be handed over to the applicable collection point for the recycling of electrical and electronic equipment. By ensuring this product is disposed of correctly, you will help prevent potential negative consequences for the environment and human health, which could otherwise be caused by inappropriate waste handling of this product. For more detailed information about recycling of this
product, please contact your local city office, your household waste disposal service or the shop where you purchased the product.
- TECHNICAL SPECIFICATIONS
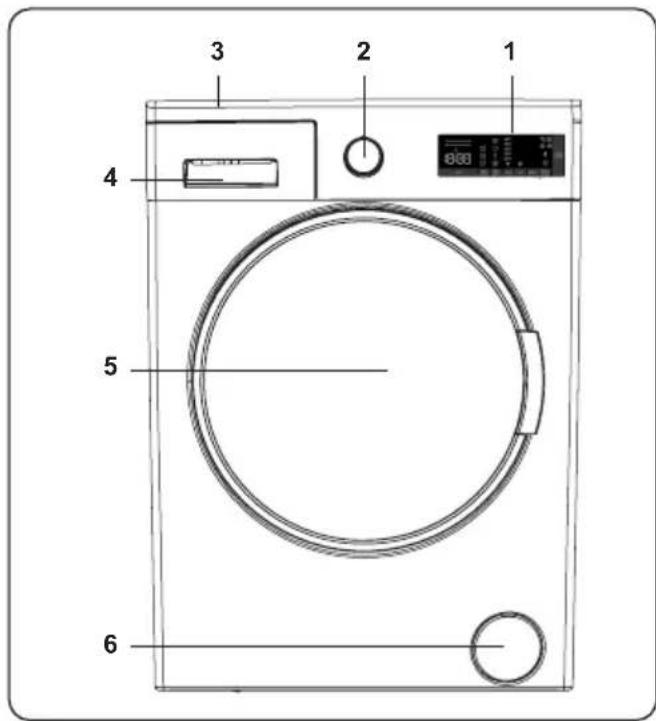
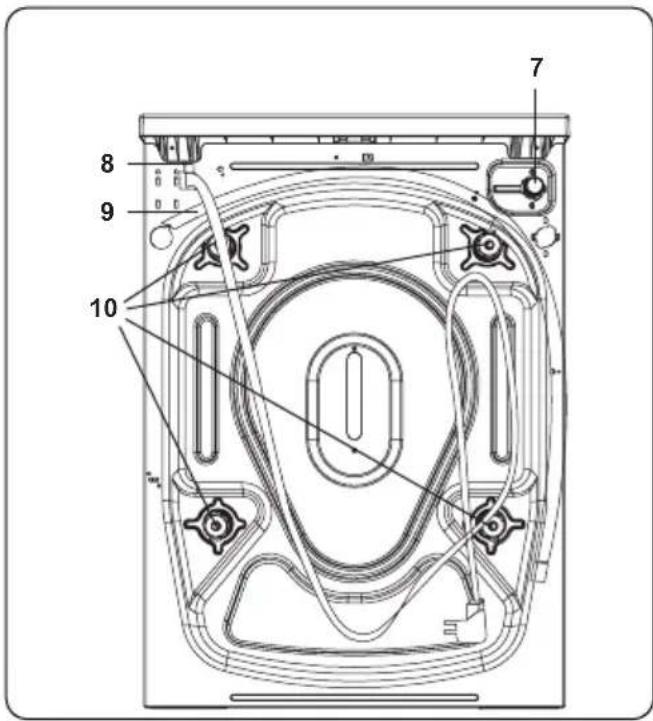
2.1 General Appearance
- Electronic Display
- Programme Dial
- Upper Tray
- Detergent Drawer
- Drum
- Pump Filter Cover
- Water Inlet Valve
- Power Cable
- Discharging Hose
- Transit Bolts
2.2 Technical Specifications
| Operating voltage / frequency (V/Hz) | (220-240)V~/50Hz |
| Total current (A) | 10 |
| Water pressure (Mpa) | Maximum: 1 MpaMinimum: 0.1 Mpa |
| Total power (W) | 2200 |
| Maximum dry laundry capacity (kg) | 10 |
| Spinning revolution (rev / min) | 1400 |
| Programme number | 15 |
| Dimensions (mm) | |
| Height | 845 |
| Width | 597 |
| Depth | 582 |
3. INSTALLATION
3.1 Removing the Transit Bolts
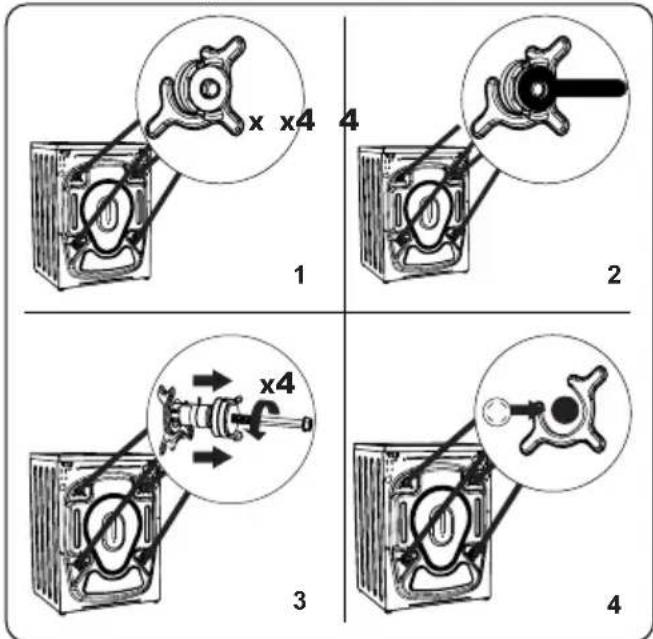
- Before operating the washing machine, remove the 4 transit bolts and rubber spacers from the rear of the machine. If the bolts are not removed, they may cause heavy vibration, noise and malfunction of the machine and void the warranty.
- Loosen the transit bolts by turning them anticlockwise with an appropriate spanner.
- Remove the transit bolts with a straight pull.
- Fit the plastic blanking caps supplied in the accessories bag into the gaps left by the removal of the transit bolts. The transit bolts should be stored for future use.
NOTE: Remove the transit bolts before using the machine for the first time. Faults occurring due to the machine being operated with transit bolts fitted are out of the scope of the warranty.
3.2 Adjusting the Feet / Adjusting Adjustable Stays
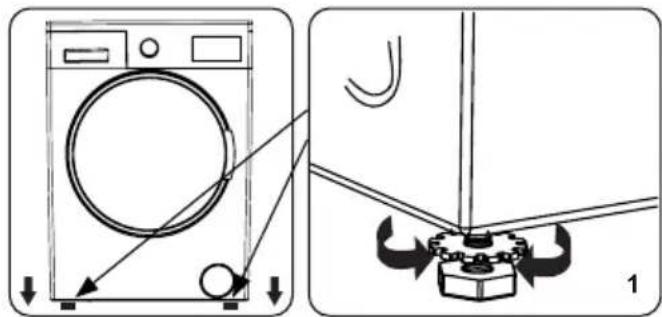
- Do not install your machine on a surface (such as carpet) that would prevent ventilation at the base.
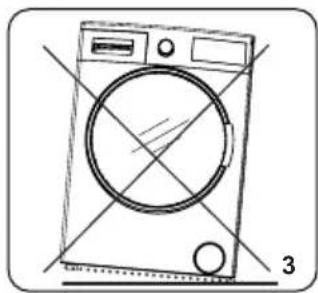
• To ensure quiet and vibration-free operation of your machine, install it on a firm surface.
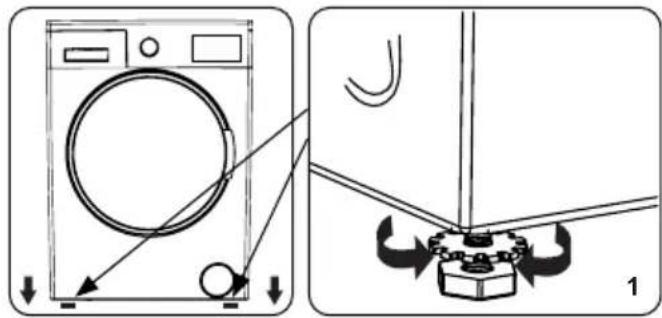
- You can level your machine using the adjustable feet.
- Loosen the plastic locking nut.
natural_image
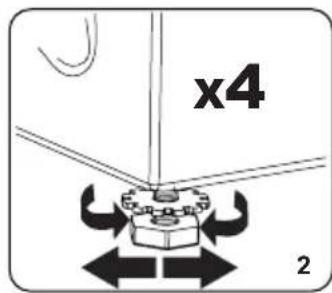
Line drawing of a front-loading washing machine with no text or symbols- To increase the height of the machine, turn the feet clockwise. To decrease the height of the machine, turn the feet anticlockwise.
- Once the machine is level, tighten the locking nuts by turning them clockwise.
- Never insert cardboard, wood or other similar materials under the machine to level it.
- When cleaning the ground on which the machine is located, take care not to disturb the level of the machine.
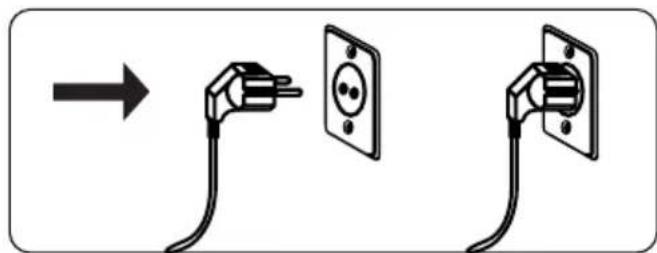
3.3 Electrical Connection
natural_image
Diagram showing two electrical plug connections with a socket, one being inserted and the other holding a socket (no text or symbols present)- Your Washing Machine requires a 220-240V, 50 mains supply.
- The mains cord of your washing machine is equipped with an earthed plug. This plug should always be inserted to an earthed socket of 10 amps.
- If you do not have a suitable socket and fuse conforming with this, please ensure the work is carried out by a qualified electrician.
• We do not take responsibility for damage that occurs due to the use of ungrounded equipment.

NOTE:
Operating your machine with low voltage will cause the life cycle of your machine to be reduced and its performance to be restricted.
3.4 Water Inlet Hose Connection
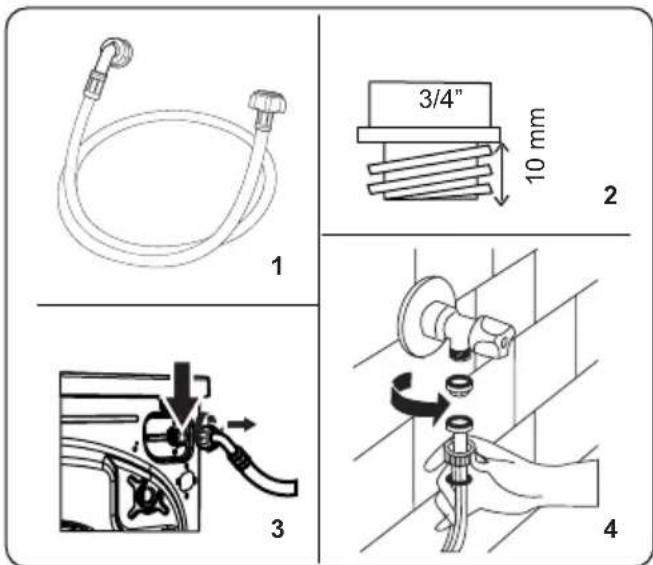
- Your machine may have either a single water inlet connection (cold) or double water inlet connection (hot and cold) depending on the machine specifications. The white capped hose
should be connected to cold water inlet and red capped hose to the hot water inlet (if applicable).
- To prevent water leaks at the joints, either 1 or 2 nuts (depending on your machine's specifications) are supplied in the packaging with the hose. Fit these nuts to the end(s) of the water inlet hose that connect to the water supply.
- Connect new water inlet hoses to a 34 ", threaded tap.
- Connect the white capped end of the water inlet hose to the white water inlet valve on the rear side of the machine and the red capped end of the hose to the red water inlet valve (if applicable).
- Tighten the plastic parts of the connections by hand. If in any doubt, consult a qualified plumber.
• Water flow with pressure of 0.1-1 Mpa will allow your machine to operate at optimum efficiency (pressure of 0.1 Mpa means that more than 8 litres of water per minute will flow through a fully opened tap).
-
Once you have made all of the connections, carefully turn the water supply on and check for leaks.
-
Ensure that the new water inlet hoses are not trapped, kinked, twisted, folded or crushed.
- If your machine has a hot water inlet connection, the temperature of the hot water supply should not be higher than 70°C.

NOTE:
Your Washing Machine must only be connected to your water supply using the supplied new fill hose. Old
hoses must not be reused.
3.5 Water Discharge Connection
natural_image
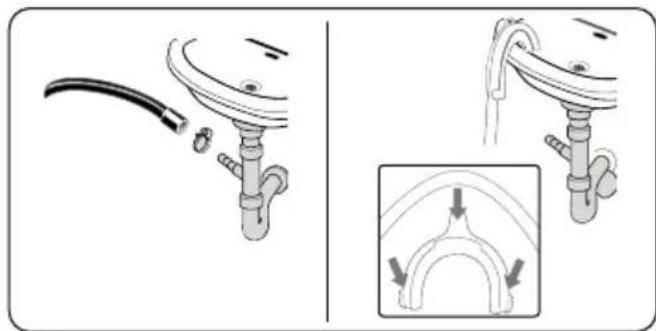
Diagram showing a cable being inserted into a sink, with an inset illustrating the structural detail of the anchor (no text or symbols present)- Connect the water drain hose to a standpipe or to the outlet elbow of a household sink, using additional equipment.
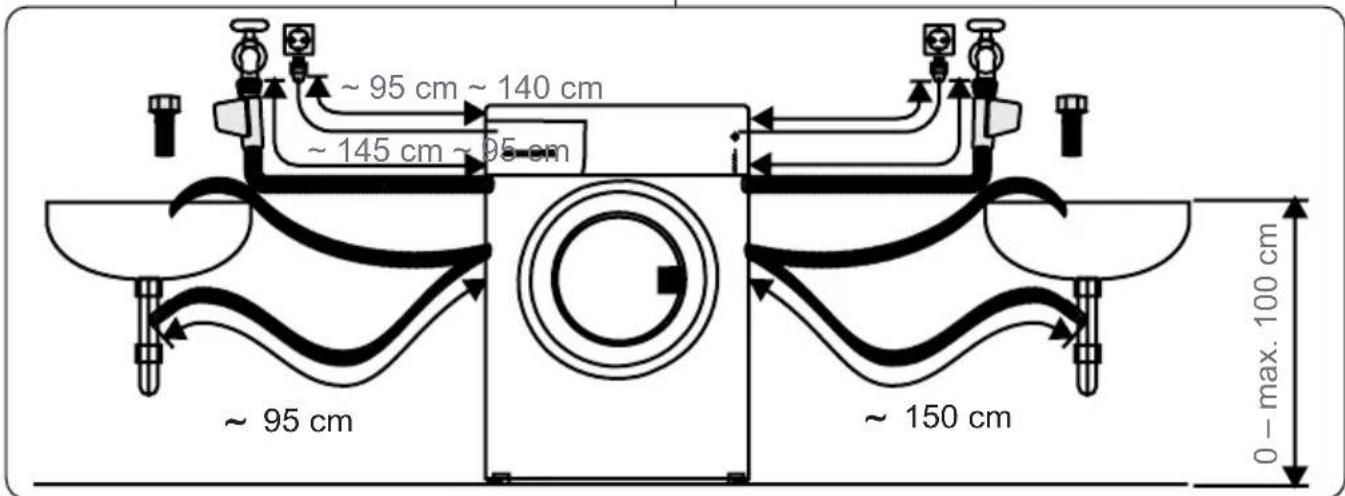
- Never attempt to extend the water drain hose.
- Do not put the water drain hose from your machine into a container, bucket or bathtub.
• Make sure that the water drain hose is not bent, buckled, crushed or extended. - The water drain hose must be installed at a maximum height of 100 cm from the ground.
4. CONTROL PANEL OVERVIEW
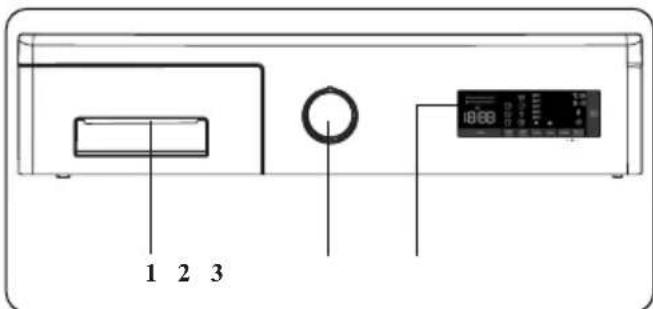
- Detergent Drawer
- Programme Dial
- Electronic Display
4.1 Detergent Drawer (\*)
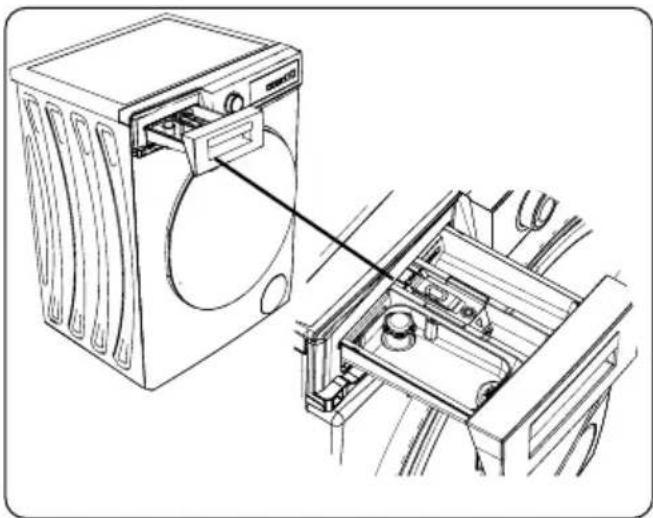
natural_image
Technical line drawing of a washing machine with internal components, showing part assembly (no text or symbols)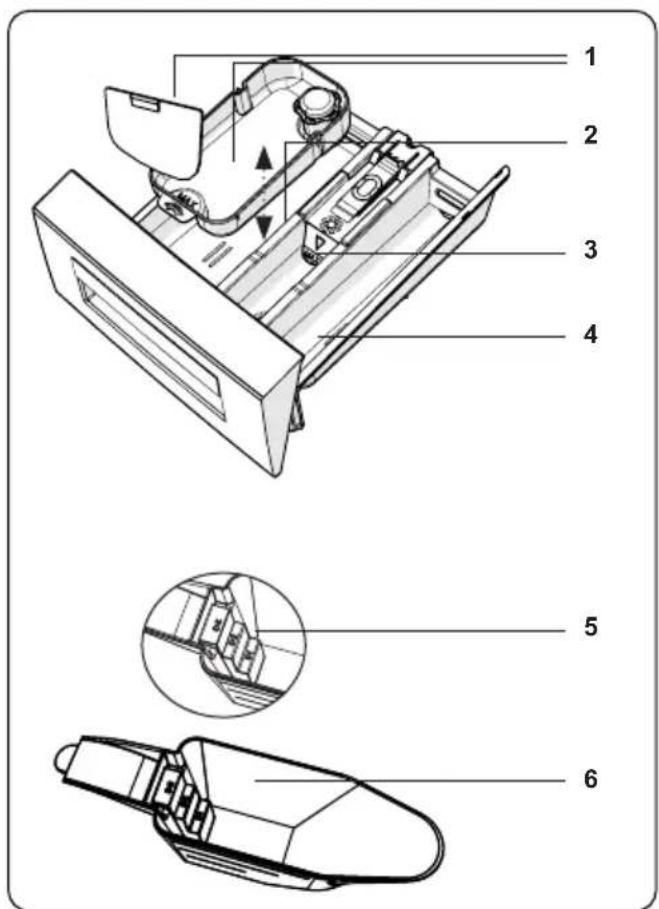
- Liquid Detergent Attachments (*)
- Main Wash Detergent Compartment
- Softener Compartment
- Pre-Wash Detergent Compartment
- Powder Detergent Levels (*)
- Powder Detergent Scoop (*)
(*) Specifications may vary depending on the machine purchased.
4.2 Sections
Main wash detergent compartment:
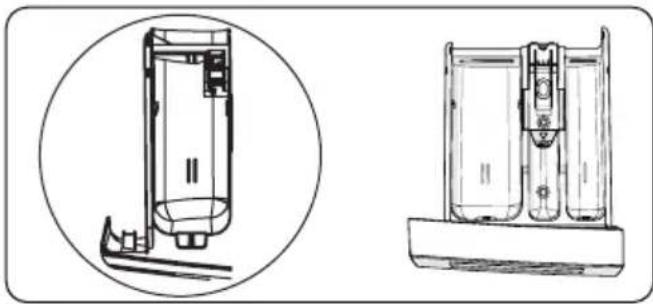
natural_image
Technical line drawings of a water dispenser and its internal components (no text or symbols)This compartment is for liquid or powder detergents or limescale remover. The fluid detergent level plate will be supplied inside your machine. (*)
Fabric conditioner, starch, detergent compartment:
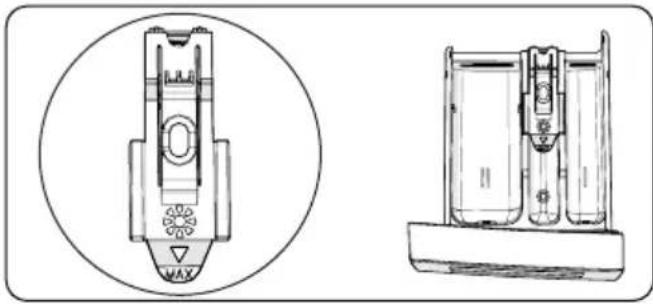
natural_image
Technical line drawings of two electronic devices, one with a circular inset showing a device component (no text or symbols)This compartment is for softeners, conditioners or starch. Follow the instructions on the packaging. If softeners leave residue after use, try diluting them or using a liquid softener.
Pre-wash detergent compartment:
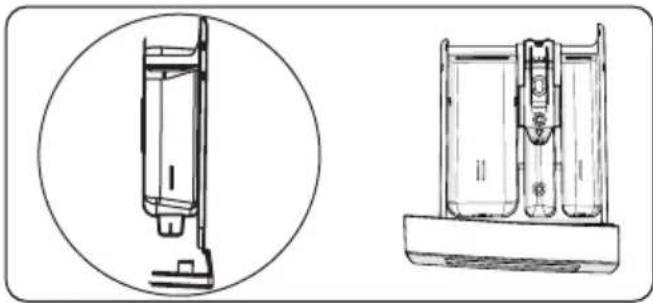
natural_image
Technical line drawing of a mechanical device with cross-sectional and top views (no text or symbols)This compartment should be used only when the pre-wash feature is selected. We recommend that the pre-wash feature is used only for very dirty laundry.
(*) Specifications may vary depending on the machine purchased.
4.3 Program Dial
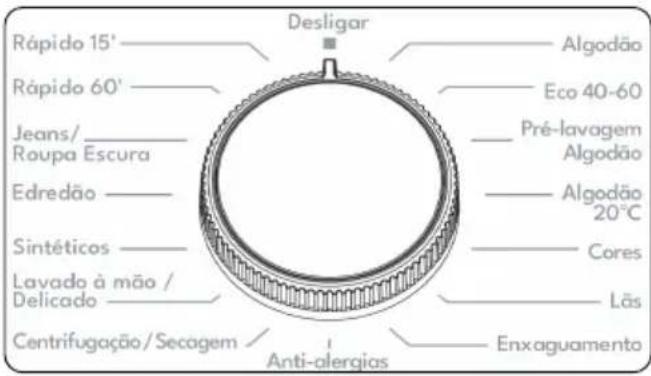
- To select the desired programme, turn the programme dial either clockwise or anti-clockwise until the marker on the programme dial points to the chosen programme.
• Make sure that the programme dial is set exactly to the programme you want.
4.4 Electronic Display
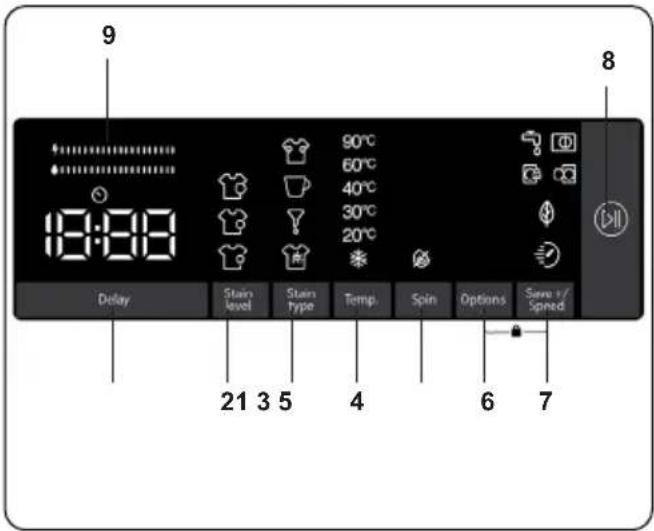
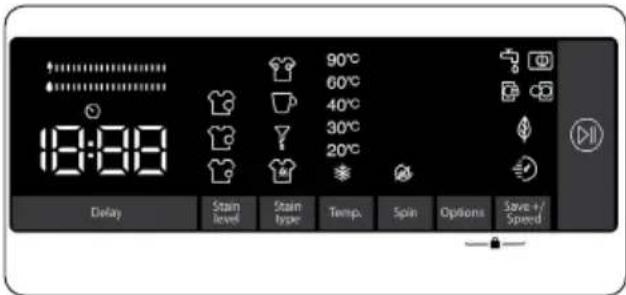
- Delayed start auxiliary function
- Selecting the level of soiling
- Stain selection
- Selecting the washing water temperature
- Spin speed selection
- Options
- Save+ / Speed (Eco washing, Quick Wash auxiliary function)
- Start Pause Button
- Energy/Water Efficiency Bar
5. USING YOUR WASHING MACHINE
5.1 Preparing Your Laundry
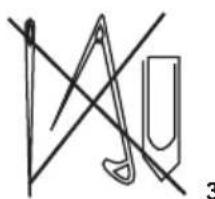
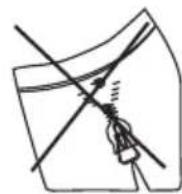
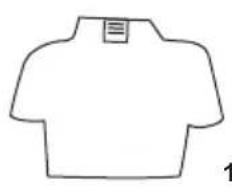 | 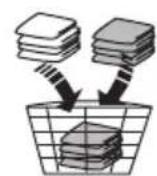 |
| 2 | |
 |  |
| 4 | |
 |  |
| 6 | |
 |
-
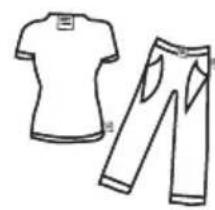
Follow the instructions given in the care labels on the clothing.
-
Separate your laundry according to type (cotton, synthetic, sensitive, wool etc.), washing temperature (cold, 30°, 40°, 60°, 90°) and the degree of dirtiness (slightly stained, stained, highly stained).
- Never wash coloured and white laundry together.
- Dark textiles may contain excess dye and should be washed separately.
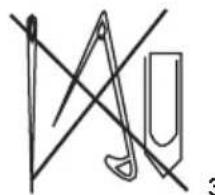
- Ensure that there are no metallic materials on your laundry or in the pockets; if so, remove them.
CAUTION: Any malfunctions which occur due to foreign materials damaging your machine are not covered by the warranty.
- Close zips and fasten any hooks and eyes.
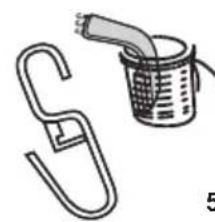
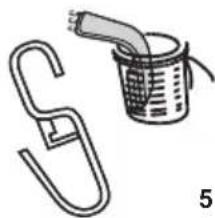
- Remove the metallic or plastic hooks off curtains or place them in a washing net
or bag.
- Turn garments inside out.
- Wash socks, handkerchiefs and other small items in a washing net.
 Can be bleached Can be bleached | 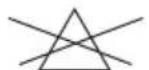 Do not bleach Do not bleach | 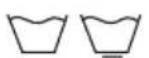 Normal washing Normal washing |
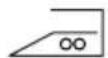 Maximum ironing temperature 150°C Maximum ironing temperature 150°C | 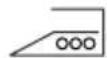 Maximum ironing temperature 200°C Maximum ironing temperature 200°C | 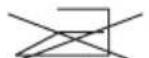 Do not iron Do not iron |
 Can be dry cleaned Can be dry cleaned | 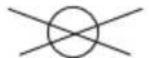 No dry cleaning No dry cleaning |  Dry flat Dry flat |
 Drip dry Drip dry |  Hang to dry Hang to dry | 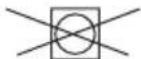 Do not tumble dry Do not tumble dry |
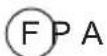 Dry in pur anca Dry in pur anca 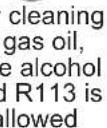 |  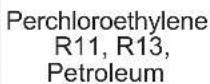 | 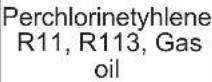 |
5.2 Putting Laundry in the Machine
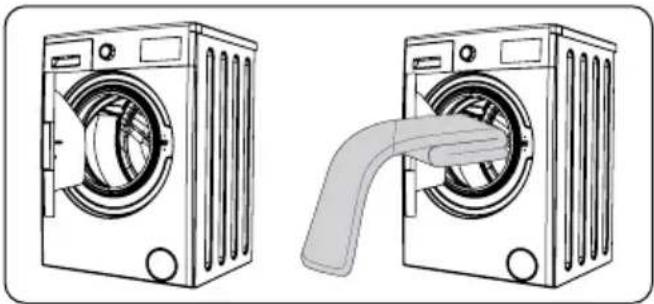
natural_image
Illustration of two washing machines side by side, one with a handle and the other with a curved pipe (no text or symbols)- Open the door of your machine.
- Spread your laundry evenly in the machine.
NOTE: Take care not to exceed the maximum load of the drum as this will give poor wash results and cause creasing. Refer to the washing programme tables for
information on load capacities.
The following table shows approximate weights of typical laundry items:
| LAUNDRY TYPE WEIGHT (gr) | |
| Towel 200 | |
| Linen 500 | |
| Bathrobe 1200 | |
| Quilt cover 700 | |
| Pillow slip 200 | |
| Underwear 100 | |
| Tablecloth 250 | |
- Load each item of laundry separately.
- Check that no items of laundry are trapped between the rubber seal and the door.
• Gently push the door until it clicks shut.
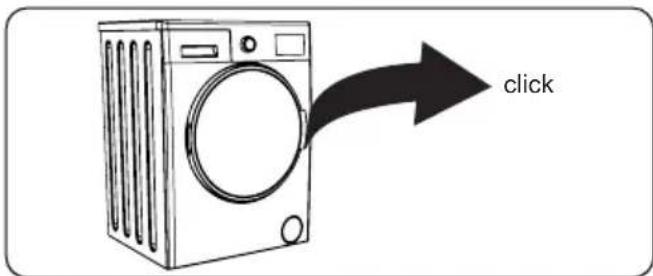
• Make sure the door is fully closed, otherwise the programme will not start.
5.3 Adding Detergent to the Machine
The amount of detergent you will need to put in your machine will depend on the following criteria:
- If your clothes are only slightly soiled, do not pre-wash. Put a small amount of detergent (as specified by the manufacturer) into compartment II of the detergent drawer.
- If your clothes are excessively soiled, select a programme with pre-wash and put 14 of the detergent to be used into compartment I of the detergent drawer and the rest in compartment II.
- Use detergents produced for automatic washing machines. Follow the manufacturer's instructions on the amount of detergent to use.
- In areas of hard water, more detergent will be required.
• The amount of the detergent required
will increase with higher washing loads.
- Put softener in the middle compartment of the detergent drawer. Do not exceed the MAX level.
- Thick softeners may cause clogging of the drawer and should be diluted.
- It is possible to use fluid detergents in all programmes without a pre-wash. To do this, slide the fluid detergent level plate (*) into the guides in compartment II of the detergent drawer. Use the lines on the plate as a guide to fill the drawer to the required level.
(*) Specifications may vary depending on the machine purchased.
5.4 Operating Your Machine

natural_image
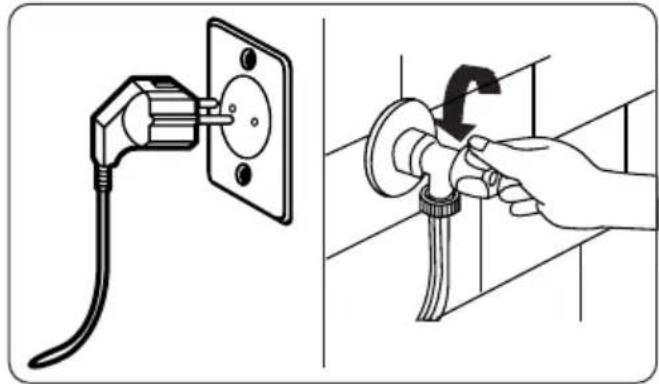
Illustration showing two steps of a hairpin installation: one with a plug, the other with a hand holding a screwdriver (no text or symbols present)- Plug your machine in to the mains supply.
- Turn on the water supply.
- Open the machine door.
• Evenly spread your laundry in the machine.
• Gently push the door until it clicks shut.
5.5 Selecting a Programme
Use the programme table to select the most appropriate programme for your laundry.
5.6 Half-Load Detection System
Your machine features a half-load detection system.
If you put less than half the maximum load of laundry into your machine it will automatically set the half-load function, regardless of the programme you selected. This means that the selected programme will take less time to complete and will use less water and energy.
(*) Model Dependant
5.7 Auxiliary Functions
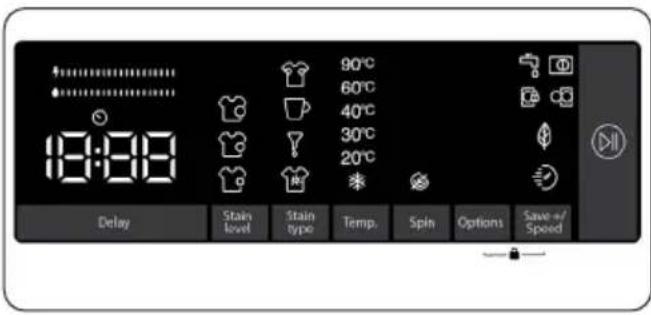
Before starting the program,
you can select auxiliary functions if you wish so.
- Press the key of the auxiliary function you want to select.
- If the symbol of the auxiliary function is continuously on in the electronic display, the selected auxiliary function will be enabled.
- If the symbol of the auxiliary function is flashing in the electronic display, the selected auxiliary function will not be enabled.
Reason for not enabling the function:
- That auxiliary function might not be available for the selected washing program.
- The machine might have passed the step where that auxiliary function could be applied.
- The auxiliary function might be incompatible with another auxiliary function you have previously selected.
1. Delayed start auxiliary function
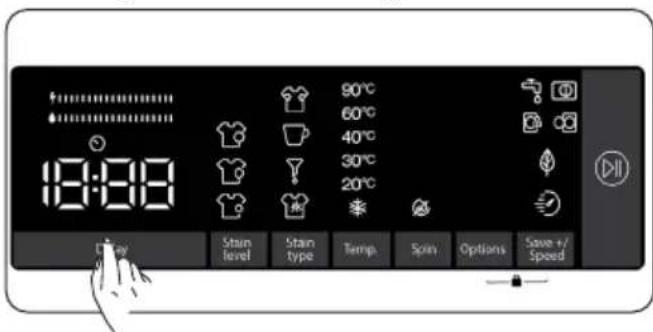
You can use this auxiliary function to delay the start time of the washing cycle for 1 to 23 hours.
To use the delay function:
- Press the delay key once.
-
"1h" will be displayed. 📋 will turn on in the electronic display.
-
Press the delay key until you reach the time after which you want the machine to start the washing cycle.
- If you have skipped the delay time you would like to set, you can keep pressing the delay key until you reach that time again.
- To use the time delay function, you need to press the Start/Pause key to start the machine.

NOTE:
NOTE: After selecting the delay function, you can select other functions without touching the "Start/Pause" key, and then you can touch the "Start/Pause" key to enable time delay.
To cancel the delay function:
- If you did not press the Start/Pause key, keep touching the delay key until the electronic display shows the duration of the program you have selected.
Once you see the program time on the electronic display, this means that the delay has been cancelled. - If you have pressed the Start/Pause key to start the machine, you just need to touch the delay key once. 📋 will go off on the electronic display, press "Start/Pause" key to start the washing cycle.
2. Selecting the level of soiling
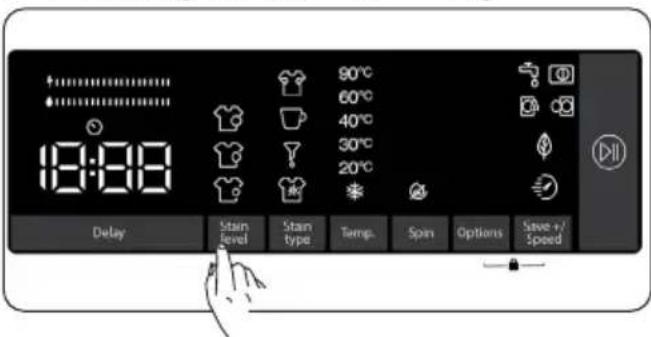
You can wash your laundries in shorter or longer durations, at lower or higher temperatures by selecting a soiling level depending on the soiling level on your laundries.
Soiling levels are automatically set in some programs. You can make changes at your discretion.

NOTE:
NOTE: If there are no changes in the level when you touch the soiling level key, it means there is no soiling level selection in the program you have selected.
3. Stain selection
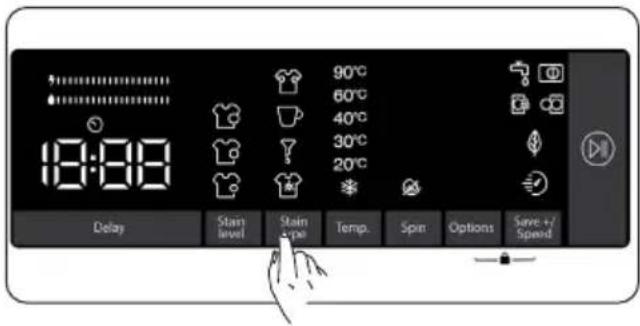
You can make use of these auxiliary functions on washing depending on the types of stains.
Warning: Do not let the stains on your laundries to get dry and stuck in order for the auxiliary function dedicated for soiling level selection to fully perform its functions. Clean the solids beforehand.
Warning: Press on the newly formed stains on your laundries with a piece of cloth before starting to wash them in your product. Do not scrub!
Your washing machine adjusts the washing temperature, drum rotation, and number and duration of rinse automatically according to the type of stain.
For example, the stain removal methods of your washing machine are as follows:
- Sweat stain
- Coffee stain
- Oil stain
- Mix
Sweat stain: This additional function will add a cold rinse before the selected programme. This will soak the laundry with cold water to clean the sweat stains before the selected washing programme starts.
Coffee stain: This additional function will add new washing steps for selected program. This will prolong the washing duration and apply a washing algorithm to remove the stain.
Oil stain: This additional function will add a cold rinse before the selected programme and will add new washing steps for selected program. This will soak the laundry with the cold water before the selected washing program and apply a washing algorithm to clean the oil stain.
Mix: This additional function will add a warm rinse before the selected programme and will add new washing steps for selected washing program. This will soak
the laundry with warm water to soften the mix stains before the selected washing programme starts.
For any other stain selection, similar stain removal solutions are available.
(*) The appliance specifications may vary depending on the purchased product.
NOTE:
ONOTE: Before starting your machine, you can switch between stain types. Once you have started the machine, you cannot cancel or change the selected stain type. You can cancel the washing program of your machine, and select the correct stain type and restart the program. If the desired results could not be achieved with the set stain selection at the end of washing, you may have selected the wrong type; restart the washing cycle with the correct stain selection to remove the stain.
4. Selecting the washing water temperature
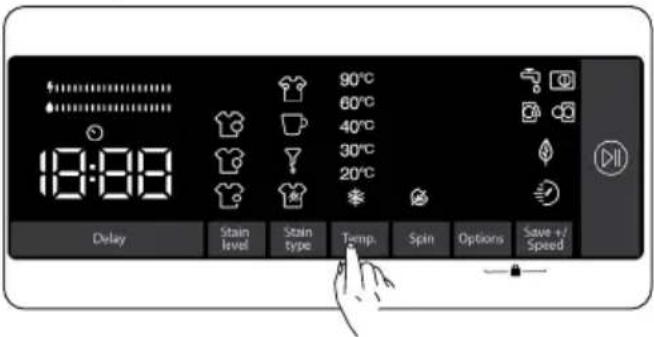
You can use the washing water temperature setting key to set the temperature of the washing water for your laundry.
- When you select a new program, the selected program's maximum temperature will be displayed on the washing water temperature display.
- You can press the washing water temperature setting key to decrease the washing water temperature gradually between the maximum water temperature of the selected program and cold water wash (*).
- If you have skipped the washing water temperature you wanted to set, keep pressing the washing water temperature key to find the desired temperature again.
5. Spin speed selection
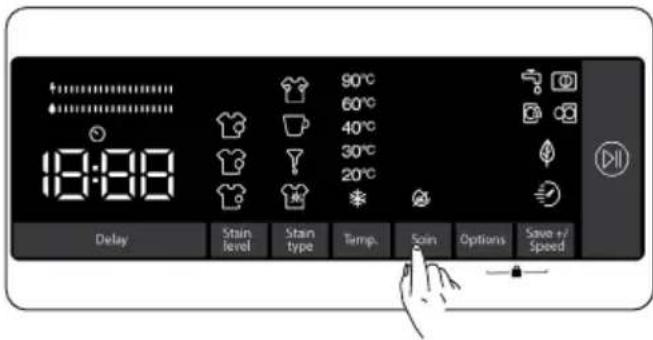
You can use the speed setting key to set the spin speed for your laundry. When you select a new program, the selected program's maximum spin speed will be displayed on the spin speed display.
You can press the spin speed setting key to decrease the spin speed gradually between the selected program's maximum spin speed and the spin cancelled (💡) option.
If you have skipped the spin speed you wanted to set, you can keep pressing the spin speed key to find the desired speed again.
6. Options
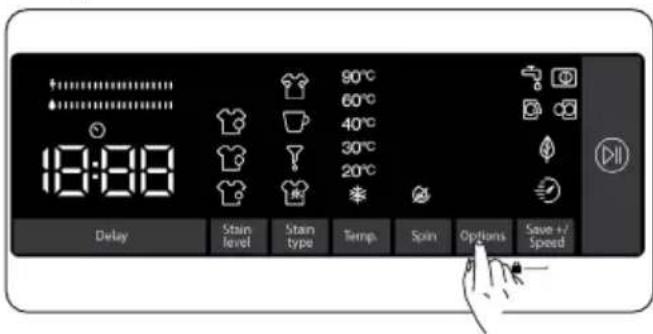
You can use auxiliary functions to make the best washing selection for your laundry. To do this, you can touch the options key on the display panel to enable the following:
6.1 Prewash auxiliary function
6.2 ✉ Extra rinse auxiliary function
6.3 Steam Assist auxiliary function
6.4 Anti-Allergy auxiliary function.
6.1 Prewash auxiliary function
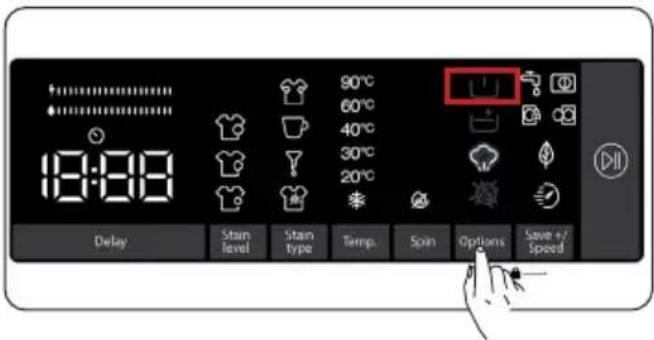
You can use this auxiliary function to perform pre-wash before the main wash cycle for your highly soiled laundry. When you use this function, you need to add detergent into the prewash dispenser of the detergent drawer. To enable the prewash auxiliary function, press the options key until the prewash symbol turns on. If the prewash LED is constantly on in the electronic display, it means that the auxiliary function is selected.

NOTE: When you want to select prewash auxiliary function, if does appear on the display, this means that feature is not available in the selected dining program.
6.2 Extra rinse auxiliary function
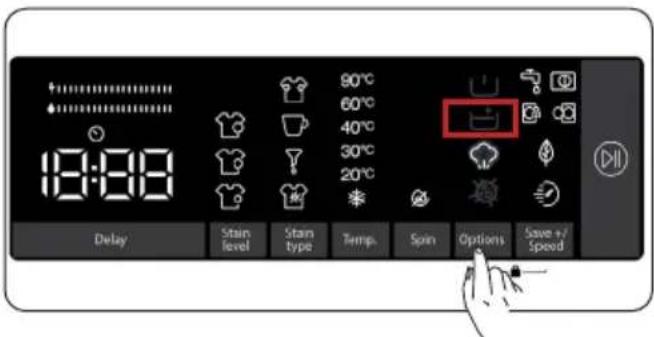
You can use this auxiliary function for extra rinsing on your laundry. To enable the extra rinse function, keep pressing the options key until the extra rinse symbol turns on. If the extra rinse LED is constantly on in the electronic display, it means that the auxiliary function is selected.

NOTE: When you want to select the extra rinse auxiliary function, if does not appear on the display, this means that this feature is not available in the selected washing program.
6.3 Steam Assist auxiliary function
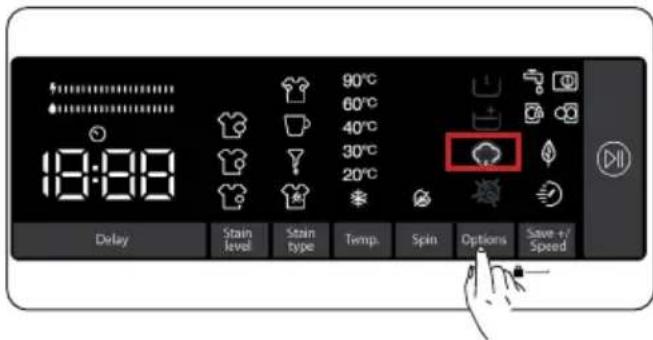
Owing to the steam system ironing has become quick and as easy. The steam used dream washing penetrates and loosens the fibres, eliminates creases and leaves our clothes soft and delicate.

NOTE: When you want to select the steam system auxiliary function, if ⚙ does not appear on the display, this means that this feature is not available in the selected washing program.
6.4 Anti-Allergy auxiliary function
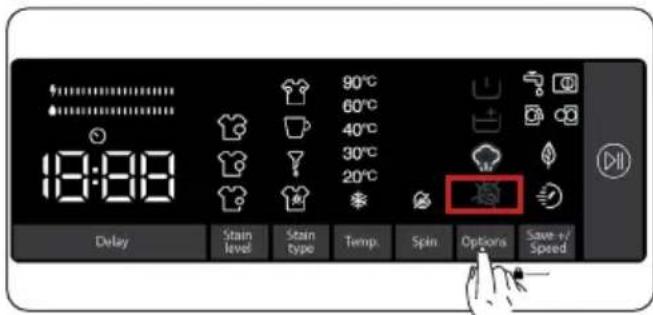
You can use this auxiliary function to add another rinse cycle for your laundry. Your machine will use hot water in all rinsing steps. (It is recommended for sensitive skin clothing, baby clothes and underclothes). To enable the Anti-Allergy auxiliary function, keep pressing the options key until the Anti-Allergy function symbol ☑ turns on. If the Anti-Allergy LED is constantly on in the electronic display, it means that the auxiliary function is selected.

NOTE: When you want to select the Anti-Allergy auxiliary function, if ⚙ does not appear on the display, this means that this feature is not available in the selected washing program.
7. Eco/Quick Wash auxiliary function
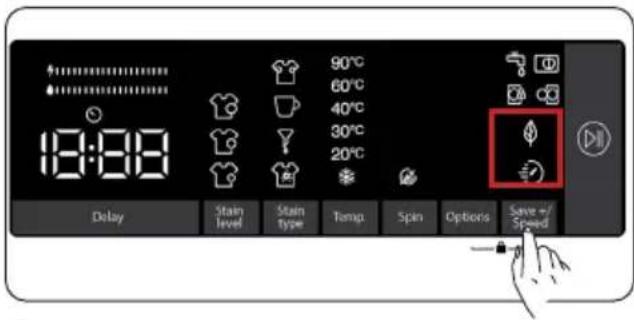

Eco washing auxiliary function:
If you select this auxiliary function, your machine will slightly extend the duration of the washing program. However, it will use less energy and water for the washing cycle. To enable this function, you can touch the Save+ / Speed selection key on the display panel to turn on the LED light of the symbol 🎨.

Quick Wash auxiliary function:
If you select this auxiliary function, your machine will shorten the duration of the washing program. (It is recommended to load the machine with half or less than half of the capacity of the selected washing program.) To enable this function, you can touch the Save+ / Speed selection key on the display panel to turn on the LED light of the symbol 📋.

NOTE: If you load the machine with half or less than half of the laundry capacity of the selected washing program, the machine will detect it thanks to the half load detection system, and this way, it will wash your laundry with less energy and less water in a shorter time. When your machine detects half load, LED light of the symbol 📋 will automatically turn on in the display panel.
(*) The appliance specifications may vary depending on the purchased product.
• Energy/Water Efficiency Bar:
“……” is an efficiency indicator comprising 2 bars. The energy/water efficiency bar shows the amount of energy and water consumption. The bigger the bar is, the more energy or water consumption you will have. The energy/water efficiency bar might extend or shorten depending on the selected program’s duration, temperature setting, spin speed and other auxiliary functions.
Start/Pause button
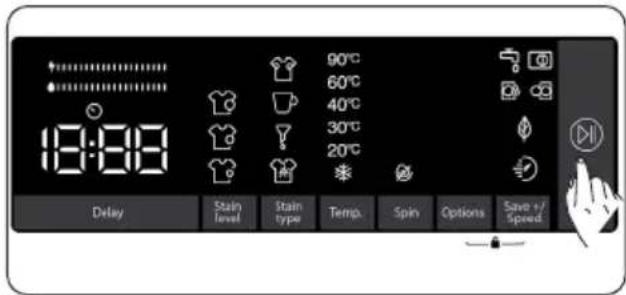
By pressing on the Start/Pause button, you may start the programme you have selected or suspend a running programme. If you switch your machine to the standby mode, the Start/Pause led on the electronic display will blink.
5.8 Child Lock
The Child Lock function allows you to lock the buttons so that the wash cycle you have chosen cannot be changed unintentionally.
To activate child lock, press and hold buttons 6 and 7 simultaneously for at least 3 seconds. "CL" will flash on the electronic display for 2 seconds when the child lock is activated.

If any button is pressed or selected programme is changed by the programme dial while the child lock is active, the "CL" symbol will flash on the electronic display for 2 seconds.
If the child lock function is active and a programme is running, when the programme dial is turned to the "Off" position and another programme is selected the previously selected programme continues from where it was left.
To deactivate the child lock, press and hold buttons 6 and 7 simultaneously for at least 3 seconds until the "CL" symbol on the electronic display disappears.
NOTE: Door remains unlocked in case when child lock is active and electricity is cut off
5.9 If you want to pause/cancel a running program or add laundry:
- Symbol key allows you to pause or restart the selected program. When you want to add laundry, you can use this function.
- Touch ▷ symbol button for this. If 🔓 is displayed on the screen, you can open the loading door and add laundry.
- If C_a is displayed on the screen, the step where you can add laundry has passed.
- If you want to cancel a running program, turn the program knob to "CANCEL" position. Your machine will stop washing process and the program will be cancelled. To drain the water in the machine, turn the program knob to any program position. Your machine will drain the water and cancel the program. You can select a new program and start the machine.
5.10 Program End
Your machine will automatically stop when the selected program ends.
- "End" will appear on the electronic display.
- You can open the door 📄 and take out the laundry. After taking out the laundry, leave the door open so that the inside of the machine can dry.
- Turn the program knob to CANCEL position.
- Unplug the machine.
-
Turn off the water tap.
-
PROGRAMME TABLE
| Programme | Washing temperature (°C) | Maximum dry laundry amount (kg) | Detergent compartment | Programme duration (Min.) | Laundry type / Descriptions |
| COTTON *60 - 90 | 10,0 2 | 145 | Very dirty, cotton and flax textiles. (Underwear, linen, tablecloth, towel (maximum 5,0 kg), bedclothes, etc.) | ||
| ECO 40-60 *40 - 60 | 10,0 2 | 239 | Dirty cotton and flax textiles. (Underwear, linen, tablecloth, towel (maximum 5,0 kg), bedclothes, etc.) | ||
| COTTON Pre-Wash | *60 - 40 - 30 - “- -C” | 10,0 18 | 2 164 | Dirty cotton and flax textiles. (Underwear, linen, tablecloth, towel (maximum 5,0 kg), bedclothes, etc.) | |
| COTTON 20 *20- “- -C” | 5,0 2 | 59 | Less dirty, cotton and linen textiles. (Underwear, bedsheet, tablecloth, towel (max.2,5 kg) bedcloth, etc.) | ||
| COLOURS *40 - 30 - “- -C” | 10,0 2 | 130 | Less dirty, cotton and linen textiles. (Underwear, bedsheet, tablecloth, towel (max. 2,0 kg) bedcloth, etc.) | ||
| WOOL *30 - “- -C” | 2,5 2 | 43 | Woollen laundries with machine wash labels. | ||
| RINSE *“- -C” | 10,0 - 3 | 30 | Provides an additional rinse to any type of laundry after the washing cycle. | ||
| ALLERGY SAFE | *60 - 40 - 30 - “- -C” | 5,0 2 | 212 | Baby laundry | |
| Spin/Drain *“- -C” | 10,0 - 17 | You can use this program for any type of laundry if you want an additional spin step after the washing cycle./ You can use the drain program to drain the water accumulated inside the machine (adding or removing laundry). To enable the drain program, turn the program knob to the spin/drain program. After you select “spin cancelled” using the auxiliary function key, the program will start to run. | |||
| HAND WASH | *30 - “- -C” | 2,5 2 | 90 | Laundry recommended for hand wash or sensitive laundry. | |
| Easy Care / Outdoor | * 40 - 30 - “- -C” | 3,5 2 | 135 | Very dirty or synthetic-mixed textiles. (Nylon socks, shirts, blouses, synthetic-including trousers etc.) | |
| Duvet | *40 - 30 - “- -C” | - | 2 100 | For washing a fibre duvet with a machine washable label. (max. 2.5 kg) | |
| Jeans / Dark Garments | *30 - “- -C” | 3,5 2 | 96 | Black and dark items made of cotton, mixed fibre or jeans. Wash inside out., Jeans often contains excess dye and may run during the first few washes. Wash light and dark coloured items separately | |
| (**) FAST 60' 60°C | *60 - 40 - 30 - “- -C” | 4,0 2 | 60 | Dirty, cotton, coloured and linen textiles washed at 60°C in 60 minutes. | |
| (***) Rapid 15 ' | *30 - “- -C” | 2,0 2 | 15 | In a short time of 15 minutes, Lightly soiled, cotton, colored and linen textiles your can wash. |
NOTE: PROGRAMME DURATION MAY CHANGE ACCORDING TO THE AMOUNT OF LAUNDRY, TAP WATER, AMBIENT TEMPERATURE AND SELECTED ADDITIONAL FUNCTIONS.
(*) Washing water temperature of the programme is the factory default.
(**) If your machine has the rapid wash auxiliary function, you can enable the quick wash option on the display panel and load the machine with 2 kg or less laundry to wash it in 30 minutes.
(***) Due to the short washing time of this programme, we recommend that less detergent is used. The programme may last longer than 15 minutes if your machine detects an uneven load. You can open the door of your machine 2 minutes after the completion of a washing operation. (The 2 minute period is not included in the programme duration).
According to regulation 1015/2010 and 1061/2010, the programme 1 and the programme 2 are respectively the 'Standard 60°C cotton programme' and the 'Standard 40°C cotton programme'.
The Eco 40-60 programme is able to clean normally soiled cotton laundry declared to be washable at 40^ C or 60^ C, together in the same cycle, and that this programme is used to assess the compliance with the EU ecodesign legislation.
- The most energy efficient programmes are generally those that run at a lower temperature and for a longer duration.
- Only running the washing machine when it's loaded to the full capacity as indicated by the manufacturer will help to save both water and energy.
- Program duration, energy consumption and water consumption values may vary according to wash load weight and type, selected extra functions, water hardness and ambient temperature. According to the EU Ecodesign regulation the values given for programs other than the ECO 40-60 are indicative only.
- It's recommended to use liquid detergent for the washing programmes at low temperature. The amount of detergent to be used may vary depending on the amount of laundry and the level of dirtiness of the laundry. Please follow the detergent manufacturers' recommendations for the amount of the detergent to be used.
- The noise and remaining moisture content are influenced by the spinning speed. The higher spinning speed in the spinning phase, the higher noise and the lower remaining moisture content.
- You can access the product database where the model information is stored by reading the QR code on the energy label.
| Programme Name | Rated Capacity kg | Energy Consumption kWh/cycle | Programme Duration Hours:Minutes | Water Consumption Litres/Cycle | max. Temperature °C | Remaining Moisture Content % 1400 Rpm | ||||||||||
| Rated Capacity | 1/2 Load | 1/4 Load | Rated Capacity | 1/2 Load | 1/4 Load | Rated Capacity | 1/2 Load | 1/4 Load | Rated Capacity | 1/2 Load | 1/4 Load | Rated Capacity | 1/2 Load | 1/4 Load | ||
| Cotton 90 | 10 2,42 03:13 | 72 81 53% | ||||||||||||||
| Cotton 60 | 10 0,9 02:25 | 50 57 53% | ||||||||||||||
| Eco 40-60 | 10 1,03 0,37 | 0,25 03:59 03:00 | 03:00 59 45 43 41 | 26 23 53% | 53% | 53% | ||||||||||
| Easy Care / Outdoor | 3,5 0,66 02:1 | 5 64 47 53% | ||||||||||||||
| Fast 60 | 4 1,12 01:00 | 36 58 53% | ||||||||||||||
| Cotton 20 | 5 0,14 00:59 | 34 20 53% | ||||||||||||||
6.1 Important Information
- Use detergents, softeners and other additives suitable for automatic washing machines only. Using too much detergent can cause excessive foam to occur. If foam occur, the foam absorption system activated.
- We recommend that you fully clean the washing machine every two months. For periodic cleaning please use Drum Clean programme. If your machine does not have a Drum Clean programme, please use the Cottons-90 programme. When required, use limescale removers manufactured specifically for washing machines only.
- Never force the door open when your Washing Machine is running. You can open the door of your machine 2 minutes after the completion of a of a wash cycle. *
- Never force the door open when your Washing Machine is running. The door will open immediately after the washing cycle has ended. *
- The installation and repairing procedures should always carried out by the Authorised Service Agent in order to avoid possible risks. The manufacturer shall not be held liable for damages that may arise from procedures carried out by unauthorised persons.
(*) Specifications may vary depending on the machine purchased.
7. CLEANING AND MAINTENANCE
7.1 Warning
natural_image
Illustration showing a plug inserted into a wall socket and a hand using a tool to adjust the cable (no text or symbols present)Turn your mains power supply off and remove the plug from the socket before carrying out maintenance and cleaning of your machine.
Turn off the water supply before starting maintenance and cleaning of your machine.
⚠️CAUTION: Do not use solvents, abrasive cleaners, glass cleaners or all-purpose cleaning agents to clean your Washing Machine. They may damage the plastic surfaces and other components with the chemicals they contain.
7.2 Water Inlet Filters
Water inlet filters prevent dirt and foreign materials from entering your machine. We recommend that these filters are cleaned when your machine is unable to receive sufficient water, although your water supply is on and the tap is open. We recommend that you clean your water inlet filters every 2 months.
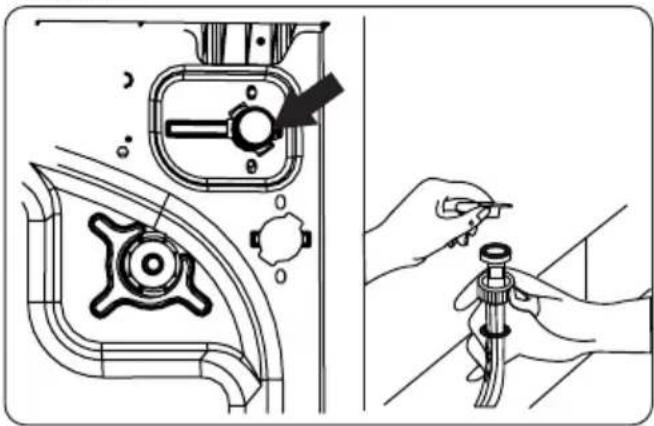
- Unscrew the water inlet hose(s) from the Washing Machine.
- To remove the water inlet filter from the water inlet valve, use a pair of long-nosed pliers to gently pull on the plastic bar in the filter.
- A second water inlet filter is located in the tap end of the water inlet hose. To remove the second water inlet filter, use a pair of long-nosed pliers to gently pull on the plastic bar in the filter.
- Clean the filter thoroughly with a soft brush and wash with soapy water and rinse thoroughly. Re-insert the filter by gently pushing it back into place.
CAUTION: The filters at the water inlet valve may become clogged due to water quality or lack of required maintenance and may break down. This may cause a water leak. Any such breakdowns are out of the scope of the warranty.
7.3 Pump Filter
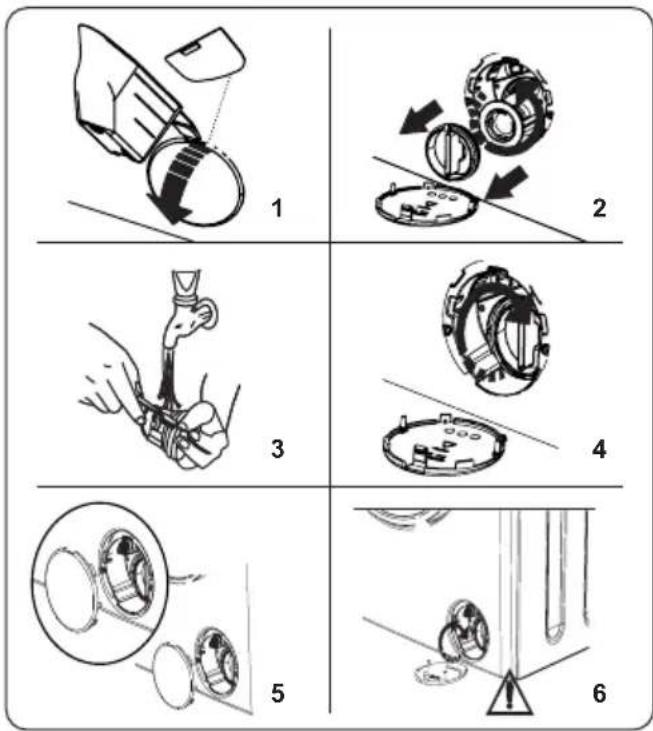
The pump filter system in your Washing Machine prolongs the life of the pump by preventing lint from entering your machine. We recommend that you clean the pump filter every 2 months.
The pump filter is located behind the cover on the front-lower right corner.
To clean the pump filter:
- You may use the washing powder spade (*) supplied with your machine or liquid detergent level plate to open the pump cover.
- Lodge the end of the powder spade or liquid detergent level plate in the opening of the cover and gently press backwards. The cover will open.
- Before opening the filter cover, place a container under the filter cover to collect any water left in the machine.
- Loosen the filter by turning anticlockwise and remove by pulling. Wait for the water to drain.
NOTE: Depending on the amount of water inside the machine, you may have to empty the water collection container a few times.
- Remove any foreign materials from the filter with a soft brush.
- After cleaning, re-fit the filter by inserting it and turning clockwise.
-
When closing the pump cover, ensure that the mountings inside the cover meet the holes on the front panel side.
-
Close the filter cover.
WARNING: The water in the pump may be hot, wait until it has cooled down before carrying out any cleaning or maintenance.
(*) Specifications may vary depending on the machine purchased.
7.4 Detergent Drawer
The use of detergent may cause residual build up in the detergent drawer over time. We recommend that you remove the drawer every 2 months to clean the accumulated residue.
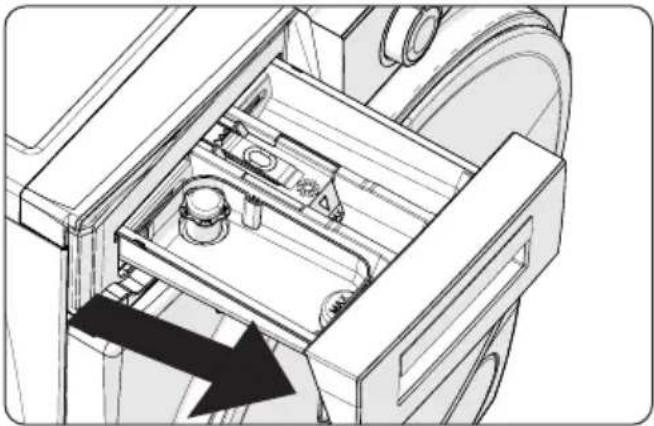
To remove the detergent drawer:
- Pull the drawer forwards until it is fully extended.
natural_image
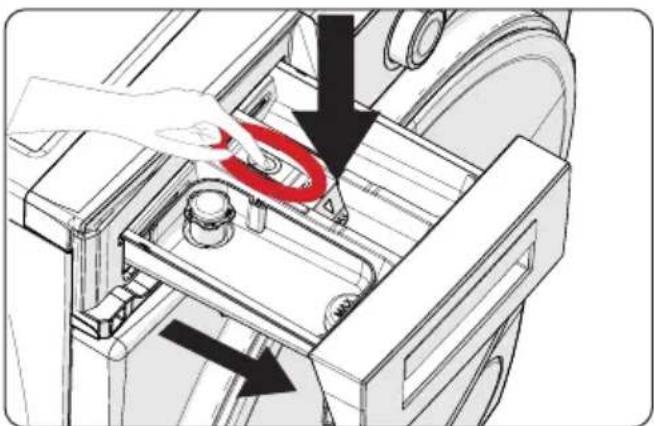
Technical line drawing of a mechanical device interior showing internal components and a black arrow indicating direction (no text or symbols)- Press the region shown below inside the detergent drawer you have pulled all the way back, and continue pulling and remove the detergent drawer from its place
natural_image
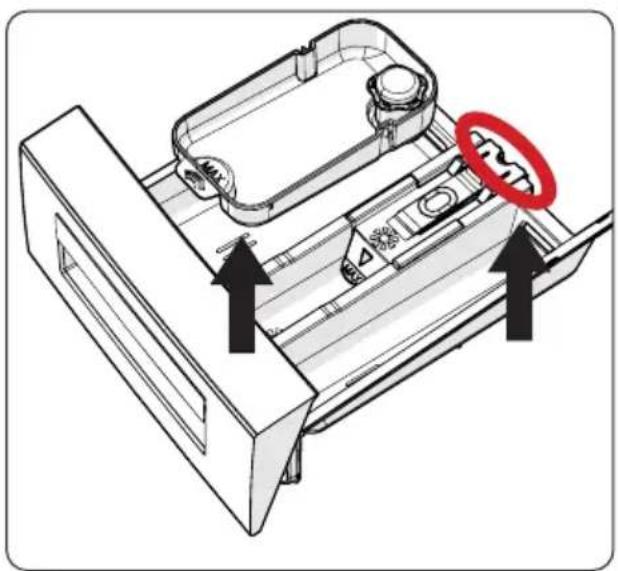
Mechanical assembly diagram showing a hand operating a component with a red circular component highlighted (no text or symbols present)- Remove the detergent drawer and disassemble the flush stopper. Clean thoroughly to completely remove any softener residue. Refit the flush stopper after cleaning and check that it is seated properly.
natural_image
Technical diagram of a mechanical device with arrows indicating assembly or movement, no visible text or symbols- Rinse with a brush and lots of water.
- Collect the residues inside the detergent drawer slot so that they don't fall inside your machine.
- Dry the detergent drawer with a towel or dry cloth and place it back
Do not wash your detergent drawer in a dishwasher.
Liquid detergent apparatus(\*)
For the cleaning and maintenance of the liquid level detergent apparatus, remove the apparatus from its location as shown in the picture below, and thoroughly clean the remaining detergent residues. Replace the apparatus. Make sure that no residual material remains inside the siphon.
(*) Specifications may vary depending on the machine purchased.
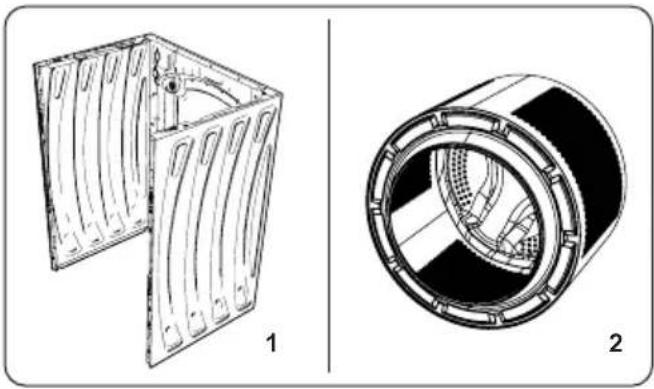
8. Body / Drum
natural_image
Technical drawings of two mechanical components: a rectangular frame with internal grooves and a cylindrical housing with internal structure (no text or symbols)1. Body
Use a mild, non-abrasive cleaning agent, or soap and water, to clean the external casing. Wipe dry with a soft cloth.
2. Drum
Do not leave metallic objects such as needles, paper clips, coins etc. in your machine. These objects lead to the formation of rust stains in the drum. To clean such rust stains, use a non-chlorine cleaning agent and follow the instructions of manufacturer of the cleaning agent. Never use wire wool or similar hard objects for cleaning rust stains.
9. TROUBLESHOOTING
Repair of your machine should be carried out by an authorised service company. If your machine requires repair or if you cannot solve an issue with the information provided below, then you should:
- Unplug your machine from the mains power supply.
- Turn off the water supply.
| FAULT POSSIBLE CAUSE TROUBLESHOOTING | ||
| Your machine does not start. | Machine not plugged in. Plug machine in. | |
| Fuses are faulty. Replace the fuses. | ||
| No mains power supply. Check mains power. | ||
| Start/Pause button not pressed. Press the Start/Pause button. | ||
| Programme dial ‘stop’ position. Turn the programme dial to the desired position. | ||
| The machine door is not completely closed. | Close the machine door. | |
| Your machine does not intake water. | Water tap is turned off. Turn tap on. | |
| Water inlet hose may be twisted. Check water inlet hose and untwist. | ||
| Water inlet hose clogged. Clean water inlet hose filters. (*) | ||
| Inlet filter clogged. Clean the inlet filters. (*) | ||
| The machine door is not completely closed. | Close the machine door. | |
| Your machine does not discharge water. | Drain hose clogged or twisted. | Check the drain hose, then either clean or untwist. |
| Pump filter clogged. Clean the pump filter. (*) | ||
| Laundry is too tightly packed together in the drum. | Spread your laundry in the machine evenly. | |
| Your machine vibrates. | The feet have not been adjusted. Adjust the feet. (**) | |
| Transit bolts fitted for transportation have not been removed. | Remove the transit bolts from the machine. (**) | |
| Small load in the drum. | This will not prevent operation of your machine. | |
| Your machine is overloaded with laundry or laundry is unevenly spread. | Do not overload the drum. Spread laundry evenly in the drum. | |
| Excessive foam is formed in the detergent drawer. | Excessive amount of detergent used. | Press the Start/Pause button. To stop the foam, dilute one tablespoon of softener into 1/2 litre of water and pour into the detergent drawer. Press the Start/Pause button after 5-10 mins. |
| Wrong detergent used. | Only use detergents produced for automatic Washing Machines. | |
| Unsatisfactory washing result. | Your washing is too dirty for the programme selected. | Use the information in the programme tables to select the most appropriate programme. |
| Amount of detergent used insufficient. | Use the amount of detergent as instructed on the packaging. | |
| There is too much laundry in your machine. | Check that the maximum capacity for the selected programme has not been exceeded. | |
| Unsatisfactory washing result. | Hard water. | Increase the amount of detergent following the manufacturer's instructions. |
| Your laundry is too tightly packed together in the drum. | Check that your laundry is spread out. | |
| As soon as the machine is loaded with water, water discharges. | The end of water drain hose is too low for the machine. | Check that the drain hose is at a suitable height. (**) . |
| No water appears in the drum during washing. | No fault. Water is in the unseen part of the drum. | ...... |
| Laundry has detergent residue. | Non-dissolving particles of some detergents may appear on your laundry as white spots. | Perform an extra rinse, or clean your laundry with a brush after it dries. |
| Grey spots appear on the laundry. | There is untreated oil, cream or ointment on your laundry. | Use the amount of detergent as instructed on the packaging in the next wash. |
| The spin cycle does not take place or takes place later than expected. | No fault. The Unbalanced load control system has been activated. | The Unbalanced load control system will try to spread your laundry. The spinning cycle will begin once your laundry is spread. Load the drum evenly for the next wash. |
(*) See the chapter regarding maintenance and cleaning of your machine.
(**) See the chapter regarding installation of your machine.
10. AUTOMATIC FAULT WARNINGS AND WHAT TO DO
Your Washing Machine is equipped with a built-in fault detection system, indicated by a combination of flashing wash operation lights. The most common failure codes are shown below.
| TROUBLE CODE | POSSIBLE FAULT WHAT TO DO | |
 | The door of your machine is not shut properly. | Shut the door properly until you hear a click. If your machine persists to indicate fault, turn off your machine, unplug it and contact the nearest authorised service agent immediately. |
 | The water pressure or the water level inside the machine may be low. | Check the tap is fully turned on. Mains water may be cut-off. If the problem still continues, your machine will stop after a while automatically. Unplug the machine, turn off your tap and contact the nearest authorised service agent. |
 | The pump is faulty or pump filter is clogged or electrical connection of the pump is faulty. | Clean the pump filter. If the problem persists, contact the nearest authorised service agent. (*) |
| E04 | Your machine has excessive amount of water. | Your machine will discharge water by itself. Once the water has drained, turn off your machine and unplug it. Turn off the tap and contact the nearest authorised service agent. |
(*) See the chapter regarding maintenance and cleaning of your machine.
| 10.2 | 10.3 | 10.4 | 10.5 | 10.6 | 10.7 | 10.8 | 10.9 | 11.0 | 11.1 | 11.2 | 11.3 | 11.4 | 11.5 | 11.6 | 11.7 | 11.8 | 11.9 | 12.0 | |
www.orima.pt
00351231467427/assistencia@ori
CE
52551681
orima
natural_image
Simple line drawing of a washing machine with no text or symbolsORM 14103 SIW
2.1 Aspecto general
natural_image
Line drawing of a washing machine with no text or symbolsnatural_image
Diagram showing a pipe installation and its corresponding cross-sectional view of a mechanical component (no text or symbols present)natural_image
Technical line drawing of a washing machine with internal components, showing part assembly (no text or symbols)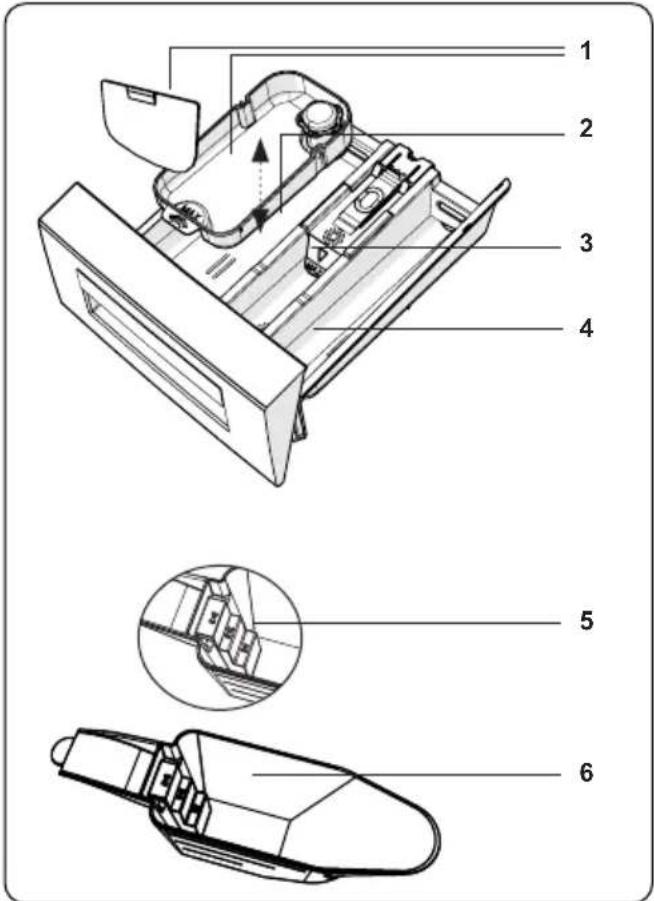
natural_image
Technical line drawings of a hand pump and its internal components (no text or symbols)natural_image
Technical line drawing of a medical device with MAX component, shown in two views (circular and rectangular) without any text or symbols.natural_image
Technical line drawing of a mechanical device with cross-sectional and top views (no text or symbols)natural_image
Simple line drawing of a short-sleeve shirt with a collar detail (no text or symbols)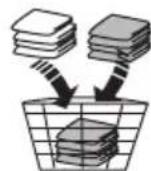
natural_image
Pure mechanical diagram showing intersecting rods and a U-shaped component (no text or symbols)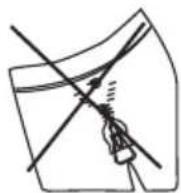
natural_image
Simple line drawing of a paperclip and a basket with a handle, no text or symbols present.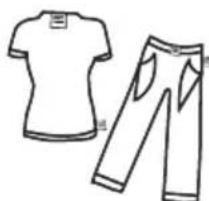
natural_image
Line drawing of a T-shirt and jeans (no text or symbols)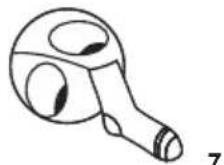
natural_image
Illustration of two washing machines side by side, one with a handle and the other with a handle (no text or symbols)natural_image
Illustration showing two steps of a hairpin installation: one with a plug, the other with a hand holding a screwdriver (no text or symbols present)natural_image
Illustration showing a wall-mounted electrical plug and a hand holding a hose, both without any text or symbols.natural_image
Technical line drawing of a mechanical device interior with internal components and a black arrow indicating direction (no text or symbols)natural_image
Mechanical assembly diagram showing a hand operating a component with red ring and black arrows indicating motion (no text or symbols)natural_image
Technical line drawing of a mechanical device with arrows indicating assembly or movement (no text or symbols)natural_image
Technical diagrams of two mechanical components: a 3D panel assembly and a cylindrical housing (no text or symbols)1. Cuerpo
natural_image
Simple line drawing of a washing machine with no text or symbolsORM 14103 SIW
natural_image
Line drawing of a front-loading washing machine with circular vent and buttons (no text or symbols)natural_image
Diagram showing a pipe fitting with a cable and a close-up of the internal structure (no text or symbols)natural_image
Line drawing of a washing machine with a close-up view of its internal components (no text or symbols)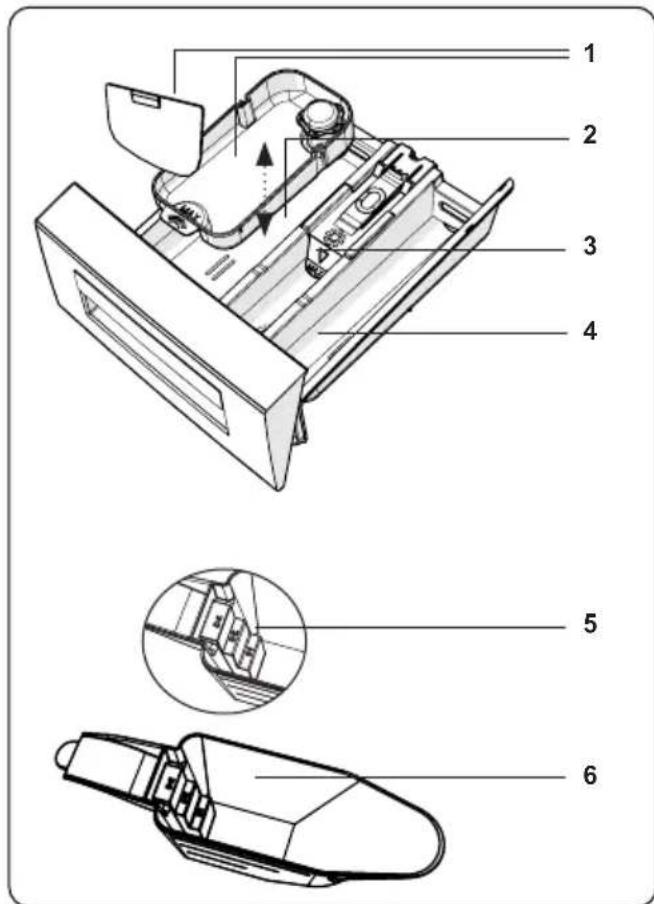
natural_image
Technical line drawings of a mechanical device and its internal components (no text or symbols)natural_image
Technical line drawings of two electronic devices, one with a MAX component and the other showing internal components (no text or symbols)natural_image
Technical line drawing of a mechanical device with cross-sectional and top views (no text or symbols)natural_image
Line drawing of a washing machine with front panel and side vent (no text or symbols)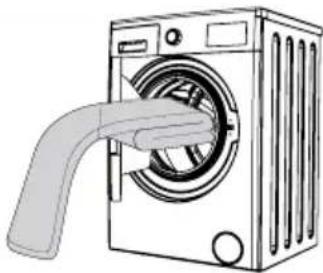
natural_image
Line drawing of a washing machine with a handle inserting into the air gap (no text or symbols)natural_image
Illustration showing two steps of a hairpin installation: one with a plug, the other with a hand holding a screwdriver (no text or symbols present)natural_image
Illustration showing a wall-mounted electrical plug and a hand using a tool to clean or adjust the component (no text or symbols present)natural_image
Technical illustration showing a mechanical component being inserted into a pipe fitting, with no visible text or symbols.natural_image
Technical line drawing of a mechanical device interior with internal components and an arrow indicating direction (no text or symbols)natural_image
Diagram of a hand operating a mechanical device with a red ring and black arrows indicating motion (no text or symbols)natural_image
Technical diagram of a mechanical device with arrows indicating assembly or movement, no visible text or symbolsSiphon adoucissant(\*)
natural_image
Technical drawings of two mechanical components: a rectangular frame with internal channels and a cylindrical housing (no text or symbols)1. Corps
- MÁQ. LAVAR ROUPA
- SERVIÇO DE APOIO AO CLIENTE
- Aparência Geral
- Ajustar os Pés / Ajustar as Bases de Ajuste
- Corpo
- Thank you for choosing this product.
- CONTENTS
- 1.SAFETY INSTRUCTIONS .... 1
- 2.TECHNICAL SPECIFICATIONS....10
- 3.INSTALLATION....11
- 4.CONTROL PANEL OVERVIEW....13
- 5.USING YOUR WASHING MACHINE....15
- 6.PROGRAMME TABLE....23
- 7.CLEANING AND MAINTENANCE ....27
- 8.Body / Drum....29
- 9.TROUBLESHOOTING....30
- 10.AUTOMATIC FAULT WARNINGS AND WHAT TO DO ....31
- SAFETY INSTRUCTIONS
- General Safety Warnings
- Door emergency opening function
- RISK OF BURNS
- RISK OF DEATH FROM ELECTRICAL CURRENT
- ⚠️Risk of flooding
- ⚠️Danger of Fire
- Risk of fire and explosion
- ⚠️Risk of falling and injury
- ⚠️The machine must be carried by at least 2 people.
- ! Child safety
- During Use
- Replacement of drive belt, only by authorized service.
- Packaging and Environment
- Removal of packaging materials
- Savings Information
- CE Declaration of conformity
- Disposal of your old machine
- General Appearance
- INSTALLATION
- Removing the Transit Bolts
- Adjusting the Feet / Adjusting Adjustable Stays
- Electrical Connection
- NOTE:
- Water Inlet Hose Connection
- Water Discharge Connection
- CONTROL PANEL OVERVIEW
- Detergent Drawer (\*)
- Sections
- Main wash detergent compartment:
- Fabric conditioner, starch, detergent compartment:
- Pre-wash detergent compartment:
- Program Dial
- Electronic Display
- USING YOUR WASHING MACHINE
- Preparing Your Laundry
- Putting Laundry in the Machine
- Adding Detergent to the Machine
- Operating Your Machine
- Selecting a Programme
- Half-Load Detection System
- Auxiliary Functions
- Reason for not enabling the function:
- Delayed start auxiliary function
- To cancel the delay function:
- Selecting the level of soiling
- Stain selection
- Selecting the washing water temperature
- Spin speed selection
- Options
- Prewash auxiliary function
- Extra rinse auxiliary function
- Steam Assist auxiliary function
- Anti-Allergy auxiliary function
- Eco/Quick Wash auxiliary function
- Start/Pause button
- Child Lock
- If you want to pause/cancel a running program or add laundry:
- Program End
- NOTE: PROGRAMME DURATION MAY CHANGE ACCORDING TO THE AMOUNT OF LAUNDRY, TAP WATER, AMBIENT TEMPERATURE AND SELECTED ADDITIONAL FUNCTIONS.
- Important Information
- CLEANING AND MAINTENANCE
- Warning
- Water Inlet Filters
- Pump Filter
- Detergent Drawer
- Do not wash your detergent drawer in a dishwasher.
- Liquid detergent apparatus(\*)
- Body / Drum
- Body
- Drum
- TROUBLESHOOTING
- AUTOMATIC FAULT WARNINGS AND WHAT TO DO
- orima
- Aspecto general
- Cuerpo
- Siphon adoucissant(\*)
- Corps
Brand : Orima
Model : ORM-14103-SIW
Category : Washing machine