USER MANUAL HSC 6350 TEKA
natural_image
Modern kitchen interior with black cabinets and wood flooring, featuring a 'TEKA' logo in the top right corner (no other text or symbols visible)
User Manual
Before using your oven for the first time, please carefully read the installation and maintenance instructions that come with it.
Depending on the model, the accessories included in your oven may vary from those shown in the pictures.
FRANÇAIS


Modelos HSB 6450 / HSB 6460

Modelo HSB 6460 P

Modelos HSB 6456 / HSB 6466

Modelo HSB 6466 P

Modelo HSB 6468

Modelo HSB 6468 P

Funciones del horno

ORMACIÓN
HYDRO CLEAN
HYDROCLEAN
PYRO
CLEAN
PIROLISIS
CHEF CHEF
FAST HEAT PRECALENTAMIENTO RÁPIDO
DISPONIBLE SÓLO EN MODELOS PIROLÍTICOS

natural_image
Close-up of a metallic bucket pouring liquid into a white container (no text or symbols visible)

Modelos HSB 6450 / HSB 6460

Modelo HSB 6460 P

Modelos HSB 6456 / HSB 6466

Modelo HSB 6466 P

Modelo HSB 6468

Modelo HSB 6468 P

Funções do forno

ORMAÇÃO
HYDRO CLEAN
HYDROCLEAN
PYRO
CLEAN
PIRÓLISE
CHEF CHEF


PROGRAMAR A FUNÇÃO TEKA HYDROCLEAN®

ATENÇÃO
natural_image
Close-up of a metallic cup pouring liquid onto a flat surface, with no visible text or symbols.
Description of the oven


1 Control panel
2 Door lock (only for pyrolytic models)
3 Grill element
4 Tray supports (depending on the model)
5 Grid shelf
6 Tray
7 Hinge
8 Inner Glass
9 Air cooling outlet
10 Unit mounting
11 Lamp
12 Back Wall Panel
13 Fan
14 Oven Seal
15 Door
1 Control panel
2 Door lock (only for pyrolytic models)
3 Grill element
4 Tray supports
5 Grid shelf
6 Tray
7 Hinge
8 Inner Glass
9 Air cooling outlet
10 Unit mounting
11 Lamp
12 Back Wall Panel
13 Fan
14 Oven Seal
15 Door
Control panel
1 Function control dial.
2 Electric clock/timer.
3 Temperature control dial.
Function selector symbols

HSB 6450 / HSB 6460 Models

HSB 6460 P Models

HSB 6456 / HSB 6466 Models

HSB 6466 P Models

HSB 6468 Models

HSB 6468 P Models

Oven functions

ORMATION
For a description of how to use each of the features, see the cooking guide that comes with your oven.
- OVEN SWITCH-OFF
CONVENTIONAL
GRILL
MAXIGRILL
LOWER ELEMENT
MAXIGRILL WITH FAN
CONVENTIONAL WITH FAN
ECO ECO
STEAM
FUNCTION PIZZA
TURBO
AIRFRY AIRFRY
WOOD-FIRED OVEN
HYDRO CLEAN
HYDROCLEAN
PYRO
CLEAN : PYROLYSIS
CHEF CHEF
FAST PREHEATING
AVAILABLE ONLY IN PILOLÍTICOS MODELS
Maximum temperature 275°C
ECO
AIRFRY
FAST
HEAT
Maximum temperature 300°C
Electronic clock/timer description
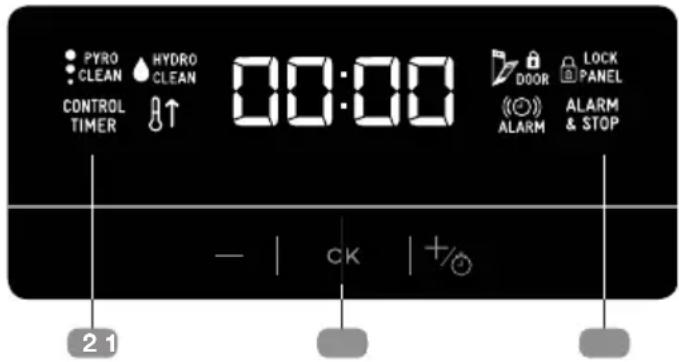
1 KEYS
— , and : Enable you to programme the electronic clock/timer functions.
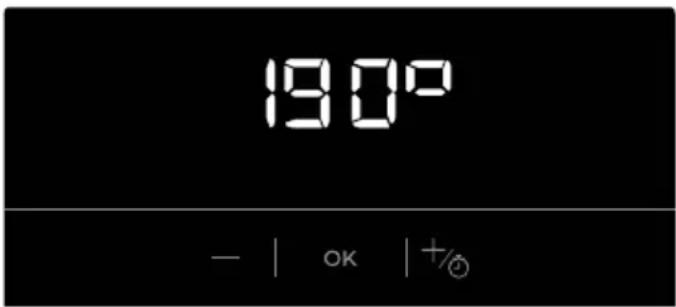
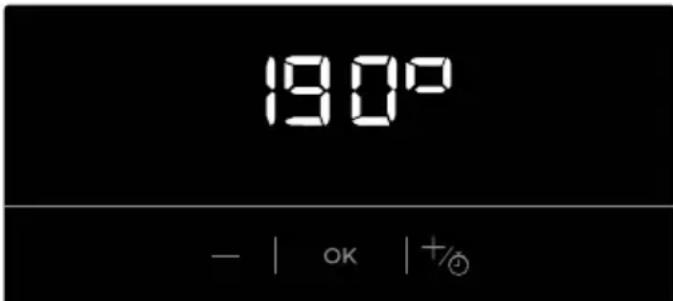
ok: For models with electronic temperature control, press this button to see the temperature during cooking.
2 SYMBOLS
Clock Settings

AVISADOR: Lights up when the clock/ timer is selected. Generates an acoustic signal when the time is up. The oven does not turn off at the end of the timer period. This function can also be used while the oven is cooking.

and ^ALARM & ^SOM PROGRAMMING: Light up to indicate that the oven is programmed (cooking time, stop time or total).
- CONTROL
TIMER Cooking Time: This function allows you to programme the cooking time, after which the oven will turn off automatically.
- ALARM & STOP Cooking Stop Time: This setting allows you to programme the time for cooking to stop, after which the oven will turn off automatically.
- CONTROL TIMER and ALARM & S
Delayed start: This setting allows you to programme the cooking time and cooking stop time. The oven switches on automatically at the set time and operates for the selected cooking time (Cooking Time). It then switches off automatically at the indicated time (Cooking Stop Time).

CLOCK/TIMER LOCK: Indicates that the touch keys for the clock/timer are locked, preventing modifications by small children.
Other functions

HEATING: Indicates that the oven is transmitting heat to the food.

HYDROCLEAN: Lights up while the Teka Hydroclean® function is in progress.

PYROLYSIS: For pyrolytic models only. Lights up while the Pyrolytic function is in progress.

DOOR LOCK: For pyrolytic models only. Indicates that the door is locked, either manually or automatically while the pyrolytic function is in progress.

WARNING
The sensitivity of the touch keys adapts continually to environmental conditions. Make sure the surface of the control panel is clean and free of obstacles when plugging in the oven.
If the clock does not respond correctly when you touch the keys, unplug the oven for a few seconds and then plug it in again. Doing this causes the sensors to adjust automatically so that they will react once more to fingertip control.
SETTING THE TIME
- To set the time on the oven, the function and temperature dials must be in the ○ posi-position.
- When you plug in the oven, you will see the clock flashing 12:00.
- Touch— or to adjust the hours and then the minutes. You will hear a double beep confirming the time is set.
- If you wish to modify the time, touch — or +∞ until the time starts flashing. Touch ok and and follow the instructions in the previous point.

NOTE
The clock light has a night mode so the display light will dim between 00:00 and 6:00 hours.

WARNING
In the event of a power failure, your electronic clock/timer settings will be erased.
If this happens, turn the function and temperature dials to the ○ position.
The indication 12:00 will show, and you will then be able to set the time as described above.
If the oven door was locked before the power cut, the locked symbol will show until it is unlocked.
This may take several minutes, depending on the temperature inside the oven, and during this time you cannot reset the time.
Once the door is unlocked, you can set the time as described above
Oven use
MANUAL OPERATION
- After setting the clock, the oven is ready for use. Select a cooking function and temperature.

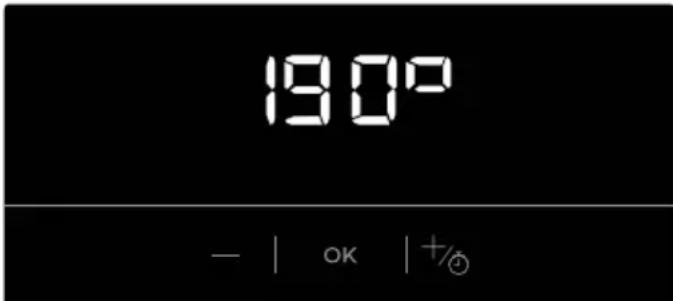
In models with an electronic temperature control, when the selector switch is turned, the clock display will show the temperature.
After selecting the temperature, the clock display will automatically reappear.
To see the temperature again during cooking, press the ok button and turn the tem-button and turn the temperature dial if you want to change it.
- You will notice that the ♂ symbol lights up during cooking to indicate that heat is being transmitted to the food. This symbol disappears when the selected temperature has been reached.
- Set the controls to turn off the oven.

When you start cooking, your oven will show the time the oven has been cooking
Programming the Buzzer
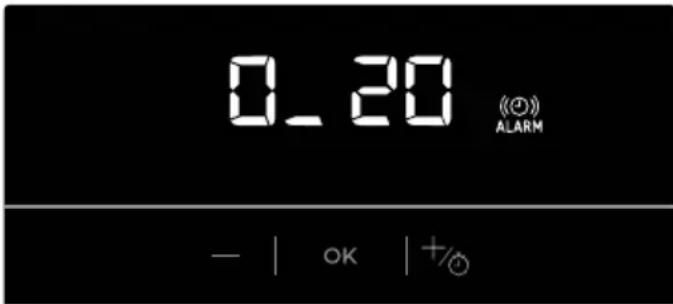
- Touch — or + until the symbol on the display starts flashing, then press OK. The indication '00:00' will appear on the display.
- Select the time after which you want the alarm to sound by pressing — or . You will hear 2 beeps to confirm that the time has been set and the clock will start counting down from the selected time. The ALARM symbol will flash slowly.
- Once the time has expired, an acoustic signal will sound for 90 seconds and the (○) ALARM symbol will flash quickly.

NOTE
With the Buzzer function, the oven will not turn off when the time expires.
- Touch any key to stop the alarm. The ALARM symbol will then disappear.
If you wish to modify the time on the buzzer, repeat the steps shown. Upon entering the timer control, the time currently remaining will appear, which you will be able to adjust.

NOTE
With the Buzzer function, the remaining time will show permanently on the display. With this programmed function, it is not possible to view the time or the total programmed cooking time.
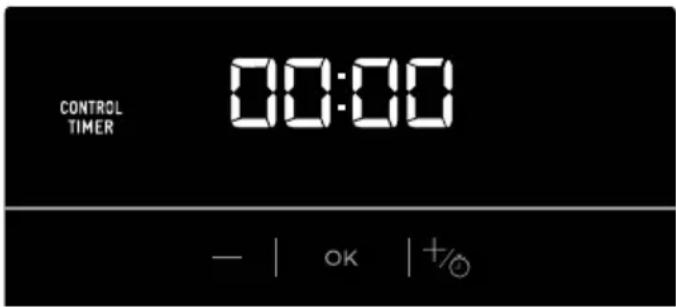
Programming Cooking Time
- Touch — or + until the symbol on the display starts flashing, then press OK. The indication '00:00' will appear on the display.
- Select the time after which you want the alarm to sound by pressing — or . You will hear 2 beeps to confirm that the time has been set and the clock will start counting
down from the selected time. The CONTROL TIMER symbol will flash slowly.
- Select a function and a cooking temperature using the oven commands.
- Once the cooking time is up, the oven will turn off, an alarm will sound and the CONTROL TIMER symbol will flash quickly.
- Touch any key to stop the alarm and turn off the CONTROL TIMER symbol. The oven will switch on again.
- Set the controls to the ○ position to turn off the oven.
You can change the remaining cooking time at any time by touching — or + until the CONTROL TIMER symbol starts to flash quickly. Now press to change the time.

NOTE
With the Cooking Time function, the remaining time will show permanently on the display. You cannot see the current time on the display when this function is set.
Programming the Cooking Stop Time
- Touch — or + until the symbol on the display starts to flash and press OK You will see the current time on the timer display.
- Select the time after which you want the alarm to sound by pressing — or +You will hear 2 beeps to confirm that the time has been set and the clock will start counting down from the selected time. The ALARM & STOP symbol will flash slowly.
- Select a cooking function and temperature.
- When the cycle is finished, the oven will turn itself off, a buzzer will sound and ALARM & STOP symbol will flash quickly.
- Touch any sensor to stop the alarm and to turn off the ALARM & STOP, symbol. The oven will switch on again.
- Set the controls to the ○ position to turn off the oven.
You can change the remaining cooking time at any time by touching — or + until the ALARM & STOP symbol starts to flash quickly. Now press OK to change the time.
Delayed start programming
- Touch — or + until the symbol on the display starts flashing, then press OK. The indication '00:00' will appear on the display.
- Select the cooking time by touching — or +/○. Next, a double beep will sound, the remaining time will appear on the display and the CONTROL TIMER symbol will flash slowly.
- Touch — or until the symbol on the display starts flashing, then press OK. You will see the expected completion time on the timer display.
-
Adjust cooking completion time by touching — or +.Next, a double beep will sound and the current time will be displayed on the display.
-
Select a cooking function and temperature. The oven will remain disconnected with the CONTROL TIMER and ALARM & SYMBOLS lit up. The oven is now programmed.
- When it is time to start cooking, the oven will turn on and will operate for the programmed cooking time.
- While cooking, the cooking time remaining will be displayed and the CONTROL TIMER symbol will flash slowly.
- When the cooking time is up, the oven will turn off, a buzzer will sound, and the CONTROL TIMER symbol will flash quickly.
- Touch any sensor to stop the buzzer and turn off the CONTROL TIMER symbol. The oven will switch on again.
- Set the controls to the ○ position to turn off the oven.
You can change the remaining cooking time at any time by touching — or + until the CONTROL TIMER symbol starts to flash quickly. Now press OK to change the time.
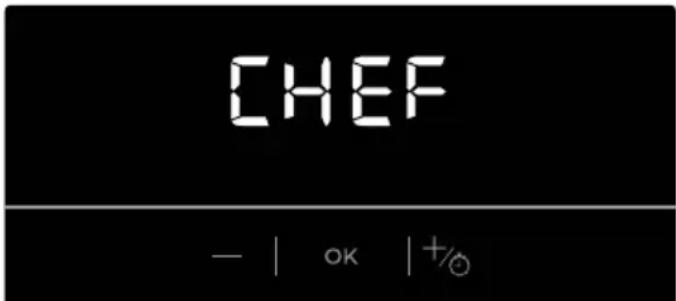
CHEF Function
Option available in models with the function.
This function allows for cooking different foods through automatic programs where it is possible to adjust, the type of food, weight, and temperature.
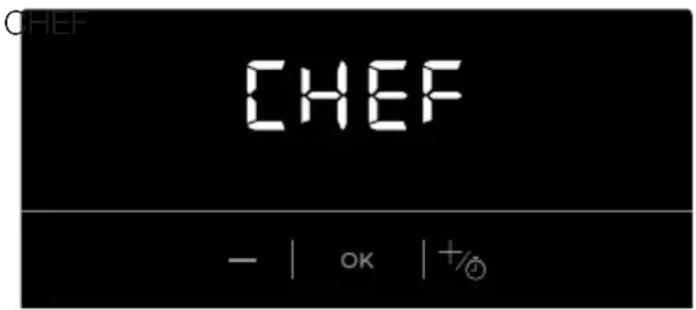
- Turn the function selector to the position of the function CHEF, and you will see CHEF on the display.
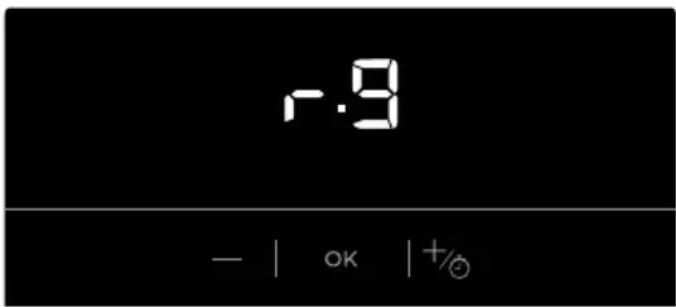
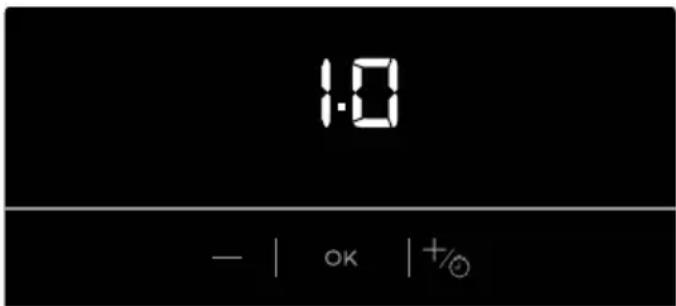
- Press any of the icons — , ok or +, and the screen will display the list of available recipes, from r.0 to r.9. The recipe icon will blink during the selection. Press — or + until you see the chosen recipe. Press ok to confirm the selection.
- Once the recipe is selected, the screen will display the preset weight in Kg. Tap — or + to adjust the weight value in grams. Tap ok to confirm the selection.
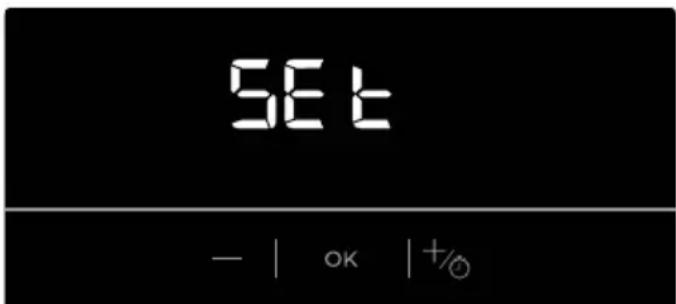
- Next, the proposed temperature will be displayed. In the case of NON-PYRC ovens, select the proposed or desired temperature by turning the temperature selector knob. The screen will alternately display SET and the proposed temperature. Tap — or +/⊗ to adjust the value. Tap to confirm the selection.
In the case of PYROLYTIC ovens, or + to select the temperature. Tap to confirm the selection.

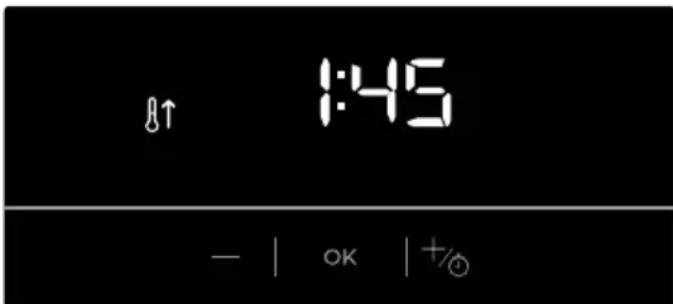
- With the temperature selection, the cooking process starts. The screen will display the estimated cooking time based on the entered parameters.
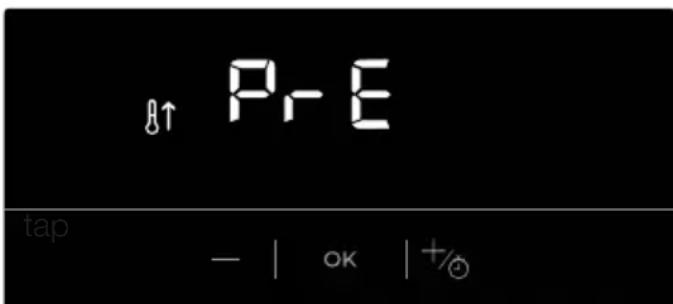
- Some recipes require preheating of the oven. In these recipes, once the cooking temperature is confirmed, "Pre" will appear on the screen. When the cooking temperature is reached, an acoustic signal will sound. Tap OK after placing the food inside the oven, or open and close the door in pyrolytic models, and the cooking will start. The screen will display the total remaining cooking time.
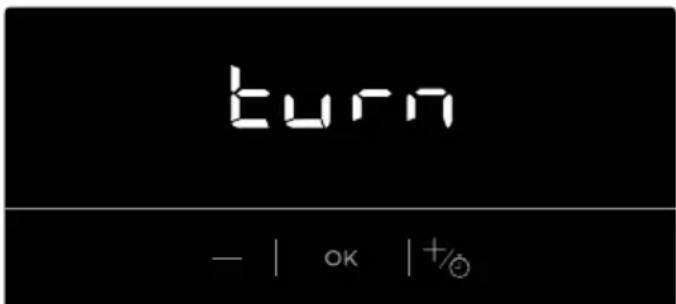
- There are recipes that require turning the food over. In these cases, an acoustic signal will sound, and "turn" will appear on the screen. Tap OK or open and close the door in pyrolytic ovens after turning the food over. The acoustic signal will stop, and the remaining cooking time will be displayed again.
- When the time is up, the cooking will stop, and an acoustic signal will sound while the icon CONTROL TIMER blinks. Pressing —, opK will +/© stop the acoustic signal.
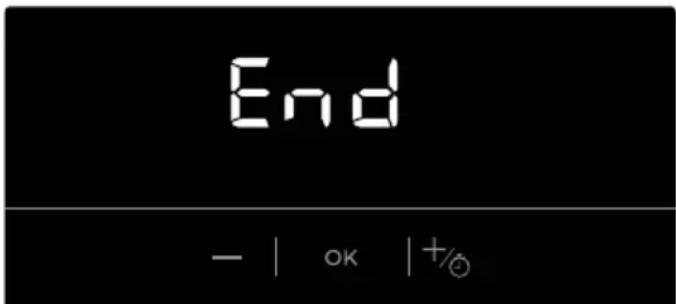
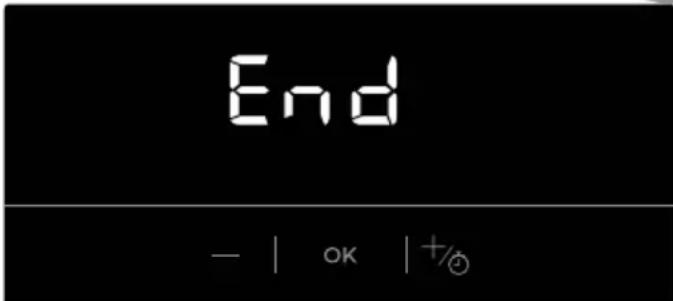
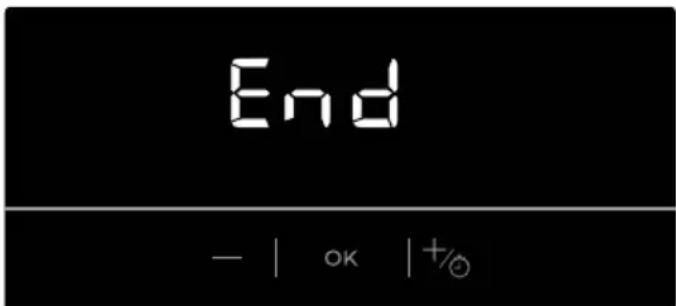
- The screen will alternately display CHEF and END to indicate the completion of the cooking process.

During cooking with the CHEF function, it is possible to set an alarm. Tap Tap — or +/⊗ until the icon (○) ALARM lights up. Tap OK to confirm. Tap Tap — or + to select the desired time. Tap OK to confirm the selection.
The icon will blink, indicating that the timing displayed on the clock corresponds to the alarm.
Once the alarm is finished, the icon ^(2) will blink rapidly, and an acoustic signal will sound. Tap —, or to stop the alarm.
At that moment, the icon will disappear from the clock display, and the remaining cooking time programmed with the CHEF function will be shown on the screen.
RECIPE TABLE
The following table shows the available recipes in the CHEF function, the preset values for each cooking process, as well as whether preheating the oven or turning the food is required.
This information is also available on the inner glass of the oven.
| Recipe Food | Weight Range Temperature | Range Preheating | Turning Food | | |
| r0 | Roast Meat | 1,5 - 4 | 140 - 155 | - | - |
| r1 | Small Roast | 0,5 - 2 | 180 - 195 | YES | - |
| r2 | Chicken / Turkey | 1 - 4 | 180 - 185 | YES | YES (50%) |
| r3 | Lamb | 1 - 3 | 170 - 185 | YES | YES (50%) |
| r4 | Fish | 0,5 - 2 | 180 - 190 | YES | - |
| r5 | Vegetables | 0,5 - 3 | 185 | - | - |
| r6 | Lasagna | 0,5 - 1 | 185 | - | - |
| r7 | Pizza | - | 200 | YES | - |
| r8 | Bread | 0,5 - 1 | 190 | YES | - |
| r9 | Cake | - | 180 | YES | - |
Safety instructions
SAFETY CHILD LOCK
This function can be selected at any time while using the oven.
To activate the function, touch and hold OK key for several seconds until you hear a beep and the LOCK PANEL symbol appears on the display. The clock/timer is locked.
If the oven is off and you activate the child safety function, the oven will not work even if a cooking function is selected.
If this function is activated while you are cooking, it will only lock the electronic clock/timer settings.
To disable the function, press OK key for several seconds until you hear a beep.
MANUAL DOOR LOCK
Available in pyrolytic models only.
This function allows the oven door to be locked.

This function can only be selected when the oven command functions are set to the rest position ○.
Once the door has been locked, start cooking normally.
you
To activate/deactivate the door lock, follow these steps:
- Touch — or + until the symbol on the display starts flashing.
The current door lock status will be displayed: "On" if it is active and "Off" if deactivated.
- Press OKYou will then hear a beep and the block will start to activate if it was "Off", or deactivate if it was "On".

WARNING
Before locking, ensure that the oven door is properly closed. If not, it will not lock and an alarm will sound.
If this happens, switch off the alarm by pressing any clock button, close the door properly and lock again as per the instructions above.
- Once the door has been fully locked, the display will show the new door status.
In the event that the locking system is active, the DOOR symbol will appear constantly lit on the display.
IMPORTANT
To unlock the door during cooking, turn the function dial to standby and unlock the door as described above.
Once the door is unlocked, turn the function dial back to its former position to continue locked/cooking.
Teka Hydroclean® function
This function makes it easy to remove grease and other food debris that may have stuck to the sides of the oven.
For easier cleaning, do not allow dirt to accumulate. Clean the oven frequently.
PROGRAMMING THE TEKA HYDROCLEAN® FUNCTION®

WARNING
Do not pour water into a hot oven as this can damage the enamel of the oven.
Always run the cycle on a cold oven. The result could be affected and the varnish damaged if it is run when the oven is too hot.
First remove the trays and all accessories from the oven interior, including the tray supports and telescopic guide rails. To do this, follow the instructions in the installation and maintenance guide accompanying the oven.
- With the oven cold, spread a cloth out on the bottom of the oven.
natural_image
Close-up of a metallic cup pouring liquid into a white rectangular container (no text or symbols visible)
- Gently pour 200 ml of water into the bottom of the oven cavity.

For best results, add a teaspoon of mild washing up detergent to the glass of water before pouring onto the cloth.
-
Turn the control dial to the ⬆ HYDRO CLEAN position.
-
You will hear a beep indicating that the Teka Hydroclean® cycle has started. The ♠sym-
bol will flash slowly and the time remaining to complete the cycle will appear on the display.

IMPORTANT
The duration of this cycle cannot be changed. To stop the cycle before it is finished, turn the control dial to the ○ position.
- When the cycle is finished, the oven will turn itself off, an alarm will sound and the ⬆HYDRO CLEAN symbol will flash quickly.

IMPORTANT
Do not open the oven door until the Hydroclean ^® function is complete.
The cooling cycle is necessary for the function to work properly.
- Touch any sensor with your fingertip to stop the alarm and turn off the ⚠ HYDRO CLEAN symbol.
- Turn the control dial to the ○ position.
- Any traces of dirt and excess water can now be removed from the oven with the damp cloth.
The Hydroclean ^® function takes place at a low temperature. However, cooling times can vary depending on the room temperature.

WARNING
Before touching the inside surface of the oven, make sure that it has cooled properly.
If a deeper clean is required after using the Hydroclean® function, use neutral detergents and non-abrasive sponges.
Pyrolytic self-cleaning function
Function available in pyrolytic models HSB P.

WARNING
Before setting the pyrolytic cleaning cycle, carefully read the safety instructions, which you will find at the start of the Installation and Maintenance guide.
This function allows you to carry out a pyrolytic cleaning cycle during which, due to the high temperatures reached inside the oven, accumulated grease undergoes a carbonisation process.
The general recommendation is to perform a pyrolytic cycle every 4-5 uses, using the most suitable programme according to the level of stains present in the oven. The more stained
the oven, the longer the duration of the programme.
During the pyrolytic cycle the light inside the oven will remain off.
PROGRAMMING
THE PYROLYTIC FUNCTION

IMPORTANT
Before carrying out the pyrolysis, you must remove all accessories and dishes from the oven, including the shelves and/or telescopic guide rails. To do this, follow the instructions in the installation and maintenance guide accompanying the oven.

WARNING
Clean any spillages or excess dirt from the inside, as these could ignite during the pyrolysis and create a fire hazard.

WARNING
Before running the pyrolytic function, ensure that the oven is properly closed.
-
Turn the cooking control dial to the Pyrolysis position PYRO CLEAN.
-
TAfter a few seconds, the PYRO CLEAN symbol will light up on the clock display, reading 'P2' (Pyrolysis programme 2.
-
You can now change the pyrolysis programme to P1, P2 or P3 by pressing the — or + keys:
P1: Light pyrolysis. Lasts 1 hour.
P2: Regular pyrolysis. Lasts 1 hour 30 min.
P3: Intensive pyrolysis. Lasts 2 hours.
- Once the desired programme has been selected, press OK. The automatic door lock will be activated immediately.

WARNING
If the door is not properly closed, it will not lock and an alarm will sound.
If this happens, switch off the alarm by pressing any clock button, close the door properly, turn the function dial to the ○ position and re-select the pyrolytic programme as described above.
- Once the door is locked, the _DOOR symbol will light up on the clock display and the time remaining before the end of the pyrolysis will appear.

IMPORTANT
At this point, the oven is programmed and the pyrolytic cleaning cycle is under way. During the cycle, none of the oven timer functions may be chosen (except the child lock).
Do not try to open the oven door as this may interrupt the cleaning process.
-
When the pyrolytic cleaning cycle has finished, an alarm will sound, the PYRO CLEAN symbol will flash and you will see the time '0:00' on the clock display.
-
Press any of the timer's keys to disable the alarm.
-
Turn the control dial to the ○ position.
-
The oven's heating process has finished. However, the oven is extremely hot and cannot be used.
The cooling process will continue to operate and the _DOOR symbol will remain lit until the oven cools down.

IMPORTANT
As a result of the high temperatures inside the oven, the cooling process may vary depending on the room temperature.
-
Once the oven has cooled down, the Z door symbol will turn off.
-
Open the oven door and wipe th with a damp cloth, removing the ash from the cleaning cycle. Hard-to-reach areas in the oven will need to be cleaned with a non-metallic fibre scourer.
-
Once the oven is clean, do not replace the supports and accessories.
-
The oven is now ready to be used.

IMPORTANT
If any incident is detected in the programming or use of this function, consult the installation and maintenance guide included with your oven.
CANCELLING THE PYROLYTIC FUNCTION
Pyrolysis is an automatic function and therefore it can only be activated from the timer programme. To cancel a pyrolysis in progress it is necessary to reset the oven, following the instructions below:
- Set the control dial to the ○ position.
The timer display will appear as follows
- Depending on the internal temperature of the oven, either of the two following situations could arise:
a) Dangerous internal temperature: In this case, the door will remain locked until the temperature reaches safe levels.
b) Safe internal temperature: If the temperature inside the oven is safe, the door will be unlocked immediately.
- Once the door has been unlocked and can be opened, the time will show once again on the timer display.
POWER SUPPLY FAULT DURING PYROL- YSIS PROCESS
If there is a power cut during the pyrolysis process, when the power is restored the following is displayed on the oven screen:

In this state, set the control dial in position. If the temperature of the oven is safe, it will automatically unblock.
However, if the oven temperature is not yet safe, the oven will cool down and unlock automatically after one hour.
If the door has not unlocked after this time, disconnect the oven from the main power supply, reconnect it and try to unlock it manually, following the steps in the chapter “Manual door lock”
Description du four
Modèles HSB 6466 P

Modèles HSB 6468

Modèles HSB 6468 P

Fonctions du four

ORMATION
HYDRO CLEAN
HYDROCLEAN
PYRO
CLEAN : PYROLYSE
CHEF CHEF
FAST HEAT PRÉCHAUFFAGE RAPIDE
DISPONIBLE SEULEMENT DANS LES MODÈLES PILOLÍTICOS
FONCTIONNEMENT MANUEL

natural_image
Close-up of a metallic cup pouring liquid onto a flat surface, with no visible text or symbols.
Modelle HSB 6466 P

Modelle HSB 6468

Modelle HSB 6468 P


Backofenfunktionen

natural_image
3D rendered image of a metallic bucket pouring liquid into a rectangular container (no text or symbols visible)
Modellen HSB 6468

Modellen HSB 6468 P


natural_image
Close-up of a metal cup pouring liquid into a rectangular basin (no text or symbols visible)

Μοντέλα HSB 6466 P

Μοντέλα HSB 6468

Μοντέλα HSB 6468 P


natural_image
Close-up of a metal cup pouring liquid into a white rectangular container (no text or symbols visible)
natural_image
World map silhouette showing continents and countries, no text or labels present

