
B-4 - Heating XPower - Free user manual and instructions
Find the device manual for free B-4 XPower in PDF.

| Product Type | Professional Pet Dryer |
| Brand | XPower |
| Model | B-4 |
| Voltage / Frequency | 115 V ~ 60 Hz |
| Rated Current | 10.0 A |
| Motor Power | 3 HP |
| Rated Airflow | 150 CFM (cubic feet per minute) |
| Speed Control | Variable (rotary knob) |
| Heating Element | None (natural heat from motor) |
| Hose Length | 8 feet / 2.4 meters |
| Power Cord Length | 10 feet / 3 meters |
| Housing Material | ABS |
| Dimensions (L x W x H) | 36.0 x 17.0 x 24.0 cm |
| Weight | 4.9 kg (10.8 lbs) |
| Safety Certification | ETL / C-ETL |
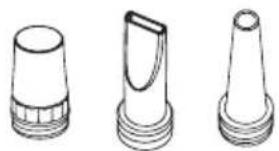
| Included Nozzles | Conical, flat, round |
| Filters | 3 filters (intake, motor, housing) |
| Filter Maintenance | Regular cleaning or replacement |
| Safety | Overheat protection, thermal switch |
| Usage | Indoor only, residential and commercial |
| Warranty | 1 year limited (USA) |
Frequently Asked Questions - B-4 XPower
User questions about B-4 XPower
0 question about this device. Answer the ones you know or ask your own.
Ask a new question about this device
Download the instructions for your Heating in PDF format for free! Find your manual B-4 - XPower and take your electronic device back in hand. On this page are published all the documents necessary for the use of your device. B-4 by XPower.
USER MANUAL B-4 XPower
natural_image
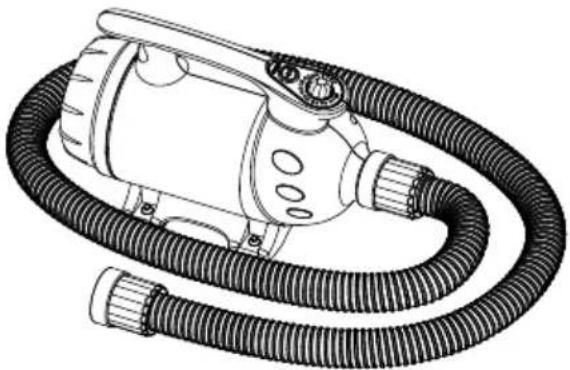
Line drawing of a vacuum cleaner with coiled tubing (no text or symbols)Professional Pet Force Dryer Owner's Manual
Read and save these instructions
WARNING: READ AND SAVE THESE INSTRUCTIONS BEFORE USING THIS PRODUCT.
When using electrical appliances, especially when children or animals are present, basic safety precautions should always be followed to reduce the risk of fire, electric shock, and personal injury, including, but not limited to the following:
- DO NOT use attachments not intended for use with the dryer. Only use attachments recommended or sold by the manufacturer.
- DO NOT attempt to perform any service or maintenance not outlined in instruction manual.
- WARNING: To reduce the risk of electric shock – Use indoors only. DO NOT use outdoors.
- WARNING: This Pet Dryer is not intended for use by children. Adult assembly and operation required. To reduce the risk of injury, close supervision is necessary when an appliance is used near children.
• DO NOT use as a toy.
- DO NOT leave appliance when plugged in. Unplug from outlet when not in use and before servicing.
- DO NOT use extension cords with dryer.
- DO NOT unplug unit by pulling on cord, to unplug, grasp the plug, not the cord.
- WARNING: Never use dryer with a damaged cord or plug, or after the appliance malfunctions or is dropped, damaged. Return to an authorized service center for service, examination, repair, or electrical or mechanical adjustment.
- To disconnect, turn all controls to the off ("O") position, then remove plug from outlet.
- DO NOT pull or carry by cord, use cord as a handle, close a door on cord, or pull cord around sharp edges or corners. DO NOT run appliance over cord. Keep cord away from heated surfaces.
- DO NOT handle plug or appliance with wet hands.
- Use extra care when cleaning on stairs.
- DANGER: DO NOT expose dryer to rain or water.
- DO NOT use or store dryer where it can fall or be pulled into tub or sink or standing water. If dryer falls into water, unplug it, DO NOT reach into the water. Keep units out of baths and DO NOT operate on a wet floor, or wet surface.
- DO NOT use to pick up flammable or combustible liquids, such as gasoline, or use in areas where they may be present. DO NOT pick up anything that is burning or smoking, such as cigarettes, matches, or hot ashes.
- Unplug before connecting nozzles and hose.
- WARNING: DO NOT put any object into dryer openings. Keep loose clothing, jewelry and hair away from dryer openings. DO NOT use with any opening blocked; keep free of dust, lint, hair, and anything that may reduce air flow.
Safety Instructions (Continued)
- WARNING: DO NOT allow any material to clog or block air intakes as this may cause units to overheat and result in a fire or electrical hazard. Regularly clear hair or other substances from air intakes. DO NOT contact moving parts.
- Connect to a properly grounded outlet only. See Grounding Instructions.
HOUSEHOLD AND COMMERCIAL USE
Grounding Instructions
This appliance must be grounded. In the event of malfunction or breakdown, grounding provides a path of least resistance for electric current to reduce the risk of electric shock. This appliance is equipped with a cord having an equipment-grounding conductor and a grounding plug. The plug must be plugged into an appropriate outlet that is properly installed and grounded in accordance with all local codes and ordinances.
A qualified electrician should be consulted if there is any doubt as to whether an outlet box is properly grounded.
DANGER: Improper connection of the equipment-grounding conductor can result in a risk of electric shock. The conductor with insulation having an outer surface that is green with or without yellow stripes is the equipment-grounding conductor. If repair or replacement of the cord or plug is necessary, do not connect the equipment-grounding conductor to a live terminal. Check with a qualified electrician or serviceman if the grounding instructions are not completely understood, or if in doubt as to whether the appliance is properly grounded. Do not modify the plug provided with the appliance – if it will not fit the outlet, have a proper outlet installed by a qualified electrician.
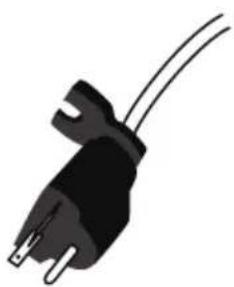
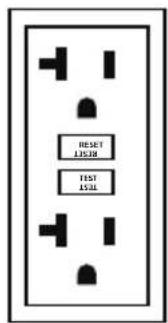
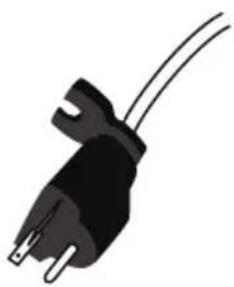
This appliance is for use on a nominal 115V circuit (NEMA 5-15R or NEMA 5-20R), and has a grounding plug (NEMA 5-15P or NEMA 5-20P) as illustrated below. Make sure that the appliance is connected to an outlet having the same configuration as the plug. No adapter should be used with this appliance.
(For Model B-27) This appliance is rated more than 15A and is for use on a circuit having a nominal rating of 120V, and is factory equipped with a specific electric cord and plug. No adapter should be used with this appliance. If the appliance must be reconnected for use on a different type of electric circuit, the reconnection should be made by qualified service personnel; and after the reconnection, the appliance should comply with all local codes and ordinances.
Safety Instructions (Continued)
Grounding Instructions (Continued)
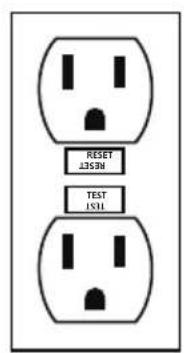
NEMA 5-15R
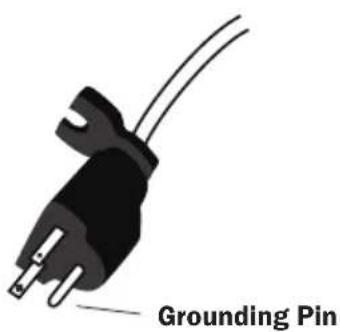
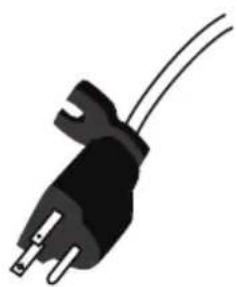
NEMA 5-15P
• NEMA 5-15R: For model B-4, B-24, B-25.
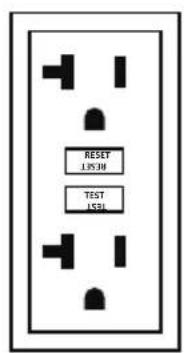
NEMA 5-20R
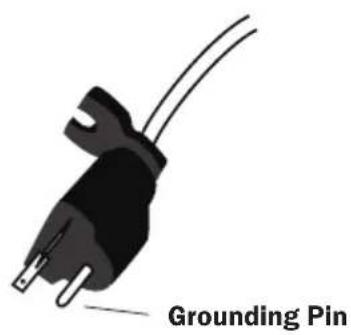
NEMA 5-20P
• NEMA 5-20R: For model B-27, compatible with model B-4, B-24, B-25.
Professional Pet Force Dryer Introduction
- The XPOWER Professional Pet Force Dryer produces high velocity airflow with adjustable volume for fast water removal in pet grooming.
- It's ideal for force drying in the tub. With natural motor heat or additional heat options, and the variable speed control, it can also complete finish drying jobs on the table.
natural_image
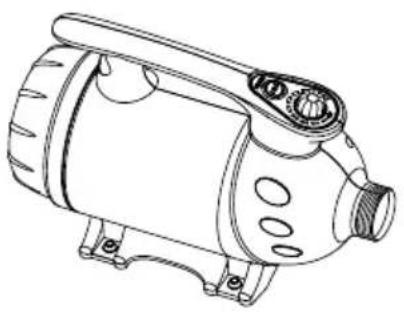
Line drawing of a vacuum cleaner with coiled tubing (no text or symbols)Items Included
natural_image
Line drawing of a mechanical device with no visible text or symbols
natural_image
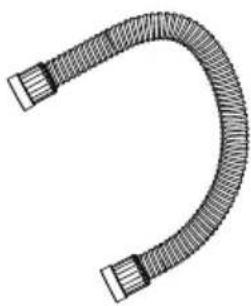
Illustration of a U-shaped pipe with two flanged ends and a central loop (no text or symbols)
natural_image
Three technical line drawings of conical mechanical parts with flanges and threaded bases (no text or symbols)- Nozzles x 3 • Pet Dryer
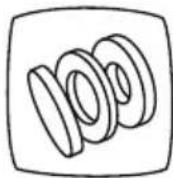
- Extra Filter Set x 1
- Owner's Manual x 1
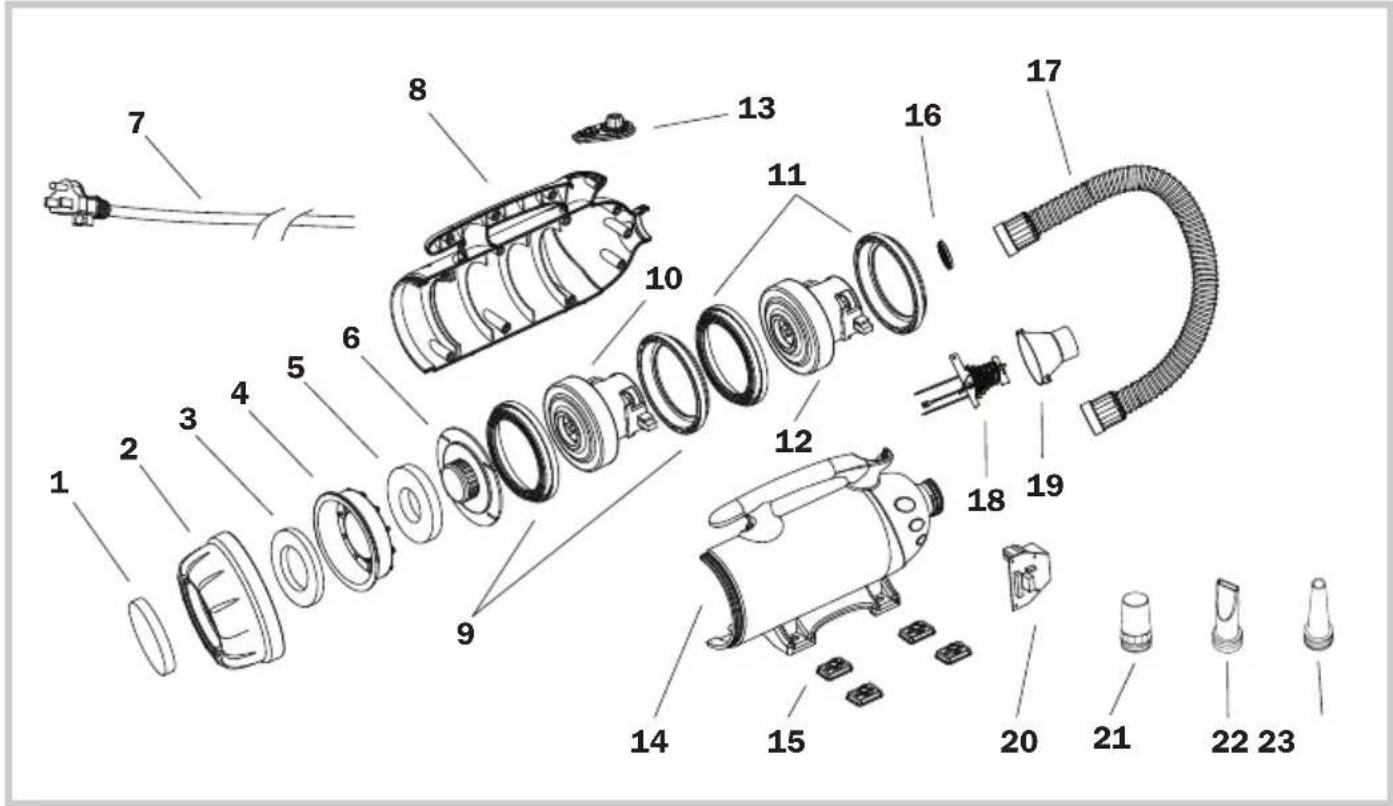
(1) Inlet Filter
(2) Rear Cover
(3) Case Filter
(4) Dust Case
(5) Motor Filter
(6) Dustproof Cover
(7) Power Cord
(8) Right Housing
(9) Motor Sleeves
(10) Motor
(11) Motor Sleeves*
(12) Motor*
(13) Switch Plate
(14) Left Housing
(15) Rubber Feet
(16) Outlet Grille Cover
(17) Hose
(18) Heating Element**
(19) Heating Element Tunnel**
(20) PCB Board
(21) Round Nozzle
(22) Flat Nozzle
(23) Cone Nozzle
Installation and Operation Guide
Power Supply
Amperage Rating
This appliance consumes high amperage electricity from 10 A to 19 A (See Page 14: Technical Specifications). You should also check if the power circuit of your building can support the total power consumption of all the devices including this appliance.
Power Outlets Selection
Make sure you have a power socket with a compatible amperage rating and fuse setting.
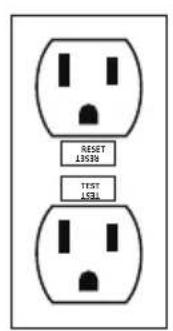
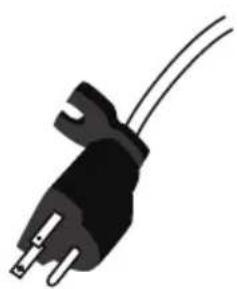
NEMA 5-15R
natural_image
Black electrical plug with three leads and two wires (no text or symbols)NEMA 5-15P
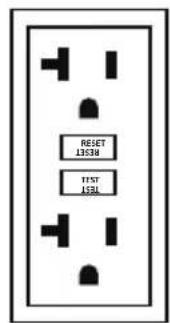
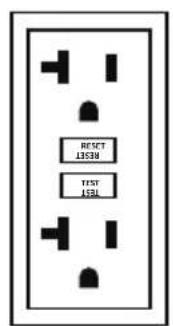
NEMA 5-20R
natural_image
Black and white illustration of an electrical outlet plug with two leads (no text or symbols)NEMA 5-20P
• NEMA 5-15R: For model B-4, B-24, B-25.
- NEMA 5-20R: For model B-27, compatible with model B-4, B-24, B-25.
Hose Installation
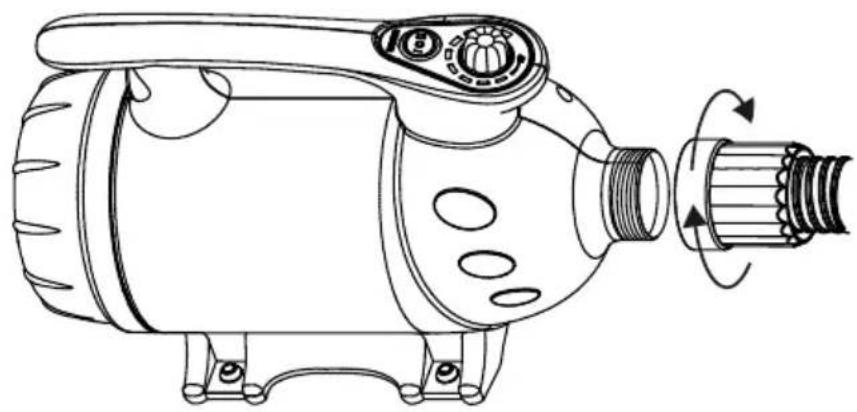
natural_image
Technical line drawing of a mechanical device with rotating shaft and housing (no text or symbols)- Screw the hose into the air outlet of the dryer. Fasten the connection.
Installation and Operation Guide (Continued)
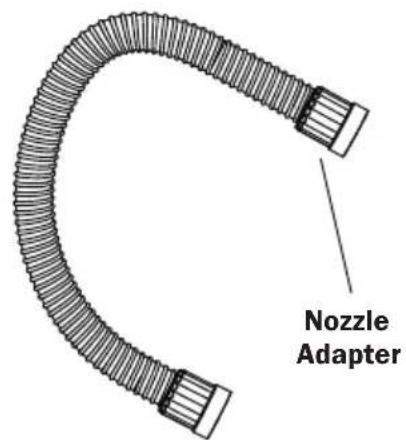
Nozzle Installation
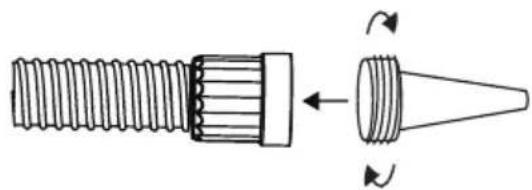
natural_image
Diagram of a threaded screw and conical tip with rotational arrows indicating movement (no text or symbols)- Screw the desired nozzle in nozzle adapter to the end.
Extension Setup
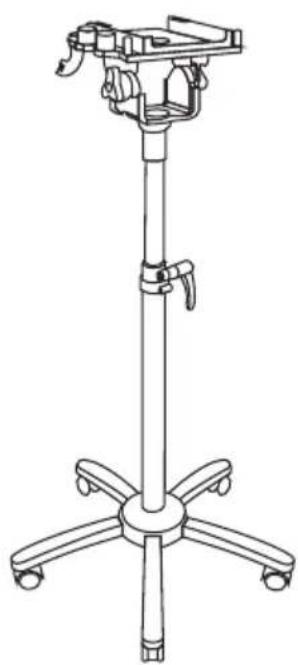
natural_image
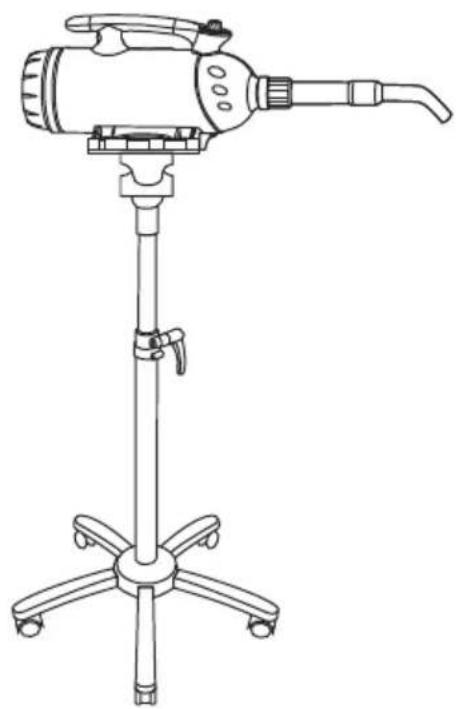
Line drawing of a four-legged stand with adjustable armrest and wheels (no text or symbols)Stand Mount Kit (B-SMK-3)
natural_image
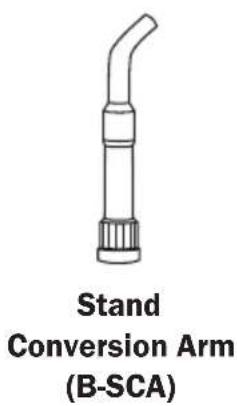
Line drawing of a handheld device with tripod base and adjustable arm (no text or symbols)Stand Conversion
- You can equip the Pet Dryer to Stand Mount Kit and a Stand Conversion ARM for convenient hands-free use.
* The Stand Mount Kit (B-SMK-3) and Stand Conversion Arm (B-SCA) are sold separately.
Installation and Operation Guide (Continued)
Extension Setup (Continued)
natural_image
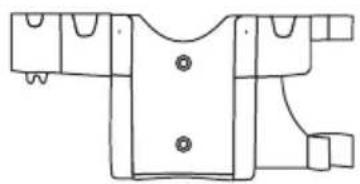
Line drawing of a garment pattern piece with buttons and side connectors (no text or symbols)Wall Mount Kit* (B-WMK-2)
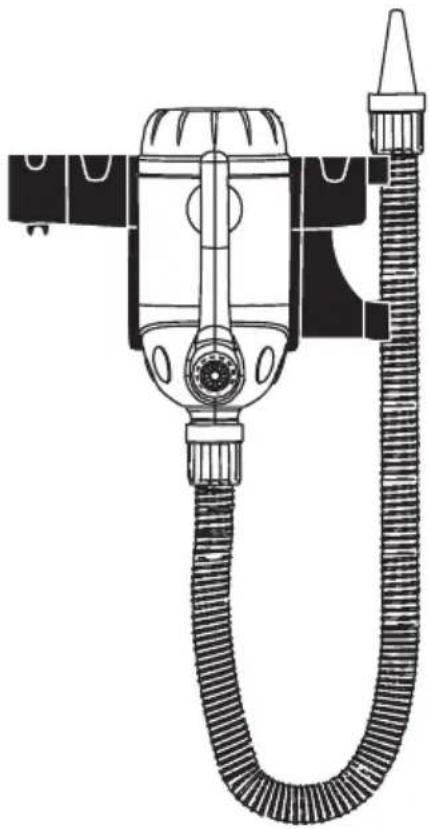
Wall Mounted
- You can mount the Pet Dryer to the wall with a Wall Mount Kit for space-saving and convenient use.
* The Wall Mount Kit (B-WMK-2) is sold separately.
natural_image
Technical line drawing of a vacuum cleaner with coiled hose and valve (no text or symbols)Switch Plate
natural_image
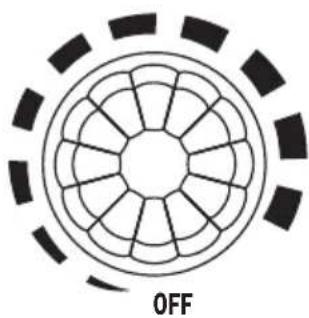
Circular diagram with radial segments and a dashed outer ring, labeled 'OFF' at the bottom (no other text or symbols)Speed Switch
- Turn to "OFF" position to switch the Pet Dryer off. Turn to any speed position to switch the Pet Dryer ON.
- Turn clockwise to set the desired speed.

Heater Switch
- Switch to "O" setting to turn the heating element OFF.
- Switch to other settings to turn the heating element on. "I"/"II" means the lower/higher heat setting.
Installation and Operation Guide (Continued)
Start Your Job
Before Turning on the Pet Dryer:
Please hold the hose tightly and point the nozzle outlet to a safe area.
Force Drying Stage
- In this stage, pets have been bathed and are saturated with heavy water. High-pressure airflow can remove the heavy water efficiently.
- You can achieve high-pressure air by installing the cone nozzle or flat nozzle and dry at the highest speed setting of the machine.
Table/Finish Stage
- In this stage, most of the heavy water on the pets have been removed in the force drying stage, but there is still some moisture. Heated-temperature and high-volume soft airflow can help to vaporize the rest of the moisture or to fluff and style.
- For model B-24, you can achieve high temperature airflow by using the heating element. For other models, turn to the highest speed setting for around 10 minutes for motor-heated airflow.
- To achieve high-volume soft airflow, switch to round nozzle and reduce the speed of the machine.
Nozzle Selections
- The cone nozzle is used for the force drying stage when the concentrated airflow with high pressure is needed.
- The flat nozzle is used for long coated (such as silky coat and natural long hair) pets to prevent knotting in the drying process.
- The round nozzle allows higher volume and softer airflow with less noise for smaller pets, sensitive areas or finishing and styling drying process.
Tips
- For pets that are sensitive to noise, try to start with the lowest speed setting and round nozzle. Then apply desired speed and other nozzles gradually.
- Hold the nozzle adapter to avoid the hot areas of the hose.
User Maintenance and Servicing Instructions
Frequent maintenance is recommended on this appliance. Failure to follow the maintenance instructions may cause failure of the appliance and void the warranty.
- When not in use, unplug and store the appliance in a dry and cool indoor place. Make sure it's out of reach of children.
- Before performing any maintenance or cleaning, always disconnect the Pet Dryer from its power source.
- Use a damp cloth to wipe the surface of the housing. Do not clean the unit with water directly.
- Check if the grille covers are clean. Remove dirt or any other objects that could block the air inlet and air outlet.
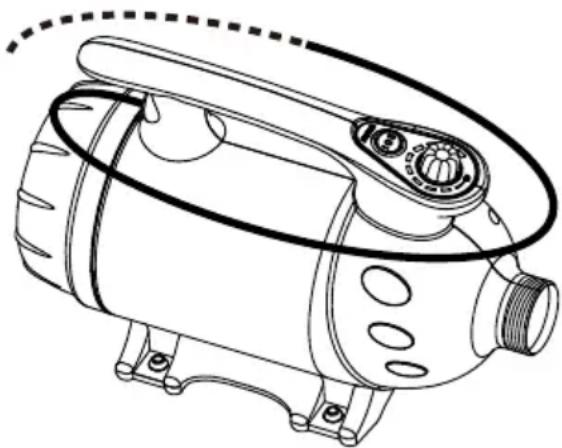
Organize the Cord
natural_image
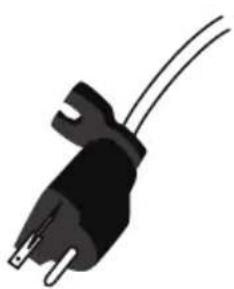
Line drawing of a mechanical device with no visible text or symbols- Wrap the power cord around the handle on top of the housing for storage after use.
natural_image
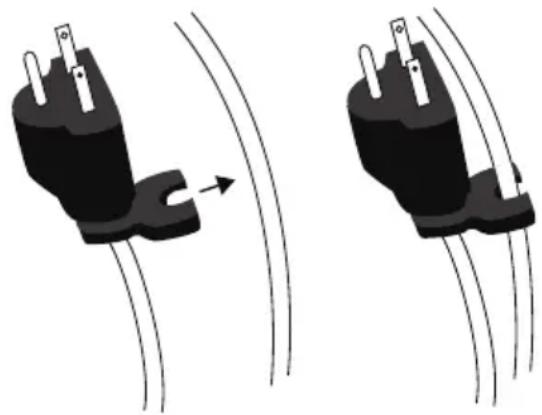
Two black electrical plug connectors with wires, one showing a curved arrow indicating motion (no text or symbols)- Use convenient clip at end of cord to secure in place.
Nozzle Maintenance
- Check if the nozzles are clean. Remove dirt or any other objects that could block the nozzle.
- Store the nozzle in a sealed container and put the container in a dry and cool indoor place. Make sure it's out of reach of children.
User Maintenance and Servicing Instructions (Continued)
Filter Maintenance
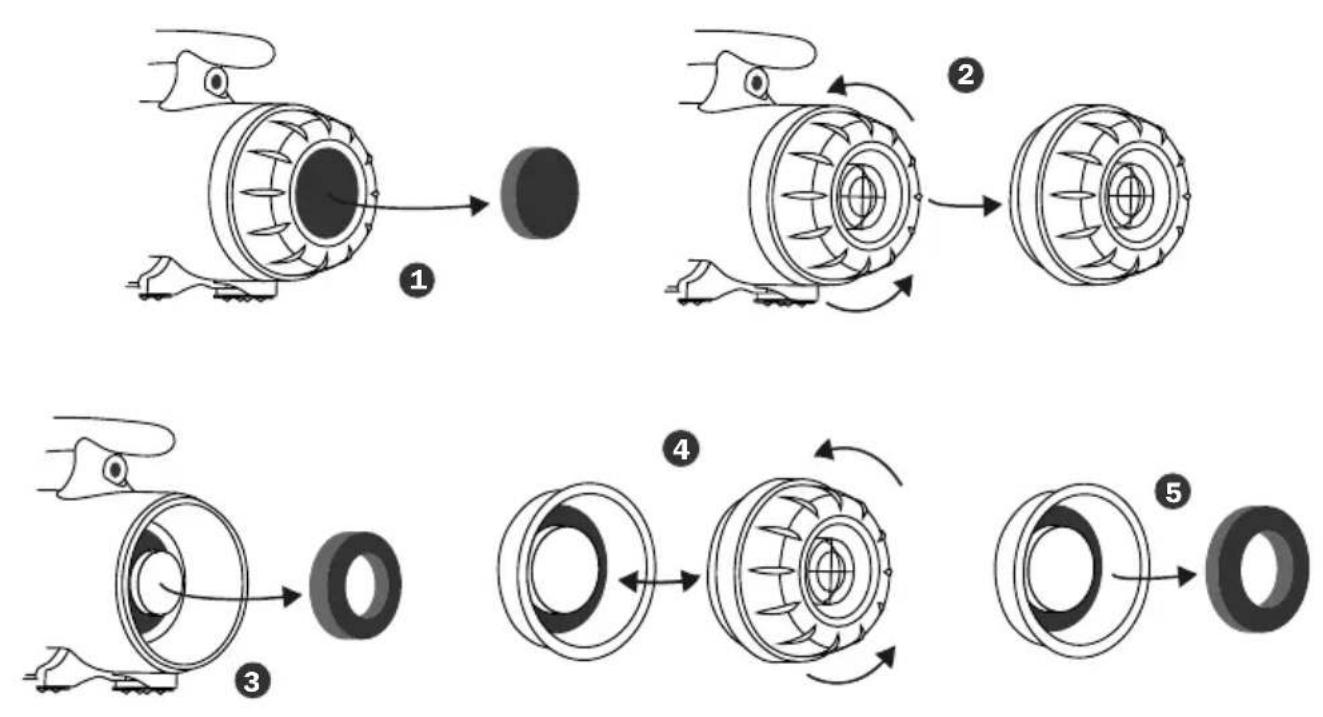
Three filters are on rear (intake) of the machine. To ensure the best performance, you should clean or replace the filters frequently. (See Also Page 5: Parts Description). Follow the below instructions to take out the filters:
① Take out the intake filter right from the end of the Pet Dryer.
② Screw off the rear cover.
③ Take out the motor filter from the machine.
④ Screw off the dust proof cover from the rear cover.
⑤ Take out the case filter from the dust case.
User Maintenance and Servicing Instructions (Continued)
Hose Maintenance
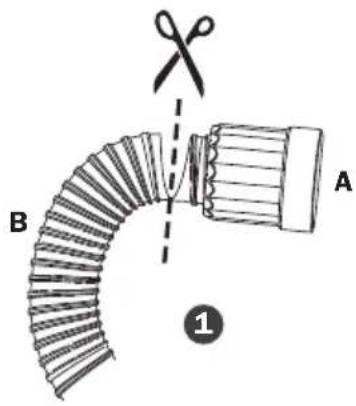
Always keep the hose away from chemicals, sunlight, ultraviolet ray, extreme temperature and sharp edges.
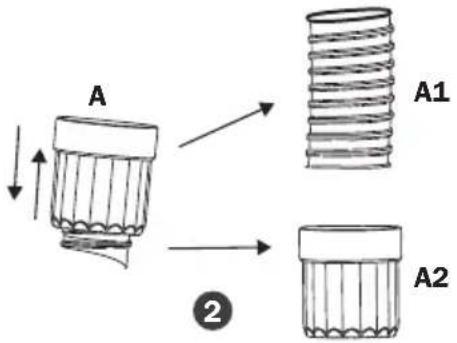
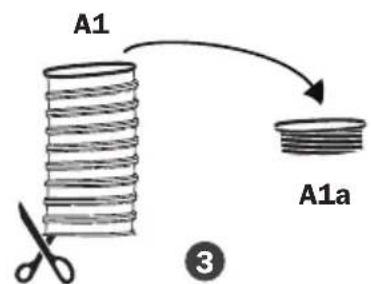
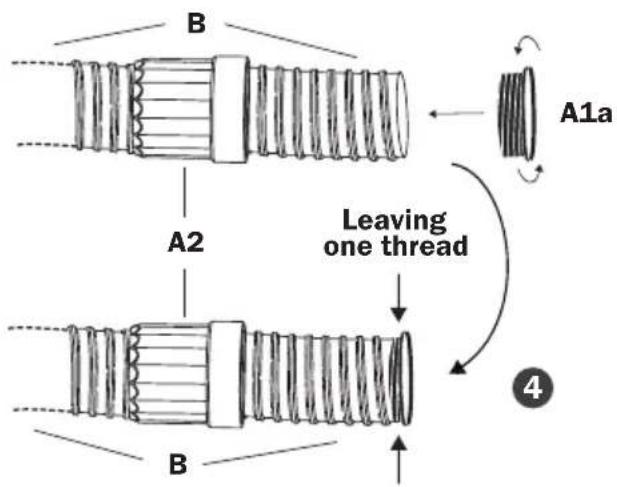
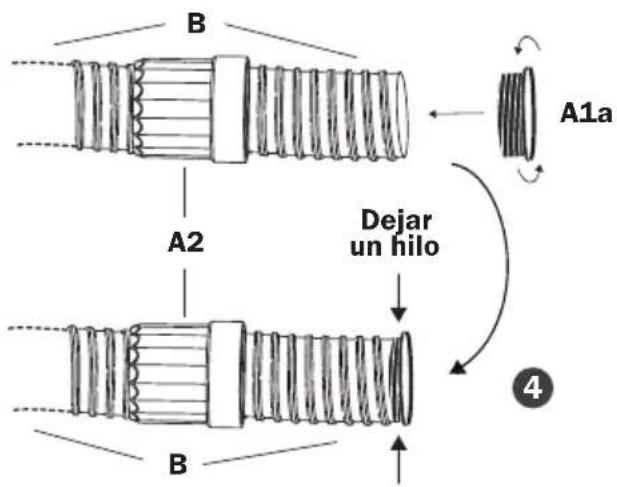
If your hose breaks, it could be fixed by the following methods:
① Cut out the broken hose into two ends, A and B.
② Take out A1 from A2.
③ Open A1 with scissors, and get A1a.
④ Insert B into A2. Screw A1a onto B, leaving one thread of space.
Troubleshooting Guide
PROBLEM POSSIBLE CAUSE SOLUTION
| Pet Dryer does not start | No electricity. Check for power supply. | |
| The power cord is not properly plugged in. | Remove and reconnect the power cord. | |
| The circuit breaker of the power socket or power circuit jumps. | Disconnect the Pet Dryer to the power socket. Reset the circuit breaker and reconnect. | |
| The thermal switch is triggered. | Turn off and unplug the machine. Clean or replace the filters. Plug and use again after the machine totally cools down. | |
| Unit runs but the speed / noise is abnormal | Air inlet or air outlet is blocked. | Remove blockage, clean or replace the filters. |
| Carbon brushes of the motor are worn out. | Contact XPOWER for more assistance. | |
| Leakage on the hose. Try to fix the leakage or replace the hose. (See Page 12: Hose Maintenance) | ||
| Unit runs but the machine gets very hot | The motor produces heat and heats up the machine after a long time use. | Turn off the machine. Use again after the machine totally cools down. |
If troubleshooting does not resolve your problem, please contact XPOWER or other parties authorized by XPOWER for further instructions.
Technical Specification
| MODEL NUMBER B-4 B-24 B-25 B-27 | ||||
| Voltage/Frequency | 115 V~60 Hz | |||
| Amperage 10.0 A | 12.0 A 12.0 A 19.0 A | |||
| Motor Power 3 HP | 3 HP 4 HP 6 HP | |||
| Rated Airflow 150 CFM | 150 CFM 160 CFM 180 CFM | |||
| Speed Control Variable Speed | ||||
| Heating Element N/A 2 Settings N/A | N/A | |||
| Hose Length 8 ft. / 2.4 m | ||||
| Cord Length | 10 ft. / 3 m | |||
| Housing | ABS | ABS+PC | ||
| Unit Dimension(L) x (W) x (H) | 14.0 x 6.5 x9.5 in. / 36.017.0 x 24.0cm | 14.0 x 6.3 x9.2 in. / 35.5x 16.0 x 23.4cm | 17.7 x 6.3 x 9.3 in. / 45.0 x16.0 x 23.5 cm | |
| Unit Weight | 10.8 lbs. /4.9 kg | 8.8 lbs. /4.0 kg | 12.3 lbs. /5.6 kg | 13.0 lbs. /5.9 kg |
| SafetyCertification | ETL/C-ETL | N/A | ||
If your product(s) is not listed above, please visit www.xpower.com for more information.
XPOWER Limited Warranty (USA)
1 YEAR LIMITED WARRANTY
XPOWER-branded products purchased in the U.S. from authorized distributors include a 1-year limited warranty. Contact XPOWER to confirm warranty information about your product(s).
This limited warranty covers defects in materials and workmanship in your XPOWER-branded products, purchased in the U.S. ONLY. Local warranty policy (if any) in your country will cover products purchased outside the U.S.

IMPORTANT:
(1) Please finish the online warranty registration before usage. Visit www.xpower.com/service-support/warranty-registration.
(2) This Limited Warranty applies with its own timeliness. Contact XPOWER or visit www.xpower.com for more information.
Items mentioned but not limited to below are not covered by warranty:
(1) Power cord, filters or any other components considered as a “consumable parts” by XPOWER.
(2) Normal wear and tear.
(3) Problems that result, directly or indirectly, at XPOWER's sole discretion, from:
(3.1) External causes such as accident, abuse, misuse or problems with electrical power supply.
(3.2) Disassembling, servicing or modification not authorized by XPOWER.
(3.3) Usage that is not accordant with product instructions stated in Owner's Manual.
(3.4) Failure to follow the product instructions or lack of necessary maintenance stated in Owner's Manual.
Before contacting XPOWER, please try one or more of the following:
(1) Consult this Owner's Manual and follow the instructions of troubleshooting guide.
(2) Access www.xpower.com for more advice and information that could be helpful to address your problems.
If you need additional assistance from XPOWER, please:
(1) Email info@xpower.com.
(2) Call XPOWER U.S. Customer Service Department at 855-855-8868 or other numbers provided on www.xpower.com.
(3) Visit XPOWER U.S. Head Office at 240 Clary Ave., San Gabriel, CA 91776 or the most current address provided on www.xpower.com.
Please also have your original proof of purchase and the serial number(s) of your product(s) ready when you contact XPOWER.
XPOWER Limited Warranty (USA) (Continued)
If you are instructed to return the unit for service or replacement, please:
(1) Request a RMA (Return-Merchandise-Authorization) number.
(2) Use the original or an equivalent packaging, prepay shipping charges at your own expense to the address provided by XPOWER, with the RMA number on the shipping label or the packaging.
(3) Include all the original parts and components.
XPOWER will inspect, assess and advise the repairs needed and applicable cost, if any. For products under warranty, we will pay to ship the repaired or replaced product(s) to you if you use an address within the Contiguous United States. Otherwise, we will ship the product(s) to you at your own expense.

ADVERTENCIA: LEA Y GUARDE ESTE MANUAL ANTES DE USAR ESTE PRODUCTO.
natural_image
Line drawing of a portable air purifier with coiled tubing (no text or symbols)Artículos incluidos

natural_image
Line drawing of a mechanical device with no visible text or symbolsmascotas x 1

natural_image
Illustration of a U-shaped pipe with two flanged ends and a central loop (no text or symbols)- Manguera x 1
natural_image
Three technical line drawings of conical mechanical parts with flanges (no text or symbols)- Boquillas x 3 • Secador |
natural_image
Black electrical plug with two leads and a terminal connector (no text or symbols)NEMA 5-15P
• NEMA 5-15R: Para el modelo B-4, B-24, B-25.
NEMA 5-20R
natural_image
Illustration of a black electrical plug with two wires (no text or symbols)NEMA 5-20P
- NEMA 5-20R: Para modelo B-27, compatible con modelo B-4, B-24, B-25.
natural_image
Technical line drawing of a mechanical device with rotating shaft and adjustment knob (no text or symbols)natural_image
Diagram of a screw and conical component with rotational arrows indicating motion (no text or symbols)natural_image
Line drawing of a handheld device with tripod stand and adjustable arm (no text or symbols)natural_image
Technical line drawing of a garment pattern piece with buttons and connectors (no text or symbols)natural_image
Technical line drawing of a vacuum cleaner with coiled hose and valve (no text or symbols)Montado en la Pared
natural_image
Circular diagram with radial segments and a dashed outer ring, labeled 'OFF' at the bottom (no other text or symbols)natural_image
Technical line drawing of a mechanical device with no visible text or symbolsnatural_image
Two diagrams showing a black plug with pins being pulled out by wires, no text or symbols present
natural_image
Line drawing of a vacuum cleaner with coiled tubing (no text or symbols)Éléments inclus

natural_image
Line drawing of a mechanical device with no visible text or symbolsd'animaux x 1
natural_image
Illustration of a U-shaped pipe with two flanged ends and a central loop (no text or symbols)- Tuyau x 1

natural_image
Three technical line drawings of conical mechanical parts with flanges (no text or symbols)- Buses x 3 • Séchoir
NEMA 5-15R
natural_image
Black electrical plug with three leads and two terminal pins (no text or symbols)NEMA 5-15P
NEMA 5-20R
natural_image
Black electrical outlet plug with two leads (no text or symbols)NEMA 5-20P
natural_image
Technical line drawing of a mechanical device with rotating shaft and housing (no text or symbols)natural_image
Diagram of a threaded screw and conical tip with rotational arrows indicating movement (no text or symbols)natural_image
Line drawing of a handheld device with tripod base and adjustable arm (no text or symbols)Conversion de Séchoir Toilettage
natural_image
Line drawing of a garment pattern piece with buttons and side connectors (no text or symbols)Fixation Murale* (B-WMK-2)
Fixé au Mur
natural_image
Technical line drawing of a vacuum cleaner with coiled hose and valve (no text or symbols)natural_image
Circular diagram with radial segments and a dashed outer ring, labeled 'OFF' at the bottom (no other text or symbols)
natural_image
Concentric circles with internal symbols (no text or labels)natural_image
Line drawing of a mechanical device with no visible text or symbolsnatural_image
Two diagrams showing a black plug with pins and a curved arrow indicating flow or movement, no text or symbols present.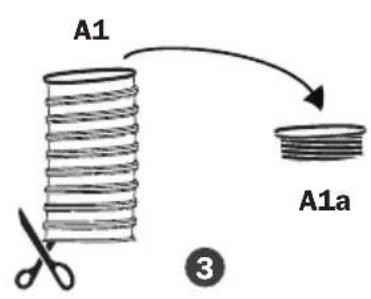

PROBLÈME CAUSE POSSIBLE SOLUTION
Technical Specification
XPOWER Manufacture, INC.
240 Clary Avenue
San Gabriel, CA 91776 USA
www.xpower.com | 1-(855)-855-8868 | info@xpower.com
Read and save these instructions

- Professional Pet Force Dryer Owner's Manual
- WARNING: READ AND SAVE THESE INSTRUCTIONS BEFORE USING THIS PRODUCT.
- Safety Instructions (Continued)
- HOUSEHOLD AND COMMERCIAL USE
- Grounding Instructions
- Grounding Instructions (Continued)
- Professional Pet Force Dryer Introduction
- Items Included
- Installation and Operation Guide
- Power Supply
- Amperage Rating
- Power Outlets Selection
- Hose Installation
- Installation and Operation Guide (Continued)
- Nozzle Installation
- Extension Setup
- Stand Conversion
- Extension Setup (Continued)
- Wall Mounted
- Switch Plate
- Speed Switch
- Heater Switch
- Start Your Job
- Before Turning on the Pet Dryer:
- Force Drying Stage
- Table/Finish Stage
- Nozzle Selections
- Tips
- User Maintenance and Servicing Instructions
- Organize the Cord
- Nozzle Maintenance
- User Maintenance and Servicing Instructions (Continued)
- Filter Maintenance
- Hose Maintenance
- Troubleshooting Guide
- Technical Specification
- XPOWER Limited Warranty (USA)
- YEAR LIMITED WARRANTY
- IMPORTANT:
- Items mentioned but not limited to below are not covered by warranty:
- Before contacting XPOWER, please try one or more of the following:
- If you need additional assistance from XPOWER, please:
- XPOWER Limited Warranty (USA) (Continued)
- If you are instructed to return the unit for service or replacement, please:
- ADVERTENCIA: LEA Y GUARDE ESTE MANUAL ANTES DE USAR ESTE PRODUCTO.
- Artículos incluidos
- Montado en la Pared
- Éléments inclus
- Conversion de Séchoir Toilettage
- Fixé au Mur
Brand : XPower
Model : B-4
Category : Heating