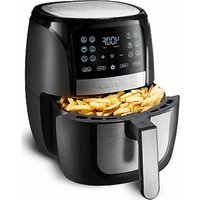
GAF698 - Deep fryer Gourmia - Free user manual and instructions
Find the device manual for free GAF698 Gourmia in PDF.


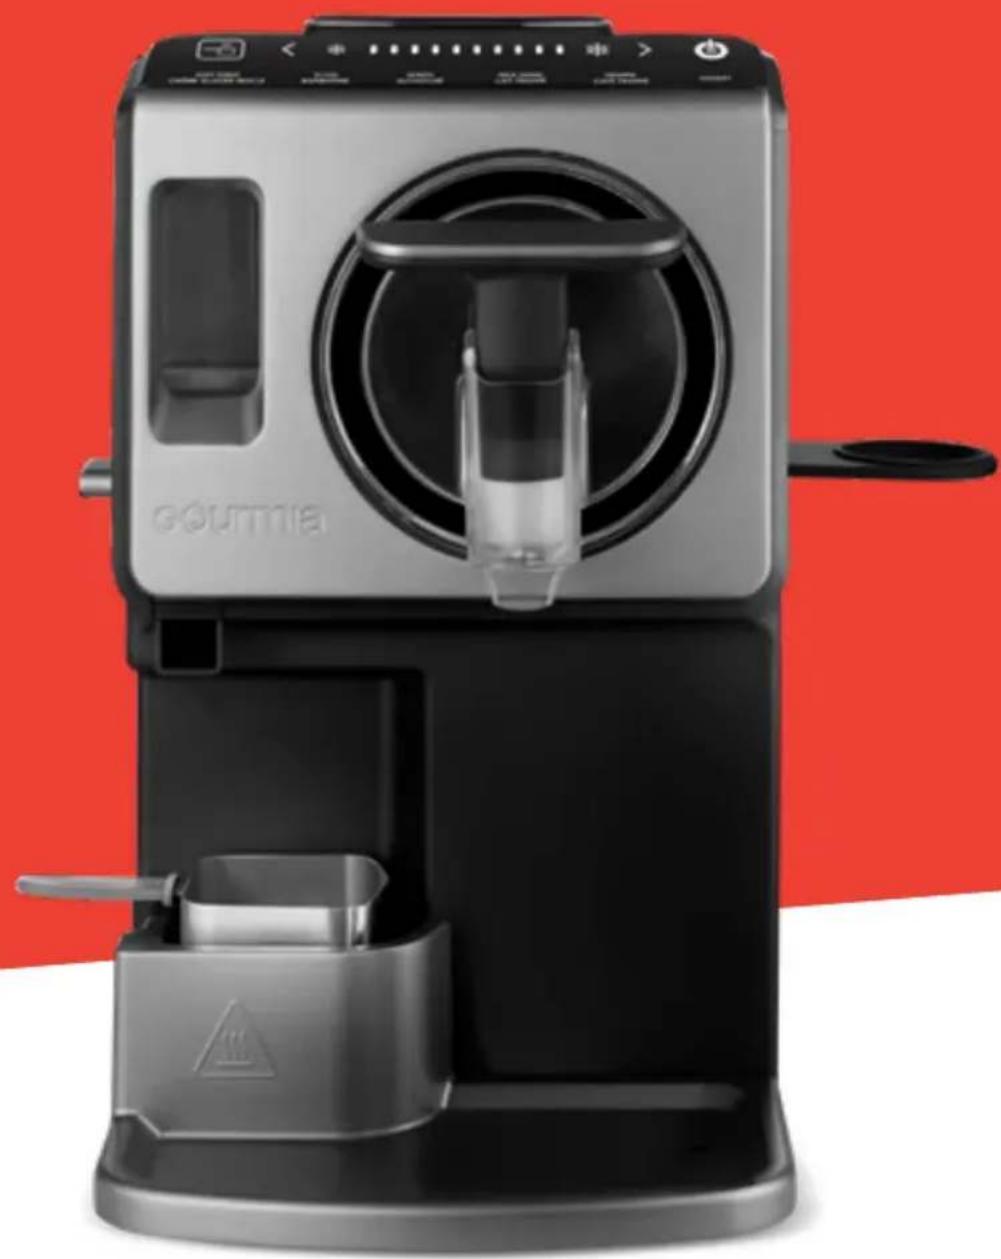
| Product type | Soft serve ice cream and frozen beverage machine |
| Capacity | 2 liters (MAX fill line) |
| Power supply | 120 V ~60 Hz (appropriate mains voltage, see rating label) |
| Preprogrammed functions | Soft serve ice cream, slushie, frozen alcoholic drinks, milkshake, frappé, sorbet |
| Texture control | 10 control bars, adjustment using right/left arrows |
| Warming station | Warming plate for topping, includes cup |
| Topping dispenser | Removable compartment with chute and dispense button |
| Keep cold function | Automatic after cycle, duration 3 hours then stops |
| Rinse cycle | Built-in function for internal cleaning (warm water, 5 minutes) |
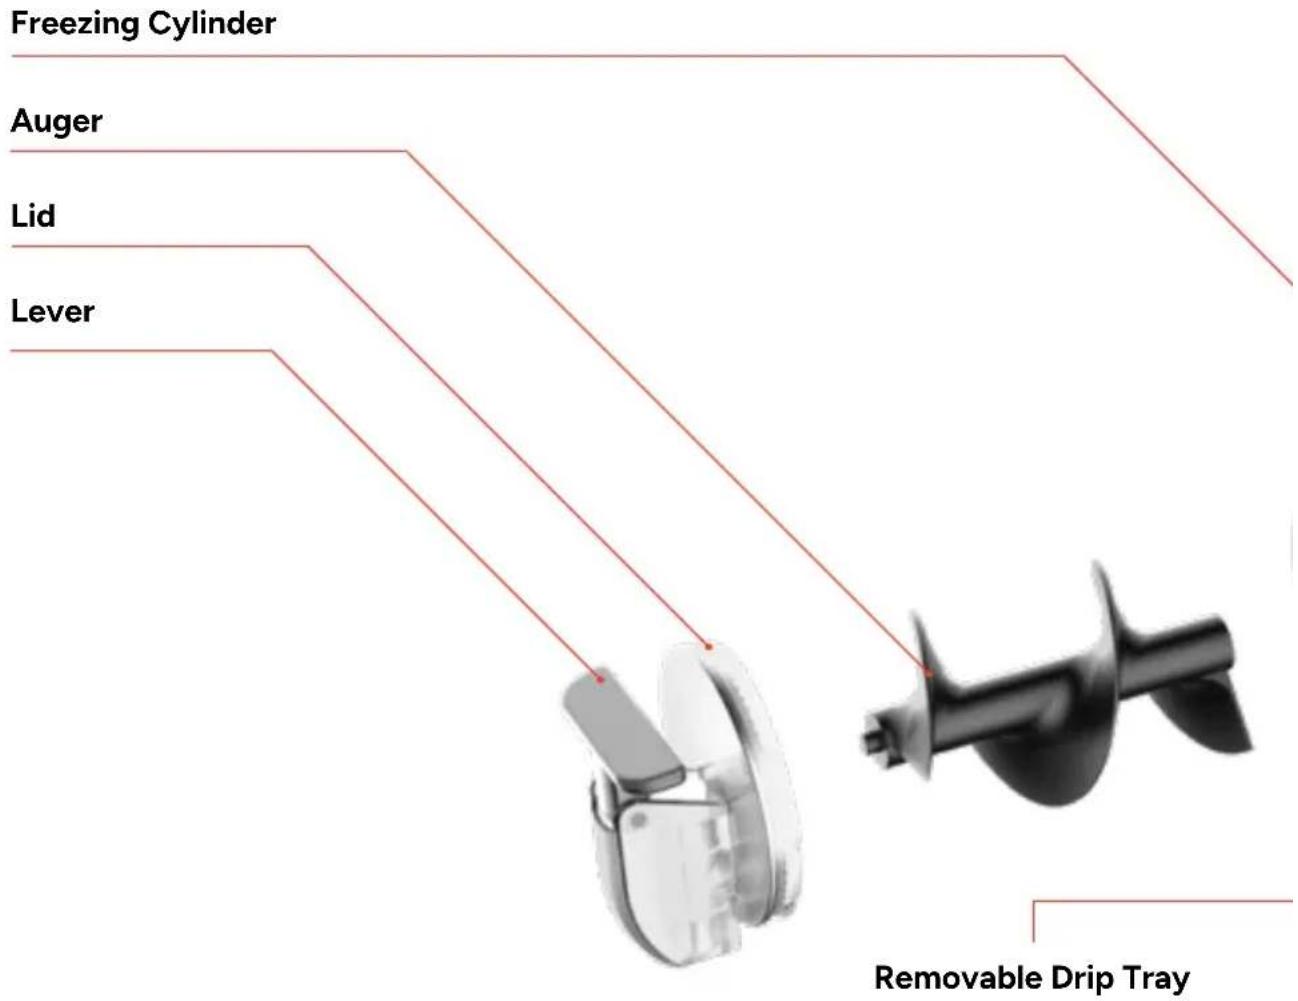
| Removable parts | Freezing cylinder, auger, fill opening, lid, topping dispenser, warming cup, drip tray |
| Cleaning | Removable parts dishwasher safe or wash with warm soapy water. Wipe base with a damp cloth |
| Safety | Automatic shut-off after 3 h, lid lock, do not use without lid, do not immerse |
| Warranty | Limited 1-year warranty (USA), proof of purchase required |
| Material | Plastic housing, metal freezing cylinder, plastic auger |
| Weight | Approximately 8 kg (estimated) |
| Included accessories | Recipe book (QR code), warming cup, drip tray |
Frequently Asked Questions - GAF698 Gourmia
User questions about GAF698 Gourmia
0 question about this device. Answer the ones you know or ask your own.
Ask a new question about this device
Download the instructions for your Deep fryer in PDF format for free! Find your manual GAF698 - Gourmia and take your electronic device back in hand. On this page are published all the documents necessary for the use of your device. GAF698 by Gourmia.
USER MANUAL GAF698 Gourmia
natural_image
Exterior view of a modern Céumia coffee maker with black and silver casing against red background (no signage or text on device)User Manual | GSI1020
Automatic Soft Serve Ice Cream & Frozen Drink Maker
Contents
Important Safeguards 4
Know Your Ice Cream Maker 6
Control Panel 6
Before First Use 8
Order of Assembling and Disassembling the Freezing Cylinder and Fill Port 8
Assembling Your Ice Cream Maker 9
Using Your Ice Cream Maker 10
Keep Cold Function 10
Using the Warming Station....11
Using the Toppings Dispenser 11
Sugar and Alcohol Guidelines, and Alerts 12
Recipes. 13
QR Code to Download Recipe Book. 14
Cleaning & Maintenance....14
Running the Rinse Cycle 14
Cleaning 14
Troubleshooting 15
Warranty and Service 16
Model: GSI1020 | © 2025 Gourmia | 1.0
The Steelstone Group Brooklyn, NY | Gourmia.com
All rights reserved. No portion of this manual may be reproduced by any means whatsoever without written permission from The Steelstone Group, except for the inclusion of quotations in a media review. Although every precaution has been taken in the preparation of this manual, The Steelstone Group assumes no responsibility for errors or omissions. Nor is any liability assumed for damages resulting from the use of the information contained herein. Although every effort has been made to ensure that the information contained in this manual is complete and accurate, The Steelstone Group is not engaged in rendering professional advice or services to the individual consumer; further, The Steelstone Group shall not be held responsible for any loss or damage allegedly arising from any information or suggestions in this manual.
natural_image
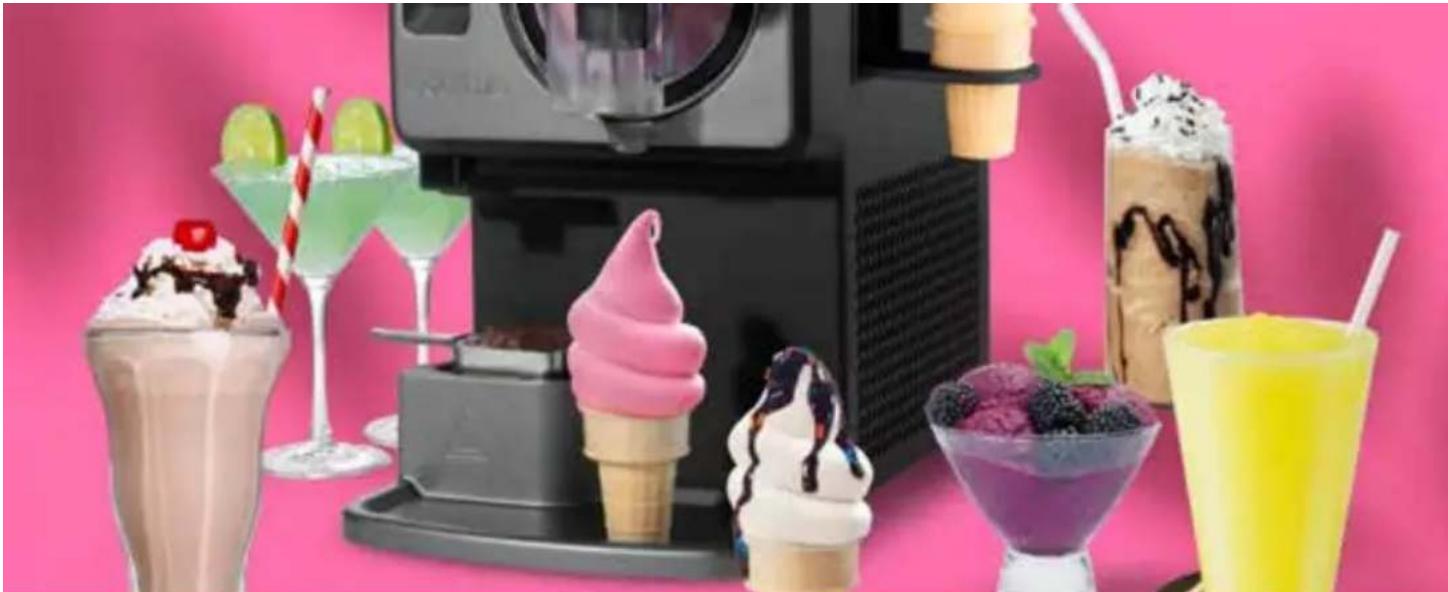
Assorted dessert and drink items including ice cream cones, chocolate drizzle, and colorful drinks against a pink background (no text or symbols visible)Congratulations on the purchase of your Ice Cream Maker from Gourmia!
Congratulations on the purchase your Soft Serve Ice Cream and Frozen Drink Maker from Gourmia!
Here at Gourmia, our goal is to make sure delicious menu options are always a practical possibility no matter how fast-paced your life is. Like everything else we create at Gourmia, this appliance is designed to work for you while you work your way through your busy day. Whether you're in need of an icy cocktail, frozen confections for a crowd, or a cold, coffee-flavored treat, your dependable frozen treat maker is up to the task.
This manual provides an overview and instructions on all the functions and features of your new appliance, along with directions for assembling, operating, cleaning, and maintaining it. Please read all safety instructions before getting started. Keep this manual handy for future use and review.
Our team is available to help with any question you might have. We're excited for you and want you to get the most out of your purchase—so whether you need assistance with setup or guidance on which functions to use, we're happy to walk you through it, step by step.
Here's to Frozen Fun!
We'd love to hear about the delicious treats you're creating! Share your thoughts, recipes, and photos with us.
IMPORTANT SAFEGUARDS
Read all instructions before using the electric appliance.
For household use only.
The following basic precautions should always be followed:
- This appliance is not intended for use by children or persons with reduced physical, sensory, or mental capabilities, or a lack of experience and knowledge, unless they have supervision.
- Close supervision is necessary when any appliance is used near children. Children should be supervised to ensure that they DO NOT play with the appliance. Cleaning and user maintenance SHOULD NOT be done by children unless they are supervised. Children SHOULD NEVER use the warming station or touch the warming plate or the warming cup.
- Check if the voltage indicated on the appliance corresponds to the local main voltage before you connect the appliance.
- DO NOT use the appliance if the plug, the main cord or the appliance itself is damaged. Always make sure that the plug is inserted properly into a wall outlet.
- If the power supply cord is damaged, it must be replaced by a cord from the manufacturer or an authorized service facility.
- DO NOT operate any appliance
with a damaged cord or plug, after the appliance malfunctions, or if the appliance has been damaged in any manner. Return the appliance to the nearest authorized service facility for examination, repair, or adjustment.
- DO NOT use an extension cord with this appliance.
- DO NOT let the cord hang over the edge of the table or counter, nor let it touch hot surfaces.
- To protect against electric shock, DO NOT immerse cord, plugs, or appliance in water or other liquid.
- DO NOT plug in the appliance or operate the control panel with wet hands.
- NEVER connect this appliance to an external timer switch or separate remote-control system in order to avoid a hazardous situation. To disconnect, turn off the appliance, then remove the plug from the wall outlet.
- ALWAYS use the appliance on a dry and level surface.
-
WARNING: Keep ventilation openings, in the appliance enclosure or in the built-in structure, clear of obstruction.
-
DO NOT place the appliance against a wall or against other appliances. Leave at least 4 inches of free space on the back and sides and 4 inches of free space above the appliance. DO NOT place anything on top of the appliance.
-
DO NOT fill containers past the max fill indicators.
-
DO NOT operate the appliance with an empty container.
-
DO NOT microwave the containers or accessories provided with this appliance.
-
DO NOT pour hot liquid into the fill port. Doing so may result in pressure buildup and steam exposure that can pose a risk of burns.
-
This appliance cannot process any solid or dry ingredients. Any solid or large ingredients including ice and frozen fruit must be pureed or liquefied before pouring into the fill port. DO NOT use this appliance to crush or grind food or ice!
-
NEVER operate the appliance without lids in place. DO NOT attempt to defeat the interlock mechanism. Ensure the freezing cylinder and lid are properly installed before operation.
-
ALWAYS Keep hands and utensils away from this appliance while mixing to reduce the risk of severe personal injury or damage to the unit.
-
WARNING: DO NOT use mechanical devices or other means to accelerate the defrosting process, other than those recommended by the manufacturer.
-
WARNING: DO NOT damage the refrigerant circuit.
-
WARNING: To avoid a hazard due to instability of the appliance, it must be assembled in accordance with the instructions.
-
WARNING: DO NOT store explosive substances such as aerosol cans with a flammable propellant in or near this appliance.
-
WARNING: Warming plate and warming cup will be hot! Use caution when handling the warming cup. DO NOT touch hot surfaces. DO NOT allow children near the warming station when in use.
-
DO NOT carry this unit by the dispenser, the cone holder, or any other extending or removable part.
-
DO NOT use the appliance for any other purpose than described in this manual. The use of accessory attachments not recommended by the appliance manufacturer may cause injuries.
-
DO NOT leave the appliance unattended when plugged in.
-
DO NOT use outdoors.
SAVE THESE INSTRUCTIONS
Know Your Ice Cream Maker
Control Panel
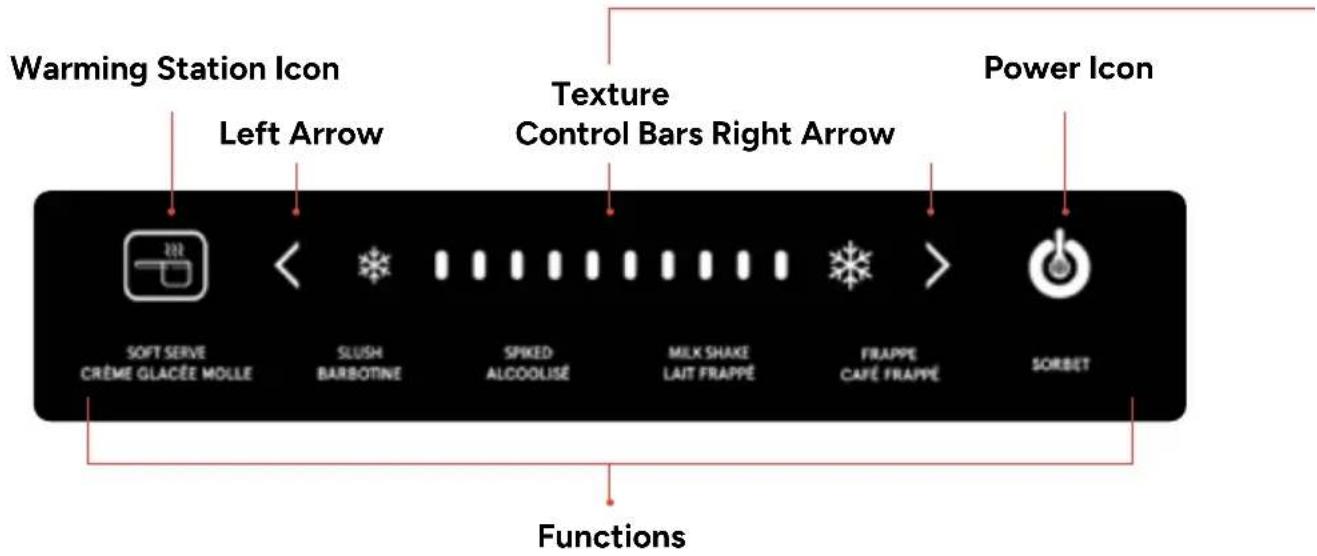
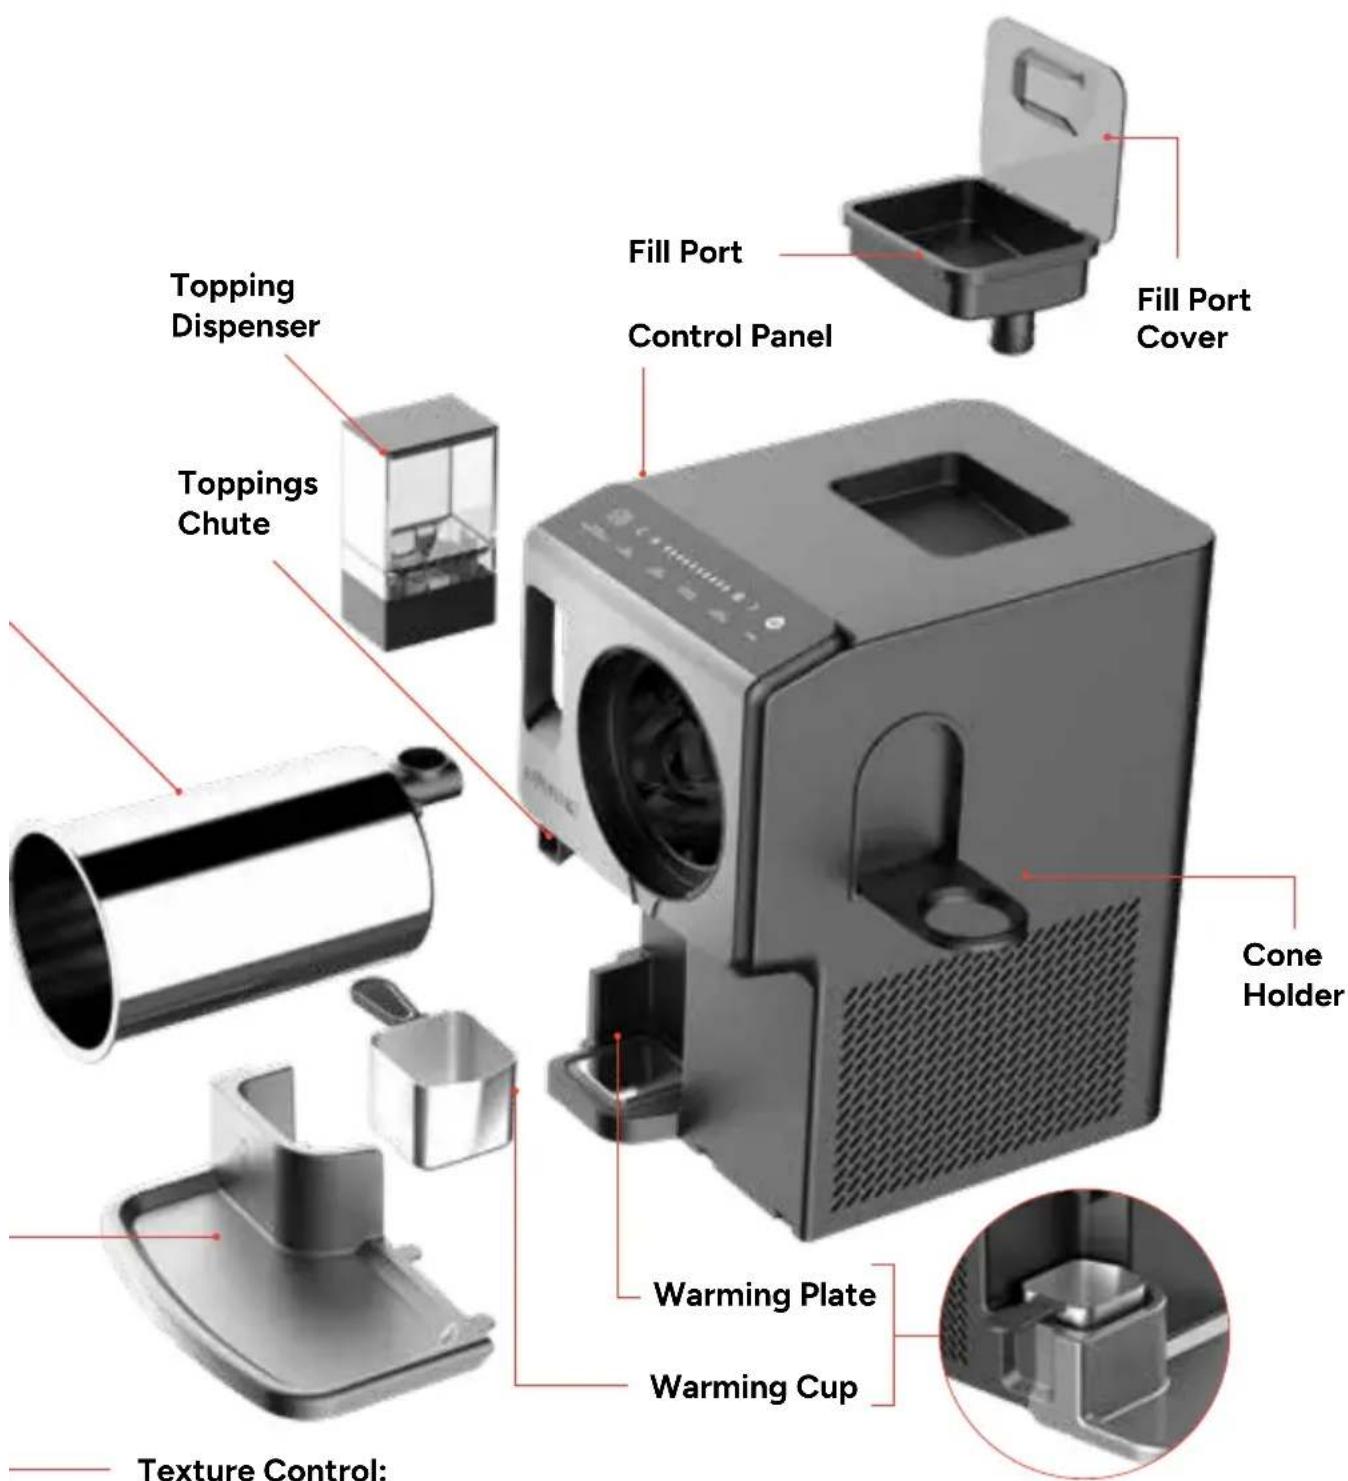
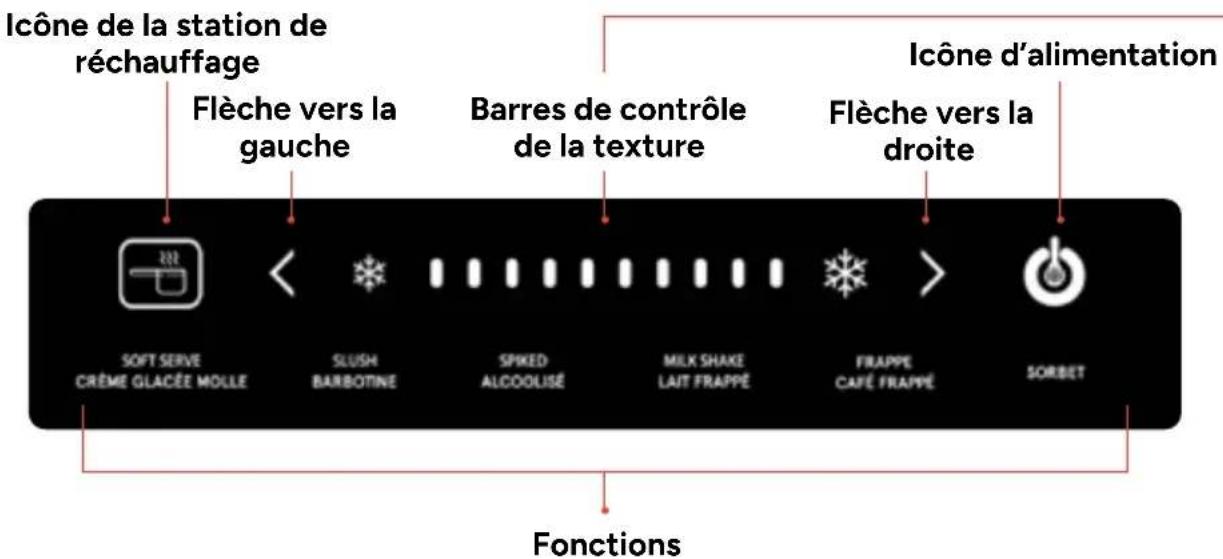
Texture Control:
This product offers 6 preprogrammed functions to achieve the ideal consistency for each frozen treat. When a function is selected, the default setting will illuminate on the texture control bars.
When you use a function for the first time, we recommend trying the default setting without adjustments. Once the cycle is complete, taste the results. To make the texture thicker, tap the right arrow; to make it thinner, tap the left arrow.
Warming Station
Before First Use
- Remove all packaging materials from the unit.
- Wash the fill port, all topping dispenser parts, and the lid in warm, soapy water, or wash in the dishwasher. Dry thoroughly.
- Run the Rinse Cycle to wash the auger and freezing cylinder. See Running the Rinse Cycle on page 14 for detailed instructions.
IMPORTANT:
This unit utilizes a compressor that must be set upright in order to function properly. Before using the appliance, ensure the appliance was upright for at least 2 hours. When storing the appliance, it is recommended keep it in an upright position.
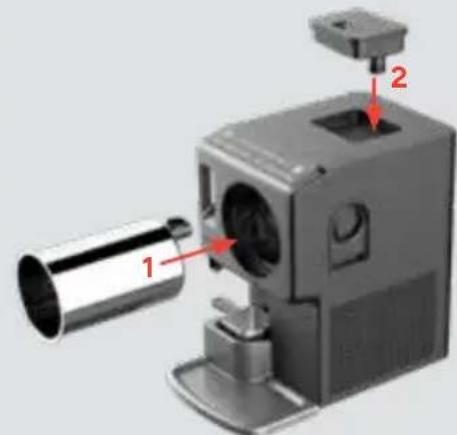
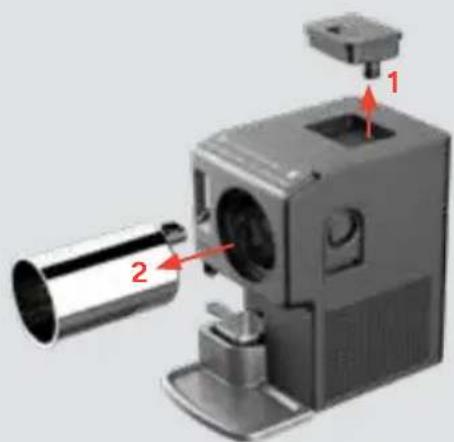
Order of Assembling and Disassembling the Freezing Cylinder and Fill Port
To Assemble: To Disassemble:
natural_image
3D rendering of a mechanical device with labeled parts (1, 2), no visible text or symbols beyond labels-
First slide in the freezing cylinder.
-
Then insert the fill port.
natural_image
Mechanical device with labeled parts, showing a cylindrical component and mounting bracket (no text or symbols visible)Before disassembly, wait 10 minutes for the cylinder to defrost.
- Lift out the fill port.
- Slide out the freezing cylinder.
Assembling Your Ice Cream Maker
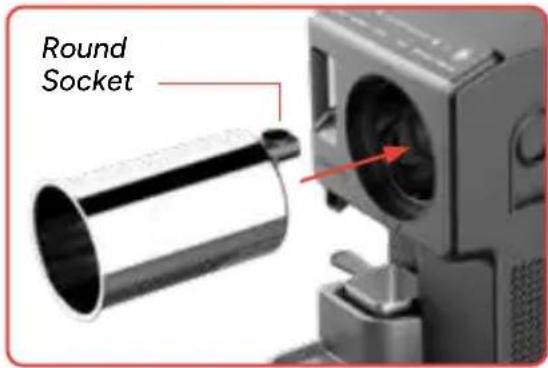
- Hold the freezing cylinder with the round socket facing upward, and slide towards the back of the unit.
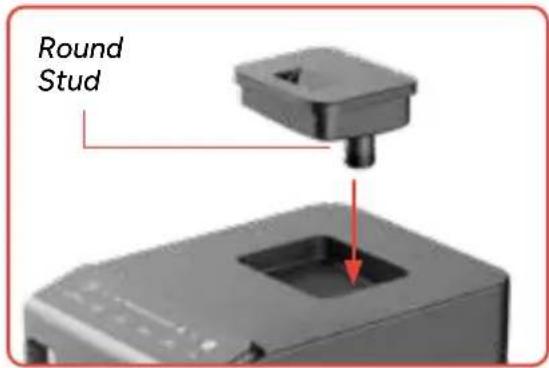
- Insert the fill port into the top of the unit with the round stud facing downward.
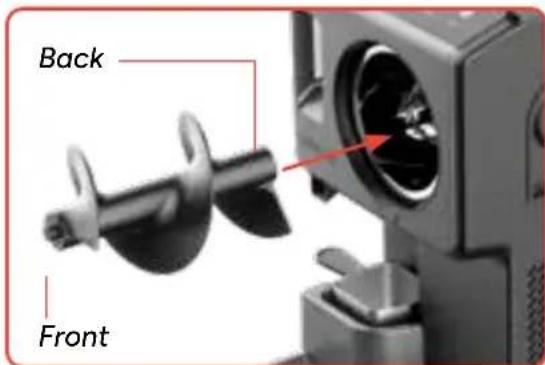
- Hold the auger with its back toward the unit and slide the auger through the freezing cylinder into its position.
natural_image
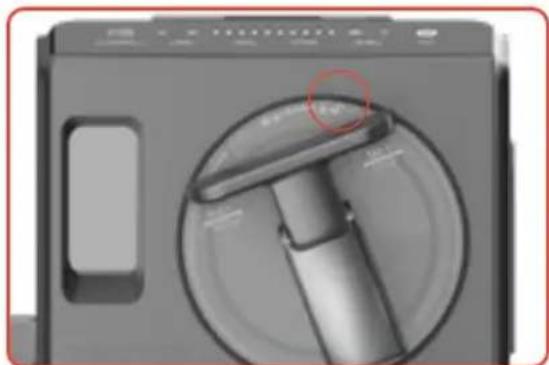
Close-up of a washing machine door with a circular dial indicator and a red circle highlighting the handle area (no text or symbols visible)- Position the lid so the unlocked arrow icon aligns with the upside-down arrow on the front of the unit.
natural_image
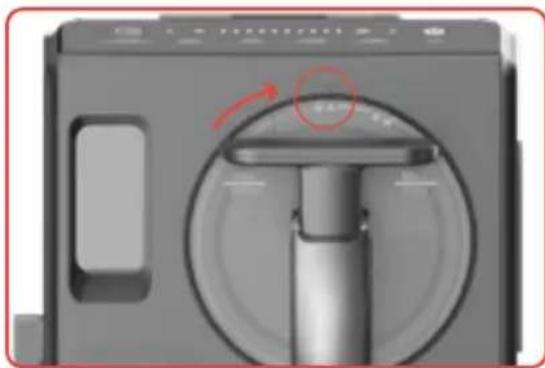
Close-up of a device casing with a circular dial and handle, showing internal components (no text or symbols visible)- Rotate the lid clockwise so the locked arrow reaches the upside-down arrow and locks into place.
natural_image
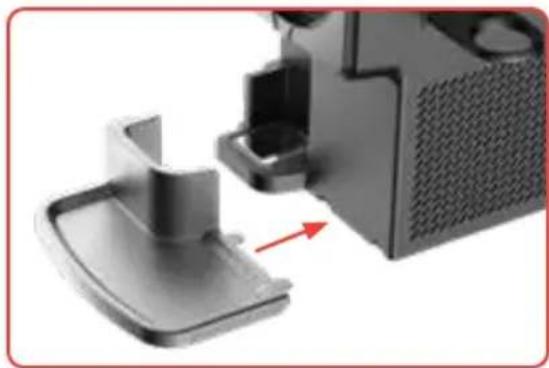
Close-up of a mechanical component with a red arrow pointing to a small component (no visible text or symbols)- Slide the removable drip tray into place at the base of the unit.
Note: The unit will not operate without the lid in the correct position.
Using Your Ice Cream Maker
The following general instructions apply to every function:
- Place the unit on a stable, level surface.
- Plug the unit into an outlet.
- Tap the power icon.
- Prepare your mixture.
WARNING: This appliance cannot process any solid or dry ingredients.
Any solid or large ingredients including ice and frozen fruit must be pureed or liquefied before pouring into the fill port. Do not use this appliance to crush or grind food or ice.
- Lift the fill port cover and pour the mixed ingredients into the opening.
Note: The MAX fill line for this unit is displayed on the lid. DO NOT overfill.
- Tap a function. The freezing process will begin.
Note: The texture control bars will light up at its default setting. If you wish to adjust the texture, tap the right or left arrows. See Texture Control on page 7 for detailed instructions.
Note: You can adjust the texture level mid-cycle.
- When your selected texture is reached, the corresponding texture control bars will be lit in solid blue. The unit will beep, indicating that your frozen treat is ready and the Keep Cold Function has started. See Keep Cold Function below. To dispense, place your cone or cup below the lever and gently pull the lever down.
Note: If you want to use larger cones or cups, you can remove the drip tray.
- Once all the contents of the freezing cylinder have been dispensed, turn off the unit by pressing the power icon.
Keep Cold Function:
The Keep Cold Function automatically begins once your frozen treat is ready, and will continue running for 3 hours.
- The Keep Warm Function can be disabled by powering off the unit.
• After 3 hours, the unit will turn off automatically. - You can adjust the texture at any time during the Keep Cold Function.
Using the Warming Station
The warming station is intended to keep preheated toppings warm, not for cooking or preparing toppings.
- Preheat your topping and pour it into the warming cup.
- Tap the warming station icon; the icon will turn and stay red while warming.
- Place the warming cup on the heating plate of the warming station.
WARNING: The Warming plate and warming cup will be hot! Use caution when handling the warming cup. DO NOT touch hot surfaces! DO NOT allow children near the warming station when in use.
Suggested Warm Toppings:
Suggested warm toppings include hot fudge, caramel sauce, butterscotch sauce, and fruit-based sauces like strawberry, blueberry and raspberry.
Using the Toppings Dispenser
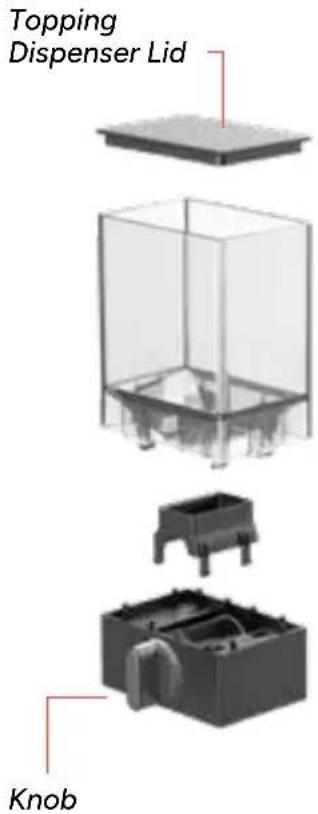
Note: The toppings dispenser can come apart for cleaning.
- Remove the topping dispenser lid and fill the topping dispenser with the topping of your choice.
- Position the topping dispenser in its compartment on the left side of the unit.
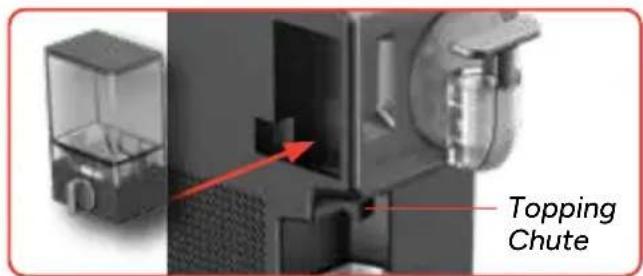
- Place your cone or cup below the topping chute and turn the knob.
Note: Some toppings may be too large for the topping dispenser and will need to be chopped before using. DO NOT use full-size chocolate chips or candy.
Note: Empty the topping dispenser before storing.
Suggested Toppings:
Suggested toppings include mini candy-coated chocolates, mini chocolate chips, sprinkles, and chopped nuts.
Sugar and Alcohol Guidelines
If there's not enough sugar or too much alcohol, your slush won't freeze properly. To get the perfect slush every time, make sure your mixture has at least 4% sugar and not more than 16% alcohol.
Sugar Guide:
For every 8 ounces, ensure a minimum of 8 grams / 2 tablespoons of sugar.
Sugar free slush hack:
Typical sugar substitutes do not work well in frozen drink options. If you would like to create a sugar free frozen drink, we suggest purchasing Liquid Allulose, which crystallizes like sugar in frozen confections.
Alcohol Guide:
When using the Spiked function, your mixture must include between 2.8% and 16% alcohol.
Texture Control Bar Alerts
Low Sugar Alert:
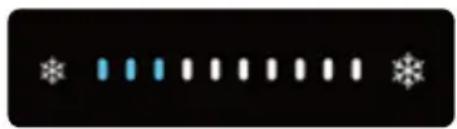
The three left texture control bars flashing is a low sugar alert. Add more liquefied sweetener and tap the function to restart.
natural_image
Black background with a row of white star symbols and blue vertical bars (no text or labels)High Alcohol / Empty Alert:
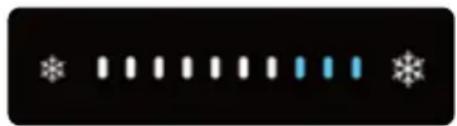
The three right texture control bars flashing is an alert that your ingredients have a high alcohol content, or the unit is running on empty. Add more liquid and tap the function to restart.
natural_image
Black background with a row of white and blue vertical bars and three asterisks at the bottom (no text or symbols)Note: DO NOT overfill. If the mixture reaches or is close to the MAX fill line, dispense some of the mixture before adding more liquid.
Motor Jam Alert:
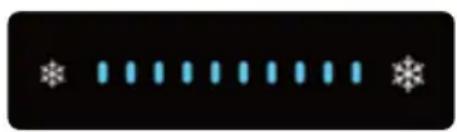
All the ten texture control bars flashing is an alert that the motor is jammed. Dispense the mixture, ensure nothing is blocking the motor, and that all parts are assembled correctly.
natural_image
Black background with a row of blue vertical bars and two white star-shaped symbols at the bottom (no text or labels)Recipes
Function Ingredients
| SOFT SERVE:Vanilla Soft Serve | 2 cups whole milk1 cup heavy cream 34 cup sugar1 tablespoon vanilla extract 18 teaspoon Diamond Krystal kosher salt or1/6 teaspoon (equal to 1 pinch)Morton's, sea, or table saltMix all ingredients together. |
| SLUSH:Fresh Juice Slush | 3 cups fresh juice(Orange, cranberry, pomegranate, grape, lemonade, etc.) |
| SPIKED:Frosé | 2 cups rose wine1 cup frozen strawberries, thawed and pureed in a blender or food processor 18 cup lemon juice2 tablespoons sugarMix all ingredients together. |
| MILK SHAKE:Vanilla Milkshake | 212 cups whole milk 12 cup heavy cream 12 cup granulated sugar1 tablespoon vanilla extractMix all ingredients together. |
| FRAPPE:Coffee Frappé | 1 cup half & half (or 1 cup heavy cream and 1 cup whole milk)2 cups black coffee 13 cup granulated sugar1 teaspoon vanilla extractMix all ingredients together. |
| SORBET:Fruit Sorbet | 4 cups frozen fruit, thawed and drained (watermelon, mangos, pineapples, raspberries, etc.) 14 cup sugar (or more to taste) 14 cup water (or juice from thawed fruit)1 tablespoon lemon or lime juiceUsing a blender or food processor, puree all ingredients and strain if desired. |
See Using Your Ice Cream Maker on page 10 for detailed instructions.
QR Code to Download Recipe Book
For more recipes, scan the QR Code to download the GSI1020 Recipe Book
Scan to Download

Cleaning & Maintenance
WARNING:
NEVER immerse cord, plug, or ice cream maker in water or any other liquid.
Running the Rinse Cycle:
The rinse cycle cleans the unit's internals. Follow the instructions below to run the rinse cycle.
- Wait 30 minutes after using the appliance to ensure the rinse water won't freeze.
- Pour warm water, or warm water premixed with dishwashing liquid, into the fill port.
- Press and hold the sorbet function. The sorbet light will flash, and the texture control bars will move in a back and forth pattern.
- Tap the sorbet function to turn off the rinse cycle at any time. The cycle will run for 5 minutes if not stopped manually.
Cleaning:
- Base and control panel: Wipe gently with a damp cloth and dry. Never use abrasives or immerse in water.
- Topping chute: remove the topping dispenser and reach into the opening of the topping chute with a thin, damp bottle brush or a damp cloth. Leave the topping chute exposed to air after cleaning and allow it to dry before storing or next usage.
- ALL removable parts are dishwasher safe, or can be washed by hand in warm soapy water.
Note: To remove the freezing cylinder, wait 10 minutes for the freezing cylinder to defrost, then lift out the fill port and remove the freezing cylinder.
Troubleshooting
Problem Solution
| Your recipe isn't dispensing Cause: Your mixture is too thick. Add some liquid to your mixture and lower the texture level. |
| The right three texture control bars are flashing. Possible Cause 1: Your unit is running on empty. Solution: Add more of your mixture. Tap a function to restart. |
| The left three texture control bars are flashing. Cause: Low sugar alert. Add more liquefied sweetener and tap the function to restart. |
| All ten texture control bars are flashing. Cause: The motor is stuck. Dispense the mixture, ensure nothing is blocking the motor, and that all parts are assembled correctly. |
| Toppings aren't dispensing. Cause: The topping dispenser or topping chute is clogged. Clean the topping dispenser and/or the topping chute to remove any large or melted particles. |
| The freeze function isn't starting, but the lights are on. Cause: The lid is not properly placed. Turn the lid counterclockwise to remove it, and replace it in the locked position. |
Warranty and Service
This is a one year Limited Warranty and requires proof of purchase from an authorized seller. It is applicable to the original purchaser only and is not transferable to a third party user. Repair or replacement of defective parts is solely at Gourmia's discretion. In the event that repair isn't possible, Gourmia will replace the product/part. If product repair/replacement won't suffice, Gourmia has the option of refunding the cash value of the product or component returned.
Product defects not covered under the Warranty provisions include normal wear and damage incurred from use or accidental negligence, misuse of instruction specifications or repair by unauthorized parties. Gourmia is not liable for any incidental or consequential damages incurred by such circumstances.
Only valid within the United States.
Register your product at www.gourmia.com/warranty
Gourmia
We'd love to hear from you! info@gourmia.com | 888.552.0033
Mon-Thu 9:00 a.m. to 6:00 p.m. ET
Fri 9:00 a.m. to 3:00 p.m. ET
Languages: English, Spanish, French
Gourmia ^TM
natural_image
Exterior view of a Goumlia coffee maker with black and silver casing against red background (no text or symbols on device)The Steelstone Group Brooklyn, NY | Gourmia.com
natural_image
Assorted dessert and drink items including ice cream cones, chocolate drizzle, and colorful drinks against a pink background (no text or symbols visible)natural_image
Close-up of a mechanical component with a red arrow pointing to a specific part (no visible text or symbols)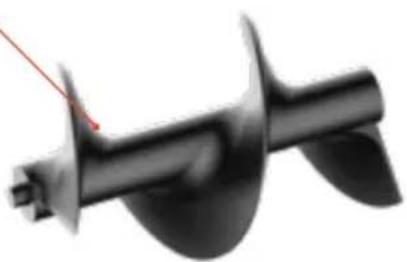
natural_image
Close-up of a black mechanical component with helical ends and a red arrow pointing to a feature (no text or symbols visible)Ramasse-gouttes amovible
Panneau de commande
natural_image
3D mechanical device with labeled parts, showing a cylindrical shaft and housing (no text or symbols visible)natural_image
3D diagram of a mechanical device with labeled parts (1 and 2), showing internal components and no readable text or symbols.natural_image
Close-up of a washing machine with a circular opening and a red circle highlighting the inner part (no visible text or symbols)natural_image
Close-up of a device casing with a circular dial and internal components, no visible text or symbolsnatural_image
Close-up of a mechanical component with a red arrow pointing to a small component (no visible text or symbols)natural_image
Pure graphical element with asterisk and vertical lines on black background (no text or symbols)natural_image
Pure graphical element with asterisk and star symbols on black background (no text or labels)natural_image
Black background with a row of light blue vertical bars and three white asterisks at the bottom (no text or symbols)Recettes
info@gourmia.com | 888.552.0033
- Contents
- Congratulations on the purchase of your Ice Cream Maker from Gourmia!
- IMPORTANT SAFEGUARDS
- Read all instructions before using the electric appliance.
- SAVE THESE INSTRUCTIONS
- Know Your Ice Cream Maker
- Control Panel
- Texture Control:
- Before First Use
- IMPORTANT:
- Order of Assembling and Disassembling the Freezing Cylinder and Fill Port
- Assembling Your Ice Cream Maker
- Using Your Ice Cream Maker
- Keep Cold Function:
- Using the Warming Station
- Suggested Warm Toppings:
- Using the Toppings Dispenser
- Suggested Toppings:
- Sugar and Alcohol Guidelines
- Sugar Guide:
- Sugar free slush hack:
- Alcohol Guide:
- Texture Control Bar Alerts
- Low Sugar Alert:
- High Alcohol / Empty Alert:
- Motor Jam Alert:
- Recipes
- QR Code to Download Recipe Book
- Cleaning & Maintenance
- WARNING:
- Running the Rinse Cycle:
- Cleaning:
- Troubleshooting
- Warranty and Service
- Gourmia TM
- Panneau de commande
- Recettes
Brand : Gourmia
Model : GAF698
Category : Deep fryer