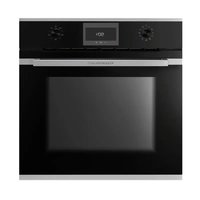
B6330.0S - Oven Küppersbusch - Free user manual and instructions
Find the device manual for free B6330.0S Küppersbusch in PDF.


| Product type | Built-in oven |
| Brand | Küppersbusch |
| Model | B6330.0S |
| Capacity | 70 L |
| Net weight | 31 kg |
| Dimensions (H x W x D) | Approx. 59.5 x 59.5 x 55 cm |
| Power supply | 230 V, 50 Hz |
| Energy class | A |
| Cooking functions | Traditional cooking, Grill, Maxi Grill, Bottom heat, Maxi Grill with turbofan, Ökotherm fan-assisted heating, Rapid preheat, Pizza, Eco mode, Defrost, ÖkoClean |
| Cleaning | ÖkoClean (low-temperature cleaning with water steam) |
| Control type | Touch keys and rotary selectors |
| Display | Digital clock with programming (duration, end, timer) |
| Interior lighting | Yes (bulb) |
| Child safety | Clock lock |
| Included accessories | Enamel baking tray, grill, mounting screws, user and installation manual |
| Installation type | Built-in |
| Cavity material | Enamel |
| Number of cooking levels | Multiple (shelf supports) |
| Defrost function | Yes |
| Rapid preheat | Yes |
Frequently Asked Questions - B6330.0S Küppersbusch
User questions about B6330.0S Küppersbusch
0 question about this device. Answer the ones you know or ask your own.
Ask a new question about this device
Download the instructions for your Oven in PDF format for free! Find your manual B6330.0S - Küppersbusch and take your electronic device back in hand. On this page are published all the documents necessary for the use of your device. B6330.0S by Küppersbusch.
USER MANUAL B6330.0S Küppersbusch
natural_image
Simple line drawing of a oven with a rectangular pan and two circular handles (no text or symbols)B6335.0
B6330.0
B6120.0
H6120.0

Please read the users instructions carefully before installation of the appliance and before starting to use it. Please, store these instructions carefully.
natural_image
Interior view of an oven with a circular vent and side door, showing no text or symbols.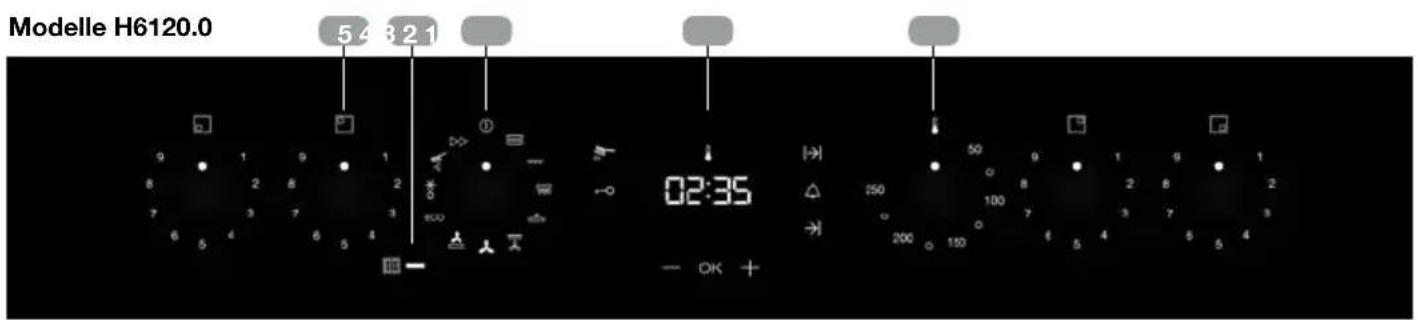
Modell B6335.0, B6330.0, B6120.0, H6120.0


1 TASTEN
natural_image
3D rendered image of a container with a metallic cup pouring liquid onto a flat surface (no text or symbols visible)Follow ALL the safety warnings!

Caution, Danger of overheating!
When using the oven, do not cover the bottom with aluminium foil or place pots, frying pans or the like inside. If this happens, the oven will overheat, causing damage to the enamel.
The oven becomes hot when in use. The cooling fan turns on when the oven overheats. The cooling fan will remain on until the oven has cooled down, even after the appliance has been turned off. The noises made by the fan are normal and do not mean that it is damaged.
When preparing a dish with alcohol or yeast with settings that use hot air, there may be a vinegary smell. If the smell is unpleasant, use a function that does not include the fan, such as top/bottom heat.
The electronic clock features Touch-Control technology. To operate, simply touch the glass control symbols with your fingertip. The touch control sensitivity continuously adapts to changing conditions. Make sure that the glass surface of the control panel is clean and free of any obstacles when turning on the oven.
If the oven does not respond correctly when you touch the glass, you will need to turn off the oven for a few seconds and then turn it back on after a few seconds. Doing this causes the sensors to adjust automatically so that they will react once more to fi ngertip control.
Connection and use
Only KÜPPERSBUSCH hobs have been manufactured and tested for use over a KÜPPERSBUSCH oven. Do not use other hobs.
Any handling or repair to the appliance, including replacement of the feed cable, should be carried out by authorised Technical Service Personnel using original spare parts. Repairs or handling by others may damage the appliance or cause malfunctioning that could be hazardous to your safety
Do not allow children to come near the oven while in use as it can reach very high temperatures.
Children should be supervised to ensure they do not play with the appliance.
This appliance is not for use by persons (including children) with reduced physical, sensorial or mental capacity, or those lacking experience and knowledge, except if they have been supervised and instructed regarding use of the device by a person responsible for their safety
The oven must always be operated with the door closed.
The manufacturer takes no responsibility for any use of the oven other than for the home preparation of food.
Only use the oven after it has been installed inside the kitchen unit.
Do not store oil, fats or inflammable materials inside the oven. This may be dangerous if the oven is turned on.
Do not lean or sit on the open oven door. You could damage it, as well as endangering your safety.
In order to cook food in the oven, place the tray or grid shelf supplied with it over the shelf runners inside the oven cavity. The tray and grid shelf have a system to make their partial outward movement easy for food handling.
Do not place containers or food on the bottom surface of the oven. Always use the trays and grid.
Do not pour water on the bottom surface of the oven when in use; this may damage the enamel. Open the oven door as little as possible during cooking. This will reduce power consumption.
Use protective oven gloves when performing operations inside the oven.
It is normal for condensation to occur on the oven door when cooking dishes with a high liquid content.
Before First Use
Remove packaging and the old appliance
Remove packaging and recycle in an environmentally-friendly way.
By returning the packaging material, raw materials are saved and also fewer waste products are generated. Old appliances still contain valuable material. Leave your old appliance at a collection point for valuable materials. Old appliances must be rendered inoperative before disposing of them in order to prevent improper use.
Technical information
If you need to contact the after-sales service or order spare parts, you must provide the technical information supplied.
The oven's technical information is on the right, on the side frame. You can see it when the door is open.
natural_image
Interior view of an oven with a circular vent and a wall-mounted door (no text or symbols visible)Cleaning and Care
Please read this chapter before using the appliance for the first time.
If it is cleaned as it should be and regularly cared for, the oven should stay beautiful and as good as new for many years. Here is a series of instructions that allow you to care for and clean all of the surfaces thoroughly, without damaging them.
For all surfaces
| Danger of death! | |
| Do not use steam and/or pressure cleaning devices on the oven.The appliance could become damaged and may create a situation where there is danger of death. |
| Danger of burning! | |
| Leave the appliance to cool until you can touch it with your hand before cleaning it. |
Clean the appliance after each use. Stains or baked-on food that have not been removed may burn the next time the appliance heats up. Often, these types of stains or dirt cannot be removed without leaving marks.
If there are light stains, clean the surfaces with a cloth, brush or soft sponge and hot water and some dishwashing detergent. Rinse with cold water so that there is no detergent left which might decolour the surface or cause more stains. Dry with a cloth immediately after
Here are some instructions for more diffi cult-to-remove stains concerning the different surfaces and elements.
 | Never clean with |
| aggressive products or bleaches that contain active oxygen, chlorine or other corrosive ingredients.cleaning products that can cause scratches, such as abrasive agents, steel wool, soapy steel wool, hard brushes, metal scourers, plastic sponges or sponges with a surface that scratches (scouring side) |
The oven is determined for the cooking, roast, baking, and keeping warm of dishes. In order to thaw of raw meat or fish the oven may not be used.
Use the oven only if inserted in a suitable piece of furniture. Use the oven exclusively as described in these instructions for use. Any other use is not in accordance with the requirements and can lead to material damages or even personal damages. The manufacturer assumes no liability for damages which have originated from not designated use.
The oven is determined exclusively for the use in the private household. A commercial use is excluded. The oven is not suited for heating a room. The light in the oven is planned only to the lighting of the done space and not as a room lighting. The oven door is only the close the oven.

Use the oven only for cooking, roasting, baking, and keeping warm of dishes!
Scope of delivery
Scope of delivery:
1 × Oven
1 × Enamelled baking tray
1 x Gridiron
Assembly material:
2 × Erection bolts
Accessories:
1 × Instructions for Use
1 × Installation Instructions
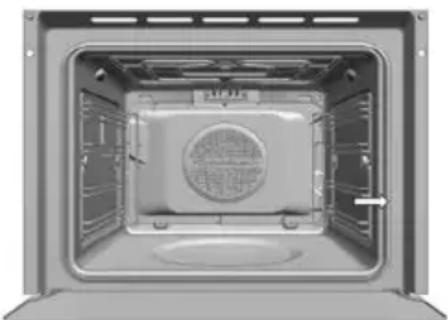
Description of the oven

1 Control panel
2 Door lock (only for pyrolytic models)
3 Grill element
4 Tray supports
5 Grid shelf
6 Tray
7 Hinge
8 Inner Glass
9 Air cooling outlet
10 Unit mounting
11 Lamp
12 Back Wall Panel
13 Fan
14 Oven Seal
15 Door
Control panel
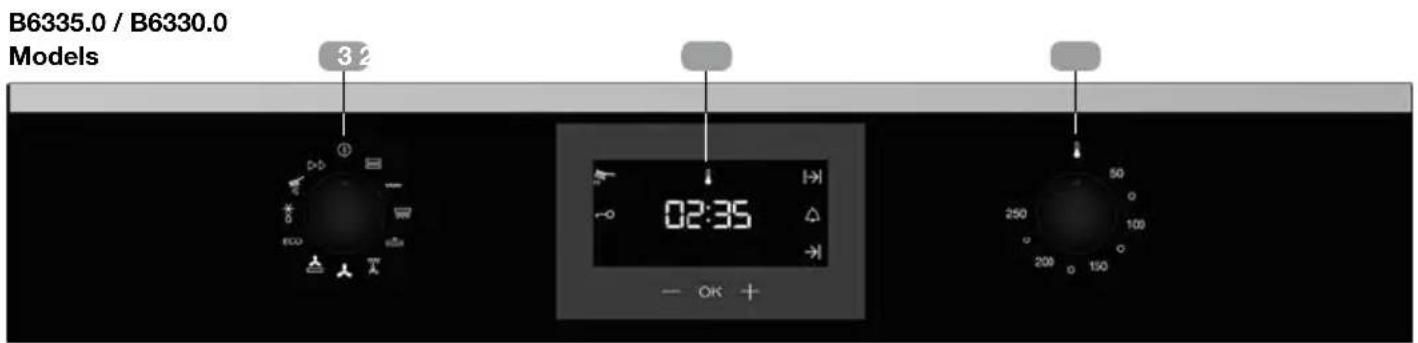
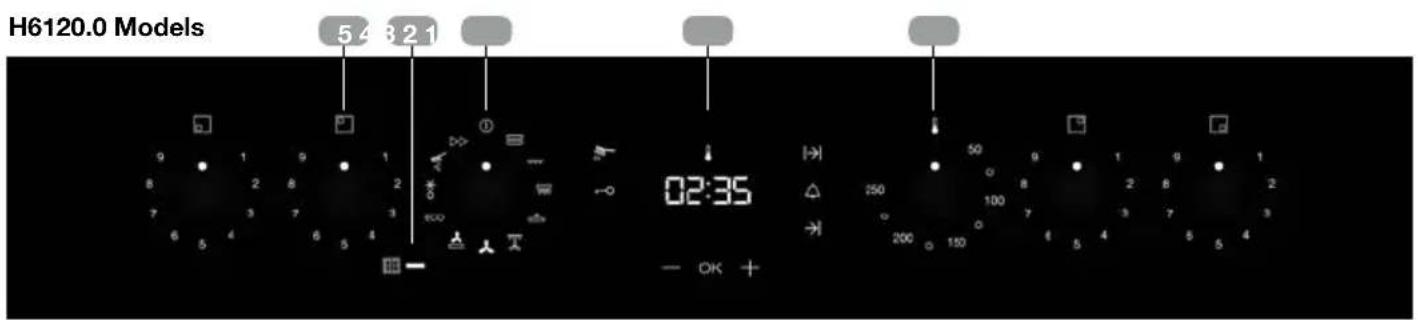
1 Temperature control dial.
2 Electric clock/timer.
3 Function control dial.
4 Pilot light cooking zone.
5 Cooking zone controls.
Control Panel - Sensor keys
B6335.0, B6330.0, B6120.0, H6120.0 Models


Conventional oven cooking functions.
Oven functions

For a description of how to use each of the features, see the cooking guide that comes with your oven.
○ SWITCHING OFF

TOP / BOTTOM HEAT

GRILL

LARGE-AREA GRILL

BOTTOM HEAT

LARGE-AREA GRILL WITH FAN

ÖKOTHERM HOT AIR

FAST PREHEATING

PIZZA-FUNCTION

ECO, for cooking with minimum energy consumption

DEFROSTING

ÖKOCLEAN®
Electronic clock/timer description

1 KEYS
-, and : Enable you to programme the electronic clock/timer functions.
2 SYMBOLS
Clock Settings
TIMER: Lights up when the clock/ timer is selected. Generates an acoustic signal when the time is up. The oven does not turn off at the end of the timer period. This function can also be used while the oven is cooking.
|→| and →PROGRAMMING: Light up to indicate that the oven is programmed (cooking time, stop time or total).
|→| Cooking Time: This function allows you to programme the cooking time, after which the oven will turn off automatically.
If a cooking time has been selected and the oven is switched off manually before the programmed time has finished, the clock will continue to display the time until the end of the process.
→I Cooking Stop Time: This setting allows you to programme the time for cooking to stop, after which the oven will turn off automatically.
|→| and →Cooking Time and Cooking
Stop Time: This setting allows you to programme the cooking time and cooking stop time. The oven switches on automatically at
the set time and operates for the selected cooking time (Cooking Time). It then switches off automatically at the indicated time (Cooking Stop Time).

CLOCK/TIMER LOCK: Indicates that the touch keys for the clock/timer are locked, preventing modifications by small children.
Other functions
HEATING: Indicates that the oven is transmitting heat to the food.

ÖKOCLEAN: Lights up while the Küppersbusch ÖkoClean® function is in progress.

WARNING
The sensitivity of the touch keys adapts continually to environmental conditions. Make sure the surface of the control panel is clean and free of obstacles when plugging in the oven.
If the clock does not respond correctly when you touch the keys, unplug the oven for a few seconds and then plug it in again. Doing this causes the sensors to adjust automatically so that they will react once more to fingertip control.
SETTING THE TIME
To set the time on the oven, the function and temperature dials must be in the ○ position.
When you plug in the oven, you will see the clock flashing 12:00.
Touch - or +to adjust the hours and then the minutes. You will hear a double beep confirming the time is set.
If you wish to modify the time, touch — or + until the time starts flashing. Touch OK and and follow the instructions in the previous point.

NOTE
The clock light has a night mode so the display light will dim between 00:00 and 6:00 hours.

WARNING
In the event of a power failure, your electronic clock/timer settings will be erased.
If this happens, turn the function and temperature dials to the ○ position.
The indication 12:00 will show, and you will then be able to set the time as described above.
Use of the oven
MANUAL OPERATION
After setting the clock, the oven is ready for use. Select a cooking function and temperature.
You will notice that the 🔍 symbol lights up during cooking to indicate that heat is being transmitted to the food. This symbol disappears when the selected temperature has been reached.
Set the controls to to turn off the oven.

INFORMATION
When you start cooking, your oven will show the time the oven has been cooking.
Programming the Buzzer
-
Touch — or until the symbol on the display starts flashing, then press OK. The indication '00:00' will appear on the display.
-
Select the time after which you want the alarm to sound by pressing — or +You will hear 2 beeps to confirm that the time has been set and the clock will start counting down from the selected time. The △ symbol will flash slowly.
-
Once the time has expired, an acoustic signal will sound for 90 seconds and the symbol will flash quickly.

NOTE
With the Buzzer function, the oven will not turn off when the time expires.
- Touch any key to stop the alarm. The symbol will then disappear.
If you wish to modify the time on the buzzer, repeat the steps shown. Upon entering the timer control, the time currently remaining will appear, which you will be able to adjust.

NOTE
With the Buzzer function, the remaining time will show permanently on the display. With this programmed function, it is not possible to view the time or the total programmed cooking time.
Programming Cooking Time
-
Touch - or until the symbol on the display starts flashing, then press OK. The indication '00:00' will appear on the display.
-
Select the time after which you want the alarm to sound by pressing - or + You will hear 2 beeps to confirm that the time has been set and the clock will start counting down from the selected time. The |→| symbol will flash slowly.
-
Select a function and a cooking temperature using the oven commands.
- Once the cooking time is up, the oven will turn off, an alarm will sound and the | | symbol will flash quickly.
- Touch any key to stop the alarm and turn off the symbol. The oven will switch on again.
- Set the controls to the oposition to turn off the oven.
You can change the remaining cooking time at any time by touching - or + until the |→| symbol starts to flash quickly. Now press OK to change the time.

NOTE
With the Cooking Time function, the remaining time will show permanently on the display. You cannot see the current time on the display when this function is set.
Programming the Cooking Stop Time
- Touch - or + until the symbol on the display starts to flash and press OK. You will see the current time on the timer display.
- Select the time after which you want the alarm to sound by pressing — or +You will hear 2 beeps to confirm that the time has been set and the clock will start counting down from the selected time. The → symbol will flash slowly.
- Select a cooking function and temperature.
- When the cycle is finished, the oven will turn itself off, a buzzer will sound and symbol will flash quickly.
- Touch any sensor to stop the alarm and to turn off the l, symbol. The oven will switch on again.
- Set the controls to the ○ position to turn off the oven.
You can change the remaining cooking time at any time by touching - or + until the |→| symbol starts to flash quickly. Now press OK to change the time.
Programming Cooking Time and Cooking Stop Time
- Touch — or until the symbol on the display starts flashing, then press OK. The indication '00:00' will appear on the display.
- Select the cooking time by touching — or + . Next, a double beep will sound, the remaining time will appear on the display and the | | symbol will flash slowly.
- Touch — or until the symbol on the display starts flashing, then press OK. You will see the expected completion time on the timer display.
- Select the cooking end time by touching — or + . Next, a double beep will sound and the current time will be displayed on the display.
- Select a cooking function and temperature. The oven will remain disconnected with the and symbols lit up. The oven is now programmed.
- When it is time to start cooking, the oven will turn on and will operate for the programmed cooking time.
- While cooking, the cooking time remaining will be displayed and the symbol will flash slowly.
- When the cooking time is up, the oven will turn off, a buzzer will sound, and the I I symbol will flash quickly.
- Touch any sensor to stop the buzzer and turn off the | | symbol. The oven will switch on again.
- Set the controls to the ○ position to turn off the oven.
You can change the remaining cooking time at any time by touching - or + until the | | symbol starts to flash quickly. Now press OK to change the time.
Safety functions
SAFETY CHILD LOCK
This function can be selected at any time while using the oven.
To activate the function, touch and hold OK key for several seconds until you hear a beep and the 🔍 symbol appears on the display. The clock/timer is locked.
If the oven is off and you activate the child safety function, the oven will not work even if a cooking function is selected.
If this function is activated while you are cooking, it will only lock the electronic clock/timer settings.
To disable the function, press OK key for several seconds until you hear a beep.
This function makes it easy to remove grease and other food debris that may have stuck to the sides of the oven.
For easier cleaning, do not allow dirt to accumulate. Clean the oven frequently.
PROGRAMMING THE ÖKOCLEAN® FUNCTION

Do not pour water into a hot oven as this can damage the enamel of the oven.
Always run the cycle on a cold oven. The result could be affected and the varnish damaged if it is run when the oven is too hot.
First remove the trays and all accessories from the oven interior, including the tray supports and telescopic guide rails.
To do this, follow the instructions in the installation and maintenance guide accompanying the oven.
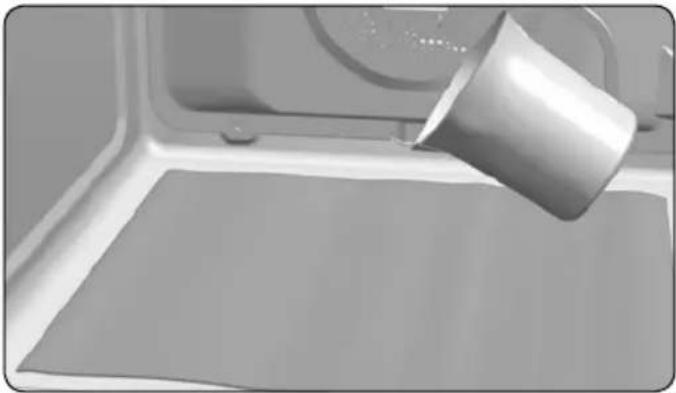
- With the oven cold, spread a cloth out on the bottom of the oven.
natural_image
Close-up of a metallic cup pouring liquid onto a flat surface, with no visible text or symbols.- Gently pour 200 ml of water into the bottom of the oven cavity.

INFORMATION
For best results, add a teaspoon of mild washing up detergent to the glass of water before pouring onto the cloth.
-
Turn the control dial to the position.
-
You will hear a beep indicating that the Öko-Clean® cycle has started. The symbol will flash slowly and the time remaining to complete the cycle will appear on the display.
IMPORTANT
The duration of this cycle cannot be changed. To stop the cycle before it is finished, turn the control dial to the ○ position.
- When the cycle is finished, the oven will turn itself off, an alarm will sound and the symbol will flash quickly.
IMPORTANT
Do not open the oven door until the Öko-Clean® function is complete.
The cooling cycle is necessary for the function to work properly.
- Touch any sensor with your fingertip to stop the alarm and turn off the symbol.
- Turn the control dial to the ○ position.
- Any traces of dirt and excess water can now be removed from the oven with the damp cloth.
The ÖkoClean ^® function takes place at a low temperature. However, cooling times can vary depending on the room temperature.
WARNING
Before touching the inside surface of the oven, make sure that it has cooled properly.
If a deeper clean is required after using the ÖkoClean® function, use neutral detergents and non-abrasive sponges.
natural_image
Interior view of an oven with a circular vent and lid, showing no text or symbols on the interior itself.Limpieza y cuidados
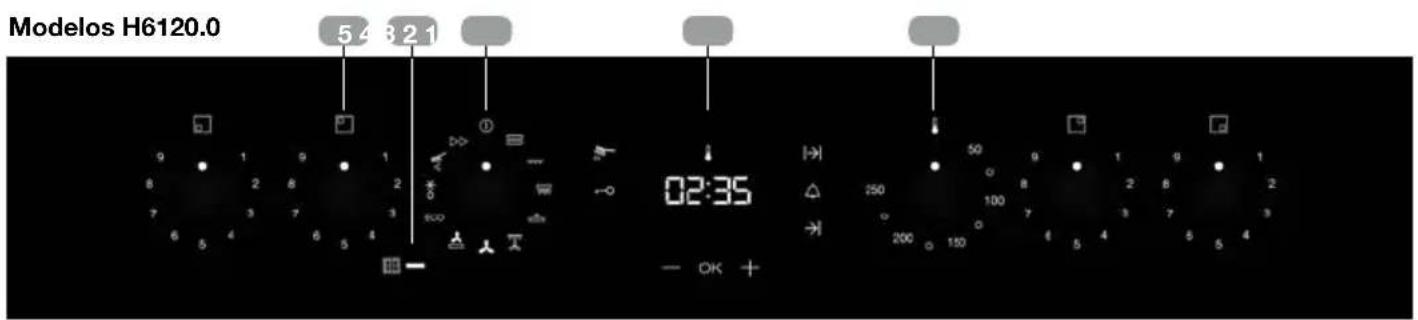
Modelos B6335.0, B6330.0, B6120.0, H6120.0


1 TECLAS
natural_image
3D rendering of a metallic bucket pouring liquid into a white container (no text or symbols visible)Attention, risque de surchauffe !
Information technique
natural_image
Interior view of an oven with a circular vent and a wall-mounted door (no text or symbols visible)1 TOUCHES
FONCTIONNEMENT MANUEL
natural_image
Close-up of a metal cup pouring liquid into a white container (no text or symbols visible)natural_image
Interior view of an oven with a circular vent and a label on the door (no visible text or symbols)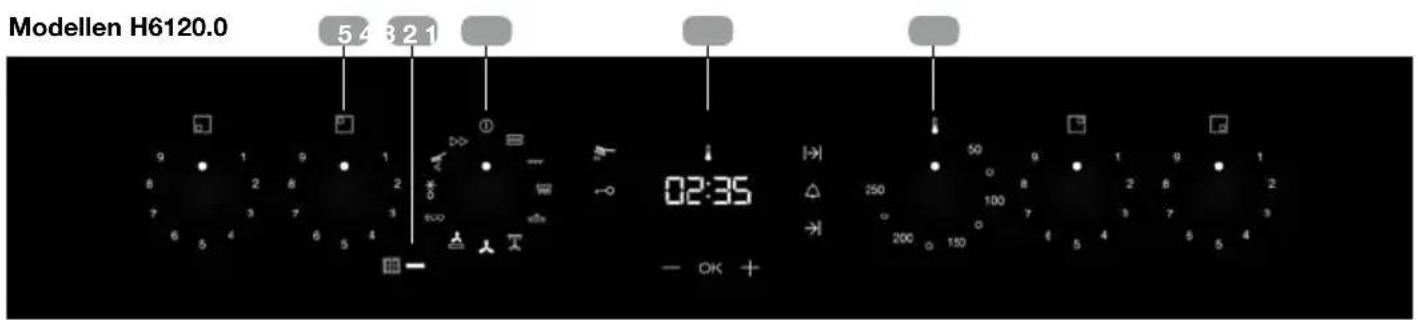
Modellen B6335.0, B6330.0, B6120.0, H6120.0


1 TOETSEN
natural_image
Close-up of a metallic cup pouring liquid into a white container (no text or symbols visible)natural_image
Interior view of an oven with a circular vent and a wall-mounted door (no text or symbols visible)Cura e pulizia
Modello B6335.0, B6330.0, B6120.0, H6120.0


1 TASTI
PROGRAMMARE LA FUNZIONE KUPPERSBUSCH ÖKOCLEAN®

ATTENZIONE
natural_image
3D rendering of a container with a metallic cup pouring liquid onto a flat surface (no text or symbols visible)natural_image
Interior view of an oven with a circular vent and a wall-mounted door (no text or symbols visible)Limpeza e cuidados
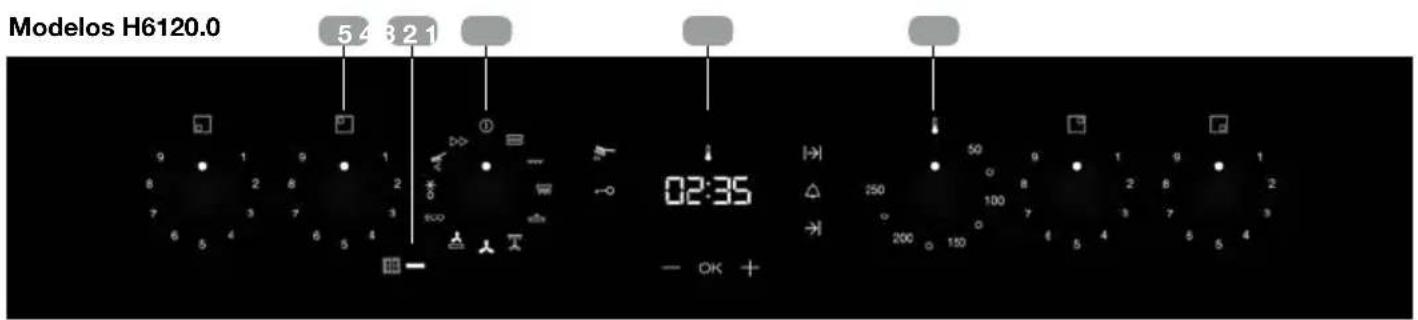
Modelos B6335.0, B6330.0, B6120.0, H6120.0


1 TECLAS
natural_image
Close-up of a metallic bucket pouring liquid into a white container (no text or symbols visible)natural_image
Interior view of an oven with a circular vent and a wall-mounted dish (no text or symbols visible)1 ПАНКТРА
natural_image
3D rendering of a white container with a metallic cup pouring liquid into it (no text or symbols visible)- TASTEN
- Follow ALL the safety warnings!
- Caution, Danger of overheating!
- Connection and use
- Before First Use
- Technical information
- Cleaning and Care
- For all surfaces
- Use the oven only for cooking, roasting, baking, and keeping warm of dishes!
- Scope of delivery
- Description of the oven
- Control panel
- Control Panel - Sensor keys
- Oven functions
- ○ SWITCHING OFF
- Electronic clock/timer description
- KEYS
- SYMBOLS
- Clock Settings
- Other functions
- WARNING
- SETTING THE TIME
- NOTE
- Use of the oven
- MANUAL OPERATION
- INFORMATION
- Programming the Buzzer
- Programming Cooking Time
- Programming the Cooking Stop Time
- Programming Cooking Time and Cooking Stop Time
- Safety functions
- SAFETY CHILD LOCK
- PROGRAMMING THE ÖKOCLEAN® FUNCTION
- To do this, follow the instructions in the installation and maintenance guide accompanying the oven.
- IMPORTANT
- Limpieza y cuidados
- TECLAS
- Attention, risque de surchauffe !
- Information technique
- TOUCHES
- FONCTIONNEMENT MANUEL
- TOETSEN
- Cura e pulizia
- TASTI
- PROGRAMMARE LA FUNZIONE KUPPERSBUSCH ÖKOCLEAN®
- ATTENZIONE
- Limpeza e cuidados
- ПАНКТРА
Brand : Küppersbusch
Model : B6330.0S
Category : Oven