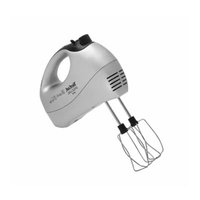
Prep'Line HT410E - Electric mixer TEFAL - Free user manual and instructions
Find the device manual for free Prep'Line HT410E TEFAL in PDF.


| Product type | Multi-function electric stand mixer (depending on model) |
| Brand | Tefal |
| Model | Prep'Line HT410E |
| Power | 300 W (estimated) |
| Speeds | 5 speeds + Turbo button |
| Included accessories | Multi-wire whisks, beaters, hand blender, bowl (depending on model), spatula |
| Main functions | Beat, mix, knead, blend |
| Usage | Household use only |
| Power supply | 230 V ~ 50 Hz (depending on country) |
| Dimensions (approx.) | 20 x 15 x 25 cm |
| Weight (approx.) | 1.5 kg |
| Cable length | 1.2 m (estimated) |
| Bowl material | Stainless steel or plastic (depending on model) |
| Care and cleaning | Dishwasher-safe accessories; wipe motor body with a damp cloth |
| Safety | Automatic shut-off at position 0; accessory ejection; lock buttons |
| Spare parts and repairability | Accessories available; repair by approved service center only |
| Warranty | Manufacturer's warranty, see service booklet |
| General information | Instructions available in multiple languages |
Frequently Asked Questions - Prep'Line HT410E TEFAL
User questions about Prep'Line HT410E TEFAL
0 question about this device. Answer the ones you know or ask your own.
Ask a new question about this device
Download the instructions for your Electric mixer in PDF format for free! Find your manual Prep'Line HT410E - TEFAL and take your electronic device back in hand. On this page are published all the documents necessary for the use of your device. Prep'Line HT410E by TEFAL.
USER MANUAL Prep'Line HT410E TEFAL
natural_image
Line drawing of a hand mixer with three handles (no text or symbols)FR
EN
NL
DE
ES
IT
PT
EL
TR
NO
DA
SV
FI
PL
RU
AR
FA
December 2010 - NI : 259865-02, Mioletor : Eco Graphique
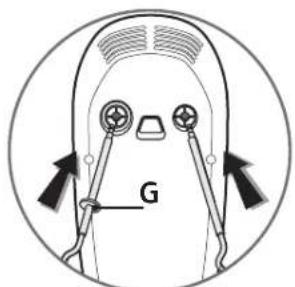
fig.1fig.2
natural_image
Diagram of a device with directional arrows indicating motion or force (no text or symbols)fig.3fig.4
natural_image
Illustration of hands using a mortar and brush to handle a mortar, no text or symbols present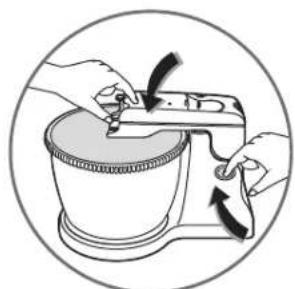
natural_image
Illustration of hands using a manual tool to clean or adjust a small bowl (no text or symbols present)fig.5fig.6
Before using your appliance for the first time, please read these instructions carefully and follow the appliance's instructions for use.
- Before plugging the appliance into the mains, check that the appliance's supply voltage is compatible with that of your electricity supply. Otherwise, you could damage the appliance or hurt yourself. Any error in connection will cancel the guarantee.
- This product has been designed for domestic use only. Any commercial use, inappropriate use or failure to comply with the instructions, the manufacturer accepts no responsibility and the guarantee will not apply.
- To avoid electric shocks, never use the appliance with wet hands or on a wet or moist surface. Avoid getting the appliance's electrical components wet and never immerse it in water.
- Do not allow children to use the appliance unsupervised.
- This appliance is not intended for use by persons (including children) with reduced physical, sensory or mental capacities, or persons with a lack of experience or knowledge, unless they are supervised or have been given instructions on how to use the appliance by a person responsible for their safety.
- Children must be supervised to ensure that they do not play with the appliance.
- Always unplug the appliance when you are finished using it, when assembling and disassembling accessories and during cleaning.
- Do not use the appliance if it is not working correctly, if it is damaged or if the power cord or plug is damaged. To avoid all danger, these must be replaced by an authorised service centre (see list in the service booklet).
- Any intervention, other than cleaning and everyday upkeep by the customer, must be performed by an authorised service centre.
- Do not immerse the appliance, the power cord or plug in liquid.
- Do not leave the power cord hanging within the reach of children, close to or in contact with hot parts of the appliance, near a heat source or on a sharp angle.
- To ensure that the guarantee remains valid and avoid any technical problems, never try to disassemble or repair the appliance yourself and do not let an unqualified person do so. Bring the appliance to an authorised post-sales service centre.
- Never move or unplug the appliance by pulling on the power cord to avoid interfering with the proper operation of the appliance and prevent all risks of an accident.
- The use of parts and accessories that are not recommended by the manufacturer may cause injuries, damage the appliance, interfere with the
proper operation and cancel the guarantee.
- To avoid electric shocks, make sure that your fingers do not come into contact with the prongs on the plug when you plug in or unplug the appliance.
- Do not plug other appliances into the same mains socket using adaptors to avoid any electrical overload which could damage the appliance or cause an accident. Do not use an extension lead unless you have checked it is in good condition.
For your safety, this appliance complies with the applicable standards and regulations:
- Low Voltage Directive
- Electromagnetic Compatibility
- Environment
-
Food contact materials
-
To avoid all accidents, make sure that your hair, clothes and other objects do not get caught in the moveable parts of the appliance.
- Do not touch the beaters or mixers and do not insert any object (knife, fork, spoon, etc.) to avoid hurting yourself and causing an accident to others or damaging the appliance. You may use a spatula once the product is not in operation.
- To avoid damaging the appliance, never place the appliance and its accessories in the freezer, oven or microwave.
- The accessories are designed to prepare food products. Do not use them to mix other products.
EN
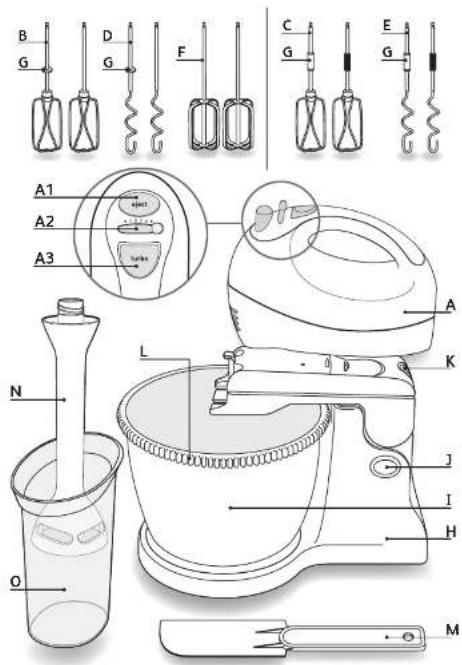
A. Motor unit
A1. Ejection button to remove kneaders or beaters
A2. Speed control
A3. Turbo button
B. Multi-blade beaters for light preparations
C. Multi-blade beaters for light preparations (model with bowl)
D. Kneaders for heavy dough
E. Kneaders for heavy dough (model with bowl)
F. Hook beaters (according to model)
G. Left beater marker
H. Base (according to model)
I. Bowl (according to model)
J. Hinged arm release button (according to model)
K. Mixer lock/unlock button (according to model)
L. Toothed rim (according to model)
M. Spatula (according to model)
N. Blender rod (according to model)
O. Blender measuring bowl (according to model)
Before first use
- Remove the accessories from their packaging and clean using warm water.
Note: The blender rod (N) has a very sharp blade. Care should be taken when handling.
Using the appliance
Important: NEVER USE THE BEATERS OR KNEADERS AT THE SAME TIME AS THE BLENDER ROD.
Mixer function with beaters or kneaders
- Manual use:
- Check that the speed control (A2) is set to "0".
- Insert the rod of each beater (B or F) or kneaders (D) into the corresponding holes and lock into place. The beaters and kneaders have a specific shape, the mixer or beater with the left beater
marker (G) should be positioned to the left, in the biggest hole (Fig.1).
- Connect the appliance:
- Your appliance has five speed levels and a turbo button. Always begin mixing or kneading at setting 1 initially, then move to setting 2, 3, 4 or 5.
- To knead thick consistent doughs we recommend using setting 5 only.
- You can also increase the speed by pressing the turbo button (A3): this function can be used at all speeds. We recommend that it is only used briefly (a maximum of 30 seconds for thick consistent doughs).
- After finishing, set the speed control (A2) to "0".
- Disconnect.
- Then press the ejection button (A1) to remove the beaters or mixers.
- Using with the base (H): (According to model)
- Check that the speed control (A2) is set to "0".
- Insert the rod of each beater (C) or mixer (E) into the corresponding holes and lock into place. The beaters and kneaders have a specific shape, the mixer or beater with the left beater marker (G) should be positioned to the left, in the biggest hole (Fig.1).
- Place the base (H) on the worktop:
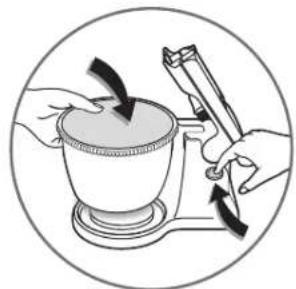
- To raise the arm, unlock by pressing on the button (J) (Fig.4).
- Position the bowl (I) (Fig.4).
- Press on button (J) to unlock the arm and lower it (Fig.5.)
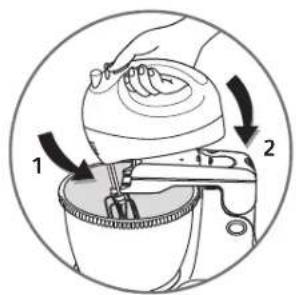
- Place the mixer, fitted with kneaders or beaters, on the hinged arm until your hear it click into place (Fig.6).
- Connect the appliance:
- Your appliance has five speed levels and a turbo button. Always begin mixing or kneading at setting 1 initially, then move to setting 2, 3, 4 or 5.
- To knead thick consistent doughs we recommend using setting 5 only.
Note: INSERT THE MIXER BY POSITIONING THE BEATERS OR KNEADERS IN THE NOTCHES (Fig.6)
- You can also increase the speed by pressing the turbo button (A3): this function can be used at all speeds. We recommend that it is only used briefly (a maximum of 30 seconds for thick consistent doughs).
- After finishing, set the speed control (A2) to "0".
- Disconnect and press the unlock button (J) to raise the hinged arm. Then press the mixer unlock button (K) to remove the mixer from its stand.
- Then press the ejection button (A1) to remove the beaters or kneaders.
Blender function (according to model)
- Check that the speed control (A2) is set to "0".
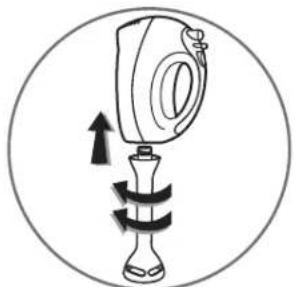
- Remove the panel at the back of the appliance and screw the Blender rod (N) anti-clockwise onto the Motor Unit (A), without forcing it, until the red dots are aligned. You will hear a small click when the red dots match up indicating that the rod is correctly positioned (fig.3).
-
Connect the appliance:
-
Dip the Mixer rod in the preparation before starting to avoid splashing.
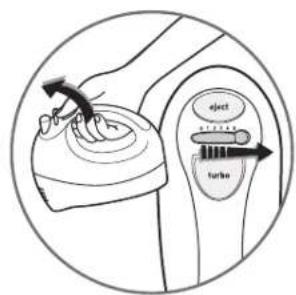
- Start using the speed selector (A2), (fig.2), initially at speed 1 then 2,3,4,5. Use the “Turbo” setting (A3) if the recipe requires more power.
- Stop the appliance before removing from the Blender rod (to avoid splashes).
If you feel resistance when tightening the rod it is not properly aligned. You should remove it comple- tely and re-screw correctly.
Stopping and Disconnecting the Blender rod
- Select setting "0", disconnect the appliance and unscrew the Blender rod (N) by turning clockwise.
Do not use the Blender rod:
• In a saucepan on the hob
- Do not use it empty or with ice cubes, sugar, hard spices, to mince raw meat, dry fruit (almonds, hazelnuts, etc.)
Quantities and preparation times
| Accessories Maximum quantity Maximum time Speed | |||
| Multi-blade beaters (B or C) Whipped egg whites | 12 egg whites 9 min 5 | ||
| Pound cake | 9 eggs, 470 g plain flour, 470g caster sugar, 470g softened butter, 1 teaspoon of baking powder, 2 pinches of salt, 1 sachet of sugared vanilla or 1/2 teaspoon vanilla extract | 14 min 5 | |
| Kneaders with base (E) Bread dough | 500 g white bread flour, 300 ml warm water, 11/2 teaspoons salt, 10g yeast (For the UK only: use 1 x 7 g sachet active or easy bake yeast) | 8 min 5 | |
| Kneaders without base (D) Bread dough | 500 g white bread flour, 300 l warm water, 11/2 teaspoons alt, 10g yeast (For the UK only: use 1 x 7 g sachet active or eay bake yeast) | 4 min 50 sec 5 | |
| Blender rod (N) Soup | 160g cooked vegetables, 240 ml stock | Operate using short pulses of power (max. time 55 sec), stopping for at least 1 minutes between each pulse operation. Do not operate more than 5 times consecutively. | Turbo |
- Make sure that the appliance is unplugged.
- Clean the beaters, kneaders and blender rod immediately after use to avoid remains of mixtures with egg or oil sticking or drying on them.
- You can clean the accessories under the tap with a sponge and washing up liquid. They can be put into the dishwasher.
- Only clean the appliance body using a wet sponge and dry thoroughly.
- Never wash the motor unit in the dishwasher.
- Do not use scourers or objects containing metal parts.
- Never immerse the motor unit in water. Wipe with a dry cloth or wet brush.
Note: The blender rod has a very sharp blade. Care should be taken when cleaning.
Recycling
Help protect the environment!
①Your appliance contains various materials that can be recovered or recycled.
Take it to a local civic waste disposal centre
If you have any further problems or queries, please call our Customer Relations Team first for expert help and advice:
Helpline:
0845 330 6460 - UK
01 677 4003 - ROI
Or consult our web site: www.krups.co.uk
natural_image
Symbol of a trash bin crossed with diagonal lines, no text or labels present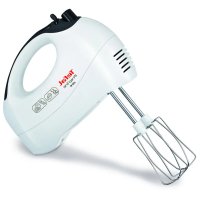

Brand : TEFAL
Model : Prep'Line HT410E
Category : Electric mixer