W55V1 112W - Fridge WHIRLPOOL - Free user manual and instructions
Find the device manual for free W55V1 112W WHIRLPOOL in PDF.

User questions about W55V1 112W WHIRLPOOL
0 question about this device. Answer the ones you know or ask your own.
Ask a new question about this device
Download the instructions for your Fridge in PDF format for free! Find your manual W55V1 112W - WHIRLPOOL and take your electronic device back in hand. On this page are published all the documents necessary for the use of your device. W55V1 112W by WHIRLPOOL.
USER MANUAL W55V1 112W WHIRLPOOL
natural_image
Simple line drawing of a pear and a carrot (no text or symbols)W55V1 112W
®/TM/© 2025 Whirlpool. Produced under license ®/TM/© 2025 Whirlpool. Produit sous licence ®/TM/© 2025 Whirlpool. Onder licentie geproduceerd ®/TM/© 2025 Whirlpool. Hergestellt unter Lizenz
11 5943 0033/ EN/ FR/ NL/ DE/ 1/4_AE/ 22.12.25 11:12
7218924311
Our valued customer,
Thank you for choosing product. We want you to get the best results from your product, which is manufactured with high quality and technology. To do this, please read this entire manual and the other documents provided carefully before using the product.
Follow all the information and warnings in the user manual. This will protect you and your product from potential hazards. Keep the user manual. If you give the product to someone else, include the user manual with it.
The following symbols appear in the user manual and on the product:

Read the user manual.

ENERG

SUPPLIER'S NAME
MODEL IDENTIFIER→(*)


The model information as stored in the product data base can be reached by entering following website and searching for your model identifier (*) found on energy label.
https://eprel.ec.europa.eu/
Table of Contents
1 Environmental Instructions ...... 4
1.1 Disposal Of Packaging Materials. 4
2 Your Refrigerator 4
3 Installation...... 4
3.1 Right Place For Installation...... 4
3.2 Attaching the Plastic Wedges ..... 5
3.3 Adjusting the Legs.... 5
3.4 Hot Surface Warning.... 5
4 Preparation...... 5
4.1 What To Do For Energy Saving..... 5
4.2 First Use....6
4.3 Climate Class and Definitions ..... 6
5 Changing Door Direction .... 6
6 Operating the Product...... 7
7 Use of Your Appliance...... 7
7.1 Setting the Operating Temperature.... 7
7.2 Storing Food in Your Product ..... 8
7.3 Replacing the Illumination Lamp.. 13
8 Maintenance and Cleaning...... 13
9 Troubleshooting...... 13
1 Environmental Instructions
EN
1.1 Disposal Of Packaging Materials
The packaging material is recyclable and is marked with the recycle symbol
The various parts of the packaging must therefore be disposed of responsibly and in full compliance with local authority regulations governing waste disposal.
2 Your Refrigerator

text_image
14 13 12 11 10 9 8 1* 2 3 4 5* 6 71 Fixed Upper Tray 2 *Butter and Cheese Compartment
3 Egg holder 4 Door Shelf
5 *Bottle Holder 6 *Safety Visor
7 Bottle Shelf 8 Adjustable Legs
9 Crisper 10 Crisper Cover Glass
11 Defrost Water Collection Channel -Drainage
12 Glass Rack
13 Thermostat Knob 14 Freezer Compartment
*Optional: Figures in this user manual are schematic and may not exactly match your product. If your product does not comprise the relevant parts, the information pertains
to other models. Please inquire with the seller whether this is applicable to your model.
3 Installation
Read the "Safety Instructions" first!
3.1 Right Place For Installation
Contact the Authorized Service for the product's installation. To prepare the product for installation, see the information
in the user manual and make sure the electric and water utilities are as required. If not, call an electrician and plumber to arrange the utilities as necessary.
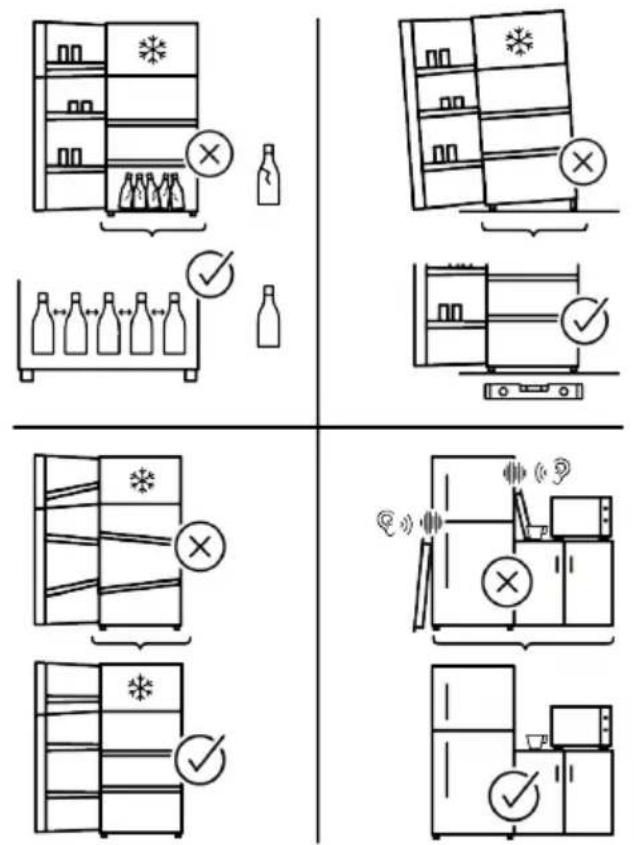
- Place the product on a flat surface to avoid vibration
- Place the product at least 30 cm away from the heater, stove and similar sources of heat and at least 5 cm away from electric ovens.
- When placing two coolers in adjacent position, leave at least 4 cm distance between the two units.
- Keep the product out of direct sunlight and in a dry place.
- Products need to have at least 5cm clearance between side walls and rear wall to reach the declared performance values. If clearance is less than 5cm, energy and performance losses will be at a level that will not affect to end user.
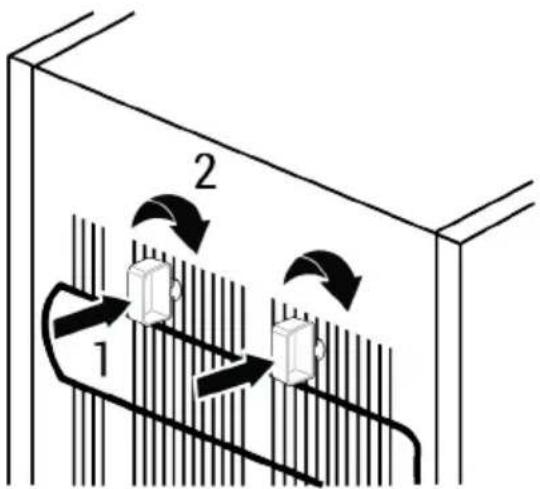
3.2 Attaching the Plastic Wedges
Use the plastic wedges provided with the product to maintain sufficient space for air circulation between the product and the wall. Mount 2 pieces of plastic wedges as shown in the following figure.
(The indicated picture is drawn representatively, it is not completely same as your product.)
text_image
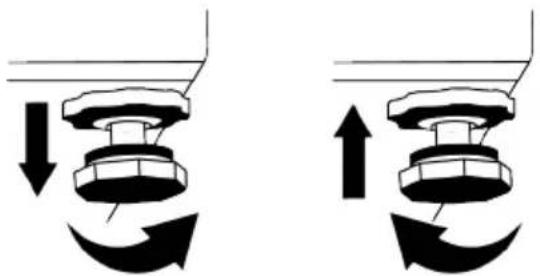
1 23.3 Adjusting the Legs
If the product is not in balanced position, adjust the front adjustable legs by rotating them to right or left.
natural_image
Pure mechanical diagram showing two configurations of a valve or pump mechanism with directional arrows (no text or symbols)3.4 Hot Surface Warning
The side walls of your product are equipped with cooler pipes to enhance the cooling system. High pressure fluid may flow through these surfaces, and cause hot surfaces on the side walls. This is normal and it does not require servicing.
4 Preparation
Read the "Safety Instructions" first!
4.1 What To Do For Energy Saving
- This refrigerating appliance is not intended to be used as a built in appliance.
- When loading the food, leave enough space inside the refrigerator to allow sufficient air circulation for cooling.
- Since hot and humid air will not directly penetrate into your product when the doors are not opened, your product will optimize itself in conditions sufficient to protect your food. Under these circumstances, functions and components such
as compressor, fan, heater, defrost, lighting, display and so on will operate according to the needs by consuming minimum energy.
- In case that multiple options are present, glass shelves must be placed so that the air outlets at the rear wall are not blocked and preferably, in a way that air outlets remain below the glass shelf. This combination may help improving air distribution and energy efficiency.
- Store food in the cooler or chill compartment according to proper storage conditions to save energy.
4.2 First Use
Before using your product make sure the necessary preparations are made in line with the instructions in "Safety Instructions" and "Installation" sections.
- Wait for at least 2 hours before operating the product, to ensure the complete efficiency of refrigeration.
- Keep the product running without placing any food inside for 6 hours and the product door should be kept as closed as possible.
- The temperature change caused by opening and closing of the door while using the product may normally lead to condensation on door/body shelves and glassware placed in the product.
- A sound will be heard when the compressor is engaged. It is normal for the product to make noise even if the compressor is not running, as fluid and gas may be compressed in the cooling system.
- It is normal for the front edges of the product to be warm. These areas are designed to warm up in order to prevent condensation
- For some models, indicator panel turns off automatically 1 minute after the door closes. It will be reactivated when the door is opened or any button is pressed.
4.3 Climate Class and Definitions
Please refer to the Climate Class on the rating plate of your device. One of the following information is applicable to your device according to the Climate Class.
- SN: Long Term Temperate Climate: This cooling device is designed for use at ambient temperatures between 10 °C and 32 °C.
• N: Temperate Climate: This cooling device is designed for use at ambient temperatures between 16°C and 32°C. - ST: Subtropical Climate: This cooling device is designed for use at ambient temperatures between 16°C and 38°C.
• T: Tropical Climate: This cooling device is designed for use at ambient temperatures between 16°C and 43°C.
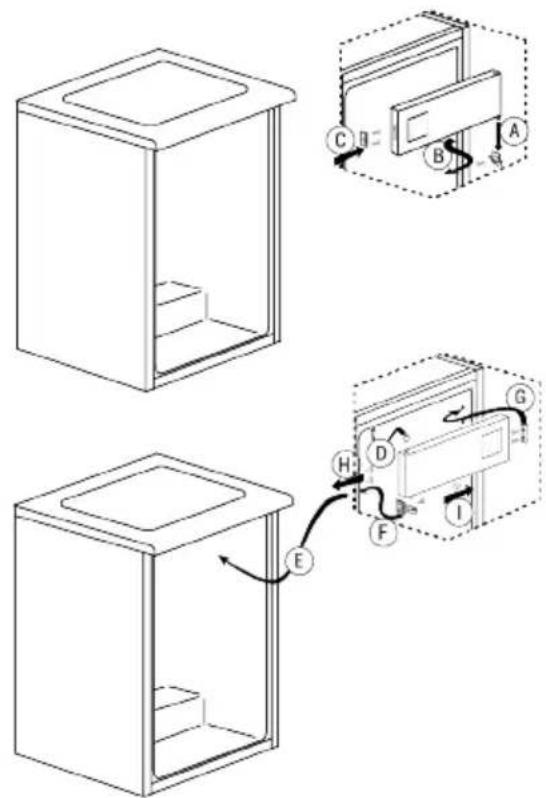
5 Changing Door Direction
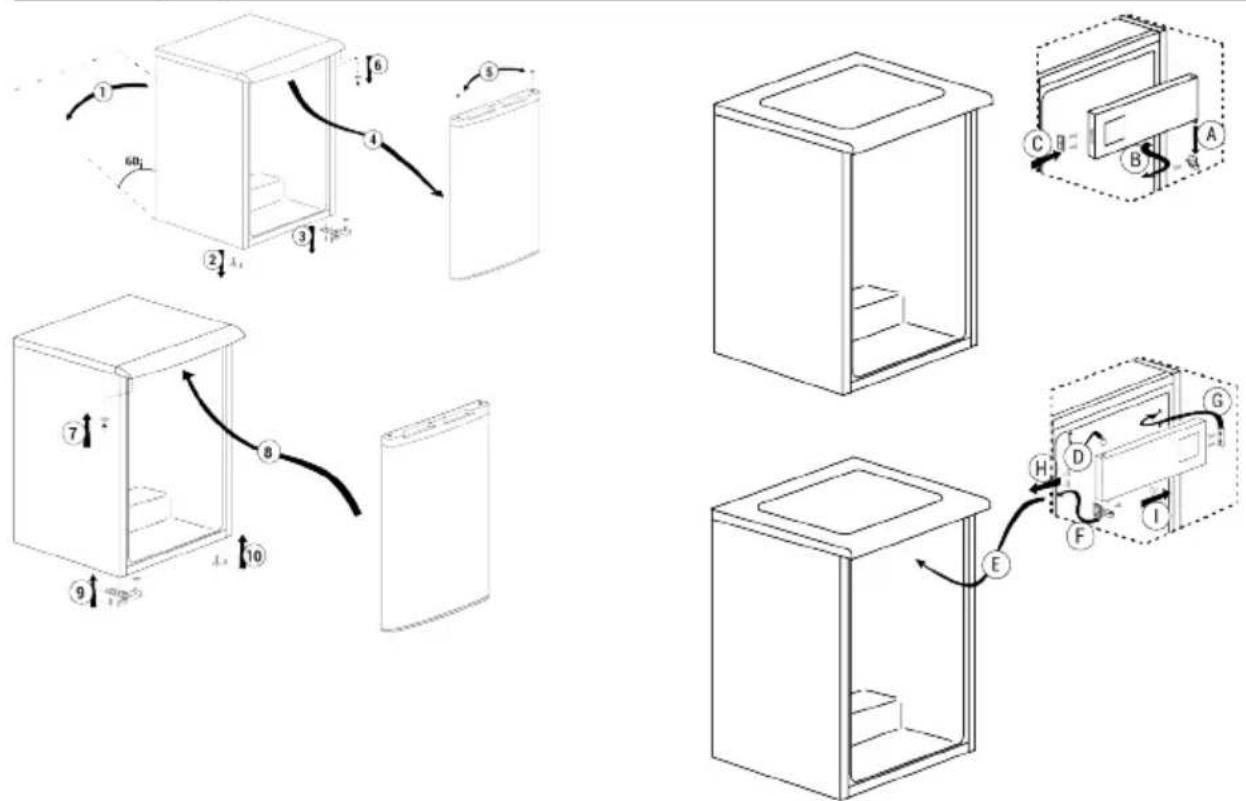
text_image
Technical diagram showing 10 steps of a refrigerator interior layout with labeled components and directional arrows indicating movement.6 Operating the Product
Read the "Safety Instructions" first!
- The product shall be used for storing food only.
- Turn off the water valve if you will be away from home (e.g. at vacation) and you will not be using the Icematic or the water dispenser for a long period of time. Otherwise, water leaks may occur.
7 Use of Your Appliance
7.1 Setting the Operating Temperature
The operating temperature is set by the temperature control.

text_image
Warm ← 1 2 3 4 5 Cold (Or) Min. Max.1=Lowest cooling setting (Warmest setting)
5=Highest cooling setting (Coldest setting)
or
Min. = Lowest cooling setting
(Warmest setting)
Max. = Highest cooling setting
(Coldest setting)
The average temperature inside the cooler compartment should be around +5°C.
Please select a setting based on the desired temperature.
Please note that there will be different temperatures in the cooling area.
The coldest zone is just above the crisper.
Unplugging the Product
- Remove the food to prevent odours,
- Wait for the ice to melt, clean the interior and let it dry, leave the doors open to avoid damaging the inner body plastics.
The internal temperature also depends on the ambient temperature, the frequency with which the door is opened and the amount of food stored inside.
Frequent opening of the door causes the internal temperature to rise.
It is therefore recommended to close the door as soon as possible after use.
Use of interior compartments
Movable shelves: The distance between the shelves can be adjusted as required.
Vegetable drawer: In this compartment, vegetables and fruit can be stored for a long time without spoiling.
Bottle shelf: Bottles, jars and cans can be placed on these shelves.
Food storage
The refrigerator compartment is intended for short-term storage of fresh food and drinks.
Store dairy products in the designated compartment of the refrigerator.
Bottles can be stored in the bottle holder or on the bottle shelf in the door.
Raw meat is best stored in a polyethylene bag in the lowest compartment of the refrigerator.
Allow hot food and drinks to cool to room temperature before placing them in the refrigerator.
- Caution:
Store concentrated alcohol only upright and tightly closed.
- Caution:
Do not store explosive substances or containers with flammable propellants (cans, spray cans, etc.) in the unit. Risk of explosion.
Defrosting
Defrosting of the refrigerator compartment is done automatically. The defrosted water flows through the drain channel into a collection container at the back of the appliance.
During defrosting, water drops form at the back of the refrigerator due to the evaporator.

natural_image
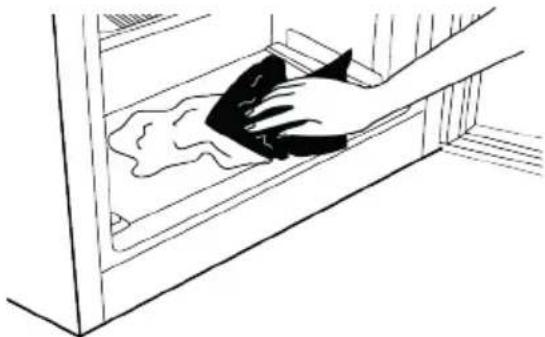
Line drawing of a hand holding a pen, writing on a curved line (no text or symbols)If the drops do not all flow downwards, they may freeze again after defrosting. Clean them with a cloth soaked in warm water, but never with a hard or sharp object.
natural_image
Line drawing of a hand cleaning a wall with a cloth (no text or symbols)7.2 Storing Food in Your Product
Storing Food in the Chill Compartment In the chill compartment, the temperature of the food to be stored in the product can vary between +3 °C and -3 °C. The temperature in the chill compartment may drop below 0°C, and this is not suitable for storing fresh fruits and vegetables. If you need to store fresh food in the cold drawers, make sure to set the refrigerator temperature to 5°C or warmer.
| Store Foods In The Different Places According To Their Properties: | |
| Food Location | |
| Egg Door Shelf | |
| Dairy products (butter, cheese) | If available, zero degree (for breakfast food) compartment/ chill compartment |
| Fruits, vegetables and greenery | Fruit-vegetable compartment, crisper or;In the fresh food compartment, in the vegetable drawer or the Everfresh+ drawer (if available), provided that the refrigerator is set to a temperature above 5°C |
| Fresh meat, poultry, fish, sausage etc. Cooked foods | If available, zero degree (for breakfast food) compartment/ chill compartment |
| Ready to serve foods, packaged products, canned foods and pickles | Top shelves or door shelf |
| Beverages, bottles, spices and snacks Door Shelf | |
Storing Food In The Freezer Compartment
- You can activate Quick Freezing function 4-6 hours before freezing function and perform a faster cooling.
- Bring hot meals to the room temperature before placing them in the freezer compartment.
- Foods to be frozen must be divided into portions according to a size to be consumed, and frozen in separate packages.
- It is recommended to pack the foods before placing them in the freezer.
- In order to prevent expiration of storage time, write the freezing date, time and name of the product on the package according to the storage times of different foods.
- Consume the foods you have defrosted quickly. Defrosted foods cannot be frozen again unless they are cooked. It is not safe to consume the refrozen fresh foods without cooking after they are defrosted.
- As you freeze fresh foods, do not bring them in contact with already frozen foods. Otherwise, frozen foods will be defrosted.
Storing The Foods, Which Are Sold Frozen
- When storing food, follow the time periods specified in these instructions.
-
In order to protect the quality of the food, keep the time interval between purchasing transaction and storing as short as possible.
-
Buy frozen food which are stored at -18^ or lower temperatures.
- Avoid buying foods whose packages are covered with ice etc. This means that the product could be partially defrosted and refrozen. Temperature impacts the quality of the food.
- Store food for manufacturer's recommended time. Remove only the food as much as you need from the freezer.
- Except the cases where extreme circumstances are available in the environment, if your product (on the recommended set values table) is set to the specified set values, the food keep their freshness for a longer time both in the fresh product compartment and freezer compartment.
- If fresh food compartment is set to a lower temperature, fresh fruits and vegetables may be partially frozen.
- The two-star compartments are suitable for pre-frozen food. Ice cream and ice cubes can be stored.
- Freeze food only in 4-star compartment.
| Meat and Fish Preparation | Longest storage time (month) | |||
| Meat Products | Veal | Steak | By cutting them 2 cm thick and placing foil between them or wrapping tightly with stretch | 6-8 |
| Roast | By packing the pieces of meat in a refrigerator bag or wrapping them tightly with stretch | 6-8 | ||
| Cubes In small pieces 6-8 | ||||
| Schnitzel, chops | By placing foil between cut slices or wrapping individually with stretch | 6-8 | ||
| Mutton | Chops | By placing foil between meat pieces or wrapping individually with stretch | 4-8 | |
| Roast | By packing the pieces of meat in a refrigerator bag or wrapping them tightly with stretch | 4-8 | ||
| Cubes | By packing the shredded meats in a refrigerator bag or wrapping them tightly with stretch | 4-8 | ||
| Beef | Roast | By packing the pieces of meat in a refrigerator bag or wrapping them tightly with stretch | 8-12 | |
| Steak | By cutting them 2 cm thick and placing foil between them or wrapping tightly with stretch | 8-12 | ||
| Cubes In small pieces 8-12 | ||||
| Boiled meat By packaging in small pieces in a refrigerator bag 8-12 | ||||
| Mince Without seasoning, in flat bags 1-3 | ||||
| Offal (piece) In pieces 1-3 | ||||
| Fermented sausage - Salami | It should be packaged even if it has casing. 1-3 | |||
| Ham By placing foil between cut slices 2-3 | ||||
| Poultry and hunting animals | Chicken and Turkey By wrapping in foil 4-6 | |||
| Goose By wrapping in foil (portions should not exceed 2.5 kg) 4-6 | ||||
| Duck | By wrapping in foil (portions should not exceed 2.5 kg) 4-6 | |||
| Deer, Rabbit, Roe Deer | By wrapping in foil (portions should not exceed 2.5 kg, and their bones should be separated) | 6-8 | ||
| Fish and sea-food | Freshwater fish (Trout, Carp, Crane, Catfish) | After thoroughly cleaning the inside and scales, it should be washed and dried, and the tail and head parts should be cut when necessary. | 2 | |
| Lean fish (Sea bass, Turbot, Sole) | 4-6 | |||
| Fatty fish (Bonito, Mack-erel, Bluefish, Red Mullet, Anchovy) | 2-4 | |||
| Shellfish | Cleaned and in bags | 4-6 | ||
| Caviar | In its packaging, in an aluminium or plastic container | 2-3 | ||
"The storage times specified in the table are based on the storage temperature of -18^ . "
| Fruits and Vegetables Preparation | Longest storage time (month) | |
| String bean and Pole bean | By shock boiling for 3 minutes after washing and cutting into small pieces | 10-13 |
| Green pea By shock boiling for 2 min | minutes after shelling and washing 10-12 | |
| Cabbage By shock boiling for 1-2 min | minute(s) after cleaning 6-8 | |
| Carrot | By shock boiling for 3-4 minutes after cleaning and cutting into slices | 12 |
| Pepper | By boiling for 2-3 minutes after cutting the stem, dividing into two and separating the seeds | 8-10 |
| Spinach By shock boiling for 2 min | utes after washing and cleaning 6-9 | |
| Leek By shock boiling for 5 min | ates after chopping 6-8 | |
| Cauliflower | By shock boiling in a little lemon water for 3-5 minutes after separating the leaves, cutting the core into pieces | 10-12 |
| Eggplant | By shock boiling for 4 minutes after washing and cutting into 2cm pieces | 10-12 |
| Squash | By shock boiling for 2-3 minutes after washing and cutting into 2cm pieces | 8-10 |
| Mushroom By lightly sauteing in oil | and squeezing lemon on it 2-3 | |
| Corn By cleaning and packing in cob | or granular 12 | |
| Apple and Pear By shock boiling for | 2-3 minutes after peeling and slicing 8-10 | |
| Apricot and Peach Divide in half and extract the seeds 4-6 | ||
| Strawberry and Raspberry | By washing and shelling | 8-12 |
| Baked fruit By adding 10% sugar in | the container 12 | |
| Plum, Cherry, Sour Cherry | By washing and shelling the stalks 8-12 | |
"The storage times specified in the table are based on the storage temperature of -18^ . "
| Dairy Products | Preparation | Longest Storage Time (Month) | Storage Conditions |
| Cheese (except feta cheese) | By placing foil thereb-etween, in slices | 6-8 | It can be left in its original packaging for short term storage. For long-term storage it should also be wrapped in aluminium or plastic foil. |
| Butter, margarine | In its own packaging | 6 | In its own packaging or in plastic containers |
"The storage times specified in the table are based on the storage temperature of -18^ . "
"The amount of fresh food that can be frozen for a certain period of time is specified on the type label.
- Compartment temperatures rise prominently if compartment door is opened and closed frequently and kept open for a long time, this can reduce the life span of the food and cause the food to spoil.
- In order not to cause odour and taste changes, the food should be stored in the closed containers.
- To achieve a better and homogeneous cooling, place the food separately in a way that cold air can wander through them.
- Provide air flow by leaving a space between the food and internal wall. If you lean the food against the rear wall, the food may freeze.
- Bring cooked hot meals to the room temperature before placing them in the refrigerator. Then, you can place the tepid meal in the lower shelves of your refrigerator. Place warm foods away from perishable foods.
- Defrost your frozen food in the fresh food compartment. Thereby, you can cool fresh food compartment by using frozen food and save energy.
- Storing unripe tropical fruits (mango, melon varieties, papaya, banana, pineapple) in the refrigerator may speed up the ripening process. This is not recommended because it will cause shorter storage time.
- You should store onions, garlics, gingers and other root vegetables in dark and cold room conditions, not in the refrigerator.
- If you notice that a food has spoiled in the refrigerator, throw away that food and clean the accessories which have come into contact with it.
- In order to cool the meals like soups and stews, which are cooked in the large pots, quickly, you can put them in the refrigerator by separating them into their own shallow containers.
- Do not place unpackaged food close to eggs.
- Keep the fruits and vegetables separately and store each variety together (for example; apples with apples, carrots with carrots).
• Take green vegetables out of the plastic bag and place them in the refrigerator after wrapping them in a paper towel or drying cloth. If you wash this type of food before placing them in the refrigerator, remember to dry them. - You can both create a damp environment and provide an air flow by keeping fruits and vegetables, which are prone to drying, in the perforated or unsealed plastic bags.
- Except the cases where extreme circumstances are available in the environment, if your product (on the recommended set
values table) is set to the specified set values, the food keep their freshness for a longer time both in the chill compartment and freezer compartment.
Placing the food
Cooler compartment shelves: Food items inside pots, capped plate and capped cases, eggs (in closed case)
Cooler compartment door shelves: Small and packaged food or beverages
Crisper: Vegetables and fruits
Freezer Details
As per the IEC 62552 standards, the freezer must have the capacity to freeze 4,5 kg of food items at -18°C or lower temperatures at 25°C room temperature in 24 hours for each 100 litres of freezer compartment volume.
Food products can only be preserved for extended periods at or below temperature of -18 °C.
You can keep the foods fresh for months (in freezer at or below temperatures of -18°C).
The food products to be frozen must not contact the already-frozen food inside to avoid partial defrosting.
Boil the vegetables and filter the water to extend the frozen storage time. Place the food in air-tight packages after filtering and place in the freezer. Bananas, tomatoes, lettuce, celery, boiled eggs, potatoes and similar food items should not be frozen. In case these foods are frozen, only nutritional values and eating qualities will be negatively affected. A rotting that would threaten human health is not in question.
Placing The Food
Freezer compartment shelves: Different frozen foods like meat, fish, ice cream, vegetables etc.
Cooler compartment shelves: Food items inside pots, capped plate and capped cases, eggs (in closed case)
Cooler compartment door shelves: Small and packaged food or beverages
Crisper: Vegetables and fruits
Fresh food compartment: Delicatessen (breakfast food, meat products to be consumed in short time)
7.3 Replacing the Illumination Lamp
Call the Authorized Service when the Bulb/LED used for lighting in your refrigerator will be replaced.
8 Maintenance and Cleaning
Read the "Safety Instructions" first!
- Unplug your appliance before cleaning it.
- The dust on the ventilation grille on the back of the product should be removed (without opening the lid) at least once a year. Cleaning should be done with a dry cloth.
- Be careful not to let water get into the lamp housing and other electrical parts.
- Clean the door with a damp cloth. Remove all contents to take out the door and body shelves. Lift the door shelves upwards to remove them. After cleaning and drying, slide them back in place from top to bottom.
- Never use chlorine-containing water or cleaning agents for cleaning the exterior surface of the product or chrome-plated parts. Chlorine causes rust on these types of metal surfaces.
• To prevent the prints on the plastic part from peeling off or deforming, do not use sharp, abrasive tools, soap, household cleaning products, detergents, gasoline, polish, etc. For cleaning, use a soft cloth with lukewarm water and dry. - In products without No Frost technology; water droplets and up to a finger's thickness of frost will form on the back wall of the cooling compartment. Do not clean it, and absolutely do not apply oil or similar substances.
- Use only a slightly damp microfiber cloth for cleaning the exterior surface of the product. Sponges and other types of cleaning cloths may cause scratches.
9 Troubleshooting
Read the "Safety Instructions" first!
Lamp(s) used in this appliance cannot be used for house lighting. Intended use of this lamp is to help the user place food into the refrigerator / freezer safely and comfortably.
- To clean the interior surfaces of the product, wash all removable parts with a mild solution of soap, water, and baking soda. Rinse thoroughly and dry completely. Prevent water from getting into the lights and control panel.
- Do not use vinegar, rubbing alcohol, or other alcohol-based cleaners on any interior surfaces.
Stainless Steel Exterior Surfaces
Use a non-abrasive stainless steel cleaner and apply it with a lint-free, soft cloth. To polish, gently wipe the surface with a microfiber cloth dampened with water and use a dry polishing pad. Always follow the grain of the stainless steel.
Preventing Bad Odors
No substances that could cause odor are used in the production of your product. However, odors may arise due to improper food storage and failure to properly clean the product's interior surface.
• To prevent this problem, clean with baking soda water every 15 days.
- Store food in sealed containers, as microorganisms released from open food can cause bad odors.
- Never store expired or spoiled food in your product.
Protection of Plastic Surfaces
If oil spills on plastic surfaces, clean them immediately with warm water, as the oil can damage the surface.
Check this list before contacting the service. Doing so will save you time and money. This list includes frequent complaints that are not related to faulty workmanship or materials. Certain features mentioned herein may not apply to your product.
If the problem persists after following the instructions in this section, contact your vendor or an Authorized Service. Do not try to repair the product.
The refrigerator is not working.
- The power plug is not fully settled. >>> Plug it in to settle completely into the socket.
- The fuse connected to the socket powering the product or the main fuse is blown. >>> Check the fuse.
Condensation on the side wall of the cooler compartment (MULTI ZONE, COOL CONTROL and FLEXI ZONE).
- The door is opened too frequently. >>> Take care not to open the product's door too frequently.
- The environment is too humid. >>> Do not install the product in humid environments.
- Foods containing liquids are kept in unsealed holders. >>> Keep the foods containing liquids in sealed holders.
- The product's door is left open. >>> Do not keep the product's door open for long periods.
- The thermostat is set to a very cool temperature. >>> Set the thermostat to an appropriate temperature.
Compressor is not working.
- In case of sudden power failure or pulling the power plug off and putting back on, the gas pressure in the product's cooling system is not balanced, which triggers the compressor thermic safeguard. The product will restart after approximately 6 minutes. If the product does not restart after this period, contact the service.
-
Defrosting is active. >>> This is normal for a fully-automatic defrosting product. The defrosting is carried out periodically.
-
The product is not plugged in. >>> Make sure the power cord is plugged in.
- The temperature setting is incorrect. >>> Select the appropriate temperature setting.
- The power is out. >>> The product will continue to operate normally once the power is restored.
The refrigerator's operating noise is increasing while in use.
- The product's operating performance may vary depending on the ambient temperature variations. This is normal and not a malfunction.
The refrigerator runs too often or for too long.
- The new product may be larger than the previous one. Larger products will run for longer periods.
- The room temperature may be high. >>> The product will normally run for long periods in higher room temperature.
- The product may have been recently plugged in or a new food item is placed inside. >>> The product will take longer to reach the set temperature when recently plugged in or a new food item is placed inside. This is normal.
- Large quantities of hot food may have been recently placed into the product. >>> Do not place hot food into the product.
- The doors were opened frequently or kept open for long periods. >>> The warm air moving inside will cause the product to run longer. Do not open the doors too frequently.
- The freezer or cooler door may be ajar.
Check that the doors are fully closed.
- The product may be set to a temperature that is too low. >>> Set the temperature to a higher degree and wait for the product to reach the adjusted temperature.
- The cooler or freezer door washer may be dirty, worn out, broken or not properly settled. >>> Clean or replace the gasket.
Damaged / torn door washer will cause the product to run for longer periods to preserve the current temperature.
The freezer temperature is very low, but the cooler temperature is adequate.
- The freezer compartment temperature is set to a very low degree. >>> Set the freezer compartment temperature to a higher degree and check again.
The cooler temperature is very low, but the freezer temperature is adequate.
- The cooler compartment temperature is set to a very low degree. >>> Set the cooler compartment temperature to a higher degree and check again.
The food items kept in cooler compartment drawers are frozen.
- The cooler compartment temperature is set to a very low degree. >>> Set the cooler compartment temperature to a higher degree and check again.
The temperature in the cooler or the freezer is too high.
- The cooler compartment temperature is set to a very high degree. >>> Temperature setting of the cooler compartment has an effect on the temperature in the freezer compartment. Wait until the temperature of relevant parts reach the sufficient level by changing the temperature of cooler or freezer compartments.
- The doors were opened frequently or kept open for long periods. >>> Do not open the doors too frequently.
- The door may be ajar. >>> Fully close the door.
- The product may have been recently plugged in or a new food item is placed inside. >>> This is normal. The product will take longer to reach the set temperature when recently plugged in or a new food item is placed inside.
- Large quantities of hot food may have been recently placed into the product. >>> Do not place hot food into the product.
Shaking or noise.
- The surface is not flat or durable >>> If the product is shaking when moved slowly, adjust the stands to balance the product. Also make sure the ground is sufficiently durable to bear the product.
- Any items placed on the product may cause noise. >>> Remove any items placed on the product.
- The product is making noise of liquid flowing, spraying etc.
- The product's operating principles involve liquid and gas flows. >>> This is normal and not a malfunction.
There is sound of wind blowing coming from the product.
- The product uses a fan for the cooling process. This is normal and not a malfunction.
There is condensation on the product's internal walls.
- Hot or humid weather will increase icing and condensation. This is normal and not a malfunction.
- The doors were opened frequently or kept open for long periods. >>> Do not open the doors too frequently; if open, close the door.
- The door may be ajar. >>> Fully close the door.
There is condensation on the product's exterior or between the doors.
- The ambient weather may be humid, this is quite normal in humid weather. >>> The condensation will dissipate when the humidity is reduced.
The interior smells bad.
- The product is not cleaned regularly. >>> Clean the interior regularly using sponge, warm water and carbonated water.
-
Certain holders and packaging materials may cause odour. >>> Use holders and packaging materials without free of odour.
-
The foods were placed in unsealed holders. >>> Keep the foods in sealed holders. Micro-organisms may spread out of unsealed food items and cause bad odour.
- Remove any expired or spoilt foods from the product.
The door is not closing.
- Food packages may be blocking the door. >>> Relocate any items blocking the doors.
- The product is not standing in full upright position on the ground. >>> Adjust the stands to balance the product.
- The surface is not flat or durable >>> Make sure the surface is flat and sufficiently durable to bear the product.
The crisper is jammed.
- The food items may be in contact with the upper section of the drawer. >>> Reorganize the food items in the drawer.
Temperature on the product surface.
- High temperature may be observed between two doors, on the side panels and on the rear grill area while your product is operated. This is normal and it does not require servicing.
Fan continues to operate when the door is opened.
- Fan may continue to operate when the freezer door is open.
If the problem persists after following the instructions in this section, contact your vendor or an Authorized Service. Do not try to repair the product. This is normal.
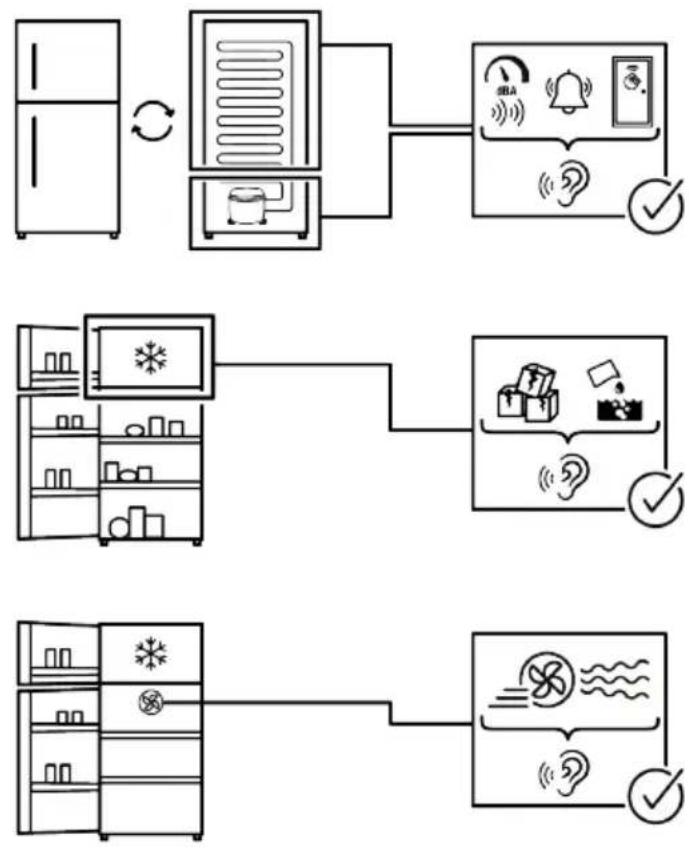
flowchart
graph TD
    A["Refrigerator"] --> B["Refrigerator with air conditioner"]
    B --> C["Refrigerator with earbell and phone"]
    C --> D["Refrigerator with earbell and phone"]
    D --> E["Refrigerator with air conditioner and shelf"]
    E --> F["Refrigerator with air conditioner and shelf"]
    F --> G["Refrigerator with air conditioner and shelf"]
    G --> H["Refrigerator with air conditioner and shelf"]

text_image
Diagram showing six different kitchen or storage room layouts with labeled items and checkmarks indicating inspection or status.DISCLAIMER
Some (simple) failures can be adequately handled by the end-user without any safety issue or unsafe use arising, provided that they are carried out within the limits and in accordance with the following instructions (see the "Self-Repair" section).
Therefore, unless otherwise authorized in the "Self-Repair" section below, repairs shall be addressed to registered professional repairers in order to avoid safety issues. A registered Professional repairer is a professional repairer that has been granted access to the instructions and spare parts list of this product by the manufacturer according to the methods described in legislative acts pursuant to Directive 2009/125/EC.
However, only the service agent (i.e. authorized professional repairers) that you can reach through the phone number given in the user manual/warranty card or through your authorized dealer may provide service under the guarantee terms. Therefore, please be advised that repairs by professional repairers (who are not authorized by) Whirlpool shall void the guarantee.
Self-Repair
Self-repair can be done by the end-user with regard exclusively to the following spare parts:door handles,door hinges, trays, baskets and door gaskets (an updated list is also available https://parts-selfservice.europeanappliances.com as of 1st March 2021).
Moreover, to ensure product safety and to prevent risk of serious injury, the mentioned self-repair shall be done following the instructions in the user manual for selfrepair or which are available in https://parts-self-service.europeanappliances.com. For your safety, unplug the product before attempting any self-repair.
Repair and repair attempts by end-users for parts not included in such list and/or not following the instructions in the user manuals for self-repair or which are available in https://parts-selfservice.europeanappliances.com, might give raise to safety issues not attributable to Whirlpool, and will void the warranty of the product.
Therefore, it is highly recommended that end-users refrain from the attempt to carry out repairs falling outside the mentioned list of spare parts, contacting in such cases authorized professional repairers or registered professional repairers. On the contrary, such attempts by end-users may cause safety issues and damage the product and subsequently cause fire, flood, electrocution and serious personal injury to occur.
By way of example, but not limited to, the following repairs must be addressed to authorized professional repairers or registered professional repairers: compressor, cooling circuit, main board, inverter board, display board, etc.
The manufacturer/seller cannot be held liable in any case where end-users do not comply with the above.
The spare part availability of the refrigerator that you purchased is 10 years. During this period, original spare parts will be available to operate the refrigerator properly. The minimum duration of guarantee of the refrigerator that you purchased is 24 months.
This product is equipped with a lighting source of the "G" energy class.
The lighting source in this product shall only be replaced by Professional repairer.
See also
2 CLAUSE DE NON-RESPONSABILITÉ [ } 39]
EN
https://eprel.ec.europa.eu/
Table des matières
natural_image
Pure mechanical diagram showing two configurations of a valve or knob with directional arrows indicating motion (no text or symbols)3.4 Attention aux surfaces chaudes
natural_image
Line drawing of a hand holding a pen tip over a curved surface (no text or symbols)Dégivrage
natural_image
Line drawing of a hand cleaning a wall with a cloth (no text or symbols)flowchart
graph TD
    A["Refrigerator"] --> B["Refrigerator with air conditioner"]
    B --> C["Refrigerator with earbell and phone icon"]
    C --> D["Refrigerator with earbell and phone icon"]
    D --> E["Refrigerator with air conditioner and shelf"]
    E --> F["Refrigerator with air conditioner and shelf"]
    F --> G["Refrigerator with air conditioner and shelf"]
    G --> H["Refrigerator with air conditioner and shelf"]

text_image
Diagram showing six different kitchen or storage room layouts with labeled items and checkmarks indicating inspection or status.https://eprel.ec.europa.eu/
Inhoudsopgave
natural_image
Pure mechanical diagram showing two configurations of a valve or knob with directional arrows indicating motion (no text or symbols)text_image
Technical diagram showing 9 numbered components of a mechanical or electrical component with directional arrows and dimension annotations.
text_image
Technical diagram showing three views of a device with labeled components and directional arrows indicating motion or assembly.natural_image
Line drawing of a hand operating a projector with rotating buttons (no text or symbols)natural_image
Line drawing of a hand holding a pen, writing on a curved line (no text or symbols)Ontdooien
natural_image
Line drawing of a person cleaning a wall with a hand near the floor (no text or symbols)7.2 Etenswaren opslaan in uw product
flowchart
graph TD
    A["Refrigerator"] --> B["Refrigerator with air conditioner"]
    B --> C["Refrigerator with ear protection"]
    C --> D["Refrigerator with ear mask and ear protection"]
    D --> E["Refrigerator with ear mask and ear protection"]
    E --> F["Refrigerator with ear mask and ear protection"]
    F --> G["Refrigerator with ear mask and ear protection"]
    G --> H["Refrigerator with ear mask and ear protection"]
    H --> I["Refrigerator with ear mask and ear protection"]
    I --> J["Refrigerator with ear mask and ear protection"]
    J --> K["Refrigerator with ear mask and ear protection"]
    K --> L["Refrigerator with ear mask and ear protection"]
    L --> M["Refrigerator with ear mask and ear protection"]
    M --> N["Refrigerator with ear mask and ear protection"]
    N --> O["Refrigerator with ear mask and ear protection"]
    O --> P["Refrigerator with ear mask and ear protection"]
    P --> Q["Refrigerator with ear mask and ear protection"]
    Q --> R["Refrigerator with ear mask and ear protection"]
    R --> S["Refrigerator with ear mask and ear protection"]
    S --> T["Refrigerator with ear mask and ear protection"]
    T --> U["Refrigerator with ear mask and ear protection"]
    U --> V["Refrigerator with ear mask and ear protection"]
    V --> W["Refrigerator with ear mask and ear protection"]
    W --> X["Refrigerator with ear mask and ear protection"]
    X --> Y["Refrigerator with ear mask and ear protection"]
    Y --> Z["Refrigerator with ear mask and ear protection"]
    Z --> AA["Refrigerator with ear mask and ear protection"]
    AA --> AB["Refrigerator with ear mask and ear protection"]
    AB --> AC["Refrigerator with ear mask and ear protection"]
    AC --> AD["Refrigerator with ear mask and ear protection"]
    AD --> AE["Refrigerator with ear mask and ear protection"]
    AE --> AF["Refrigerator with ear mask and ear protection"]
    AF --> AG["Refrigerator with ear mask and ear protection"]
    AG --> AH["Refrigerator with ear mask and ear protection"]
    AH --> AI["Refrigerator with ear mask and ear protection"]
    AI --> AJ["Refrigerator with ear mask and ear protection"]
    AJ --> AK["Refrigerator with ear mask and ear protection"]
    AK --> AL["Refrigerator with ear mask and ear protection"]
    AL --> AM["Refrigerator with ear mask and ear protection"]
    AM --> AN["Refrigerator with ear mask and ear protection"]
    AN --> AO["Refrigerator with ear mask and ear protection"]
    AO --> AP["Refrigerator with ear mask and ear protection"]
    AP --> AQ["Refrigerator with ear mask and ear protection"]
    AQ --> AR["Refrigerator with ear mask and ear protection"]
    AR --> AS["Refrigerator with ear mask and ear protection"]
    AS --> AT["Refrigerator with ear mask and ear protection"]
    AT --> AU["Refrigerator with ear mask and ear protection"]
    AU --> AV["Refrigerator with ear mask and ear protection"]
    AV --> AW["Refrigerator with ear mask and ear protection"]
    AW --> AX["Refrigerator with ear mask and ear protection"]
    AX --> AY["Refrigerator with ear mask and ear protection"]
text_image
Diagram showing four different kitchen or storage room layouts with labeled items and checkmarks indicating inspection or status.https://eprel.ec.europa.eu/
Inhaltsverzeichnis
natural_image
Pure mechanical diagram showing two configurations of a valve or knob with directional arrows indicating motion (no text or symbols)text_image
Technical diagram showing 10 numbered mechanical or electrical component assembly with directional arrows and dimension annotations