ACP610 - Fan PHILIPS - Free user manual and instructions
Find the device manual for free ACP610 PHILIPS in PDF.

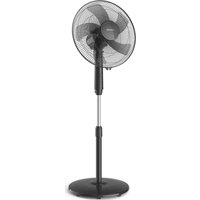
| Product type | Pedestal fan |
| Brand | Philips |
| Model | ACP610 |
| Number of speeds | 3 (1, 2, 3) |
| Horizontal oscillation | 80° |
| Vertical oscillation | 30° (manual adjustment) |
| Power supply | Mains |
| Rated voltage | 220-240 V |
| Rated frequency | 50/60 Hz |
| Estimated power consumption | 50 W |
| Blade material | Plastic |
| Grille material | Metal |
| Base type | Round plastic |
| Use | Indoor only |
| Recommended location | Dry, stable and horizontal surface |
| Cleaning | Soft dry cloth |
| Safety | Safety grille, stop via button 0 |
| Warranty | 2 years |
| EMC compliance | Yes |
| Recycling | Do not dispose of with household waste |
Frequently Asked Questions - ACP610 PHILIPS
User questions about ACP610 PHILIPS
0 question about this device. Answer the ones you know or ask your own.
Ask a new question about this device
Download the instructions for your Fan in PDF format for free! Find your manual ACP610 - PHILIPS and take your electronic device back in hand. On this page are published all the documents necessary for the use of your device. ACP610 by PHILIPS.
USER MANUAL ACP610 PHILIPS
m = 311
一
1
m = 311
English 4
Français 13
a 23
4 English
Important
Read this user manual carefully before you use the appliance, and save it for future reference.
Danger
- Do not let any liquid or flammable detergent enter the appliance, to avoid electric shock and/or a fire hazard.
Warning
- This appliance can be used by children aged from 8 years and above and persons with reduced physical, sensory or mental capabilities or lack of experience and knowledge if they have been given supervision or instruction concerning use of the appliance in a safeway and understand the hazards involved.
- Children shall not play with the appliance.
- Cleaning and maintenance shall not be made by children without supervision.
- This appliance is not intended for use by persons (including children) with reduced physical sensory or mental capabilities, or lack of experience and knowledge, unless they have been given supervision or instruction concerning use of the appliance by a person responsible for their safety.
Take care that curtains or other objects are not sucked into the fan during operation. - Do not insert fingers, sticks or other objects into the machine, in order to avoid electric shocks, physical injury or fire.
- Do not use the appliance near gas appliances, fireplaces.
- Do not spray any flammable materials such as insecticides or fragrances around the appliance.
- If the power cord is damaged, you must have it replaced by Philips, a service center authorized by Philips, or similarly qualified persons in order to avoid a hazard.
Caution
Always place and use the appliance on a dry, stable, and horizontal surface.
- Do not use the appliance in surroundings with high humidity such as the bathroom, toilet, kitchen, swimming pool, or any outdoor environment.
- Always unplug the appliance when you want to move, clean appliance, or carry out other maintenance. After assembly, do not remove the guards during use or cleaning.
- The appliance is only intended for household use under normal operating conditions.
- Keep product away from fire and do not expose them to direct sunlight on high temperatures.
- Wear gloves when assembly or maintenance.
- Be careful not to blow the fan wind directly toward body for a long time especially for patient, infants and the elderly.
Electromagnetic fields (EMF)
This appliance complies with the applicable standards and regulations regarding exposure to electromagnetic fields.
Recycling
Do not throw away the product with the normal household waste at the end of its life, but hand it in at an official collection point for recycling. By doing this, you help to preserve the environment.
Follow your country's rules for the separate collection of electrical and electronic products. Correct disposal helps prevent negative consequences for the environment and human health.
6 English
Your pedestal fan
Product overview
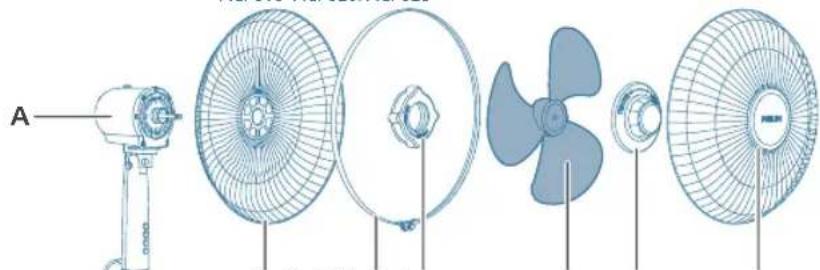
A Motor&upper pillar F Plastic nut
B Lower pillar G Fan blade
C Base H Spinner
D Rear grill I Front grill
E Plastic ring
Controls overview
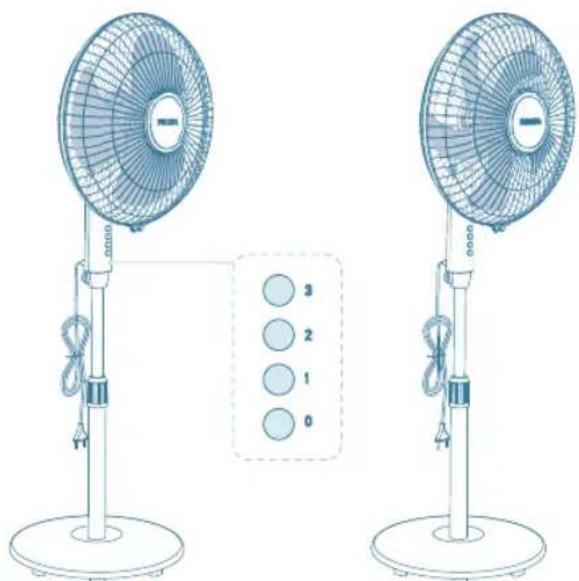
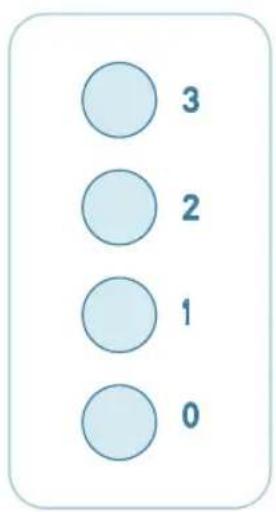
0 Power off button 1 Fan speed 1 button
2 Fan speed 2 button 3 Fan speed 3 button
Getting started
Installing the fan
Remove all packaging of the fan before first use.
Make sure all components of the fan are correctly installed and fastened.
1 Turn the base screw clockwise to unscrew it from the lower pillar, and insert the lower pillar into the base.
8 English
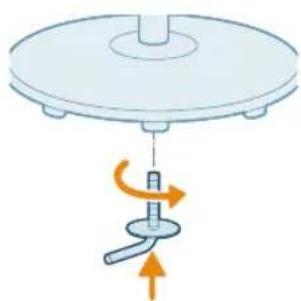
2 Insert the base screw, connect the base and lower pillar by turning the base screw counterclockwise.
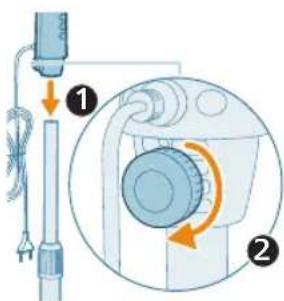
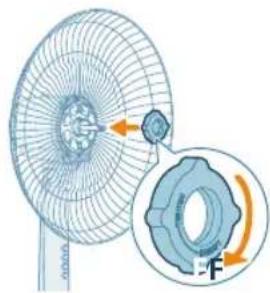
3 Rotate the spinner in a clockwise direction to fasten the motor.

4 Rotate the spinner in a clockwise direction to detach it from the motor.
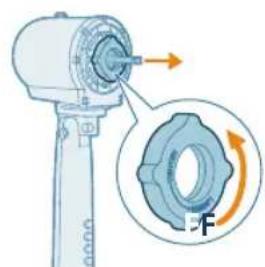
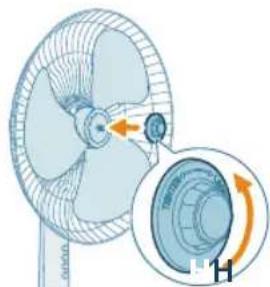
5 Turn the plastic nut counterclockwise to detach it from the motor.
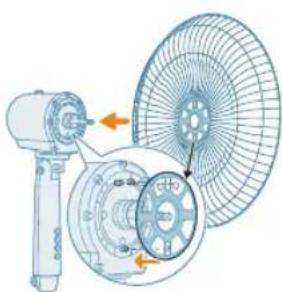
6 Secure the rear grill to the motor by aligning the mounting hole on the rear grill with the bolt on the motor.
7 Turn the plastic nut clockwise to secure the rear grill.
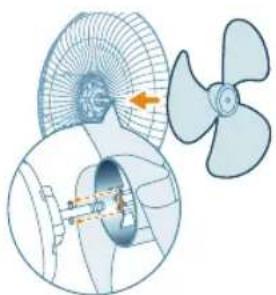
8 Install the fan blade as indicated in the illustration.
9 Rotate the spinner in a counterclockwise direction to secure the fan blade.

10 Install the plastic ring around the rear grill.

11 Install the front grill, make sure the plastic ring is well installed around the front grill. Align the bottom buckle on the grill and use a screw driver to securely fasten the rear and front grill together.
10 English
Using your pedestal fan
Turning on and off
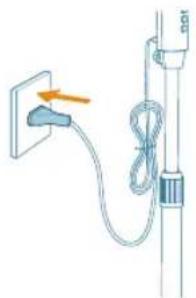
1 Put the plug in the power socket.
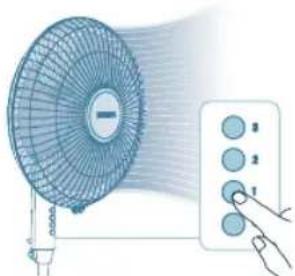
2 Press the 1/2/3 button to switch on the fan. The appliance beeps once.
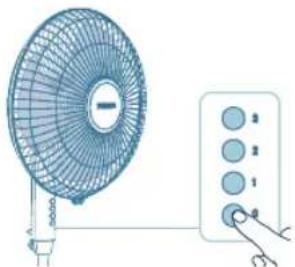
3 Press the 0 button again to switch off the fan.
Changing the fan speed
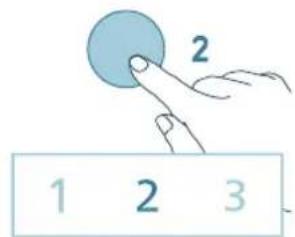
- You can choose the fan speed 1, fan speed 2 or fan speed 3 by pressing the 1/2/3 button.
Oscillation
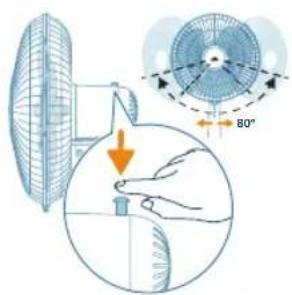
Horizontal oscillation
Use the switch to turn on/off oscillation function. The fan can oscillate horizontally up to 80 degrees.
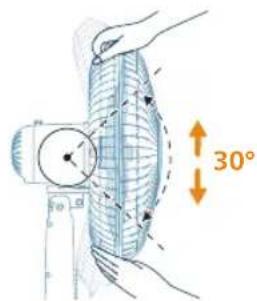
Vertical oscillation
You can manually adjust the fan to oscillate up to 30 degrees vertically.
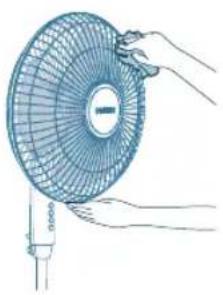
Cleaning and maintenance
Always unplug the appliance before you clean it.
Never immerse the appliance in water or any other liquid.
Never use abrasive, aggressive, or flammable cleaning agents such as bleach or alcohol to clean any part of the appliance.

Regularly clean the outside of the fan to prevent dust from collecting.
Use a soft, dry cloth to clean both the exterior of the appliance and the air outlet.
Storage
1 Turn off the appliance and unplug from the power socket.
2 Clean the appliance.
3 Store the appliance in a cool, dry location.
12 English
4 Always thoroughly wash hands after cleaning.
Troubleshooting
This chapter summarizes the most common problems you could encounter with the appliance. If you are unable to solve the problem with the information below, contact the Consumer Care Center in your country.
Problem Possible solution
| My fan fails to turn on or off. If the appliance can't be turned on, please ensure the power plug is plugged in properly or try another power socket. | |
| If the appliance still doesn't work, contact the Consumer Care Center in your country. | |
| My fan is not producing sufficient amount of air or very weak. | Ensure the appliance is set to the highest fan speed for maximum air circulation. Allow the appliance to fully circulate the air throughout the room, this may take few minutes. |
| Ensure all the air inlet and outlet grilles are unobstructed. | |
| The fan produces a strange/burnt smell. The first few times you use the appliance, it may produce a plastic smell. This is normal on new appliance. However, if the appliance produces a burnt smell, turn off the appliance and unplug immediately, then contact the Consumer Care Center in your country. | |
| My fan is too loud. The higher the fan speed setting of the appliance, the louder the noise will be. Set to lower fan speed, the noise will be reduced. | |
| If anything drops into air outlet, it may also cause abnormal loud sound. Immediately turn off appliance, and get the foregin objects out of the appliance. | |
| If there is abnormal sound, contact the Consumer Care Center in your country. | |
| The fan base is wobbly or vibrating. Check if the appliance is placed on the flat floor or surface. | |
| Check if any foreign objects beneath the appliance. | |
| Check if the base of the appliance is properly assembled. | |
| Check the chapter "Installing the fan". | |
Warranty and support
Versuni offers a two-year warranty after purchase on this product. This warranty is not valid if a defect is due to incorrect use or poor maintenance. Our warranty does not affect your rights under law as a consumer. For more information or for invoking the warranty, please visit our website www.philips.com/support.
Important
Oscillation vertical
jLj=xy yJabx JIabx JIe gao
a 10000000000000000000000000000000
iX1 iai 1111 (jabxl dxj g lo) jgxl jpluxwL yao yjxllia Jgauo aai pae lxl x, aegaxgl g aayxipaaui nxl gl ,dlaeXl gl ,aewxxl gl
j4=21 pluxuLy galei ciLw jpalb9i pioiaow
1 1 1 1 1 1 1 1 1 1 1 1 1 1 1 1 1 1 1 1 1 1 1 1 1 1 1 1
gaw gaiy
jglgxljlz1wLcJoo3y1yjge2x100yjz1yjlgx1pssu3
jaxy jx yjx g J 1000 Jio Jiau x aJg o Juy Jaoaoss jyog Philips no axu u x aJx Jau x dJw J5
jbs jzjz 0000
du
g jaiog 1j baw jlc lau dousuiug jqxg
a ggl aalx1 gglg lgl bax1 gl gblax1 gl plaxxl jio aagbxtl xlc sloj j4x1 pssuX .
gaiy1 yaiyaiyaiyaiyaiyaiyaiyaiyaiyaiyaiyaiyaiyaiyaiyaiyaiyaiyaiyaiyaiyaiyaiyaiyaiyaiyaiyaiyaiyaiyaiyaiyaiyaiyaiyaiyaiyaiyaiyaiyaiyaiyaiyaiyaiyaiyaiyaiyaiyaiyai
auiy1g juxxcld g ayoxxl cjx iy
aJxI JxixI xIs Gao bao xiaol pluiuul 1oo jzxl li
gaiy gaiy
a|g|g|a|j>
aaiaxgjySxjxjxjxjxj-
Jg JabXg joxgfoa aagb oajx gaojolao gaxc gao jos
(EMF) auiubioogyI IxIoll
auiu bieogy5x1 jgaxx yaeixx1 aaiiaoxl aaibaxl aobixlg yleao x 0j4x1i i
ygl a!
yj j 1000000000000000000000000000000000000000000000000
aai jie abaloxj gpalusdyduolgue.oguoy
yolssxjL eL aalaoa aR aaiyegg aaggye 1gaae gaae
alilaiw alwog auixl Jc auixlwl ggey eio aiaa aaiia
y dolll yogosl glgall
iill Jgdole jbi
ACP610 ACP620/ACP625
DFHEGI
aagall aajg G aalll aolll B
jdl Haalll C
olol I 1
aL aLl aLl E
5ill j4j lde ole yj
2jLac dljl w. aclwll
gac a 30 c w yill L gag aagall bdo dis
aillg
aaihij jia ailljuao jie Ioljipoi Jai
. gJbXl JcJgJilw gJgJdall jgeJoo
auii jai i 100
14 ÷ 21 = 10·s a
jglll gial pbiio Jciu agall jlll puiil aibii p 1gll sog jlsll o jlaill aaii adi aaiia aae bpsiu
#
- aolbll isslo
2. > 0, < 1
3. 0.1g - ab = 12
#
clogaleall ducwpi li jai pluxiwl ie gauj w jlaull jaoa
Joioll Joll idcill
PHILIPS and the Philips Shield Emblem are registered trademarks of Koninklijke Philips N.V. and are used under license.
This product has been manufactured by and is sold under the responsibility of Versuni Holding B.V., and Versuni Holding B.V. is the warrantor in relation to this product.
2024 © Versuni Holding B.V.