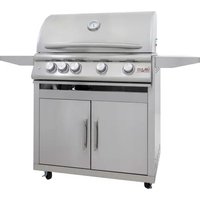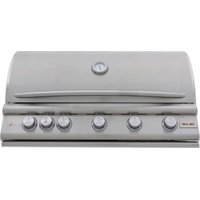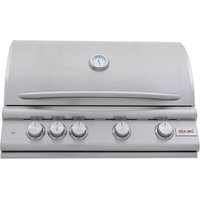
BLZ-4LTE3 - Grill plate Blaze Outdoor - Free user manual and instructions
Find the device manual for free BLZ-4LTE3 Blaze Outdoor in PDF.


User questions about BLZ-4LTE3 Blaze Outdoor
0 question about this device. Answer the ones you know or ask your own.
Ask a new question about this device
Download the instructions for your Grill plate in PDF format for free! Find your manual BLZ-4LTE3 - Blaze Outdoor and take your electronic device back in hand. On this page are published all the documents necessary for the use of your device. BLZ-4LTE3 by Blaze Outdoor.
USER MANUAL BLZ-4LTE3 Blaze Outdoor
I) Shut off the gas supply to the appliance at its source.
2) Extinguish any open flames.
3) Open grill hood to release any accumulation of gas vapor.
4) If a gas odor persists, keep away from your appliance and contact your gas supplier or fire department immediately.
WARNING
I) Do not store or use gasoline or other flammable liquids or vapor in the vicinity of this or any other appliance
2) A LP cylinder not connected for use shall not be stored in the vicinity of this or any other appliances.
ATTENTION:
INSTALLER: PLEASE LEAVE THESE INSTRUCTIONS WITH THE CONSUMER.
CONSUMER: PLEASE READ & RETAIN THESE INSTRUCTIONS FOR FUTURE REFERENCE AND BEFORE INSTALLING OR OPERATING.
- CONTACT INFORMATION -
Blaze: 6620 Greenwell Springs Rd, Baton Rouge, LA 70805 USA Phone: 866-
976-9510
CustomerService@BlazeGrills.com
BLAZEGRILLS.COM
Blaze Instructional Book
Table of Contents
I. BBQ Specifications 4-5
II. General Safety and Installation Warnings 6-10
i. Location of Appliance 10-11
III. Electrical Safety and Installation Warnings 12-13
IV. Gas Safety and Installation Warnings 13-14
i. Checking for Gas Leaks 15-17
ii. Unpacking Unit 17
V. Gas Connections 18
i. Natural Gas Requirements 18
ii. Liquid Propane Gas and Tank Requirements 18
iii. Transporting and Storing LP Gas 19-20
VI. Installing the Appliance in a BBQ Island 21
i. Outdoor Kitchen Ventilation 22-23
ii. Building BBQ Specifications and Instruction 23-25
iii. Installation Diagrams 26
VII. First Time Operation 27
i. Lighting the Appliance 27-28
ii. Manually Lighting the Appliance 28-29
iii. Flame Adjustment 29-30
VIII. Cleaning your Appliance 30-31
IX. Optional Infrared Sear Burner 32
i. How to Replace Conventional Burner with Infrared Sear Burner 32
ii. Preheating the Infrared Burner 32
iii. Infrared Burner Cleaning 32
X. Fuel Conversion 33
i. Gas Regulator 33-34
ii. Main Burner 35
iii. Rear Burner 35
XI. Warranty Registration 36
XII. Grill Parts 37
XIII. Product Serial Number 38
XIV. Blaze Product Registration 39
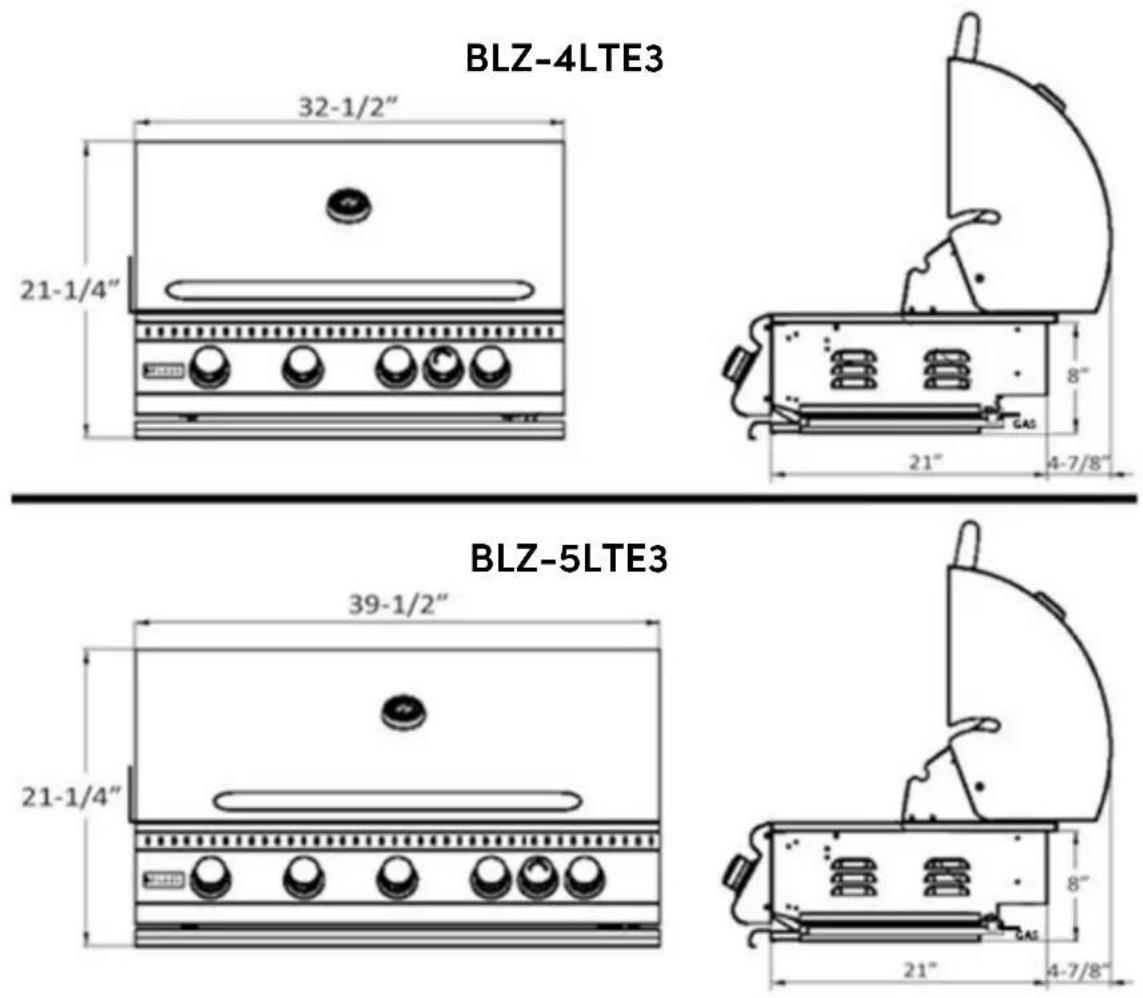
Model: BLZ-4LTE3 / 4 BURNER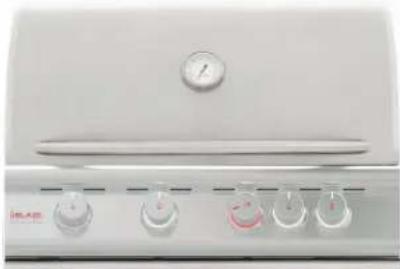 | |
| Cutout Dimensions | 30 5/8"W x 21 1/4"D x 8 1/2"H*These dimensions create the required air gap underneath this appliance. This air gap serves multiple purposes, such as preventing a build-up of heat in the island cavity and helping provide proper airflow for combustion and/or cabinetry. |
| BTU Output | 14,000 BTU per Burner x4 |
| Infrared Back Burner | 10,000 BTU |
| Total BTU | 66,000 |
| Primary Ignition | Push N' Turn Flame Thrower |
| Secondary Ignition | Flash Tube |
| Cooking Grid Dimensions | 29 1/2" X 17 7/8" |
| Total Cooking Area | 748sq.in(includes warming rack) |
| Flame Tamer | Flame Stabilizer Grid |
| Zone Cooking | Removable HeatZone Separators |
| Rotisserie Kit (Motor & Forks) | Optional |
| Burner | Commercial Quality CastStainless Steel |
| Gas Type | Each grill contains anNG/LP Orifice Kit |
| Warranty | *Limited Lifetime – Defects in manufacturing and workmanship.Cooking grids, Flame Tamers,Heat Zone Separators, stainless housing, valves, and stainless burners against rust- through.*1 Year – Ignition Components, Electronics and Lighting systems*Appliances must be registered within 30 days of purchase to validate this warranty.*See warranty section for details. |
| Model: BLZ-5LTE3/ 5 BURNER | |
| Cutout Dimensions | 38 3/8"W x 21 1/4"D x 8 1/2"H*These dimensions create the required air gap underneath this appliance. This air gap serves multiple purposes, such as preventing a build-up of heat in the island cavity and helping provide proper airflow for combustion and/or cabinetry. |
| BTU Output | 14,000 BTU per Burner x5 |
| Infrared Back Burner | 10,000 BTU |
| Total BTU | 80,000 |
| Primary Ignition | Push N' Turn Flame Thrower |
| Secondary Ignition | Flash Tube |
| CookingGridDimensions | 37" X 18" |
| Total Cooking Area | 915sq.in(includes warming rack) |
| Flame Tamer | Flame Stabilizer Grid |
| Zone Cooking | Removable Heat Zone Separators |
| Rotisserie Kit(Motor & Forks) | Optional |
| Burner | Commercial Quality Cast Stainless Steel |
| Gas Type | Each grill contains an NG/LP Orifice Kit |
| Warranty | *Limited Lifetime – Defects in manufacturing and workmanship.Cooking grids, Flame Tamers,Heat Zone Separators, stainless housing, valves, and stainless burners against rust- through.*1 Year – Ignition Components, Electronics and Lighting systems*Appliances must be registered within 30 days of purchase to validate this warranty.*See warranty section for details. |
BBQ SPECIFICATIONS
NOTE: ALWAYS have equipment measured by Contractor before beginning any project.
*These dimensions create the required air gap underneath this appliance. This air gap serves multiple purposes, such as preventing a build-up of heat in the island cavity and helping provide proper airflow for combustion and/or cabinetry
IMPORTANT SAFETY INFORMATION
Please read this manual carefully and before using your BLAZE GRILL to ensure proper operation, installation, servicing and to reduce the risk of fire, burn hazard and or other injury. This manual should be retained for your information
NOTE:
Improper installation and service or maintenance may cause property damage, injury or death. Do
not operate this appliance without having read this manual.
All gas installations and gas conversions must be performed by a qualified technician or authorized service agent.
NOTE: This appliance is not intended for commercial use.
FOR YOUR SAFETY
If you smell gas:
- Shut off gas to the appliance.
- Extinguish any open flame.
- If odor continues, immediately
call your gas supplier or your fire department.
General Safety and Installation Warnings
Safe operation of the BLAZE GRILL depends upon its proper installation. Only a qualified professional installer and service technician must perform adjustments and service of the grill. Proper location and proper use is essential to insure safe and continued trouble-free operation. Any non-approved alterations made to the appliance will void the product's warranty.
NOTE: The manufacturer cannot be held responsible for damage or injury caused by improper use of this appliance.
WARNING
To reduce the risk of fire, electric shock, or injury, read and follow these basic precautions before installing/operating your appliance.
APPLIANCE INSTALLATION
This gas appliance must be installed in accordance with all local codes.
If installation is planned in an area with no local codes, the gas appliance must be installed in accord with the National Fuel Gas Code ANSI Z223.1 and storage and handling of liquefied petroleum gases, ANSI/NFPA 58 or CSA B149.1 natural gas and propane installation code.

CALIFORNIA PROPOSITION 65 WARNING
WARNING: This product can expose you to chemicals including Chromium (hexavalent compounds), which are known to the State of California to cause cancer and birth defects or other reproductive harm. For more information go to: www.P65Warnings.ca.gov
WARNING: Improper installation, adjustment, alteration, service or maintenance can cause injury or property damage. Read the installation, operating and maintenance instructions thoroughly before installing or servicing this equipment.
WARNING
EXPLOSION HAZARD
Do not use the appliance as storage area for flammable materials. Keep area clear and free from combustible materials, gasoline, and other flammable vapors and liquids. Failure to do so can result in death, explosion, or fire.
In Massachusetts: All gas products must be installed using a "Massachusetts" licensed plumber or gasfitter. A "T" handle type manual gas valve must be installed in the gas supply line to this appliance. This applies to permanently installed natural gas and propane installations. This does not apply to propane portable installations using a 20 pound tank.
Have an ABC Fire Extinguisher accessible at all times. Never attempt to extinguish a grease fire with water or other liquids.
IMPORTANT: Consult the AHJ (Authority Having Jurisdiction) or local contractor of any uncertainty.
WARNING
This unit is for outdoor use only!
Do not operate in a building, garage or any other enclosed areas. This could result in carbon monoxide buildup which could result in injury or death. Grills are not designed or intended for installation near a window or vent that goes into the house.
WARNING
For proper operation, burners must be aligned with the valve orifice and seated in the bracket slot. This is accomplished by first placing the burner tube shutter hole securely over the valve orifice and ensuring the male post on the rear of the burner rests in the opening in the grill chassis. Failure to do so could result in a fire and injury.
BEWARE OF SPIDERS

CAUTION: BURNER TUBES MUST BE INSPECTED AND CLEANED BEFORE EACH USE.
Spiders and small insects occasionally spin webs or make nests in the burner tubes. These webs can lead to a gas flow obstruction, which could result in a fire in and around the burner tubes. This type of fire is known as "FLASH-BACK" and can cause serious damage to your appliance and create an unsafe operating condition for the user. Although an obstructed burner tube is not the only cause of "FLASH-BACK" it is the most common cause, and frequent inspection and cleaning of the burner tubes is necessary.
FOR YOUR SAFETY
- Do not store or use gasoline or other flammable vapors and liquids in the vicinity of this or any other appliance.
- Do not store any propane/butane (G31-G30) cylinder (that is not connected for use) in the vicinity of this or any other appliance.
NOTE: Check with City and Fire department for Local Building Codes. A Permit may be required for outdoor kitchen construction.
Do not attempt to heat unopened containers on the grill as pressure may build up and cause the container to explode.
Never use charcoal or any other solid fuel in the grill.
Never cook without the drip pan in place.
Never operate this grill while under the influence of alcohol or drugs.
Please read all instructions before installing or operating your gas appliance to prevent injury and appliance damage.
• All gas appliances will get hot during use. Use extreme caution when operating the appliance.
- Do not touch hot surfaces. Always use the handle to open or close the appliance.
- Close supervision is necessary when this or any appliance is used near children. Keep children away from the appliance during operation and until the appliance has cooled off.
- Do not store any LP cylinder or tank not connected for use with the appliance, in the area of this appliance or any other appliance. Never store an LP cylinder or tank indoors, or within the reach of children.
- Never test the appliance for gas leaks using a lighted match or any other open flame; see leak test procedures using soap/water solutions – see section on Leak Testing.
- The use of accessories, regulators, or components not recommended by the appliance manufacturer may cause injuries and will void warranty.
- Never light the appliance with the hood closed and be certain that the burners are positioned and seated over the gas valves and on the burner support.
• Never lean over the cooking surface when lighting or operating the appliance.
• Use cooking utensils with wood handles and insulated oven mitts when operating the appliance.
- Do not store anything in the appliance. Make sure food is not forgotten in the appliance; forgotten items could melt or catch fire when the appliance is turned on.
• To prevent injuries, do not use accessories that are not recommended by the manufacturer. - Before cleaning the appliance, disconnect the rotisserie and "trip" the circuit breaker.
- Never use the appliance in windy conditions. If located in a consistently windy area (oceanfront, mountaintop, etc.) a wind break will be required. Winds blowing into or across the back hood gap, can cause poor performance and / or cause the control panel and knobs to get dangerously hot.
• Always open the appliance hood carefully, using only the handle - the hood may be hot. - Children should not be left alone or unattended in an area where any appliance is in use. They should never be allowed to touch, sit or stand on any part of the appliance.
- Do not store items of interest to children in cabinets above the appliance or in the appliance. Children climbing on the appliance to reach these items could be seriously injured.
- Wear proper clothing when operating this appliance. Loose-fitting or hanging garments should never be worn while using the appliance.
- Do not leave the appliance unattended while in use.
- Do not use water on grease fires! A violent steam explosion may result. Instead, smother the fire with a multipurpose ABC extinguisher.
Location of Appliance
Most importantly, this is an outdoor appliance. Ensure your appliance is positioned safely away from anything that can catch fire. Under no circumstance is this appliance to be used indoors. This includes
garages or any other enclosed area. This outdoor cooking gas appliance is not approved to be installed in or on any recreational vehicles and /or boats. Blaze Grills are for single family/residential use only.
When determining a suitable location take into account concerns such as exposure to wind, proximity to traffic paths and keeping any gas supply lines as short as possible.
- Do not store combustible materials, gasoline or flammable liquids or vapors around the appliance.
- This BLAZE GRILL must be located outdoors only. As with any gas appliance, harmful carbon monoxide is produced during the combustion process that should not be allowed to accumulate in a confined space. Please note since hot air rises above the BLAZE GRILL while in operation, covered locations should be avoided. Do not locate the BLAZE GRILL where an overhang or awning may cover it.
• DO NOT obstruct the flow of combustion and ventilation air to this appliance. -
Keep any electrical supply cords and the fuel supply hoses away from any heated surfaces and/or sharp and aggressive edges.
-
Non-Combustible Enclosure: The BLAZE GRILL must be installed in a NON-COMBUSTIBLE ENCLOSURE ONLY. The determination of whether a location is combustible or non-combustible construction is made by the local fire marshal, building inspector or the local safety authority having jurisdiction.
- Clearance from Combustibles: Ensure your appliance remains at a distance of at least 14" fromsides & 16" from back from any combustible material such as wood, gyprock, paper and plants. Do not store combustible materials, gasoline or flammable liquids or vapors around the appliance. The outdoor kitchen structure itself should be constructed completely out of non-combustible materials.
- Adequate Ventilation: Ensure there is adequate ventilation for both the appliance, grill cartand/or island cavity. This is required not only for proper combustion, but also to prevent gas build up. While the amount of venting required varies on a case by case basis, consult with your local licensed professional and local code for adequate venting requirements. Keep the ventilation openings of the enclosure free and clear from any debris.
- Firm Level Surface: Use your appliance only on a firm level surface. This appliance is not designed for recreational vehicles, and should not be installed on a boat or marine craft.
- Protection from Weather: Keep the appliance protected from adverse weather, including rain and winds. Wind, particularly coming into the rear of the grill, can affect the exhaust from escaping from the grill. This can back up the heat behind the control panel potentially creating a gas leak, damage to the product, and injury.
- Maintenance Access: When your appliance is installed, you should be able to access the gassupply line including the gas piping or hose, gas regulator, gas cylinder and any shut off valves. Allow clear access to the entire gas supply hose and regulator.
- Partial Enclosures: Many backyards have areas that are partially closed off, such as balconies and pergolas. In some cases, it is hard to decide whether these partially enclosed areas should be classified as indoor areas, particularly in terms of permanent (non-closable) ventilation. Consult the AHJ(Authority Having Jurisdiction) or local contractor of any uncertainty.
- When installing a Blaze Appliance under an overhead construction:
○ A minimum 6 foot of clearance is required between the countertop and the overhead construction.
When installing a Blaze Appliance under an overhead construction: A minimum 6 foot of clearance is required between the countertop and the overhead construction.
- When installed under a overhead construction, the area above the Blaze appliance must be covered with a UL 710 / ULC S646 vent hood. The vent hood must provide protection for the overhead construction.
When installed under overhead non-combustible construction, a UL 710 / ULC S646 vent hood is still Required. Gas appliances produce a large amount of smoke. The covered area should be properly ventilated.
When using a vent hood, the area above the cooking surface of the griddle must be covered with a vent hood larger than the cooking area of the griddle, and with a minimum of 1000 CFM for proper outdoor application.
Electrical Safety and Installation Warnings
Extension cords may be used if care is exercised in their use. If an
extension cord is used:
The marked electrical rating of the cord set or extension cord should be at least as great as the electrical rating of the appliance
The cord should be arranged so that it will not touch hot surfaces, sharp edges or drape over the countertop or tabletop (where it can be pulled or tripped over unintentionally).
Outdoor extension cords should be used with products suited for outdoor use. They are surface marked with suffix letters "W" or "W-A" and with a tag stating "Suitable for Use with Outdoor Appliances".
To protect against electrical shock, the power cord and plug should be kept dry and off of the ground. Do not clean this product with water spray; do not spray cleaners into the lamp socket area.
Gasoline, lighter fluid or other flammable liquids and vapors should never be stored in the area of this appliance or any other appliance.
Before installation or service, disconnect the power supply to the work area by removing the fuse, "tripping" the circuit breaker, or unplugging the unit.
NOTE: Use a 15 AMP Breaker with GFI protection.
NOTE: This grill uses a "Transformer" to provide power to the LED lights and internal lights. This diagram shows the connection to the transformer.
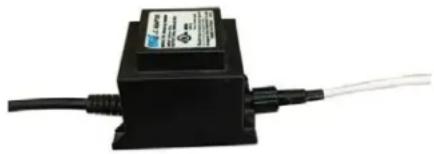
natural_image
Close-up of a black electronic component with wires, no visible text or symbolsKeep any electrical supply cord and fuel supply hose away from any heated surfaces, sharp edges and dripping grease.
Be certain your appliance is properly installed and grounded by a qualified technician in accordance with applicable codes. To guarantee the electrical safety of this appliance, continuity must exist between the appliance and an effective grounding system. It is imperative that this basic safety requirement be met. The manufacturer cannot be held responsible for damages caused by the lack or inadequacy of an effective grounding system.
Do not operate any appliance with a damaged power cord or power plug, and do not operate any appliance after the appliance malfunctions or has been damaged in any manner. If this should occur, return the appliance to the nearest authorized service facility for examination, repair or adjustment.
This appliance conforms to all uniform electrical safety codes and electrical grounding regulations. Install unit according to I.A.W. local codes or with National Electrical Code ANSI/NFPA 70 or CSA C22.1 in their absence.
Gas Safety and Installation Warnings
- All gas connections should be made by a Professional qualified technician and in accordance with local codes and ordinances. The installation must conform with local codes or, in the absence of local codes, with either the national Fuel Gas Code, ANSI Z223.1/NFPA 54, or CAN/CGA-B149.1, Natural Gas Installation Code or CAN/CGA-B149.2, Propane Installation Code.
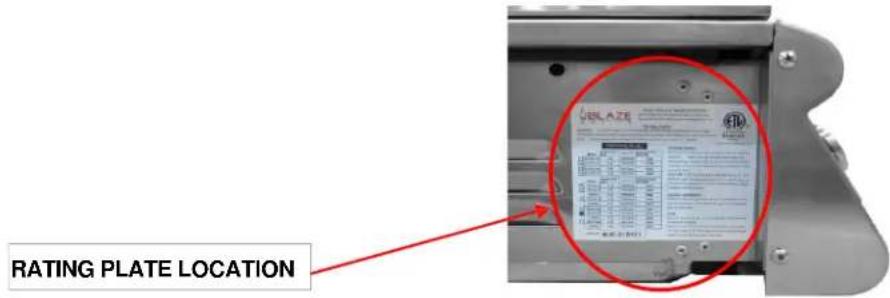
- Always check the Rating Plate to make sure the gas supply you are hooking up to is the gas type the appliance is manufactured for.
- Check the rating label on the left hand outside of the unit.
text_image
RATING PLATE LOCATION• Do not twist the gas supply hose.
- Before each use, visually inspect the gas supply hose for cracks, cuts or excessive wear. Replace the hose if necessary. Check for gas leaks before each use.
- Gas Specifications: Be sure that the gas supplied to the appliance conforms to the model you purchased. A Natural Gas appliance requires natural gas to operate; an LP appliance requires liquid Propane gas to operate.
- Never connect the appliance to an unregulated gas supply line. Appliances operated without regulator are unsafe and will not be serviced until installed properly and safely. Unsafe operation without a gas regulator will void the warranty of the appliance.
- Appliances operated with NG (natural gas) gas must be installed with the NG regulator supplied with the unit and set to 4.0" water column pressure.
- Appliances operated with LP (liquid propane) gas must be installed with an LP regulator set to 11"water column pressure.
- Please contact your dealer and use a licensed contractor or installer to convert your appliance to the different gas type.
- CHECK TO ENSURE THAT THE GAS SUPPLY HOSE DOES NOT COME IN CONTACT WITH ANY HOT SURFACE, SHARP OR ROUGH EDGES OF THE GRILL OR OUTDOOR KITCHEN CONSTRUCTION. DO NOT KINK THE GAS LINE WHEN INSTALLING.
The self-contained LP system appliance is design certified to be used with a standard 20 lb., 12 1/4" diameter; 18" high cylinder with right handed connection threads and this is the maximum size LP tank to be used. The cylinder must be marked in accordance with the latest U.S. Department of Transportation specifications for LP gas cylinders. (DOT. CFR49 or National Standards of Canada CAN/CSA-B359 Cylinders, Spheres and Tubes for the Transportation of Dangerous Goods) a Propane Tank with an ODP) Overfill Prevention Device) must be used at all times.
IMPORTANT: Never connect the appliance to an unregulated gas supply.
If there are local codes that apply to outdoor grills, you will have to confirm them with the local authority.
Installation must conform with local codes or in the absence of local codes, to the National Fuel Gas Code, ANSI Z223.1/NFPA 54 and Natural Gas Installation Code, CSA B149.1. All Natural Gas installations must conform to local codes or in the absence of local codes the national fuel gas code, ANSIZ2223.1a--1998.
If there are local codes that apply to outdoor burners, you will have to conform to them. Installation must conform with local codes or, in the absence of local codes, with Propane Installation Code, CSA B149.1, or Propane Storage and Handling Code, B149.2 as applicable. Installation in Canada must be in accordance with the standard CAN/CGA-B149.2.
○A licensed contractor or local gas company representative must perform all gas connections.
- Ensure that the service supplying the appliance is fitted with a shut off valve conveniently positioned near the appliance and giving ease of access.
The appliance and its individual shutoff valve must be disconnected from the gas supply piping system during any pressure testing of that system.
WARNING
GAS LEAK WARNINGS
Finding and/or fixing a gas leak is NOT a "DO-IT-YOURSELF" procedure - ONLY USE A PROFESSIONAL.
☑ NEVER USE THE GRIDDLE WITHOUT FIRST LEAK TESTING THE GAS CONNECTIONS INCLUDING ALL OF THE VALVES, FITTINGS, LINES ETC. (ALL GAS CONNECTIONS SHOULD BE CHECKED)
WARNING: DO NOT USE OPEN FLAME TO CHECK FOR LEAKS. USE OF AN OPEN FLAME COULD RESULT IN A FIRE, EXPLOSION AND BODILY HARM.
DO NOT SMOKE WHILE PERFORMING THE LEAK TEST. Any open flame will ignite the gas.
To prevent fire or explosion hazard, Perform leak test outdoors only.
Check to ensure that flexible hoses do not have any cuts and wear that may affect the safety before each use. Only the factory supplied hose and regulator must be used. Use only replacement regulator and hose assemblies specified by BLAZE.
Checking for Gas Leaks
Perform a leak test before each use whether the gas supply cylinder has been disconnected or not. In addition, whenever the gas cylinder is connected to the regulator or whenever any part of the gas system is disconnected or replaced, perform a leak test.
As a safety precaution, remember to always leak test your appliance outdoors in a well-ventilated area. Never smoke or permit sources of ignition in the area while doing a leak test. Do not use a flame, such as a lighted match to test for leaks. Use a solution of soapy water.
- Prepare a leak testing solution of soapy water by mixing in a spray bottle one part liquid soap to one part water.
• Make sure all the control knobs are in the OFF position. - Turn on the gas.
- On Natural Gas systems, turn the main feed valve to the appliance.
○ On LP systems, turn the cylinder valve knob counter clockwise one turn to open.
- Apply the leak-testing solution by spraying it on joints of the gas delivery system. This includes all valves, pipe connections, joints, lines and every point from the gas source to the burners.
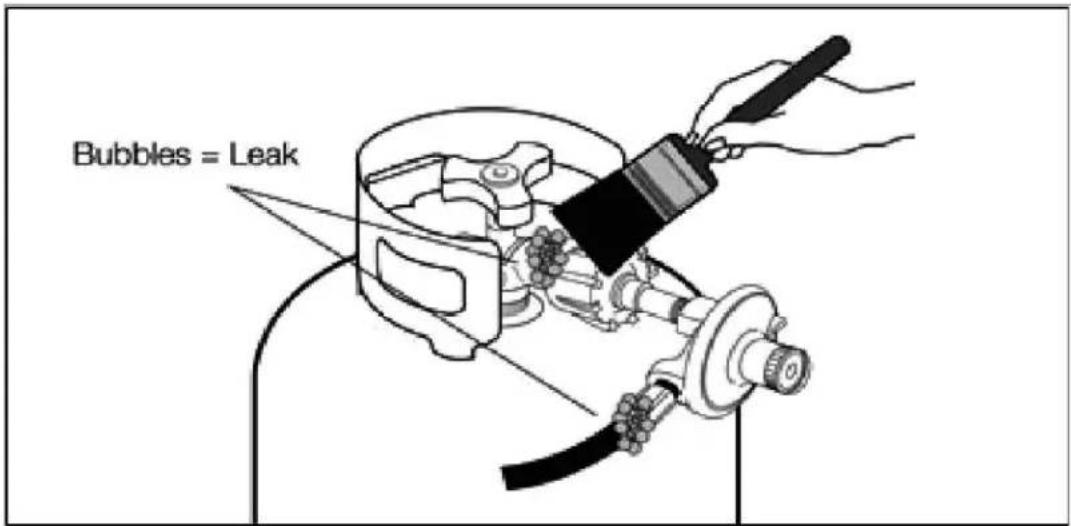
- Blowing bubbles in the soap solution and/or there is a faint gas smell (Typically Gas has an Egg Smell) indicates that a leak is present. Do not attempt to ignite the grill.
• Turn all control knobs back to the full OFF position. - Stop a leak by tightening the loose joint and/or resealing with thread sealant or Teflon tape, removing sealant
or tape in the event of a flared connection or by replacing the faulty part with a replacement part recommended by the manufacturer. Do not attempt to repair the cylinder valve if it is damaged. The cylinder must be discarded to a proper LP tank location and then replaced.
- If you are unable to stop a leak turn all control knobs back to the full OFF position, shut off the gas supply to the appliance and release pressure in the hose and manifold by pushing in and turning any of the control valves one quarter turn counter-clockwise.
• On LP systems, remove the cylinder from the appliance. - Call an authorized gas appliance service technician or an LP gas dealer.
• Do not use the appliance until the leak is corrected. - The below diagram is intended to show what a leaking connection would look like. These two locations are not the only points to check nor the only potential areas for a gas leak to be present.
text_image
Bubbles = LeakLeak Testing
- All gas piping and connections must be tested for leaks after installation or service along with before each use. This includes all valves, pipe connections, joints, lines and every point from the gas source to the burners.
All leaks must be corrected immediately. Remember-before exchanging an empty bottle for a new one; make sure all control valves are in the "off" position. This can create a low flow of gas through the grill. This would require the tank to be disconnected from the regulator, and then reconnected to reset the regulator.
Open the valve (shut-off or 'ON' LP tank). Test for leaks by applying liquid soap solution to all joints. Bubbles forming indicate gas leak.
- The following diagram is for informational purposes only. These locations are not the only points to check nor the only potential areas for a gas leak to be present. Ensure the leak test includes all valves, pipe connections, joints, lines and every point from the gas source to the burners.
NEVER USE AN OPEN FLAME TO CHECK FOR LEAKS.
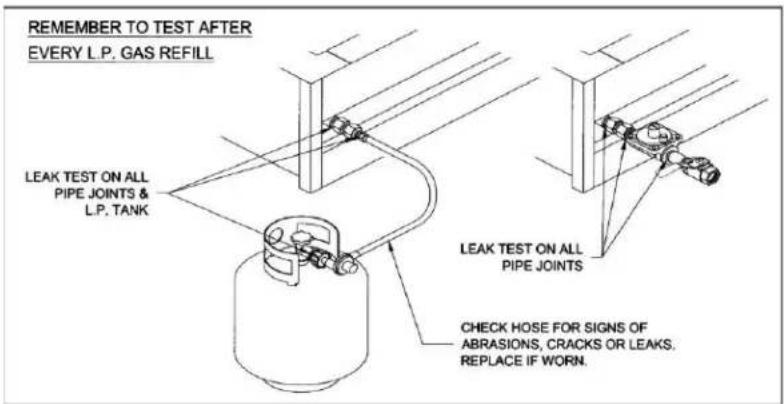
text_image
REMEMBER TO TEST AFTER EVERY L.P. GAS REFILL LEAK TEST ON ALL PIPE JOINTS & L.P. TANK LEAK TEST ON ALL PIPE JOINTS CHECK HOSE FOR SIGNS OF ABRASIONS, CRACKS OR LEAKS. REPLACE IF WORN.UNPACKING UNIT:
Product Inspection: A final inspection of your product occurs at the factory to ensure a quality product is packaged. Please re-check for possible shipping damage immediately after unpacking your grill. If the appliance is found to have some damage, contact your dealer immediately as often the shipping carrier will have a timeframe to report damage. Please also save the packaging material the product came with as that is at times inspected by the shipping carrier.
Caution: Do not leave the unit under the sun with the protective film on for a long period of time as it will make the film difficult to remove and/or leave markings on the materials which are not covered by the warranty.
Your Blaze Series Appliance comes pre-assembled and requires very little setup. We do however; recommend the use of professional help during the installation of your unit as improper installation may affect your warranty. Remove the unit from the box along with all accessories and check that no damage has occurred to the unit or any parts. Remove all packaging materials, labels and protective plastic film before you start cooking.
Burners: Check the burner tubes and remove any obstructions that may be in the ports or holes. Using cold water and a brush will be sufficient. Make sure all foreign particles are removed from the burner before use. Make sure the air shutter on the burners is slightly opened (to about 1/8" for NG and 1/4" for LP). When finished ensure that the burners are aligned with the valve orifice and seated in the bracket slot. This is accomplished by first placing the burner tube shutter hole securely over the valve orifice and ensuring the male post on the burner rests in the corresponding slot in the rear of the grill chassis. Failure to do so could result in a fire and injury.
Gas Connections
Natural Gas Requirements
- Connect a suitable natural gas flex connector to the grill regulator located on the rear right corner of the appliance. It is recommended to use a flex connector with a minimum of a 12 " diameter or larger.
• Sealing all non-flared fittings with thread sealant or Teflon tape. - Ensure the flex connector is protected from sharp edges, heat, aggressive surfaces, and kinking.
- Check the appliance controls to ensure all control valves are in the full OFF position.
- Turn on the main gas supply and check all connections for leaks using soapy water as described in the leak testing procedure section.
- The regulator used must be set for 4" water column and is for use with Natural gas only. Note: Most low pressure regulators have a directional arrow indicating the direction in which the gas must travel. Ensure the arrow is pointing in the direction of the grill.
- An installer supplied gas shutoff valve must be installed in an accessible place.
Liquid Propane (LP) Gas and Tank Requirement
- If your BLAZE Grill is for a Liquid Propane application, a L.P regulator set for 11" WC must be used and is for use with LP gas only.
• The regulator and hose supplied must be used with a 20 lb. LP cylinder.
• A collar to protect the cylinder threads on the customer supplied tank.
• An arrangement for gas vapor withdrawal.
• A safety relief device having direct communication with the vapor space of the cylinder.
• A method of mounting. - The gas supply must be turned off at the LP Gas supply cylinder and the LP Gas supply cylinder must be disconnected from the regulator when this outdoor cooking gas appliance is not in use.
- Always sit the cylinder in an upright position so that the cylinder valve is at the top. This will ensure proper vapor withdrawal.
- The cylinder should not be stored in a building, garage, or any other enclosed area. It should be stored outdoors in a protected, cool, and dry location out of reach of children.
- Never store any spare or extra gas cylinder(s) around or in the outdoor kitchen containing the BLAZE GRILL or any other open flame, heat-producing appliance(s) or heat source.
WARNING
Filling and Refilling LP Gas Cylinders:
All purging and refilling of LP gas cylinders must be performed by qualified personnel in the LP gas industry. Never store a spare LP gas cylinder under or near this appliance. Never fill the LP gas cylinder beyond 80 percent full. Failure to follow these instructions may result in explosion, personal injury or death.
• Turn control knobs and cylinder valve to the OFF position. Unscrew valve.
- Remove cylinder and have it filled at your local qualified propane dealer.
• Once filled, carefully connect the valve and make sure it is secure and not leaking.
- With the control knobs in the OFF position, turn on the cylinder valve.
If you smell gas or hear a hiss of gas escaping from the tank, get away from the tank and do not attempt to correct the problem yourself. Call the Fire Department immediately.
If your appliance has no leak at the cylinder, then re-check for loose connections and retest for leaks using the method detailed in the following pages with soapy solution.
Do not subject your LP gas cylinder to excessive heat, and always store the cylinder in an upright position. Never store your LP cylinders indoors.
Make sure that when attaching components, all connections are secured and fully tightened to prevent leakage.
Always check for leaks before every use.
If one is not already available, it is required that an ON-OFF shutoff valve be installed at the gas supply source, and that the gas supply be turned off when either Natural Gas or LP Gas appliances are not in use.
Transporting and Storing LP Gas
Transport only one cylinder at a time. Ensure the cylinder is secured in an upright position with the control valve turned off and the dust cap in place. Store cylinders outdoors and out of the reach of children. Do not store cylinders in a building, garage, or any other enclosed area.
Procedure for LP Gas Cylinder Connection (20 lbs)
The LP Gas Cylinder must be in compliance with the specifications for LP-Gas Cylinders of the US Department of Transportation or the National Standard of Canada, CAN/CSA - B339. The basic tank size is 12" in diameter and 18" High with a QCC-1 cylinder valve.
- Turn the "Hand Wheel" on cylinder clockwise until it stops to ensure the Cylinder Valve is fully closed.
- Turn all of the burner knobs to the OFF position.
- Connect the 3/8" Flare end of the hose to the 3/8" Flare end of the brass coupling on the unit using a 3/4" open wrench. Do not apply pipe sealant. (These are flared fittings). Note: remember the rubber line on the hose and regulator must be protected from sharp edges, hot surfaces, aggressive building materials that could cut, melt, or damage the line. A separate approved gas line might be needed to go between the hose and regulator and the grill to position the rubber line in a safe location.
- Connect the regulator to the LP cylinder. Only hand-tighten the regulator.
- Check for leaks using a soapy water solution by spraying on all connections, including all of the valves, fittings, lines etc. (any and all gas connections have the ability leak and therefore it is critical to check for leaks before each use)
- To disconnect after you have used the appliance, turn the burner knobs to the OFF position.
- Close the Cylinder Valve by turning the Hand Wheel counter-clockwise until it stops.
- Disconnect the regulator from the LP cylinder after use.
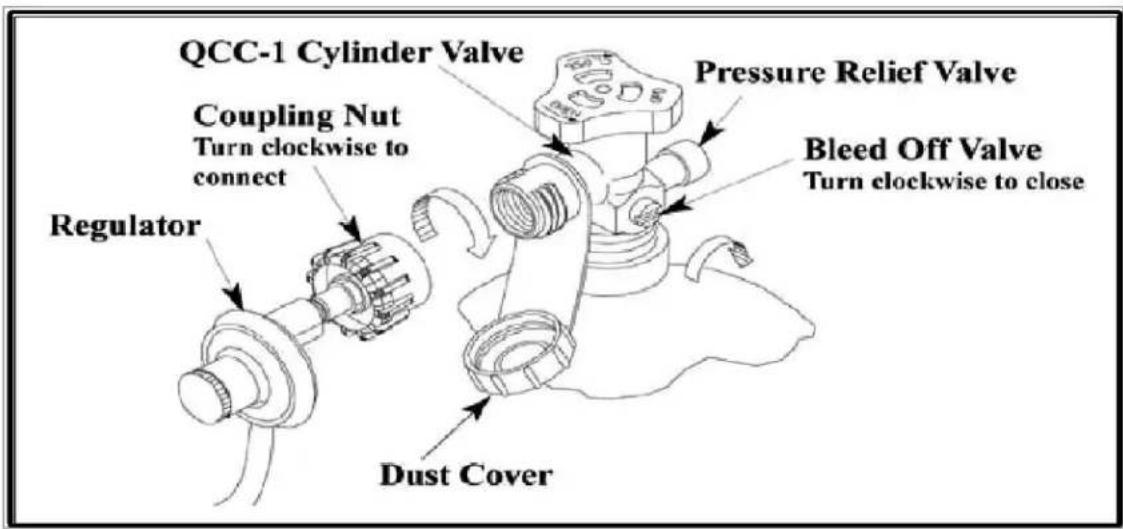
text_image
QCC-1 Cylinder Valve Coupling Nut Turn clockwise to connect Regulator Pressure Relief Valve Bleed Off Valve Turn clockwise to close Dust CoverInstalling the Appliance in a BBQ Island
NOTE: Check with City and Fire department for Local Building Codes. A Permit may be required for outdoor kitchen construction.
You will need a second person to help you avoid damaging the appliance or your appliance island.
WARNING
Ensure all clearances to combustibles are maintained. See page 25.
The island must be made out of non-combustible material. In the event it is combustible, the use of an insulation jacket is REQUIRED.
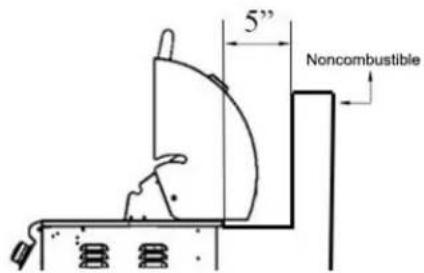
A distance of 5" will be needed behind the grill for the lid to open and close. Remember that should combustible materials (such as a combustible wall) be located behind the grill that the needed 5" for lid clearance doesn't satisfy the distance required from a combustible surface.
WARNING
Protection from Weather: Keep the appliance protected from adverse weather, including rain and wind. Wind, particularly coming into the rear of the grill, can affect the exhaust from escaping from the grill. This can back up the heat behind the control panel potentially creating a gas leak, damage to the product, and injury. A wind block behind the grill may be necessary.
Outdoor Kitchen Ventilation
WARNING
Failure to adequately vent your outdoor kitchen cavity could result in an explosion or fire.
When building a gas grill into an outdoor kitchen, it is necessary to provide adequate ventilation for the island cavity underneath. This is necessary for not only proper combustion, but also to prevent a buildup of gas. While the amount of venting required for your island will vary due to the variety of differing local codes, inner framework and design of an outdoor kitchen, the amount of gas products installed and their locations, etc., all built in grill islands should be ventilated in some way. Your local contractor and/or your local code authority can determine adequate ventilation for each installation. Stainless Steel vent panels are available from your dealer to cover the island venting.
The following information is important to consider when adhering to your local code requirements.
LP/Propane Gas: LP gas is heavier than air and will settle to the lowest levels of the outdoor kitchen. It is imperative to provide adequate cross ventilation for the areas where gas can accumulate at these lower levels of the island cavity. Should the Propane cylinder be located in the outdoor kitchen itself, a plenum wall is required to separate the gas source from the other areas of the outdoor kitchen (picture shown in owner's manual), and both the cabinets containing the gas appliances and the gas tank should be ventilated appropriately. If a plenum wall is undesirable, Blaze offers a Propane tank drawer as an alternative.
NG/Natural Gas: Natural gas is lighter than air and will rise to the highest levels of the outdoor kitchen. It is imperative to provide adequate cross ventilation for the areas where gas can accumulate at these higher levels of the island cavity.
The following diagram shows a variety of examples of venting locations and configurations for an outdoor kitchen. These are not the only possible options for venting but instead simply some examples of the more common configurations found. Notice the middle set of vents being positioned lower on the island cavity for LP gas.
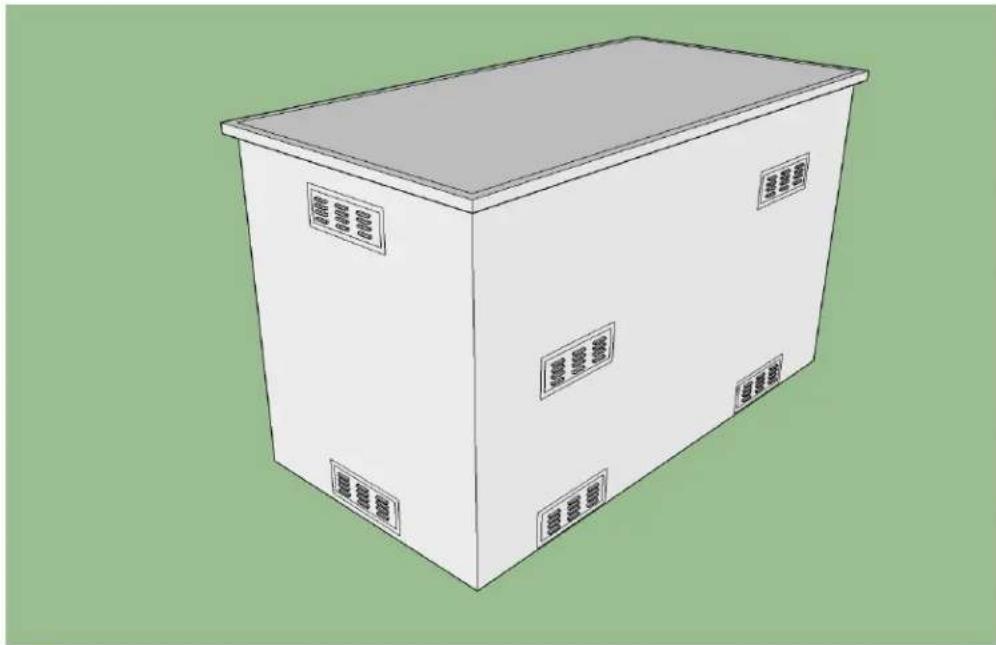
natural_image
Isometric line drawing of a rectangular industrial box with labeled compartments (no text or symbols on the box itself)BUILDING BBQ SPECIFICATIONS
ALL GAS CONNECTION POINTS SHOULD BE TESTED FOR LEAKS AFTER INSTALLATION PRIOR TO FIRST USE OF THE GAS APPLIANCE(S).
Before installing an appliance in any island cut out, make sure that the opening is not bigger than the outside frame of the appliance unit. The appliance should rest on the lip of the frame.
Pay careful attention to the location of the gas line. It should be routed away from sources of heat, sharp edges, and aggressive surfaces and should make as few bends as possible.
Ensure the gas line connection will be accessible when appliance is installed. A safety shutoff valve is required at this gas connection point. Before installing the grill into the island cutout, the main burner cotter pins may be removed for convenience of service, adjustments, and maintenance in the future. These are accessible from the outside rear of the grill.
PLEASE NOTE: An enclosure for an gas shall be ventilated by openings at both the upper and lower levels of the enclosure. At least two ventilation openings shall be provided in the side wall of the enclosure, located within 5 in (217 mm) of the top of the enclosure at a minimum of 90 degrees (1.57 rad), and unobstructed. Also, ventilation opening(s) shall be provided at floor level of the enclosure. If ventilation openings at floor level are in a side wall, there shall be at least two openings. The bottom of the openings shall be 1 in (25.4 mm) or less from the floor level and the upper edge no more than 5 in (127 mm) above the floor level. Every opening shall have minimum dimensions so as to permit the entrance of a 1/8 in (3.2 mm) diameter rod. Ventilation openings in side walls shall not communicate directly with other enclosures of the outdoor cooking gas appliance.

text_image
BACK OF BBQ Bumer Copper FoWARNING
If the main burner cotter pins are removed before installing, the main burners must be double checked for the correct placement in the grill before operation. When finished ensure that the burners are aligned with the valve orifice and seated in the bracket slot. This is accomplished by first placing the burner tube shutter hole securely over the valve orifice and ensuring the male post on the rear of the burner rests in the corresponding slot in the grill chassis. Failure to do so could result in a fire and injury.
If the outdoor kitchen countertop will overhang the face of the island, notching out the two front countertop edges will be
necessary to allow the grill to slide flush against the outer front wall to the outdoor kitchen. Due to differing personal
preferences of the size of the notch out, this is recommended to be done at the point of installation so that the consumer can
dictate their preference.
NOTE: The control panel of this unit is removable for service and must remain accessible. Do not seal around the control panel preventing removal.
- Slide the appliance into the cut out and then attach the gas line.
- Be very careful not to kink the gas line when lowering the appliance into the cutout.
- Keep your fingers away from where the appliance will be supported on counter. Your fingers could become trapped and serious injury could occur.
- Check to make sure the appliance is level and is supported around the entire outside edge. If the appliance is not level or is unstable, use non-combustible shims under the outside lip to stabilize it.
• Perform the leak test procedure as described earlier in this manual. - Connect the transformer to the grill, then into the electrical outlet. Be sure to follow all of the electrical safety and instructions found on page 12.
*Ensure your island cavity is adequately vented. Number of vents shown in diagram is for informational purposes only.
*Consult your local licensed professional for adequate requirements.
*Ensure your outdoor kitchen is constructed out of non-combustible materials. *If your outdoor kitchen is constructed of combustible materials, an insulated jacket is REQUIRED.
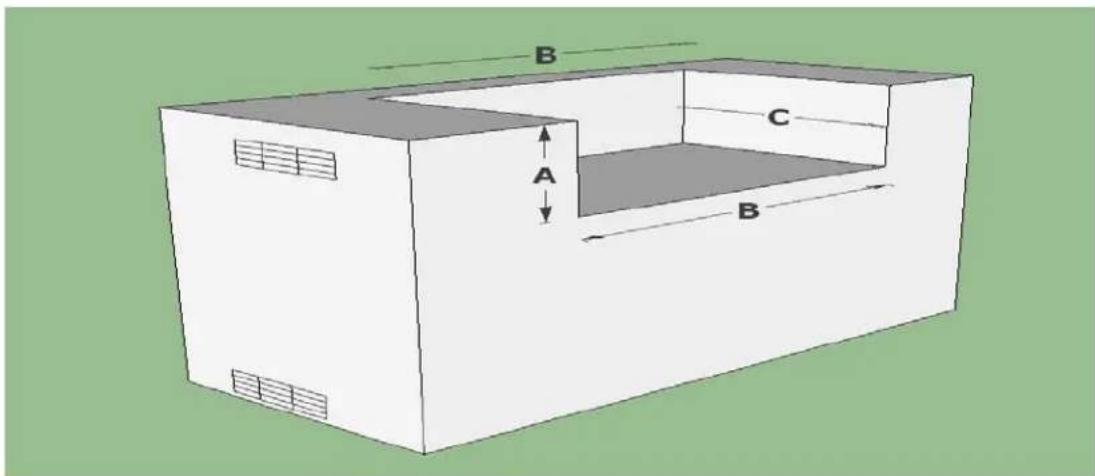
text_image
B A C BALL BBQ ISLANDS MUST BE MANUFACTURED FROM "NON-COMBUSTIBLE" MATERIAL.
Minimum clearance to adjacent combustible construction at 14" from sides & 16" from back
MODEL DESCRIPTION HEIGHT (A) WIDTH (B) DEPTH (C)
| BLZ-4 LTE2 | 32" 4 Burner LTE | 8 1/2" | 30 5/8" | 21 1/4" |
| BLZ-5 LTE2 | 40" 5 Burner LTE | 8 1/2" | 38 3/8" | 21 1/4" |
A distance of 5" will be needed behind the grill for the lid to open and close. Remember that should combustible materials (such as a combustible wall) be located behind the grill that the needed 5" for lid clearance doesn't satisfy the distance required from a combustible surface. See diagram on next page.
*These dimensions create the required air gap underneath this appliance. This air gap serves multiple purposes, such as preventing a build-up of heat in the island cavity and helping provide proper airflow for combustion and/or cabinetry.
Additional Hood Clearance
text_image
5" Noncombustible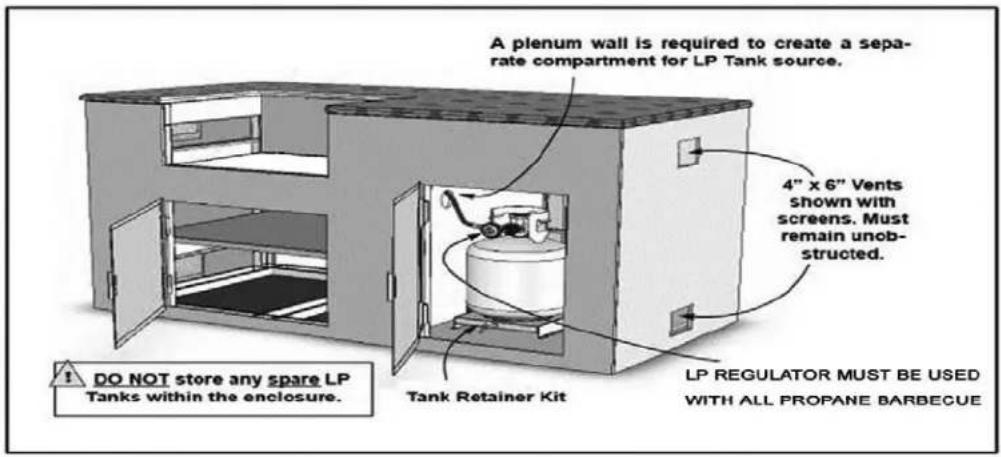
text_image
A plenum wall is required to create a separate compartment for LP Tank source. 4" x 6" Vents shown with screens. Must remain unob-structed. DO NOT store any spare LP Tanks within the enclosure. Tank Retainer Kit LP REGULATOR MUST BE USED WITH ALL PROPANE BARBECUEInstallation Diagram
(5 Gallon LP tank shown)
text_image
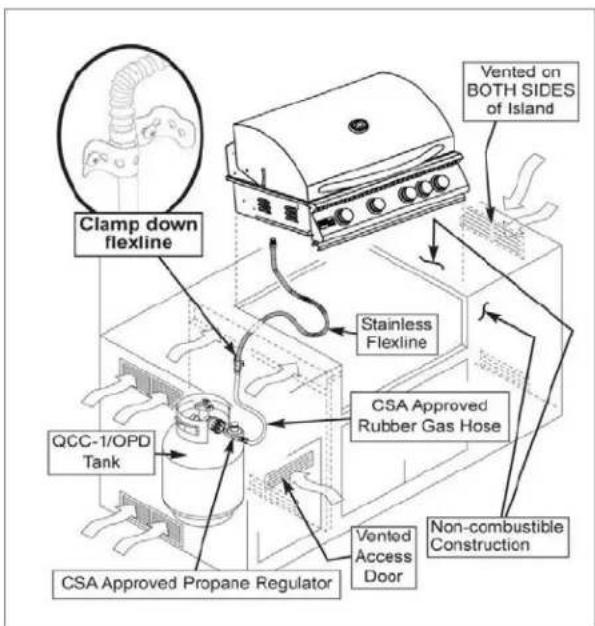
Clamp down flexline Vented on BOTH SIDES of Island Stainless Flexline QCC-1/OPD Tank CSA Approved Rubber Gas Hose CSA Approved Propane Regulator Vented Access Door Non-combustible ConstructionInstallation Method for Low Pressure Gas Source- (Natural Gas Regulator Shown)
text_image
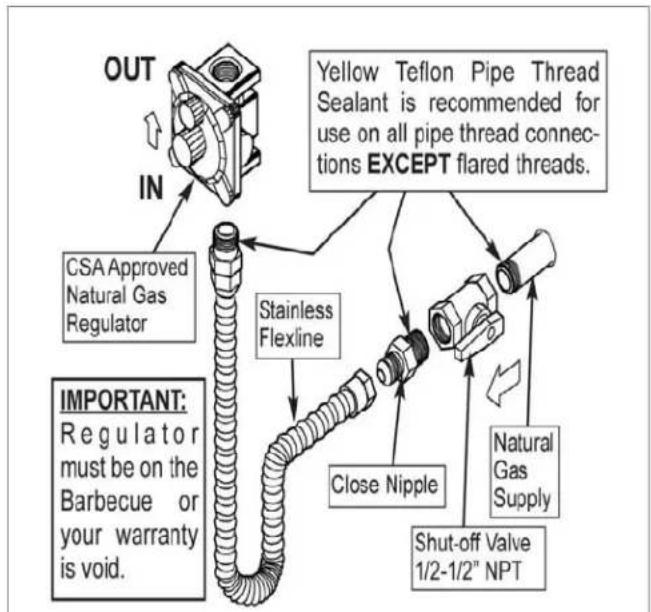
OUT IN CSA Approved Natural Gas Regulator Stainless Flexline Yellow Teflon Pipe Thread Sealant is recommended for use on all pipe thread connections EXCEPT flared threads. IMPORTANT: Regulator must be on the Barbecue or your warranty is void. Close Nipple Natural Gas Supply Shut-off Valve 1/2-1/2" NPTBefore lighting the burners inspect the gas supply piping or hose. If there is evidence of cuts, wear, or abrasion, it must be replaced prior to use. Always keep your face and body as far away from the grill as possible when lighting. Always perform a gas leak test before each use.
Caution: Never operate the appliance unattended. The surface is extremely hot and someone can touch the hot surface and get seriously burned. All gas appliances should be attended at all times.
Prior to using your appliance, verify that all of the following is correct:
√ The burner tube is free of any debris or obstruction.
√ Installation of the proper gas type and regulator settings.
√ The proper gas connection is complete.
√ Check for gas leaks.
√ Minimum clearances are maintained.
√ All packaging has been removed.
√ All parts and components are properly in place.
√ An installer-supplied manual gas shut-off valve is fully accessible.
√ LP hose is clean and inspected for cuts, wear, abrasion, or leaks. Replace if necessary with a suitable UL, ETL or CSA Listed part with internally threaded connector.
Lighting the Appliance
- Open the hood.
- Use caution when lighting burners by standing as far away from the burners as possible. Do not put your hands, arms, head or any body parts close to the grill when lighting.
- To ignite burners, push the burner knob in and slowly rotate counter-clockwise to the highposition.
- You will hear a loud click as the electronic lighter produces a spark. Listen for the sound of the gas igniting and look for a flame through the cooking grids. If the burner does not light on the first try, repeat
immediately. (For rear burner, a slower turn of the knob is necessary. This allows gas to accumulate in the rear burner to achieve ignition. Never use the rear burner with the warming rack in place)
- If the burner does not light in 5 seconds, turn the burners off and wait five minutes with the lid open until the gas clears before attempting to light it again. Repeat the procedure or try the manual lighting procedure below.
- If the burner does not light after several attempts, immediately close all gas valves and consult an authorized service technician.
- Upon successful lighting, repeat the process on the other burners you wish to light.
- Toshut off the burners, rotate the knob and turn to OFF. It is normal to hear a popping sound when the burners are turned off.
- Close the valve at the gas supply.
Manually Lighting the Main Burners
WARNING: A paper book match can be used, but it is recommend to use a longer match or cigarette lighters to perform match-lighting procedures. Serious burns can occur and lighters can explode.
- Open the hood.
- If you have just attempted to light the burner, allow five minutes for any accumulated gas to dissipate. Use caution by standing as far away from the burners as possible. Do not put your hands, arms, head or any body parts close to the grill when lighting.
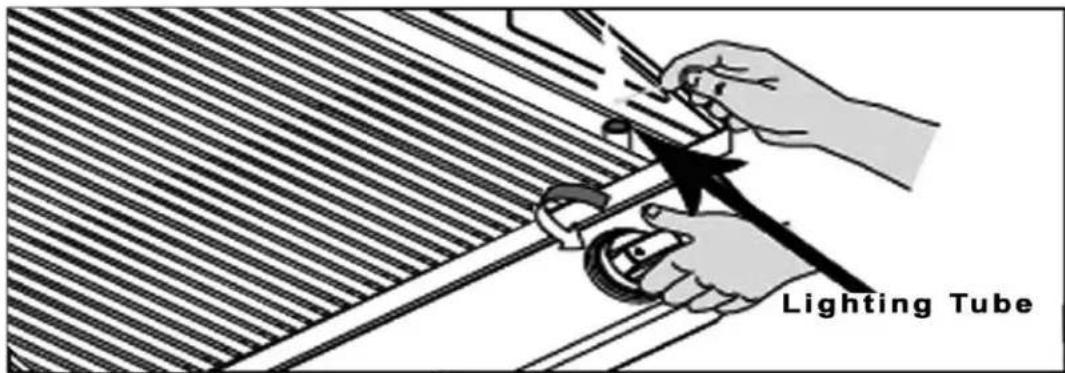
- Hold your open flame to the top of the Lighting Tube. See below picture.
text_image
Lighting Tube- Push in and turn the control knob to HIGH.
- If the burner does not light after five seconds, turn the control knobs to the OFF position.
- Wait five minutes until the gas clears before attempting to light it again.
- If the burner does not light after several attempts, immediately close all gas valves and consult an authorized service technician.
WARNING
"FLASHBACK" may occur in or around the burner tubes. Flashback exhibits a characteristic "whooshing/jet like" sound. If this should occur, immediately turn off your burners, then remove and clean them with soap, water and a brush until all foreign objects are removed.
Before cooking with your appliance for the first time, burn off any foreign matter and rid the unit of any odors by burning the main burners only on HIGH with the lid down for about 10 minutes. When lit, the flame should have a mostly blue color to it. It may have a tint of yellow and adjustment to the air shutters can be made to obtain a blue flame and proper gas glow (see flame adjustment. Turn the control knobs to HI and allow the grill to preheat for 15 minutes or until desired temperature is displayed on the thermometer. The hood is to be closed during the appliance preheat period.
Manually Lighting the Rear Burner
- Open the hood. Never use the rear burner with the warming rack in place.
- If you have just attempted to light the burner, allow five minutes for any accumulated gas to dissipate. Use caution by standing as far away from the burners as possible. Do not put your hands, arms, head or any body parts close to the grill when lighting.
- Hold your open flame to the right side of the rear burner.
- Push in and turn the control knob to HIGH.
- If the burner does not light after five seconds, turn the burner off and wait five minutes with the lid open until the gas clears.
- Wait five minutes until the gas clears before attempting to light it again.
- If the burner does not light after several attempts, immediately close all gas valves and consult an authorized service technician.
Flame Adjustment
a. Become familiar with the safety instructions at the front of this manual. Do not smoke while lighting the appliance or checking the gas supply connections.
b. Make sure that all gas connections are securely tightened and have been leak-tested with a soapy water solution - never with a flame!
c. With the cooking grids and flame tamers removed, light the main burners and run them on the high setting.
d. Inspect burners for proper flame appearance. The ideal flame appearance is one that is mostly blue and not lifting off of the burner surface. There is an air shutter found at the end of the burner (close to the valve) which
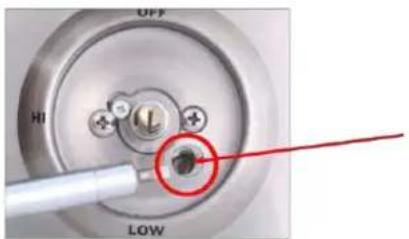
can be either opened or closed to make adjustments to the flame's appearance. To adjust, remove the burner from the appliance and loosen the Philips head screw holding the air shutter to the burner. If the flame is yellow, open the air shutter to make the flame bluer. If the flame is lifting off the burner surface, slightly close the air shutter. Re-tighten the Philips head screw and re-install the burner to recheck the flame appearance. Repeat if necessary. Turn burners to low flame setting and test for proper flame height. Flame should be stable and burning out of each burner port without danger of going out in the lowest setting. (To adjust the LOW flame setting simply light the appliance on the LOW setting and adjust the screw located under the knob on the front of the valve using a flat head screwdriver as seen in the diagrambelow.)
text_image
OFF HI LOWLow flame setting screw
Cleaning Your Appliance
NOTE: Always wait until your appliance is completely cool before cleaning. You should clean your appliance after each use to maintain the overall appearance over the life of your appliance. After the first use, it is normal for your appliance to become discolored in certain areas from the heat produced by the burners. A video for cleaning your grill is located on the blaze website to assist with the below instructions, www.blazegrills.com .
Exterior Cleaning
When cleaning your appliance, always scrub and polish in the direction of the stainless steel grain. Wipe down the exterior of the appliance to remove any splatter or grease. Do not use harsh abrasives. Use a stainless steel cleaner to clean the exterior surface for a polished look. To remove baked-on foods, use a fine to medium grit non-metallic abrasive pad with a stainless steel cleaner to avoid specks of grease collecting in the grain causing the appearance of rust. Before installing the cover, always allow the surface to dry. DO NOT cover a damp appliance.
Drip Tray
Clean the drip tray after each use. Failure to do so could result in a fire. Once the appliance has cooled completely, remove the tray by pulling it all the way out until it comes free. Clean the tray with hot soapy water and replace ensuring the tray is installed completely in the grill housing. If using an oven cleaning agent, be sure to carefully follow the manufacturer's instructions to avoid damage to the stainless steel.
Heat Separators, Flame Tamers, Grilling and Warming Racks
To clean (should clean after each use), turn the main burners on HIGH for 10-15 minutes with the hood closed. This allows any food particles or grease drippings to burn away. Brush components with a stainless steel bristle brush to remove any remaining charred materials.
Cast Stainless Steel Burners
The appliance must be completely cooled before proceeding. Make sure the gas supply is off and all control knobs are in the "OFF" position. You must remove all cooking grids and flame tamers to expose the main burners in the appliance. On the bottom rear of each burner is a cotter pin accessible from the back of the grill head. Remove cotter pins (unless they were removed prior to installation into an outdoor kitchen). To remove burner, pull rod upwards and slide burner toward the rear of the appliance. Repeat for each burner. To clean the burners, use a wire brush to clean the exterior of the burner. Free all clogged ports of obstructions with a small metal object. Clean out any debris through the air shutter and inspect the burner inlet to ensure it is free of any obstructions. Use a rod or pipe cleaner to remove any debris within the burner if necessary.
SPIDER AND INSECT WARNING
Spiders and other insects can nest in the burner of this and any other burner, which causes the gas to flow from the front of the burner. This dangerous "condition" can cause a fire behind the valve panel, damaging the burner and making the burner unsafe to operate. Inspect the burners before each use. Symptoms of insect nests can include any of the following conditions:
1) The smell of gas in conjunction with the burner flames appearing yellow.
2) The burner does not reach temperature.
3) The burner heats unevenly.
4) The burner makes popping noises.
WARNING
NOTE: Make sure each burner is properly placed after cleaning. It is very important to ensure the end of the burner is installed appropriately onto the gas valve to ensure gas flows safely into the burner. Failure to meet these conditions can cause dangerous conditions that can cause personal injury and/or property damage.
How to Replace Conventional Burner with Infrared Sear Burner (A video for installing the infrared sear burner is located on the blaze website to assist with the below instructions, www.blazegrills.com)
- To install the optional infrared burner, begin by removing the far left cooking grid, flame stabilizing grid and zone divider.
- Remove conventional burner by first removing the cotter pin that holds it in place (unless they were removed prior to installation), located on the bottom rear of the burner and accessible from the rear outside of the grill body. With the cotter pin removed, remove the conventional burner.
- Place the infrared burner in place, leaving off the flame tamer. Ensure the burner is seated appropriately around the valve so that gas flows into the burner.
- Replace the heat zone divider and cooking grid. Do not use this burner with the flamer tamer reinstalled above the burner.
Note: It is critical that the end of the infrared burner is installed appropriately onto the gas valve to ensure gas flows safely into the burner. For additional information, contact us at 866-976-9510 or go to Blazegrills.com.
Preheating the Infrared Burner
Always preheat the entire appliance before cooking. If the appliance is already hot from cooking, you should still preheat the infrared burner for 3 minutes with lid open. Never place food over the burner until it is fully preheated to avoid clogging the tiny ports and damaging the burner from grease drippings and food particles.
Infrared Burner Cleaning
To keep your infrared burner operating at maximum performance after each use, turn it on HIGH for 5-7 minutes with the hood open. This allows any food particles or grease drippings to burn away. Once your appliance has cooled completely, use a soft brush or vacuum to remove any ash accumulation on the burner if necessary.
Fuel Conversion
CAUTION: This should only by performed by a licensed gas professional.
(A video converting your blaze grill is located on the blaze website to assist with the below instructions, www.blazegrills.com)
Convertible Gas Regulator (if applicable):
Currently all Natural gas grills are supplied with a regulator which is appropriate for use with Natural Gas or Low Pressure Propane.
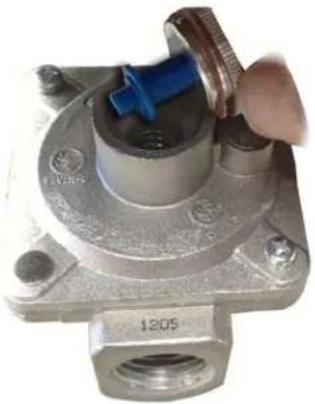
- When converting to Propane Gas, the most common Propane canister used is a smaller sized portable canister (typically 5 gallons or 20 pounds). The pre-installed regulator will need to be converted to LP gas (see below) and add a secondary low pressure hose and regulator with an outbound pressure set to approximately 11" of water column pressure. If an individual is intending on using Propane provided from a larger tank permanently installed on location, the regulator included with the appliance will only need to be converted for use with LP fuel (see NG-LP Regulator Conversion below). Please be aware that this included regulator can only withstand an inbound pressure of .5 PSI or roughly 14 inches of water column pressure. Any higher pressure on location will have to be further regulated before connecting to the regulator on the appliance. Please consult your local Propane gas provider to confirm the gas pressure on the supply line feeding the appliance.
- If converting to Natural Gas, a low pressure regulator with an outbound pressure set to 4" of Water Column pressure must be used.
- With either setup, remember to always check for gas leaks after the job is complete (see checking for gas leaks).
natural_image
Close-up of a mechanical component with a blue handle and bolted base, no visible text or symbolsNG - LP Regulator Conversion
text_image
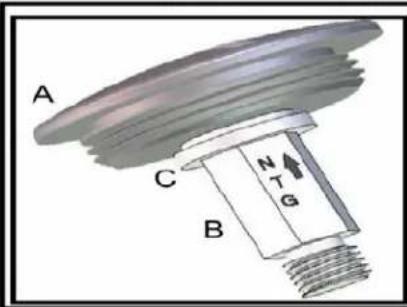
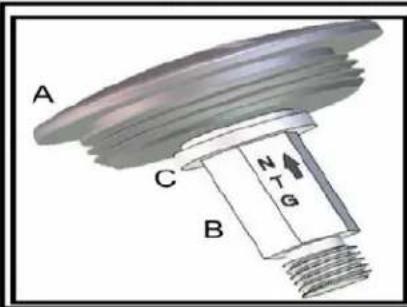
A C B N T GCap is attached to regulator and in this picture it is shown as "set to Natural Gas".
Step 1: Remove Cap by Unscrewing it.
A= Cap B= Stem C= Flange
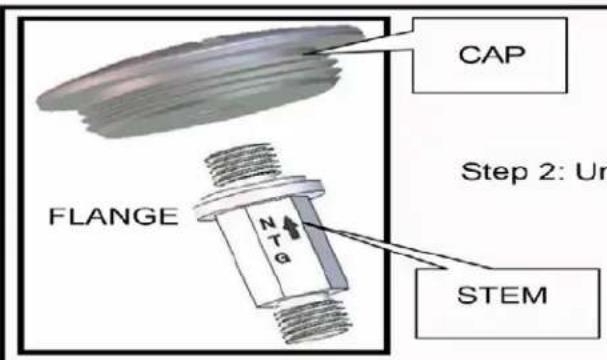
text_image
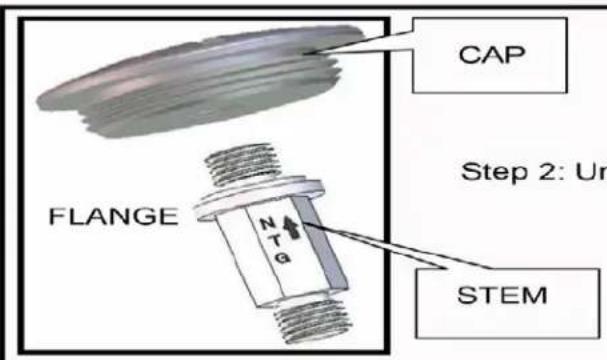
CAP FLANGE Step 2: Un N T G STEMCAP
Step 2: Unscrew the Stem from the cap
STEM
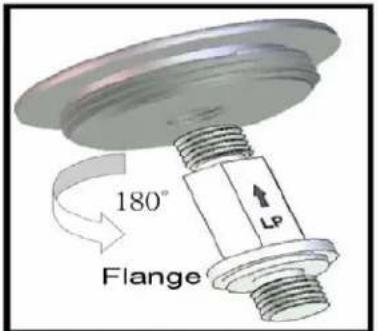
text_image
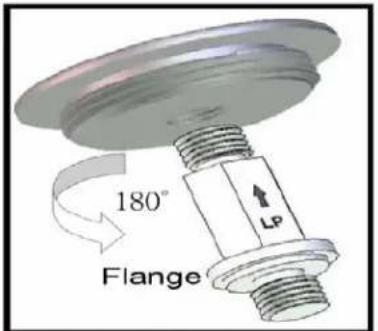
180° Flange LPStep 3: Turn the Stem 180^ so that the Flange is at The Bottom.
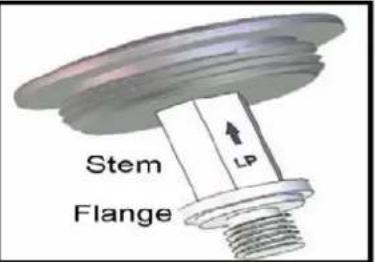
text_image
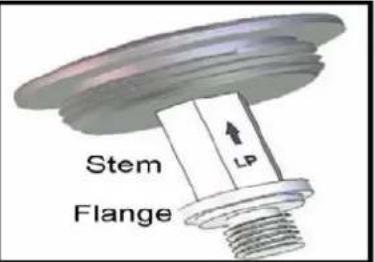
Stem FlangeStep 4: Screw the Stem back into the Cap and then reinstall the Cap/Stem Assembly back into the Regulator.
Note: Hand Tight Only.
NOTE: for a "FULL" conversion make sure you replace all of the orifices located in the Valves including the Back Burner valve with the LP orifices provided in the Conversion Kit
CAUTION: This should only be performed by a licensed gas professional.
Main Burners:
- You must remove all cooking grids and flame tamers to expose the main burners in the appliance.
- On the bottom rear of each burner is a cotter pin. Remove cotter pin. (unless they were removed prior to installation into an outdoor kitchen)
- To remove burner, pull burner upwards and slide burner toward the rear of the appliance. Repeat for each burner.
- Where the burner was previously located, connecting to the main valve through the hole in the basin should now be empty space.
- Inside the space you will find the end of the valve (toward the front of appliance), with an orifice (brass fitting), screwed into the end of the valve stem.
- Carefully remove the orifice with a 6mm socket set and extension. (These are extremely fragile! When unscrewing, be extremely gentle, for you could easily break the brass fitting and have to replace the valve).
- Once the old orifice is removed, replace it with the new orifice, (repeat for all burners). When re-installing the orifice, do not over tighten or you will strip the brass fitting. Very little pressure is needed!!!
- Inspect burners for proper flame appearance. The ideal flame appearance is one that is mostly blue and not lifting off of the burner surface. There is an air shutter found at the end of the burner (close to the valve) which can be either opened or closed to make adjustments to the flame's appearance. To adjust, remove the burner from the appliance and loosen the Philips head screw holding the air shutter to the burner. If the flame is yellow, open the air shutter to make the flame bluer. If the flame is lifting off of the burner surface, slightly close the air shutter. Re-tighten the Philips head screw and re-install the burner to recheck the flame appearance. Repeat if necessary.
Rear Burner
For the Blaze 4 & 5 Burner, replace the back burner orifice by removing the plate on the rear of the BBQ and carefully removing the fitting. Replace with the provided conversion back burner orifice – large brass fitting (differs from small main burner orifice).
Warranty Registration
If you have purchased a Blaze Series Grill you must register your product within 30 days of purchase to validate the warranty and maintain your original receipt to get parts for the appliance. You may register your appliance at blazegrills.com by selecting Support, and then selecting Register your Product. You may also fill out page 38 - 39 and mail to the address located at the bottom of the form. The warranty is for original owners only at the original site of delivery and cannot be transferred to new owners. You must retain your sales slip or invoice. Blaze Grills are warranted for normal single family/residential use only.
Installation, repair and maintenance work should be performed by an authorized service technician. Work by unqualified persons could be dangerous and will void the warranty. All Natural and LP Gas appliances must have a qualified installer complete the installation for the warranty to be in effect. The incorrect installation of the Blaze gas appliance will void the warranty. Please call Blaze for more information on correct installation of the gas appliance.
Blaze shall not be liable under this or any implied warranty for incidental or consequential damages and Blaze liability is limited to the purchase price of the appliance only. This warranty gives you specific legal rights, and you may also have other rights, which may vary from state to state. This warranty is applicable in the United States and Canada only.
ATTENTION International Customers: Please consult your selling dealer or distributor for specifics pertaining to your product warranty and procedure. No one else is authorized to perform any obligations under this warranty.
Improper Maintenance, high cooking temperatures, excessive humidity, chlorine, fertilizers, lawn pesticides, chemicals, and salt can affect the Stainless Steel components and for these reasons, the warranties DO NOT COVER DISCOLORATION, SURFACE RUST, OR RUST, unless there is a loss of structural integrity / rust through of the appliance components. This warranty covers defects in material and workmanship.
WARRANTY ON PARTS:
● Main Burners – Lifetime (Parts Only)
● Cooking Grids– Lifetime (Parts Only)
Body - Lifetime (Parts Only)
Flame Tamers + Heat Zone Separators – Lifetime (Parts Only)
Warming Rack – Lifetime (Parts Only)
- Valves- Lifetime (Parts Only)
- Ignition, Electronics, and Lighting systems–1 year (Parts Only)
Consumers are responsible for all labor and shipping cost associated with warranty parts. All warranty claims are subject to manufacturer review. Please make sure to have your sales receipt information and product serial number located on the outside left side panel of the appliance. All replacement parts can be purchased through your local stocking dealer.
Blaze 4 & 5 LTE (4-burner pictured)
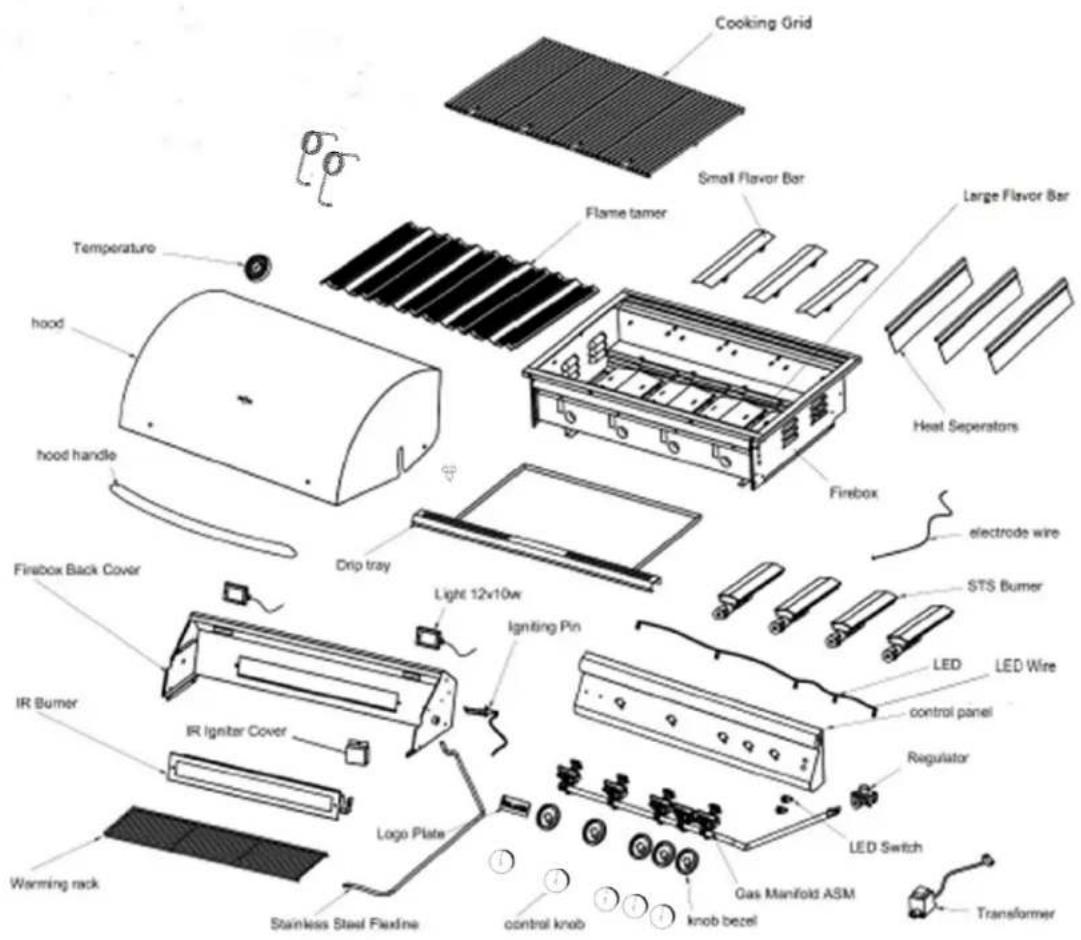
text_image
Cooking Grid Small Flavor Bar Flame tamer Large Flavor Bar Temperature heat hoof heat separator Finbox Drip tray electrode wire STS Bumer Firebox Back Cover Light 12x10w Igmitting Pin LED LED Wire control panel Regulator IR Burner IR Igniter Cover Logo Plate LED Switch Gas Manifold ASM Transformer Stainless Steel Flexline control knob knob bezel Warming rackNote: BLZ-4LTE3 is depicted above. Add one burner, one flame tamer, one heat separator and one grid for the Blaze 5 LTE3.
Locating the Product Serial Number:
The serial number for your BLAZE appliance is located on the left hand outside of the Firebox (see picture on page 13.) You will need this number to properly register your appliance and activate coverage. Write this information in the space provided below for your records
Appliance model:
Appliance serial number: ____
Type of fuel being used: □Propane □ Natural Gas
Date purchased: ____
Date installed:
Blaze dealer's name: ____
Blaze dealer's address:
Blaze dealer's phone number:
Blaze Product Registration
Please take a minute to let us know what you bought. This makes sure we keep you up to date and have your info ready if you ever need warranty help! You may register your product electronically on the blaze website vs mailing in the below paperwork, blazegrills.com.
First Last
Phone
Street Address Address
Line 2
City
Zip / Postal Code
State / Province / Region
Country
What is the model number of the Blaze Product purchased?
What is the serial number on the Blaze product?
Where did you buy your Blaze product?
Mail To:
Blaze, Warranty Registration, 6620 Greenwell Springs Rd Baton Rouge, LA 70805
BLAZE
GUIDE D'UTILISATION ET D'ENTRETIEN
GRILLES À GAZ : BLZ-4LTE3(NG/LP), BLZ-5LTE3(NG/LP)
DANGER - SI VOUS SENTEZ UNE ODEUR DE GAZ :
ii. Gaz propane liquide et exigences relatives aux reservoirs 18
natural_image
Close-up of a white appliance front panel with control knobs and a dial (no visible text or symbols)natural_image
Front view of a white portable stove burner with control knobs and a dial (no visible text or symbols)- Do not store or use gasoline or other flammable vapors and liquids in the vicinity of this or any other appliance.
- Do not store any propane/butane (G31-G30) cylinder (that is not connected for use) in the vicinity of this or any other appliance.
natural_image
Close-up of a black electronic component with wires, no visible text or symbolstext_image
EMPLACEMENT DE LAtext_image
Bubbles = LeakTest de fuite
All purging and refilling of LP gas cylinders must be performed by qualified personnel in the LP gas industry. Never store a spare LP gas cylinder under or near this appliance. Never fill the LP gas cylinder beyond 80 percent full. Failure to follow these instructions may result in explosion, personal injury or death.
text_image
QCC-1 Cylinder Valve Coupling Nut Turn clockwise to connect Regulator Pressure Relief Valve Bleed Off Valve Turn clockwise to close Dust Covernatural_image
Isometric line drawing of a rectangular box with labeled windows (no text or symbols on the box itself)SPÉCIFICATIONS DU BBQ DE CONSTRUCTION
TOUS LES POINTS DE RACCORDEMENT AU GAZ DOIVENT ÊTRE TESTÉS POUR DÉTECTER LES FUITES APRÈS L'INSTALLATION AVANT LA PREMIÈRE UTILISATION DE L'APPAREIL OU DES APPAREILS À GAZ.
text_image
A plenum wall is required to create a separate compartment for LP Tank source. 4" x 6" Vents shown with screens. Must remain unob-structed. DO NOT store any spare LP Tanks within the enclosure. Tank Retainer Kit LP REGULATOR MUST BE USED WITH ALL PROPANE BARBECUEtext_image
Clamp down flexline Vented on BOTH SIDES of Island Stainless Flexline QCC-1/OPD Tank CSA Approved Rubber Gas Hose CSA Approved Propane Regulator Vented Access Door Non-combustible Constructiontext_image
OUT IN CSA Approved Natural Gas Regulator Stainless Flexline Yellow Teflon Pipe Thread Sealant is recommended for use on all pipe thread connections EXCEPT flared threads. IMPORTANT: Regulator must be on the Barbecue or your warranty is void. Close Nipple Natural Gas Supply Shut-off Valve 1/2-1/2" NPTPREMIÈRE OPÉRATION
WARNING
Before lighting the burners inspect the gas supply piping or hose. If there is evidence of cuts, wear, or abrasion, it must be replaced prior to use. Always keep your face and body as far away from the grill as possible when lighting. Always perform a gas leak test before each use.
text_image
Lighting Tubetext_image
OFF HI LOWnatural_image
Close-up of a mechanical component with a hand adjusting a blue plastic component (no visible text or symbols)NG - LP Regulator Conversion
text_image
A C B N T GCap is attached to regulator and in this picture it is shown as "set to Natural Gas".
Step 1: Remove Cap by Unscrewing it.
A= Cap B= Stem C= Flange
text_image
CAP FLANGE Step 2: Un N T G STEMCAP
Step 2: Unscrew the Stem from the cap
STEM
text_image
180° Flange LPStep 3: Turn the Stem 180^ so that the Flange is at The Bottom.
text_image
Stem FlangeStep 4: Screw the Stem back into the Cap and then reinstall the Cap/Stem Assembly back into the Regulator.
Note: Hand Tight Only.
NOTE: for a "FULL" conversion make sure you replace all of the orifices located in the Valves including the Back Burner valve with the LP orifices provided in the Conversion Kit