FS30LMED - Freezer Accucold - Free user manual and instructions
Find the device manual for free FS30LMED Accucold in PDF.


User questions about FS30LMED Accucold
0 question about this device. Answer the ones you know or ask your own.
Ask a new question about this device
Download the instructions for your Freezer in PDF format for free! Find your manual FS30LMED - Accucold and take your electronic device back in hand. On this page are published all the documents necessary for the use of your device. FS30LMED by Accucold.
USER MANUAL FS30LMED Accucold
If you need service or call with a queson, please have this informaon ready. We advise you to keep this Use & Care Guide in your possession.
Model: ____ Serial number: ____
Opons added:
Date of purchase: Dealer:
NOTE: This manual is also available in French. Look on our website.
FELIX STORCH, INC.
ISO 9001:2008 Registered
770 Garrison Avenue
Bronx, New York 10474
medicalrefrigerators.com
Model Numbers
PLUS Models:
- FF6 / FF7 / FF28LWH / FF31L7 / FF511L / FF521BL / FFAR2L / FFAR21L / FFAR24L / FFAR25L7 / FF590SSHH PLUS Series
All-refrigerators with automatic defrost or frost-free operation
• VT65ML PLUS Series Low temperature freezers
• FFAR10 PLUS Series Full-size storage all-refrigerators - FS20L / FS21L / FS22L / FS24L PLUS Series Compact all-freezers (-20°C)
- CM411L / CM421BL / CP35LL / CT66 / S19LWH PLUS Series Compact refrigerator-freezers
- FCL44 / FS30L / FS60ML / FS407L / FS408BL PLUS Series Compact and mid-size storage all-freezers
- SCR450L / SCR500BL / SCR600L / SCR610BL / SCR1156 PLUS Series Glass door all-refrigerators
MED/MEDDT\* Models:
- FF6 / FF7 / FF28LWH / FF31L7 /FF511L / FF521BL / FF590SSHH / FFAR2L / FFAR21L / FFAR24L / FFAR25L7 MED Series All-refrigerators with automatic defrost or frost-free operation
• FFAR10 MED Series Full-size storage all-refrigerators
- SCR450L / SCR500BL / SCR600L / SCR610BL / SCR1156 / SP6DS2D7 / SP6DS7 / SP6DSSTB7 MED Series Specialty all-refrigerators (drawers or glass doors)
• CP35LL MED Series Compact refrigerator-freezers
- FCL44 / FS30L / FS60ML / FS407L / FS408BL MED Series Compact and mid-size storage all-freezers
- VT65ML // SCFF51OSWH MED / ACF48WMEDDT Series Low-temperature freezers // Built-in frost-free freezers
- FS20L / FS21L / FS22L / FS24L MED Series All-freezers (-20°C)
Table of Contents
Model Numbers ...... 1
Appliance Safety 3
Proper disposal of an old appliance 3
Installation Instructions 4
Key Eject lock 4
Location Requirements 5-6
Location 5
Recommended grounding method 5
Leveling your appliance 6
When using the appliance 6
Energy-saving tips 6
Appliance Care 7-8
Cleaning a frost-free appliance 7
Cleaning a cycle defrost or manual defrost appliance ..... 7
Base grill 8
Changing the light bulb 8
Loss of power 8
Moving the appliance 8
Temperature Selection and Monitoring 9-12
Manual (dial) thermostat 9
Digital thermostat (on certain models) 10
Digital thermostat (SCR610BL & SCR1156) ...... 10 – 11
Thermometer (PLUS models) 12
Thermometer/alarm (MED models) 12-13
Keypad Lock 14
About the Fixed Shelf 14
Operation of Specific Models 15
Troubleshooting 16
Limited Warranty 17
Appliance Safety
Your safety and the safety of others are very important to us.
We have provided many important safety messages in this manual and on your appliance. Always read and obey all safety messages.
You can be seriously injured or even killed if you don't follow instructions.
Safety messages will tell you what the potential hazard is, how to reduce the chance of injury, and what can happen if the instructions are not followed.

IMPORTANT SAFETY INSTRUCTIONS
WARNING: To reduce the risk of fire, electric shock or injury when using your appliance, follow these basic precautions:
- Plug into a grounded 3-prong outlet.
- Do not remove ground prong, nor use a 3/2 adapter.
- Do not use an extension cord.
- Use care not to plug into outlets controlled by wall switches.
- Disconnect power before servicing.
• After servicing, replace all parts and panels before operating. - Use nonflammable cleaners.
- Keep flammable materials and vapors, such as gasoline, away from appliances.
- Use two or more people to move and install appliance.
NOTE: Drawer refrigerators are provided with anti-tip brackets. Always install prior to use.
Proper disposal of an old appliance:
Old appliances can represent a suffocation hazard to children.
Remove doors from your old appliance.
Leave shelves in place.
If an old appliance contains refrigerants, it must be recycled by a licensed service or disposal company.
Installation Instructions

Excessive Weight Hazard!
Use two or more people to move and install your appliance.
Failure to do so can result in back or other injury.
ALLOW APPLIANCE TO SIT UPRIGHT FOR 24 HOURS BEFORE TURNING ON, TO ALLOW THE COMPRESSOR LUBRICANT TO DRAIN.
- Remove packaging materials.
- Remove tape and glue residue from surfaces before turning on the appliance. Rub a small amount of liquid dish soap over the adhesive with your fingers. Rinse with warm water and dry.
- Do not use sharp instruments, rubbing alcohol, flammable fluids, or abrasive cleaners to remove tape or glue. These products can damage the surface of your appliance.
- When Moving Your Appliance:
Your appliance is heavy. When moving the appliance for cleaning or service, be sure to protect the floor. Always pull the appliance straight out when moving it. Do not wiggle or “walk” the appliance when trying to move it, because floor damage can occur. - Clean Before Using:
After you remove all of the packaging materials, clean the inside of your appliance before using it. See cleaning instructions in Appliance Care. - Some upright models have leveling legs. Level as necessary for best operation.
- If your appliance has casters, after moving into place, lock the brakes on those casters supplied with brakes. Always unlock before moving the appliance for cleaning.
Key Eject lock (some models):
To lock or unlock the appliance, you must hold the key in the lock while turning. The lock is spring loaded, so the key cannot be left in the lock.
If the key is lost, contact your dealer or SUMMIT APPLIANCE for a replacement. Always give the model and serial number of your appliance when requesting a replacement key. Keys for most models can be ordered online at www.summitappliance.com/support
Location Requirements

Keep flammable materials and vapors, such as gasoline, away from appliances. Failure to do so can result in fire, explosion or death.
Location:
IMPORTANT: Do not install the appliance near an oven, radiator, or other heat source, nor in a location where the temperature will fall below 40^ F ( 5^ C). Do not place in direct sunlight.
Check the strength of the floor before installing your appliance. It should hold the weight of a fully loaded appliance. Allow at least 4" (10 cm) of airspace at the top and on both sides of the appliance and also 4" between the back of the appliance and the wall. If the appliance is going to be placed next to a wall, leave extra space on the hinge side so the door can open wider than its width.
NOTE: Allow 4" (10 cm) clearance at the top and sides and a 14 " (0.64 cm) clearance between appliances. IF YOUR MODEL HAS THE LETTERS "BI" IN THE SUFFIX, IT IS DESIGNED FOR BUILT-IN USE AND REQUIRES ONLY MINIMAL CLEARANCES EXCEPT AT THE BACK WHERE AT LEAST 2" OF CLEARANCE SHOULD BE ALLOWED. ALL FF590 AND SCFF51OSWH MODELS ARE ALSO BUILT-IN CAPABLE

Electrical Shock Hazard
- Plug into a grounded 3-prong outlet.
- Do not remove ground prong.
- Do not use an adapter.
- Do not use an extension cord.
Failure to follow these instructions can result in fire, electrical shock or death.
Recommended grounding method:
A 115 Volt (AC only) 60 Hz grounded electrical supply with a 15- or 20- amp fuse or circuit breaker is required. It is recommended that a separate circuit serving only your appliance be provided. Use outlets that cannot be turned off by a switch or pull chain. Do not use an extension cord.
Leveling your appliance (some upright models):
Locate the two front leveling legs that may be taped among the packing materials. (In many models these legs are already mounted into the underside of the appliance.)
- Screw these legs into the front holes on the bottom of the appliance. The back of the appliance rests on two fixed supports. (Built-in models also have rear level legs that can provide more precise leveling).
- Adjust the front legs just enough to lift the cabinet up off the floor.
Note: If your model is equipped with front rollers, the front legs should be lowered enough to lift the rollers off the floor to ensure the appliance does not roll forward when the door is opened. - Place a leveling tool on top of the appliance, first side to side, then front to back. Turn leg counter-clockwise to raise a corner. Turn leg clockwise to lower a corner.
- Repeat Step 3 until appliance is level.
- After appliance is fully loaded, recheck with level as in Step 3.
- If your appliance is equipped with casters, the two front casters have brakes to prevent rolling. Keep brakes locked, and unlock for moving only.
When using the appliance:
In order to ensure proper temperature, you need to permit proper airflow in the appliance. Do not block off any air vents. If the vents are blocked, airflow will be hindered, and temperature and moisture problems may occur. Always position contents to allow some airflow between shelves or baskets.
Allow the appliance to cool at least 6 to 8 hours before adding contents. Allow 24 hours for temperature to stabilize.
NOTE: When the appliance is first started, the compressor will run constantly until the appliance is cooled. It may take 6 to 8 hours (or longer), depending on room temperature and the number of times the appliance door is opened. After the appliance has cooled, the compressor will turn on and off as needed to keep the appliance at the proper temperature.
For optimum temperature performance, it is recommended that this unit be at least 30% full during use. If you are only using this unit to store small loads, we recommend adding some water bottles or freezer packs to ensure temperature stability.
The outside of your appliance may feel warm. This is normal. The appliance's design and main function is to remove heat from packages and air space inside the appliance. The heat is transferred to the room air, making the outside of the appliance feel warm. (In some models the condenser that gets warm is just inside the side walls, making these walls warm to the touch.)
ENERGY-SAVING TIPS
- The more airflow provided around an appliance, the less energy it will use.
- If your appliance requires manual defrosting, keep ice build-up to less than 1/2".
- Keep doors open a minimum of time, and shut securely.
Appliance Care
Cleaning a frost-free appliance:
Use nonflammable cleaners.
Frost-free means that you do not have to defrost your appliance. Frost is removed by air moving and collecting any moisture and depositing it on the cooling coil. The cooling coil periodically warms up enough to melt the frost, and the water then flows down to the drain pan (located behind the base grill) where it is evaporated.
Complete cleaning should be done at least once a year.
- Unplug appliance or disconnect power.
- Remove all stored items, plus shelves, trays, etc.
- Wash the inside walls, shelves and trays with a solution of mild detergent in warm water or 2 tbsp (26 g) baking soda to 1 qt (0.95 L) warm water.
- Do not use abrasive or harsh cleaners such as window sprays, scouring cleansers, flammable fluids, cleaning waxes, concentrated detergents, bleaches or cleansers containing petroleum products on plastic parts, interior and door liners or gaskets. Do not use paper towels, scouring pads, or other harsh cleaning tools. These can scratch or damage surfaces.
-
Rinse well and wipe dry with a clean soft cloth.
-
Use the appropriate cleaning method for the exterior finish.
Painted metal: Wash exteriors with a clean sponge or soft cloth and a mild detergent in warm water. Do not use abrasive or harsh cleaners, or cleaners designed for stainless steel. Dry thoroughly with a soft cloth. For additional protection against damage to painted metal exteriors, apply appliance wax (or auto paste wax) with a clean, soft cloth. Do not wax plastic parts.
-
Plug in appliance or reconnect power.
-
Replace all containers.
Cleaning a cycle defrost or manual defrost refrigerator:
Cycle defrost models utilize a system where ice builds up on the rear wall and melts when the compressor is off. Manual defrost models continually build ice on inner walls.
NEVER USE A METAL OBJECT TO REMOVE ICE FROM THE REAR WALL. IF NEEDED, USE A PLASTIC ICE-SCRAPER OR A HAIR DRYER.
Clean surfaces using the same instructions as for frost-free models.
For CSS Models (completely stainless steel), only use cleaners especially made for stainless steel.
Base grill (some models only):
To Remove and Replace the Base Grill:
- Open the appliance door and remove the base grill by pulling down and out from the top.
- Replace the base grill by putting the clips in the openings in the appliance panel. Push in until the base grill snaps into place.
Changing the light bulb (some models only):
NOTE: Not all appliance bulbs will fit your appliance. Be sure to replace the bulb with one of the same size, shape, base size and wattage. You can purchase bulbs from www.summitappliance.com/support
- Unplug appliance or disconnect power.
- Remove the light shield. Most models do not require tools.
- Replace the light bulb with an appliance bulb of the same wattage.
- Replace the light shield.
- Plug in appliance or reconnect power.
Loss of power:
After the power is restored, unplug the appliance for 30 minutes to allow the refrigeration system to equalize. During this time, keep the door closed as much as possible.
Remember: A full appliance stays cold longer than a partially filled one.
Moving the appliance:
- Remove stored items and tape shelves, drawers and trays in place.
- Unplug the appliance.
- Clean it thoroughly.
- Tape the appliance shut and tape the electrical cord to the cabinet.
When you get the appliance to its new location, refer to the Installation Instructions and Temperature Selection sections for information on installation and setting the controls.
Temperature Selection and Monitoring
YOUR APPLIANCE MAY HAVE A MECHANICAL (DIAL) OR DIGITAL THERMOSTAT. DIAL INSTRUCTIONS ARE BELOW. DIGITAL INSTRUCTIONS ARE ON PAGE 10.
Manual (dial) thermostat (on most models):
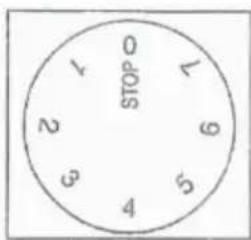
Your refrigerator may be controlled with a thermostat knob located inside the unit, towards the right-hand corner. Turn the knob clockwise from the STOP (0) position toward the higher numbers for colder temperatures.
text_image
STOP 1 2 3 4 5 6 7 8 9 1 STOPSetting the Temperature:
- Higher settings on the knob (higher numbers) mean lower temperatures (colder) in all compartments of the appliance. The temperature inside a refrigerator may even drop below 32^ F. Use higher thermostat settings only when required or recommended. When the ambient temperature is normal, we recommend a medium setting.
- Changes of the ambient temperature affect temperature in the interior of the appliance, so keep this in mind when choosing the setting of the thermostat dial.
- At STOP (0) position, the appliance does not operate (the cooling system is switched off), but the power supply is not interrupted (the light is on when you open the refrigerator door).
- The temperatures in the refrigerator and freezer compartments also depend on how often you open the door.
In all small refrigerators and freezers without interior fans, temperatures are coldest near the bottom, and occasionally near the rear. Place contents accordingly.
For optimum temperature performance, it is recommended that this unit be at least 30% full during use. If you are only using this unit to store small loads, we recommend adding some water bottles or freezer packs to ensure temperature stability.
Digital thermostat (on certain models):
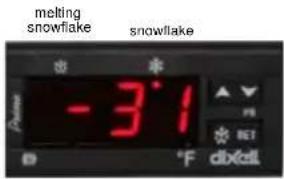
If you find it necessary to change the temperature setting for your digital-thermostat controlled appliance, please refer to the following instructions. The front panel of the thermostat is illustrated here:
text_image
melting snowflake snowflake -3.1 F dixellUP & DOWN arrows
SETkey
To see the SET POINT:
Push and immediately release the SET key. The display will show the SET POINT value. Wait 5 seconds and the probe value will display again.
To change the SET POINT:
Push and hold the SET key for more than 3 seconds to change the set point value. The value of the set point will be displayed, and the “snowflake” LED will start blinking.
To change the SET value:
Push the UP or DOWN arrow to the desired setting. The new setting will be memorized after 15 seconds, provided no other keys are pushed.
NOTE: The minimum and maximum range of your thermostat is preset and locked by us, so it cannot easily be accidentally moved between freezer and refrigerator temperatures. To reset this range lock, either call us or find information on our website under Troubleshooting.
Digital thermostat (SCR610BL & SCR1156 models):
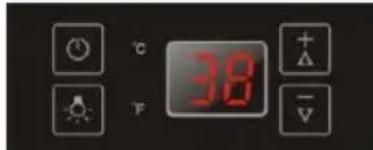
ON/OFF Power:
To turn the appliance ON or OFF, touch the ⏻ symbol and hold for 5 seconds.
NOTE: Pressing the POWER key once can switch off the audible alarm when the alarm is on.
text_image
°C 38 + -Control panel
UP +
Used to increase (warm) the set temperature by 1°C/1°F.
DOWN V:
Used to decrease (cool) the set temperature by 1°C/1°F.
Interior Light

Touching the LIGHT symbol toggles between 2 modes of operation for the internal lights: functional (default) mode and showcase mode. If you are in functional (default) mode, the lights will turn on only when the door is open. If you are in showcase mode, the lights will be on whether or not the door is open.
°F/°C Selector:
Select the temperature display in Fahrenheit or Celsius degrees. To change the temperature from Fahrenheit to Celsius or from Celsius to Fahrenheit, press and hold the LIGHT key for 5 seconds.
Setting the Temperature Control:
- You can set the temperature by touching the UP and DOWN symbols. When you push either of the two buttons for the first time, the LED readout will show the original temperature set previously. (The temperature preset at the factory is 38^ F, or 3^ C.)
- The temperature you are setting will increase by one degree each time you touch the UP symbol, and will decrease by one degree each time you touch the DOWN symbol.
- The range of the temperature control is from 36^ to 43^ (2°C to 6°C).
- To view the set temperature at any time, touch the UP or DOWN symbol. The set temperature will flash in the display window for 5 seconds. After 5 seconds, the temperature inside the unit will reappear in the display window.
Sabbath Mode:
Sabbath mode is available for the observance of certain religious holidays. This mode turns off the displays, interior light and audible alarms and prevents them from turning on again. Normal cooling operations will still take place.
To initiate Sabbath mode, press the POWER and LIGHT keys at the same time for at least 5 seconds. The indicator light will flash four times and confirm the Sabbath mode is ON.
Sabbath mode can be exited by repeating the above process. The Sabbath Mode will automatically exit after 96 hours.
Temperature Memory Function:
In the event of a power interruption (power surge, breaker switch, etc.), the unit can remember the previous temperature settings. When power is recovered, the cabinet will return to the same set temperature as before the power went off.
Temperature Alarm / Door Alarm:
- An audible alarm sounds if the storage temperature is not cold enough. The temperature display flashes at the same time.
-
The cause of the temperature being too high may be:
-
Warm items were placed inside
- Too much warm ambient air flowed in when rearranging and removing contents
- Power failure for some time
- The appliance is faulty.
- The audible alarm is automatically silenced and the temperature display stops flashing when the temperature is sufficiently cold again.
- If the door has been left open for more than 60 seconds, the alarm will sound. Pressing the POWER key once can switch off the audible alarm.
Thermometer (PLUS models):
text_image
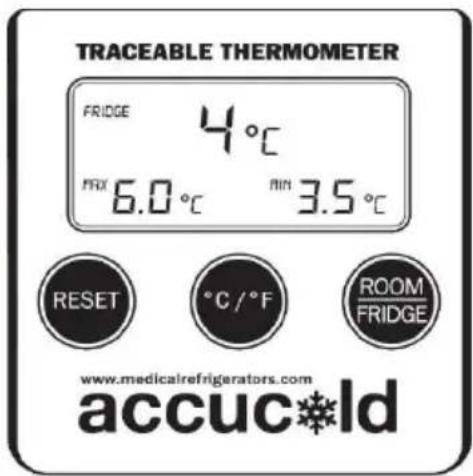
TRACEABLE THERMOMETER FRIDGE 4°C PREX 6.0°C MIN 3.5°C RESET °C /°F ROOM FRIDGE www.medicalrefrigerators.com accucoldThis digital thermometer simultaneously displays maximum, minimum and current temperatures. The Max/Min feature monitors and stores the highest and lowest readings since the battery was inserted or since the RESET button was last pressed.
The temperature sensor, or probe, is enclosed in a glycol-filled bottle that you insert into the location to be monitored, such as inside a refrigerator or freezer. The thermometer itself can be attached to the door of the unit with the magnet on the back, or it can be placed on a convenient table or shelf.
Power to the Thermometer is supplied with a AAA lithium battery. When it is inserted correctly, all segments of the LCD display are temporarily activated. When the battery needs to be replaced, a battery symbol will flash on the display.
The temperature display can be switched between Celsius (°C) and Fahrenheit (°F) with a push of the °C/°F button. The display will alternate between refrigerator (probe) temperature and room temperature when you press the ROOM/FRIDGE button. Press RESET to clear the Max/Min temperature record.
See instruction pamphlet for more information about the Thermometer.
Thermometer/alarm (MED models):
text_image
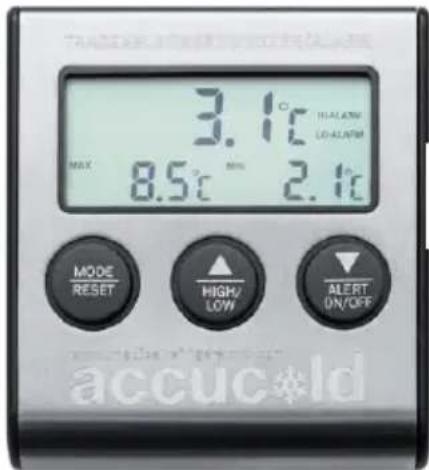
3.1°C MAX 8.5°C MIN 2.1°C MODE RESET HIGH/ LOW ALERT ON/OFF accucoldEvery MED unit is equipped with a Thermometer/Alarm that simultaneously displays minimum, maximum and current interior temperatures and provides a visual and audible signal when the temperature inside the unit falls outside the set temperature range.
The temperature sensor, or probe, is enclosed in a glycol-filled bottle that you insert into the location to be monitored, such as inside a refrigerator or freezer, once the unit has been programmed. The thermometer/alarm itself can be attached to the door of the unit with the magnet on the back, or it can be placed on a convenient table or shelf.
Power to the Thermometer/Alarm is supplied with a lithium iron disulfide battery with a 10-year shelf life. When it is inserted correctly, the unit will beep and all segments of the LCD display will be temporarily activated. (Note that alarm temperatures will have to be reset after replacing the battery.)
The temperature display can be switched between Celsius (°C) and Fahrenheit (°F) by sliding the °C/°F button located on the back of the unit.
Thermometer/alarm instructions (cont'd):
Function of Controls:
MODE/RESET Key: Press ONCE to reset Max/Min temperature record. When the unit is sounding an alarm, press ONCE to turn off the beeping sound.
HIGH/LOW Key: Press ONCE to display high alarm setting. Press TWICE to display low alarm setting. Press THREE TIMES to display current temperature reading.
ALERT ON/OFF Key: When the unit is sounding an alarm, press ONCE to turn off. However, the High-Alarm or Low-Alarm will still flash until the temperature goes back to normal or the Alarm function is turned off.
Programming the Alarms:
The thermometer displays the internal temperature of the unit being monitored, as well as the maximum and minimum temperatures reached. The maximum and minimum readings reflect the highest and lowest temperatures since the battery was inserted or since the MODE/RESET key was last pressed. If the temperature rises above or falls below the set temperature range, the alarm will sound. By default, the high alarm temperature setting is 8^ C ( 46.4^ F) and the low alarm temperature setting is 2^ C ( 35.6^ F). To reset these limits, follow these instructions:
High Alarm Temperature Setting: Press the HIGH/LOW key ONCE, then press MODE/RESET to enter the High Alarm temperature setting mode. Use the Up and Down arrows to adjust the temperature accordingly. Press MODE/RESET once again to confirm the setting.
Low Alarm Temperature Setting: Press the HIGH/LOW key TWICE, then press MODE/RESET to enter the Low Alarm temperature setting mode. Use the Up and Down arrows to adjust the temperature accordingly. Press MODE/RESET ONCE to confirm the setting.
By default, the low and high alarms should be audible. To turn alarms on/off:
Audible High Alarm Setting: To make sure the high alarm is audible, press HIGH/LOW key ONCE (to activate HI-SET on the screen). Then press the ALERT ON/OFF key ONCE to activate the HIGH-ALARM beeping sound. Press again to deactivate.
Audible Low Alarm Setting: To make sure that the low temperature alarm is audible, press the HIGH/LOW key TWICE to activate LOW-SET on the screen. Then press the ALERT ON/OFF key ONCE to activate the LOW-ALARM beeping sound. Press again to deactivate.
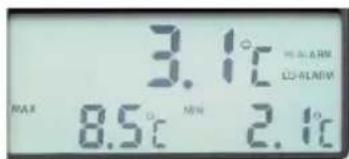
NOTE: For an activated high alarm and low alarm buzzer, the display should indicate HI-ALARM and LO-ALARM as shown here.
text_image
3.1°C MAX 8.5°C MIN 2.1°CMore details about the features and usage of the Thermometer/Alarm can be found in the User Manual accompanying the unit.
Keypad Lock (optional on most models)
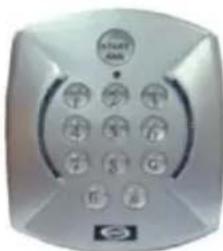
Factory-set default password: The factory-set default password is 0123. If the default
natural_image
Close-up of a silver remote control device with buttons and a circular dial (no visible text or symbols)password is lost, press the key (located inside the battery box) for 30 seconds, then wait for the warning sound which signifies the factory-set default password has been restored.
To set the password: While door is open, press the key (located inside the battery box) until it jingles, enter the 0123 password, then # within 10 seconds to confirm. Enter your password (1-16 digits), then press # again to confirm. A total of 10 passwords can be set.
NOTE: Each password starts with a number from 0 to 9 in order. The first password starting with 0 is the default password. For example, use 1xxx, then 2xxx etc. for 10 users.
Changing password: While the door is open, press the key (located inside the battery box) until it jingles, enter the old password and press # within 10 seconds to confirm. Enter the new password, then press # to confirm.
NOTE: The first digit cannot be changed.
To open the door: While the door is closed, press the START/END key, enter the password, then press START/END again to confirm.
To lock door manually: Press #.
Function setting of automatic lock: Setting of the auto-lock time: Press the ⑪key (inside the battery box), enter a number (any number between 10-99), then press # to confirm. The auto-lock time can be set between 10-99 seconds after opening the door. If the time is set less than 10 seconds, the door will not lock automatically, only manually.
Deleting the door-opening passwords: Press the START/END key, enter default password followed by 0000, then press # and all the door-opening passwords will be deleted except for the default password.
NOTE: To access the battery box you need to remove only the two small screws on the top and bottom of that cover. Do not remove the 4 screws holding the keypad and cover to the appliance door.
About the Fixed Shelf
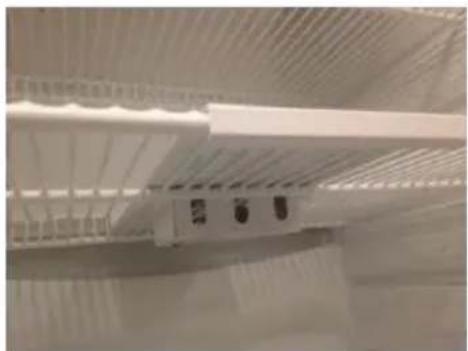
In some units, the center shelf is fixed in place and cannot be removed (see image). This is because the glycol-filled bottle that contains the temperature sensors for your alarm and thermometer is best stored in this location. The center of your refrigerator or freezer will provide the most accurate temperature readings. For proper temperature monitoring, keep the bottles in place and do not remove this shelf.
natural_image
Close-up of a white refrigerator shelf with ventilation grilles and two circular outlets (no visible text or symbols)Operation of Specific Models
SCFF51OSWH MED and ACF48WMEDDT Series
These frost-free all-freezers can be built-in or free-standing. They do not require defrosting and have a digital thermostat, LED lighting and a lock. At the top of the unit is a cooling system that uses a fan to provide cold air. For best operation, do not block the air flow with contents.
FF6L, FF7L, FF28LWH, FF31L7, FF511L, FF521BL, FF590SSHH, FFAR2L, FFAR10, FFAR21L, FFAR24L, FFAR25L7, SCR450L, SCR500BL, SCR600L, SCR610BL, SCR1156 PLUS & MED Series; SP6DS2D7, SP6DS7, SP6DSSTB7 MED Series only
These models are all-refrigerators (no freezer compartment) with automatic defrost. All have cold plates on the rear wall, and the coldest spots in the refrigerator will be in the rear and toward the bottom. All have interior fans to promote even cooling. In the rear bottom above the step, there is a drain line to allow defrost water to exit the refrigerator. Keep this drain line clear, or icing inside the refrigerator will occur. FF7, FF31L7, FF511L, FF521BL, FFAR25L7 and SCR series models have lights that are not door-activated, and are controlled either by a rocker switch on the top right or a Light switch on the control panel. The light generates a small amount of heat, so minimize the use of the light for best operation and energy savings. FF6 models and FFAR10 models all have door-activated lights. Smaller models and drawer models do not have interior lights.
NOTE: FF590, models with BI in the model number, and all drawer units are designed for built-in operation and need very little clearance on the sides and above the units. All other models require at least 1 inch of airflow on the sides and above the units. All models operate best when 2 inches is provided between the rear wall and the back of the unit.
FCL44, FS20L, FS21L, FS22L, FS24L, FS30L, FS60ML, FS407L, FS408BL, VT65ML PLUS & MED Series
Model FCL44 is a chest freezer; all of the others are upright. These are manual defrost all-freezers. No internal fans are present, and ice will build up along the cooling coils. Periodically defrost the ice (recommended when the ice level reaches a thickness of 1/4 to 1/2 inch). NEVER USE A METAL INSTRUMENT as you can damage the cooling coils which will void your warranty and often cannot be repaired. To defrost, disconnect from the power supply, empty the contents, provide a tray in the bottom to collect water, and use a hairdryer or other source of warm air to melt the ice (or leave the door open and the power off for 24 to 48 hours). For built-in (BI) models and clearance information, see NOTE above.
CP35LL PLUS & MED Series; CT66 PLUS Series only
These models are cycle defrost refrigerator-freezers. The freezers are designed to operate at 0^ F ( -18^ C), suitable for medical or laboratory uses. These models have dual evaporators to maintain separate temperatures in the freezer and refrigerator. Defrost the freezer carefully, as directed above for manual defrost. The refrigerator section operates in the normal range (35 to 45^ F, or 2 to 7^ C) and defrosts automatically. For built-in (BI) models and clearance information, see NOTE above.
CM411L, CM421BL, S19LWH PLUS Series
These models are manual defrost refrigerator-freezers. The freezers in these models are designed to operate at 25^ F ( -4^ C) to keep ice frozen, and not for medication or products needing colder temperatures. Defrost carefully, following directions above. The refrigerator section will operate in the normal range (35 to 45^ F, or 2 to 7^ C) and is suitable for most refrigerated products. For built-in (BI) models and clearance information, see NOTE above.
Troubleshooting
Try these solutions first to avoid the cost of an unnecessary service call.
Your appliance will not operate:
- Has a household fuse blown or circuit breaker tripped?
Replace the fuse or reset the circuit breaker.
- Is the freezer defrosting (on some models)?
Recheck to see whether the freezer is operating in 30 minutes. Your freezer will regularly run an automatic defrost cycle.
There is water in the defrost drain pan (on some models):
• Is the freezer defrosting?
The water will evaporate. It is normal for water to drip into the defrost pan.
• Is it more humid than normal?
When it is humid, expect that the water in the defrost pan will take longer to evaporate.
The motor seems to run too much:
- Is there excessive frost or a package preventing the door from closing?
Defrost and clean the freezer, or move the package so the door closes properly.
- Is the room temperature hotter than normal?
The motor will run longer under warm conditions. At normal room temperatures, the motor will run about 40% to 80% of the time. Under warmer conditions, it will run even more.
- Has a large amount of food just been added to the freezer?
Adding a large amount of food warms the freezer. The motor normally will run longer to cool the freezer back down.
• Is the door closed completely?
Push the door firmly shut. If it will not shut all the way, see The door will not close completely later in this section.
- Are the condenser coils dirty (on some models)?
This prevents heat transfer and makes the motor work harder. Clean the condenser coils.
• Is the door gasket sealed all the way around?
If not, contact a qualified technician.
NOTE: If the problem is not due to any of the above, remember that the compressor on your new appliance will operate longer than your old one due to its high-efficiency motor.
Temperature is too warm:
- Are the air vents blocked?
This prevents cold air movement. Move objects away from the air vents.
• Is the door opened often?
Be aware that the freezer will warm when this occurs. In order to keep the freezer cool, try to get everything you need out of the freezer at once, keep food organized so it is easy to find, and close the door as soon as the food is removed.
- Has a large amount of food just been added to the freezer?
Adding a large amount of food warms the freezer. It can take several hours for the freezer to return to the normal temperature.
The door will not close completely or is difficult to open:
- Are food packages blocking the door?
Rearrange containers so that they fit more tightly and take up less space.
- Are the shelves or drawers out of position (on some models)?
Put the shelves and drawers back into their correct positions.
Limited Warranty
ONE YEAR LIMITED WARRANTY FOR APPLIANCE
Within the 48 contiguous United States, for one year from the date of purchase, when this appliance is operated and maintained according to instructions attached to or furnished with the product, warrantor will pay for factory-specified parts and repair labor to correct defects in materials or workmanship. Service must be provided by a designated service company. Outside the 48 states, all parts are warranted for one year from manufacturing defects. Plastic parts, shelves and cabinets are warranted to be manufactured to commercially acceptable standards, and are not covered from damage during handling or breakage.
5-YEAR COMPRESSOR WARRANTY
- The compressor is covered for 5 years.
- Replacement does not include labor.
ITEMS WARRANTOR WILL NOT PAY FOR:
- Service calls to correct the installation of your appliance, to instruct you how to use your appliance, to replace or repair fuses or to correct wiring or plumbing.
- Service calls to repair or replace appliance light bulbs or broken glass shelves. Consumable parts (such as filters) are excluded from warranty coverage.
- Damage resulting from accident, alteration, misuse, abuse, fire, flood, acts of God, improper installation, installation not in accordance with electrical or plumbing codes, or use of products not approved by warrantor.
- Replacement parts or repair labor costs for units operated outside the United States.
- Repairs to parts or systems resulting from unauthorized modifications made to the appliance.
- Expenses for travel and transportation for product service in remote locations.
- The removal and reinstallation of your appliance if it is installed in an inaccessible location or is not installed in accordance with published installation instructions.
DISCLAIMER OF IMPLIED WARRANTIES – LIMITATION OF REMEDIES
CUSTOMER'S SOLE AND EXCLUSIVE REMEDY UNDER THIS LIMITED WARRANTY SHALL BE PRODUCT REPAIR AS PROVIDED HEREIN. IMPLIED WARRANTIES, INCLUDING WARRANTIES OF MERCHANTABILITY OR FITNESS FOR A PARTICULAR PURPOSE, ARE LIMITED TO ONE YEAR. WARRANTOR SHALL NOT BE LIABLE FOR INCIDENTAL OR CONSEQUENTIAL DAMAGES. SOME STATES DO NOT ALLOW THE EXCLUSION OR LIMITATION OF INCIDENTAL OR CONSEQUENTIAL DAMAGES, OR LIMITATIONS ON THE DURATION OF IMPLIED WARRANTIES OF MERCHANTABILITY OR FITNESS, SO THESE EXCLUSIONS OR LIMITATIONS MAY NOT APPLY TO YOU. THIS WARRANTY GIVES YOU SPECIFIC LEGAL RIGHTS AND YOU MAY ALSO HAVE OTHER RIGHTS, WHICH VARY FROM STATE TO STATE.
WARNING! This product may contain chemicals known to the state of California to cause cancer or birth defects or other reproductive harm. For more information, visit: www.summitappliance.com/prop65 Chemicals known by the manufacturer to be present in this product in concentrations higher than threshold limits: NONE.
FELIX STORCH, INC.
770 Garrison Avenue
Bronx, New York 10474
Phone: (718) 893-3900
Fax: (844) 478-8799
www.summitappliance.com
17

For parts and accessory ordering,
troubleshooting and helpful hints,
visit:www.summitappliance.com/support