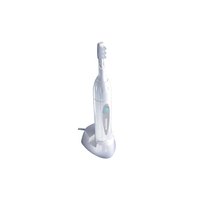
Sonicare HX4571 - Toothbrush PHILIPS - Free user manual and instructions
Find the device manual for free Sonicare HX4571 PHILIPS in PDF.


User questions about Sonicare HX4571 PHILIPS
0 question about this device. Answer the ones you know or ask your own.
Ask a new question about this device
Download the instructions for your Toothbrush in PDF format for free! Find your manual Sonicare HX4571 - PHILIPS and take your electronic device back in hand. On this page are published all the documents necessary for the use of your device. Sonicare HX4571 by PHILIPS.
USER MANUAL Sonicare HX4571 PHILIPS
the sonic toothbrush
Advance
4000
series
text_image
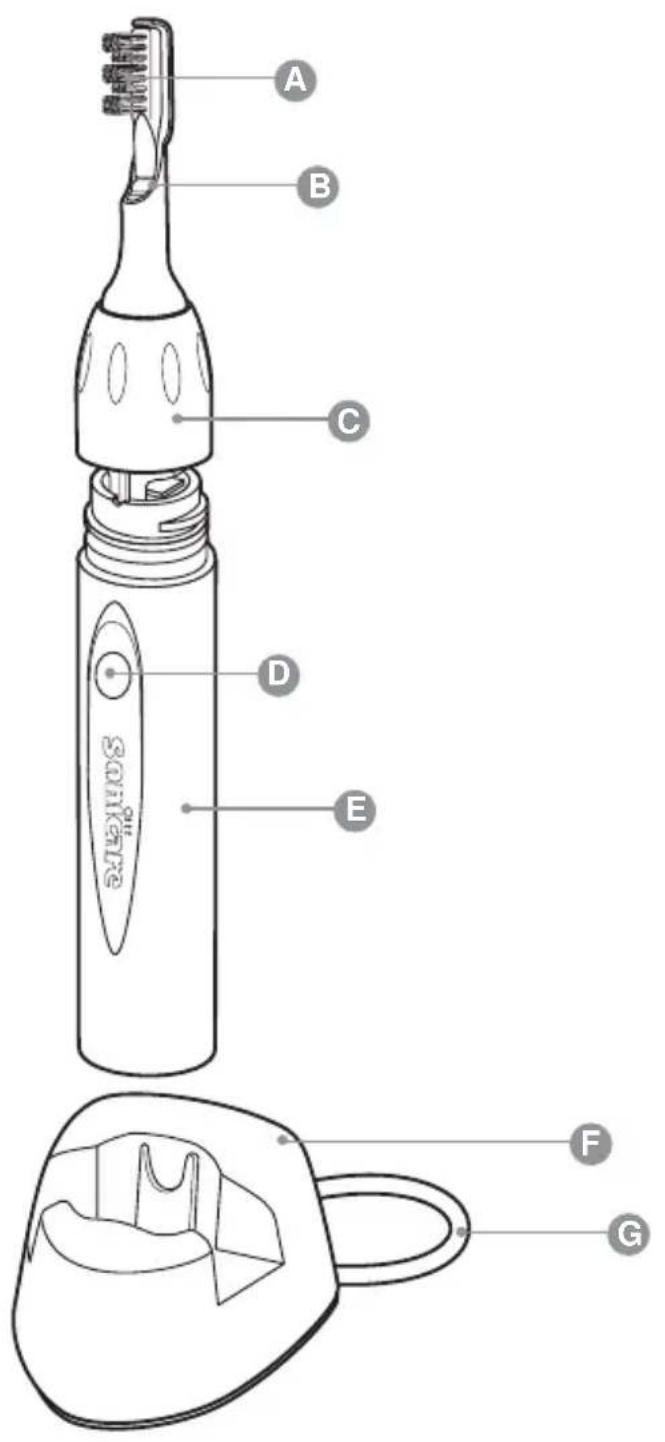
A B C D E F G SATESSO H10ENGLISH 4
FRANÇAIS 15
ESPAÑOL 27
General description
A Brush head
B Color code
© Removable nut
D Power on/off button
E Sonic power handle
F Charger base with cord wrap
G Power cord
Refer to bottom of charger for voltage specifications.
IMPORTANT SAFEGUARDS
READ ALL INSTRUCTIONS BEFORE USING
SAVE THESE INSTRUCTIONS
Sonicare® has been carefully engineered for both effectiveness and safety. However, basic safety precautions should always be followed when using any electrical product, especially when children are present.
DANGER
To reduce the risk of electrocution:
I) DO NOT place or store the charger where it can fall or be pulled into a tub or sink.
2) DO NOT place or drop the charger into water or other liquid.
3) DO NOT reach for a charger that has fallen into water. Unplug immediately.
4) DO NOT use while bathing.
5) DO NOT plug the charger into an incorrect voltage source outlet. It has been designed for use with a specific electrical voltage.
Refer to the bottom (or back) of the charger for the correct voltage specification. Voltage converters and plug adapters DO NOT guarantee voltage compatibility. Never force the plug into an outlet.
WARNING
To reduce the risk of burns, electrocution, fire or injury:
I) Use this product only for its intended use as described in this booklet. Do not use attachments not recommended by the manufacturer. See voltage information above.
2) Never operate the charger if it has a damaged cord or plug, if it is not working properly, if it has been dropped and appears to be damaged, or if it has been dropped into water. Call the Sonicare Customer Service Department at 1-800-682-7664 (in North America) for further instructions.
3) Keep the cord away from heated surfaces.
4) Close supervision is necessary when this product is used by or on children or the disabled.
MEDICAL WARNINGS
1) Avoid using a brush head with crushed or bent bristles. Damaged bristles may break off while brushing. In order to prevent this, replace the brush head with a new one every 6 months or sooner if signs of wear appear.
2) Similar to starting with any new manual or electric oral hygiene product, consult your dental professional before using this product if you have had oral or gum surgery in the previous 2 months.
3) Contact your dental professional if excessive bleeding occurs after using this product or bleeding continues to occur after 1 week of use.
4) If you have any questions concerning usage with a pacemaker, consult your physician or pacemaker manufacturer prior to use. Sonicare is believed to be safe for use with many common pacemakers.
5) The Sonicare toothbrush is a personal care device and is not intended for use on multiple patients in a dental office or institution.
6) This product is designed for cleaning teeth, gums and tongue only. Do not use for any other purpose.
Customer Service Information
If you have any questions after reading this manual, feel free to contact our Customer Service Center or visit our Web site.
▶ Customer Service Center
1-800-682-7664 (North America), outside North America contact your local Philips Customer Care Center.
▶ Internet Information
www.sonicare.com (North America)
www.philips.com (outside North America)
SAVE THESE INSTRUCTIONS
Preparing for use
Attaching the brush head
natural_image
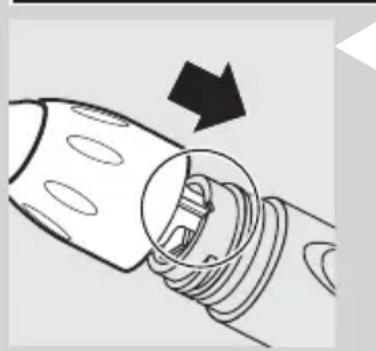
Diagram of a mechanical component with a directional arrow indicating motion (no text or symbols)1 Align the bar on the brush head with the notch on the handle and slide the brush head onto the handle.
text_image
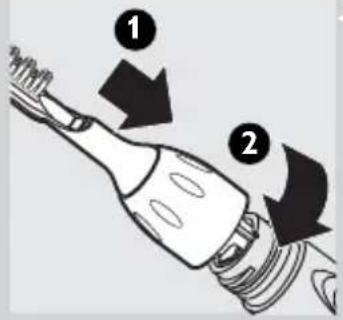
Diagram showing two labeled parts of a hairbrush with arrows indicating direction of movement or adjustment.2 Screw the brush head nut clockwise until it's firmly tightened. If the brush head rattles when in use, tighten the nut further.
3 Remove the travel cap from your brush head.
Charging
Sonicare comes partially charged and ready for use, but we highly advise that you charge it for a total of 21 hours during the first few days of use.

natural_image
Illustration of a hand holding a pen with a downward arrow indicating force or pressure (no text or symbols)To charge your Sonicare, place the handle in the charger base with the Sonicare logo facing towards you to ensure the handle properly fits (slots) in the charger. Once the handle is placed in the charger base, the power button light should illuminate or blink to indicate charging is taking place.
Do not attempt to force the handle into the charger; this will cause damage.
Older model Sonicare handles without the slotting feature will not fit in this new charger base and do not charge effectively. Do not attempt to force a handle without the slotting feature into this charger base, as this will cause damage.
Sonicare handles with the slotting feature can be charged effectively in most older Sonicare charger bases. (Note; these handles are not compatible with charger model TX-1).
It is recommended that you keep your Sonicare in the charger base when not in use to maintain a full battery charge. After the initial charging period, it takes 15 hours charging time to reach full charge level. There is no need to periodically discharge handle.
Using the appliance
Useful tips
▶ Gel toothpastes are recommended for optimal product performance.
Place the brush head in your mouth before turning on your Sonicare and keep your mouth closed during brushing, otherwise toothpaste may splatter.
- You may experience a slight tickling or tingling sensation when using an electronic toothbrush such as Sonicare for the first time.
As you become accustomed to brushing with Sonicare this sensitivity will diminish.
A fully charged Sonicare will provide approximately 2 weeks of typical use (2 minutes of brushing twice a day), making it easy to take your Sonicare along without the charger.
Remember that voltage converters and plug adapters DO NOT guarantee voltage compatibility. Always check for voltage compatibility.
Tips for special needs
Stain removal
In areas where excess staining occurs, spend extra brushing time to assist with stain removal.
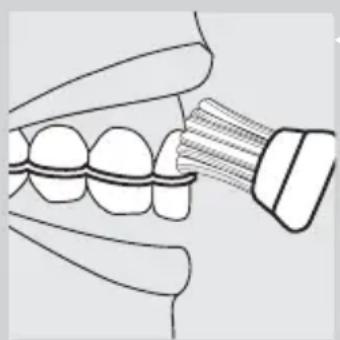
Braces
natural_image
Illustration of a dental procedure showing tooth alignment and tooth penetration (no text or symbols)The brush should be placed at an angle between your brackets and gumline. Using light pressure, gently move the bristles in a small circular motion so the longer bristles reach between your teeth for 2 seconds. Then gently turn (roll) the brush handle so the bristles clean the bracket and the rest of the tooth before you glide the bristles to the next tooth. Continue this until you have brushed all of your teeth.
Dental restorations (dental work)
Use Sonicare on dental restorations (such as implants, caps, crowns, bridges and fillings) as you would on your natural tooth surfaces to reduce plaque build-up and improve gum health. Work the bristles around all the areas of the restoration for thorough cleaning.
Periodontal pockets
Your dental professional may have indicated that you have periodontal pockets, deep pockets where plaque bacteria collect. If this is the case, after brushing for a full 2 minutes, spend extra time gently brushing these areas to improve your gum health.
Brushing technique
natural_image
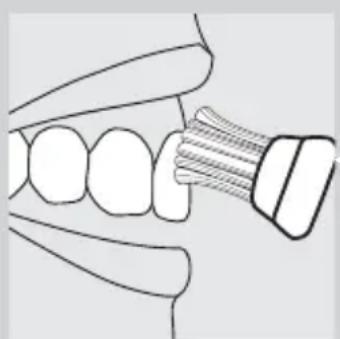
Diagram of a dental tool interacting with teeth (no text or labels)Follow these simple steps to maximize your brushing experience.
Before turning the Sonicare on, place the bristles of the brush head along the gumline with the longer bristles placed between your teeth.
2 Position the bristles of the brush head towards the gumline and close your mouth.
3 Hold the handle with a light grip and turn the Sonicare on.
flowchart
graph TD
    A["1: Tooth with teeth"] --> B["2: Tooth with teeth"]
    B --> C["3: Tooth with teeth"]
    C --> D["4: Tooth with teeth"]
    D --> E["5: Tooth with teeth"]
    E --> F["End"]
4 Gently move the vibrating brush head in a slightly circular motion so the longer bristles reach between your teeth. After 2 seconds, glide the bristles to the next section and pause while you gently circulate the bristles again. Continue this routine throughout your 2-minute brushing cycle to effectively remove plaque in those hard-to-reach places.
5 To maximize Sonicare's effectiveness use light pressure and let the Sonicare toothbrush do the brushing for you. Do not scrub.
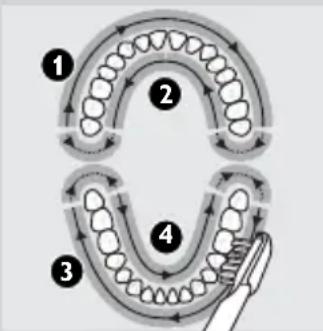
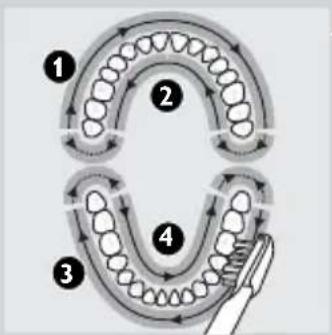
6 To make sure you brush evenly throughout the mouth, divide your mouth into 4 sections: outside top, inside top, outside bottom and inside bottom teeth. Begin brushing in section 1 (outside top teeth) and brush for 30 seconds before moving to section 2 (inside top teeth). Continue brushing for 30 seconds in each section progressing through all 4 sections until you've brushed for 2 minutes.
7 After the 2-minute brushing cycle is complete, additional time should be spent brushing the chewing surfaces of your teeth.
Press the power button to turn the brush on and off as needed.. To clean your mouth more completely, you may also brush your tongue, with the toothbrush turned on or off, as you prefer.
Remember to floss daily.
Features
Easy-start® brushing power ramp-up
All Sonicare models come with the Easy-start feature activated (on), which helps you get used to brushing with Sonicare.
- Brushing power will gently increase to full power over the first 12 brushings.
The Easy-start feature is active if you hear 2 beeps immediately after turning on your Sonicare. Once you reach optimal brushing power (after the 12th brushing), you will no longer hear the double beep at the beginning of your brushing routine.
Note: each of the first 12 brushings must be at least 1 minute in length to properly move through the Easy-start ramp-up cycle.
To turn off or reactivate the Easy-start feature:
I Attach your brush head to the handle.
2 Place the handle in a plugged-in charger base.
3 Press and hold the power button for 5 seconds. You will hear I beep if the Easy-start feature is off. If you hear 2 beeps, Easy-start is active (on).
Using the Easy-start feature beyond the initial ramp-up period is not recommended and reduces Sonicare's effectiveness in removing plaque.
The Easy-start feature should be deactivated when Sonicare is used in clinical trials.
Smartimer® 2-minute timer
All Sonicare models come with the Smartimer feature, which automatically sets the brushing time to the 2 minutes recommended by dental professionals.
If you wish to pause or stop brushing during your 2-minute cycle, press the power button. Press the power button again and the Smartimer will pick up where you left off.
The Smartimer will automatically reset to the beginning of a 2-minute cycle if:
- b r ushing is paused for 45 seconds or longer;
- the handle is returned to the charger base.
Quadpacer® 30-second interval timer (available on select models).
- Quadpacer makes sure that you brush all sections of your mouth evenly and thoroughly. At 30, 60 and 90 seconds, you will hear a short beep and a pause in brushing action. This is your signal to move to the next section of your mouth.
text_image
Diagram illustrating dental tooth movement with numbered steps and directional arrows indicating progressionRecharge indicator battery charge status (available on select models).
If your Sonicare has a low charge, you will hear 5 beeps after you have brushed your teeth for 2 minutes and the power button light will flash rapidly.
When you hear the low charge indication, you have 3 or fewer 2-minute brushings left.
natural_image
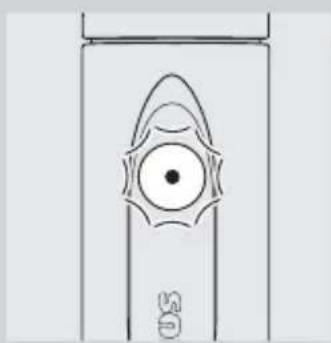
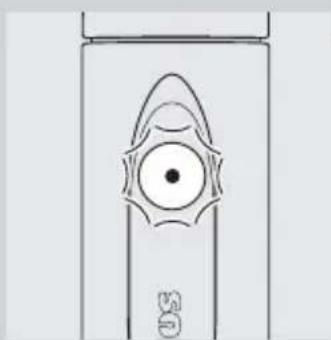
Simple line drawing of a door with a circular head and 'US' logo at the bottom (no text or symbols on the door itself)1 Place the handle in the charger base (with the Sonicare logo facing towards you) to begin the recharging process.
The power button light flashes slowly when the handle is in the charger base to signal charging is in progress.
When the Sonicare is fully charged, the power button light is constantly on (not flashing), signalling that your Sonicare is ready for use.
When not in use, keep your Sonicare in the charger base to maintain a full battery charge.
Cleaning
By following these simple steps, you should get years of worry-free brushing:
natural_image
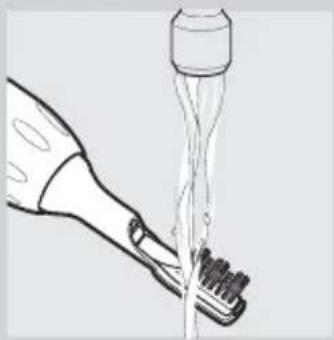
Line drawing of a hand brushing teeth with a toothbrush (no text or symbols)1 Rinse brush head and bristles after each use.
natural_image
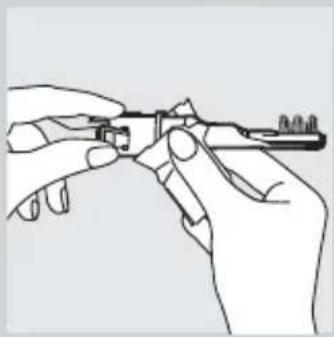
Line drawing of hands holding a tool, no text or symbols present2 Clean the brush head at least once per week, including under the nut.
natural_image
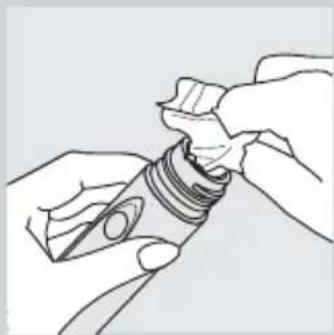
Line drawing of hands holding a cylindrical object with a ring, no text or symbols present3 Clean and dry the handle periodically.
4 Clean the charger base periodically.
UNPLUG the charger before cleaning. After cleaning the charger base completely dry the charger before plugging it into an electrical outlet.
Mild soap, water and a moist cloth are recommended for cleaning your Sonicare.
Utilize the cord wrap feature in the underside of the charger base to store excess cord length.
Replacement
Brush head
Sonicare brush heads should be replaced every 6 months to achieve optimal results. Use only Sonicare Advance replacement brush heads.
Environment
HANDLE CONTAINS NICKEL CADMIUM BATTERIES. BATTERIES MUST BE RECYCLED OR DISPOSED OF PROPERLY.
The batteries inside your Sonicare cannot be replaced, but are easily removed for recycling. At the end of product life and prior to disposal, please remove the batteries from the handle by following the instructions below.
Please note that this process is not reversible.
To help protect our environment, we encourage you to recycle at approved recycling locations. Do not dispose of the batteries in normal household waste.
Removing the batteries
To remove the batteries yourself, you will need a flat-head (standard) screwdriver and a small towel. Basic safety precautions should be observed when following the procedure outlined below. Be sure to protect your eyes, hands, fingers and the surface on which you are working.
natural_image
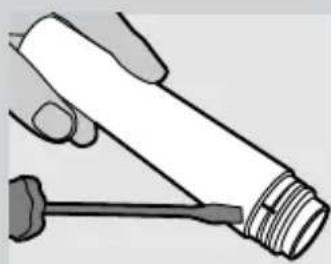
Illustration of a hand holding a cylindrical object with a screwdriver inserted, no text or symbols present1 With the brush head still attached to the power handle, completely deplete the batteries of electrical charge by pressing the power button and running a brushing cycle until it stops.
Repeatedly run brushing cycles until the handle will no longer activate the brush head.
2 Remove the brush head from the handle.
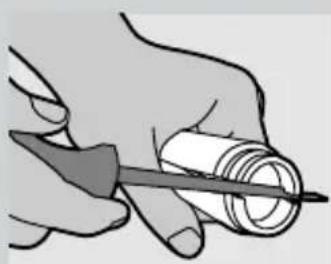
3 Split the handle open by inserting the screwdriver head all the way through both slots on the top part of the handle throat, where the brush head was previously attached.
4 Turn the screwdriver handle sideways, using twisting and prying motions, to crack open the handle along its side seams.
natural_image
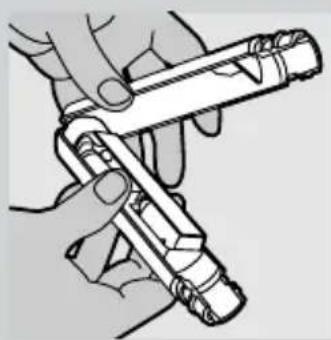
Illustration of a hand holding a pen and a cylindrical object (no text or symbols visible)5 Pull the 2 handle sections completely apart.
natural_image
Illustration of a hand holding a mechanical tool or spring, no text or symbols presentENGLISH12
natural_image
Illustration of hands using a tool to adjust or install a mechanical component (no text or symbols visible)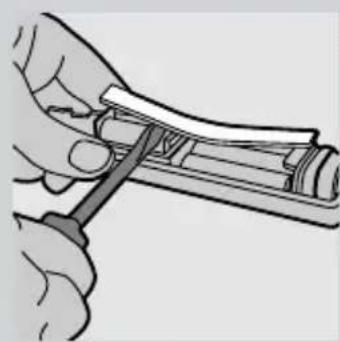
natural_image
Illustration of a hand using a tool to adjust or install a mechanical component (no text or symbols visible)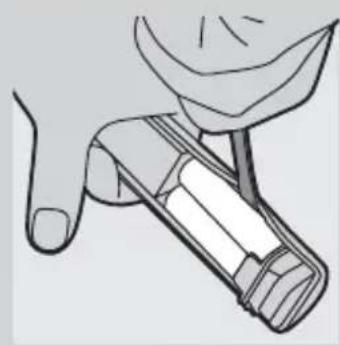
natural_image
Illustration of a hand holding a small mechanical component, possibly a tool or device, with no visible text or symbols.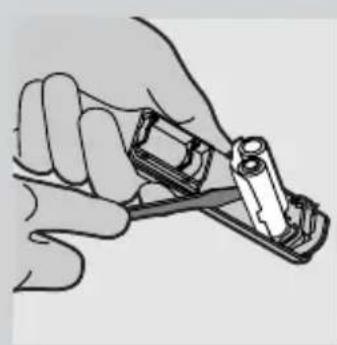
natural_image
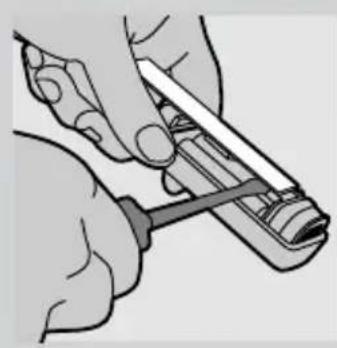
Illustration of a hand using a tool to adjust or install a mechanical component (no text or symbols visible)6 Insert the screwdriver underneath the electronic circuit board in multiple places.
7 Twist and pry the electronic circuit board loose until it is completely separated from the handle.
8 Pry the 2 AA-sized cylindrical nickel-cadmium batteries loose by inserting the screwdriver on the sides of the two batteries in the locations shown in the figure.
9 Use a twisting and prying motion to break the glue bond on the inside of the handle plastic and underneath the batteries. The 2 batteries are joined together with glue and will be lifted out together.
For information about Sonicare's battery recycling program or instructions on recycling your Sonicare, call 1-800-682-7664 (North America) or, outside North America, contact your local Philips Customer Care Center.
Please note that this process is not reversible.
Guarantee & service
See separate Philips worldwide guarantee leaflet for standard guarantee.
Guarantee Restrictions
What is not covered under warranty:
- B r ush Heads
- Damage caused by misuse, abuse, neglect or alterations
- Normal wear and tear, including chips, scratches, abrasions, discoloration or fading.
IMPLIED WARRANTIES
ANY IMPLIED WARRANTIES, INCLUDING IMPLIED WARRANTIES OF MERCHANTABILITY AND FITNESS FOR A PARTICULAR PURPOSE, SHALL BE LIMITED TO THE DURATION OF THE EXPRESS WARRANTIES SET FORTH IN THE PHILIPS WORLDWIDE GUARANTEE LEAFLET. SOME STATES DO NOT ALLOW LIMITATION ON HOW LONG AN IMPLIED WARRANTY LASTS, SO THE ABOVE LIMITATION MAY NOT APPLY TO YOU.
LIMITATION OF REMEDIES
IN NO EVENT SHALL PHILIPS ORAL HEALTHCARE, INC. OR ANY OF ITS AFFILIATED OR SUBSIDIARY COMPANIES BE LIABLE FOR ANY SPECIAL, INCIDENTAL OR CONSEQUENTIAL DAMAGES BASED UPON BREACH OF WARRANTY, BREACH OF CONTRACT, NEGLIGENCE,TORT, OR ANY OTHER LEGAL THEORY. SUCH DAMAGES INCLUDE,WITHOUT LIMITATION, LOSS OF SAVINGS OR REVENUE; LOSS OF PROFIT; LOSS OF USE;THE CLAIMS OF THIRD PARTIES INCLUDING,WITHOUT LIMITATION, DENTISTS AND DENTAL HYGIENISTS; AND COST OF ANY SUBSTITUTE EQUIPMENT OR SERVICES. SOME STATES DO NOT ALLOW THE EXCLUSION OR LIMITATION OF INCIDENTAL OR CONSEQUENTIAL DAMAGES, SO THE ABOVE LIMITATION OR EXCLUSION MAY NOT APPLY TO YOU.
Troubleshooting
If you are unable to solve your problem by means of the troubleshooting guide below, please contact our Customer Service Center at 1-800-682-7664(in North America), or the Philips Customer Care Center in your country.
| Problem | Solution |
| The Sonicare toothbrush does not work | Recharge your Sonicare overnight, ensuring that it is not plugged into an electrical outlet controlled by a light switch. Make sure the brush head is attached correctly. |
| I feel a tickling sensation when I use Sonicare. | You may experience a slight tickling/tingling sensation when using Sonicare for the first time.As you become accustomed to brushing with Sonicare this sensitivity will diminish. |
| The brush head rattles when I use Sonicare | Sonicare should produce a gentle hum during operation.Tightening the brush head nut can eliminate excessive rattling. If rattling does not stop, you may need to replace the brush head. Make sure that the travel cap has been removed. |
| The brush head chatters against my teeth. | Chattering of the plastic backplate may occur occasionally.This is harmless and can be avoided by keeping the brush head properly oriented, with the bristles angled toward the teeth as instructed, at an angle of 30 to 40 degrees. |
| Brushing seems less powerful. | The handle may need recharging. |
| The Easy-start feature may be on and needs to be shut off (see chapter "Using the appliance") | |
| You may need to clean your brush head.You may need to replace your brush head. | |
| Unpleasant odor | Clean the handle, brush head and charger thoroughly (see chapter "Cleaning"). |
Replace the brush head with a new one.
▶ Informations Internet
natural_image
Diagram of a mechanical component with a black arrow indicating direction (no text or symbols)text_image
Diagram showing two labeled parts of a mechanical or electrical component with arrows indicating direction of movement.natural_image
Diagram of a hand holding a tool with a downward arrow indicating force or pressure (no text or symbols present)natural_image
Illustration of a dental procedure showing tooth alignment and tooth penetration (no text or symbols)natural_image
Diagram of a dental tool interacting with teeth (no text or labels)text_image
Diagram illustrating dental archway tooth movement with numbered steps and directional arrows indicating flow or orientation.flowchart
graph TD
    A["1: Tooth with teeth"] --> B["2: Tooth with teeth"]
    B --> C["3: Tooth with teeth"]
    C --> D["4: Tooth with teeth"]
    D --> E["End"]
natural_image
Line drawing of a stylized door with a circular head and star-shaped top (no text or symbols)natural_image
Line drawing of a hand brushing teeth with a toothbrush (no text or symbols)natural_image
Line drawing of hands holding a small mechanical component (no text or symbols)natural_image
Line drawing of hands holding a cylindrical object with a ring, no text or symbols presentnatural_image
Illustration of a hand holding a cylindrical object with a screwdriver inserted, no text or symbols presentnatural_image
Illustration of a hand holding a pen and a rolled cylindrical object (no text or symbols visible)natural_image
Illustration of a hand holding a mechanical tool or spring (no text or symbols visible)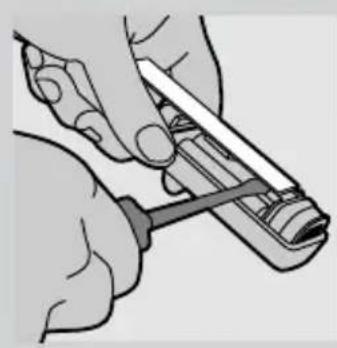
natural_image
Illustration of hands using a tool to adjust or install a mechanical component (no text or symbols visible)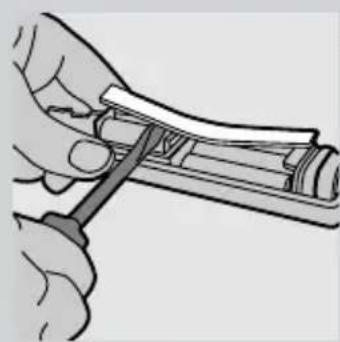
natural_image
Illustration of a hand using a tool to adjust or install a mechanical component (no text or symbols visible)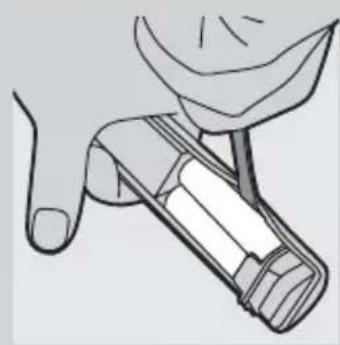
natural_image
Illustration of a hand holding a small mechanical component, possibly a tool or device, with no visible text or symbols.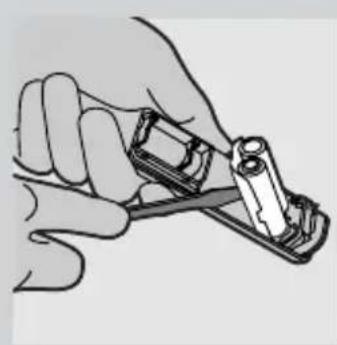
natural_image
Illustration of a hand using a tool to adjust or install a mechanical component (no text or symbols visible)natural_image
Diagram of a mechanical component with an arrow indicating direction (no text or symbols present)text_image
Diagram showing two labeled parts of a mechanical or electrical component with arrows indicating direction of movement.natural_image
Illustration of a hand holding a pen with a downward arrow indicating force or pressure (no text or symbols)natural_image
Diagram of a dental procedure showing tooth alignment and tooth penetration (no text or labels)Bolsas periodontales
natural_image
Diagram of a dental tool inserted into teeth (no text or labels)text_image
Diagram illustrating dental archway tooth movement with numbered steps and directional arrows indicating progressionnatural_image
Line drawing of a stylized door with a circular head and star-shaped opening (no text or symbols)natural_image
Illustration of a toothbrush brushing teeth with a toothpaste can (no text or symbols)natural_image
Line drawing of hands holding a tool, no text or symbols present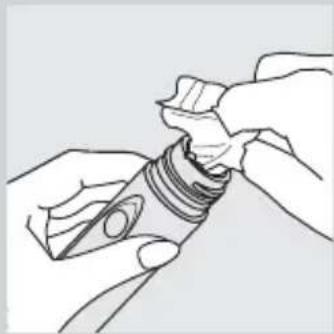
natural_image
Line drawing of hands holding a mechanical component (no text or symbols)natural_image
Illustration of a hand holding a cylindrical object with a screw-like end, next to a small mechanical component (no text or symbols)natural_image
Illustration of a hand holding a pen and rolled paper (no text or symbols visible)natural_image
Line drawing of a hand holding a mechanical tool or spring (no text or symbols)natural_image
Illustration of hands using a tool to adjust or install a mechanical component (no text or symbols visible)natural_image
Illustration of a hand using a tool to cut or adjust a cylindrical object (no text or symbols visible)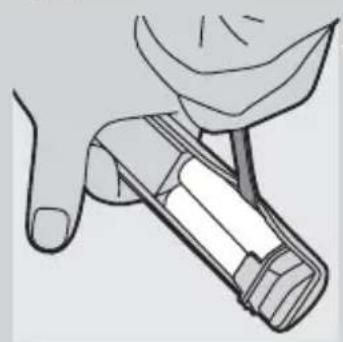
natural_image
Illustration of a hand holding a tool or device with a cylindrical component inserted (no text or symbols visible)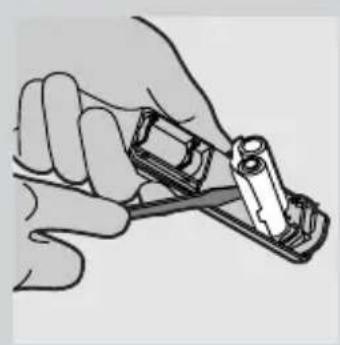
natural_image
Illustration of a hand using a tool to cut or adjust a cylindrical object (no text or symbols visible)Philips Oral Healthcare, Inc.
35301 SE Center Street
Snoqualmie, WA 98065
USA
www.sonicare.com
1-800-682-7664 (North America only)

Printed in USA on 100%
recycled paper
Protected by U.S. and international patents. Other patents pending.
© 2002 Philips Oral Healthcare, Inc.
All rights reserved. PHILIPS and Philips
shield are registered trademarks of Koninklijke Philips Electronics NV.
Easy-Start, Quadpacer, Smartimer,
Sonicare, and the Sonicare logo are
registered trademarks of Philips Oral
Healthcare, Inc.
4235 020 00391