
PDST61 - Furniture accessory AEG - Free user manual and instructions
Find the device manual for free PDST61 AEG in PDF.
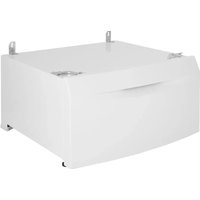


| Product type | Washing/drying pedestal |
| Brand | AEG |
| Model | PDST61 |
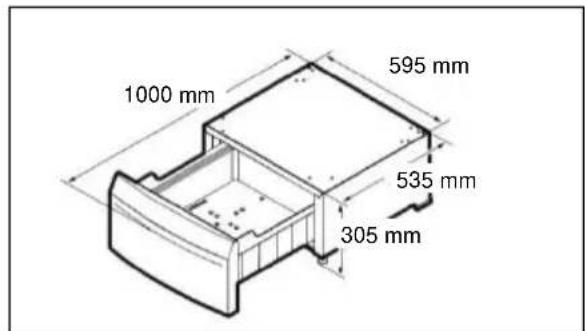
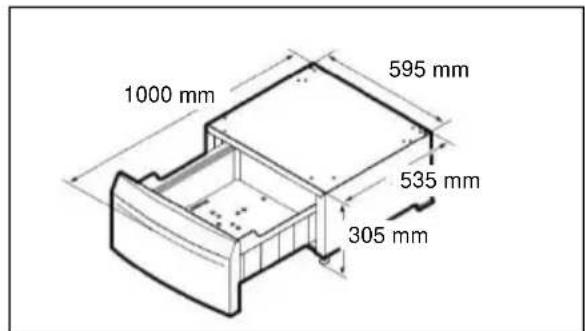
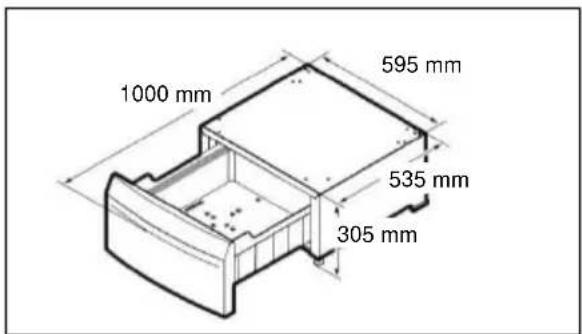
| Width | 1000 mm |
| Depth | 595 mm |
| Height | 305 mm |
| Approximate weight | 15 kg |
| Material | Coated steel |
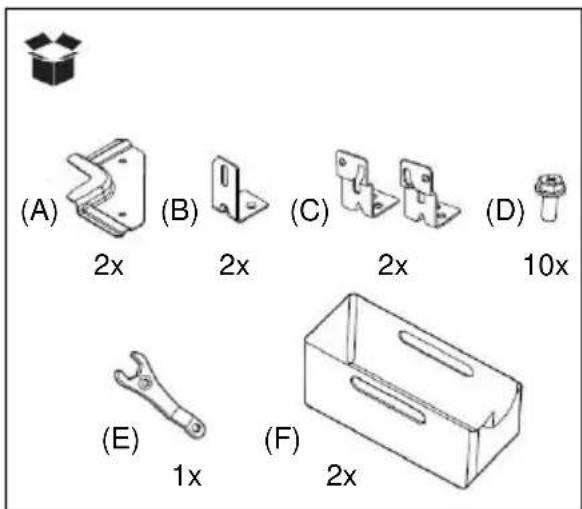
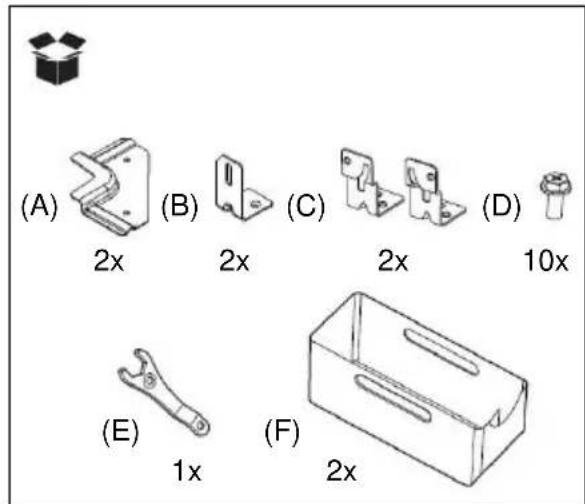
| Included accessories | 2 front brackets, 2 rear brackets for washing machine, 2 rear brackets for dryer, 10 screws, 1 adjustment key, 2 extra bins |
| Load capacity | 80 kg (estimate) |
| Compatibility | AEG washing machines and dryers (other brands subject to dimensions) |
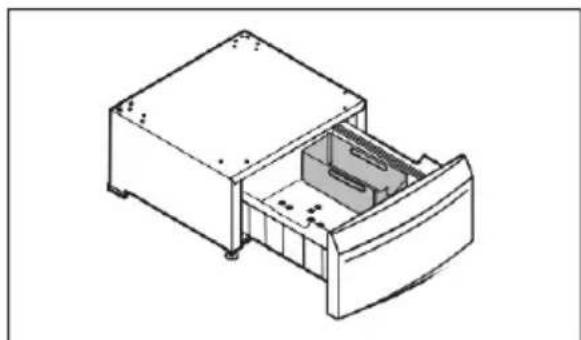
| Main functions | Elevates the machine, facilitates loading, integrated storage drawer |
| Height adjustment | Adjustable front feet via included key |
| Secure attachment | Front and rear brackets with screws |
| Safety instructions | Do not stack two appliances, do not install alone, fix all brackets |
| Maintenance | Clean with a soft cloth, avoid abrasive products |
| Environmental protection | Recycling through approved centers |
Frequently Asked Questions - PDST61 AEG
User questions about PDST61 AEG
0 question about this device. Answer the ones you know or ask your own.
Ask a new question about this device
Download the instructions for your Furniture accessory in PDF format for free! Find your manual PDST61 - AEG and take your electronic device back in hand. On this page are published all the documents necessary for the use of your device. PDST61 by AEG.
USER MANUAL PDST61 AEG
| EN | Accessories | Installation Instruction | 2 |
| BG | Аксесоари | Инструкция за монтаж | 8 |
| CZ | Příslušenství | Pokyny k instalaci | 14 |
| DA | Tilbehør | Installationsvejledning | 20 |
| DE | Zubehör | Montageanleitung | 26 |
| EL | Аξεσουάρ | Обнгієс егката́оста́снç | 32 |
| ES | Accesorios | Instrucciones de instalación | 38 |
| ET | Tarvikud | Paigaldusjuhend | 44 |
| FI | Tarvikkeet | Asennusohjeet | 50 |
| FR | Accessoires | Instructions d'installation | 56 |
| HR | Dodaci | Upute za montažu | 62 |
| HU | Tartozékok | Szerelési utasítások | 68 |
| IT | Accessori | Istruzioni di installazione | 74 |
| LT | Priedai | Montavimo instrukcija | 80 |
| LV | Piederumi | Uzstādīšanas norādījumi | 86 |
| NL | Accessoires | Montage-instructies | 92 |
| NO | Tilbehør | Monteringsanvisning | 98 |
| PL | Akcesoria | Instrukcja instalacji | 104 |
| PT | Acessórios | Instruções de instalação | 110 |
| RO | Accesorii | Instructiuni de instalare | 116 |
| RU | Аксессуары | Инструкции по установке | 122 |
| SK | Príslušenstvo | Návod na použitie | 128 |
| SL | Pripomočki | Navodila za namestitev | 134 |
| SR | Прибор | Упутство за постављање | 140 |
| SV | Tillbehör | Installationsinstruktion | 146 |
| TR | Aksesuarlar | Montaj Talimati | 152 |
| UA | Аксесуари | Інструкція з установки | 158 |
Safety Information Product & Accessories Information

WARNING!
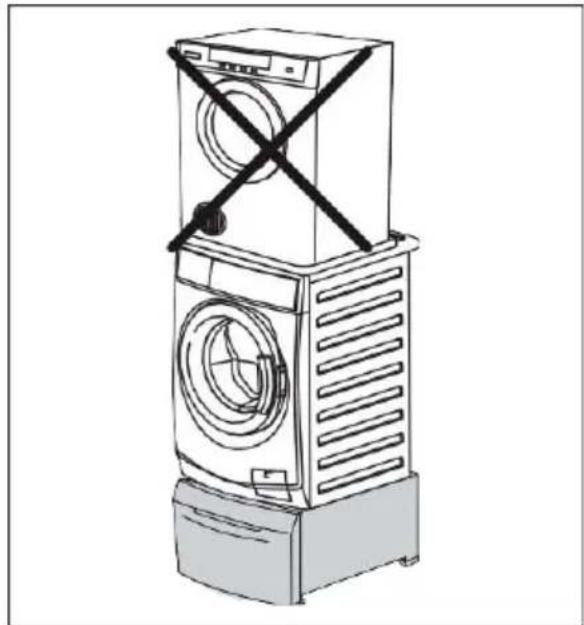
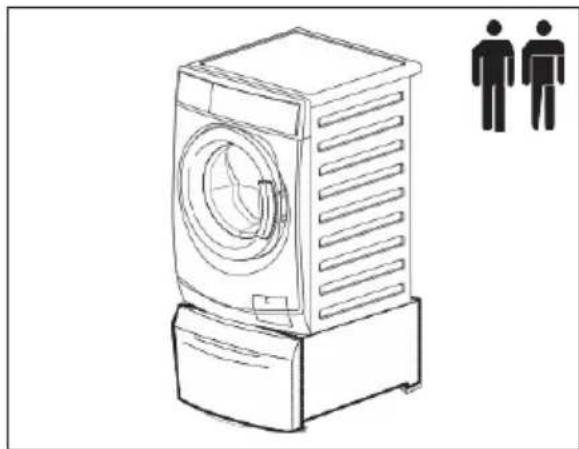
Do not stack 2 appliances over Pedestal.

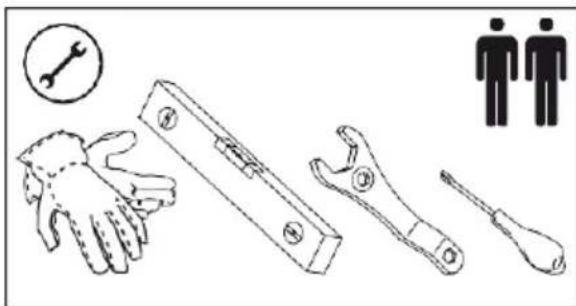
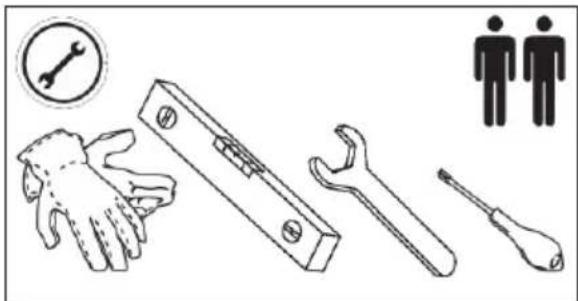
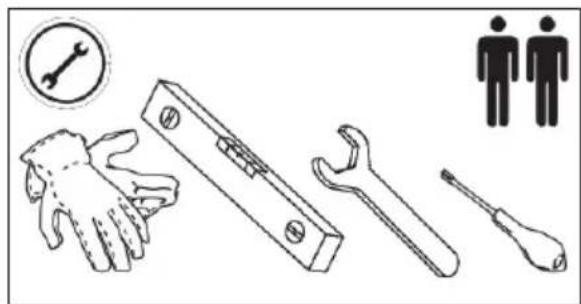
WARNING! Do not install it alone.

WARNING! Before proceeding with installation, make sure there is enough room.

WARNING! Before use of the appliance (Washing Machine or Dryer) be sure all the rear brackets (2x) are fixed by screws.
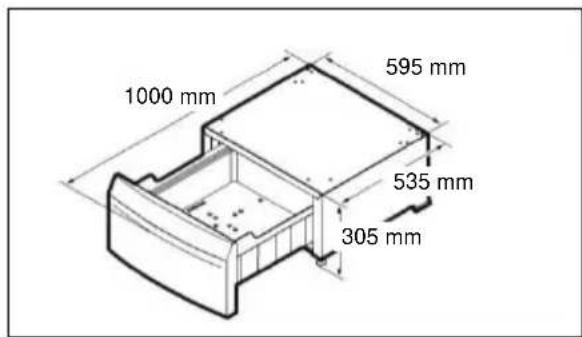
- Dimension

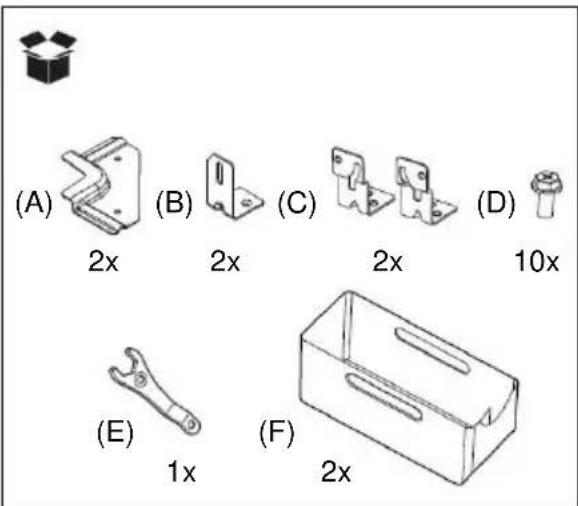
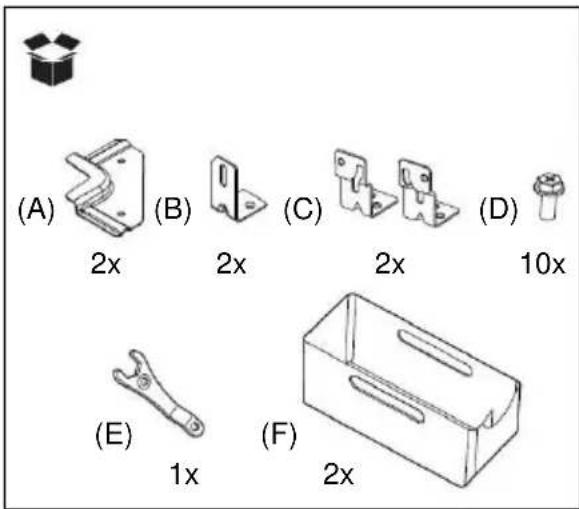
- Accessories
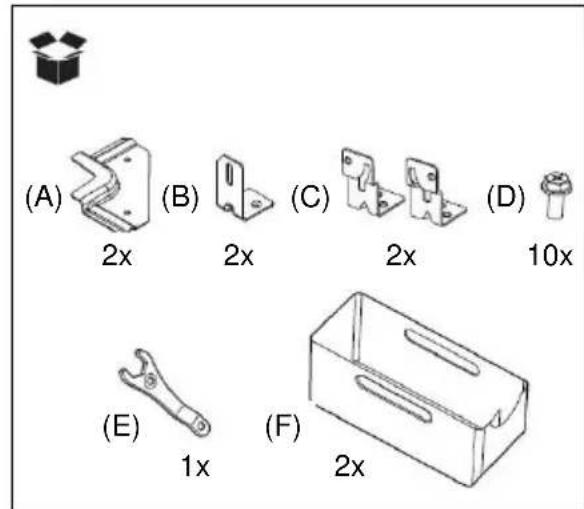
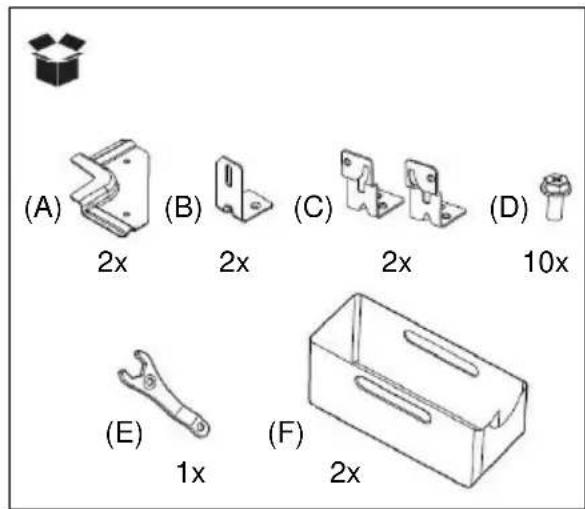
(A) 2 front metal brackets. (B) 2 rear brackets for washing machine. (C) 2 rear brackets for tumble dryer. (D) 10 screws. (For tumble dryer 8 screws will be sufficient.) (E) 1 spanner to adjust the levelling feet. (F) 2 additional containers (if available).
Installation Procedure
- Remove the pedestal and all accessories from the box.
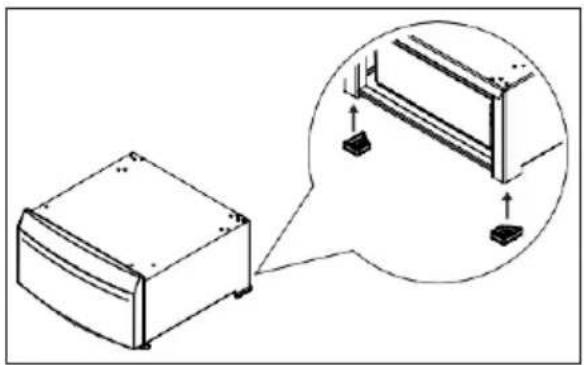
- Make sure that the rear rubber feet are mounted.
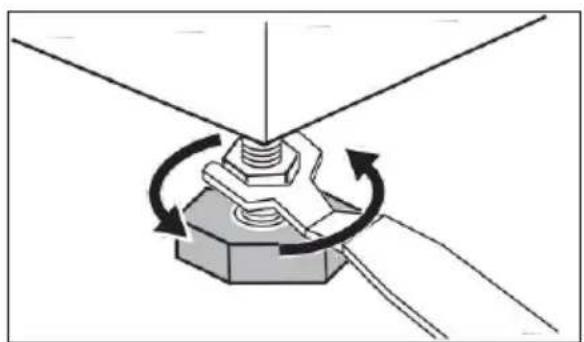
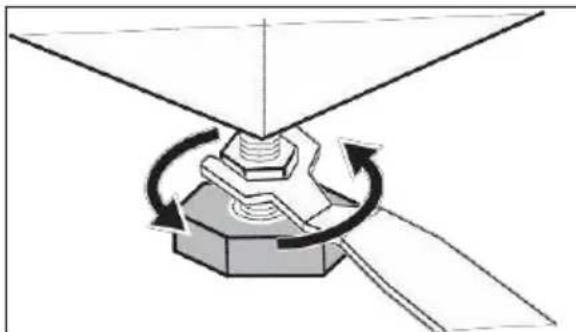
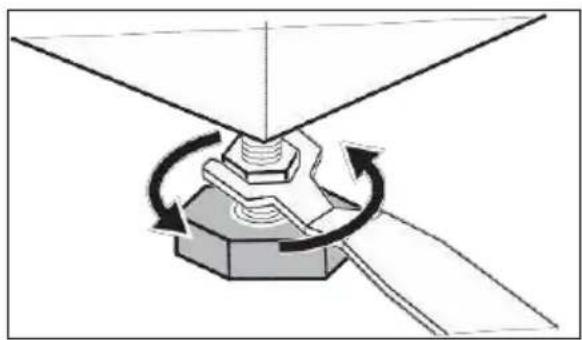
- Adjust the front adjustable feet to make the pedestal stable.
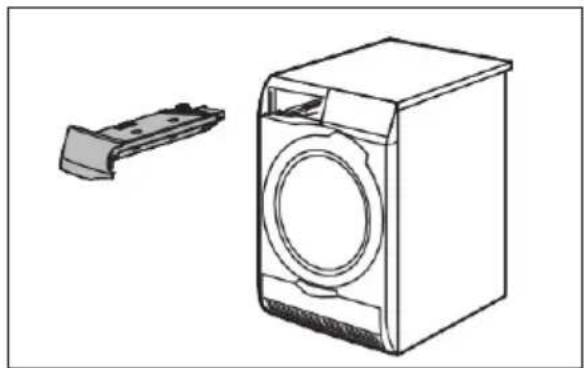
- If you install the pedestal under a brand new appliance, unpack the appliance as indicated in the instructions supplied with it and then proceed with step 6.
- If the appliance is already connected:
- Disconnect the mains plug from the mains socket.
- For washing machine: Close the water tap.
- For washing machine: Disconnect the inlet hose(s) from the water tap and let the water flow out from the inlet hose(s) and the drain hose, collecting it in a shallow basin.
For tumble dryer: Empty the water container in a wash basin or, if available, activate the direct drain system to let the water flow out.
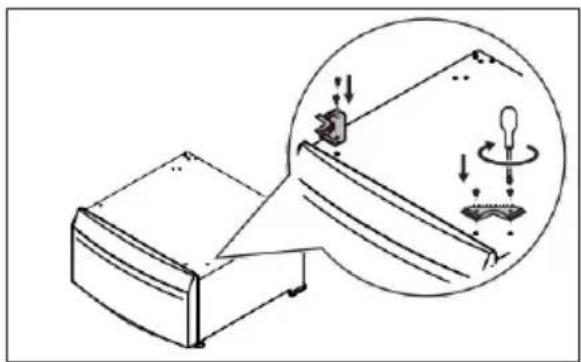
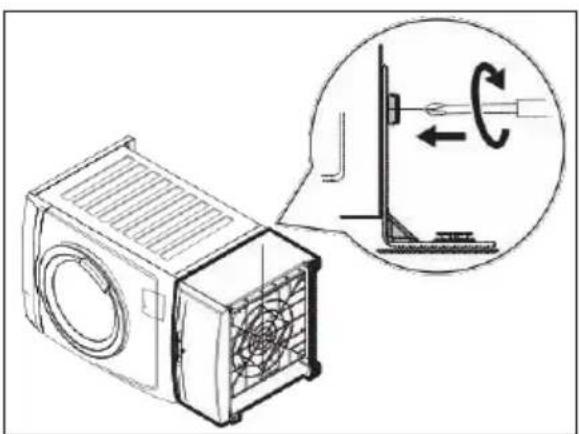
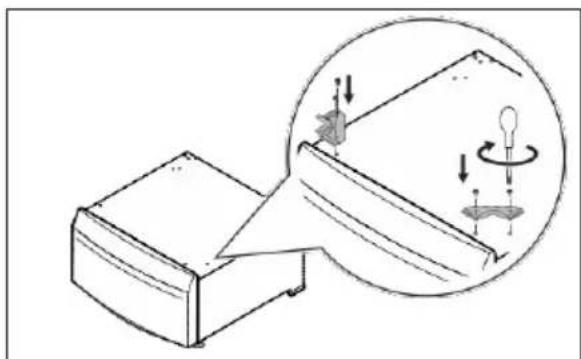
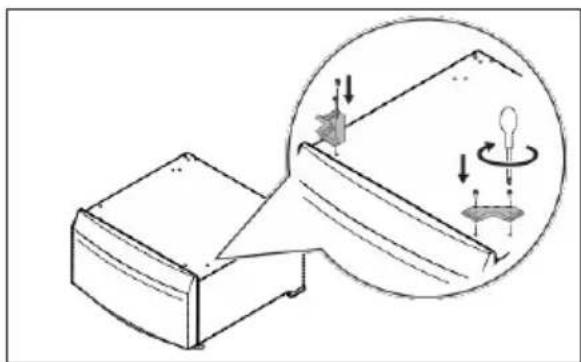
- Screw the front brackets onto the pedestal.
- For washing machine: Gently lay the washing machine on its detergent dispenser side.

Lay it on cardboard or a piece of polystyrene to avoid scratching the cabinet.
- For washing machine: Adjust the appliance's adjustable feet to a suitable height to allow it to slide under the foot locking brackets.
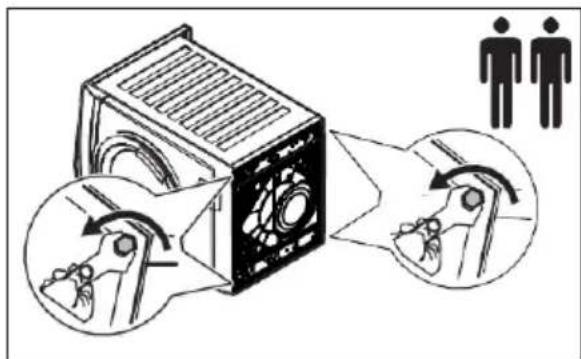
- For washing machine: Lay the pedestal on the same side and slide it forward so that the appliance's front feet slide under the foot locking brackets.
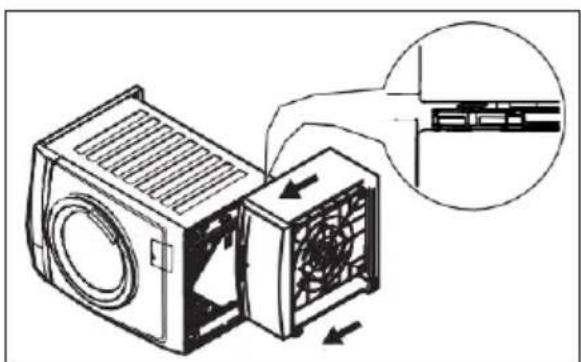
- For washing machine: Use the screws supplied to secure the rear brackets (B) on both the washer and the pedestal.
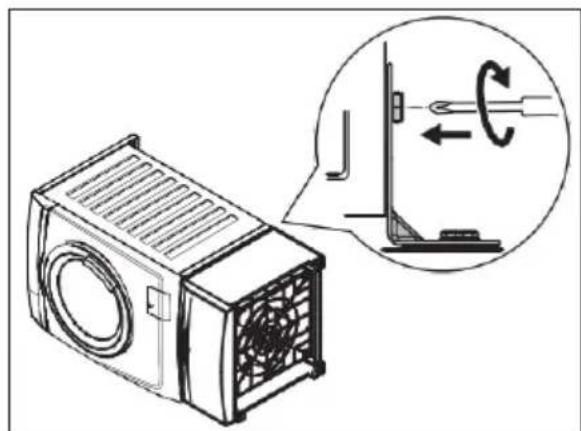
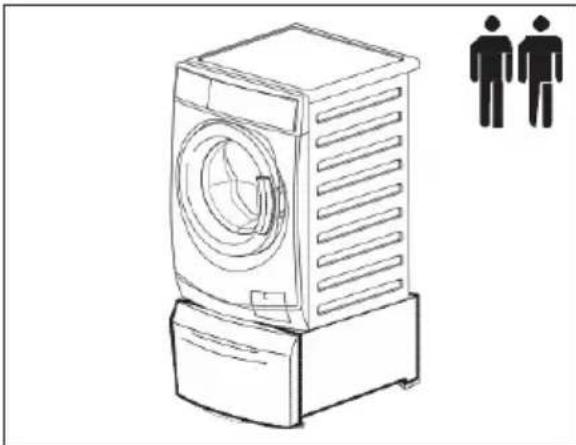
- For washing machine: Put the pedestal and appliance in a vertical position. If necessary, adjust the appliance feet and go to step 16. Check that the screws are firmly tightened.
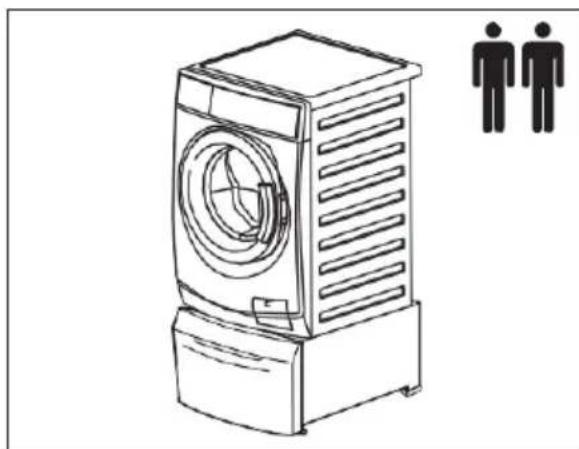
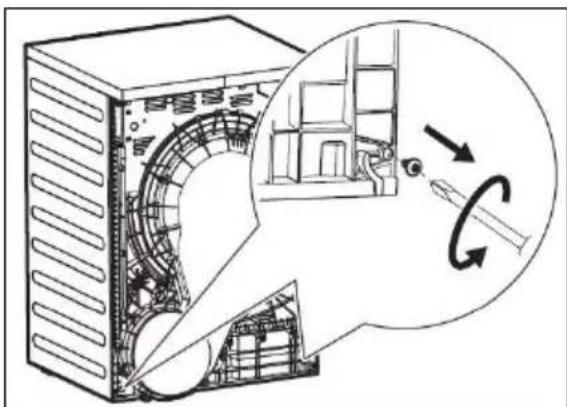
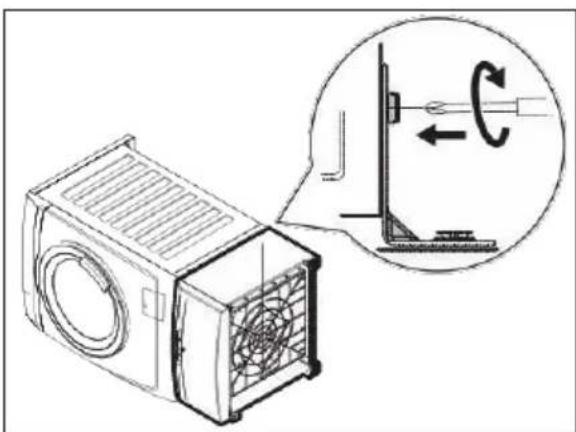
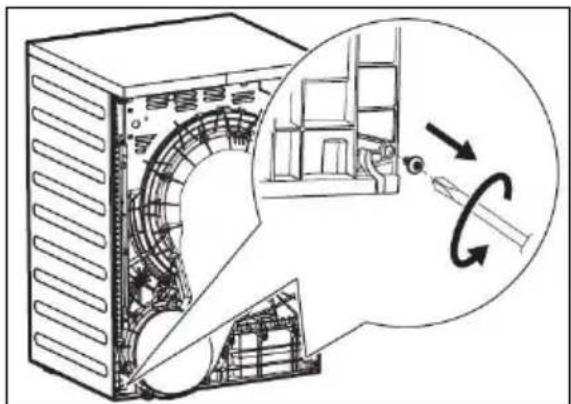
- For tumble dryer: Unscrew the two bottom screws from the back of the appliance.
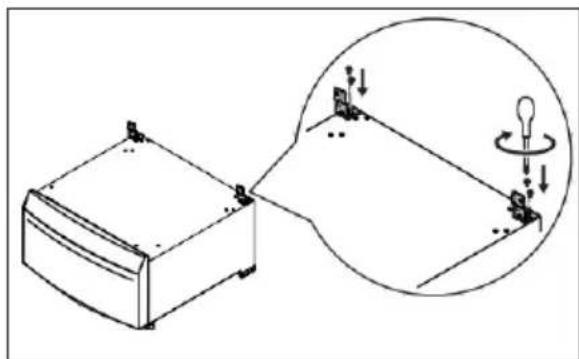
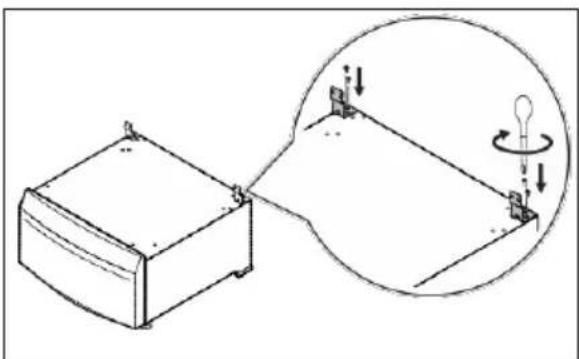
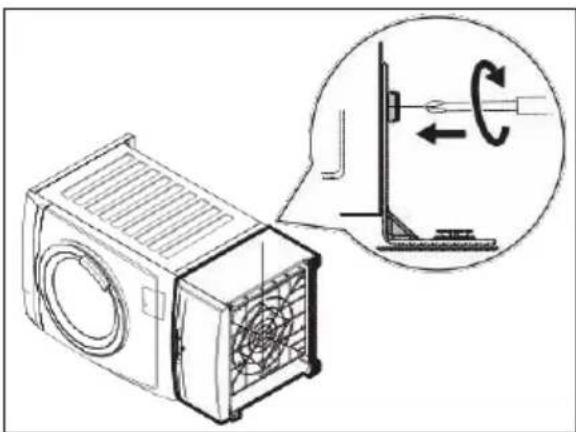
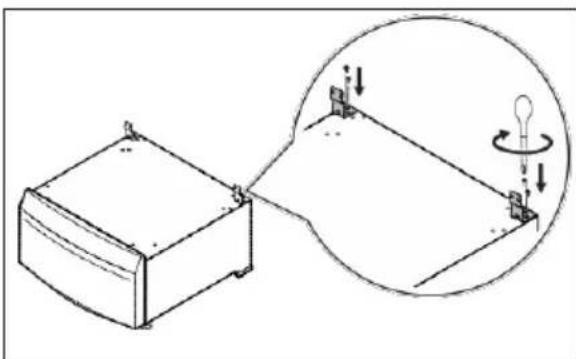
- For tumble dryer: Screw the rear brackets (C) onto the pedestal using the screws supplied in the stand box.
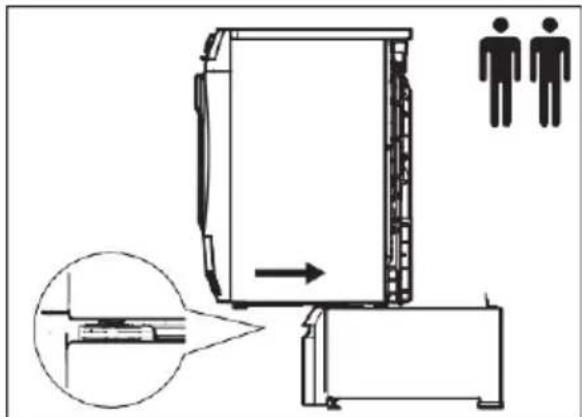
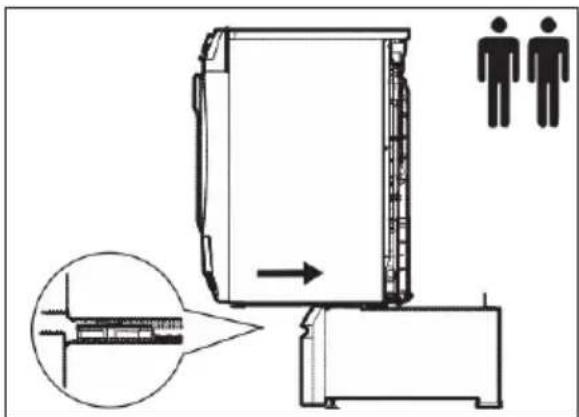
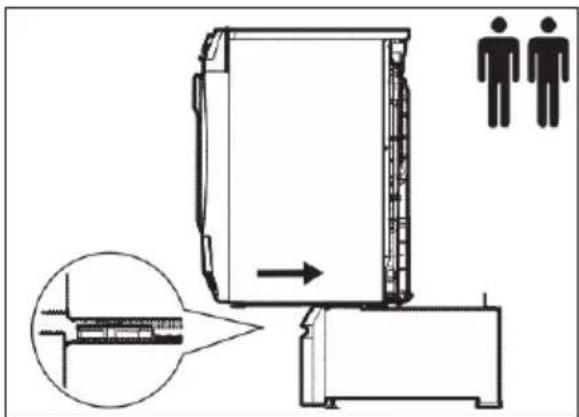
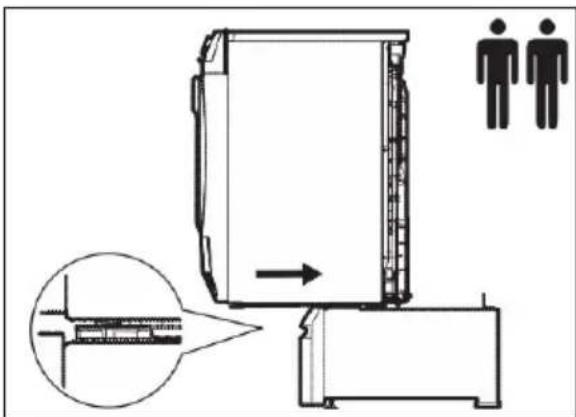
- For tumble dryer. Lift the appliance and slide backwards so that the appliance front feet slides under foot locking brackets.
- For tumble dryer. Screw the rear brackets (C) to the back of the appliance by using the screws removed in step 12 and adjust the appliance feet if required.

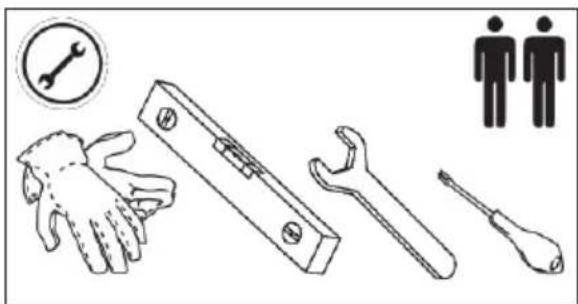
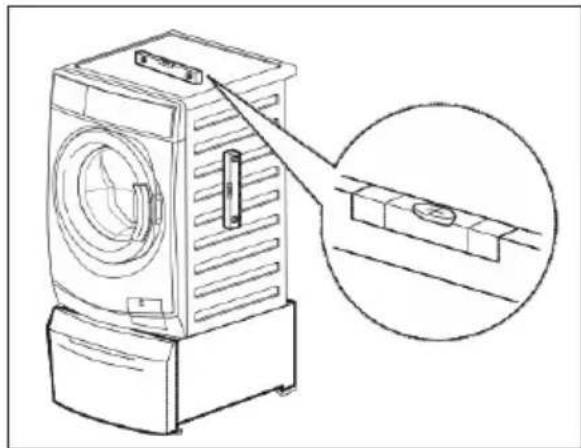
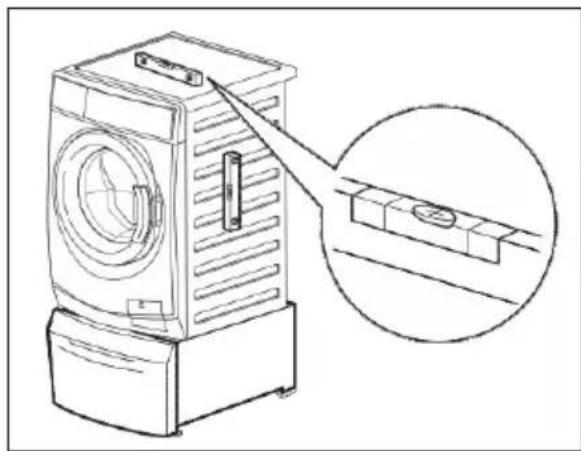
- Move the Pedestal/Appliance assembly to its permanent location. Use a spirit level to check if the assembly is properly leveled. If not leveled, adjust feet to level properly.
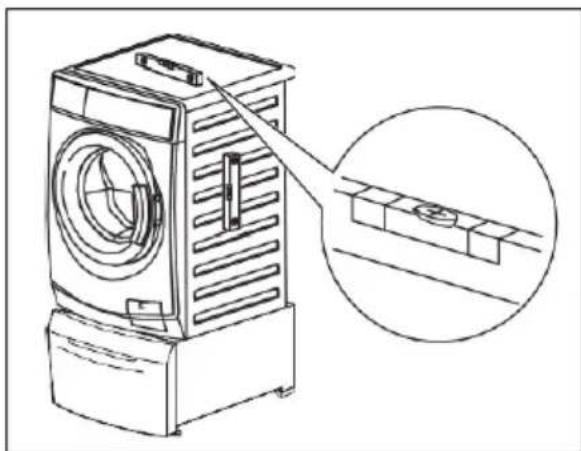
- If available, you can insert the additional container (F).
- Connect the appliance as indicated in the instructions supplied with the appliance.
Environmental Concerns
Recycle the materials with the symbol 📊. Put the packaging in applicable containers to recycle it. Help protect the environment and human health and to recycle waste of electrical and electronic appliances.
Do not dispose appliances marked with the symbol with the household waste.
Return the product to your local recycling facility or contact your municipal office.
Note


WARNING! Do not install without assistance.


- For tumble dryer. Lift the appliance and push it backwards so that the front feet of the appliance slide under the foot locking brackets.


WARNING! Before starting installation, make sure you have enough space.

- Dimensions
- Accessories



WARNING! Do not install it yourself.

WARNING! Before installation, make sure there is enough space.

- Adjust the front feet so that the base is stable.
- If you are mounting the base under a new appliance, unpack the appliance as indicated in the enclosed instructions and proceed to step 6.
- If the appliance is already connected:
- Pull the power plug out of the electrical outlet.
- For washing machines: Close the water tap.
- For washing machines: Disconnect the inlet hose(s) from the water tap and let the water drain from the inlet and drain hoses into a shallow basin.
- For tumble dryers: Empty the water container into a sink or, if available, activate the direct drain system to release the water.
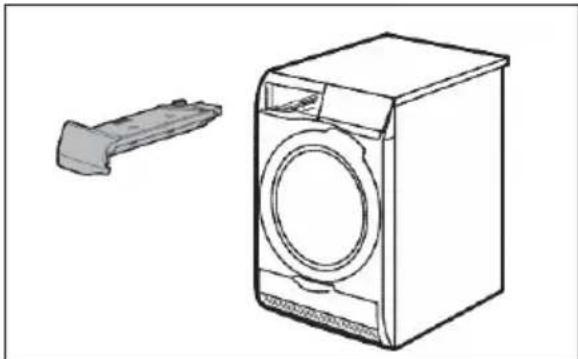
- For washing machines: Carefully lay the washing machine on its side with the detergent drawer.

Place it on cardboard or a piece of polystyrene to avoid scratching the frame.
- For washing machines: Adjust the feet to adjust the appliance to a suitable height so that they can fit under the foot locking brackets.
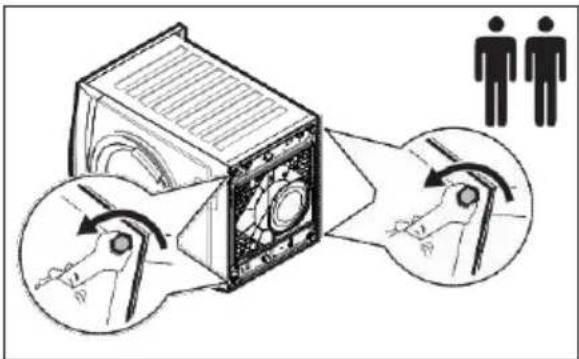
- For washing machines: Lay the base on the same side and push it forward so that the front feet of the appliance slide under the foot locking brackets.
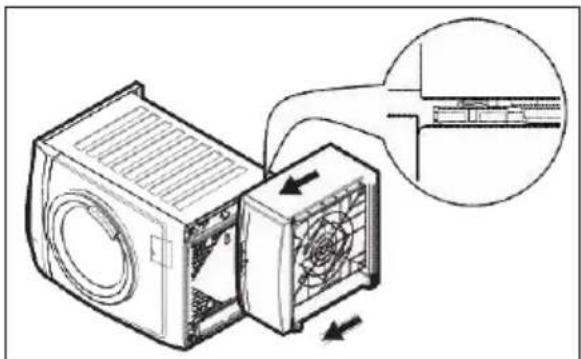
- For washing machines. Use the screws (G) supplied to fix the rear brackets (B) to the base and screws (D) for the plinth.
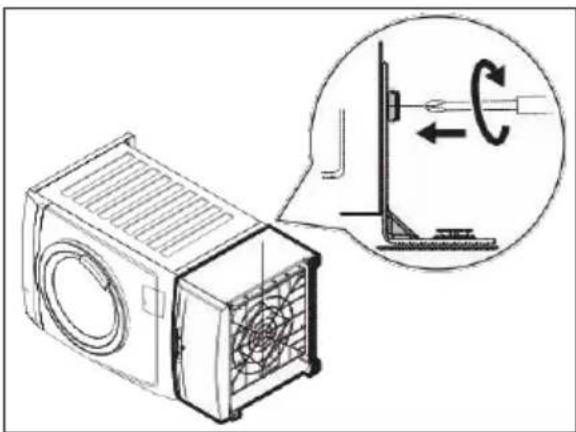
- For washing machines. Place the base and the appliance in an upright position. If necessary, adjust the appliance feet and proceed to step 16. Check that the screws are properly tightened.
- For tumble dryers. Unscrew and keep the two lower screws on the rear of the appliance.
- For tumble dryers. Screw the rear brackets (C) to the base using the screws supplied in the base box.
- For tumble dryers. Lift the appliance and push it backwards so that the front feet of the appliance slide under the foot locking brackets.
- For tumble dryers. Screw the rear brackets (C) to the back of the appliance using the screws removed in step 12 and, if necessary, adjust the appliance feet.
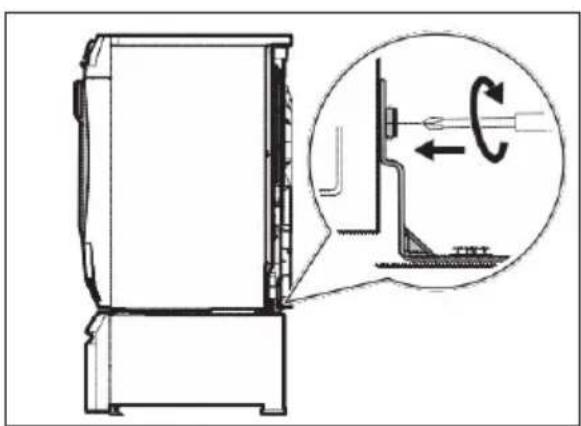
- Connect the appliance as indicated in the instructions supplied with the appliance.
Environmental information
Recycle materials with the symbol 🚙. Dispose of packaging for recycling in suitable containers. Help protect the environment and human health and recycle waste from electrical and electronic appliances.
- Dimensions
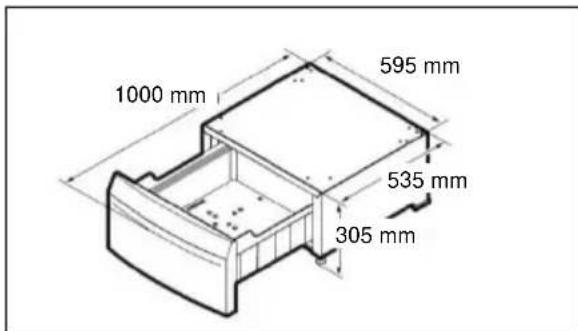
- Accessories


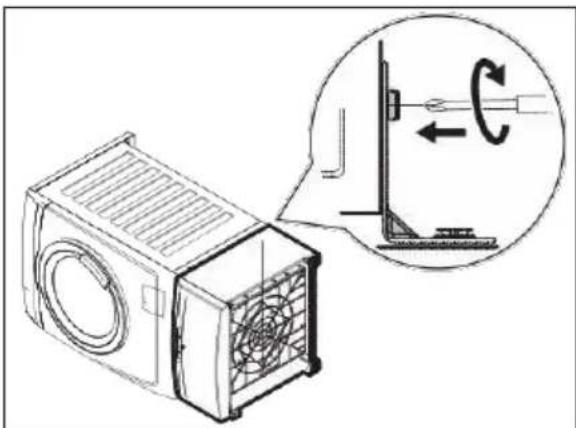


- Dimensions
- Accessories

WARNING! Do not install it alone.
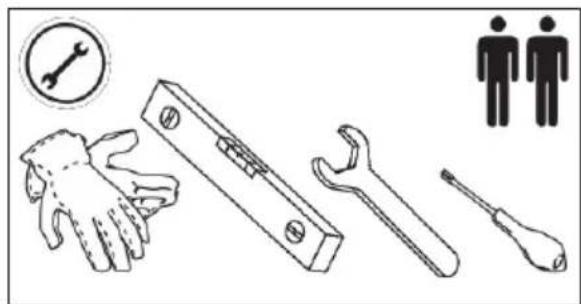

- Screw the front brackets to the base.
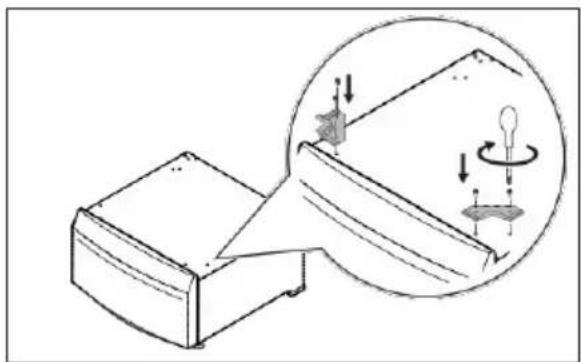
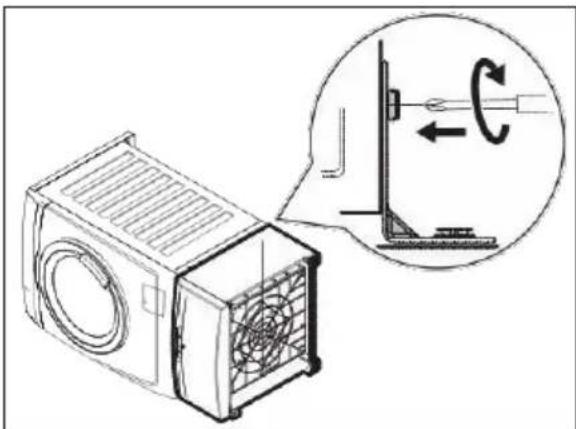


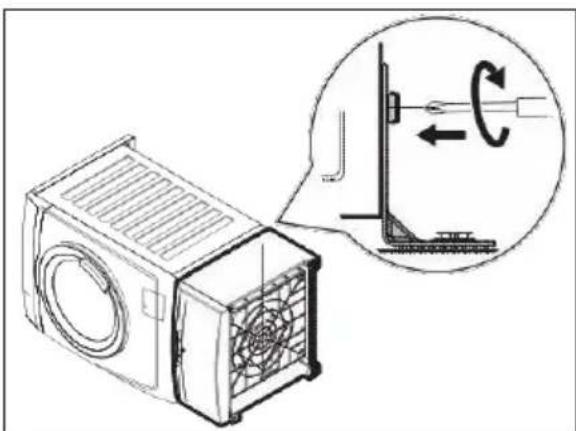


- Screw the front brackets onto the base.
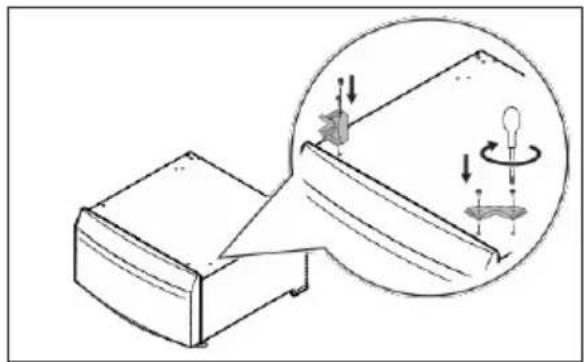
- For washing machine. Use the (G) screws provided to attach the rear brackets (B) to the washer and (D) screws for the pedestal.
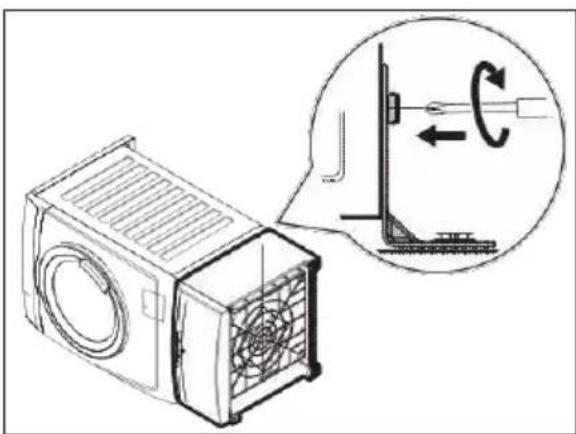
- For washing machine. Raise the pedestal and appliance to a vertical position. If necessary, adjust the feet and proceed to Step 16. Check that the screws are properly tightened.
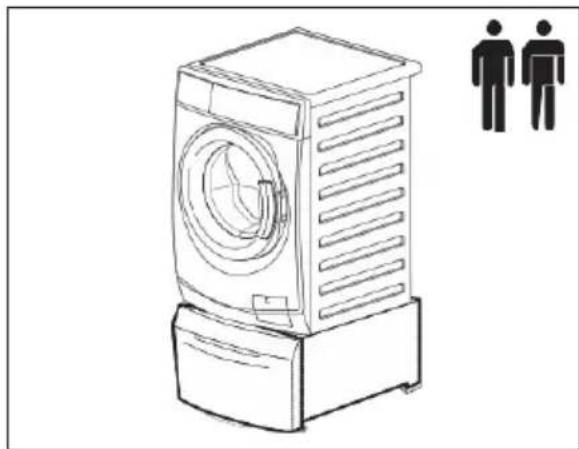


- For washing machine: Gently place the washing machine on the floor on the detergent dispenser side.

- For washing machine. Use the (G) screws provided to fix the rear brackets (B) to the washer and (D) screws to the pedestal.
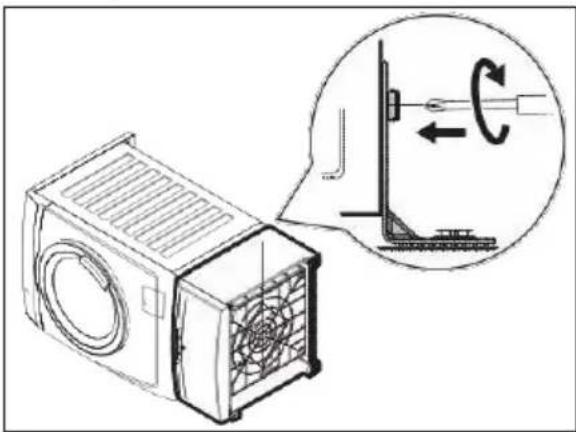


WARNING! Do not install it alone.
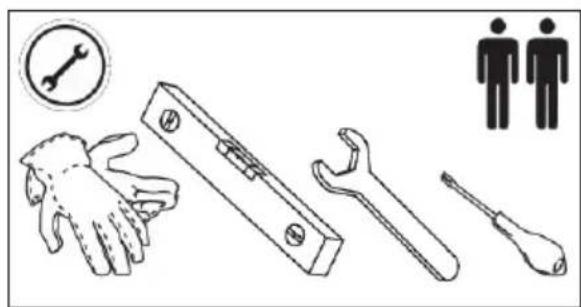

- Screw the front brackets onto the base.
- For washing machine. Carefully lay the washing machine on the detergent dispenser side.

- For dryer. Lift the appliance and slide it so that the front feet of the appliance slide under the locking brackets of the feet.
- Move the pedestal/appliance to its permanent location. Use a spirit level to check that the mounting kit is balanced. If not, adjust the feet and level it.

WARNING! Do not install it alone.

WARNING! Before continuing with the installation, make sure you have enough space.

WARNING! Before using the appliance (washing machine or dryer), make sure that the rear brackets are secured with screws.
- Adjust the front adjustable feet so that the base is stable.
- Screw the front brackets onto the base.
- For washing machine. Place the base and appliance upright. Adjust the appliance feet if necessary and proceed to step 16. Check that the screws are tightened properly.
- For dryer. Screw the rear brackets (C) onto the base with the provided screws.
- Move the base/appliance to its permanent location. Use a spirit level to check if the appliance is level. If not, adjust the feet accordingly.


- Dimensions
- Accessories


Brand : AEG
Model : PDST61
Category : Furniture accessory