
Dymension Outdoor AW-450 - Loudspeaker DEFINITIVE TECHNOLOGY - Free user manual and instructions
Find the device manual for free Dymension Outdoor AW-450 DEFINITIVE TECHNOLOGY in PDF.

| Product Type | All-weather outdoor speaker |
| Brand | Definitive Technology |
| Model | Dymension Outdoor AW-450 |
| Dimensions (W x H x D) | 168 x 202 x 290 mm (bracket included) |
| Unit Weight | 2.5 kg |
| Nominal Impedance | 4 Ω (8 Ω compatible) |
| Recommended Amplifier Power | 80 W |
| Sensitivity | 85 dB SPL (2.83 V at 1 m) |
| Frequency Response (-3 dB) | 86 Hz – 24 kHz |
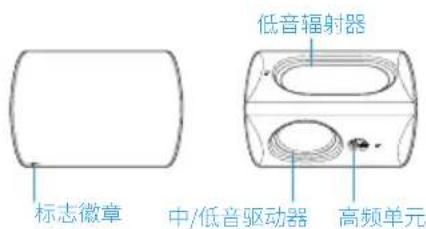
| Drivers | 110 mm woofer/midrange, 110 x 170 mm bass radiator, 25 mm aluminum oxide dome tweeter |
| Ingress Protection | IP66 |
| Enclosure Material | PP with 30% mineral fill |
| Inputs | Nickel-plated 5-way binding posts |
| Box Content | 2 speakers, mounting template, documentation |
| Use | Indoor and outdoor |
| Installation | Wall or overhang mounting, horizontal/vertical orientation |
| Cleaning | With a soft cloth and mild soapy water solution |
| Warranty | 5-year limited (U.S. and Canada) |
Frequently Asked Questions - Dymension Outdoor AW-450 DEFINITIVE TECHNOLOGY
User questions about Dymension Outdoor AW-450 DEFINITIVE TECHNOLOGY
0 question about this device. Answer the ones you know or ask your own.
Ask a new question about this device
Download the instructions for your Loudspeaker in PDF format for free! Find your manual Dymension Outdoor AW-450 - DEFINITIVE TECHNOLOGY and take your electronic device back in hand. On this page are published all the documents necessary for the use of your device. Dymension Outdoor AW-450 by DEFINITIVE TECHNOLOGY.
USER MANUAL Dymension Outdoor AW-450 DEFINITIVE TECHNOLOGY
AW-450 | AW-550 | AW-650
Important Product Information
IMPORTANT SAFETY INSTRUCTIONS
- Read these instructions.
- Keep these instructions.
- Heed all warnings.
- Follow all instructions.
- Do not use this apparatus near water.
-
Clean only with dry cloth.
-
Do not block any ventilation openings. Install in accordance with the manufacturer's instructions.
-
Do not install near any heat sources such as radiators, heat registers, stoves, or other apparatus (including amplifiers) that produce heat.
-
Protect the power cord from being walked on or pinched particularly at plugs, convenience receptacles, and the point where they exit from the apparatus.
-
Only use attachments/accessories specified by the manufacturer.
-
Use only with the cart, stand, tripod, bracket, or table specified by the manufacturer, or sold with the apparatus. When a cart is used, use caution when moving the cart/apparatus combination to avoid injury from tip-over.

-
Unplug this apparatus during lightning storms or when unused for long periods of time.
-
Refer all servicing to qualified service personnel. Servicing is required when the apparatus has been damaged in any way, such as power-supply cord or plug is damaged, liquid has been spilled or objects have fallen into the apparatus, the apparatus has been exposed to rain or moisture, does not operate normally, or has been dropped.
Notes on Use
- Avoid high temperatures.
- Do not let foreign objects into the unit.
- Do not let insecticides, benzene, and thinner come in contact with the unit.
- Never disassemble or modify the unit in any way.
- Naked flame sources such as lit candles should not be placed on the unit.
- Do not sit or step on unit.
- Do not place unit in standing water.
Sound United, LLC
5541 Fermi Court
Carlsbad, CA 92008, USA
1. Introduction
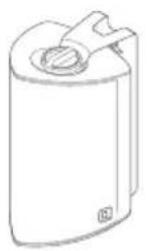
The Definitive Technology All-Weather (AW) Series indoor/outdoor speakers are unique high-performance products developed for superb music reproduction in domestic and commercial indoor/outdoor applications, such as restaurants and bars. The AW-450, AW-550 and AW-650 speakers use specially developed materials and components, brought together to achieve a level of superior sound quality and durability in all-weather speakers.
2. Box Contents
Ensure the following items are included in the box.
DocumentationAW Speaker x2 Mounting Template
3. Planning the Installation
- The AW speakers have a very wide dispersion pattern. However, if you are trying to disperse sound over a very large area, use multiple pairs of AW speakers to achieve an even distribution of sound. With multiple pairs, you will avoid having areas where the sound is too loud and others where the sound is not loud enough.
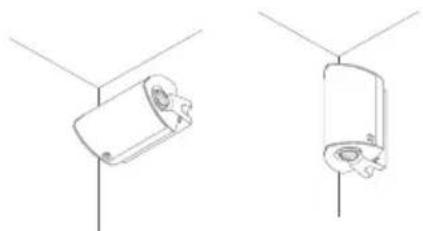
- The AW speakers should be positioned as close as possible to the listening area. The speakers may be oriented either horizontally or vertically (see Figure 1).
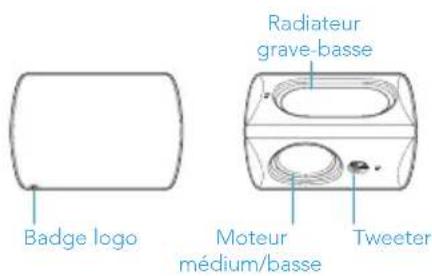
- Remember to always point the speakers in such a way as to allow water to roll off the driver cone and/or low-bass radiator. Always position the speakers so that the side with the mid/bass driver and tweeter—this is the side with the Definitive Technology logo badge (see Figure 2)—faces the listening area.
- One pair of AW speakers will cover approximately 200–400 square feet of listening area at moderately loud levels. Try to point the speakers directly at the listening area to maximize the output level. Mounting the speakers horizontally under the roof eaves is a good location (especially if it is on the same level as the listening area). Point the driver/tweeter/logo side down towards the listening area (see Figure 3 and Figure 4).
- The side of the speaker with the low-bass radiator can be placed facing an adjacent surface, such as a wall, the underside of an eave, the ceiling, or the ground, as long as there are at least a couple of inches of clearance (see Figure 3 and Figure 4). Positioning the low-bass radiator near a large surface will provide louder bass. For less bass, move the speaker farther away from the wall, ceiling, eave or ground.
natural_image
Technical line drawing of two mechanical components with mounting holes (no text or symbols)Figure 1
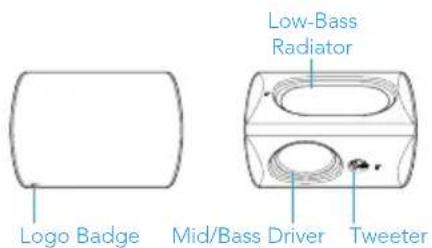
Figure 2
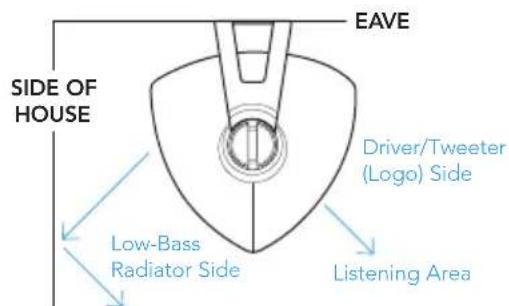
Figure 3
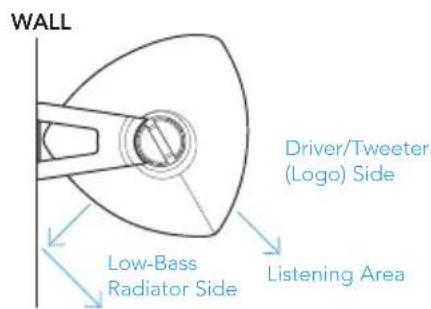
Figure 4
NOTE: The AW Series speakers use special components and materials for outdoor use. However, you can ensure longer speaker life by positioning the speaker to minimize weather exposure.
4. Mounting the Speakers
Installation of AW Series speakers requires tools such as a drill and screwdriver. If you have questions about the skills or tools required to install these products, please consult your Definitive Technology dealer, general contractor or professional installer.
Detailed Mounting Directions
- Make sure the mounting hardware and surface you choose are capable of holding the weight of the speaker (see the Specifications section for product weight) combined with the force generated by strong wind and/or snow accumulations common to the area.
- Make sure the locations you select do not conceal electrical wiring or plumbing behind the surface.
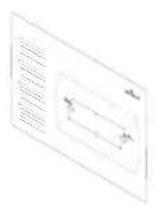
- Prior to installation, hold the included mounting template in the chosen location to make sure it safely clears obstacles such as the ceiling, adjacent walls, corners, beams, lighting fixtures and door/window frames.
- Using the mounting template, mark the screw locations.
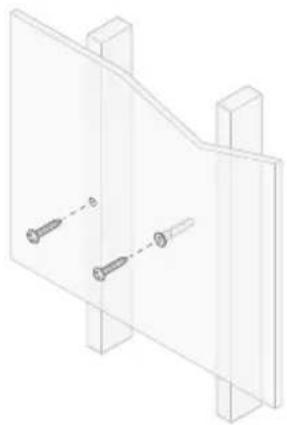
- If you are certain that there is a stud behind the wall surface, drive #10/M5 screws (not included) through the wall and into the stud (see Figure 5).
-
If there is no stud behind the wall at the chosen location, install wall anchors (not supplied) into the wall by following the wall anchor manufacturer's instructions. Always use two wall anchors and two screws per speaker (see Figure 5). For wood surfaces and studs, use wood screws; for sheetrock or gypsum, use wall anchors; for masonry, use masonry anchors.
-
Drive the screws into the stud or wall anchors, leaving the screw heads protruding 1/8" (4 mm).
-
If speaker wire is being fed from a hole in the wall behind the bracket, pull the speaker wire through the center hole in the bracket before mounting the bracket.
-
Line up the bracket attached to the speaker so that the screw heads pass through the large center hole of the bracket's screw slot.
-
Let the speaker and bracket slide straight down, allowing the screw head to slip behind the smaller end of the slot.
-
Tug gently on the speaker to make sure that the mounting hardware and bracket are properly aligned and secure.
-
If the bracket is not snug against the wall, remove the speaker from the wall, drive the screws in a little further, then remount the speaker.
-
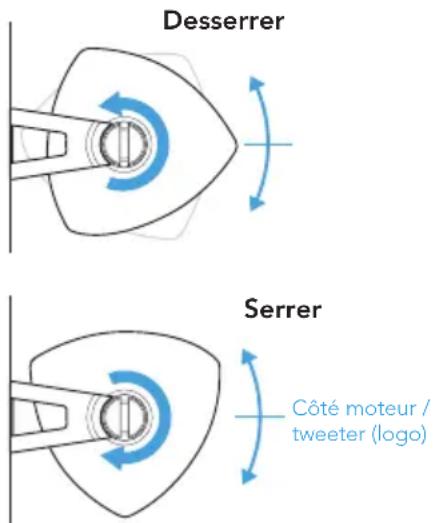
Once the speaker is mounted, the bracket locking knobs can be loosened to "aim" the speaker and then hand-tightened to keep the speaker angled correctly (see Figure 6).
-
Rotate the logo badge if required by lifting the spring-loaded badge and turning it to the desired orientation.
natural_image
Technical line drawing of a mechanical bracket with two screws and mounting holes (no text or symbols)Figure 5
Adjusting the Bracket
In order to point the driver/tweeter/logo side toward the listening position, turn the locking knobs counter-clockwise at least one rotation until the speaker is loose enough in the bracket to rotate. Hand-tighten the locking knobs to secure the speaker at the desired angle.
IMPORTANT SAFETY NOTICE: It is essential that you use appropriate hardware that is designed for proper, safe and secure mounting to the surface to which you are attaching the AW speaker. If you are unsure in any way about how to do this, consult a building contractor or professional installer.
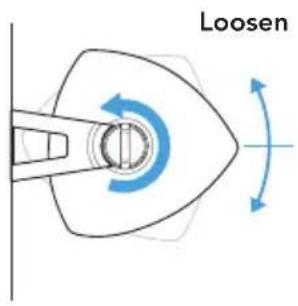
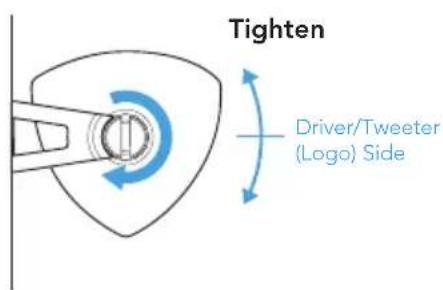
Figure 6
5. Connecting the Speakers
Speaker Wiring
Refer to the wiring chart below to determine the minimum required wire gauge for a given distance.
Wire Gauge Distance
16 AWG Up to 150' (45 meters)
14 AWG Up to 250' (80 meters)
Connecting the Speakers
It is critical for proper performance that both speakers (left and right) be connected in proper polarity. Note that one terminal on each speaker (the + terminal) is colored red and the other (the - terminal) is colored black. Please make certain that you connect the red (+) terminal on each speaker to the red (+) terminal of its channel on the amplifier or receiver and the black (-) terminal on the speaker to the black (-) terminal on the amplifier/receiver. It is essential that all speakers be connected in the same way to the amplifier (in phase). If you experience lack of bass, it is likely that one speaker is out of phase with the other; double-check the wiring and reconnect if necessary.

natural_image
Technical line drawing of a rectangular device connected to a cylindrical device with a circular top (no text or symbols)Figure 7
Speaker Pre-Conditioning (Break-In)
The AW Series speakers should sound good right out of the box. However, a pre-conditioning (break-in) period of 20–40 hours of normal playing at moderate volume is required to reach full performance capability. Pre-conditioning allows the driver suspensions to loosen and results in fuller bass, clearer, more open midrange, and smoother high-frequency reproduction.
Power and Loud Listening Levels
It takes more speakers and amplifier power to achieve a given sound level outdoors than required to produce the same apparent sound level indoors. Keep this in mind when designing and listening to the outdoor system. Be careful how loud you turn up the outdoor system. We recommend leaving the bass and treble controls on the amplifier or receiver at their "flat" (0 dB) positions.
Audible distortion when the speakers are playing at loud levels is caused by driving (turning up) the receiver or amplifier louder than it or the speakers are capable of playing. Most receivers and amplifiers put out their full-rated power well before the volume control is turned all the way up, so the position of the volume control is a poor indicator of its power limit. If the speakers distort when you play them loud, turn the volume down.
6. Use and Care
The AW Series speaker's robust construction ensures years of reliable operation. Periodically wash the speakers with a mild soap and water solution to remove dirt and pollutants.

For support, FAQs or more information about these products, please visit www.definitivetechnology.com or scan the QR code.
AW-450 Specifications
Speaker Type / Electrical
| Drivers | 4.5" bass/midrange driver x14"x 6" pressure-driven low-bass radiator x125 mm aluminum-oxide dome tweeter x1 |
| Inputs Nickel-plated 5-way binding posts | |
| Frequency Response (-3dB) 86 Hz to 24 kHz | |
| Nominal Impedance 4Ω (8Ω compatible) | |
| Recommended Amp Power 80W | |
| Sensitivity (2.83 V @ 1 m) 85 dB SPL | |
| Physical | |
| Enclosure Material PP +30% mineral fill | |
| Rating IP66 rated for outdoor use | |
| Product Dimensions (W x D x H) | 168 mm (6.61") x 202 mm (7.95") x 290 mm (11.42") (dimensions include bracket) |
| Product Weight (Each) 2.5 kg (5.5 lbs) | |
Specifications are subject to change without notice.
AW-550 Specifications
Speaker Type / Electrical
| Drivers | 5.25" bass/midrange driver x15"x 8" pressure-driven low-bass radiator x125 mm aluminum-oxide dome tweeter x1 |
| Inputs Nickel-plated 5-way binding posts | |
| Frequency Response (-3dB) 82 Hz to 24 kHz | |
| Nominal Impedance 4Ω (8Ω compatible) | |
| Recommended Amp Power 100W | |
| Sensitivity (2.83 V @ 1 m) 86 dB SPL | |
| Physical | |
| Enclosure Material PP +30% mineral fill | |
| Rating IP66 rated for outdoor use | |
| Product Dimensions (W x D x H) | 190 mm (7.48") x 224 mm (8.81") x 311 mm (12.24") (dimensions include bracket) |
| Product Weight 3.0 kg (6.6 lbs) | |
Specifications are subject to change without notice.
AW-650 Specifications
Speaker Type / Electrical
| Drivers | 6.5" bass/midrange driver x15.5" x 10" pressure-driven low-bass radiator x125 mm aluminum-oxide dome tweeter x1 |
| Inputs Nickel-plated 5-way binding posts | |
| Frequency Response (-3dB) 76 Hz to 24 kHz | |
| Nominal Impedance 4Ω (8Ω compatible) | |
| Recommended Amp Power 100W | |
| Sensitivity (2.83 V @ 1 m) 87 dB SPL | |
| Physical | |
| Enclosure Material PP +30% mineral fill | |
| Rating IP66 rated for outdoor use | |
| Product Dimensions (W x D x H) | 231 mm (9.09") x 264 mm (10.39") x 350 mm (13.78") (dimensions include bracket) |
| Product Weight 4.0 kg (8.8 lbs) | |
Specifications are subject to change without notice.
Limited 5-Year Warranty (United States and Canada)
Definitive Technology, LLC (herein "Definitive") warrants to the original purchaser only that this Definitive Loudspeaker Product (the "Product") will be free from defects in materials and workmanship for a limited period of five (5) years from the date of original retail purchase from a Definitive Authorized Dealer. However, this Warranty will automatically terminate prior to the expiration of the five (5) years if the original retail purchaser sells or otherwise transfers the Product to any other party. The original retail purchaser shall hereinafter be referred to as "you." To allow Definitive to offer the best possible warranty service, please visit the website on the Product Registration Card(s) and fill out the form within ten (10) days of the date of purchase.
Defective Products must be shipped, together with proof of purchase, prepaid insured to the Definitive Authorized Dealer from whom you purchased the Product, or an authorized service center. Products must be shipped in the original shipping container or its equivalent; in any case the risk of loss or damage in transit is to be borne by you. If upon examination at the Factory or Definitive Authorized Dealer it is determined that the Product was defective in materials or workmanship at any time during this Warranty period, Definitive or the Definitive Authorized Dealer will, at its option, repair or replace this Product at no additional charge, except as set forth below. All replaced parts and Products become the property of Definitive. Products replaced or repaired under this warranty will be returned to you, within a reasonable time, freight prepaid.
This warranty does not include service or parts to repair damage caused by accident, disaster, misuse, abuse, negligence, inadequate packing or shipping procedures, commercial use, voltage inputs in excess of the rated maximum of the unit, cosmetic appearance of cabinetry not directly attributable to defect in materials or workmanship, or service, repair, or modification of the Product which has not been authorized or approved by Definitive. This warranty shall terminate if the Serial number on the Product has been removed, tampered with or defaced. This warranty is in lieu of all other expressed Warranties. If this Product is defective in materials or workmanship as warranted above, your sole remedy shall be repair or replacement as provided above. In no event will Definitive be liable to you for any incidental, special, or consequential damages arising out of the use or inability to use the Product, even if Definitive or a Definitive Authorized Dealer has been advised of the possibility of such damages, or for any claim by any other party. Some states or provinces do not allow the exclusion or limitation of consequential damages, so the above limitation and exclusion may not apply to you. All implied warranties on this Product are limited to the duration of this expressed Warranty. Some states or provinces do not allow limitation on how long an implied Warranty lasts, so the above limitations may not apply to you. This Warranty gives you specific legal rights, and you also may have other rights which vary from state to state or province to province. Definitive has no liability for acts of third parties. Definitive's liability, whether based on contract, tort, or any other theory, shall not exceed the purchase price of the Product for which a claim has been made. For U.S. warranty claims, the consumer agrees and consents that all disputes shall be resolved in accordance with California laws in San Diego County, California. Definitive reserves the right to modify this warranty statement at any time.
This Warranty applies only to Products purchased in the United States of America, its possessions, and U.S. and NATO armed forces exchanges and Canada, except Quebec. Residents of Quebec are governed by that province's consumer protection legislation. The Warranty terms and conditions applicable to Products purchased in other countries are available from the Definitive Authorized Distributors in such countries. Please see the warranty guide specific to Products purchased in countries or territories not referenced herein.
natural_image
Technical line drawing of two mechanical components with mounting holes (no text or symbols)Figure 1
natural_image
Isometric technical drawing of a mechanical bracket with two screws and mounting holes (no text or symbols)Figure 5
natural_image
Line drawing of a device with a rectangular block connected to a cylindrical device (no text or symbols)Figure 7
natural_image
Technical line drawing of a mechanical bracket with two screws and mounting holes (no text or symbols)Figura 5
natural_image
Line drawing of a device with a rectangular block connected to a cylindrical device (no text or symbols)Figura 7
natural_image
Technical line drawing of two mechanical components with mounting holes (no text or symbols)图1
natural_image
Technical line drawing of a mechanical bracket with two screws and mounting holes (no text or symbols)图5
调整支架
natural_image
Line drawing of a rectangular device connected to a cylindrical device with a cable (no text or symbols)图7
扬声器预调节(磨合)
natural_image
Empty rectangular frame with dashed border and corner handles (no text or symbols)
- Important Product Information
- IMPORTANT SAFETY INSTRUCTIONS
- Notes on Use
- Introduction
- Box Contents
- Planning the Installation
- Mounting the Speakers
- Detailed Mounting Directions
- Adjusting the Bracket
- Connecting the Speakers
- Speaker Wiring
- Wire Gauge Distance
- Connecting the Speakers
- Speaker Pre-Conditioning (Break-In)
- Power and Loud Listening Levels
- Use and Care
- AW-450 Specifications
- AW-550 Specifications
- AW-650 Specifications
- Limited 5-Year Warranty (United States and Canada)
- 调整支架
- 扬声器预调节(磨合)
Brand : DEFINITIVE TECHNOLOGY
Model : Dymension Outdoor AW-450
Category : Loudspeaker