
KFP0710CU - Food Processor KITCHENAID - Free user manual and instructions
Find the device manual for free KFP0710CU KITCHENAID in PDF.

| Brand | KitchenAid |
| Model | KFP0710CU |
| Product Type | Food Processor |
| Bowl Capacity | 7 cups (1.7 L) |
| Bowl Material | BPA-free |
| Main Blade | Stainless steel multipurpose blade |
| Reversible Disc | Reversible slicing/shredding disc |
| Speeds | Low, High, Pulse |
| Power Supply | 120 V AC, 60 Hz |
| Polarized Plug | Yes (one blade wider) |
| Functions | Chop, slice, shred, mix, knead, emulsify |
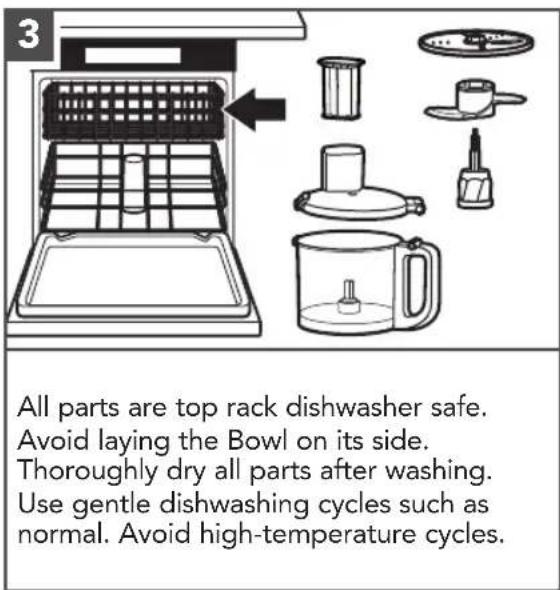
| Cleaning Parts | Dishwasher safe (normal cycle) |
| Cleaning Base | Wipe with damp cloth and mild soap |
| Safety | Lid lock, food pusher, automatic overload shut-off |
| Cord Storage | Cord wrap under base with plug clip |
| Warranty | 1 year, hassle-free replacement in US and Canada |
| Customer Service (USA) | 1-800-541-6390 |
| Customer Service (Canada) | 1-800-807-6777 |
| Included Accessories | Bowl, lid, food pusher, multipurpose blade, reversible disc, drive stem |
Frequently Asked Questions - KFP0710CU KITCHENAID
User questions about KFP0710CU KITCHENAID
0 question about this device. Answer the ones you know or ask your own.
Ask a new question about this device
Download the instructions for your Food Processor in PDF format for free! Find your manual KFP0710CU - KITCHENAID and take your electronic device back in hand. On this page are published all the documents necessary for the use of your device. KFP0710CU by KITCHENAID.
USER MANUAL KFP0710CU KITCHENAID
natural_image
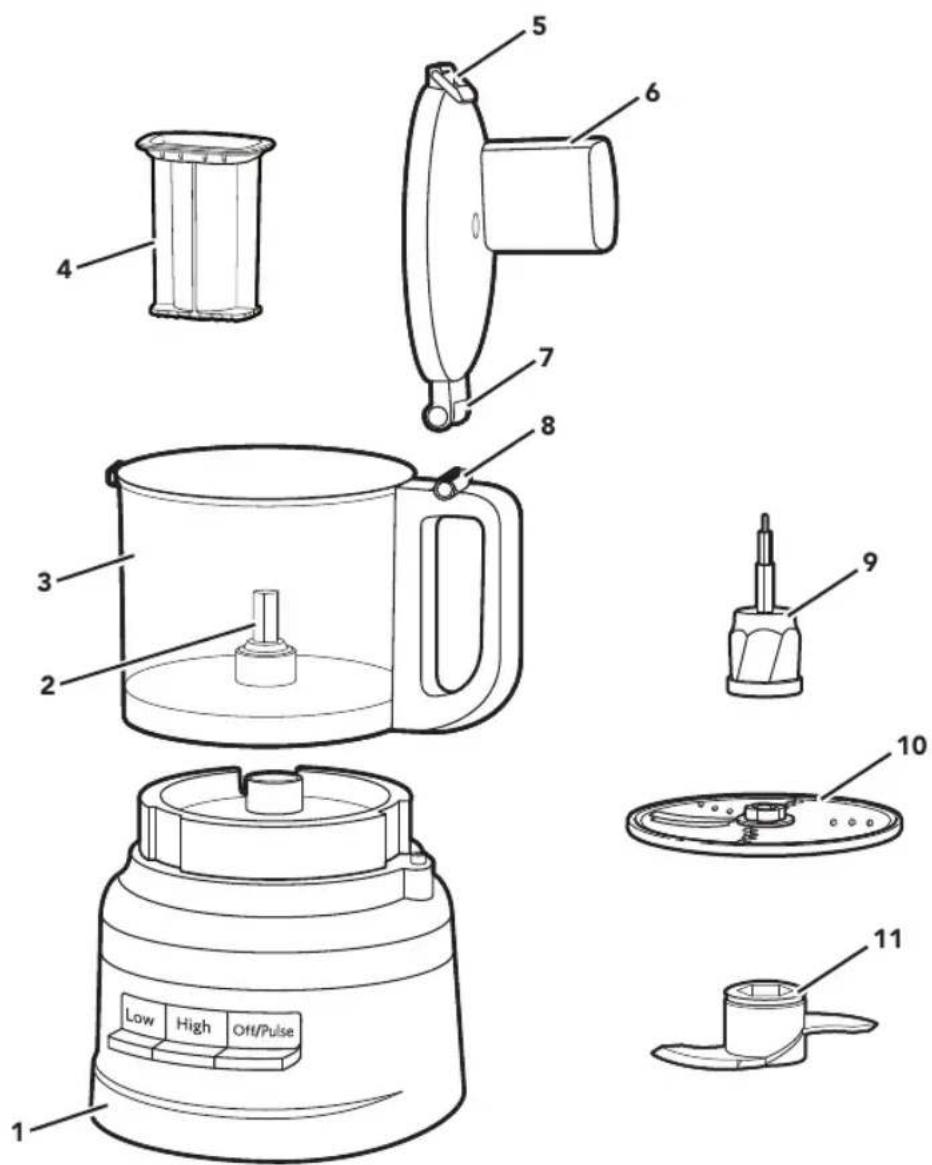
KitchenAid kitchen blender with clear glass casing and control panel (no visible text or symbols on the device body)PARTS AND FEATURES
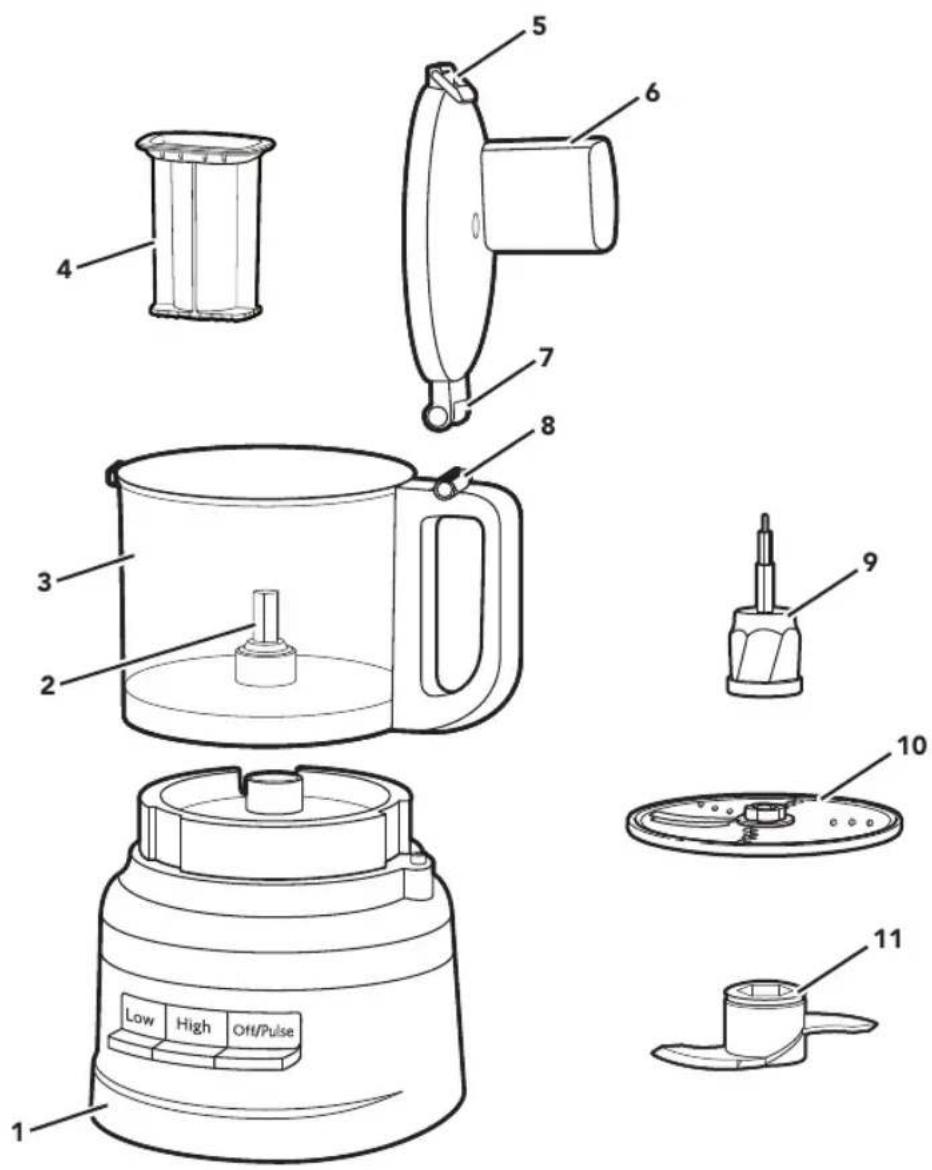
1 Heavy-Duty Base
2 Drive Pin
3 7-Cup (1.7 L) Work Bowl
4 1-Piece Food Pusher
5 Lid Latch
6 Work Bowl Cover with Feed Tube
7 Lid Hinge
8 Handle Hinge
9 Drive Adapter
10 Reversible Slicing/Shredding Disc
11 Multipurpose Stainless Steel Blade
PRODUCT SAFETY
Your safety and the safety of others are very important.
We have provided many important safety messages in this manual and on your appliance. Always read and obey all safety messages.

This is the safety alert symbol.
This symbol alerts you to potential hazards that can kill or hurt you and others.
All safety messages will follow the safety alert symbol and either the word "DANGER" or "WARNING." These words mean:

You can be killed or seriously injured if you don't immediately follow instructions.

You can be killed or seriously injured if you don't follow instructions.
All safety messages will tell you what the potential hazard is, tell you how to reduce the chance of injury, and tell you what can happen if the instructions are not followed.
IMPORTANT SAFEGUARDS
When using electrical appliances, basic safety precautions should always be followed, including the following:
- Read all instructions.
- To protect against risk of electrical shock, do not put Food Processor in water or other liquid.
- This appliance is not intended for use by children or by persons with reduced physical, sensory, or mental capabilities, or lack of experience and knowledge. Close supervision is necessary when any appliance is used near children. Children should be supervised to ensure that they do not play with the appliance.
- Turn the appliance OFF, then unplug from the outlet when not is use, before assembling or disassembling parts and before cleaning. To unplug, grasp the plug and pull from the outlet. Never pull from the power cord.
- Avoid contacting moving parts.
- Do not operate any appliance with a damaged cord or plug or after the appliance malfunctions, or is dropped or damaged in any manner. Contact the manufacturer at their customer service telephone number for information on examination, repair, or adjustment.
- The use of attachments not recommended or sold by KitchenAid may cause fire, electric shock, or injury.
- Do not use outdoors.
- Do not let cord hang over edge of table or counter.
- Keep hands and utensils away from moving Blades or Discs while processing food to reduce the risk of severe injury to persons or damage to the Food Processor. A scraper may be used, but must be used only when the Food Processor is not running.
PRODUCT SAFETY
- Blades are sharp. Handle carefully.
- To reduce the risk of injury, never place cutting Blade or Disc on Base without first putting Bowl properly in place.
- Be certain Cover is securely locked in place before operating appliance.
- Never feed food by hand. Always use the Food Pusher.
- Do not attempt to defeat the Cover interlock mechanism.
- Do not fill the Bowl above the marked maximum fill line (or rated capacity) to avoid risk of injury due to damage to the Cover or Bowl.
SAVE THESE INSTRUCTIONS
This product is designed for household use only.
ELECTRICAL REQUIREMENTS
Voltage: 120 VAC
Frequency: 60 Hz
NOTE: This Food Processor is equipped with a polarized plug (one Blade is wider than the other). To reduce the risk of electrical shock, this plug will fit in a polarized outlet only one way. If the plug does not fit fully in the outlet, reverse the plug. If it still does not fit, contact a qualified electrician. Do not modify the plug in any way.
ACCESSORIES SELECTION GUIDE
| Action Setting | Food Accessory | ||
| Chop | Low or Pulse | CheeseChocolateFruitsFresh herbsNutsTofuVegetables | Multipurpose Stainless Steel Blade |
| Mince or Purée | High or Pulse | ||
| Mix | Low | Pasta SaucePestoSalsaSaucesBatters | |
| Knead | High or Pulse Doughs | ||
| Slice | Low | Fruit (soft)PotatoesTomatoesVegetables (soft) | Reversible Slicing/Shredding Disc (slicing side) |
| High | CheeseChocolateFruits (hard)Vegetables (hard) | ||
| Shred (fine to medium) | Low | PotatoesVegetables (soft) | Reversible Slicing/Shredding Disc (shredding side) |
| High | CabbageCheeseChocolateFruits (hard)Vegetables (hard) | ||
FOR DETAILED INFORMATION ON USING THE FOOD PROCESSOR
Visit www.kitchenaid.com/quickstart for additional instructions with videos, inspiring recipes, and tips on how to use your Food Processor.
PRODUCT ASSEMBLY
Before first use
Before using your Food Processor for the first time, wash all parts and accessories either by hand or in the dishwasher (see the "Care and Cleaning" section). Your Food Processor is designed so that all accessories may be stored inside the Work Bowl.
natural_image
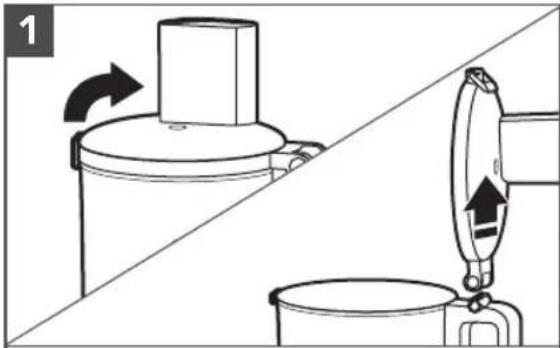
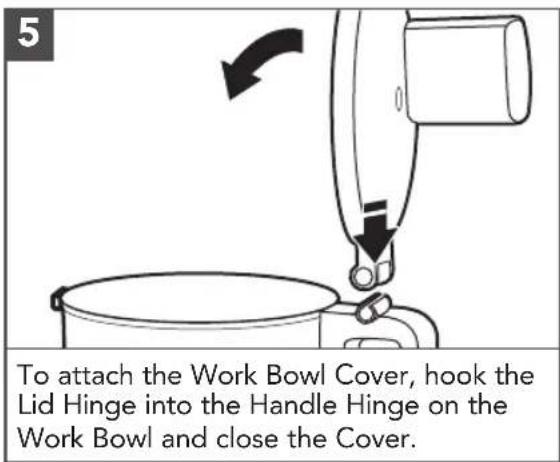
Diagram showing a kitchen appliance with a lid and a side view of a container, no text or symbols presentLift up the Lid Latch to unlock the Cover. Tilt the Work Bowl Cover back and lift it straight up so that the Lid Hinge pulls out of the Handle Hinge.
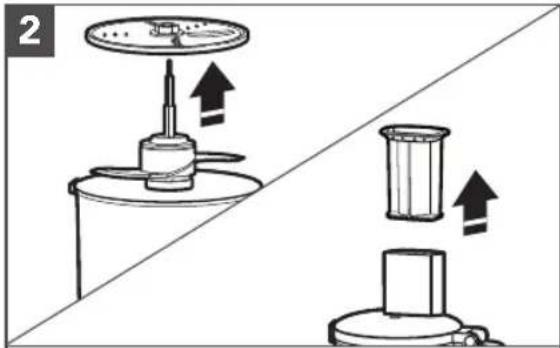
Remove all parts and accessories from the Work Bowl, and lift the Food Pusher out of the Feed Tube.
IMPORTANT: Place the Food Processor on a dry, level countertop with the controls facing forward. Do not plug in the Food Processor until it is completely assembled.
natural_image
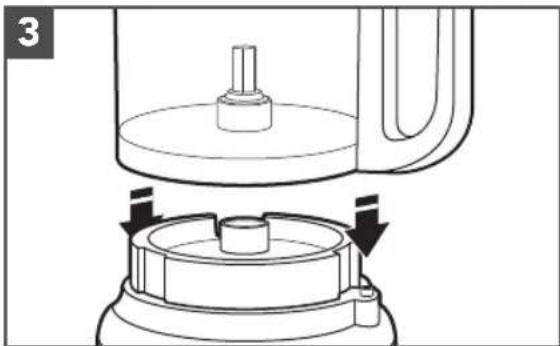
Diagram of a mechanical device with a cylindrical component and two arrows indicating motion or assembly (no text or symbols)Place the Work Bowl on the Base, aligning the handle with the raised button on the right side of the Base. The Bowl will click into place and should be flush against the Base when properly aligned.
natural_image
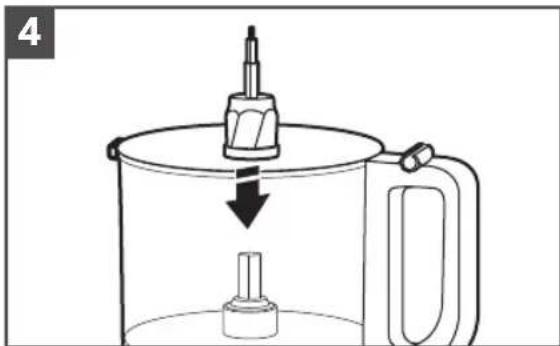
Line drawing of a mechanical device with a downward arrow indicating compression or disassembly (no text or symbols)Place the Drive Adapter in the Work Bowl, lowering it onto the Drive Pin.
PRODUCT ASSEMBLY
NOTE: For ease of assembly, install the desired Blade or Disc before attaching the Work Bowl Cover.
NOTE: Your Food Processor will not operate unless the Work Bowl Cover is fully closed and the Work Bowl is properly seated on the Base.
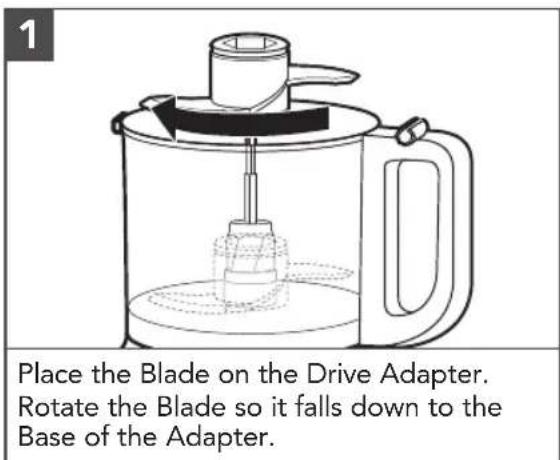
INSTALLING THE MULTIPURPOSE BLADE
PRODUCT ASSEMBLY
INSTALLING THE REVERSIBLE SLICING/SHREDDING DISC

natural_image
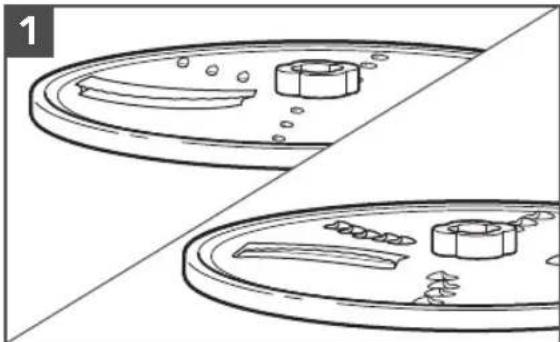
Two-panel line drawing showing a circular tray with food items and a side divided by a diagonal line (no text or symbols)To slice: Turn the Disc so that the raised slicing Blade is facing up.
To shred: Turn the Disc so that the small, raised shredding Blades are facing up.
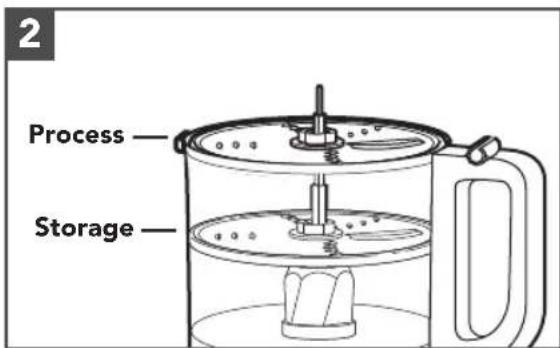
The Disc can be placed in two different positions: level with the top of the Bowl for processing, and lower, inside of the Bowl, for storage.
NOTE: While the Disc will operate in storage position, it will not perform as well. Make sure the Disc is level with the top of the Bowl for best performance.
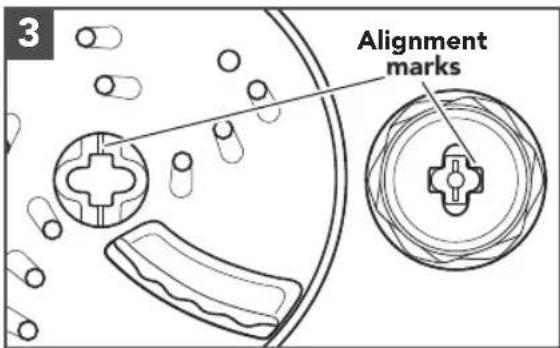
Hold the Disc by its center hub and lower it onto the Drive Adapter, aligning the mark on the center hub of the Disc to the matching mark on the Adapter. When properly placed, the Disc should be level with the top of the Bowl. If the Disc falls to the storage position, lift it out, turn it 90°, and lower it again.

natural_image
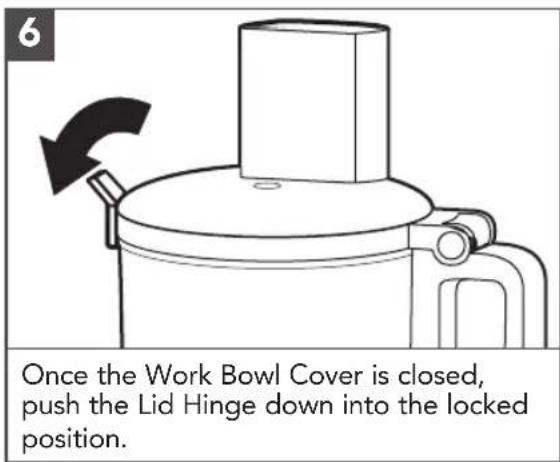
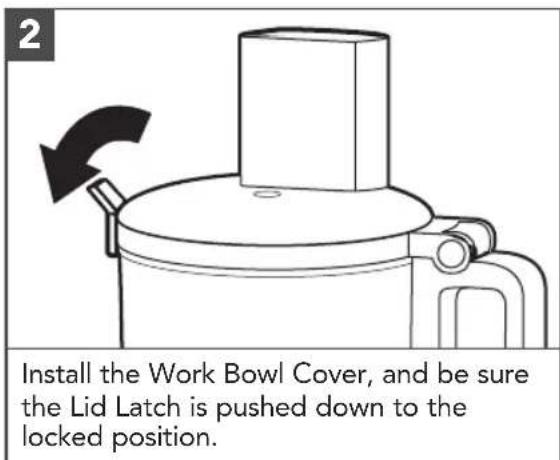
Line drawing of a mechanical device with a rotating arrow indicating rotation (no text or symbols)Install the Work Bowl Cover, and be sure the Lid Latch is pushed down to the locked position.
PRODUCT USAGE
WARNING

Rotating Blade Hazard Always use food pusher. Keep fingers out of openings. Keep away from children. Failure to do so can result in amputation or cuts.
Before operating the Food Processor, be sure the Work Bowl, Blades/Disc and Work Bowl Cover are properly assembled on the Base (see the "Product Assembly" section).
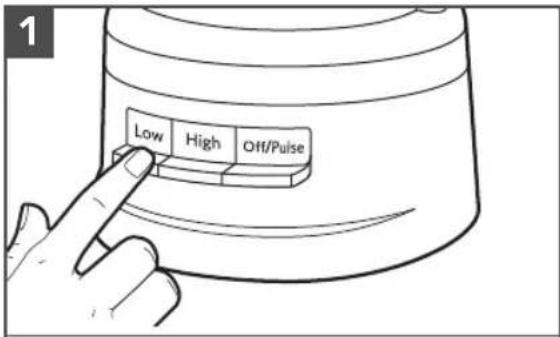
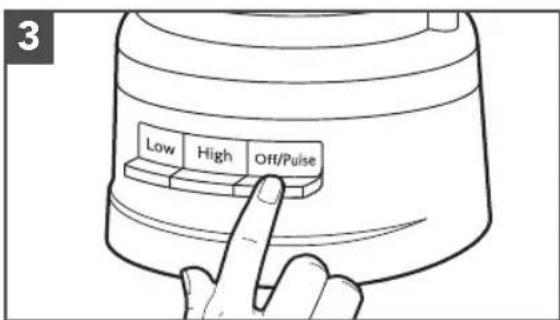
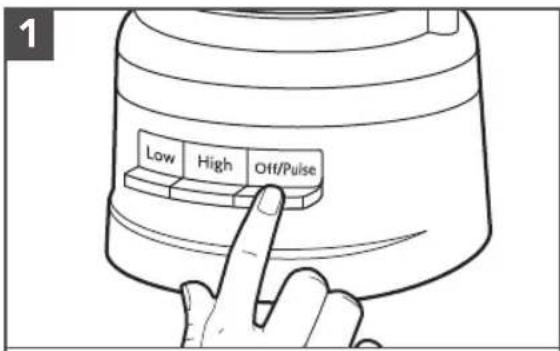
To turn on, press LOW or HIGH. The Food Processor will run continuously and the indicator light will glow. To turn off, press LOW or HIGH again, or press OFF/PULSE.
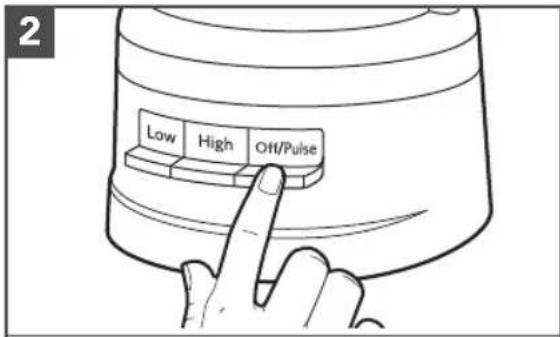
To use the Pulse function: Press OFF/PULSE for short bursts, or press and hold for longer bursts. The Pulse function runs at high speed only. The Food Processor will turn off when the Off/Pulse button is released.
When finished, press the OFF/PULSE button. The indicator light will go out and the Blade or Disc will slow to a stop.

Wait until the Blade or Disc comes to a complete stop before removing the Work Bowl Cover. Be sure to turn off the Food Processor before removing the Work Bowl Cover, or before unplugging the Food Processor.
PRODUCT USAGE
USING THE FEED TUBE
To slice or shred items, place food inside the chute.
Use the Pusher to safely guide the food towards the blade.
Food Pusher
REMOVING PROCESSED FOODS
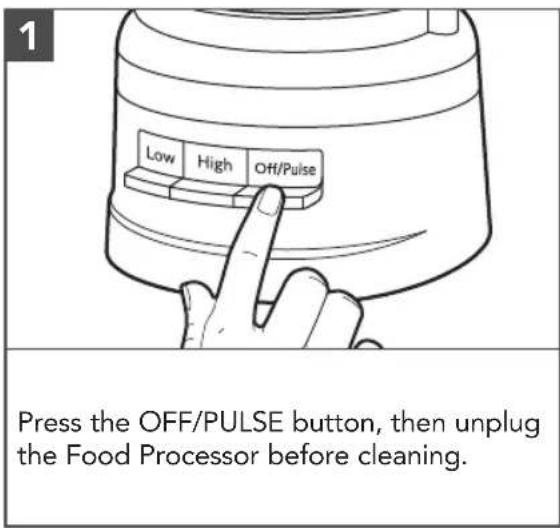
Turn the Food Processor off: Press the OFF/PULSE button and unplug the Food Processor before disassembling.
natural_image
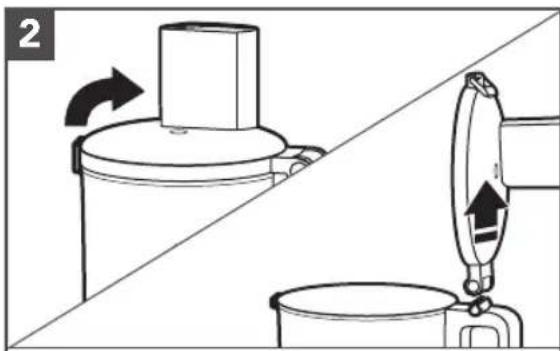
Diagram showing two steps of a kitchen appliance: one with a lid and arrow indicating rotation, the other with a handle and upward arrow (no text or symbols)Lift the Lid Latch to unlock the Work Bowl Cover, then lift Cover to remove.
If using the Disc, remove it before removing the Bowl. Holding the Disc by the center hub, lift it straight up.

natural_image
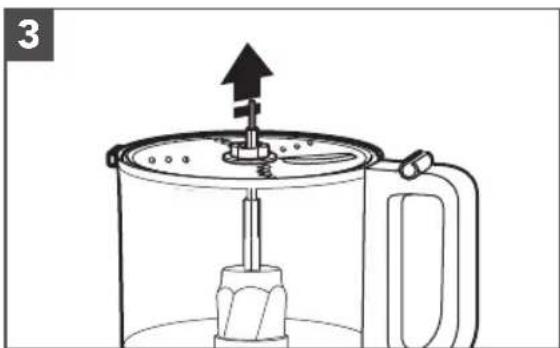
Line drawing of a mechanical device with an upward arrow indicating motion or force (no text or symbols)Remove the Drive Adapter and Multipurpose Blade, if using. The Blade will stay in place on the Drive Adapter when you remove the Adapter.
natural_image
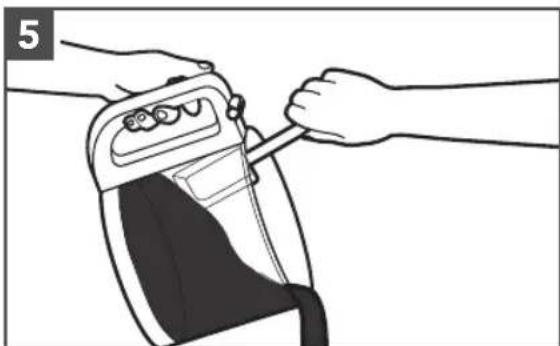
Line drawing of a hand using a handheld device to adjust or install a device (no text or symbols visible)Lift the Work Bowl off of the Base to remove food from the Bowl with a spatula.
CARE AND CLEANING
IMPORTANT: The BPA-free Bowl requires special handling. If you choose to use a dishwasher instead of hand washing, please follow these guidelines.
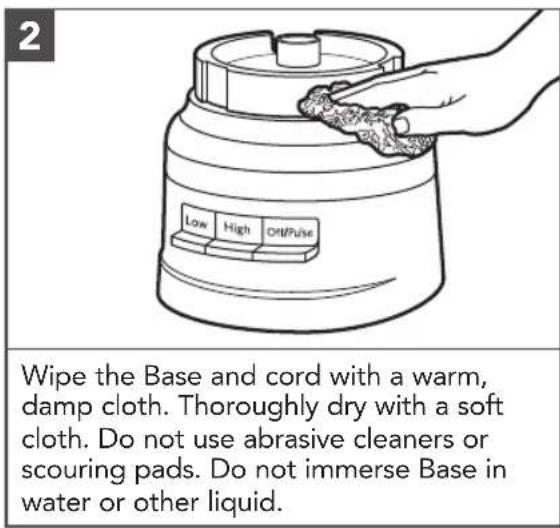

NOTE: If washing the Food Processor parts by hand, avoid the use of abrasive cleansers or scouring pads. They may scratch or cloud the Work Bowl and Cover.
TROUBLESHOOTING GUIDE
| Problem Solution | |
| If your Food Processor should malfunction or fail to operate, check the following: | Is the Food Processor plugged in? |
| Make sure that the Bowl and Lid are properly aligned and locked in place. | |
| Have you pressed more than one button at the same time? | |
| Unplug the Food Processor, then plug it back into the outlet. | |
| Is the fuse in the circuit to the Food Processor in working order? | If you have a circuit breaker box, be sure the circuit is closed. |
| The Food Processor may need to cool to room temperature: | If the speed light turns off and the Off/Pulse light flashes, wait until the Off/Pulse light turns off and retry.The Food Processor may take from 5-15 minutes to cool completely. |
| The motor may be locked: | If the speed light stays on while the Off/Pulse light flashes, press the Off/Pulse button to reset the motor. |
| Food Processor not shredding or slicing properly: | Make sure the raised-blade side of the Disc is positioned face up on the Drive Adapter. |
| Make sure ingredients are suitable for slicing or shredding. | |
| Make sure the Disc is positioned in the process position (near the top of the bowl), and not the storage position (low and inside of the bowl). | |
| If the Work Bowl Cover won’t close when using the Disc: | Make sure the Disc is installed correctly, and is positioned properly on the Drive Adapter. |
| If the problem cannot be corrected: | See the “Warranty and Service” sections.Do not return the Food Processor to the retailer.Retailers do not provide service. |
WARRANTY AND SERVICE
KITCHENAID® FOOD PROCESSOR WARRANTY FOR THE 50 UNITED STATES, THE DISTRICT OF COLUMBIA, PUERTO RICO, AND CANADA
This warranty extends to the purchaser and any succeeding owner for Food Processors operated in the 50 United States, the District of Columbia, Puerto Rico, and Canada.
| Length of Warranty: One Year Full Warranty from date of purchase. | |
| KitchenAid Will Pay for Your Choice of:[IMAGE] | Hassle-Free Replacement of your Food Processor. See the next page for details on how to arrange for service, or call the Customer eXperience Center toll-free at 1-800-541-6390.ORThe replacement parts and repair labor costs to correct defects in materials and workmanship. Service must be provided by an Authorized KitchenAid Service Center. |
| KitchenAid Will Not Pay for: | A. Repairs when your Food Processor is used in other than normal single family home use.B. Damage resulting from accident, alteration, misuse or abuse.C. Any shipping or handling costs to deliver your Food Processor to an Authorized Service Center.D. Replacement parts or repair labor costs for Food Processors operated outside the 50 United States, District of Columbia, Puerto Rico, and Canada. |
| DISCLAIMER OF IMPLIED WARRANTIES; LIMITATION OF REMEDIESIMPLIED WARRANTIES, INCLUDING TO THE EXTENT APPLICABLE WARRANTIES OF MERCHANTABILITY OR FITNESS FOR A PARTICULAR PURPOSE, ARE EXCLUDED TO THE EXTENT LEGALLY PERMISSIBLE. ANY IMPLIED WARRANTIES THAT MAY BE IMPOSED BY LAW ARE LIMITED TO ONE YEAR, OR THE SHORTEST PERIOD ALLOWED BY LAW. SOME STATES AND PROVINCES DO NOT ALLOW LIMITATIONS OR EXCLUSIONS ON HOW LONG AN IMPLIED WARRANTY OF MERCHANTABILITY OR FITNESS LASTS, SO THE ABOVE LIMITATIONS OR EXCLUSIONS MAY NOT APPLY TO YOU.IF THIS PRODUCT FAILS TO WORK AS WARRANTED, CUSTOMER'S SOLE AND EXCLUSIVE REMEDY SHALL BE REPAIR OR REPLACEMENT ACCORDING TO THE TERMS OF THIS LIMITED WARRANTY. KITCHENAID AND KITCHENAID CANADA DO NOT ASSUME ANY RESPONSIBILITY FOR INCIDENTAL OR CONSEQUENTIAL DAMAGES. This warranty gives you specific legal rights and you may also have other rights which vary from state to state or province to province. | |
WARRANTY AND SERVICE
HASSLE-FREE REPLACEMENT WARRANTY – 50 UNITED STATES, DISTRICT OF COLUMBIA, AND PUERTO RICO
We're so confident the quality of our products meets the exacting standards of KitchenAid that, if your Food Processor should fail within the first year of ownership, KitchenAid will arrange to deliver an identical or comparable replacement to your door free of charge and arrange to have your original Food Processor returned to us. Your replacement unit will also be Covered by our one year limited warranty.
If your Food Processor should fail within the first year of ownership, simply call our
toll-free Customer eXperience Center at 1-800-541-6390 Monday through Friday. Please have your original sales receipt available when you call. Proof of purchase will be required to initiate the claim. Give the consultant your complete shipping address (no P.O. Box numbers, please).
When you receive your replacement Food Processor, use the carton, packing materials, and prepaid shipping label to pack up your original Food Processor and send it back to KitchenAid.
HASSLE-FREE REPLACEMENT WARRANTY - CANADA
We're so confident the quality of our products meets the exacting standards of the KitchenAid brand that, if your Food Processor should fail within the first year of ownership, we will replace your Food Processor with an identical or comparable replacement. Your replacement unit will also be Covered by our one year limited warranty.
If your Food Processor should fail within the first year of ownership, simply call our toll-free Customer eXperience Center at
1-800-807-6777 Monday through Friday. Please have your original sales receipt available when you call. Proof of purchase will be required to initiate the claim. Give the consultant your complete shipping address.
When you receive your replacement Food Processor, use the carton, packing materials, and prepaid shipping label to pack up your original Food Processor and send it back to KitchenAid.
ARRANGING FOR SERVICE AFTER THE WARRANTY EXPIRES, OR ORDERING ACCESSORIES AND REPLACEMENT PARTS
In the United States and Puerto Rico:
For service information, or to order accessories or replacement parts, call toll-free at 1-800-541-6390 or write to:
Customer eXperience Center, KitchenAid Small Appliances, P.O. Box 218, St. Joseph, MI 49085-0218
Outside the United States and Puerto Rico:
Consult your local KitchenAid dealer or the store where you purchased the Food Processor for information on how to obtain service.
For service information in Canada: Call toll-free 1-800-807-6777.
For service information in Mexico: Call toll-free 01-800-0022-767.
PIÈCES ET CARACTÉRISTIQUES
ASSEMBLAGE DU PRODUIT
natural_image
Diagram showing a kitchen appliance with a lid and a hanging stand, both rotating around it (no text or symbols present)natural_image
Diagram of a kitchen appliance with a lid and base, showing mechanical components and directional arrows (no text or symbols)natural_image
Line drawing of a kettle with a screwdriver inserted, showing liquid level and internal components (no text or symbols)ASSEMBLAGE DU PRODUIT
ASSEMBLAGE DU PRODUIT
ASSEMBLAGE DU DISQUE ÉMINCEUR/DÉCHIQUETEUR RÉVERSIBLE
natural_image
Two diagrams showing a circular tray with small objects and granular contents, separated by a diagonal line (no text or symbols)natural_image
Line drawing of a mechanical device with a rotating arrow indicating rotation (no text or symbols)natural_image
Line drawing of a portable coffee maker with an upward arrow indicating motion (no text or symbols)natural_image
Diagram of a mechanical device with an upward arrow indicating motion or force, no text or symbols presentnatural_image
Illustration of a hand using a handheld device to interact with another person (no text or symbols visible)Customer eXperience Center, KitchenAid Small Appliances, P.O. Box 218, St. Joseph, MI 49085-0218
natural_image
Diagram showing a kitchen appliance with a lid and a side mirror, both rotating around it (no text or symbols present)natural_image
Diagram of a kitchen appliance with a lid and base, showing mechanical components and directional arrows (no text or symbols)natural_image
Line drawing of a kettle with a screwdriver inserted, showing liquid level and internal components (no text or symbols)natural_image
Two-panel line drawing showing a circular tray with small objects and granular contents, separated by a diagonal split line (no text or symbols)natural_image
Diagram of a mechanical device with a rotating arrow indicating rotation (no text or symbols)natural_image
Diagram showing two steps of a kitchen appliance: one with a lid and arrow indicating rotation, the other with a handle and upward arrow (no text or symbols)Customer eXperience Center, KitchenAid Small Appliances, P.O. Box 218, St. Joseph, MI 49085-0218
natural_image
White silhouette of a telephone handset on black background (no text or symbols)PRODUCT QUESTIONS OR RETURNS
QUESTIONS SUR LE PRODUIT OU LES RETOURS
MEXICO: KitchenAid.com.mx
LATIN AMERICA: KitchenAid-Latam.com
KitchenAid®
®/TM ©2020 KitchenAid. All rights reserved. Used under license in Canada.
- PARTS AND FEATURES
- PRODUCT SAFETY
- Your safety and the safety of others are very important.
- IMPORTANT SAFEGUARDS
- When using electrical appliances, basic safety precautions should always be followed, including the following:
- SAVE THESE INSTRUCTIONS
- ACCESSORIES SELECTION GUIDE
- FOR DETAILED INFORMATION ON USING THE FOOD PROCESSOR
- PRODUCT ASSEMBLY
- Before first use
- INSTALLING THE MULTIPURPOSE BLADE
- PRODUCT USAGE
- WARNING
- REMOVING PROCESSED FOODS
- CARE AND CLEANING
- TROUBLESHOOTING GUIDE
- WARRANTY AND SERVICE
- HASSLE-FREE REPLACEMENT WARRANTY - CANADA
- ARRANGING FOR SERVICE AFTER THE WARRANTY EXPIRES, OR ORDERING ACCESSORIES AND REPLACEMENT PARTS
- In the United States and Puerto Rico:
- Outside the United States and Puerto Rico:
- PIÈCES ET CARACTÉRISTIQUES
- ASSEMBLAGE DU PRODUIT
- KitchenAid®
Brand : KITCHENAID
Model : KFP0710CU
Category : Food Processor