
WL14 - Warming drawers and cabinets ETNA - Free user manual and instructions
Find the device manual for free WL14 ETNA in PDF.

| Product type | Warming drawer for dishes and keeping warm |
| Brand | ETNA |
| Model | WL14 |
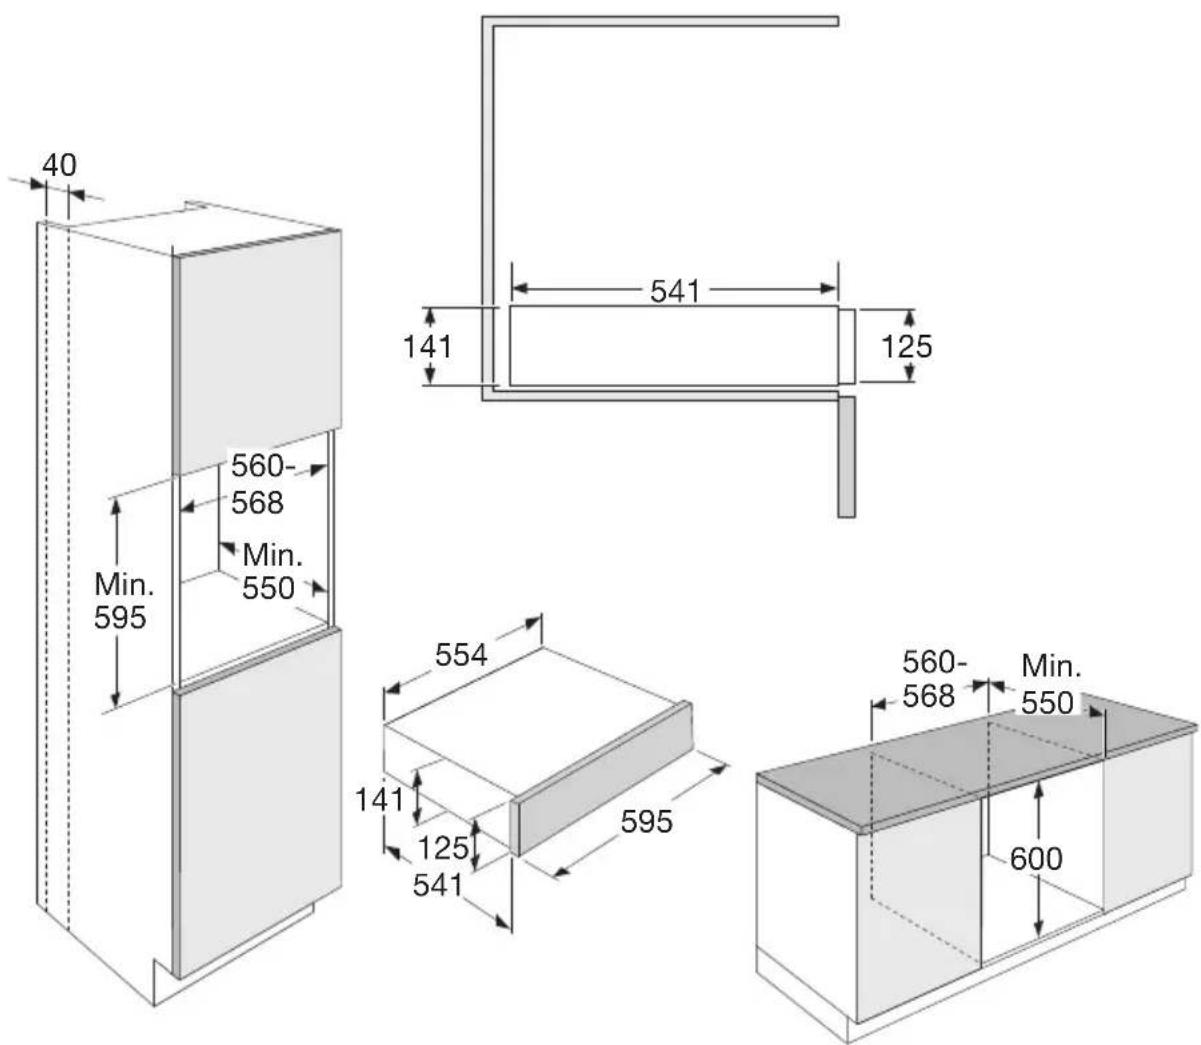
| Built-in dimensions (W x H x D) | 560-568 mm x 595 mm x 550 mm |
| Weight (estimated) | 15 kg |
| Power supply | 230 V, 50 Hz, 1000 W (estimation) |
| Maximum load | 25 kg |
| Adjustable temperature | 40 °C to 80 °C in steps of 5 °C |
| Timer | 1 h to 5 h in steps of 1 h |
| Programs | Warm cups/glasses, warm plates, keep warm |
| Display | Digital display of temperature and timer |
| Opening | Press on front panel (push-to-open) |
| Maintenance and cleaning | Soft cloth and soapy water, no abrasive products or steam cleaners |
| Safety | Do not sit on the drawer, do not obstruct ventilation, mandatory grounding |
| Spare parts and repairability | Contact ETNA after-sales service, type number required |
| General information | User manual available in several languages, recycling via collection points |
| Warranty | Consult warranty card |
Frequently Asked Questions - WL14 ETNA
User questions about WL14 ETNA
0 question about this device. Answer the ones you know or ask your own.
Ask a new question about this device
Download the instructions for your Warming drawers and cabinets in PDF format for free! Find your manual WL14 - ETNA and take your electronic device back in hand. On this page are published all the documents necessary for the use of your device. WL14 by ETNA.
USER MANUAL WL14 ETNA
Before using the appliance for the first time 5
Control panel 6
Operation
Automatic programs 7
Using the warming drawer 8
Maintenance
Cleaning the drawer 10
Introduction
Congratulations on choosing this drawer. Read these instructions thoroughly before you first use the drawer, and keep the instructions for future use.
Installation
- When connecting the drawer, always ensure that the connection is accessible for emergencies, even after installation.
- Make sure the plug is connected to an earthed socket.
Building in
- Check the drawer after unpacking. Do not install the drawer if it is damaged; contact your supplier.
- Before first use, remove all packaging material from inside the drawer.
- Slide the drawer into the niche of the kitchen cabinet. Check that the drawer housing is positioned properly.
- Open the drawer and fasten it to the side walls of the cabinet using the 2 screws provided.
Before using the appliance for the first time
- Clean the drawer with a damp cloth before first use. Do not use abrasive or strong-smelling detergents.
- Then let the warming drawer heat at the maximum temperature for at least 2 hours.

During initial heating, odours and smoke may occur. The kitchen should therefore be well ventilated during this initial operation.
Control panel

- Display
- Heating cups and glasses
- Heating plates
- Keeping food warm
- Temperature key
- Timer key
- Minus (-) key for temperature and timer
- Plus (+) key for temperature and timer
- Stop key
- Start key
Using the warming drawer

- Do not lean or sit on the open drawer. Otherwise, the slide rails may be damaged.
-
The drawer can carry a maximum weight of 25kg .
-
Open the drawer by pressing briefly on the front panel.
The drawer is now in standby mode; the display shows '0'.
- Place the crockery or dish in the drawer and choose the desired programme.
The set temperature is shown in the display.
Each programme has its own temperature range (see table). The factory-set recommended temperatures are in bold. The temperature can be changed in 5 °C increments.
| Temperature °C* | ||
 |  |  |
| 40 60 60 | ||
| 45 65 65 | ||
| 50 | 70 70 | |
| 55 | 75 75 | |
| 60 80 | 80 | |
| 65 | / | / |
| 70 | / | / |
* Approximate temperature values, measured in the middle of the drawer when empty.
-
Set the desired temperature with the minus (-) key or plus (+) key.
-
Touch the timer key and set the desired heating time with the minus (-) key or plus (+) key.
The timer can be set from 1 hour to 5 hours, in one-hour increments.
-
Touch the start key to save the settings.
-
Close the drawer by pressing the front panel.
▶ After closing the drawer, the heating is started.
When the set heating time is over, the heating system stops.

- If you want to change the selected programme, open the drawer. You can select another programme or adjust the temperature or heating time.
- If you want to interrupt the selected programme, open the drawer and touch the stop key. The drawer goes to standby.
- If you touch the stop key while setting, the settings are cancelled. The drawer goes to standby.
Cleaning the drawer
- Clean and dry the entire appliance after each use.
- Clean all surfaces with a soft cloth and warm soapy water.
- Wipe with a clean wet cloth afterwards and dry the surfaces.

Important:
- Allow the appliance to cool down to a safe temperature before cleaning.
- NEVER use abrasive cleaning agents or chemical solvents.
- DO NOT use a pressure washer or steam cleaner to clean the drawer.
- Remove any soiling immediately. If this is not done, it might become impossible to remove and could cause the surfaces to alter or discolour.
- All surfaces are susceptible to scratching. Scratches on glass surfaces could even cause a breakage.
- Contact with unsuitable cleaning agents can alter or discolour the surfaces.
Faults table
When you have any doubts about whether your appliance is working properly you should not immediately assume that it is defective. We recommend that you should in any case check the points in the following table.
| Problem Possible cause Solution | ||
| The appliance does not heat up. | The appliance is not correctly plugged in and switched on at the mains socket. | Insert the plug and switch on at the socket. |
| The mains fuse has tripped. Reset the trip switch in the mains fuse box (minimum fuse rating - see data plate). If, after resetting the trip switch in the mains fuse box and switching the appliance back on, the appliance will still not heat up, contact the service centre. | ||
| The food or crockery is not hot enough. | The function for keeping food or crockery warm is not selected. | Select the correct function. |
| The temperature setting is too low. | Select a higher temperature. | |
| The vents are covered. Ensure that the air can circulate freely. | ||
| The food is too hot. The function for keeping food or crockery warm is not selected. | Select the correct function. | |
| Select a lower temperature. | ||
| A noise can be heard when the drawer is being used. | The noise is caused by the fan which distributes the heat evenly through the drawer. The fan operates at intervals when the functions for keeping food warm and low temperature cooking are being used. | This is not a fault. |
If you are unable to solve the problem then contact the service centre.
Disposal of packaging and appliance
This appliance is made from sustainable materials. This appliance must be disposed of in a responsible manner at the end of its service life. Contact the local authorities for information about the method.

See also the chapter ‘Disposal’ in the Safety instructions.
The packaging of the appliance is recyclable. The following materials may have been used:
- Cardboard.
• Polyethylene foil (PE).
• CFC-free polystyrene (hard PS foam).
These materials must be disposed of in a responsible manner and in accordance with government regulations.
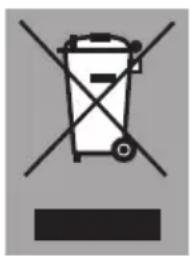
The appliance is marked with a crossed out wheeled bin symbol to draw your attention to the requirement for the separate disposal of domestic electrical appliances. This means that the appliance may not be disposed of in unsorted household waste at the end of its service life. The appliance must be taken to a special municipal waste processing location for separated waste or to a dealer who provides this service.
Collecting and disposing of domestic appliances separately avoids detrimental consequences for humans and the environment. This ensures that the materials used to make the appliance can be recovered and that substantial savings in the use of energy and raw materials can be achieved.

Declaration of conformity
We hereby declare that our products conform to the applicable European Directives, Regulations and requirements, as well as all requirements in the standards to which reference is made.

When contacting the service department,
have the complete type number to hand.
You will find the addresses and phone numbers of the service organisation on the guarantee card.
www.etna.nl
www.etna.be
935898