
PR511SV - Vacuum Cleaner PRIMO - Free user manual and instructions
Find the device manual for free PR511SV PRIMO in PDF.


| Product Type | Cordless stick vacuum |
| Brand | PRIMO |
| Model | PR511SV |
| Power Supply | Removable rechargeable battery (adapter included) |
| Battery | Lithium-ion (voltage and capacity not specified) |
| Runtime | Varies by mode (Min/Max) - duration not specified |
| Dust Tank Capacity | Not specified |
| Main Filter | Washable HEPA filter with integrated sponge filter |
| Additional Filter | Spare HEPA filter included |
| Suction Modes | Min (economical) and Max (maximum power) |
| Battery Indicators | 4 LEDs (blinking during charging, steady when full) |
| Floor Nozzle | Motorized rotating brush for hard floors and carpets |
| Included Accessories | Crevice tool, 2-in-1 brush, dusting brush, wall mount with screws and anchors |
| Weight | Not specified |
| Dimensions | Not specified |
| Warranty | 2 years (accessories: 6 months) |
| Intended Use | Domestic and similar environments (offices, hotels, farms) |
| Charging Specifics | 24 hours before first use; ambient temperature 15-25 °C |
Frequently Asked Questions - PR511SV PRIMO
User questions about PR511SV PRIMO
0 question about this device. Answer the ones you know or ask your own.
Ask a new question about this device
Download the instructions for your Vacuum Cleaner in PDF format for free! Find your manual PR511SV - PRIMO and take your electronic device back in hand. On this page are published all the documents necessary for the use of your device. PR511SV by PRIMO.
USER MANUAL PR511SV PRIMO
natural_image
Blue and black compact vacuum cleaner with handle extended, no visible text or symbolsnatural_image
Two simple line icons: a triangular warning symbol and an open book, both without any text or symbols.Read all instructions carefully - save this instruction manual for future reference.
| NL Nederlands 3 | |
| FR Français 18 | |
| DE Deutsch 33 | |
| EN English 48 |
GARANTIE (NL)
Geachte klant,
⚠PRODUCTSPECIFIEKE WAARSCHUWINGEN
natural_image
Close-up of a purple and black vacuum cleaner being processed, showing internal components and a red arrow indicating motion (no text or symbols)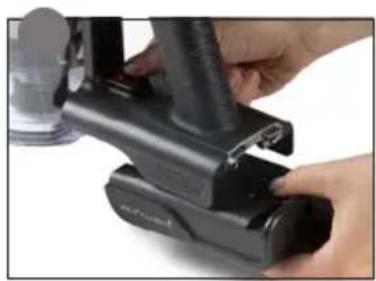
natural_image
Close-up of hands operating a black vacuum cleaner device (no visible text or symbols)MUURBEVESTIGING
natural_image
3D rendering of a purple handheld vacuum cleaner with attached black clip and red buttons, shown from front and side views (no text or symbols visible)OPLADEN
natural_image
Close-up of a hand inserting a small component into a black vacuum cleaner (no visible text or symbols)natural_image
Close-up of a black cylindrical device with a circular vent and textured base (no visible text or symbols)GEBRUIK
natural_image
Close-up of a black PRAD vacuum cleaner with blue internal wiring (no visible text or symbols)natural_image
Black rectangular object with red accent, possibly a brush or tool (no visible text or symbols)natural_image
Two black plastic components with red adjustment knobs, shown in two sequential states with arrows indicating movement (no text or symbols)natural_image
Close-up of a kitchen brush head with blue filter and black control knob (no text or symbols visible)OPMERKING:
natural_image
Two compact vacuum cleaner units with blue and black casing, shown against white background (no text or symbols visible)ONDERHOUD EN REINIGING
HET TOESTEL SCHOONMAKEN
natural_image
Hand holding a black vacuum cleaner with a transparent control panel and a small display (no visible text or symbols)natural_image
Close-up of a black vacuum cleaner nozzle with red buttons and a transparent plastic cover, showing mechanical components (no text or symbols visible)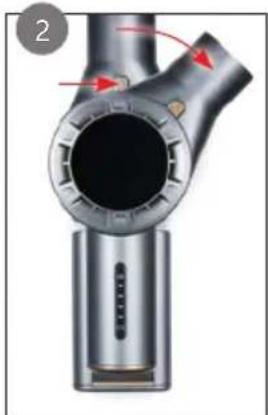
natural_image
Close-up of a metallic mechanical component with red arrows indicating flow or movement (no text or symbols)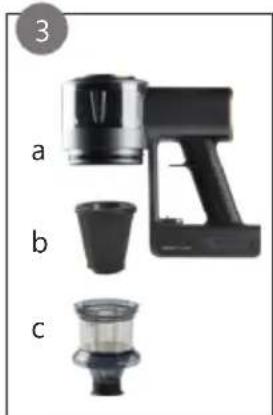
natural_image
Three types of kitchen appliances shown in black and white, labeled a, b, and c (no text or symbols on the devices themselves)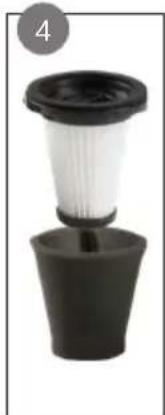
natural_image
Close-up of a black plastic filter or filter component with a circular label '4' in the top-left corner (no text or symbols on the object itself)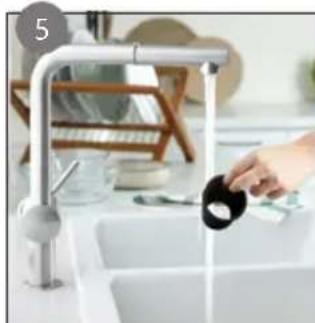
natural_image
Kitchen sink with hand pouring black soap can into water, no visible text or symbols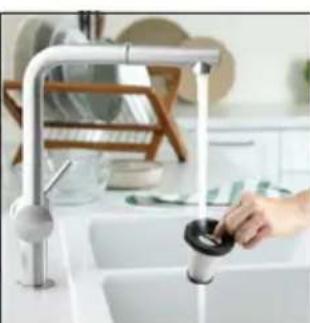
natural_image
Interior kitchen sink with hand cleaning a drain, no visible text or symbols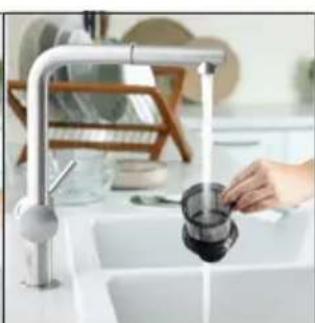
natural_image
Modern kitchen sink with a hand washing a sink, no visible text or symbols
natural_image
Kitchen sink with hand washing a cup, no visible text or symbolsDE VLOERBORSTEL SCHOONMAKEN
natural_image
Close-up of a black vacuum cleaner with attached blue and red components, showing mechanical assembly (no text or symbols visible)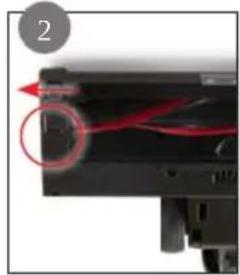
natural_image
Close-up of a mechanical component with red highlighted cable or wire, no visible text or symbols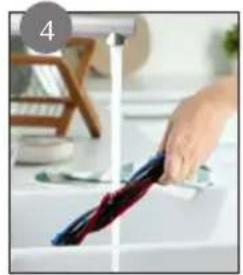
natural_image
Hand cleaning a kitchen surface with a tool, no visible text or symbols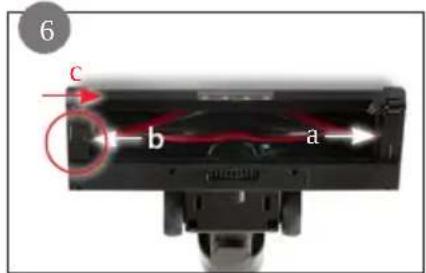
⚠️ AVERTISSEMENTS SPÉCIFIQUES AU PRODUIT
natural_image
Close-up of a purple vacuum cleaner being inserted into a black plastic housing, showing step-by-step assembly (no text or symbols)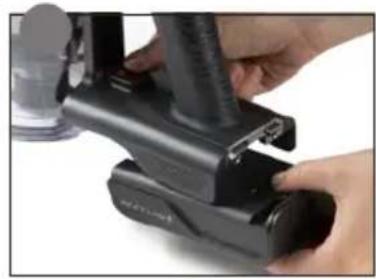
natural_image
Close-up of hands operating a black vacuum cleaner device (no visible text or symbols)SUPPORT MURAL
natural_image
3D rendering of a purple handheld vacuum cleaner with black handle and blue vertical arm, shown from front and side views (no text or symbols visible)CHARGE
natural_image
Close-up of a hand inserting a small component into a black vacuum cleaner (no visible text or symbols)REMARQUES :
natural_image
Close-up of a black cylindrical electronic device with a circular button and indicator lights (no visible text or symbols)UTILISATION
natural_image
Close-up of a black vacuum cleaner with blue cable and red filter bands (no visible text or symbols)natural_image
Black cylindrical object with red handle, possibly a battery or tool (no visible text or symbols)natural_image
Two mechanical component diagrams showing red adjustment knobs on a black body, with arrows indicating movement (no text or symbols)natural_image
Close-up of a digital kitchen brush head with blue and black adjustment knobs (no visible text or symbols)REMARQUE :
natural_image
Two compact vacuum cleaner units with blue and black casing, shown against white background (no text or symbols visible)ENTRETIEN ET NETTOYAGE
NETTOYER L'APPAREIL
natural_image
Close-up of a hand holding a black electric vacuum cleaner with a blue internal component, next to a small display (no visible text or symbols)natural_image
Close-up of a black HIMO vacuum cleaner with red buttons and blue tip, showing mechanical components and a close-up view (no text or symbols visible)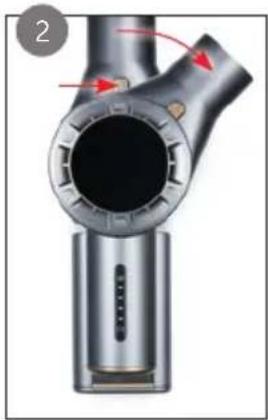
natural_image
Close-up of a metallic mechanical component with red arrows indicating flow or movement (no text or symbols)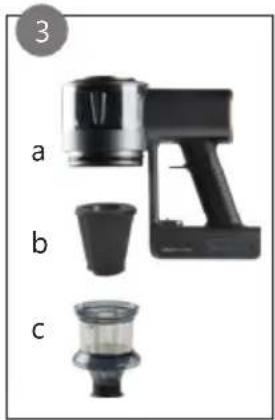
natural_image
Three types of kitchen appliances shown in black, labeled a, b, and c (no text or symbols on the devices themselves)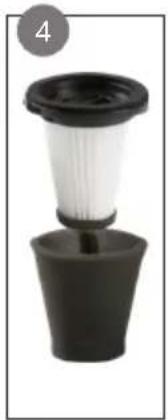
natural_image
Close-up of a black and white plastic filter or filter device with a circular label showing the number 4 (no text or symbols on the device itself)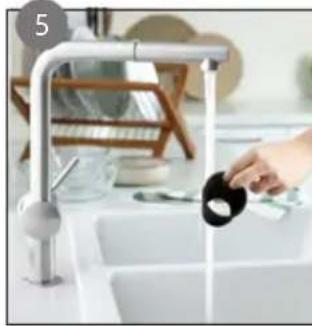
natural_image
Kitchen sink with hand pouring black liquid from a faucet (no visible text or symbols)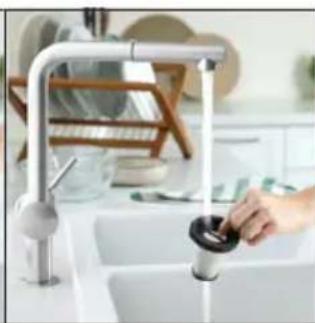
natural_image
Modern kitchen sink with hand using a drain drain, no visible text or symbols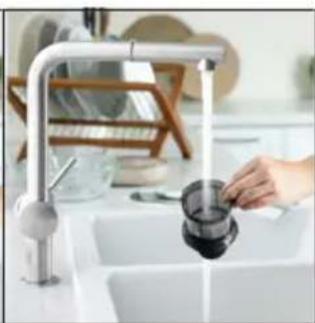
natural_image
Modern kitchen sink with hand washing a sink (no visible text or symbols)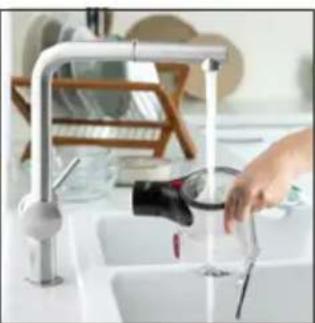
natural_image
Person washing wine from a sink in a kitchen setting (no visible text or symbols)NETTOYER LA BROSSE DE SOLS
natural_image
Close-up of a black and white vacuum cleaner with attached cable, showing mechanical components and a red component (no text or symbols visible)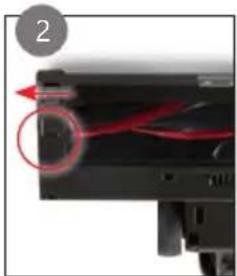
natural_image
Close-up of a mechanical component with red motion arrows indicating movement (no text or symbols)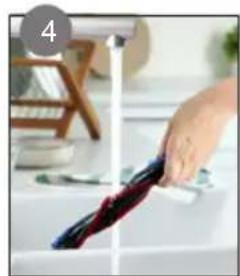
natural_image
Person cleaning a kitchen sink with a tool on the counter (no visible text or symbols)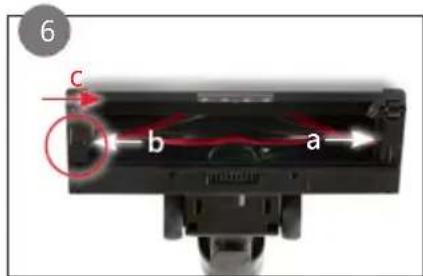
natural_image
Three-step diagram showing a vacuum cleaner's internal components being processed, with no visible text or symbols.WANDBEFESTIGUNG
natural_image
3D rendering of a purple handheld vacuum cleaner with black handle and attached bracket, shown from front and side views (no text or symbols visible)AUFLADEN
natural_image
Close-up of a hand inserting a small black component into a black base (no visible text or symbols)ANMERKUNGEN:
natural_image
Close-up of a black cylindrical device with a circular base and ventilation slots (no visible text or symbols)GEBRAUCH
natural_image
Close-up of a black vacuum cleaner with attached screwdriver and blue cable (no visible text or symbols)natural_image
Black rectangular object with a red tab, possibly a tool or device (no visible text or symbols)natural_image
Two black plastic components with red connectors, shown in two sequential states of assembly (no text or symbols visible)natural_image
Close-up of a cleaning brush head with blue filter and black adjustment knob (no text or symbols visible)ANMERKUNG
natural_image
Two compact vacuum cleaner units with blue and black casing, shown against white background (no text or symbols visible)natural_image
Close-up of a hand holding a black vacuum cleaner with a blue liquid, partially visible through a glass container (no text or symbols)natural_image
Close-up of a black and blue vacuum cleaner with a red handle, showing mechanical components and a close-up view (no text or symbols visible)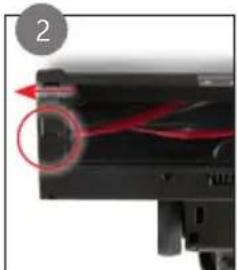
natural_image
Close-up of a black electronic device with red internal wiring and a circular component, labeled with number 2 (no text or symbols on the device itself)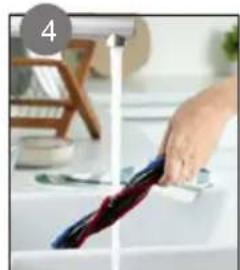
natural_image
Hand cleaning a kitchen sink with a tool on the surface (no visible text or symbols)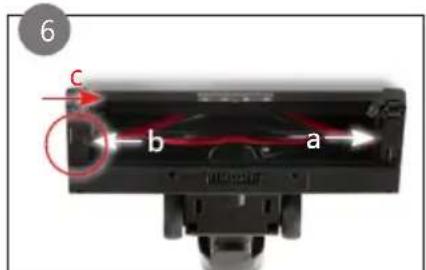
All of our products are always submitted to a strict quality control before they are sold to you. Should you nevertheless experience problems with your device, we sincerely regret this.
In that case, we kindly request you to contact our customer service. Our staff will gladly assist you.

www.primo-elektro.be
Monday – Thursday: 8.30 – 12.00 and 13.00 – 17.00
Friday: 8.30 – 12.00 and 13.00 – 16.30
This appliance has a two year warranty period. During this period the manufacturer is responsible for any failures that are the direct result of construction failure.
When these failures occur the appliance will be repaired or replaced if necessary. The warranty will not be valid when the damage to the appliance is caused by wrong use, not following the instructions or repairs executed by a third party. The guarantee issued with the original till receipt. All parts, which are subject to wear, are excluded from the warranty. If your device breaks down within the 2-year warranty period, you can return the device together with your receipt to the shop where you purchased it. The guarantee on accessories and components that are liable to wear-and-tear is only 6 months.
The guarantee and responsibility of the supplier and manufacturer lapse automatically in the following cases:
- If the instructions in this manual have not been followed.
- In case of incorrect connection, e.g. electrical voltage that is too high.
- In case of incorrect, rough or abnormal use.
• In case of insufficient or incorrect maintenance. - In case of repairs or alterations to the device by the consumer or non-authorised third parties.
- If the customer used parts or accessories that are not recommended or provided by the supplier / manufacturer.
SAFETY INSTRUCTIONS
When using electrical appliances, basic safety precautions should always be taken, including the following:
- Read all instructions carefully. Keep this manual for future reference.
- Make sure all packaging materials and promotional stickers have been removed before using the appliance for the first time. Make sure children cannot play with the packaging materials.
- This appliance is intended to be used in household and similar applications such as:
- staff kitchen areas in shops, offices and other working environments;
- farm houses;
- by clients in hotels, motels and other residential type environments;
- bed and breakfast type environments.
• Children should be supervised to ensure that they do not play with the appliance.
- This appliance can be used by children aged from 16 years and above and persons with reduced physical, sensory or mental capabilities or lack of experience and knowledge if they have been given supervision or instruction concerning use of the appliance in a safe way and understand the hazards involved.
• Children shall not play with the appliance.
- Cleaning and user maintenance shall not be made by children unless they are older than 16 or supervised.
- Keep the appliance and its cord out of reach of children younger than 16 years.
- All repairs should be carried out by the manufacturer or its aftersales service.
- Using the appliance incorrectly may cause an injury. Any injury or damage caused by failure to comply with these rules are at your own risk. Neither the manufacturer, importer, or the supplier may be held liable.
▲ELECTRICAL WARNINGS
- In order to avoid a hazard this appliance must not be supplied through an external switching device, such as a timer or a separate remote control, or connected to a circuit that is regularly switched on and off by the utility.
- The appliance must be disconnected from its power source when not in use, during service and when replacing parts. Allow to cool before putting on or taking off parts, and before cleaning the appliance. To disconnect, turn controls to “OFF” or “0” position, then remove the plug from the wall. Never pull the cord or appliance to remove the plug from the socket.
- Before use, check carefully that the electric tension and frequency of the power net at your home match
the indications on the rating label of the appliance.
- The appliance must be plugged into an appropriate outlet that is installed in accordance with local installation regulations.
- Do not let the power supply cord hang over the edge of a counter, or touch hot surfaces.
- Keep the power cord away from hot parts and don't cover the appliance.
- Unwrap the cord completely to prevent overheating of the cord. Do not allow the power cord supply to run underneath or around the unit.
- To avoid danger, do not operate this appliance with a damaged cord or plug or in the event the appliance malfunctions or has been damaged in any manner. Return the appliance to the PRIMO Service Department or its service agent for examination, repair, or electrical or mechanical adjustment. Do not try to repair the appliance yourself.
⚠️INSTALLATION
- Do not place near flammable materials, gases or explosives.
- Do not use or store this appliance outdoors.
- Always use the appliance on a steady, dry and level surface.
- Never place this appliance near a gas stove or electrical stove or in a place where it may come into contact with a warm appliance.
⚠ USE
- Do not use this appliance for other than intended use.
- Only use the appliance for domestic use. The manufacturer cannot be held responsible for accidents that result from improper use of the appliance or not following the instructions described in this manual.
- Never leave the appliance unattended while it is functioning.
- Do not operate the appliance with wet hands.
- The use of accessories that are not recommended or sold by the manufacturer can cause fire, electrical shock or injuries. Only use the utensils delivered with the appliance.
⚠️CLEANING AND MAINTENANCE
- To protect against electrical shock or burns, do not immerse unit, cord, or plug in water or other liquid.
- Failure to maintain this appliance in a clean condition could adversely affect the life of the appliance and possibly result in a hazardous situation.
⚠️PRODUCT-SPECIFIC WARNINGS
- Do not use the vacuum cleaner to vacuum up detergents, liquids, needles, matches and other similar liquids, sharp objects or flammable objects.
- Do not use the vacuum cleaner to vacuum up cement, powder and other small particles. Avoid
vacuuming large objects and items that could become entangled in the brush (long hair, plastic bags, string, etc.). Also avoid vacuuming up large objects. The vacuum cleaner could be clogged, the motor could overheat or other damage may occur.
- Make sure that the air intake or the floor suction opening do not become blocked.
- Make sure that the machine does not come into contact with liquids.
- First charge a new battery up completely.
- Pull the plug from the outlet when the vacuum cleaner is fully charged.
- This product contains a rechargeable battery. Batteries should be recycled. Do not drill into the battery or expose it to high temperatures; the battery could explode.
- Under extreme circumstances, there could be leakage of the battery. If the liquid from the battery comes into contact with the skin, wash it off immediately with water and soap or neutralize it with a mild acid such as lemon juice or vinegar. If the liquid comes into contact with the eyes, rinse them liberally with water for at least 10 minutes and contact a doctor.
- Do not place foreign objects in the openings of your machine. Do not use the machine if an opening is blocked. Keep the machine free from dust, dirt, hair or anything that could reduce the air supply.
- Remove large and sharp objects from the floor to
prevent damage to the plastic components, the brushes and the motor.
- Keep hair, loose clothing, fingers and other body parts away from openings and moving parts.
- Never use the appliance without filters. This will damage the motor and render it unusable.
SAVE THESE INSTRUCTIONS FOR FUTURE REFERENCE
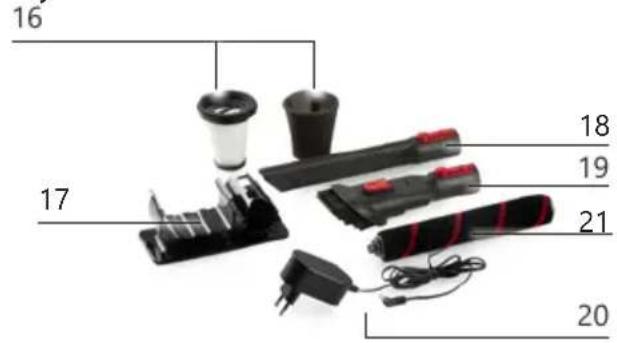
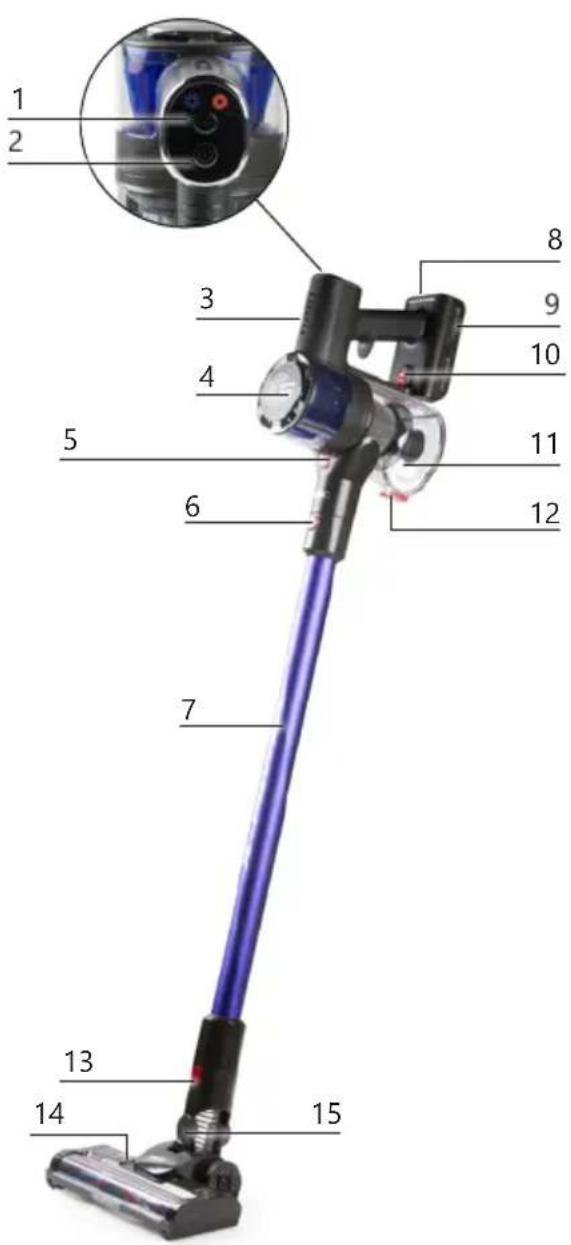
PARTS
- Mode button (Min/Max)
- On/off button
- Battery level indicator lights
- Motor compartment
- Dust container release button
- Aluminium tube release button
- Aluminium tube
- Adapter connection
- Removable battery
- Battery release button
- Dust container
- Dust container release button
- Release button floor nozzle
- Floor nozzle with rotating floor brush
- Parking lock
- Additional HEPA filter with sponge filter
- Wall fixing (screws and plugs included) and accessory holder
- Long crevice tool
- 2-in-1 fabric brush
- Adapter
- Fluffy brush
BEFORE THE FIRST USE
- Remove all packaging materials and any promotional stickers.
-
Wipe the unit and all parts down with a soft, damp cloth.
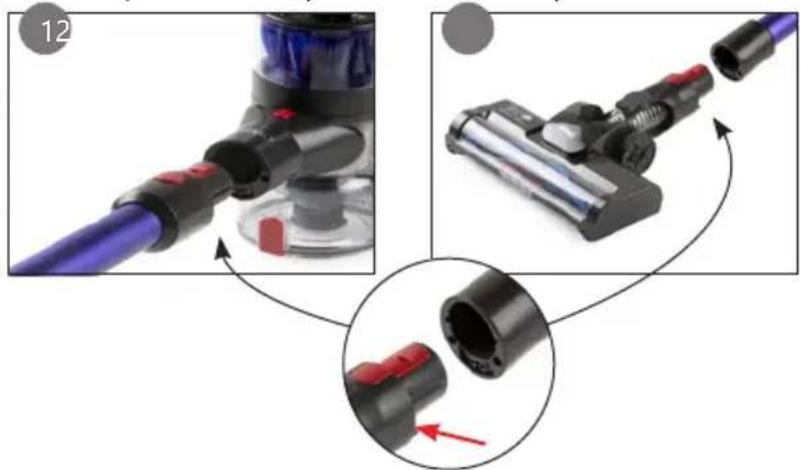
•Assemble all the parts: -
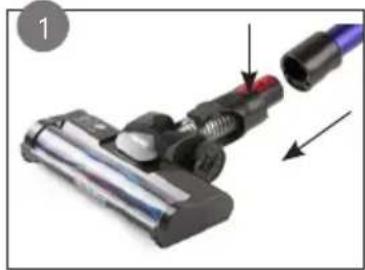
Slide the wand assembly into the motor part until it clicks into place. Make sure the power pins slide into the intended holes properly.
- Slide the floor attachment on to the wand assembly until it clicks into place. Make sure the power pins slide into the intended holes properly.
- Snap the battery into the battery holder.
natural_image
Close-up of a purple vacuum cleaner's tip being adjusted, showing internal components and assembly steps (no text or symbols)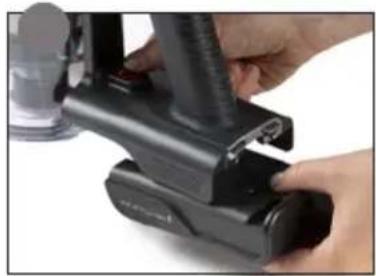
natural_image
Close-up of hands operating a black vacuum cleaner device (no visible text or symbols)WALL MOUNT
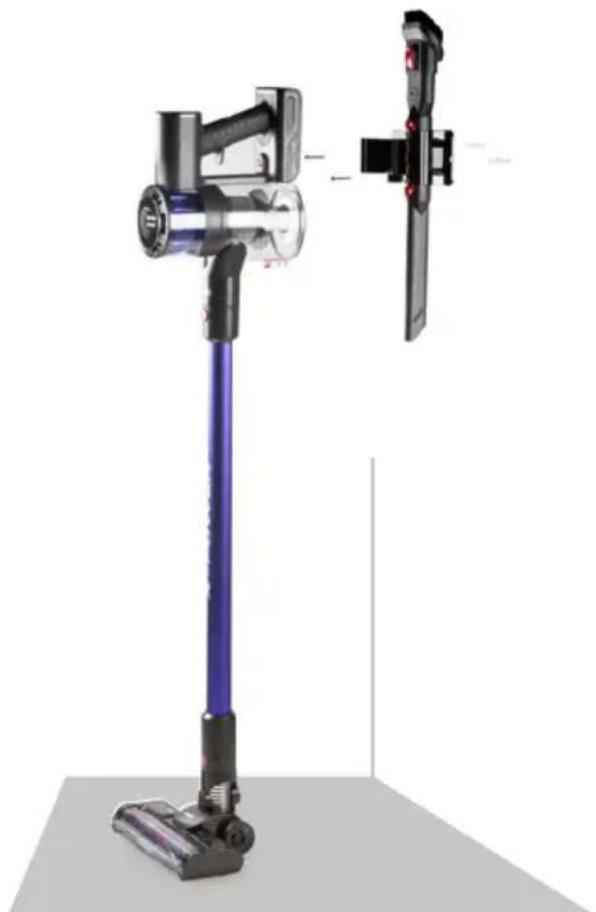
⚠ The wall mount serves to keep the stick vacuum cleaner upright and to store accessories. It is not intended to hang the vacuum cleaner on. The stick vacuum cleaner must always rest on the ground when clicked into the wall mount.
To mount the wall mount to the wall, please follow these steps:
- Snap the stick vacuum cleaner with the battery section into the wall mount and hold it where the wall mount will be attached. Make sure that the stick vacuum cleaner rests completely on the ground when doing so.
- Mark the two points on the wall where you will attach the mount.
- Drill 2 holes in the wall corresponding to these attachment points.
- Insert the supplied plugs into the wall.
- Fix the wall mount using the supplied screws.
natural_image
3D rendering of a purple handheld vacuum cleaner with attached black clip and side-mounted blade (no text or symbols visible)- To store the appliance, place it flat on the ground until the floor nozzle clicks into the tube (parking lock) and click the appliance into the wall mount.
CHARGING
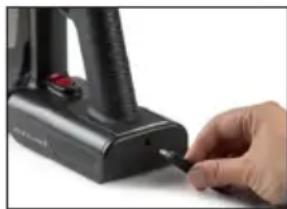
- Connect the adapter into the battery via the provided connection, and then plug the adapter into the wall socket.
-
The battery level indicator lights will then flash (see also "Indicator lights"). The battery is fully charged when all four lights stay illuminated.
•The machine cannot be started during charging. -
Prior to first use, charge the machine for 24 hours in order to be able to utilize the full capacity of the battery.
- It is recommended that the battery be fully charged for the first three charges.
natural_image
Close-up of a hand inserting a small electronic component into a black vacuum cleaner (no visible text or symbols)NOTES:
- The ambient temperature while charging should be between 15 °C and 25 °C. Higher or lower temperatures reduce battery life.
- It is recommended that the vacuum cleaner be charged after each use regardless of the duration of the use.
- Do not charge the battery for extended periods. This can damage the battery. Disconnect the adapter once the battery is fully charged.
- The recommendation is to disconnect the battery and adapter if the vacuum cleaner is not used for more than two months. To ensure a longer lifespan, the battery must be charged at least once every two months.
- The battery and adapter may become hot during charging. Take the necessary precautions to avoid coming into contact with it during this time.
INDICATOR LIGHTS
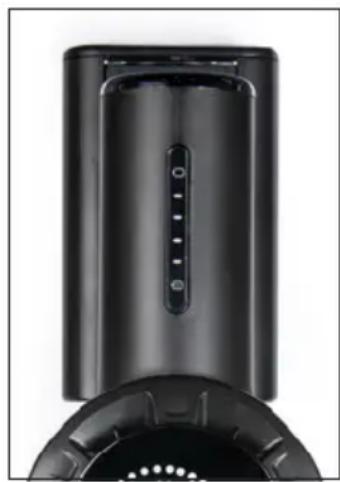
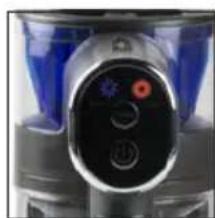
There are indicator lights at the front of the motor unit to show the battery level:
- When charging: the indicator lights flash alternately from top to bottom until all four lights stay illuminated.
- During use: the indicator lights turn off alternately (from bottom to top) as the battery level decreases.
- The last (top) light flashes: the battery is almost empty. Turn off the vacuum cleaner and put it on charge.
- All four lights flash simultaneously: the rotating floor brush is blocked. Turn off the vacuum cleaner, remove the object blocking the floor brush, and then turn the vacuum back on.
natural_image
Close-up of a black cylindrical device with a circular base and ventilation slots (no visible text or symbols)USE
-
Choose the correct accessory for the cleaning task you want to carry out:
-
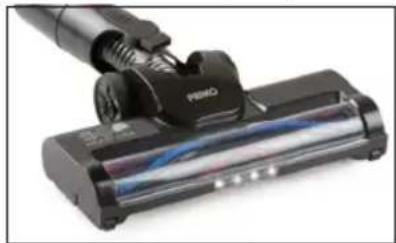
Floor attachment with rotating floor brush: suitable for floors and carpets. When you switch on the machine, the rotating floor brush at the bottom of
the floor nozzle will begin to turn. This will cause the dirt in the opening to be shifted and thereby vacuumed up. You can use the normal floor brush for all floor types; the fluffy floor brush is particularly suitable for sensitive floor types such as parquet or laminate floors.
natural_image
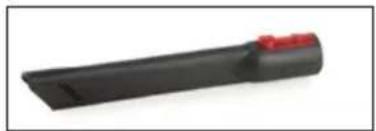
Close-up of a black vacuum cleaner with attached screwdriver and blue cable (no visible text or symbols)- Long crevice tool: for corners, cracks, skirting board edges and hard-to-reach places.
natural_image
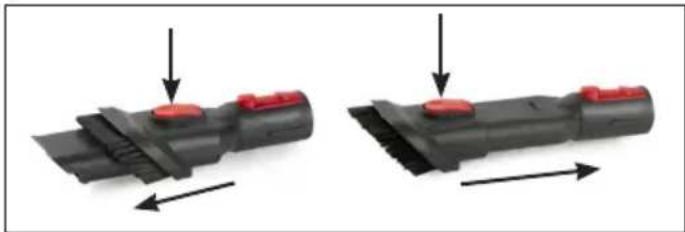
Black rectangular object with red accent, possibly a brush or tool (no visible text or symbols)- 2-in-1 fabric brush: use on upholstered surfaces, keyboards, lamps, curtains, blinds, ventilation openings, etc. The brush offers extra friction to make it easier to loosen hair and dust stuck on fabric. Use the short crevice tool for regular cleaning of small surfaces. To switch between brush and crevice tool, press the button to unlock the brush and slide it up or down.
natural_image
Two mechanical component diagrams showing red adjustment knobs and directional arrows, no text or symbols present.-
Press the on/off button. The vacuum cleaner starts working. Press again to stop.
-
Press the mode button to switch between the 2 suction power levels: MIN (energy efficient) or MAX (maximum suction power).
natural_image
Close-up of a digital washing machine nozzle with blue and black color scheme (no visible text or symbols)NOTE:
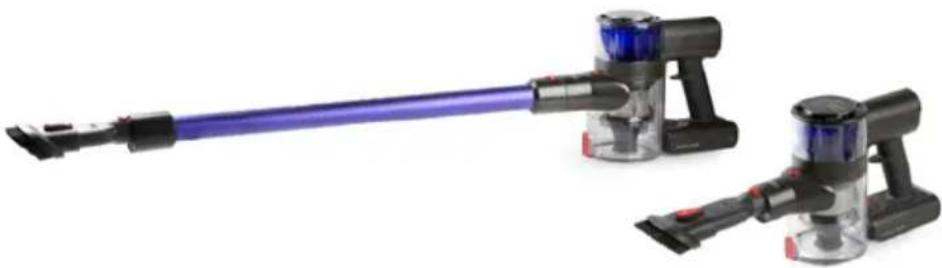
The various accessories can be clicked onto the wand assembly (stick vacuum cleaner) or directly onto the motor part, without the tube (hand vacuum cleaner).
natural_image
Two compact vacuum cleaner units with blue and black casing, shown against white background (no text or symbols visible)MAINTENANCE AND CLEANING
CLEANING THE APPLIANCE
Clean the appliance with a slightly moist soft cloth. Dry the machine off well. Never submerge the appliance in water!
CLEANING THE DUST RESERVOIR
Empty the dust container after each cleaning session:
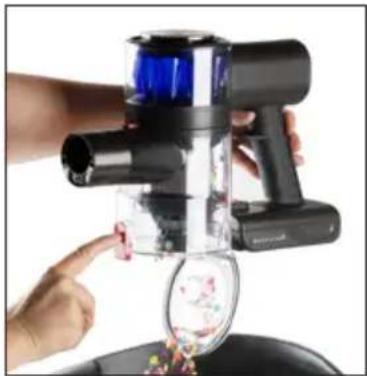
- Hold the dust container over a rubbish bin and press the release button to open the cover. Empty the dust container.
Clean the dust container and filters at least once a month to maintain optimal performance. We recommend changing the filters regularly to ensure optimal operation of the appliance.
natural_image
Hand holding a black vacuum cleaner with a blue liquid, interacting with a small display (no visible text or symbols)- Disconnect the tube from the motor part.
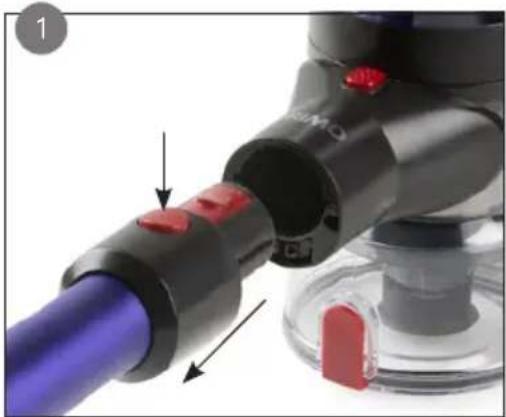
- Press the release button to remove the dirt receptacle. Unscrew the dust container clockwise and remove from the motor unit.
- Remove the coarse filter (c) from the motor unit (a) by turning it clockwise. Now turn the HEPA filter (b) clockwise and remove it from the outer coarse filter (c).
- Remove the sponge filter from the HEPA filter.
- Wash all the parts under cold running water.
- Allow all the parts to dry completely before reassembling them.
- Make sure all the parts fit together nicely when assembling, before using the machine again.
natural_image
Close-up of a black vacuum cleaner's tip and handle assembly, showing red buttons and blue body (no text or symbols visible)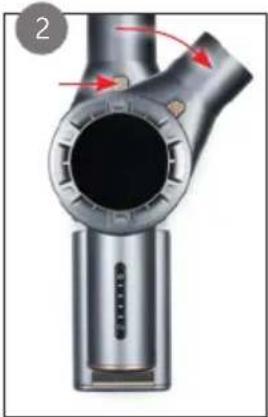
natural_image
Close-up of a metallic mechanical component with red arrows indicating flow or movement (no text or symbols)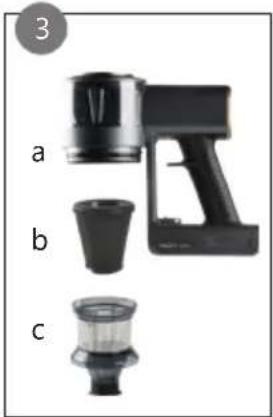
natural_image
Three types of kitchen appliances shown in black, labeled a, b, and c (no text or symbols on the devices themselves)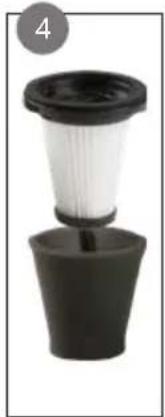
natural_image
Close-up of a black plastic filter or filter component with a circular label '4' in the top-left corner (no text or symbols on the component itself)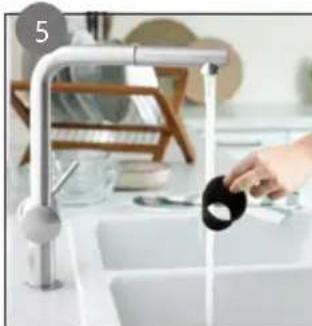
natural_image
Kitchen sink with hand pouring black soap from a faucet (no text or symbols visible)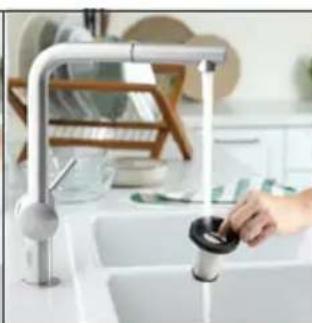
natural_image
Modern kitchen sink with hand using a drain drain, no visible text or symbols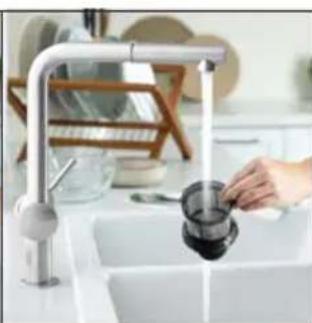
natural_image
Modern kitchen sink with hand washing a cup, no visible text or symbols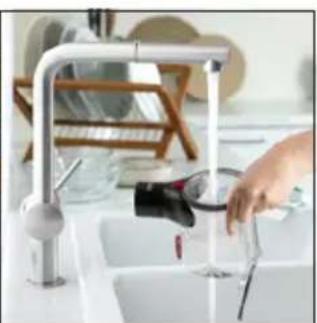
natural_image
Modern kitchen sink with hand washing a cup and water tap, no visible text or symbolsCLEANING THE FLOOR BRUSH
- Remove the floor nozzle from the upright vacuum cleaner. Press the release button at the back of the floor nozzle and remove it from the machine.
- Slide out the brush lock to unlock the floor brush.
- Gently remove any hair and dirt from around the brush; do this by hand or carefully with a knife.
- Rinse the brush under cold running water.
- Allow the brush to dry completely before reassembling it.
- To refit the brush, place the right side of the brush against the gear (a) and push the left side (b) until it clicks into place. Slide the lock (c) back in to secure the brush.
- Push the nozzle back onto the stick. The machine is now again ready for use.
natural_image
Close-up of a black vacuum cleaner with attached blue cable and red component, showing mechanical assembly (no text or symbols visible)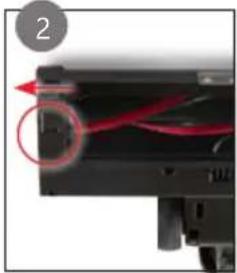
natural_image
Close-up of a mechanical component with red wiring and a circular annotation (no visible text or symbols)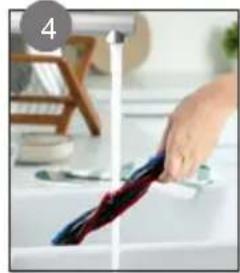
natural_image
Hand cleaning a kitchen sink with a cloth (no text or symbols visible)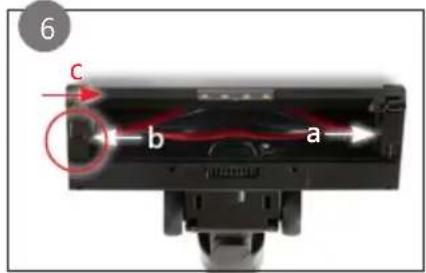
⚠️Do not immerse unit, cord, or plug in water or other liquid.
⚠️Never use aggressive or abrasive cleaning agents.
TROUBLESHOOTING GUIDE
| PROBLEMS SOLUTIONS | |
| The machine does not start up. •The battery is empty. Charge the machine. | |
| Loss of suction. •The filters are dirty/the dust | reservoir is full. Clean the machine as described in this manual. If necessary, replace the HEPA filter with sponge filter (an extra filter is included).•The floor nozzle or tube is clogged. Turn off the vacuum cleaner and remove the object blocking the floor nozzle or tube. |
| The rotating floor brush is not rotating. | • The floor brush is blocked. Turn off the vacuum cleaner and remove the object blocking the floor brush.•The floor brush is assembled incorrectly. Follow the instructions to correctly assemble the floor brush as described in this manual. |
| All the indicator lights are flashing simultaneously. | •The rotating floor brush is blocked. Turn off the vacuum cleaner and remove the object blocking the floor brush. |
| The last light on the battery is flashing. | • The battery is almost empty. Turn off the vacuum cleaner and put it on charge. |
ENVIRONMENTAL GUIDELINES
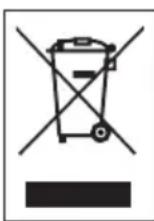
This symbol on the product or on its packaging indicates that this product may not be treated as household waste. Instead it must be brought to the applicable collection point for recycling of electrical and electronic equipment. By ensuring this product is disposed of correctly, you will help prevent potential negative consequences for the environment and human health, which could otherwise be caused by inappropriate waste handling of this product. For more detailed information about recycling of this product, please contact your local city office, your household waste disposal service or the shop where you purchased the product.

The packaging is recyclable. Please treat the packaging ecologically.
REMOVABLE BATTERY
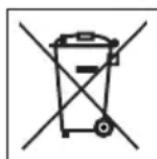
The appliance is battery-operated, and the battery must not be disposed of with household waste, even after use. You can take the appliance to a collection point for discarded electrical appliances (Recupel) in your neighbourhood (container park, specialist shop, etc.). Batteries contain substances that are dangerous to human health and to the environment. Remove the battery from the appliance before disposal as described in this manual. Recycle the battery in accordance with local laws and regulations. Never pierce the battery or expose it to high temperatures; this may cause the battery to explode.
Battery leakage may occur under extreme conditions. If the liquid from the battery comes into contact with the skin, immediately wash it off with soap and water or neutralise it with a mild acid such as lemon juice or vinegar. If the liquid comes into contact with the eyes, rinse them abundantly with water for at least 10 minutes and contact a doctor.

This appliance conforms to all European requirements in the areas of safety, health, and environmental protection.
The EU declaration concerning this appliance can be requested at any time from info@linea2000.be
WEBSHOP

Following accessories have 6 months warranty, and can be easily ordered using the link below.
WWW.PRIMO-ELEKTRO.BE


- GARANTIE (NL)
- ⚠PRODUCTSPECIFIEKE WAARSCHUWINGEN
- MUURBEVESTIGING
- OPLADEN
- GEBRUIK
- OPMERKING:
- ONDERHOUD EN REINIGING
- HET TOESTEL SCHOONMAKEN
- DE VLOERBORSTEL SCHOONMAKEN
- ⚠️ AVERTISSEMENTS SPÉCIFIQUES AU PRODUIT
- SUPPORT MURAL
- CHARGE
- REMARQUES :
- UTILISATION
- REMARQUE :
- ENTRETIEN ET NETTOYAGE
- NETTOYER L'APPAREIL
- NETTOYER LA BROSSE DE SOLS
- WANDBEFESTIGUNG
- AUFLADEN
- ANMERKUNGEN:
- GEBRAUCH
- ANMERKUNG
- SAFETY INSTRUCTIONS
- ▲ELECTRICAL WARNINGS
- ⚠️INSTALLATION
- ⚠ USE
- ⚠️CLEANING AND MAINTENANCE
- ⚠️PRODUCT-SPECIFIC WARNINGS
- SAVE THESE INSTRUCTIONS FOR FUTURE REFERENCE
- PARTS
- BEFORE THE FIRST USE
- WALL MOUNT
- CHARGING
- NOTES:
- INDICATOR LIGHTS
- USE
- NOTE:
- MAINTENANCE AND CLEANING
- CLEANING THE APPLIANCE
- CLEANING THE DUST RESERVOIR
- CLEANING THE FLOOR BRUSH
- ENVIRONMENTAL GUIDELINES
- REMOVABLE BATTERY
- WEBSHOP
- WWW.PRIMO-ELEKTRO.BE
Brand : PRIMO
Model : PR511SV
Category : Vacuum Cleaner