
DIGITRADIO 550 IR - Radio TECHNISAT - Free user manual and instructions
Find the device manual for free DIGITRADIO 550 IR TECHNISAT in PDF.

| Product Type | DAB+/FM/Internet alarm clock radio with Bluetooth and USB |
| Brand | TechniSat |
| Model | DIGITRADIO 550 IR |
| Dimensions (L x D x H) | 210 x 143 x 123 mm |
| Weight | Approximately 1.1 kg |
| Power supply | DC 9 V, 3 A mains adapter (included); max consumption 27 W, standby < 1 W, network standby < 2 W |
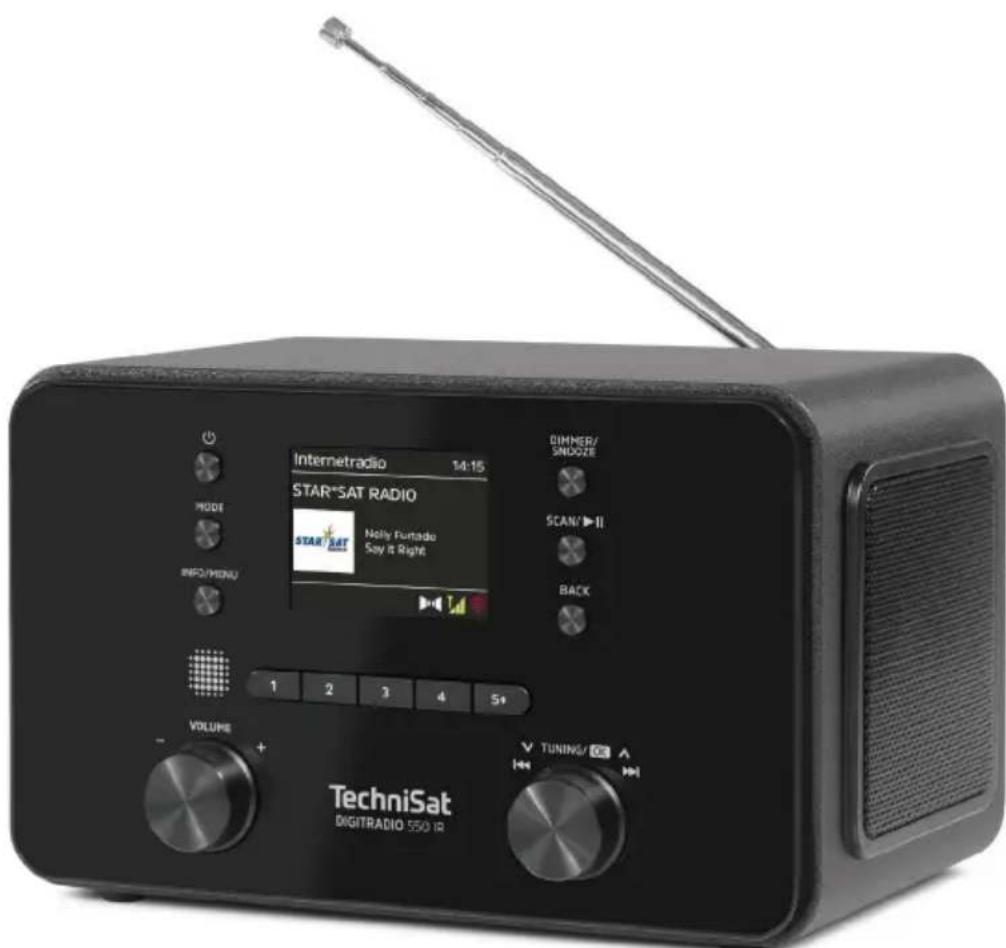
| Display | 2.4" TFT with information display and slideshow |
| Radio reception | DAB+ (band III 174-240 MHz), FM (87.5-108 MHz RDS), Internet Radio (WiFi) |
| Connectivity | WiFi 802.11 a/b/g/n (2.4 and 5 GHz), Bluetooth V5.2, USB-A (5 V, 1 A), AUX input (3.5 mm jack), headphone output (3.5 mm jack) |
| Preset memory | Up to 20 DAB+/FM/Internet stations |
| Main functions | DAB+, FM, Internet radio and podcasts; Bluetooth audio; USB MP3 playback; dual alarm with snooze; sleep timer; equalizer (Normal, Jazz, Rock, Classic, Pop, My EQ); infrared remote control |
| Speakers | 2 x 5 W RMS (stereo) |
| Care and cleaning | Unplug before cleaning; use a soft, slightly damp cloth; do not use solvents, alcohol, or scouring powder |
| Safety | Do not open the device; do not expose to water or moisture; use only the supplied adapter; keep batteries out of reach of children |
| Spare parts and repairability | Remote control batteries (2 x AAA) replaceable; repair by qualified after-sales service (hotline: 03925/9220 1800) |
| Package contents | Radio, remote control with batteries, mains adapter, user manual |
| Warranty | Legal warranty of 24 months |
| General information | Indoor use only; protection class II; operating temperature 0-35°C; humidity 5-90% (non-condensing) |
Frequently Asked Questions - DIGITRADIO 550 IR TECHNISAT
User questions about DIGITRADIO 550 IR TECHNISAT
0 question about this device. Answer the ones you know or ask your own.
Ask a new question about this device
Download the instructions for your Radio in PDF format for free! Find your manual DIGITRADIO 550 IR - TECHNISAT and take your electronic device back in hand. On this page are published all the documents necessary for the use of your device. DIGITRADIO 550 IR by TECHNISAT.
USER MANUAL DIGITRADIO 550 IR TECHNISAT
Operating instructions
DIGITRADIO 550 IR
TechniSat
1 Illustrations
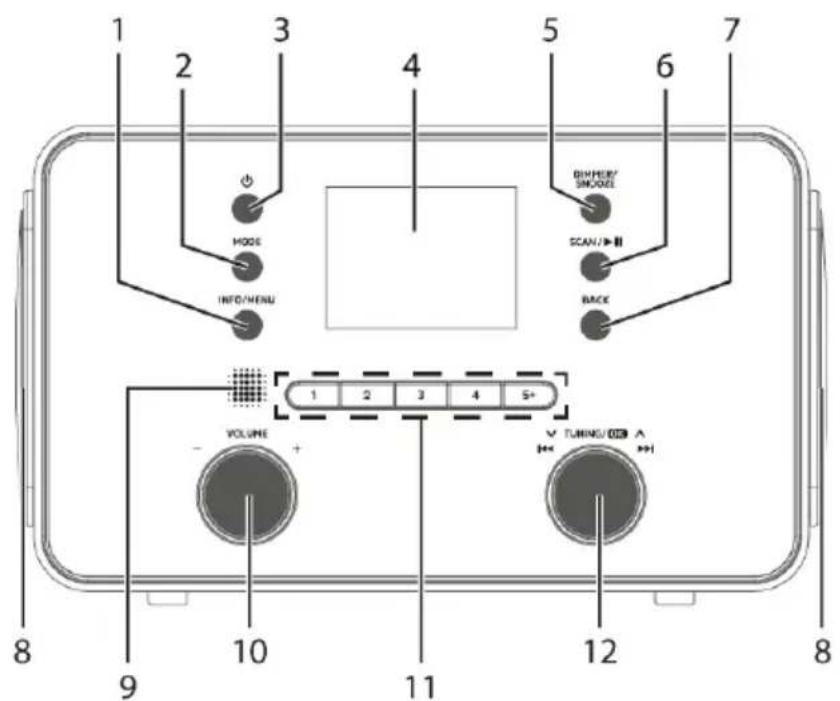
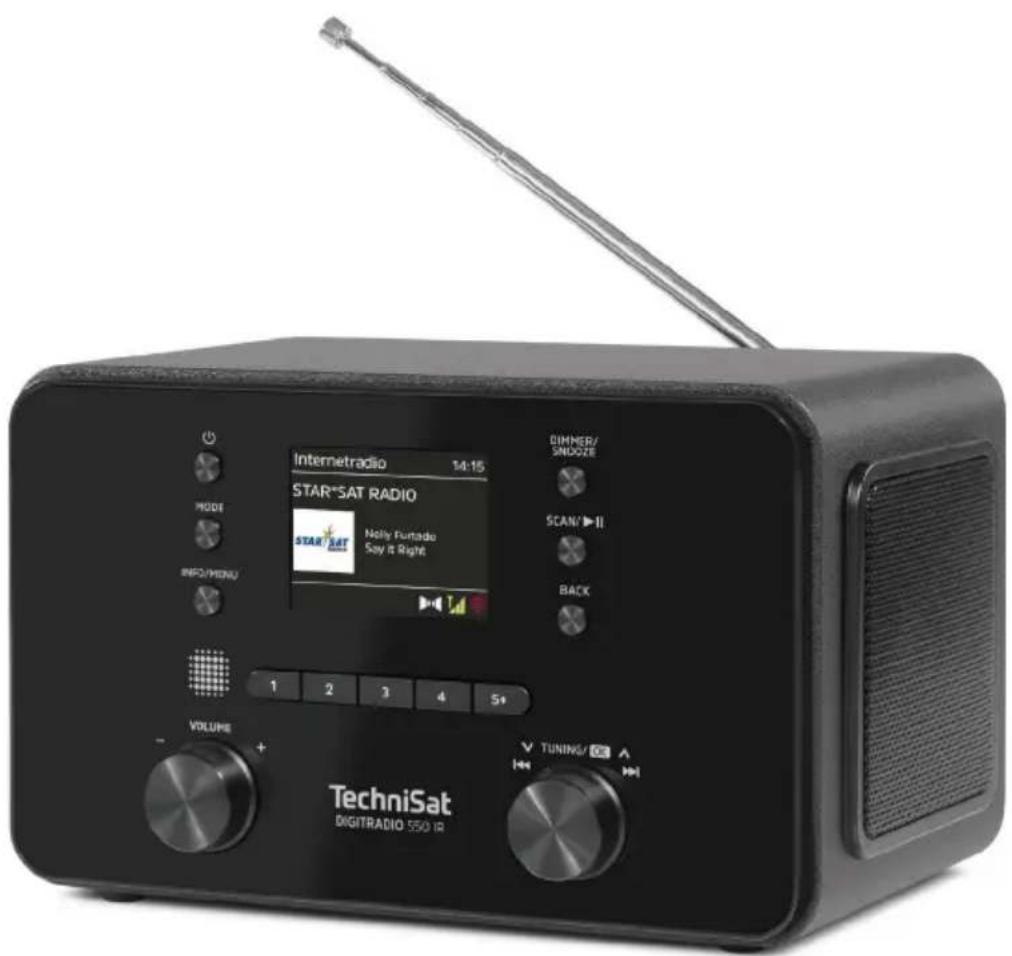
1.1 Front view
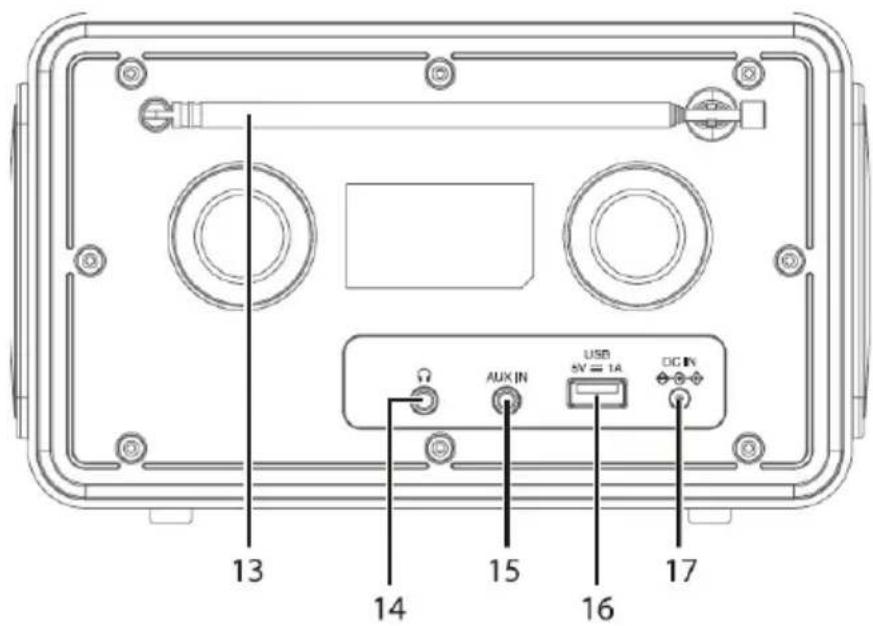
1.2 Rear view
1 INFO/ MENU Display information/ Device menu
2 MODE Source selection
3 On/Standby
4 Display
5 DIMMER/SNOOZE Display brightness/snooze
6 SCAN/▶II Search/play/pause
7 BACK
8 Loudspeaker
9 Infrared receiver
10 VOLUME +/- rotary control
11 Direct selection buttons 1, 2, 3, 4, 5+
12 ▼ TUNING/OK ▲ Rotary knob (select/confirm/track skip)
13 Telescopic antenna
14 Headphone connection (3.5 mm jack output)
15 AUX IN (analogue input jack 3.5 mm)
16 USB socket 5 V, 1 A
17 Power supply connection DC IN 9 V, 3 A
1.3 Remote control
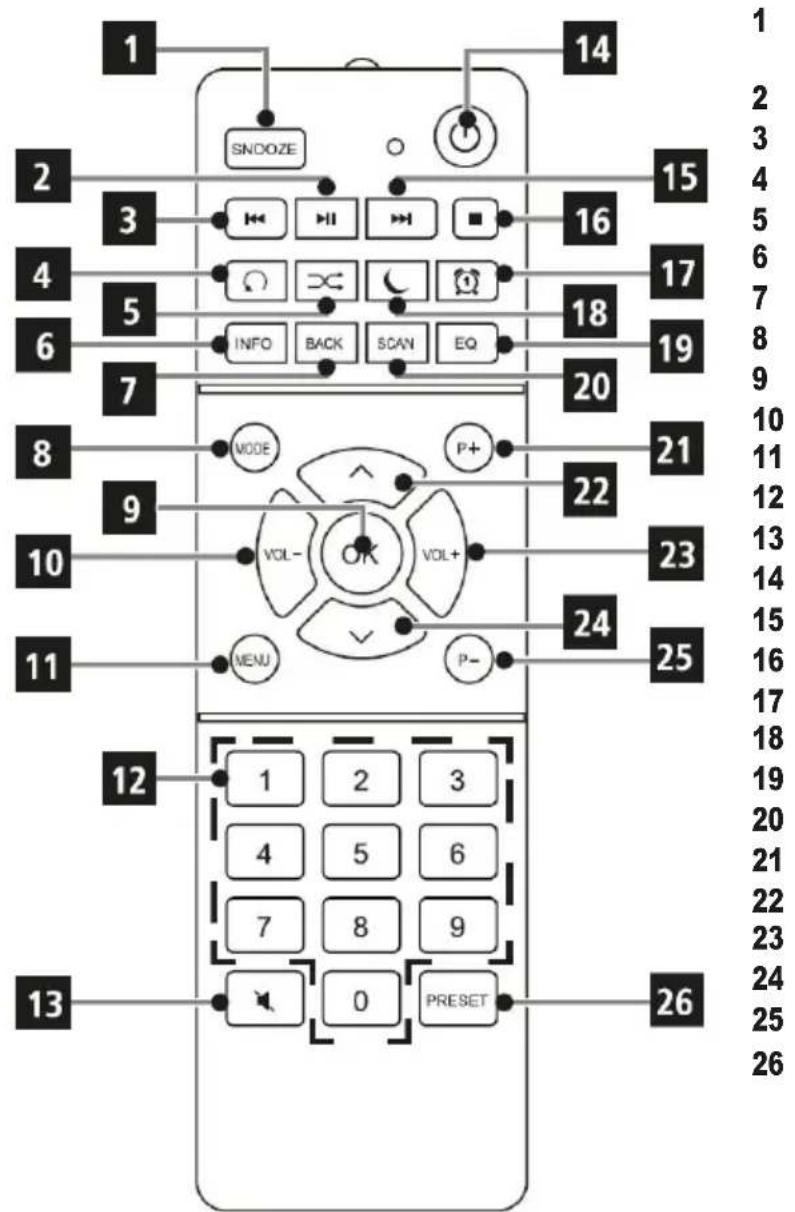
SNOOZE Snooze/
Dimmer
Play/pause
Previous title
Repetition
Shuffle
INFO
BACK
MODE Source selection
OK Confirm
Volume -
MENU
Numeric keys
MUTE Mute
On/Standby
▶▶ Next title
STOP
WECKER
SLEEP Timer
EQ Equaliser
SCAN channel search
P+ (favourite channel)
▲ Arrow key/channel list
Volume +
▼ Arrow key/station list
P- (favourite transmitter)
PRESET Favourites
2 Table of contents
1 Figures....2
1.1 Front view 2
1.2 Rear view....2
1.3 Remote control....4
2 Table of contents 5
3 Safety instructions ....8
3.1 Characters and symbols used ....8
3.2 Intended use....9
3.3 The target group of these operating instructions....9
3.4 Safe handling of the DIGITRADIO 550 IR....9
4 Legal information....11
4.1 Service instructions....12
5 Description of the DIGITRADIO 550 IR ....13
5.1 The scope of delivery....13
5.2 The special features of the DIGITRADIO 550 IR....13
6 Preparing the DIGITRADIO 550 IR for operation....13
6.1 Setting up the appliance ....13
6.2 Align antenna....14
6.3 Connecting the power supply unit....14
6.4 Insert BaGeries into remote control....15
6.5 Connect headphones ....15
6.6 Music playback from external devices....15
7 General device functions....15
7.1 Switch on the device....16
7.2 Switch off the device....16
7.3 Operating the device with the remote control 16
7.4 Setting the volume 17
7.5 Switch on mute 17
7.6 Calling up displays 17
7.7 Display indication ....17
8 Menu operation....18
8.1 Source selection 18
9 Internet radio and podcasts....18
9.1 Channel list 19
9.2 Add Internet radio stations to your favourites....19
9.3 Selecting a favourite channel .....19
9.4 Deleting a programme position memory....19
10 Playing music (USB media) 20
10.1 Play media....20
10.2 Repeat function 20
11 DAB+ Radio 21
11.1 What is DAB+ 21
11.2 Switch on DAB+ radio reception....21
11.3 Perform search run....21
11.3.1 Manual search....21
11.4 Call up channel list 22
11.5 Save DAB+ favourite stations....22
11.6 Play favourite stations 22
11.7 Deleting a programme position memory....22
11.8 Signal strength....22
11.9 Dynamic Label Plus....23
11.10 Set DRC 23
11.11 Delete inactive stations....23
12 FM radio 24
12.1 Switch on FM radio mode 24
12.2 FM reception with RDS information....24
12.3 Setting the transmission frequency manually ....24
12.4 Automatic search....24
12.5 Set mono/stereo 25
12.6 Saving FM stations 25
12.7 Selecting the programmed stations .....25
12.8 Deleting a programme position memory....25
13 Bluetooth Audio 26
13.1 Activate Bluetooth mode....26
13.2 Couplings....26
13.3 Play music 26
14 Audio input 27
15 Advanced functions 27
15.1 Sleep function....27
15.2 Alarm clock 27
15.2.1 Setting the alarm time....27
15.2.2 Switch off alarm clock after alarm....29
15.2.3 Switch off alarm clock 29
15.2.4 Snooze function....29
16 System settings....29
16.1 Equaliser....29
16.1.1 Set my EQ....29
16.2 Audio stream quality ....30
16.3 Internet settings 30
16.3.1 Network assistant....30
16.3.2 WPS connection....30
16.3.3 Further information on the network connection....31
16.4 Time settings ....31
16.5 Language....32
16.6 Factory setting 32
16.7 Sokware Update....32
16.8 Setup wizard....33
16.9 Info....34
16.10 Display illumination 34
17 Cleaning....35
18 Eliminate errors....36
19 Technical data / manufacturer's information....37
20 Disposal instructions....39
3 Safety instructions
3.1 Characters and symbols used

Indicates a safety instruction that can lead to serious injury or death if ignored. Observe the following signal words:
DANGER - Serious injuries with fatal consequences
WARNING - Serious injuries, possibly fatal
ATTENTION - Injuries

Indicates a note that you must observe to avoid device defects, data loss/misuse or unintentional operation. It also describes additional functions for your device.

Warning of electrical voltage. Follow all safety instructions to avoid electric shock. Never open the appliance.

Indoor use - Appliances with this symbol are only suitable for indoor use.

Protection class II - Electrical appliances in protection class II are electrical appliances that have continuous double and/or reinforced insulation and no connection options for a protective conductor. The housing of an insulated electrical appliance of protection class II can partially or completely form the additional or reinforced insulation.

Your appliance bears the CE mark and fulfils all required EU standards.

Electronic devices/equipment do not belong in household waste, but must be disposed of properly in accordance with Directive 2012/19/EU of the European Parliament and of the Council of 4 July 2012 on waste electrical and electronic equipment (WEEE). At the end of its life, please take this device to the designated public collection points for disposal. BaGeries must be removed before disposing of the appliance and disposed of separately from the appliance.

Observe all notes and safety instructions in these operating instructions. Keep the operating instructions in a safe place for future reference. Pass the operating instructions on to the buyer when selling the appliance.

Polarity Direct current symbol. This appliance is operated with direct current and/or converts alternating current into direct current. The symbol shows the polarity of the plug.
3.2 Intended use
The device is designed to receive and play radio programmes via DAB+, FM and the Internet. Furthermore, music media can be streamed from external devices via a BT connection. The device may only be operated with the accessories supplied (mains adapter, BaGerien, cable, aerial, etc.). Any other use of these accessories is not permitted. The device is designed for private use and is not suitable for commercial purposes. Any other use is considered improper use!
3.3 The target group of these operating instructions
The operating instructions are intended for any person who sets up, operates, cleans or disposes of the appliance.
3.4 Safe handling of the DIGITRADIO 550 IR
Please observe the following instructions to minimise safety risks, avoid damage to the appliance and contribute to environmental protection.
Please read all safety instructions carefully and keep them for future reference. Always follow all warnings and instructions in these operating instructions and on the back of the appliance.

WARNING!
Never open the device or the power supply unit!
Touching live parts is life-threatening!

Observe all the following instructions for the intended use of the appliance and to prevent appliance defects and personal injury.
- Do not repair the appliance yourself. Repairs may only be carried out by trained specialists. Please contact our customer service centres.
- The device may only be operated in the specified ambient conditions.
- Do not expose the appliance to dripping or splashing water. If water gets into the appliance, disconnect it from the power supply and contact the service centre
- Do not expose the appliance to heat sources that heat the appliance in addition to normal use.
- In the event of a conspicuous appliance defect, odour or smoke development, significant malfunctions or damage to the housing, contact Service immediately.
-
The appliance may only be operated with the mains voltage printed on the rating plate. Never attempt to operate the appliance with a different voltage. Only use the original mains adapter supplied. Do not use the mains adapter for other devices.
-
If the appliance or the power supply unit is damaged, it must not be put into operation.
- Do not operate the appliance near bathtubs, showers, swimming pools or running/splashing water. There is a risk of electric shock and/or device defects.
- Foreign objects, e.g. needles, coins, etc., must not fall into the interior of the device. Do not touch the connection contacts with metal objects or your fingers. This may result in short circuits.
- This appliance is not intended for use by persons (including children) with reduced physical, sensory or mental capabilities, or lack of experience and/or knowledge,
unless they are supervised by a person responsible for their safety or have received instructions from them on how to use the appliance. Never allow children to use this appliance unsupervised. - Keep foils and small parts such as BaGeries away from children. Choking hazard!
- Modifications to the appliance are prohibited.
Dealing with BaUeries
- Make sure that BaGerien does not get into the hands of children. Children could put BaGeria in their mouths and swallow it. This can lead to serious damage to health. In this case, consult a doctor immediately! Therefore, keep BaGerien out of the reach of small children.
- Only operate the appliance with the baGeries approved for this appliance.
- Normal BaGeries must not be loaded. BaGeries must not be reactivated with other MiGels, taken apart, heated or thrown into an open fire (risk of explosion!).
- Clean the battery contacts and device contacts before inserting.
- There is a risk of explosion if the BaGerie is inserted incorrectly!
- Replace BaGeries only with BaGeries of the correct type and model number
- Caution! Do not expose BaGerien to extreme conditions. Do not place on radiators, do not expose to direct sunlight!
- Leaked or damaged BaGeria can cause chemical burns if it comes into contact with the skin. In this case, use suitable protective gloves. Clean the BaGeria compartment with a dry cloth.
- If the appliance will not be used for a longer period of time, remove the batteries.
4 Legalinformation

Hereby, TechniSat declares that the radio equipment type
DIGITRADIO 550 IR is in compliance with Directive 2014/53/EU. The full text of the EU
Declaration of conformity is available at the following Internet address:
Alternatively, you can also find the declaration of conformity in the download area of your product on the TechniSat website www.technisat.de.

TechniSat is not liable for product damage due to external influences, wear and tear or improper handling, unauthorised repairs, modifications or accidents.

Subject to changes, printing errors and mistakes. Status 04/24.
Copying and reproduction only with the authorisation of the publisher. The current version of the operating instructions is available in PDF format. format in the download area of the TechniSat website at www.technisat.de.

DIGITRADIO 550 IR and TechniSat are registered trademarks of:
The names of the companies, institutions or brands mentioned are trademarks or registered trademarks of their respective owners.

In the countries listed below, the device may only be operated indoors in the 5GHz WLAN range.
| BE | CY | FI | FR | HU | LV | LI |
| LU | NL | ES | SE | UK | CH | EN |

All images shown in these operating instructions are for illustrative purposes only and may differ from the actual product.

From time to time, updates to the device software may be provided that extend, remove, add or improve functions, menu items and displays. The procedures described in these instructions may therefore change. You can find the latest operating instructions on the TechniSat website www.technisat.de in the download area of your product.
4.1 Service instructions

This product is quality-tested and comes with a statutory warranty period of 24 months from the date of purchase. Please keep the invoice as proof of purchase. With For warranty claims, please contact the dealer of the product.

For questions and information or if there is a problem with this device, please contact our technical hotline:
Mon. - Fri. 8:00 - 18:00 under Tel.: 03925/9220 1800.

Repair orders can also be applied for directly online at www.technisat.de/reparatur.
If you need to return the device, please use only the following address:
5.1 The scope of delivery
Please check that the scope of delivery is complete before commissioning: 1x
DIGITRADIO 550 IR
1x remote control + BaGerien
1x operating instructions
1x power supply unit
5.2 The special features of the DIGITRADIO 550 IR
The DIGITRADIO 550 IR consists of a DAB+/UKW/Internet radio receiver with the following functions:
- You can store up to 20 DAB+/ FM/Internet radio stations.
- The radio receives on the frequencies FM 87.5-108 MHz (analogue) and DAB+ 174.9-239.2 MHz (digital antenna).
- Internet radio via WLAN connection.
- Music streaming via a BT connection.
- MP3 music playback via USB storage media
- Alarm clock and sleep timer function.
6 Preparing the DIGITRADIO 550 IR for operation
6.1 Setting up the appliance
Place the appliance on a firm, secure and horizontal surface. Ensure good ventilation.
i Notes:
- Do not place the appliance on soft surfaces such as carpets, blankets or near curtains and wall hangings. The
Ventilation openings could be covered. This can interrupt the necessary air circulation. This could potentially lead to an appliance fire. - As this appliance is disconnected from the mains by pulling out the mains adapter/plug, it is essential that it is easily accessible at all times.
- Please note that the appliance feet may leave coloured marks on certain furniture surfaces. Use protection between your furniture and the appliance.
- Keep the DIGITRADIO 550 IR away from devices that generate strong magnetic fields. Otherwise, reception interference may occur.
- Do not place any heavy objects on the appliance.
6.2 Aligning the antenna enne
The number and quality of the stations to be received depends on the reception conditions at the installation site. Excellent reception can be achieved with the telescopic aerial.
Release the telescopic aerial (13) from its holder, straighten it and pull it out lengthways.

Note:
- The exact alignment of the antenna is important, especially in the peripheral areas of DAB+ reception. On the Internet, for example, you can find "www.dabplus.de" to quickly find the location of the nearest transmitter mast.
- Start the first search at a window in the direction of the transmitter mast. If the weather is poor, DAB+ reception may only be possible to a limited extent.
- Do not touch the aerial while a station is playing. This can lead to impaired reception and audio dropouts.
6.3 Connecting the power supply unit

WARNING!
Do not touch the mains plug with wet hands, risk of electric shock. Blow!

ATTENTION!
Lay the mains cable so that nobody can trip over it.

Notes:
- Make sure that the operating voltage matches the local mains voltage before inserting the mains plug into the wall socket.
- Use a suitable, easily accessible mains connection and avoid using multiple sockets!
- In the event of faults or smoke and odours coming from the housing, pull the mains plug out of the socket immediately!
- If the appliance is not to be used for a longer period of time, e.g. before travelling, unplug the mains plug.
Connect the DC plug of the power supply unit to the socket labelled DC-IN (17) on the back of the DIGITRADIO 550 IR.
Insert the mains plug into a mains socket.
6.4 Inserting batteries into the remote control
Open the battery compartment on the back of the remote control by sliding it in the direction of the arrow.
Insert the BaGeries (2x AAA 1.5V) into the BaGeries compartment according to the polarity shown in the BaGeries compartment.
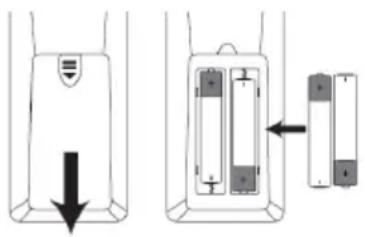
Carefully close the assembly compartment cover again so that the retaining tabs of the cover engage in the housing.
i Notes:
- To operate the remote control, you need 2x alkaline batteries, type Micro, 1.5 V, LR03/AAA. Make sure the polarity is correct when inserting the batteries.
- Replace weakening BaGeries in good time.
6.5 Connecting the headphones

ATTENTION: Hearing damage!
Do not listen to music at high volume through headphones. This can lead to permanent hearing damage. Before using headphones, set the device volume to the minimum level.

Only use headphones with a 3.5 millimetre stereo jack plug.
Insert the plug of the headphones into the headphones socket (14) on the back of the DIGITRADIO 550 IR. The sound is now reproduced exclusively via the headphones, the loudspeakers are muted.
If you want to listen via the speakers again, unplug the headset from the headset socket on the device.
6.6 Music playback from external devices
You can play music from external devices with an audio output via the DIGITRADIO 550 IR.
Connect the DIGITRADIO 550 IR to the audio output of the external device via the AUX-IN (15) using a standard stereo jack cable (3.5 mm).
7 General device functions
You can make settings and perform functions using the buttons on the appliance as well as the remote control. The buttons on the remote control are used to operate the device as described in these operating instructions.

In these operating instructions, buttons to be pressed are shown in feU, menu entries or display messages are shown in [square brackets] and operating messages with an arrow >.
Note on operating the device:
The ▼ TUNING/OK ▲ rotary knob can be turned and pressed. Pressing the ▼ TUNING/OK ▲ rotary knob: Select / Confirm
Turn the ▼ TUNING/OK ▲ rotary knob: station selection / option selection in the Menu.
7.1 Switch on the device
You can switch on the DIGITRADIO 550 IR by pressing the On/Standby button (3) on the device or the On/Standby button (14) on the remote control.

After switching on for the first time, you must first select the operating language with ▲ /▼ and confirm the selection with OK. You can then start the setup wizard. Here you can, for example, update the date and time either via DAB+/UKW or the Internet. An attempt is then made to establish a connection to a WLAN network. To do this, select the appropriate Wi-Fi network and enter the Wi-Fi password using the remote control if necessary. Detailed Information on the settings in the setup wizard can be found in chapter "16.8 Setup wizard" on page 33.
72 Switch off the device
You can switch the DIGITRADIO 550 IR to standby by pressing the On/Standby button (3) on the device or the On/Standby button (14) on the remote control. The date and time appear on the display.
7.3 Operating the device with the remote control
You can use the infrared remote control to operate the most important functions of the appliance from the comfort of your seat. Please note the following points when operating the appliance with the remote control:
Point the remote control at the IR receiver (9) on the front of the appliance.
There must be a line of sight between the remote control and the IR receiver.
If the range of the remote control decreases, the BaGeries should be replaced with new ones.
The maximum range is approximately 5 metres in front of the device.
7.4 Setting the volume
Set the volume using the VOL +/- buttons (10, 23) on the remote control or by turning the VOLUME +/- rotary control (10) on the device. The set volume is shown on the display.
7.5 Switch onmute
You can mute the volume using the MUTE button (13) on the remote control.

This mode is signalled by a corresponding icon in the status bar.
Pressing the button again switches the volume back on.
7.6 Call up display screens
By pressing the INFO button (6) several times while playing a source, you can display and switch through some additional information.
7.7 Display indication
Current source
Channel name, title, artist, additional information, menu, lists

Time of day
Status bar with WLAN and DAB+/FM reception strength, active alarm clock, stereo/mono etc.

The display may vary depending on the selected function/source. Follow the instructions on the display.
The additional information shown on the display, such as title, artist or station frequency, can be adjusted and scrolled through depending on the source/station using the INFO button.
Slideshow
Some DAB+ stations transmit additional information such as album cover of the current track, adverts or web data. The size of the window can be changed using the OK button on the remote control or by pressing the
▼ TUNING/OK ▲ Rotary knob on the device.
8 Menu operation
The menu is navigated using the MENU, ▲/▼, BACK and OK buttons on the remote control or MENU, BACK and the ▼ TUNING/OK ▲ rotary knob on the device.
The device menu is divided into the respective submenu of the currently selected source, the main menu and the system settings. Press the MENU button to open the submenu of the currently selected source.
With the ▲/▼ buttons on the remote control or by turning the ▼ TUNING/OK Use the ▲ rotary knob on the device to navigate through the settings and options. Press the OK button on the remote control or the ▼ TUNING/OK ▲ rotary knob on the device to make a selection or activate a function.
An "*" marks the current selection.
Press the BACK button to go back one step.

Close the menu: Press MENU several times or wait approx. 15 seconds.
8.1 Source selection
Press the MODE button several times until the desired source is shown on the display.
Alternative:
Press the MENU button.
Use the ▲ or ▼ buttons to select the [Main menu] entry and confirm your selection with OK.
Use the ▲ or ▼ buttons to select the desired source and confirm your selection with OK.
9 Internet radio and podcasts
The DIGITRADIO 550 IR is equipped with an Internet radio receiver.
To be able to receive Internet radio stations/stations/podcasts, you need a WLAN router with Internet access.
Press the MODE button until [Internet Radio] or [Podcast] appears on the display.
Alternative:
Press the MENU button and then select [Main menu > Internet radio] or [Podcasts].

If you are starting Internet radio operation for the first time without having configured a WLAN connection during the initial setup, you must first set up a WLAN connection. For more information, see chapter "16.3 Internet settings" on page 30.
9.1 Channel list
Press the MENU button and select [Channel list] or [Poscast list]. Press the OK button.

Under Station list, all Internet radio stations are displayed in different categories.
After selecting a category, select a channel and press the OK button.

To obtain additional information on the currently playing station, press the INFO button several times (point 7.6).
92 Add Internet radio stations to your favourites
The favourites memory can store up to 20 stations.
The saved transmitters are retained even after a power failure.
Set the desired channel.
Press one of the number buttons 1 ... 9 (0 = 10) on the remote control or 1 ...4 on the device and keep them pressed until [saved] appears on the display.
Repeat the process to save additional channels. Alternatively
and for memory locations 11 ... 20:
Press and hold the PRESET button (5+ on the device), use the ▲/▼ buttons to select a favourite memory location 1...20 and press the OK button.
9.3 Selecting a favourite station
Briefly press the desired number button 1 ... 9 (0 = 10) briefly. If you have not saved a station in the selected programme position, [empty] appears. An asterisk in the status bar indicates an actively selected favourite channel.
Alternative:
Briefly press the PRESET button (5+ on the device), use the buttons to select ▲/▼ to select a favourite memory location 1...20 and press the OK button.
9.4 Deleting a programme position memory
Simply save a new channel to the relevant programme position.
10 Play music (USB media)
You have the option of playing MP3 music media on a USB data carrier via the DIGITRADIO 550 IR. To do this, the USB medium must be connected to the USB port (20) must be connected.
Press the MODE button until [USB] appears on the display. Alternatively:
Press the MENU button and then select [Main menu > USB].
10.1 Play media
Use the ▲ or ▼ buttons to select the music playlist and then a music track or a folder with music tracks and play the track by pressing OK.
The track name and the playback duration appear on the display. ▶Play/pause.
▶▶▶ Next track, press and hold to search.
Press 1x track from beginning / 2x for previous track, press and hold for search.
Stop playback.
10.2 Repeat function
Press the repeat button (4) to repeat the contents of the current folder.
To switch the function off again, press the Repeat button again.
Press the Shuffle button (5) to play the tracks in random order.
Alternatively, repeat and random playback can also be activated/deactivated via the menu.
11 DAB+ radio
11.1 What is DAB+
DAB+ is a new digital format that allows you to listen to crystal-clear sound without noise. Unlike conventional analogue radio stations, DAB+ broadcasts several stations on the same frequency. This is called an ensemble or multiplex. An ensemble is made up of the radio station and several service components or data services, which are broadcast individually by the radio stations. Information e.g. at www.dabplus.de or www.dabplus.ch.
11.2 Switch on DAB+ radio reception
Press the MODE button until [DAB+ Radio] appears on the display.
Alternative:
Press the MENU button and then select [Main menu > DAB+].

When DAB+ is started for the first time, a complete station search is carried out. The station list is then displayed (see point 11.4).
11.3 Perform search run
The automatic search scans all DAB Band III channels and thus finds all stations broadcast in the reception area.

Once the search is complete, the first station is played in alphanumeric order.
To perform a complete search, press the SCAN button.
"Search" appears on the display. The search starts, the progress bar appears on the display. The station list is then displayed
After completing the channel search, press the ▲ or ▼ and OK buttons when the channel list is displayed to select a channel.
Alternative:
Press the MENU button and use the ▲ or ▼ buttons to select [Complete search]. Confirm by pressing OK.

If no station is found, check the antenna and change the installation location if necessary (point 6.2).
11.3.1 Manual search
If you would like to perform a manual channel scan, proceed as follows:
Select [MENU] > [Manual setting] and press the OK button.
Use the ▲ or ▼ buttons to select a station frequency and press the OK button.

If transmitters are transmitted on the selected frequency, this is shown on the stability bar (see also point 11.8). If these stations are not yet in your station list, they will now be saved there.
11.4 Call up channel list
You can use the station list to check and play the stations found on the device. To do this, press the ▲ or ▼ buttons to call up the station list and select a station.
To select the highlighted station, press the OK button.
Alternatively, you can also press the MENU button and press ▲ or ▼ > Select [Channel list].
11.5 Save DAB+ favourite stations
The favourites memory can store up to 20 stations.
The saved transmitters are retained even after a power failure.
Set the desired channel.
Press one of the number buttons 1 ... 9 (0 = 10) on the remote control or 1 ...4 on the device and keep them pressed until [saved] appears on the display.Repeat the procedure to save additional channels. Alternatively
and for memory locations 11 ... 20:
Press and hold the PRESET button (5+ on the device), use the ▲/▼ buttons to select a favourite memory location 1...20 and press the OK button.
11.6 Play favourite stations
Briefly press the desired number button 1 ... 9 (0 = 10) briefly. If you have not saved a station in the selected programme position, [empty] appears. An asterisk in the status bar indicates an actively selected favourite station.
Alternative:
Briefly press the PRESET button (5+ on the device), use the buttons to select ▲/▼ to select a favourite memory location 1...20 and press the OK button.
11.7 Deleting a programme position memory
Save the new channel to the relevant programme position.
11.8 Signal strength
Press the INFO button several times. The signal strength is displayed.
The level bar shows the current level.
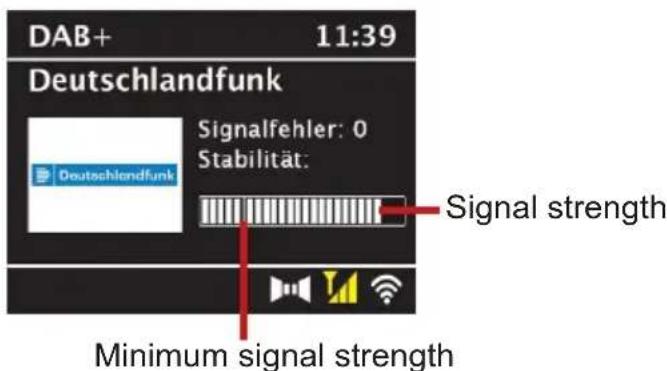

Transmitters whose level is below the required minimum signal strength do not transmit a sufficient signal. If necessary, align the aerial as described under point 6.2.

Pressing the INFO button several times switches through various information, e.g. programme type, multiplex name, frequency, signal error rate, data bit rate, programme format, date.
11.9 Dynamic Label Plus
If supported by the programme provider, the Dynamic Label Plus service allows, for example, the name of the current programme or the title and artist to be displayed additionally.
11.10 Set DRC
The compression rate compensates for dynamic fluctuations and the associated volume variations.
Press the MENU button and select [Volume adjustment] to select the desired compression rate.
Use the ▲/▼ buttons to select the compression rate:
DRC high - High compression
DRC low - Low compression
DRC off - Compression switched off.
Confirm by pressing OK.
11.11 Delete inactive stations
Press the MENU button and use ▲ or ▼ to select [Delete inactive channels].
Confirm by pressing OK.
Select with ▲ or ▼ > [Yes] and confirm by pressing OK.
12 FM radio
121 Switch on FM radio mode
Press the MODE button until [FM] appears on the display.
Alternatively:
Press the MENU button and then select [Main menu > FM].

When switching on for the first time, the frequency is set to 87.5 MHz.

If you have already set or saved a station, the radio will play the last station set.

The station name appears for RDS stations.
Align the aerial to improve reception.
12.2 FM reception with RDS information
RDS is a procedure for transmitting additional information about FM stations. Broadcasters with RDS transmit their station name or programme type, for example. This is shown on the display.
The device can receive RDS information:
RT (radio text),
PS (station name),
PTY (programme type)
represent.
12.3 Set the transmission frequency manually
Press the ▲ or ▼ button several times to set the desired transmission frequency. The display shows the frequency in steps of 0.05 MHz.
124 Automatic search
Press SCAN to start the automatic station search. The transmission frequency will flash upwards on the display.
or
Press and hold the ▲ or ▼ button for approx. 2 seconds to automatically search for the next station with sufficient signal.

If an FM station with a sufficiently strong signal is found, the search stops and the station is played. If an RDS station is received, the station name and, if applicable, the radio text will appear.

To set weaker stations, please use the manual station selection.

You can set in the Menu > Scan setting whether the scan only finds strong stations (only strong stations). To do this, press the MENU button
Search settings > [Yes]. Confirm the selection with OK. If [NO] is selected, the channel scan stops for every channel. However, these can also be disturbed.
125 Set mono/stereo
Press the MENU button and use ▲ or ▼ to select [Audio setting].
Select [YES] to play back the sound in mono only when FM reception is weak or [NO] to play back the sound in stereo (only in good reception conditions).
Confirm by pressing OK.
126 Saving FM stations
The favourites memory can store up to 20 stations.
The saved transmitters are retained even after a power failure.
Set the desired channel.
Press one of the number buttons 1 ... 9 (0 = 10) on the remote control or 1 ...4 on the device and keep them pressed until [saved] appears on the display.
Repeat the procedure to save additional channels. Alternatively
and for memory locations 11 ... 20:
Press and hold the PRESET button (5+ on the device), use the ▲/▼ buttons to select a favourite memory location 1...20 and press the OK button.
127 Selecting the programmed stations
Briefly press the desired number button 1 ... 9 (0 = 10) briefly. If you have not saved a station in the selected programme position, [empty] appears. An asterisk in the status bar indicates an actively selected favourite channel.
Alternative:
Briefly press the PRESET button (5+ on the device), use the buttons to select ▲/▼ to select a favourite memory location 1...20 and press the OK button.
12.8 Deleting a programme position memory
Save the new channel to the relevant programme position.
13 Bluetooth Audio
13.1 Activate Bluetooth mode
Press the MODE button until [Bluetooth Audio] appears on the display.
Alternative:
Press the MENU button and then select [Main menu > Bluetooth].

Pairing mode is signalled by a flashing [BT] in the status bar of the display.

If the DIGITRADIO 550 IR has already been paired with another device that is within range, the connection is established automatically.
13.2 Coupling
Activate Bluetooth on your music player, e.g. a smartphone or tablet.

To activate Bluetooth on your music player, please refer to the operating instructions for the device you wish to pair with the DIGITRADIO 550 IR.

Please note that only 1 device can connect to the DIGITRADIO 550 IR at any one time.

Do not exceed the maximum Bluetooth range of 10 metres to ensure perfect playback quality.
Select the list of Bluetooth devices found on your music player.
Search for the DIGITRADIO 550 IR entry in the list and select it. If you are prompted to enter a PIN, enter "0000" (4x zero).
Once pairing has been successfully completed, [BT] stops flashing on the display of the DIGITRADIO 550 IR.
13.3 Play music
Select a music track on your music player and play it.
The sound is now played back via the DIGITRADIO 550 IR.

You can use the playback buttons on the remote control of the DIGITRADIO 550 IR to control playback on your music player (only with compatible devices).
Play/pause.
Next title.
Press twice to play the previous track, press once to play the track from the beginning. ▪top playback.

Make sure that the volume on your music player is not set too low.
14 Audio input
You can play the sound of an external device via the speakers of the DIGITRADIO 550 IR.
Connect the external device to the AUX-IN connection (19, 3.5 mm stereo jack) on the back of the DIGITRADIO 550 IR.
Use the MODE button to select the AUX-IN audio input. The display shows [Aux-In] is displayed.

Control and playback are performed on the external device. Do not set the volume too low to avoid background noise.
15 Advanced functions
15.1 Sleep function
Press the MENU button and then select [Main menu > Sleep]. Alternatively: Press the SLEEP button(2).
You can use the ▲ or ▼ buttons to set the time period after which the appliance switches to standby in each operating mode in steps of 15, 30, 45, 60, 90 and 120 minutes.
Alternative:
Press the SLEEP button several times.

A moon symbol appears in the status bar of the display with the time remaining until the DIGITRADIO 550 IR switches to standby.
15.2 Alarm clock
Press the MENU button and then select [Main menu > Alarm clock].
Alternative:
Press the Alarm clock button (17) to jump directly to the alarm clock configuration.
15.2.1 Setting the alarm time

You can only operate the alarm function once the correct time has been set. Depending on the configuration, this happens automatically or
must be set manually. The time can be updated either manually, via DAB+/UKW or via the Internet. Further information on this can be found in chapter 16.4.
Select one of the alarm time memories Alarm clock 1 or Alarm clock 2 using the ▲ or ▼ buttons and confirm with OK.
Then go through all the points in sequence. Confirm each entry with the OK button.
Alarm clock
You can choose between Off, Daily (every day of the week), Once, Weekdays (Mon. - Fri.) or Weekends (Sat. and Sun.). Press the OK button to accept the setting.
Wake-up time
Here you can enter the alarm time and, if necessary, the date. First select the hours using the ▲/▼ buttons and press the OK button to accept. Then enter the minutes. Press the OK button to accept these as well.

If you have selected [Once] under Repeat, you must enter the date as well as the time.
Source
The source is then entered. Buzzer, DAB+ or FM are available. Press the OK button to accept the setting.
Programme
If you have selected DAB+ or FM, you can then specify whether you want to be woken up with the last station you listened to or with one from your favourites list.
Duration
Enter the time you want the alarm clock to be active.
Volume
Use the ▲/▼ buttons to select the volume at which you want to be woken up.
Save
Press the OK button to save the alarm clock.

The alarm clock is active as soon as you have set the alarm repetition to Daily, Once, Weekend or Working days. An alarm clock symbol appears in the status bar with the corresponding number of the active alarm clock and the alarm time.
15.2.2 Switch off alarm clock after alarm
Press the On/Standby button to switch off the alarm clock. The
alarm symbol is still shown on the display when the Alarm repetition is set to Daily, Weekend or Working days.
15.2.3 Switch off the alarm clock
In the menu of the corresponding alarm clock, select > Repeat: Off.
15.2.4 Snooze function
With the alarm clock active, press the SNOOZE button (1) to activate the snooze function. The alarm is muted and restarts after the set snooze time. The snooze time can be increased by pressing the SNOOZE button several times (5, 10, 15...minutes).
16 System settings
All settings explained in this section apply equally to all sources.
Open the menu and use the ▲ / ▼ buttons to select [System settings]. Press the OK button to open the system settings.
16.2 Equaliser
Press the MENU button and then select [System settings] > [Equaliser].
Alternatively: Press the EQ button (19) on the remote control.
Here you can make various equaliser settings to adjust the sound to your liking. You have the choice between:
Normal, Jazz, Rock, Classical, Pop and My EQ.
Use the ▲/▼ buttons to select an equaliser setting and press the OK button to accept the setting.
16.2.1 Set my EQ
Select [My EQ setting] and press the OK button.
Use the ▲ /▼ buttons to select either [Treble] to adjust the treble or [Bass] to adjust the bass. Then press the OK button.
You can now use the ▲ /▼ buttons to set a value between -14 and +14 dB. Press the OK button to accept the setting.
16.3 Audio stream quality
Depending on the internet speed, the audio stream quality of the internet radio stations can be adjusted (if available). The higher the quality, the higher the data transmission.
Press the MENU button and then select
[System settings] > [Audio stream quality].
Select a quality level and press the OK button to save.
16.4 Int ernet settings
Press the MENU button and then select
[System settings] > [Internet settings].
In this menu you will find some settings and information about the Internet connection.
16.4.1 Network wizard
Select [Network Wizard] to establish a WLAN connection. The network
wizard shows you all WLAN networks within range.
stations. Select the known Wi-Fi network with ▲/▼ and OK, select [Skip
WPS] and then enter the corresponding password using the keypad that appears. Then select the OK and press OK. If the
password is correct, a connection to this network will now be established. You
can recognise whether a connection exists by the signal bar in the status bar of the display.

To cancel the entry, select C N C E L press the OK button. If you have made a typing error, you can delete the last letter entered by pressing B K S P .
If you want to establish a WPS connection instead of entering the password, proceed as follows after selecting the WLAN network:

Please refer to your router's operating instructions to find out how to activate WPS on your router.
After selecting the WLAN network on the DIGITRADIO 550 IR, select [Press button]. Follow the instructions on the display.
Start WPS on your router by pressing the corresponding button.
If your router only supports the WPS PIN, select [PIN] on the DIGITRADIO 550 IR and make a note of the PIN shown on the display. You must then enter the PIN in the router.
16.4.2 WPS connection
Select [Internet settings > WPS setup] if your router has the WPS function. This establishes a direct connection to the router without having to enter the WLAN password.

Please refer to your router's operating instructions to find out how to activate WPS on your router.

Start WPS on your router by pressing the corresponding button. Follow the instructions on the display of the DIGITRADIO 550 IR.
16.4.3
Further information on the network connection

To display further information on the current connection, select [Show settings].

Select [Manual settings] if you know the parameters of your network and want to configure them manually. Follow the instructions on the display.

Select [Delete network profile] to delete WLAN connections that are no longer required.

Select [Delete network settings] to delete all current Internet settings.

Select [Allow WLAN connection in standby] if the WLAN connection should also be maintained in standby mode. This setting increases power consumption.
16.5
Time settings

Press the MENU button and then select [System settings] > [Time/date].

Select [Set time/date] to set the time and date manually.
Use the OK button to select a value. With the ▲ or ▼ buttons change it.

Confirm by pressing OK.

Select [Time update] to specify whether the time should be updated automatically via DAB+, FM or Internet or whether you want to enter it manually (no update).

To do this, select [Update from DAB+], [Update from FM], [Update from NET] or [No update].

Under the [Set format] option, you can activate the 12 or 24 hour format. Confirm your selection with the OK button.
Under [Set time zone], select the current time zone you are in and under [Summer time?], specify whether summer time should currently be active. This setting is only displayed if you have previously selected Update NET in the update settings. Update from NET in the update settings.
16.6 Language
Press the MENU button and then select [System settings] > [Language].
Use ▲ or ▼ to select one of the available menu languages and confirm your selection by pressing OK.
16.7 Factory setting
If you change the location of the device, e.g. if you move house, you may no longer be able to receive the saved channels. In this case, you can delete all saved channels by resetting to factory settings and then start a new channel search.
Press the MENU button and then select
[System settings] > [Factory settings].
Confirm by pressing OK.
Use ▲ or ▼ to select YES and confirm the security prompt by pressing OK.
All previously saved channels and settings will be deleted. After the reset, you can start the setup wizard (point 16.8).
16.8 Software Update
Software updates may be provided from time to time, which may contain improvements or bug fixes. The DIGITRADIO 550 IR is therefore always up to date.
Press the MENU button and then select
[System settings] > [SoLware update].
Select [Auto-Update] if you want the DIGITRADIO 550 IR to check periodically for new software versions.
Select [Search now] if you want to check now whether a newer Sokware version is available.
If a Sokware update is found, follow the instructions on the display.
To find and download software updates, the DIGITRADIO 550 IR must be connected to the Internet. Do not switch off the DIGITRADIO 550 IR during the update process!
16.9 Setup wizard
Press the MENU button and then select [System settings] > [Setup wizard].

The setup wizard starts automatically the first time you switch on the device. First select the language with ▲ /▼ and confirm your selection with OK.
As soon as [Execute now] appears on the display, select [YES] and confirm with OK.

If you select [No], the wizard will close and you will have to make the required settings manually.
You will now be guided through the settings step by step.
Under [Date/Time], select the desired display format for the time display (chapter 16.4) and press the OK button.
In the next step, you must select the source via which the time and date are to be synchronised (for more details, see chapter 16.4).

If you have selected [Update from Net], you must then specify the time zone and summer/winter time.
After the time and date settings, some network settings are now made.
Select whether the WLAN connection should also remain active in standby mode. Press the OK button.
Make sure that the device is in the reception area of the desired Wi-Fi network and that you have the access data. In some cases, it may be necessary to make some settings on the router. In this case, please consult the relevant operating instructions.

After a search of the available wireless networks, the result will be displayed.
Select the desired wireless network and confirm your selection with OK. Select Skip WPS to enter the password.

If it is a protected network, you will be asked to enter the corresponding access key.
To do this, select the corresponding character.
Then enter the selected character by pressing the OK button.

Continue in this way until the complete access key is visible in the input field.

To cancel the entry, select the field 🔊️ unless the OK button. If you have made a typing error, you can delete the last letter entered by pressing BKSP.
Then select OK press the OK button. If the password was correct, a connection to this network will now be established.
When [Setup wizard completed] appears on the display, press the OK button.

For more information on setting up a network connection, please refer to chapter "16.3 Internet settings" on page 30.
16.10 Info
Press the MENU button and then select [System settings] > [Info].
Confirm by pressing OK.
The Sokware versions are displayed.
16.11 Display illumination
You can set the display brightness for both operation and standby.
Press the MENU button and then select [System settings] > [Lighting].
Select [Operation] or [Standby] to make the brightness setting for operation or standby mode.
You can adjust the brightness in three steps.
Confirm the selection with OK.
Auto dimming
When the auto-dimming function is active, the display is set to the standby brightness value after the set time.
17 Cleaning

To avoid the risk of electric shock, do not clean the appliance with a wet cloth or under running water. Disconnect the mains plug before cleaning!

Do not use scouring pads, scouring powder or solvents such as alcohol or petrol.

Do not use any of the following substances: Saltwater, insecticide ammonia, chlorinated or acidic solvents (ammonia), scouring powder.

Clean the housing with a soft cloth moistened with water. Do not use solvents, spirits, thinners, etc.; they could damage the surface of the device.

Only clean the display with a soft cotton cloth. If necessary, use a cotton cloth with small amounts of non-alkaline, diluted water- or alcohol-based soapy water.

Rub the cotton cloth gently over the surface until it is completely dry.
18 Eliminate errors
If the device does not work as intended, check it using the following table.
| Symptom | Possible cause/remedy |
| Device cannot be switched on. | The device is not supplied with power. Connect the mains cable/power supply unit correctly to the socket. |
| No sound can be heard. | Increase the volume. |
| The display does not switch on. | Disconnect the appliance from the mains and reapply power. |
| Reception via DAB+/FM is poor. | Change the position of the antenna or the DIGITRADIO 550 IR. |
| Device cannot be operated. | Disconnect the appliance from the mains and reapply power. |
| No WLAN connection possible | Restart the WLAN wizard and check that the password has been entered correctly. |
| Device switches off automatically. | Depending on the playback mode, the device automatically switches to standby mode if there is no playback, the volume has been turned down and no operation has taken place for 15 minutes. The auto standby function may be active. |
| Poor Bluetooth connection and dropouts | Do not exceed the maximum range of 10m via Bluetooth. |
If you are still unable to rectify the fault after the checks described, please contact the technical hotline.
19 Technical data / manufacturer information
Technical changes and errors excepted.
| Operating modes | Internet radio/podcasts, DAB+, FM, Bluetooth, USB, AUX-IN. |
| Power supply | DC 9 V, 3 A via supplied external power supply unit |
| Display | 2.4" TFT |
| Frequencies | FM: 87.5 - 108 MHzDAB+: Band III 174 - 240 MHzBluetooth V5.2:2402 - 2480 MHzWIFI: 802.11 a/b/g/n2412 - 2472 MHz5150 - 5700 MHz |
| Transmission power (EIRP) | Bluetooth: 2 dBmWLAN: 19 dBm |
| Audio formats | MP3 |
| Power consumption | in operation max.: 27 Wstandby: < 1 WStandby with active network: < 2 W |
| Audio output power | 10 W (2x 5 W) RMS |
| Ambient conditions Operation | Temperature: 0 °C ~ 35 °CHatch humidity: 5 - 90 % relative hatch humidity (non-condensing) |
| Weight | ~ 1.1 kg |
| Dimensions (WxDxH) | 210 x 143 x 123 mm |
Technical data of the supplied power supply unit
| Manufacturer | TechniSat Digital GmbH, Julius-Saxler-Straße 3, D-54550 Daun |
| Model identifier | R241-0903000E |
| Input voltage | AC 100 - 240 V |
| Input alternating current frequency | 50/60 Hz |
| Output voltage | DC 9.0 V |
| Output current | 3,0 A |
| Output power | 27,0 W |
| Consistent efficiency in operation | 86,8 % |
| Efficiency at low load | 86,0 % |
| Power consumption at no load | 0,09 W |
20 Disposal instructions
The packaging of your appliance consists exclusively of recyclable materials. Please sort them accordingly and return them to the "Dual System". This product is labelled in accordance with Directive 2012/19/EU on waste electrical and electronic equipment (WEEE) and must not be disposed of with normal household waste at the end of its service life, but rather must be handed in at a collection point for the recycling of electrical and electronic equipment.
The symbol on the product, the instructions for use or the packaging indicates this.
The materials are recyclable according to their labelling. By reusing, material recycling or other forms of recycling old appliances, you are making an important contribution to protecting our environment.

Please ask your local authority for the responsible disposal centre. Ensure that empty batteries and electronic scrap are not disposed of with household waste, but disposed of properly (take back by specialist retailers, hazardous waste).

Important note on the disposal of batteries/rechargeable batteries:
Batteries/rechargeable batteries may contain toxic substances that are harmful to the environment and must be disposed of separately from the device. For the chemical composition, please refer to the technical data or the imprint on the battery.
It is therefore essential that you dispose of BaGeria/rechargeable batteries in accordance with the applicable legal regulations. Never dispose of batteries in normal household waste. You can dispose of used batteries free of charge at your specialist dealer or at special disposal centres.
For products with a battery compartment, you can remove the battery directly. If batteries are permanently installed, do not under any circumstances attempt to remove them yourself. In this case, contact the appropriate specialist personnel, e.g. a waste disposal company.
We hereby advise you to delete all personal data stored on the device on your own responsibility before disposing of the device.
Mode d'emploi
DIGITRADIO 550 IR
1 Illustrations
1.1 Vue de face

1.2 Vue arrière

P+ (station favorite)
P- (station favorite)
PRESET Favoris
1 Illustrations ....2
11.9 Dynamic Label Plus....23
11.9 Dynamic Label Plus
12.1 Activer le mode radio FM
▶▶▶ Lecture/pause.▶▶▶
Titre suivant.
16.8 Update software
- Operating instructions
- Illustrations
- Front view
- Rear view
- Remote control
- Table of contents
- Figures....2
- Table of contents 5
- Safety instructions ....8
- Legal information....11
- Description of the DIGITRADIO 550 IR ....13
- Preparing the DIGITRADIO 550 IR for operation....13
- General device functions....15
- Menu operation....18
- Internet radio and podcasts....18
- Playing music (USB media) 20
- Safety instructions
- Characters and symbols used
- Intended use
- The target group of these operating instructions
- Safe handling of the DIGITRADIO 550 IR
- WARNING!
- Dealing with BaUeries
- Legalinformation
- Service instructions
- The scope of delivery
- The special features of the DIGITRADIO 550 IR
- Preparing the DIGITRADIO 550 IR for operation
- Setting up the appliance
- i Notes:
- Aligning the antenna enne
- Connecting the power supply unit
- ATTENTION!
- Inserting batteries into the remote control
- Connecting the headphones
- ATTENTION: Hearing damage!
- Music playback from external devices
- General device functions
- Note on operating the device:
- Switch on the device
- Switch off the device
- Operating the device with the remote control
- Setting the volume
- Switch onmute
- Call up display screens
- Display indication
- Slideshow
- Menu operation
- Source selection
- Alternative:
- Internet radio and podcasts
- Channel list
- Add Internet radio stations to your favourites
- Selecting a favourite station
- Deleting a programme position memory
- Play music (USB media)
- Play media
- Repeat function
- DAB+ radio
- What is DAB+
- Switch on DAB+ radio reception
- Perform search run
- Manual search
- Call up channel list
- Save DAB+ favourite stations
- Play favourite stations
- Deleting a programme position memory
- Signal strength
- Dynamic Label Plus
- Set DRC
- Delete inactive stations
- FM radio
- Switch on FM radio mode
- FM reception with RDS information
- Set the transmission frequency manually
- Automatic search
- Set mono/stereo
- Saving FM stations
- Selecting the programmed stations
- Deleting a programme position memory
- Bluetooth Audio
- Activate Bluetooth mode
- Coupling
- Play music
- Audio input
- Advanced functions
- Sleep function
- Alarm clock
- Setting the alarm time
- Alarm clock
- Wake-up time
- Source
- Programme
- Duration
- Volume
- Save
- Switch off alarm clock after alarm
- Switch off the alarm clock
- Snooze function
- System settings
- Equaliser
- Set my EQ
- Audio stream quality
- Int ernet settings
- Network wizard
- WPS connection
- 16.4.3
- Further information on the network connection
- 16.5
- Time settings
- Language
- Factory setting
- Software Update
- Setup wizard
- Info
- Display illumination
- Auto dimming
- Cleaning
- Eliminate errors
- Technical data / manufacturer information
- Disposal instructions
- Mode d'emploi
- Vue de face
- Vue arrière
- Illustrations ....2
- Activer le mode radio FM
- Update software
Brand : TECHNISAT
Model : DIGITRADIO 550 IR
Category : Radio