
IK2164 - Cooker Pelgrim - Free user manual and instructions
Find the device manual for free IK2164 Pelgrim in PDF.

| Product type | Built-in induction hob |
| Brand | Pelgrim |
| Model | IK2164 |
| Number of cooking zones | 4 |
| Technology | Induction |
| Diameter front left and rear right zones | 240 mm (2.2 kW / 3.0 kW boost) |
| Diameter rear left zone | 145 mm (1.2 kW / 1.6 kW boost) |
| Diameter front right zone | 210 mm (1.5 kW / 2.0 kW boost) |
| Maximum total power | 7200 W (adjustable to 6000 / 3600 / 2800 W) |
| Power levels | 10 levels (0-9) + Boost (P) |
| Boost function | Maximum power for up to 10 minutes |
| Timer | Independent per zone, 0-99 minutes, automatic shut-off |
| Automatic preheating function | For levels 1 to 8 |
| Keep warm / reheat function | Yes, dedicated symbol |
| Child safety | Yes, control panel lock |
| Key lock | Yes, during use |
| Pan detection | Yes, with warning symbol |
| Overheating protection | Yes, thermal sensor per zone |
| Cooking time limiter | Yes, according to power level (max 10 h) |
| Power limiter | Yes, according to number of zones used |
| Surface type | Ceramic glass |
| Cleaning | Damp cloth + mild detergent; scraper for stubborn residues |
| Power supply | Electric, mains connection (see installation manual) |
| Energy consumption | 163.5 Wh/kg (model IK2164) |
Frequently Asked Questions - IK2164 Pelgrim
User questions about IK2164 Pelgrim
0 question about this device. Answer the ones you know or ask your own.
Ask a new question about this device
Download the instructions for your Cooker in PDF format for free! Find your manual IK2164 - Pelgrim and take your electronic device back in hand. On this page are published all the documents necessary for the use of your device. IK2164 by Pelgrim.
USER MANUAL IK2164 Pelgrim
Instructions for use
Induction hob
bar
| Position | Value | |---|---| | 1 | 5 | | 3 | 8 | | 22 | 8 | | 4 | 9 | The chart displays a single data point labeled '5' at position 1, with no other categories or trends visible. The label above it is '1-4'.IK2164____
Temperature safety 7
Cooking-time limiter 7
Power limiter 7
Before first use
Use of the touch keys 8
Induction noises 8
Appropriate pans 9
Pan detection 9
Power level setting 9
Cooking settings 10
Operation
Switching on and power setting 11
Boost function 11
Finish cooking 12
Pan detection symbol 12
Connecting bridge induction cooking zones 12
Timer control 13
Lock function 15
Child safety lock 15
Reheat function / Keep-warm function 16
Power limiter
17
Maintenance
Cleaning 18
Troubleshooting
General 19
Troubleshooting table 19
Technical specifications
Information according regulation (EU) 66/2014 21
Environmental aspects
Disposal of packaging and appliance 22
Introduction
Congratulations on your choice of this appliance. This product was designed with simple operation and optimum comfort in mind.
This manual describes the best way to use this appliance. In addition to information on operation, you will also find background information that may come in handy when using the appliance.

Please read the separate safety instructions carefully before using the appliance.
Read this manual before using the appliance and keep it in a safe place for future use.
This manual serves as reference material for the service department. Please, stick the appliance rating label in the rectangle on the back of the manual. The appliance rating label contains all the information that the service department will need in order to respond appropriately to your needs and questions.
The installation instructions are included separate.
Enjoy your cooking!
You can find the most recent version of the instructions for use on our website.
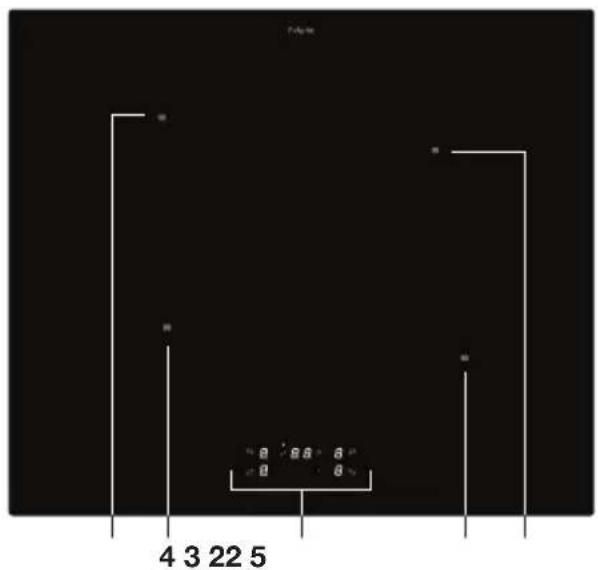
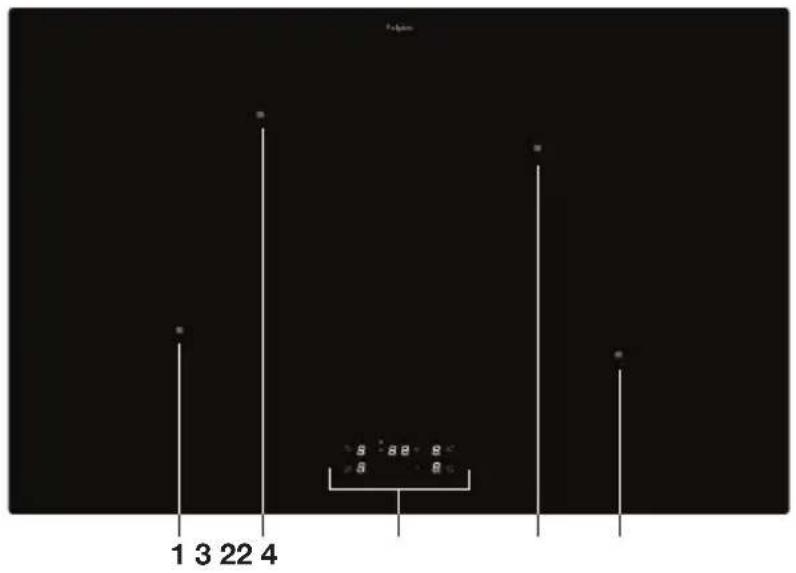
Description
IK2184____
bar
| Position | Value | |---|---| | 1 | 8.2 | | 3 | 8.0 | | 22 | 8.2 | | 4 | 8.0 |IK2164____

- Cooking zone ∅ 240 mm (2,2 kW / 3,0 kW boost)
- Cooking zone ∅ 145 mm (1,2 kW / 1,6 kW boost)
- Control panel
- Cooking zone ∅ 210 mm (1,5 kW / 2,0 kW boost)
- Cooking zone ∅ 210 mm (2,2 kW / 3,0 kW boost)
Control panel
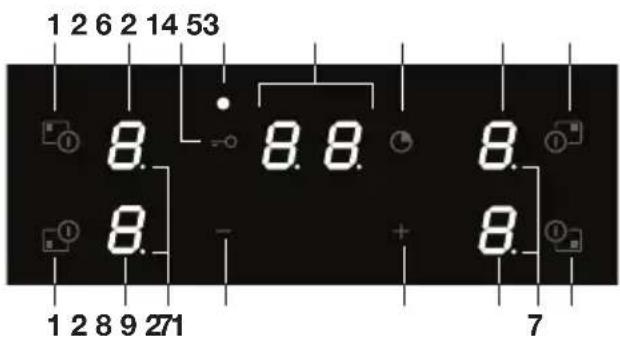
- On/off key cooking zone and selection key cooking zone
- Display cooking zone
- Lock key
- Indication locked control panel
- Timer display
- Timer key
- Active timer indication (the time of this cooking zone is shown in the timer display)
- Minus (-) key for power/timer
- Plus (+) key for power/timer
| Display Description | |
 | Power level of a cooking zone |
 | Boost |
 | Pan detection symbol |
 | Residual heat indicator |
 | Reheat symbol / Keep-warm symbol |
  | Timer has been set |
 | Power limitation active; the maximum power has been reached. |
  | FaultError code |

Before use, read the separate safety instructions first!
Temperature safety
A sensor continuously measures the temperature of certain parts of the hob. Every cooking zone is equipped with a sensor that measures the temperature of the bottom of the pan to avoid any risk of overheating when a pan boils dry. In case of temperatures rising too high, the power is reduced automatically or the hob switches off automatically.
Cooking-time limiter

The cooking-time limiter is a safety function of your cooking appliance. It will operate if you forget to switch off your hob. Depending on the cooking level you have chosen, the cooking time will be limited as follows:
| Cooking level Maximum operating time ( in hours) | |
| 1 | 10 |
| 2 | 5 |
| 3 | 5 |
| 4 | 4 |
| 5 | 3 |
| 6 | 2 |
| 7 | 2 |
| 8 | 2 |
| 9 | 1,5 |
| Keep warm | 2,5 |
| P (boost) 10 minutes | After 10 minutes, the power is reduced to setting 9. |
Power limiter

Cooking zones that are next to or behind each other influence each other. The maximum power that can be set depends on the number of zones that are used simultaneously. When the maximum setting is reached, an 'r' appears in the display of the cooking zone. Use the minus (-) key to reduce the power for the cooking zone in question. The fewer zones that are used, the higher the power to be set per cooking zone.
Use of the touch keys
Place the tip of your finger flat on a touch key to achieve the best results. You do not have to apply any pressure. The touch keys only react to the light pressure of a fingertip. Do not operate the controls with any other objects.
Induction noises
A ticking sound
- This is caused by the capacity limiter on the left and right zones. Ticking can also occur at lower cooking levels.
Pans are making noise
- Pans can make some noise during cooking. This is caused by the energy flowing from the hob to the saucepan. At high levels, this is perfectly normal for some pans. It will not damage either the pans or the hob.
The fan is making noise
- To enlarge the lifespan of the electronics, the appliance is equipped with a fan. If you use the appliance intense, the fan is activated to cool down the appliance and you will hear a buzzing sound. The fan runs on for several minutes after the hob has been switched Off.
Appropriate pans
Induction cooking requires a pan with a thick flat bottom (minimum 2.25 mm). Use pans made of magnetic material or pans with a sandwich bottom. Other pans provide a lower performance. Pans made of copper, aluminium or ceramic material are not appropriate.

Only use pans with a flat bottom. A hollow or rounded bottom can interfere with the operation of the empty cooking protection, causing the appliance to become too hot. This may lead to damages. Damage caused by using pans that are not appropriate or that boil dry is excluded from the guarantee.

Pans that have been used on a gas hob cannot be used on an induction hob.

Be careful with thin enamelled sheet-steel pans! The enamel may become damaged at high settings if the pan is too dry. High power level settings may cause the bottom of the pan to warp.
Minimum pan diameter
- The diameter of the bottom of the pan must be at least:
90 mm for a cooking zone 145 mm.
110 mm for a cooking zone 210 mm.
130 mm for a cooking zone 240 mm.
- You will achieve the best results by using a pan with the same diameter as the zone. If a pan is too small the cooking zone will not work.

Attention
Grains of sand may cause scratches which cannot be removed. Only put pans with a clean bottom on the hob. We recommend that you lift pans and not slide them over the hob.
Pan detection
- If the hob does not detect a (ferrous) pan after a power level has been set, the pan detection symbol flashes in the display. After 1 minute the cooking zone switches off.
- If you remove a pan from the cooking zone during cooking, the pan detection symbol shows. The symbol will disappear if you replace the pan within 1 minute; the cooking zone switches on again with the previously set power level. If it takes longer than 1 minute, the cooking zone switches off.
Power level setting
The cooking zones have 10 power levels (0-9) and a ‘boost’ level (P). Set the power by touching the selection key of a cooking zone. Use the minus (-) key and the plus (+) key to set the power or change the setting.
Boost function
You can use the boost function to cook at the highest power level during a short period of time (max. 10 minutes). After 10 minutes, the power is reduced to setting 9.
Cooking settings
Because the settings depend on the quantity and composition of the contents of the pan, the table below is intended as a guideline only.
Use setting 'boost' to:
- bring the food or liquid to the boil quickly;
Use setting 9 to:
- sear meats;
- cook fish;
- cook omelettes;
- fry boiled potatoes;
- deep fry foods.
Use setting 7 and 8 to:
- fry thick pancakes;
- fry thick slices of breaded meat;
- fry bacon (fat);
- cook raw potatoes;
• make French toast; - fry breaded fish;
• cook through pasta; - fry thin slices of (breaded) meat.
Use setting 4-6 to:
• complete the cooking of large quantities;
• defrost hard vegetables;
- fry thick slices of breaded meat.
Use settings 1-3 to:
- simmer bouillon;
- stew meats;
- simmer vegetables;
- melt chocolate;
- poach;
- melt cheese.

Please read the chapter ‘Before first use’ very carefully before you start cooking. This prevents incorrect use of the hob.
Switching on and power setting

The child lock is active after the hob is switched on for the first time or after a long power failure. If necessary, switch off the child lock first.

Make sure the bottom of the pan and the surface of the cooking zone are clean and dry.
- Place a pan in the middle of a cooking zone.
- Touch the on/off key of the cooking zone until you hear an audio signal.
On the cooking zone display a '0' appears.
- As long as the power is brightly lit, touch the minus (-) key or the plus (+) key to set the desired setting.
The cooking zone starts automatically at the level that has been set.
Set a higher or lower power by selecting the cooking zone with the selection key and using the minus (-) key or the plus (+) key.

The hob switches off if no setting is made or a function is selected within 10 seconds.

If only one cooking zone is in operation, then adjustments to the power level can be made directly with the minus (-) key or the plus (+) key. If multiple cooking zones are in operation, then the cooking zone must first be selected before adjustments to the power level can be made. The display of the selected cooking zone is the brightest.
Boost function
You can use the boost function to cook for max. 5 minutes at the highest cooking level.
- Touch the selection key of the desired cooking zone.
- Touch the plus (+) key several times to select the boost setting (P).
▷'P' shows on the display.
▶After 10 minutes, the power is reduced to setting 9.

Touch the selection key of the desired cooking zone and touch the minus (-) key to stop the boost function prematurely.

Select the cooking zone and simultaneously touch the minus (-) key and the plus (+) key to immediately set the power to '0'.
Finish cooking
- Touch the selection key of the desired cooking zone.
- Set the power level to '0' to switch off the cooking zone or switch off the cooking zone by touching the on/off key until you hear an audio signal.

Symbol H will appear in the display of the cooking zone which is too hot to touch. The symbol disappears when the surface has cooled down to a safe temperature. It can also be used as an energy saving function; if you want to heat other pans, use the cooking zone that is still hot.

Touch andhold a selection key of an active cooking zone for 6 seconds to switch off all active cooking zones at once. You can also touch 2 selection keys at the same time until you hear an audible signal; all cooking zones switch off.
Pan detection symbol
When the pan detection symbol blinks on the display:
- you have not placed a pan on the correct cooking zone;
- the pan you're using is not suitable for induction cooking;
- the pan is too small or not properly centred on the cooking zone.
The cooking zone does not work until a suitable pan is placed on the cooking zone.
Switch on the automatic heat-up function
This function sets the cooking zone at the highest level in order to bring your pan rapidly up to the required temperature. After a given time interval, the power level returns to the established level. This function is available for power level 1 to 8.
| Power level Heat-up time(minutes:seconds) |
| 1 0:40 5 4:20 |
| 2 1:10 6 7:10 |
| 3 2:00 7 2:00 |
| 4 3:00 8 3:15 |
| Power level | Heat-up time(minutes:seconds) |
- Touch the on/off key of the cooking zone until you hear an audio signal.
On the cooking zone display a '0' appears.
- Touch the minus (-) key twice.
An 'A' appears in the display.
- Set the desired power level with the minus (-) key or the plus (+) key (from 1 to 8).
An ‘A’ appears in the display alternating with the selected power level; the automatic heat-up function is switched on.
When the automatic heat-up time has expired, an audible signal sounds and the cooking zone will switch automatically to the selected level which will show permanently on the display.
If the power level is set too late, level '9' will appear in the display and the automatic heating function will not be active. Switch off the cooking zone and follow the described steps again.
- Stop the automatic heating function early by switching off the cooking zone.
Timer control
The cooking timer is connected to an active cooking zone. After the set time has elapsed, the cooking zone switches off automatically.
- Select the cooking zone for which you want to set the timer by touching the cooking zone selection key.
- Touch the timer key.
▶ 't' appears in the display of the cooking zone and '00' appears in the timer display.
- Set a time using the minus (-) key or the plus (+) key of the timer (from 0 to 99 minutes).
As long as 't' is shown on the display, you can still adjust the time.
▶When the time is set, it will begin to countdown immediately.
The remaining time of the cooking zone is shown in the timer display with an illuminated dot. When using multiple timers at the same time, the time of the timer that runs out first is displayed.
The power and 't' will appear alternately in the display of a cooking zone that is linked to the timer.
The cooking zone will switch off automatically after the set time has passed. An audible signal sounds and 't' flashes in the display.
- Switch off the audible signal by touching the selection key of the relevant cooking zone.

If only one cooking zone is in operation, adjustments can be made directly to the timer time. Touch the timer key and use the minus (-) key or the plus (+) key. If multiple cooking zones are in operation, the cooking zone must first be selected before adjustments can be made to the timer time. Then touch the timer key and use the minus (-) key or the plus (+) key. The display of the selected cooking zone is the brightest.

Set the time to '00' to switch off the cooking timer before the time has passed.

Briefly touch the minus (-) key or the plus (+) key to shorten or lengthen in 1-minute increments.
OPERATION
Touch and hold the minus (-) key or the plus (+) key to quickly shorten or lengthen the time.
Touch the minus (-) key once, when the time is set to '00', to set the time to '99'.
Simultaneously touch the minus (-) and plus (+) key of the timer to set the time to '00'.
Changing the preset cooking time
The cooking time can be changed anytime during the operation.
- Select the cooking zone for which you want to change the timer by touching the cooking zone selection key.
- Touch the timer key.
The time is flashing.
If the time is not modified within 5 seconds since touching the timer key, the timer is keeping the countdown before the adjusting operation.
- Touch the minus (-) key or the plus (+) key of the timer to change the cooking time.
Checking the remaining cooking time
When using multiple timers at the same time, the time of the timer that runs out first is displayed.
The power and 't' will appear alternately in the display of a cooking zone that is connected to the timer.
A point next to the power level indicates that of this cooking zone the time of the set timer is shown.
- Select the cooking zone for which you want to check the timer by touching the cooking zone selection key.
The remaining cooking time is visible in the timer display.
Switching off the timer prematurely
If you want to switch off the timer prior the end of preset time:
- Select the cooking zone for which you want to switch off the timer by touching the cooking zone selection key.
- Touch the timer key.
- Simultaneously touch and hold the minus (-) key and the plus (+) key of the timer to set the time to '00'.
The timer is switched off.
Lock function
By activating the lock function, you can lock the keys while using the hob. Only the off keys and the lock key will be active.
The hob is switched on and in operation.
- Touch and hold the lock key for approximately 2 seconds.
▶You will hear an audible signal.
The control panel lock indicator light will light up for 3 seconds.
When a key is touched, you will hear a beep and the control panel lock indicator light will light up briefly.
The lock function is activated.
- Touch and hold the lock key again for approximately 2 seconds to deactivate the lock function.
‘L’ disappears in the displays. You will hear an audible signal.
The indicator light will go out.
The lock function is deactivated.
Child safety lock
Use this function to prevent the hob from being switched on unintentionally.
The hob is switched off.
- Touch and hold the lock key for approximately 2 seconds.
▶You will hear an audible signal.
The control panel lock indicator light will light up for 3 seconds.
The child safety lock is activated.
- When you switch on the hob again, the child safety lock is active.
▶ You will hear a beep and the control panel lock indicator light will light up briefly.
- Touch and hold the lock key for approximately 2 seconds
▶You will hear an audible signal.
▶The indicator light will go off.
The child safety lock is deactivated.

The child lock is active after the hob is switched on for the first time or after a long power failure.
Reheat function / Keep-warm function
Use this function to reheat food or keep it warm after cooking.
Reheat function
- Place the pan with the cold food on a cooking zone.
-
Touch the on/off key of the cooking zone until you hear an audio signal.
On the cooking zone display a '0' appears. -
Touch the minus (-) key once.
The reheat symbol is shown on the display.
The food is being heated. -
Use the plus (+) key to set the power level to '0' to switch off the reheat function or switch off the cooking zone by touching the on/off key until you hear an audible signal.
Keep-warm function
The food is ready and the pan is still on an active cooking zone.
- First set the power of the cooking zone in question to '0'.
-
Then touch the minus (-) key once.
The keep-warm symbol is shown on the display.
The food is being kept warm. -
Use the plus (+) key to set the power level to '0' to switch off the keep-warm function or switch off the cooking zone by touching the on/off key until you hear an audible signal.

Setting the power limiter should only be carried out by a registered and qualified installer. Please read the safety regulations and the installation instructions carefully.
The limiter is set at 7200W by the factory, but it is possible to change it to 6000 W / 3600 W / 2800 W.

The hob must be switched off and unlocked.
Perform, within 30 seconds after reconnecting the hob to the power supply, the following steps.
-
Touch the selection keys of the left and right front cooking zones at the same time. The current setting appears in the displays. You will hear a beep.
-
Touch the minus (-) key or the plus (+) key to change the power. The selected setting appears in the displays.
-
Touch the selection key of the front left cooking zone and the front right cooking zone simultaneously again to confirm the setting. ▶The selected setting is saved. ▶The system is reset.

If the newly selected setting is not confirmed, the system is reset after 1 minute and the old setting is saved.
Cleaning
Daily cleaning
- We recommend that you clean the appliance after each use. This will prevent food that has boiled over from damaging the glass plate.
- Best for daily cleaning is a damp cloth with a mild cleaning agent.
- Dry with kitchen paper or a dry towel.
Heavily soiled glass
- Remove food residues, burnt fat, sugar or stubborn stains from the hob immediately with a scraper, even if the hob is still hot! Sugar and/or other food residues can permanently damage the glass ceramic surface.
- After removing stubborn stains from the glass, carry out the daily cleaning steps to clean the hob.
- If the cleaning result is not satisfactory, you can repeat the above cleaning steps as often as necessary.
Stubborn stains
- Remove water marks and lime scale with vinegar.
- Metal marks (caused by sliding pans) can be difficult to remove. Special agents are available.

Never use
- Never use abrasives. They leave scratches in which dirt and lime scale can accumulate.
- Never use anything sharp such as steel wool or scourers.
General
If you notice a crack in the glass top (however small), switch the hob off immediately, unplug the hob or turn off the (automatic) fuse switch(es) in the meter cupboard or. In the event of a permanent connection, set the switch in the power supply lead to zero. Contact the service department.
Troubleshooting table
If the appliance does not work properly, this does not always mean that it is defective.
Try to deal with the problem yourself first by checking the points mentioned below or check for more information the website.
| Symptom Possible cause Solution | ||
| The display lights up when the hob is activated for the first time. | This is the standard set-up routine. | Normal operation. |
| The fan runs on for several minutes after the hob has been switched off. | The hob is cooling. Normal operation. | |
| A slight smell is noticeable the first few times the hob is used. | The new appliance is heating up. | This is normal and will disappear once it has been used a few times. Ventilate the kitchen. |
| The pans make a noise while cooking. | This is caused by the energy flowing from the hob to the saucepan. | At high settings this is perfectly normal for some pans. It will not damage either the pans or the hob. |
| You have switched on a cooking zone, but the display shows ↙. | The pan you are using is not suitable for induction cooking, or has a diameter that is too small. | Use a suitable pan. |
| There is no suitable pan on the cooking zone. | ||
| A cooking zone suddenly stops working and you hear a signal. | The preset time has ended. Normal operation. | |
| The hob is not working and nothing appears in the display. | There is no power supply due to a defective cable or a faulty connection. | Check the fuses or the electric switch (if there is no plug). |
| A fuse blows as soon as the hob is switched on. | The hob has been wrongly connected. | Have the electrical connection checked. |
| The control panel lock indicator light is on. | Lock function/child safety lock is activated. | Deactivate the lock function/ child safety lock. |
| The controls react badly. There may be a thin layer of water on the hob or on a finger that makes the controls unresponsive. | Make sure the hob and/or finger is clean. | |
| The display shows the power and c alternately. | The appliance is overheated. When the appliance has cooled down sufficiently, the message will disappear and the cooking will continue. If the o is still there, contact the service department. | |
| The display shows -. There is an object or liquid on the keys of the control panel. | Make sure the keys are clean. | |
| One or more keys pressed for too long. | ||
Error codes
First step when an error code appears: Reset the device (disconnect the device from the power supply for a while). If this does not solve the problem, contact the service department.
| Zone related error | |||
| F/8 | Temperature of the zone cannot be measured. | NtC coil defective, generator defective. | 1. Replace the induction coil.2. Replace the induction generator. |
| F/1 | Temperature sensor of the zone is short-circuited. | Sensor defective. | |
| F/2 | Temperature sensor of the zone is not connected. | Sensor defective, not connected. | 1. Check sensor connection(s).2. Replace the induction coil.3. Replace the induction generator. |
| F/7 | The coil does not measure a temperature change. | Internal connection of the coil swapped. | 1. Check induction coil with temperature sensor connection.2. Replace the induction coil.3. Replace the induction generator. |
| Internal generator error | |||
| F/6 | One side is not receiving power. | Connection error.. Check | the connection. |
| F/J | Power supply voltage too high. | ||
| F/3 | Generator temperature sensor has a short circuit. | Internal error. | Reset the device (disconnect the device from the power supply for a while). If this does not solve the problem, contact the service department. |
| F/4 | Generator temperature sensor is defective / open. | ||
| F/9 | Cooling fan is not running. Fan blocked. | ||
For all other error codes (F/*): unplug the appliance when 'F0' appears on the display. Plug the appliance back in after 2 minutes and switch it on. If the error code is still there, contact the service department.
Information according regulation (EU) 66/2014
Measurements according EN60350-2
| Model identification IK2164 | --- | IK2184--- |
| Type of hob Induction hob Induction hob | ||
| Number of electric cooking zones and/or areas 4 4 | ||
| Heating technology | Induction cooking zones and cooking areas | Induction cooking zones and cooking areas |
| For circular electric cooking zones: diameter of useful surface area per electric heated cooking zone in mm | 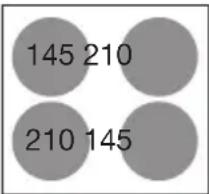 | 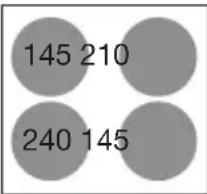 |
| Energy consumption per cooking zone or area calculated per kg (ECelectric hob) in Wh/kg |  |  |
| Energy consumption for the hob calculated per kg (ECelectric hob) in Wh/kg | 163,5 158,7 |
Disposal of packaging and appliance
In the manufacturing of this appliance durable materials were used. Make sure to dispose of this equipment responsibly at the end of its lifecycle. Ask the authorities for more information regarding this.
The appliance packaging is recyclable. The following may have been used:
- cardboard;
• polythene film (PE);
• CFC-free polystyrene (PS hard foam).
Dispose of these materials in a responsible manner and in accordance with government regulations.

As a reminder of the need to dispose of household appliances separately, the product is marked with the symbol of a crossed-out wheeled dustbin. This means that at the end of its working life, the product must not be disposed of as urban waste. It must be taken to a special local authority differentiated waste collection centre or to a dealer providing this service.
Disposing of a household appliance separately avoids possible negative consequences for the environment and health deriving from inappropriate disposal and enables the constituent materials to be recovered to obtain significant savings in energy and resources.
Declaration of conformity
CE We declare that our products meet the applicable European Directives, Decisions and Regulations and the requirements listed in the standards referenced.

The appliance identification card is located on the bottom of the appliance.
Stick the appliance identification card here.
When contacting the service department, have the complete type number to hand.
You will find the addresses and phone numbers of the service organisation on the
guarantee card.
www.pelgrim.nl
www.pelgrim.be

935922
Pelgrim

- Introduction
- Please read the separate safety instructions carefully before using the appliance.
- Description
- Before use, read the separate safety instructions first!
- Temperature safety
- Cooking-time limiter
- Power limiter
- Use of the touch keys
- Induction noises
- A ticking sound
- Pans are making noise
- The fan is making noise
- Appropriate pans
- Minimum pan diameter
- Attention
- Pan detection
- Power level setting
- Boost function
- Cooking settings
- Use setting 'boost' to:
- Use setting 9 to:
- Use setting 7 and 8 to:
- Use setting 4-6 to:
- Use settings 1-3 to:
- Switching on and power setting
- Finish cooking
- Pan detection symbol
- Switch on the automatic heat-up function
- Timer control
- OPERATION
- Changing the preset cooking time
- Checking the remaining cooking time
- Switching off the timer prematurely
- Lock function
- Child safety lock
- Reheat function / Keep-warm function
- Reheat function
- Keep-warm function
- Cleaning
- Daily cleaning
- Heavily soiled glass
- Stubborn stains
- Never use
- General
- Troubleshooting table
- Error codes
- Information according regulation (EU) 66/2014
- Disposal of packaging and appliance
- Declaration of conformity
Brand : Pelgrim
Model : IK2164
Category : Cooker