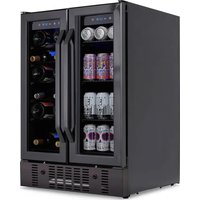
NWB076BS00 - Refrigerator NewAir - Free user manual and instructions
Find the device manual for free NWB076BS00 NewAir in PDF.


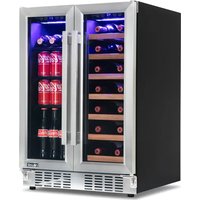
| Product Type | French Door Wine and Beverage Refrigerator |
| Model | NWB076BS00 |
| Brand | NewAir |
| Capacity | 18 bottles and 58 cans (4.1 cu ft) |
| Temperature Range | 36 to 72 °F (2 to 22 °C) |
| Dimensions (D x W x H) | 23.43 in x 22.4 in x 34.25 in (59.5 x 56.9 x 87 cm) |
| Power Supply | 110-120 V ~ 60 Hz, 0.9 A |
| Power Consumption | 100 W |
| Refrigerant | R600a (0.85 oz) |
| Control Panel | Digital with LED display, two adjustment zones |
| Interior Lighting | LED, separate switch |
| Door Lock | Yes, with key lock |
| Shelves | Flat and curved shelves, removable |
| Humidity Tray | Yes, to maintain cork humidity |
| Adjustable Feet | Yes, at the front |
| Installation | Built-in or freestanding, clearance required |
| Cleaning | Warm water and mild detergent, do not use abrasives |
| Safety | Instructions: do not let children play, risk of entrapment |
| Warranty | 1-year limited manufacturer warranty |
| Customer Service | Phone 1 855 963-9247, email support@newair.com |
Frequently Asked Questions - NWB076BS00 NewAir
User questions about NWB076BS00 NewAir
0 question about this device. Answer the ones you know or ask your own.
Ask a new question about this device
Download the instructions for your Refrigerator in PDF format for free! Find your manual NWB076BS00 - NewAir and take your electronic device back in hand. On this page are published all the documents necessary for the use of your device. NWB076BS00 by NewAir.
USER MANUAL NWB076BS00 NewAir
24" French Door Wine and Beverage Fridge
A Name You Can Trust
Trust should be earned and we will earn yours. Customer happiness is the focus of our business.
From the factory to the warehouse, from the sales floor to your home, the whole Newair family promises to provide you with innovative products, exceptional service, and support when you need it the most.
Count on Newair
As a proud Newair owner, welcome to our family. There are no robots here, real people shipped your product and real people are here to help you.
Contact Us
Please reach out to our customer service team before making a return to your store of purchase. We are happy to help with any questions or concerns!
Mon-Fri from 8-4 PST at:
Call: 1-855-963-9247
Email: support@newair.com
Online: www.newair.com
A team member will respond to you within 24 hours.
Follow Us

Facebook.com/newairusa

Instagram.com/newairusa

YouTube.com/newairusa

Twitter.com/newairusa
READ AND SAVE THESE INSTRUCTIONS
TABLE OF CONTENTS
Specifications 5
Register Your Product Online....6
Safety Information & Warnings 7
Parts List....8
Assembly & Installation 9
Initial Setup 9
Installation 9
Positioning Your Wine and Beverage Cooler 10
Handle Installation....10
Operating Instructions 11
Setting The Temperature 11
Storing Wine 12
Door Lock 12
Shelves 12
How To Use Your Moisture Tray....13
Cleaning & Maintenance....14
Usage & Storage Tips 15
Troubleshooting....17
Limited Manufacturer's Warranty 18
SPECIFICATIONS
| MODEL NO. | NWB076BS00 |
| VOLTAGE: | 110-120 Volts |
| CURRENT: | 0.9 Amps |
| REFRIGERANT: | R600a (0.85oz) |
| FREQUENCY: | 60Hz |
| PRODUCT DIMENSIONS: | 23.43"W x 22.4"D x 34.25"H |
| POWER CONSUMPTION: | 100 Watts |
| STORAGE CAPACITY: | 18 Bottles & 58 Cans (4.1 cu. Ft.) |
| TEMPERATURE RANGE: | 36-72° F |
REGISTER YOUR PRODUCT ONLINE
Register Your Newair Product Online Today!
Take advantage of all the benefits product registration has to offer:

Service and Support
Diagnose troubleshooting and service issues faster and more accurately

Recall Notifications
Stay up to date for safety, system updates and recall notifications

Special Promotions
Opt-in for Newair promotions and offers
Registering your product information online is safe & secure and takes less than 2 minutes to complete:
newair.com/register
Alternatively, we recommend you attach a copy of your sales receipt below and record the following information, located on the manufacturer's nameplate on the rear of the unit. You will need this information if it becomes necessary to contact the manufacturer for service inquiries.
Date of Purchase: ____
Serial Number: ____
Model Number: ____
SAFETY INFORMATION & WARNINGS

Before Using Your Wine and Beverage Cooler for the First Time:
Carefully read all instructions before using this wine and beverage cooler for the first time. Also make sure the wine and beverage cooler stays in an upright position during transportation. After removing the appliance from its packaging, make sure it is in good condition, and let the fridge stand for 24 hours before connecting to power, to allow refrigerant to settle. If there are any issues with the wine and beverage cooler, please contact us immediately.
- Place the appliance on a level floor surface that will be strong enough to support it when it is at full capacity. To level the wine and beverage cooler adjust the leveling feet located at the bottom of the appliance.
- Do not use this wine and beverage cooler in applications for which it is not intended. Damage that occurs from improper use or from unauthorized repairs will void the warranty.
- For proper air circulation, please maintain a 2-inch minimum clearance in between the back of the wine and beverage cooler and the wall.
- Do not operate this wine and beverage cooler in excessively moist or humid environments.
- Keep the wine and beverage cooler away from direct sunlight.
- Keep the wine and beverage cooler away from hazardous materials or combustible/flammable substances.
CAUTION:
- This wine and beverage cooler is designed for built-in or freestanding applications.
DANGER: RISK OF CHILD ENTRAPMENT:
An empty wine and beverage cooler can be dangerous to children. Remove any latches, lids, locks, and/or doors from unused or discarded appliances to prevent child entrapment and suffocation. Never allow children to operate, play with or crawl inside this appliance.
PARTS LIST
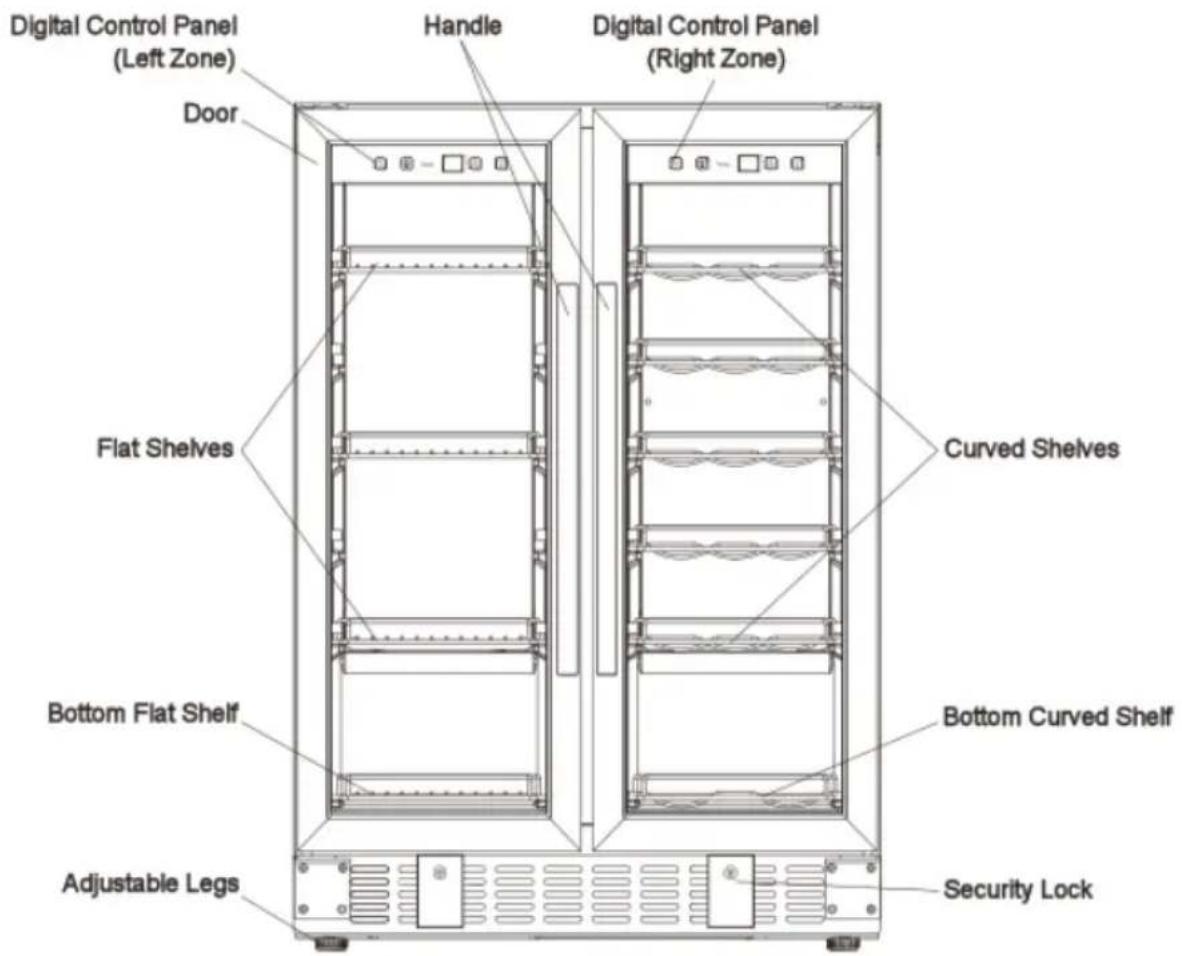
INITIAL SETUP
Remove exterior and interior packing materials and let the fridge stand for 24 hours before connecting to power, to allow refrigerant to settle. Once it is plugged in, let it run for at least 30 minutes before stocking. Do not change the temperature or adjust any settings during this time.
INSTALLATION
- Use two or more people to move and install the appliance. Failure to do so can result in back or other injury.
- Place your appliance on a floor that is strong enough to support it when it is fully loaded.
- Choose a well-ventilated area with temperatures above 60° F and below 90° F.
- This appliance is designed for built-in, recessed or free-standing installation.
- For built-in installation, leave a 1/4" (6.35mm) space on each side and at the top of the appliance to ensure proper air circulation to cool the compressor and condenser.
- For freestanding installation, leave the proper clearance around the appliance. Below are the recommended clearances: Side: 3/4" (19mm); Top: 4" (100mm); Back: 2" (50mm)
- Even for built-in installation, you must keep space on each side and at the top. If you plan to use the unit for a built-in application, please leave at least 0.25 in of space on all sides.
- The appliance must be installed with all electrical, water and drain connections in accordance with state and local codes.
- Make certain that the pipes are not pinched, kinked or damaged during installation. Check for leaks after connection.
NOTE:
Designed for indoor, home use only. The appliance should not be located next to sources of high heat or in direct sunlight. Do not store or install the appliance outdoors, in a garage, basement or in moist areas. Don't install in a location where the temperature will fall below 60°F. For best performance and to ensure proper ventilation, do not install the appliance behind a cabinet door or block the base grille.
POSITIONING YOUR WINE AND BEVERAGE COOLER
- It is important for the appliance to be leveled in order to work properly. You may need to make several adjustments to level it.
• To level your appliance, adjust the front legs at the bottom of the appliance. - When positioning the appliance, ensure that there is at least a 1/4-inch clearance at the sides and a 1-inch clearance at the back of the cooler as this is the main outlet for heat. This will allow for adequate ventilation.
HANDLE INSTALLATION
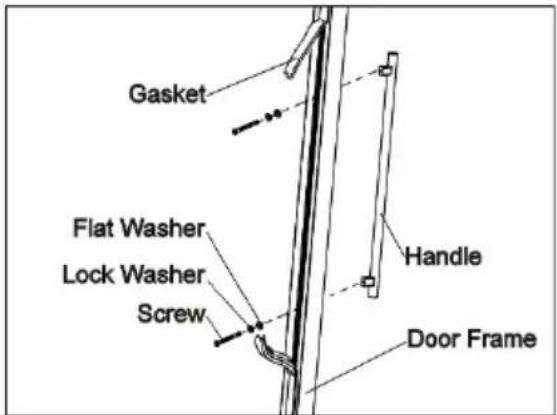
- Pull away the door gasket in the area where the handle is to be installed. The gasket is easily removed by hand, no tools are necessary.
- Insert the two (2) Phillips head screws with the lock washers and flat washers through the gasket side of the door frame until the screws pass through the door frame. Follow the sequence shown in the figure.
- Align the handle with the screws installed in the above step. Tighten the screws using a Phillips head screwdriver until the handles secure tightly against the door frame. (Do NOT over tighten) Replace the gasket.
OPERATING INSTRUCTIONS
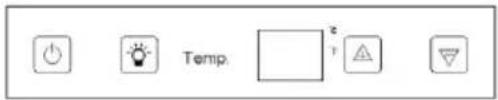
LEFT ZONE PANEL
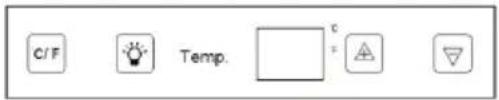
RIGHT ZONE PANEL
| Power |  | Powers on/off the appliance. To turn off the appliance, touch the mark and hold 5 seconds. |
| Light |  | To control the interior light to turn on/off. |
| Up |  | Used to increase the corresponding zone set temperature by 1°C or 1°F. |
| Down |  | Used to decrease the corresponding zone set temperature by 1°C or 1°F. |
| °C/°F Selector | Selects the temperature display setting to display in Fahrenheit or Celsius. | |
SETTING THE TEMPERATURE
- The left zone temperature can be set between 36° and 72° F, and the right zone temperature can be set between 36° and 72° F.
- The temperature will increase by 1° C or 1° F if you touch UP once, or the temperature will decrease by 1° C or 1° F you touch DOWN once.
- To view the set temperature at any time, touch the UP or DOWN marks. The set temperature will temporarily flash in the LED display for 5 seconds.
- The internal storage temperature will appear in blue on the temperature display window.
NOTE:
If the unit is unplugged, turned off, or power is lost, you must wait 3 to 5 minutes before restarting the unit. If you attempt to restart before this time delay the unit will not start. When you use the unit for the first time or restart the unit after having been shut off for a long time, there could be a few degrees variance between the temperature you select and the one indicated on the LED readout. This is normal and it is due to the length of the activation time. Once the unit is running for a few hours everything will normalize.
STORING WINE
Many bottles may differ in size and dimensions. The actual number of bottles you are able to store may vary. You can place 18 standard bottles in each zone (or 60 12oz-cans in the beverage zone). Bottle capacities are approximate maximums when storing traditional Bordeaux 750ML bottles and include bulk storage.
DOOR LOCK
Your unit is provided with a lock and key combination. The keys are located inside the plastic bag that contains the owner's manual. Insert the key into the lock and turn it counter clockwise to unlock the door. To lock the door, do the reverse operation while making sure the metal pin is engaged completely. Remove the key and place it in a secure place for safekeeping.
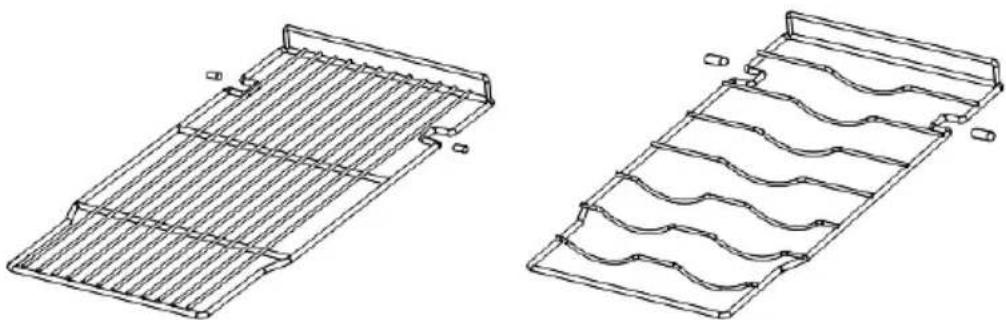
SHELVES
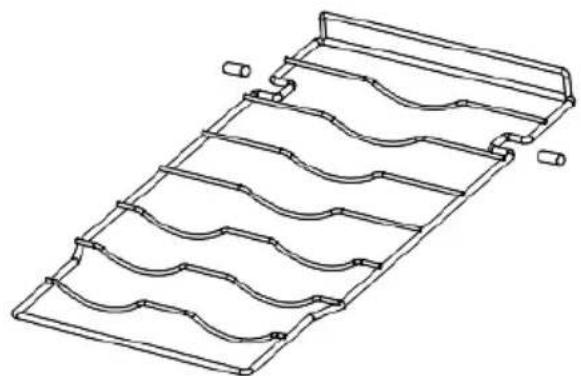
To prevent damaging the door gasket, make sure to have the door completely opened when pulling the shelves out of the rail compartment.
- For easy access to the storage content, you must pull the shelf out of the rail compartment; however this unit was designed with a plastic post on each side of the shelf track to prevent bottles from falling.
- When removing the shelf out of the inner rail, make sure to remove all items first. Then move the shelf to the position where the notch of the shelf is exactly under the plastic post and lift the shelf. In order to replace the shelf, repeat these directions in reverse.
- To ensure maximum performance and efficiency, be sure to place your wine and beverage cooler in an area where there is proper air circulation. Also make sure the plumbing and electrical connections are correct.
- For proper internal air circulation, do not overfill your wine and beverage cooler.
- Do not place the unit in direct sunlight.
- Do not place heated beverages in your wine and beverage cooler.
- Do not store perishable food in your wine and beverage cooler. The unit's interior temperature may not be low enough to prevent spoilage.
- Do not place heavy objects on top of the wine and beverage cooler.
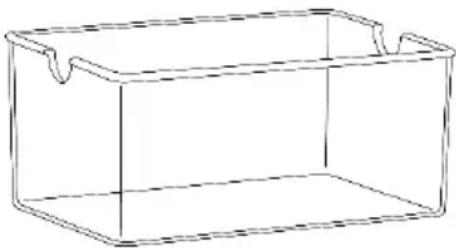
HOW TO USE YOUR MOISTURE TRAY
Your unit comes with a small water tray to help moisturize corks and or wooden shelves so they don't dry out. Fill the tray halfway and place it on the middle shelf— horizontally and towards the back —so moisture is evenly distributed throughout the inside of the cabinet. Refill the tray when it is a quarter of the way empty and exercise caution when removing or restocking bottles so water does not spill out.
CLEANING & MAINTENANCE
- Shut off the power supply before cleaning the unit's cabinet.
- Remove all cans and storage shelves.
- Clean the unit's interior with a warm water and neutral detergent solution.
• Thoroughly dry all surfaces.
Please Note:
- Do not use abrasive cleaners to clean the wine and beverage cooler.
- Use mild, soapy water to clean the unit's door seal.
- To ensure efficient operation, also thoroughly clean the back and bottom of the wine and beverage cooler.
USAGE & STORAGE TIPS
- Only pull out one shelf at a time. Never attempt to pull more than one.
- Disperse the bottles evenly to avoid concentrating weight in one place. Bottles must not touch the back of the cabinet.
- You can increase your wine fridge's storage capacity by removing shelves and stacking bottles on top of one another. Do not stack more than 3 rows of bottles per shelf.
- The ideal temperature for long-term or short-term wine storage is around 55° F ( 13° C), but this can vary from wine to wine. Wine should never be kept below 25° F (-4°C), which can cause wine to freeze, or above 68° F ( 20° C), which can accelerate the aging process and destroy volatile compounds.
- Keep your wine in the dark as much as possible. UV rays from direct sunlight can damage wine's flavors and aromas. You should also keep wines away from sources of vibration, they can disturb sediments in the bottle, disrupting the delicate process that causes wines to age favorably.
- At lower humidity levels, your corks can dry out, leaving the wine vulnerable to the effects of oxygen, while higher humidity can cause labels to peel off the bottles, making them difficult to display or sell. In general, your wine cellar humidity should be between 60 and 68 percent.
- The key to extending the shelf life of an open wine and retain its original qualities is to recork it promptly and tightly. To recork wine, place some wax paper around the cork and slide it back into its original position. The wax will ease the cork into the top and also ensure that no stray parts of the cork drop into the bottle. If recorking isn't an option, a rubber wine stopper or a wine vacuum pump can create an airtight seal.
While most wines today are meant to be drunk “young” (within a few years of production) some fine wines are best served by proper aging. But aging too long can decrease the flavor of the wine. Generally speaking, red wines can age longer than white wines, but here is a storage guide for some popular vintages.
Cabernet Sauvignon 7-10 years
Pinot Noir 5 years
Merlot 3-5 years
Zinfandel 2-5 years
Beaujolais Drink now
Chardonnay 2-3 years
Riesling 3-5 years
Sauvignon Blanc 18 months – 2 years
Pinot Gris 1-2 years
Champagne Ready to drink
TROUBLESHOOTING
| Problem | Possible Causes | Solution |
| The wine and beverage cooler does not cool. | The unit may be plugged in using a different voltage. | Check if using the wrong voltage. |
| The circuit breaker may be tripped or there is a blown fuse. | Reset the circuit breaker or check for a broken fuse. | |
| The wine and beverage cooler does not get cold enough. | The unit may be placed too close to a heat source. | Keep the unit away from direct sunlight or other heat sources. |
| There is insufficient ventilation. | Place the unit in an area with proper ventilation and clearances. | |
| The door is not completely closed or the door seal is not working properly. | Close the door tightly. Do not open the door frequently or keep the door open for extended periods. | |
| The wine and beverage cooler seems to make too much noise. | The unit is not leveled or positioned properly. | Adjust the unit's feet and ensure the product is level. |
| There is insufficient ventilation. | Allow sufficient clearance around the unit. | |
| The unit is too close to a wall or other surface. | Allow sufficient clearance around the unit. | |
| An interior red light is flashing. | The set temperature is too low. | Adjust the set temperature so that it is higher than the unit's interior temperature |
| The automatic defrost function is working. | Normal function. No repair needed. | |
| Frost is building up in the unit. | There is excess humidity or the interior temperature is too low. | Turn the unit off, unplug it and remove the frost manually. Reconnect once the ice has thawed. |
LIMITED MANUFACTURER'S WARRANTY
This appliance is covered by a limited manufacturer's warranty. For one year from the original date of purchase, the manufacturer will repair or replace any parts of this appliance that prove to be defective in materials and workmanship, provided the appliance has been used under normal operating conditions as intended by the manufacturer.
Warranty Terms:
During the first year, any components of this appliance found to be defective due to materials or workmanship will be repaired or replaced, at the manufacturer's discretion, at no charge to the original purchaser. The purchaser will be responsible for any removal or transportation costs.
Warranty Exclusions:
The warranty will not apply if damage is caused by any of the following:
- Power failure
- Damage in transit or when moving the appliance
- Improper power supply such as low voltage, defective household wiring or inadequate fuses
- Accident, alteration, misuse or abuse of the appliance such as using non-approved accessories, inadequate air circulation in the room or abnormal operating conditions (extreme temperatures)
- Use in commercial or industrial applications
- Fire, water damage, theft, war, riot, hostility or acts of God such as hurricanes, floods, etc.
- Use of force or damage caused by external influences
- Partially or completely dismantled appliances
- Excess wear and tear by the user
Obtaining Service:
When making a warranty claim, please have the original bill of purchase with the purchase date available. Once confirmed that your appliance is eligible for warranty service, all repairs will be performed by a Newair™ authorized repair facility. The purchaser will be responsible for any removal or transportation costs. Replacement parts and/or units will be new, re-manufactured or refurbished and is subject to the manufacturer's discretion. For technical support and warranty service, please email support@newair.com.
Un nom de confiance
Instagram.com/newairusa
Twitter.com/newairusa
LISEZ ET CONSERVEZ CES INSTRUCTIONS
TABLE DES MATIÈRES
Caractéristiques 21
NETTOYAGE ET ENTRETIEN
Email: support@newair.com
Instagram.com/newairusa

YouTube.com/newairusa

Twitter.com/newairusa
LEA Y GUARDE ESTAS INSTRUCCIONES
INDICE
Repisas ....Error! Bookmark not defined.
Como Usar su Bandeja de Humedad ......Error! Bookmark not defined.
- To ensure maximum performance and efficiency, be sure to place your wine and beverage cooler in an area where there is proper air circulation. Also make sure the plumbing and electrical connections are correct.
- For proper internal air circulation, do not overfill your wine and beverage cooler.
- Do not place the unit in direct sunlight.
- Do not place heated beverages in your wine and beverage cooler.
- Do not store perishable food in your wine and beverage cooler. The unit's interior temperature may not be low enough to prevent spoilage.
- Do not place heavy objects on top of the wine and beverage cooler.
CÓMO USAR SU BANDEJA DE HUMEDAD
LIMPIEZA Y MANTENIMIENTO

- 24" FRENCH DOOR WINE AND BEVERAGE FRIDGE
- A NAME YOU CAN TRUST
- COUNT ON NEWAIR
- CONTACT US
- FOLLOW US
- READ AND SAVE THESE INSTRUCTIONS
- TABLE OF CONTENTS
- REGISTER YOUR PRODUCT ONLINE
- REGISTER YOUR NEWAIR PRODUCT ONLINE TODAY
- SERVICE AND SUPPORT
- RECALL NOTIFICATIONS
- SPECIAL PROMOTIONS
- NEWAIR.COM/REGISTER
- SAFETY INFORMATION & WARNINGS
- BEFORE USING YOUR WINE AND BEVERAGE COOLER FOR THE FIRST TIME
- CAUTION
- DANGER: RISK OF CHILD ENTRAPMENT
- PARTS LIST
- INITIAL SETUP
- INSTALLATION
- NOTE
- POSITIONING YOUR WINE AND BEVERAGE COOLER
- HANDLE INSTALLATION
- OPERATING INSTRUCTIONS
- SETTING THE TEMPERATURE
- STORING WINE
- DOOR LOCK
- SHELVES
- HOW TO USE YOUR MOISTURE TRAY
- CLEANING & MAINTENANCE
- PLEASE NOTE
- USAGE & STORAGE TIPS
- LIMITED MANUFACTURER'S WARRANTY
- WARRANTY TERMS
- WARRANTY EXCLUSIONS
- OBTAINING SERVICE
- UN NOM DE CONFIANCE
- LISEZ ET CONSERVEZ CES INSTRUCTIONS
- TABLE DES MATIÈRES
- NETTOYAGE ET ENTRETIEN
- LEA Y GUARDE ESTAS INSTRUCCIONES
- INDICE
- CÓMO USAR SU BANDEJA DE HUMEDAD
- LIMPIEZA Y MANTENIMIENTO
Brand : NewAir
Model : NWB076BS00
Category : Refrigerator