VQU30075+ - TV CECOTEC - Free user manual and instructions
Find the device manual for free VQU30075+ CECOTEC in PDF.

| Product Type | LED QLED Television |
| Brand | Cecotec |
| Model | VQU30075+ |
| Reference | 03620 |
| Screen Size | 75 inches (189 cm) |
| Resolution | 4K Ultra HD (3840 x 2160) |
| Display Technology | QLED (Quantum Dot) |
| Power Consumption | 250 W |
| Power Supply | 180-240 V~, 50/60 Hz |
| Energy Efficiency Class | Class II (Double Insulation) |
| Smart TV | Yes (Google TV / Android TV) |
| Network Connectivity | WiFi 2.4/5 GHz, Ethernet LAN |
| Bluetooth | Yes, version 5.0 |
| HDMI Inputs | 3 (with ARC/eARC) |
| USB Ports | 2 (for multimedia playback and recording) |
| Optical Audio Output | 1 (SPDIF) |
| Audio | Dolby Atmos, built-in speakers |
| Voice Assistant | Google Assistant (via Bluetooth remote) |
| VESA Standard | 400 x 300 mm (for wall mounting) |
| Dimensions (without stand) | Approximately 1675 x 960 x 100 mm |
| Weight (without stand) | Approximately 30 kg |
| Main Features | Google TV, pre-installed apps (Netflix, YouTube, Prime Video), parental controls, game mode, automatic standby, program guide |
| Safety | Double insulation, automatic shutdown, child lock |
| Maintenance and Cleaning | Unplug before cleaning, use a soft dry cloth, avoid aerosols |
| Included Accessories | Bluetooth remote, AAA batteries (x2), table stand, instruction manual |
Frequently Asked Questions - VQU30075+ CECOTEC
User questions about VQU30075+ CECOTEC
0 question about this device. Answer the ones you know or ask your own.
Ask a new question about this device
Download the instructions for your TV in PDF format for free! Find your manual VQU30075+ - CECOTEC and take your electronic device back in hand. On this page are published all the documents necessary for the use of your device. VQU30075+ by CECOTEC.
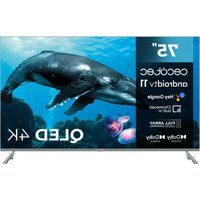
USER MANUAL VQU30075+ CECOTEC
natural_image
Front view of a flat-screen TV screen with two stand legs (no visible text or symbols)| 1. Before use | 107 |
| 2. Installation | 107 |
| 3. Operation 108 | |
| 4. Remote control | 115 |
| 5. Troubleshooting | 117 |
| 6. Technical specifications 118 | |
| 7. Disposal of old electrical and electronic appliances | 120 |
| 8. Technical support and warranty | 120 |
| 9. Copyright | 120 |
| 10. Simplified Declaration of Conformity | 121 |
SOMMAIRE
Read these instructions thoroughly before using the appliance. Keep this instruction manual for future reference or new users.
- For any type of incident, breakdown, inspection or maintenance, please contact the official Cecotec Technical Support Service.
- This symbol means: general warning sign. It is used to draw the user's attention to the main safety instructions related to use or maintenance (routine maintenance). Please pay particular attention to the information marked with this symbol.
- This symbol means: Warning; Electricity. It is used to warn the user of the presence of uninsulated high voltage in the product's system that may be strong enough to constitute a risk of electric shock. Warning: Please pay particular attention to the information marked with this symbol.
- PLEASE READ THESE INSTRUCTIONS CAREFULLY BEFORE USING THE PRODUCT AND KEEP THEM FOR FUTURE REFERENCE.
- ATTENTION: TO REDUCE THE RISK OF ELECTRIC SHOCK DO NOT REMOVE LID (OR BACK PAD). IT DOES NOT CONTAIN PARTS THAT CAN BE CHANGED BY THE USER. CONTACT QUALIFIED TECHNICAL PERSONNEL.
- In extreme weather (storms, lightning) and long periods of inactivity (going on vacation) disconnect the television from the mains.
- The mains plug is used to disconnect the television from the electricity and must therefore always be accessible. If the TV is not disconnected from the mains, the device will still consume power for all situations, even if the TV is in standby
mode or switched off.
- WARNING: This device is intended for use by persons (including children) with skill/experience in the operation of such a device without supervision unless they have been given supervision or instruction concerning use of the appliance by a person responsible for their safety.
- Please use this appliance at an altitude of less than 5000 meters above sea level, in dry places and in regions with temperate or tropical climates.
- The TV is designed for domestic and similar indoor use.
- To facilitate ventilation, leave at least 5 cm of free space around the TV.
- Ventilation should not be impeded by covering or blocking the ventilation openings with items such as newspapers, tablecloths, curtains, etc.
- The power cable must be easily accessible. Do not place the TV or any furniture etc. on the power cable or step on it. A damaged cable may cause a fire or give you an electric shock. Grasp the power cable by the plug; do not unplug the TV by pulling on the power cable. Never touch the cable with wet hands, as this may cause a short circuit or give you an electric shock. Never tie a knot in the cable or splice it with other cables. You must replace it when it is damaged, being only a professional who can do it. If the cable or any other part of the device is damaged, contact the Official Cecotec Technical Support Service.
- Do not expose the TV to dripping and splashing liquids, and do not place objects filled with liquids, such as flower vases, cups, etc., or more on the TV (e.g., on shelves above the TV).
- Do not expose the TV to direct sunlight or open flames, such
as light candles on top of or near the TV.
- Do not place any heat sources such as electric heaters, radiators, etc. near the TV.
- Do not place the TV on the floor or on inclined surfaces.
- To avoid a suffocation hazard, keep plastic bags out of the reach of babies, children, and pets.
- Carefully attach the stand to the TV. If the stand is provided with screws, tighten the screws firmly to prevent the TV from tilting. Do not over-tighten the screws and mount the bracket rubbers properly.
- Do not dispose of batteries in fire or with hazardous or flammable materials.
- WARNING: Never expose batteries to excessive heat such as sunlight, fire or the like.
VERY IMPORTANT: You MUST NOT let anyone, especially children, insert any objects into holes, slots or any opening on the TV.
- Excessive volume on headphones could cause hearing loss problems.
- No part of this product may be repaired or replaced by the user. Repairs and maintenance should only be carried out by qualified personnel. Disassembling the product in any way will void the product warranty.
Use
- This product is intended for domestic use only and not for commercial or industrial use. Use only as described in this manual.
- This appliance cannot be used by children. Children should not play with the product.
Power supply
- Before plugging in the device, check that the voltage indicated on the rating plate of the product corresponds to the voltage of your electrical installation.
- Connect the plug to an easily accessible socket.
- The mains plug is the only way to completely disconnect the device from the mains. To make sure that the device is no longer powered, you must unplug this plug from the socket.
- Be sure to unplug the power plug from the outlet during a lightning storm or when unused for long periods of time.
- Power socket and power cable
- Make sure that the plug and power cable cannot be crushed or jammed, especially at plugs, sockets and the point of connection to the product.
- Be sure to position the power cable so that it cannot be tripped over or stepped on.
- When unplugging the TV, always pull the power plug. Do not pull the cord.
- Do not touch the product or the power cable with wet hands.
- Never knot the cord or tie it with other cords.
- If the power cable is damaged, it can be replaced by your dealer, your after-sales service or a similarly qualified person in order to avoid any risk.
- Do not immerse the appliance in water or other liquids.
- This symbol means: Class II equipment. This equipment is a class II or double insulated electrical appliance. It has been designed in such a way that it does not require a safety earthed connection.
Installation
- Install the product on a flat, stable surface of sufficient size to accommodate it.
- Do not install the TV set on top of another electrical appliance.
- This product should be used in a temperate climate and indoors only.
Maintenance
- Make sure that the stand on which you place the appliance is stable. If using a trolley, be careful when moving the product so that it does not tip over and injure someone.
- Use only with stands, stands and tripods recommended by the manufacturer or sold with the product. If you use a stand, be careful not to turn it when transporting the TV + stand, to avoid injury. The product must be fixed to the floor or wall as indicated in the instructions to avoid any damage.
Humidity and water
- Do not expose this product to rain or moisture to avoid the risk of fire or electric shock.
- Avoid splashing and do not place objects containing liquids (such as vases) on or near the appliance.
- Do not use this equipment in damp and wet locations (avoid bathrooms, toilets and locations near a washing machine).
- If liquid or any object enters the TV, unplug it and do not use it again until it has been checked by the after-sales service.
Heat sources
- Do not install this product near any heat sources such as radiators, heat registers, stoves, or other appliances (including amplifiers) that produce heat.
- Do not place flammable sources, such as lighted candles, on or near the product.
- Do not expose this product to direct sunlight, dust or vibration.
Ventilation and entry of objects
- The slots and openings in the product are used for ventilation and to ensure reliable operation.
- Do not obstruct ventilation holes by covering them with objects such as newspapers, tablecloths, curtains, etc.
- Do not place the product on a bed, sofa or other similar surface that may obstruct the ventilation grilles.
- Make sure that there is at least 10 cm of space around the product to ensure good ventilation.
- Make sure that no objects fall and that no liquid enters the appliance through the slots or ventilation grilles. The device has a high voltage, and the introduction of an object inside the device may cause electric shock and/or short-circuit of the internal parts.
Headphone volume
To preserve your hearing, we recommend that you never set the headphone volume too high.
Removable USB media
- You can connect external 2.5" and 3.5" hard disks (hard disks with external power cable) to the TV via the USB input.
- IMPORTANT: Back up the files on your storage devices before connecting them to the TV. Please note that the manufacturer is not liable for damage to files or loss of data.
- Some types of USB devices (such as MP3 players) or hard disk drives may not be compatible with this TV.
- The TV supports formatting of FAT32 and NTFS discs. However, burning will not be possible with NTFS formatted discs.
- You may experience some problems when formatting
USB hard disks with a storage capacity of more than 1TB (Terabyte).
- Wait a moment before connecting or disconnecting the device, as it may not have finished reading the files. If this happens, it may physically damage the USB drive and the USB device itself. Never remove a USB device while playing a file.
- You can use USB hubs with the USB input of the TV. In this case, USB hubs equipped with an external power supply are recommended.
- We recommend that you use the USB input of the TV directly if you want to connect a USB hard disc.
Cleaning
- Before cleaning the product, unplug it from the wall socket.
- Use only a soft, dry cloth.
- Avoid the use of aerosols.
Technical Assistance
- Refer all maintenance requests to qualified personnel. Servicing is required if the appliance has been damaged in any way: damaged power cable; liquids or objects entering the product; exposure to rain or moisture; malfunction or being dropped.
- No repairs can be carried out by the user. Please consult with the after-sales service of your establishment for maintenance requests.
Spare parts
- When parts need to be replaced, make sure that the service technician has used spare parts specified by your dealer or parts having the same characteristics and performance as
the original parts.
- Unauthorised modifications may result in fire, electric shock or other damage.
Disposal instructions
- The packaging and its components are recyclable and should therefore be recycled. Packaging materials should be kept out of the reach of children.
- The liquid crystal display (LCD) is a high-tech product containing approximately one million transistors that give you a high quality image. Occasionally, some blue, green or red dots (corresponding to non-active pixels) may appear on the display. This does not affect the performance of the product.
Recycling of remote control batteries
- Do not dispose batteries with household waste. To protect the environment, please dispose of batteries in accordance with the applicable regulations.
- Never recharge non-rechargeable batteries, and do not disassemble or dispose of batteries in fire.
- Do not expose to high temperatures or direct sunlight.
- WARNING: Do not ingest batteries, there is a danger of chemical burns.
- This product contains batteries. If swallowed, it can cause severe internal burns in as little as 2 hours, leading to death.
- Keep new and used batteries out of the reach of children.
- If the battery compartment does not close securely, stop using the product and keep it out of the reach of children.
- If you think batteries may have been swallowed or placed inside any part of the body, seek immediate medical attention.
- Discharged batteries must be removed from the device for
safe disposal.
- Leaks from the batteries can occur under extreme conditions. Do not touch any liquid that leaks from the batteries. If the liquid gets into contact with skin, wash immediately with soap and water. If the liquid gets into the eyes, wash them immediately with clean water for a minimum of 10 minutes and seek medical attention. Wear gloves to handle the battery and dispose of it immediately in accordance with local regulations.
- If the device is to be stored unused for a long period of time, it is advisable to remove the batteries.
- Batteries must be inserted according to the correct polarity. Pay attention to polarity when inserting it.
Electronic equipment
- Your Bluetooth* TV uses Bluetooth* technology. Transmits and receives radio frequencies (HF) around 2.4 GHz. These high-frequency emissions can interfere with the proper functioning of many electronic devices. To avoid accidents, turn off the Bluetooth TV* when you are in the following places:
- Places where flammable gases are present, hospitals, trains, aeroplanes or petrol stations, near automatic doors or fire alarms.
- Blast zones.
- If you have a pacemaker or other prosthesis, ask your doctor for advice.
INSTRUCTIONS DE SÉCURITÉ
Assistance Technique
Trocar as pilhas do controlo remoto
- This appliance is packaged in a way as to protect it during transport. Take the appliance out of its box and remove all packaging materials. You can keep the original box and other packaging elements in a safe place. This will help you prevent damage to the appliance when transporting it in the future. In case the original packaging is disposed of, make sure all packaging materials are recycled accordingly.
- Make sure all parts and components are included and in good conditions. If there is any piece missing or in bad conditions, contact the official Cecotec Technical Support Service immediately.
Box content:
- TV
- Remote control
- AAA batteries (x2)
- Instruction manual
Note:
The graphics in this manual are schematic representations and may not exactly match the appliance.
2. INSTALLATION
Assembling the support base
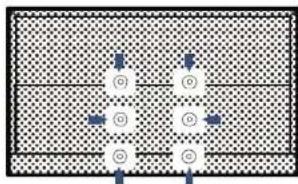
- Place the TV with the screen facing downwards on a flat surface. Use a cloth to protect the screen. Place the 2 pieces of the base bracket into the recess at the bottom of the TV.
- Lock 4 PCS screws below and check that each screw is firmly tightened. Fig. 1
Note: This bracket is non-rotatable. Do not attempt to rotate the TV.
The figure is only a schematic diagram, please refer to the actual product.
Connections
Warning:
Before making any connections to external devices, make sure that the TV and the various devices are not receiving power.
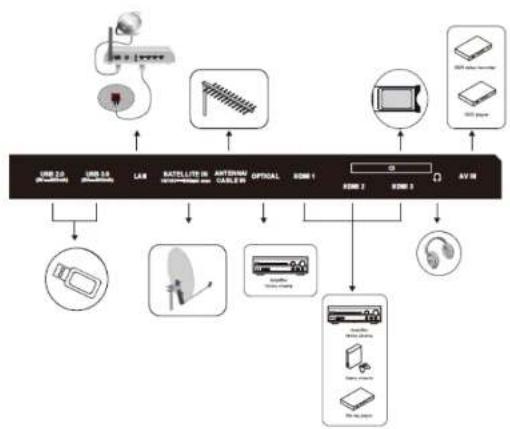
This TV offers an AV cluster for convenient connection of VCRs, DVDs or other video equipment. Refer also to the instruction manual of the equipment to be connected.
- You can use the input terminals on the back of the TV as shown in figure 2.
ENGLISHENGLISH

Do not touch or come close to the ANTENNA, SATELLITE and HDMI terminals, and avoid electrostatic discharge while the TV is in USB and LAN mode, otherwise the TV will stop working or show abnormal condition.
Installing a bracket
- Call a technician to install the wall bracket. The manufacturer is not liable for damage to property or personal injury resulting from installation by the customer.
- Make sure that the hardware used is suitable for your wall.
- Attach your TV only to a brick or concrete wall.
- Make sure that children do not hang on the TV or try to climb on it.
- VESA wall bracket is NOT INCLUDED. During installation, refer to the instructions supplied with the wall bracket.
- 43° TV > VESA 300*300 mm
- 75° TV > VESA 400°300 mm
- 85° TV > VESA 500*200 mm
- 98° TV > VESA 800*400 mm
- The 43/75/85-inch model requires four screws to attach the wall bracket to the back of the TV. Fig. 3
- 43" TV > M8*12 screws
- 75" TV > M6*16 screws
85° TV > MB*16 screws
- The 98-inch model requires six screws to attach the wall bracket to the back of the TV. Fig. 4
- 98" TV > M8*16 screws
The figures are only a schematic diagram, please refer to the actual product.
3. OPERATION
First configuration
- Connect the power and antenna to your TV, then turn on the device.
- On first start-up, the Welcome display appears to guide you through the initial setup process. Follow the on-screen instructions to select your preferred language, connect to the network, perform an automatic channel search, etc.
Google - Initial Setup
When you switch on the TV for the first time, a wizard will appear to guide you through the
following initial settings:
Step 1: Select the menu language you require. Fig. 5
Note: English is recommended. The illustrations in this publication are provided for reference only.
Step 2: (Some countries only) Select whether you want to use an Android device to set up the TV. Fig. 6
Note: If you do not want to use your Android device to set up the TV, skip to step 3. If you want to use your Android device to set up the TV, activate the Bluetooth functions on your Android phone, then search for and open the "Google" application on your phone. Follow the instructions to configure the device.
Step 3: Select whether or not you want to connect your TV to the WLAN network. Fig. 7
Note: If you have connected the TV to the WI-FI network, it will check for updates such as Google service updates, etc. Then select whether you want to sign in to your Google account.
Step 4: Sign in to get new apps, recommendations, movies, Assistant and more from Google. Fig. 8
Step 5: Please read and accept Google's terms of service and privacy policy. Fig. 9
Tv - Initial Setup
- The initial setup consists of selecting all the necessary settings to be able to scan and store all the analogue channels that can be received.
- Make sure the TV is switched on and follow the steps below.
Note: If the channel scan only retrieves a few channels, this could be due to poor transmission and is therefore not covered by the manufacturer's warranty. Cecotec is not responsible for lack of transmission or poor transmission in some areas.
- The first time you turn on the device, the initial setup wizard will open and guide you through the initial setup process.
Step 1: Environment Fig. 10
- Press to select your environment. Then press OK to proceed to the next step.
- Home mode: You can see the standard settings for picture and sound modes.
- Shop mode: You can enjoy enhanced picture and sound mode settings.
Note: The picture mode setting will not be accessible when selecting Store Mode.
Step 2: Where are you? Fig. 11
ENGLISHENGLISH
Press ∧/∨ to select your Country/Region. Press OK to confirm and proceed to the next step.
Step 3: Terms and Conditions Fig. 12
Use ∧/∨ to read the Terms and Conditions, then press OK to confirm and move on to the next step.
Step 4: Installation of channels Fig. 13
Use ∧/∨ to select Tuner Mode: Antenna, Cable:
- Type: Digital, Analogue and All, then press OK to confirm and move to the next step.
Step 5: Check the configuration Fig. 14
When all the settings are completed, the [Please check the settings] Interface will appear on the display, press OK to finish the initial configuration. You can also go back to the previous step and make changes with the button ←.
The setup is complete and the TV is ready for viewing.
Note: If tuning has failed, check the RF cable connection and follow the on-screen instructions.
Basic usage
Switching the TV on or putting it on standby
This TV is switched on or in standby mode. It cannot be switched off completely. If you are not going to use the TV set for a long period of time, unplug it from the wall socket.
To turn on the TV
- Make sure that the mains plug is plugged in.
- Press the Power button ⏻ on the remote control or the button on the back/bottom of the TV (depending on the model). Power indicator goes out.
To put the TV in standby
Press the (Power) button ⏻ on the remote control or the control button on the back or bottom of the TV for a few seconds. The power indicator turns red (colour may vary depending on the model).
Source selection
- Once the external systems are connected to your TV, you can switch between the different input sources.
- Press the ▶on the remote control.
Then use the buttons ∧ or ∨ on the remote control to highlight an entry and press the
OK button on the remote control to confirm it.
Volume setting
Press the VOL- or VOL- buttons on the remote control to adjust the volume to your preference.
- If you want to mute the sound, press the (Mute) button on the remote control. Press again to cancel this function.
Programme selection
- Press the P+ or P- buttons on the remote control to change channels.
- You can go directly to the TV channel of your choice by pressing the 1, 2, 3... buttons on the remote control. buttons on the remote control.
- To select channel 12, for example, press key 1 followed by key 2.
Display of the channel list
While watching a channel, press the LIST button to display the list of memorised channels.
Accessing the HOME menu. Fig. 15
After connecting the TV to the Internet, press the button ⚠ on the remote control to display the HOME menu and access the Smart TV functions. Press ∧, ∨, < or > buttons to select one of the available applications and press OK button to confirm.
Access to usage time
- Hours of use lets you know how long the TV has been in use since it was first switched on (i.e., a kind of odometer for the TV).
- To access the time of use, press the button 🎨 on the remote control.
- Select the System menu.
- Go to Space Available. The usage time is then displayed on the screen.
Using the quick access menu
Note: Some features may not be available from certain sources. And on some models, some options are not available.
This section explores the menus and settings of your TV. Each menu is outlined and detailed to help you get the most out of your TV. To access the menu system:
- In TV mode, press on the remote control to display the quick access list.
- Press ∧∨ to select the desired option, then press OK to open the corresponding submenu.
- In the submenu, use the < / > and OK buttons to make settings, or use ∧/∨ to select an item. Use OK to enter and operate according to the on-screen display or guide.
ENGLISHENGLISH
- Press to return to the previous menu.
Menu
Image: Enter to adjust the picture mode or advanced settings.
Sound: Select this option to configure the sound settings
Channel: Select this option to adjust the channel.
System: Select this option to configure the settings.
Image Fig. 16
- Picture Mode: To select Normal, Dynamic, Cinema, Sport, Game and Custom mode.
- Backlight: Select the level from 0-100.
ECO setting: To select Off, Low and High.
- Aspect ratio: Displays the [Aspect Ratio] screen. Follow the operation guide to select the mode. [4:3]/[16:9] / Auto / Original.
Advanced setting:
- Colour temperature: To select Normal, Warm, Cool.
- Dynamic contrast: To select On or Off.
- HDMI PC/ AV Mode: Auto/Video/PC
- Overscan: To select On or Off
- Noise reduction: To select Off, Low, Medium, High and Auto.
- Image Reset: To reset the image.
- Motion estimation and compensation (MEMC):
- To select Off, Low, Medium, and High.
- Range: Select 2.2 o 2.4.
Sound Fig. 17
- Sound Mode: To select Standard, Voice, Music, Stadium and User mode.
- Surround mode: Select OFF/ Pure Sound/Surround.
- Dolby Atmos: Select On or Off.
- Sleep mode: Select On or Off
- Sound only: Select this mode and the TV screen will turn off in 10 seconds.
- Output device: For selecting the TV speaker, SPDIF/Optical and HDMI-ARC.
- Digital output: Select the PCM/ByPass/Auto option.
Advanced settings:
-
DAC-4 Enhanced dialogue
-
Enhanced dialogue level DAC-4
-
Scale
-
Digital audio delay (ms)
-
Digital audio volume
-
eARC
-
Sound reset
Channel Fig. 18
- Channel search: Allows you to search for all available analogue and digital channels.
Configuration of digital channels:
- To select the option to adjust the Subtitle Settings, Teletext Settings, Audio Settings, CI Plus, LCN, Auto Service Update, Scan Update.
EPG:
- Press OK/▶ to enter the Programme Guide menu.
Favourites:
- Configure the list of favourite channels.
- Channel diagnostics:
- Press OK/▶ to display information about the current digital channel signal, such as signal strength, frequency, etc.
- Channel organisers
- This option allows you to organise the channels.
- Note: This function is only available in TV mode.
System Fig. 19
HDMI CEC Settings:
- CEC Control: To select On or Off.
- Automatic shutdown of the device: To select On or Off.
- Automatic switching on of the TV: To select On or Off.
- List of CEC devices: Turn on the devices and select [Enable] to enable HDMI device control.
- HDMI signal format: HDMI 1.4 / HDMI 2.1.
- Switch-off timer: To select 15min, 30min, 45min, 60min, 90min, 120min or off.
- Idle TV Off: To select After 1 hour of inactivity, After 2 hours of inactivity, After 4 hours of inactivity, After 24 hours of inactivity or off.
- TV placement: To select Desktop and Wall Mount.
- Environment: To select Home and Shop.
- Shop mode: To select E-Sticker.
- Settings:
- Lock: Select to block the TV.
- Power: Enables or disables the Network On and Network Standby functions.
- Storage of recordings: Place the storage device and record the storage.
- Privacy Notice: Enter the privacy notice.
- OSS Licence: The content on the oss licence.
- Execution time: Execution time.
Configured channels
The Settings menu allows you to configure the channel setting to your preferences.
ENGLISHENGLISH
Note: Some features may not be available from certain sources. And on some models, some options are not available.
1. Press the → menu, and select the input of the connected equipment.
Example: ANTENNA. Fig. 20
2. Press the OK button to enter the Channels setting.
3. Press ∧∨ to select the desired option, then press OK to open the corresponding submenu.
4. In the submenu, use the ∧/∨ and OK buttons to make settings, or use ∧/∨ to select an item, use OK to enter and operate according to the on-screen display or guide.
5. Press to return to the previous menu.
ATV Setting
Use to select the ATV, then press OK to enter.
Fig. 21
- Analogue automatic tuning: Press OK to start the automatic search process. The search may take a few minutes.
- Analogue manual tuning: Press OK to access the interface.
- Press ∧/∨ to set the programme, TV system or colour system, then press ∧/∨ to select the frequency and press OK to search the channel.
- Teletext setting: Western EUR, Eastern EUR, Russian, Arabic, Farsi, Hebrew, Greek and Turkish.
Cable adjustment
Use to select the CABLE, then press OK to enter.
Fig. 22
- Automatic tuning: Press OK to start the automatic search process. The search may take a few minutes.
Press ← and select YES to exit the search.
- Manual Tuning: Use ∧∨ to select and set the Channel Number and Frequency (KHz), then select START Scan to scan the channel.
- LCN: Select On or Off.
- Automatic service update: Select On or Off.
Antenna adjustment
- Use to select the ANTENNA, then press OK to enter.
Fig. 23 - Automatic tuning: Press OK to start the automatic search process. The search may take a few minutes.
- Press ← and select YES to exit the search.
-
Manual Tuning: Use ∧∨ to select and set the Channel Number and Frequency (KHz), then select Start Scan to scan the channel.
-
LCN: Select On or Off
- Automatic service update: Select On or Off.
Tuning update: Select On or Off.
Satellite adjustment
- Use to select the SATELLITE, then press OK to enter.
Fig. 24 - Satellite tuning: select satellite and search for channel.
- Automatic service update: select on or off.
LCN: Select On or Off
Fig. 25 - Press Scan to enter the channel scan settings and select the desired item.
Fig. 26 - Network: Use the network ID to search for channels.
- Default: Use the default transponder to search the channels.
- Blind scan: Search of all frequencies.
4. REMOTE CONTROL
Fig. 27
- Make sure that there are no obstacles between the remote control and the infrared sensor and that sunlight or other light sources are not reflected on them.
- PAIR THE BLUETOOTH* REMOTE CONTROL WITH THE TV
- The Bluetooth® remote control, which is mainly used to control the TV using the Google voice assistant, needs to be paired with the TV at first power on or later by following the steps below:
- Press to go to the home page.
- Press to access 'RC Pairing'
- Follow the "setup tips page", press OK and at the same time.
- The screen will show "Pairing...", when it is in the process of pairing, when it is finished, the screen will show "Success!".
NOTE: If you wait more than 2 minutes and it cannot be paired, please repeat the above steps to pair again. - If you want to unpair your Bluetooth remote, follow these steps:
- Press to go to the home page.
- Press ∧ ∨ ⟨/⟩ to choose Ⓞ and then press OK to access.
- Press √ to select "Remotes & Accessories" and then choose the name of the Bluetooth remote to access the next steps.
- Press Unpair, and then select the OK button.
ENGLISHENGLISH
Remote control button functions
- Most of your TV's features are available through the menus that appear on the screen. The remote control supplied with the equipment allows you to navigate through the menus and configure all the general settings.
(On/Off button) Turns the TV on or off
To mute and unmute
Select the digital key number
To open the favourite channel list menu.
Enter the quick access menu.
To select tasks or Teletext pages.
(Microphone) Click to interact with the Google Assistant on the TV. (Available only when the network connection is normal.)
To open the applications, move them or remove them from favourites
Show the TV setup menu
OK Confirm your selection.
(up, down, left, and right directional buttons) Highlights various items in the menu
system and adjusts menu controls.
Exit the menu and return to the previous menu
- Goes to the home page
- Click here to view the electronic program guide
+ - Increase or decrease the volume
To enter the source selection interface.
To enter the interface of SMART function.
Channel up / down
NETFLIX Goes to the NETFLIX home page
Goes to the YouTube home page
Goes to the Prime Video home page
Goes to the Google Play home page
To select the Widgets
■■ APPS To select the apps
Inserting the batteries
Open the cover on the back of the remote control. Correctly insert the batteries into the remote control, respecting the "+" and " * polarities. Refit the cover.
- The remote control is powered by two AAA LR03 1.5 V batteries. We recommend using only alkaline batteries. Remove the batteries from the remote control if you are not going to use it for a long time (more than one month). Used batteries must be disposed of safely. Deposit them in specially designated collection containers to protect the environment.
Orientation
Point the remote control at the infrared sensor on the front of the TV at an angle of 30° so
that it can receive the transmitted information.
- The remote control has a range of 6 meters.
5. TROUBLESHOOTING
Before contacting the after-sales service, perform the following basic checks.
| Problem Possible causes Possible solutions | ||
| There is no electricity. | The plug is disconnected. Make sure the power cable is properly plugged into a power outlet. | |
| The power socket is disconnected from the mains. | Try connecting the plug to different power outlets to check. | |
| There is no image or sound. | The image settings are incorrectly adjusted. | Check the brightness and contrast settings of the image. |
| There is no audio. Check that | Mute mode has not been activated. | |
| There are no DTT HD channels or the image is distorted. | Reception of digital terrestrial television channels (DTT) is only possible in areas with coverage. Checks the proximity of a transmitter. Check the quality and strength of the receiving signal. | Check that the antenna cable is well connected to the TV. Resetting to factory settings. Have a professional check your installation. |
| The remote control does not work. | There are no batteries in the remote control or the batteries are dead. | Check that the batteries are correctly inserted in the remote control. Check the batteries. If they don't work, replace them. |
| Cannot read USB removable media. | The format is not compatible. | Check that the formats used are compatible with this device. Disconnect the removable device and reconnect it. Please format the USB media and try again. |
ENGLISHENGLISH
| The registration has not been fully completed | There is not enough space on the removable media. | Check the available space on the USB media. |
Stops during playback
Keep a distance of at least three meters between the microwave oven, mobile phones. Bluetooth ^® equipped devices or any other Wi-Fi compatible devices.
- Try changing the active channel on the WLAN router.
Internet connection not available / Unable to share audio and video
- If the MAC address (a unique identification number) of your computer or modem has been stored according to regulations, your TV may not connect to the Internet. In this case, the MAC address is authenticated every time you connect to the Internet. This is a precautionary measure against unauthorized access. Since your TV has its own MAC address, your Internet provider cannot validate this address. As a result, the TV cannot connect to the Internet. Contact your internet service provider for information on how to connect a different device, such as the TV, to the Internet.
- It is also possible that the Internet connection is not available due to a firewall related issue. If you suspect that this may be the cause of your problem, contact your Internet service provider. A firewall could explain the connectivity and detection problem when using the TV in Audio/Video Share mode or when browsing using the Audio/Video Share feature.
Invalid domain name
- Make sure you are already logged in to your computer with an authorized username/password and also make sure your domain is active, before sharing any files on your computer's media server program.
If the domain is invalid, you may have trouble browsing files in Audio/Video Share mode.
- TECHNICAL SPECIFICATIONS
| Product | TV LEDA3 seriesALU30043 | TV LEDA3 seriesALU30043S | TV LEDA3 seriesALU30075 | TV LEDA3 seriesALU30075S | TV QLEDV3+ seriesVQU30075+ |
| Product reference | 02623 | 02526 | 02624 | 02627 | 03620 |
| QR |  |  |  |  |  |
| Power 95 W 95 W 23 | 5 W 235 W 250 W | ||||
| Voltage 180-240 V - | 180-240 V - 180-240 V - 180-240 V - 180-240 V - | ||||
| Frequency 50/60 Hz | 50/60 Hz 50/60 Hz 50/60 Hz | ||||
| Shelf life 30,000 h 30,000 h 30,000 h 30,000 h | |||||
| Product TV QLED | V3+ seriesVQU30075+S | TV QLEDV3+ seriesVQU30085- | TV QLEDV3+ seriesVQU30085+S | TV QLEDV3+ seriesVQU30098- | TV QLEDV3+ seriesVQU30098-S |
| Product reference | 03625 | 03621 | 03626 | 03622 | 03627 |
| QR |  |  |  |  |  |
| Power | 250 W 390 W 3 | 90 W | 500 W 500 W | ||
| Voltage | 180-240 V~ | 180-240 V~ | 180-240 V~ | 180-240 V~ | 180-240 V~ |
| Frequency | 50/60 Hz | 50/60 Hz | 50/60 Hz | 50/60 Hz | 50/60 Hz |
| Shelf life | 30,000 h | 30.000 h | 30.000 h | 30,000 h | 30.000 h |
| Product | 02628 | 03623 | 02629 | 03624 |
| Product reference | TV QLEDV2 seriesVQU20043 | TV QLEDV2 seriesVQU200435 | TV QLEDV2 seriesVQU20075 | TV QLEDV2 seriesVQU200755 |
| QR |  |  |  |  |
| Power | 95 W | 95 W | 250 W | 250 W |
| Voltage | 180-240 V- | 180-240 V- | 180-240 V- | 180-240 V- |
ENGLISHENGLISH
| Frequency 50/60 Hz 50/60 Hz | 50/60 Hz 50/60 Hz | |
| Shelf life 30,000 h 30,000 h | 30,000 h 30,000 h |
Technical specifications may change without prior notice to improve product quality. Made in China | Designed in Spain
7. DISPOSAL OF OLD ELECTRICAL AND ELECTRONIC APPLIANCES

This symbol indicates that, according to the applicable regulations, the product and/or batteries must be disposed of separately from household waste. When this product reaches the end of its shelf life, you should dispose of the cells/batteries/accumulators and take them to a collection point designated by the local authorities.
Consumers must contact their local authorities or retailer for information concerning the correct disposal of old appliances and/or their batteries. Compliance with the above guidelines will help protecting the environment.
8. TECHNICAL SUPPORT AND WARRANTY
Cecotec shall be liable to the end user or consumer for any lack of conformity that exists at the time of delivery of the product under the terms, conditions, and deadlines established by the applicable regulations. It is recommended that repairs are carried out by qualified personnel. If at any moment you detect any problem with your product or have any doubt, do not hesitate to contact the official Cecotec Technical Support Service at +34 953 210 728.
9. COPYRIGHT
The intellectual property rights over the texts in this manual belong to CECOTEC INNOVACIONES, S.L. All rights reserved. The contents of this publication may not in whole or in part, be reproduced, stored in a retrieval system, transmitted, or distributed by any means (electronic, mechanical, photocopying, recording or similar) without the prior authorization of CECOTEC INNOVACIONES, S.L.
10. SIMPLIFIED DECLARATION OF CONFORMITY

Cecotec Innovaciones hereby declares that these TVs, model 02623_TV LED A3 series ALU30043, 02626_TV LED A3 series ALU30043S, 02624_TV LED A3 series ALU30075, 02627_TV LED A3 series ALU30075S, 03620_TV OLED V3+ series VQU30075+, 03625_TV QLED V3+ series VQU30075-S, 03621_TV QLED V3+ series VQU30085+, 03626_TV QLED V3+ series
VQU30085+S, 03622_TV QLED V3+ series VQU30098+ and 03627_TV QLED V3- series VQU30098-5, 02628_TV QLED V2 series VQU20043, 03623_TV QLED V2 series VQU20043S, 02629_TV QLED V2 series VQU20075, 03624_TV QLED V2 series VQU20075S are in compliance with Directive 2014/53/EU on radio equipment. The full text of the EU Declaration of Conformity can be found on the following website:
www.cecotec.es
FRANÇAISFRANÇAIS
1. AVANT UTILISATION
Cocotec Innovaciones dichlara che I televisori, modelli 02623_TV LED A3 series ALU30043, 02626_TV LED A3 series ALU30043S, 02624_TV LED A3 series ALU30075, 02627_TV LED A3 series ALU30075S, 03620_TV QLED V3+ series VQU30075+, 03625_TV QLED V3+ series VQU30075+S, 03621_TV QLED V3+ series VQU30085+, 03626_TV QLED V3+ series VQU30085+S, 03622_TV QLED V3+ series VQU30098+ e 03627_TV QLED V3+ series
VQU30098-5, 02628 TV QLED V2 series VQU20043, 03623 TV QLED V2 series VQU200435, 02629 TV QLED V2 series VQU20075, 03624 TV QLED V2 series VQU20075S sono conformi alla Direttiva sulle apparecchiature radio 2014/53/UE.
A Cecotoc Innovaciones declarar que as TVs modelos 02623_TV LED A3 series ALU30043, 02626_TV LED A3 series ALU300435, 02624_TV LED A3 series ALU30075, 02627_TV LED A3 series ALU300755, 03620_TV QLED V3+ series VQU30075-, 03625_TV QLED V3+ series VQU30075+S, 03621_TV QLED V3+ series VQU30085+, 03626_TV QLED V3+ series VQU30085+S, 03622_TV QLED V3+ series VQU30098+ y 03627_TV QLED V3+ series
De TV in stand-by zetten
5. PROBLEEMOPLOSSING
natural_image
Technical line drawing of a rectangular device with a grid pattern and a small inset showing a bolt (no text or symbols)Fig./Img./Abb./Rys./Obr.1
flowchart
graph TD
    A["USB 2.0 (Microcontroller)"] --> B["USB 7.0 (Microcontroller)"]
    B --> C["LAB"]
    C --> D["BATellite 18 (Network/Video Cable)"]
    D --> E["OPTICAL"]
    E --> F["USB 1"]
    F --> G["AV 13"]
    G --> H["USB 2"]
    H --> I["AV 3"]
    I --> J["USB 4"]
    J --> K["USB 5"]
    K --> L["USB 6"]
    L --> M["USB 7"]
    M --> N["USB 8"]
    N --> O["USB 9"]
    O --> P["USB 10"]
    P --> Q["USB 11"]
    Q --> R["USB 12"]
    R --> S["USB 13"]
Fig./Img./Abb./Rys./Obr.2

natural_image
Diagram of a soccer field with goal net and player positions (no text or symbols)Fig./Img./Abb./Rys./Obr.3
natural_image
Pure diagram of a rectangular container with internal circular elements and directional arrows, no text or symbols present.Fig./Img./Abt./Rys./Obr. 4
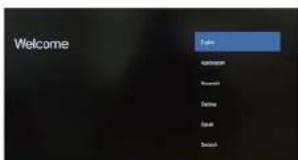
Fig./Img./Abb./Rys./Obr.5
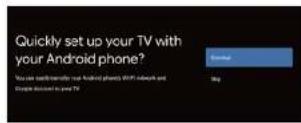
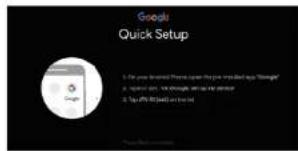
Fig./Img./Abb./Rys./Obr. 6
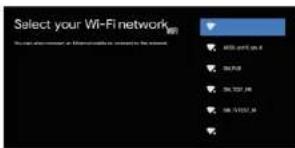
Fig./Img./Abb./Rys./Obr.7
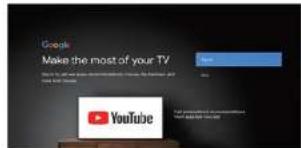
Fig./Img./Abb./Rys./Obr. 8
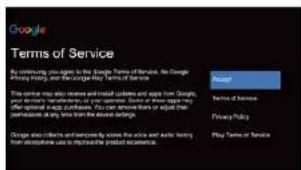
Fig./Img./Abb./Rys./Obr.9
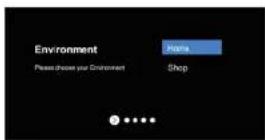
Fig./Img./Abb./Rys./Obr.10
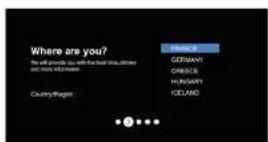
Fig./Img./Abb./Rys./Obr.11
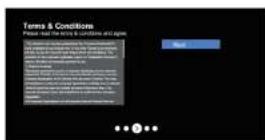
Fig./Img./Ab./Rys./Obr.12
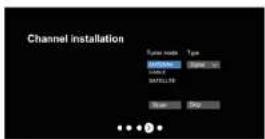
Fig./Img./Abb./Rys./Obr.13
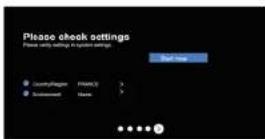
Fig./Img./Abb./Rys./Obr.14
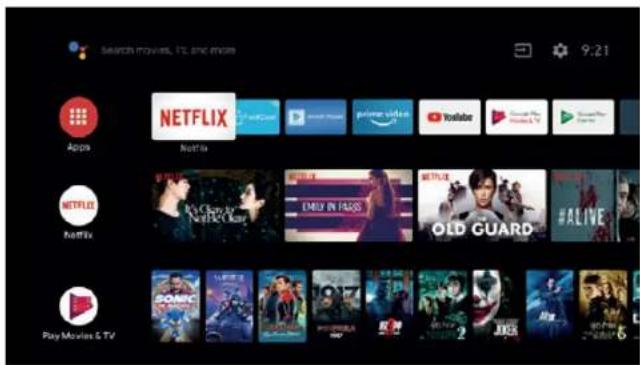
Fig./Img./Abb./Rys./Obr.15
Fig./Img./Abb./Rys./Obr.16
Fig./Img./Abb./Rys./Obr.17
TV LED A3/ QLED V3+/QLED V2TV|LED A3/ OLED V3+/
Fig./Img./Abb./Rys./Obr.18
Fig./Img./Abb./Rys./Obr.19
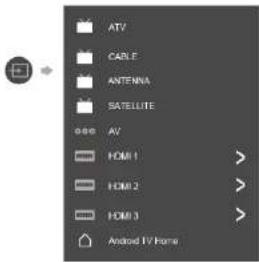
Fig./Img./Abb./Rys./Obr.20
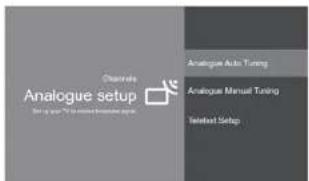
Fig./Img./Abb./Rys./Obr.21
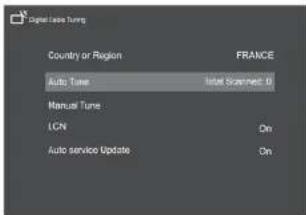
Fig./Img./Abb./Rys./Obr.22
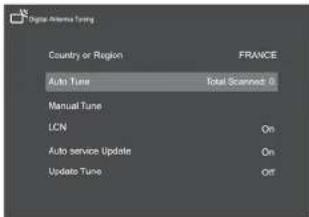
Fig./Img./Abb./Rys./Obr.23
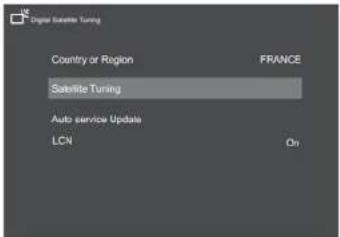
Fig./Img./Abb./Rys./Obr. 24
Fig./Img./Abb./Rys./Obr. 25
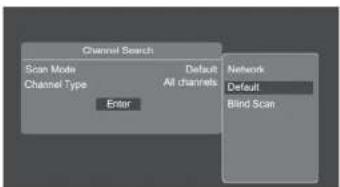
Fig./Img./Abb./Rys./Obr. 26

Fig./Img./Abb./Rys./Obr.27
TV LED A3/ QLED V3+/QLED V2TV|LED A3/ QLED V3+/